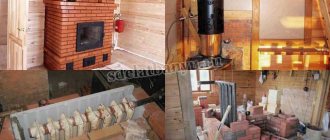
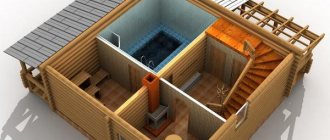
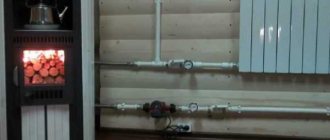
An excellent option for organizing an autonomous heating system in a private house or bathhouse is a stationary stove with a water heating boiler.
Such a device is practical and economical, has high heat transfer and efficiency, which allows you to effectively heat rooms of various sizes in a short period of time.
It is quite easy to organize such a system yourself, without involving expensive specialists.
Design features of a furnace with a circuit
A stove with a heating circuit ensures uniform and rapid heating of the room thanks to the coolant (water or other liquid) located inside the system. The thermal energy released during the fire is used to heat the room and heat the water in the system.
Heating equipment of this type is equipped with a metal heating circuit. It is a tank with fittings and pipes connected to them.
Modern stoves with a heating circuit are made of metal or refractory brick, with different placement of the heater, as well as with a water tank.
Structurally, the furnace boiler is presented in two types:
- Boiler in the chimney. This device is characterized by high performance characteristics, long service life and ease of use. The only drawback of the design is the inability to heat large rooms.
- Boiler in the firebox. It is intended for heating large areas, is accessible and durable. The disadvantages include close contact with open fire, which leads to severe overheating and destruction of metal structural elements. In addition, a high temperature of the heating circuit leads to the rapid formation of soot and a decrease in the efficiency of the device.
Types of heat exchangers for furnaces
When creating an autonomous heating system, two types of heat exchangers are used: flat and tubular.
Flat type heat exchanger
Stove boilers with a flat configuration heat exchanger are a practical option for country houses, private cottages and baths. They are easy to manufacture, install and maintain.
Such devices are mounted vertically and horizontally and have a high efficiency. The flat design of the boiler is characterized by a large chamber volume, which ensures rapid heating of the water necessary for heating and water procedures.
A significant drawback of the equipment is the reduction in thermal output from the furnace wall structures. The heat exchanger is presented in a U-shape and is mounted around the entire perimeter of the firebox. This leads to a decrease in the heating temperature of the external walls of the furnace and an increase in the time for heating the room. This is only problematic in cases where the heating stove is installed inside residential premises, where the combustion process is carried out constantly.
You can increase the heating rate of a flat boiler in several ways: lengthen the heater and place it above the firebox, or use a metal chimney, first increasing its length.
Tube type heat exchanger
A tubular boiler for a stove differs in the type and size of the structure and installation method. If repairs or replacement are necessary, the heat exchanger can be easily removed from the furnace.
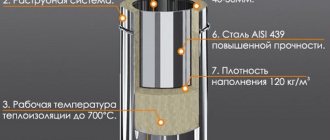
Seamless water pipes are used to make a tubular register for a brick stove, so it is considered the most reliable, safe and durable.
When choosing or manufacturing a heat exchanger, you need to remember that its design and dimensions must fully correspond to the shape of the firebox, which will allow heating the maximum amount of water. A high-quality register provides a large heat exchange area.
Main operational characteristics of furnaces
A do-it-yourself stove with a water heating boiler is designed to perform two important functions: heating rooms and heating water. In addition, it can be equipped with a hob and oven, which will allow you to use it for cooking.
Heating equipment has a number of advantages:
- A traditional stove emits up to 7 thousand kcal of thermal energy in 1 hour of operation, which is enough to heat a country house. The heating boiler has a higher efficiency, which makes it possible to heat a large residential building and a bathhouse. At the same time, low fuel consumption leads to significant savings.
- A combined heating system consisting of a furnace and boiler provides maximum performance at minimum costs.
- The main fuel is charcoal, firewood or pellets. Such materials are affordable, convenient to transport and store.
- Furnaces equipped with a water circuit do not require continuous combustion. One addition of fuel material per day is enough to ensure rapid heating of the premises and hot water supply.
- The efficiency of combined devices compared to traditional furnaces reaches 85%.
- Any homeowner can organize an autonomous heating system, combined with a water circuit, by preparing the necessary tools and materials.
Recommendations for carrying out construction activities
When constructing a stove with a hob and a water circuit, the following standards must be adhered to:
- The stove and nearby surfaces must be separated by a safe distance. For these purposes, a metal sheet is additionally installed in front of the firebox to protect the floor and partitions.
- To make the masonry as strong as possible, every 4th row of bricks is reinforced with metal pins.
- A clay mortar of medium plasticity is used as a mounting mixture. A small ball rolled from it should not crack or crumble when it hits the floor.
- The chimney must have a height of at least 5 m: the presence of a head is a prerequisite. This element is designed to protect the chimney from climatic precipitation and blockages. In addition, it helps to increase traction and decorate the building.
Building a home stove with a boiler with your own hands usually does not cause any particular difficulties. Quite often you can find metal structures that are not inferior to brick ones in terms of external aesthetics. Such a product can greatly decorate a home interior. For the construction of brick kilns, a special building material is selected. The best option is fired ceramic red bricks. They are distinguished by their uniform color and metallic sound when tapped.
Safety rules for operating furnaces with a water circuit
To ensure proper operation of the stove and boiler, it is recommended to follow important safety rules, as well as recommendations for caring for the equipment:
- Water heating devices must be operated under human supervision. This applies to adding fuel and regularly cleaning the chamber from soot and ash.
- Safe operation of the stove requires control of the smoke exhaust ducts. Before starting the fire, it is necessary to check the technical condition of the channels and the position of the valves. When starting a fire, the valves must be completely open.
- Such a system is recommended for use in winter, when it is necessary to provide rapid heating of rooms and hot water supply. Using a stove with a water circuit in the summer only for cooking and heating water is irrational. In this case, it is recommended to choose more economical heat sources.
- An open fire leads to excessive heating of the stove structure, which can be the main cause of heat exchanger failure.
- When using a homemade heating system, you can install a pumping unit to inject liquid and devices to control pressure levels.
Construction of a brick oven with a heating boiler
Construction work begins after preparing a standard design and manufacturing a heat exchanger, the dimensions of which are used to lay the brickwork of the furnace.
A furnace with a water circuit can be placed in a place convenient for operation and maintenance.
After the construction of the foundation, the arrangement of the furnace is prepared, taking into account the water circuit - a plan for the location of the ash and fuel chamber, the smoke exhaust and the hob (if present).
To build a furnace with a boiler, heat-resistant bricks without chips, cracks or damage are used.
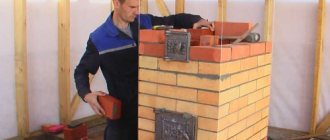
The construction of the furnace is carried out in stages:
- Preparing a kiln solution from clay, sand and water. You can purchase a ready-made mixture, but experienced craftsmen mix the brickwork mortar with their own hands.
- A layer of waterproofing made of roofing material or film is laid on the foundation.
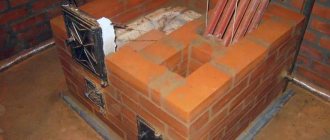
- The oven mortar is evenly applied to the waterproofing and the initial brick row is laid. Next, according to the diagram, subsequent rows are completed, and a heat exchanger is mounted in the firebox.
- An ash pit and a combustion chamber are being built. The correctness of the masonry is checked by the building level.
- The door to the combustion chamber is fixed, the stove vault and chimney are laid out. Rounded bricks are used to line the internal walls of the firebox and chimney.
- After the masonry is completed, the water circuit is installed. Water pipes connected to a heating radiator are supplied to the heat exchanger. An expansion tank is installed, and the finished system is filled with water or other liquid.
The final stage is the decorative finishing of the stove with plaster or tiles, as well as a test firebox to identify and eliminate design flaws.
You can build an economical stove with a heating circuit yourself. This design is safe, practical and durable, with high efficiency, and is also independent of centralized energy sources.
DIY brick cauldron
A solid fuel boiler is an excellent option for solving the heating problem in private homes. If you wish and have all the necessary knowledge and materials, you can build such a thermogenerator yourself, without any help.
Homemade solid fuel boilers can be assembled from pieces of pipes, sheets of steel or brick. However, when building such a heat exchanger, the most popular option is to use brick and metal, since entirely metal structures are often too heavy and expensive.
In addition, a brick boiler can be used not only as a heating device for a private home, but also as a stove for cooking. In this material we will talk about building a brick solid fuel boiler with your own hands.
DIY construction. Materials
To successfully build a blacksmith, you need to pay special attention to the correct choice of materials - due to the fact that the temperatures in the firebox significantly higher than average , ordinary brick will not be suitable for the device.
It is better to choose the most durable heat-resistant material based on fireclay clay , as well as a special masonry mixture from a hardware store.
It is recommended to make masonry mortar yourself only if you have sufficient experience - slight violations of the proportions in the future will lead to cracking and depressurization of the masonry.
Important! It is not necessary to use highly fire-resistant bricks for the external walls of the furnace - this will only lead to a reduction in the service life of the structure. Without receiving good heating, such bricks and masonry mortar will collapse quite quickly.
The heat exchanger will have to be purchased at a specialized store - most often, especially strong steel of sufficient thickness or cast iron . Various additional elements will be required for purchase - valves, doors, hinges, handles and all fasteners that allow you to connect the heat exchanger to the pipeline.
Tools
When building such a structure, you will need to do work with both brickwork and metal parts. Therefore, you will need an appropriate set of tools:
- measuring instruments;
- container for mixing the solution;
- trowel-trowel;
- furnace hammer-pick;
- rule;
- grinder with cutting discs for metal and stone;
- welding machine.
To protect yourself when performing work, you will need protective equipment - glasses and a mask that covers your face from sparks, dust, and special gloves.
Preparing the site
Proper location of the stove will increase its heat transfer and reduce the risk of a fire hazard . The device is not installed close to walls or partitions - the distance to them must be at least 30 cm , the same distance is left from the ceiling.
All surfaces near the device are covered with non-combustible material . The location of the chimney is also very important, as is the ability to properly insulate when passing through the ceilings. When locating a stove with a water circuit, a convenient connection to the heating system must be taken into account.
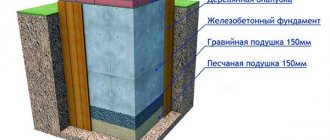
When building the device, the first step is to equip the foundation:
- A pit is dug out that exceeds the dimensions of the sides of the future device by 15-20 cm .
- A special cushion of sand and crushed gravel 15 cm .
- Formwork made from wooden boards is installed on the compacted drainage layer , which is filled with concrete mixture .
- The foundation is left until completely hardened.
After the foundation has completely hardened, its surface protrudes 10 cm above the floor level two layers of roofing felt waterproofing is laid on it
Stages of work. Order of construction
The construction of the furnace begins with laying the first row of the base on a dry surface , then the following steps are performed:
- The lower part is being built - the height varies depending on the chosen project.
- The bottom of the combustion chamber is laid out from fireclay bricks. No mortar is placed between the layer and the ceramic base.
- Even before equipping the furnace walls, pipes are installed and connected .
- The firebox and outer walls of the furnace are erected - a gap of at least 15 mm , a gap of 5-10 mm is left between the walls of the firebox and the layer of ceramic brick.
- A second cap created with a mandatory air gap.
- The chimney is laid out and insulated .
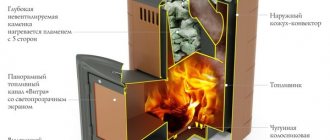
Principle of operation
The peculiarity of the operation of horizontal and vertical structures is that when fuel is burned, air is heated, which rises and is discharged through the chimney. At the same time, in the process of transferring heat from heated air, cold water is heated in the heat exchanger.
There is also another type of heat generator, in the form of a mine boiler. This design differs from others in the vertical location of the large loading chamber. At the same time, the fuel burns at the bottom of the shaft, and hot air and smoke exit through the second chamber, where the heat exchanger is located.
What is needed
First, you should decide on the dimensions of the future solid fuel boiler and select the most suitable design. Of course, knowing all the aspects of building brick heat generators, you can design and build everything yourself.
However, in the absence of proper knowledge, it is better to carefully read and choose an option from those presented on the Internet.
It is immediately worth noting the fact that when building a solid fuel boiler from brick with your own hands, you will have to deal with welding work, since the heat exchanger is made of pipes or sheet metal.
If you wish, you can buy a ready-made heat exchanger in a specialized store, then you can do without welding work.
Materials
So, from the materials for building a solid fuel boiler made of brick you will need:
- Cement and reinforcement for the foundation. If a brick foundation is planned, then additional amounts of broken bricks and pebbles will be required.
- Fireclay bricks and mortar for laying a furnace.
- Pipes and sheet metal for heat exchanger.
- Doors and grate.
- Water pump.
- Device for heating water.
You will also need tools such as:
- Welding machine.
- Grinder, gas cutter, electric drill.
- A marker that will be used to mark sheet metal.
- Level, pliers and tape measure.
In addition, do not forget about personal protective equipment in the form of gloves, goggles and a mask to protect yourself while working.
Preparing the heat exchanger
To build a brick boiler with your own hands, you first need to prepare a heat exchanger so that you can take dimensions from it for the combustion chamber. That is, you will have to either buy a ready-made heat exchanger or design it yourself.
For example, if you decide to make a horizontal type heat exchanger from pipes, you will need:
- First, prepare pipe sections of the required size.
- Next, holes are cut out of the rectangular pipe in the corner posts, with the help of which the transverse pipes will be joined. Holes are made with a diameter of 50 mm on a face of 60 mm. In total, each rack has 4 holes. 2 more holes are made in the front wall. One is done from below and is required for the return. The second one from the top is for hot water drainage.
- After this, you need to weld the racks to the transverse pipes at an angle of 90 degrees.
- The underwater and outlet pipes are also welded, and then the ends of the rectangular pipes are welded.
Also, a horizontal heat exchanger can be made of steel and pipes. The principle of performing all the work is similar to the option described above, except that in this case the corner posts, as well as the longitudinal pipes, will be replaced with hollow walls.
A vertical type heat exchanger not only provides the ability to transfer heat to the room, but it can also be used to install a stove with one burner. The location of the chimney will depend on its presence or absence.
Radiator assembly
Assembling radiators is a simple process, because it completely repeats the process of disassembling them. The sections are connected by nipples that have left and right threads on both sides. This way, the sections at the top and bottom will be pulled tightly against each other when the nipple is turned. When the gap becomes 2 cm wide, you should wind the asbestos-impregnated cord and only then tighten the nipples completely.
When the entire structure is assembled, you should wait for the drying oil to dry, and then check the joints for leaks. that is, supply water under high pressure to the radiator. This will ensure the subsequent use of the radiator and there will be no leaks.
The return and coolant supply pipes must be connected diagonally to the radiators. Holes that remain open must be closed with plugs. It is better to take inch pipes. On one side of the radiator there will be a right-hand thread, so there will be no difficulties with connection. On the opposite side, use a coupling with a squeegee and a nipple.
How the system works
The simplest water circuit is with natural circulation of water flow. Its basis is a simple physical phenomenon: the expansion of liquids when they are heated. The unit that creates pressure is an expansion tank (a container for collecting water), installed in the attic or attic.
The water circuit is a closed system. The boiler heats the water in it and, expanding, it is directed through a pipe into a storage tank. The movement is carried out under pressure created by the cooled water constantly entering the boiler and passing through the entire system. Boiling water from the expansion tank is directed by gravity down through the pipes leading to the batteries. Having given off the heat, it returns to the tank and heats up again.
Installing a pump will help to significantly increase the pressure in the system and speed up the circulation of the coolant. At average outdoor temperatures, it can be turned off and the circuit will function on the natural movement of water. This will save you on your energy bills. Water enters the pump with the check valve closed. By turning it off (leaving it open), the entire volume of coolant is directed to bypass the pump.
Such a stove can be loaded not only with wood or coal. When using alternative fuels, it is possible to complicate the structure of the system by adding:
- granule storage tank;
- a mechanism that feeds pallets into the firebox (pneumatic or auger).
You can make the operation of the stove easier by installing an automatic system for regulating its operation and forced ventilation.
Creating a heating wiring diagram
You can combine a stove with a water heating boiler and connect the circuit to the heating system using two schemes.
Open system
With an open system, the expansion tank is located at the highest point - in the attic; you can include a pump in the circuit
The coolant moves by gravity, so the installation of a circulation pump is required. It is placed on the bypass, reduces the temperature difference between the return and supply, increases the speed of water movement and the quality of heat transfer. Without electricity, the line will operate on the principle of gravity.
To organize it, you will need to increase the line and horizontal slopes in diameter. The open system is equipped with a 32 mm distribution manifold with a slope of 3 to 5 mm per linear meter. The expansion tank is located at the top; air enters it from the communications.
Closed system
The radiator network provides for forced movement of water. The thrust in this case is created by a pump. It also pumps up pressure from 1 bar for cold coolant. The membrane-type reservoir is located at the bottom. A shut-off valve is used to connect it to the main line. Safety devices (air vent, pressure gauge, drain valve) are required.
Installing a water circuit in the chimney
The water circuit heat exchanger has a complex design. One of the options for its placement is to be built into the chimney. The furnace can be initially built with a coil, or it can be built into a ready-made structure.
Peculiarities
This method allows you to use heat, which quickly and practically uselessly flies into the pipe. Wherein:
- The decision to install this type of circuit is made at the furnace design stage. It is virtually impossible to integrate a heat exchanger into the chimney of a stove that has already been put into operation.
- Heat is not taken away from the stove; the firebox heats up to the maximum.
- The degree of heating of the coolant is regulated by the length of the coil. For a large house - a large coil.
- The service life of the coil built into the smoke duct is much longer, since there is no contact with fire.
- Requires a stove with a rather large and complex chimney, which leads to an increase in the size of the stove.
PVC installation
If in a country cottage it is planned to install water heating from a brick stove (wood-burning), the heat exchanger is designed individually, for a specific stove. Such a device is practically beyond repair, so for installation a specialist stove specialist is hired who can professionally perform all the work:
- Make a heat exchanger and double check its quality - before and after installation.
- Install the heat exchanger at the required stage (after completing the foundation), then continue laying, observing certain rules. When installing the heat exchanger, compensation gaps are left, leaving 1-1.5 cm to the walls of the combustion chamber. Gaps that take into account thermal expansion are also needed when installing pipes.
- When installing a heat exchanger with pipes and for insulation, use only heat-resistant seals.
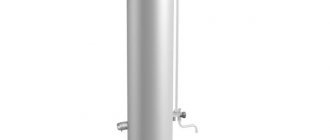
Steel pipes for the manufacture of a heat exchangerSource 36doors.ru
Installing a heat exchanger in the firebox
Boilers installed in the firebox have a variety of designs and do not require a large firebox volume. The spider model heat exchanger shown in the photo has a symmetrical two-sided structure and can consist of a different number of fins. It is quite compact. Through its openings, an open fire perfectly heats the walls of the oven.
Peculiarities
- possibility of heating large areas;
- several options for the structure of the boiler (in the form of a wide tank or flat container);
- flat boilers and tanks have a larger volume than pipe structures and allow some of the water to be used for sanitary needs;
- difficult, but nevertheless a real possibility of embedding into an already folded stove.
A tubular heat exchanger is the most popular solution for installation in a firebox. He can :
- have various simple and complex shapes and dimensions;
- installed on the outside of the firebox or on two or three sides;
- easy to remove from the oven for routine inspection and repair.
Choose seamless patterns. Their distinguishing feature is the absence of a longitudinal weld line. Seamless pipes often crack when heated.
Installation
The heat exchanger is placed on the bottom row of bricks in the firebox and lined with fireclay stone. The size of the structure is selected taking into account the parameters of the firebox. There should be enough space left for storing firewood. The registers should not touch the walls of the combustion chamber, but too much distance will not do any good. A hole is left in the firebox for the inlet pipe and then the roof is laid out.
Installing a coil on a pipe
This is an excellent and fairly simple way to increase the efficiency of the stove. Flue gases heat the pipe to extremely high temperatures. The outer coil, like the inner one, helps reduce the temperature and somewhat cool the outer surfaces of the chimney. An external water heat exchanger is especially often installed on metal chimneys. This is an excellent auxiliary device for heating small spaces.
This heat exchanger has two pipes. The top one is connected to a pipe going to the storage tank, the bottom one is connected to the heating circuit. It is easy to make such a structure, as well as attach it to a pipe.
Use copper pipe or ready-made modules.
Important points in the construction of a furnace
In order for the water circuit to function with maximum efficiency, not only the heating water system must be properly designed, but also the furnace itself. Mere observance of order is not enough. Full compliance with furnace construction technology is important.
Foundation
Its type and thickness depend on the size of the stove. It is recommended to install a massive classic Russian stove on a solid strip foundation. For smaller modern heating structures, a concrete pad one and a half ten centimeters thick, sometimes on a frame made of reinforcement, is sufficient.
Brick
For external walls, ceramic refractory bricks are used. For the base - his own, possibly second-hand. Experts recommend that you always line the inner surface of the firebox with fireclay stone. For a more presentable appearance of the facade, it can be laid with facing bricks right away or this finishing can be done later.
Solution
The mortar for masonry is prepared traditionally: sand is mixed with clay, diluted with water and a little cement is added for strength. You can purchase a ready-made cement-based masonry composition with special additives.
Masonry
The main condition for a strong structure is the presence of high-quality ligation of seams. They must not coincide under any circumstances. It is ideal when the seams of the bottom brick row fall under the middle of the bricks lying in the next row. To do this, starting the rows, alternate whole bricks and their halves.
Stoves with a water heating body have a fairly simple and understandable design. They are popular due to their low cost and ease of use. And if you don’t like using natural gas to heat your home or don’t have access to a gas network, this heating option should be considered first. Built by a good craftsman, such a stove never disappoints its owners.
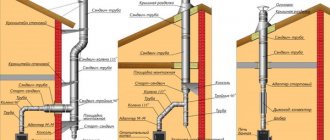
Brick chimney construction
Brick chimney laying diagram.
Laying should begin with the mounting tube. It should be laid out in compliance with the brick dressing. After this, a cutting (fluff) is formed. It needs to be laid out from 5 bricks. The channel will have dimensions of 270x140 mm. The external dimensions of the cutting are 450x590 mm. This can be achieved by inserting brick halves. To maintain the dimensions of the channel, you will need to insert brick plates inside. In this case, the channel will not change.
The next row will have dimensions of 650x510 mm. Brick plates 6 cm thick are mounted inside. At this stage, the cutting will begin to take its shape. In the next row, the external dimensions will be 710x570 mm. Inside you will need to install material 9-10 cm thick.
After this, the fluff ends. In the next row, be sure to observe the dressing. If you need to make a cut of greater height, you can install another row; the dressing should be done under the bottom row.
To allow the riser to exit outside, you will need to prepare a hole in the roof. Next, the riser should be routed through the roof. The rest of the work is done on the roof.
At the next stage, the riser is laid out. You need to carefully monitor the dressing of the brickwork. The riser must be placed several rows above the roof. After this, the otter lays out. The internal plates are selected so that the channel does not expand.
After this you will need to form the neck and head. The actions will be the same as in the case of erecting a cutting.