Almost every owner of a summer house or private house dreams of building a bathhouse. At the same time, rarely does anyone order construction from specialized companies, since the price of such buildings amounts to a tidy sum. That’s why most people build bathhouses with their own hands.
However, building materials these days are also not cheap. So you have to get creative when coming up with ways to save money. But the main thing is that such savings do not affect the characteristics of the steam room itself.
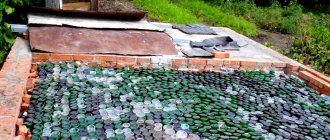
The photo shows a bath wall made of bottles.
One of the most interesting options is a bathhouse made of glass bottles, which we will talk about in this article.
Bottle floor installation technology
So, let's move on to the most basic thing: how to insulate a concrete floor with bottles.
Yes, concrete, because a wooden structure is not an option. For concrete floors, as I already said, the best insulation is penoplex. First of all, we level the base on which the floors are planned. To do this, we dig out the soil to the depth of a bayonet shovel. We plan the entire area evenly and fill it with crushed stone, screenings or sand. The best option: first screening, coarse clean sand on top. We compact the made pillow well. Fortunately, these building mixtures are compacted perfectly and easily.
Next, you can lay out geotextiles, you can do without it (after all, we have a budget option for heated floors). Afterwards, you need to lay out a metal grid for reinforcement. I don’t think there’s any need to explain why it’s needed.
The next step is to carefully place the bottles. Here you can use both glass and plastic. But one point must be taken into account - all containers must be tightly closed. We try to seal them in dry, hot weather, since hot air is much better for these purposes. Let a kind of “vacuum” be created under the floor.
Place the bottles vertically
We place this “bottle insulation” horizontally, as tightly as possible, with the neck directed towards each other. By the way, if the space and quantity of glass containers allows, the bottles can be placed vertically. This is clearly visible in the photo.
Plastic bottles can be filled with sawdust, fine foam glass or expanded clay. But you must admit that this is long and tedious work. You can leave them empty, but tightly twisted. Just throw another reinforcing mesh on top. The optimal cell is 50 - 70 mm.
Now boldly mix the solution and fill the bottles with it. We must try to ensure that there are as few air voids and unfilled areas as possible in the concrete. Therefore, we carefully tamp and pierce the entire surface of the resulting screed. A thickness of 50-70 mm on top of the bottles will be quite enough.
To bring the entire surface to the horizon and provide it with good strength, you can “don’t sweat it” and buy a couple of bags of dry mixture for screed. It already contains special plasticizers and other ingredients that affect the density and durability of concrete. But, you can again use the budget option.
If we need to fill the floors at an angle, making a drain, then here we act a little differently. But this is the topic of another article, which will definitely be published soon.
After the screed has completely dried, feel free to lay tiles or other finishing coating. Again, an economical option is a regular wooden grate.
This is how you can make unconventional insulation of a concrete floor. If all other points are done correctly, then you are guaranteed a warm bath during the long winter period. I would be glad if you spent your time reading this article with benefit and interest. Finally, as always, an interesting video and a couple of original bottle photos. Bye! Bye!
Bottle sauna Original gazebo
Wisdom Quote: A person knows himself only in the fight against obstacles.
If you approach the issue of floor insulation with used glass containers from a scientific point of view, then this method will not seem so strange, and for some even ridiculous. The fact is that in empty bottles an air gap forms, which completely fills the container.
As a result, a thermal barrier is created that prevents cold masses from entering the house, and also protects the lower part of the log house from freezing in winter.
The first question that comes to mind is: where to get such a quantity of glass and plastic containers. But we think that for a Russian person who is puzzled by insulation with bottles, this is not such a big problem. As a last resort, there are always neighbors around who have plenty of this stuff.
A more difficult issue is storing non-standard insulation until it is used. You will need quite a lot of bottles, so you need to take care of this in advance.
Insulation can be done using bottles with tightly sealed necks. If the seal is broken, the air inside the container comes into contact with the external environment, which increases its thermal conductivity and reduces the thermal insulation characteristics of the insulation.
The bottles must be warmed up before corking. After cooling, the air becomes more rarefied, and accordingly its density decreases, which helps reduce thermal conductivity.
Insulation is best done in warm sunny weather; this will allow glass containers to heat well and quickly.
Pouring concrete screed with bottles
You can insulate a finished floor with bottles in a log house or in a bathhouse. But you must immediately take into account that the height of the room will decrease. To reduce this indicator, when thermally insulating the finished base, bottles are laid only in a horizontal position.
The work is performed in the following sequence:
- The subfloor boards are covered with roofing felt. The sheets are laid overlapping each other, and also placed on the walls to a height of 10-15 cm.
- The joints and edges of the waterproofing material are coated with bitumen mastic.
- The gaps between the bottles are filled with dry sand.
- Another waterproofing layer is laid, and then it is covered with a reinforcing mesh.
- The structure is filled with a concrete screed on top, after which it hardens, the installation of the finishing coating begins.
Horizontal stacking of bottles
This option is more preferable, since it is possible to lay glass containers at the required level from the zero mark. When building a log house or bathhouse from logs, insulated floors made from bottles are installed directly on the ground. Bottles can be stacked both horizontally and vertically.
In the second case, significantly more containers will be required, but the thickness of the air gap and the strength of the structure itself increase. Such a base requires a smaller layer of screed, while its thermal insulation characteristics are higher.
Stages of work:
- It is necessary to remove the top layer of soil. If you plan to place bottles horizontally, it is enough to go 20-25 cm below the zero mark. When installing vertically, you need to deepen the pit by 30-40 cm. After removing the soil, the base is well compacted.
- Make a drainage layer. For these purposes, you can use sand, crushed stone, gravel or screenings. After backfilling, the bottom must be leveled and compacted tightly.
- A reinforced metal mesh is laid on a flat base.
- Bottles are placed on top of the mesh. When positioned vertically, the necks of the containers should be facing down and recessed into the ground. When laying horizontally, the containers are placed in parallel rows with a tight fit to each other.
- Another layer of reinforcement is laid on top of the bottle layer for strength.
- Concreting of the insulated base is carried out. The height of the cement screed when laying bottles horizontally should be 6-8 cm. To prevent the concrete from cracking, it is necessary to remove air. To do this, the screed is pierced in several places.
- To strengthen the base, sprinkle the wet fill with a thin layer of dry cement.
To make the floor even warmer, you can lay two rows of bottles. In this case, a reinforcing layer is laid between the bottles.
Complete drying of the concrete takes at least 3-4 weeks, after which you can begin laying the finishing coating. Tiles can be laid directly on a concrete base, while a wooden floor can be laid on a frame base.
Bottle sauna - a fresh idea for arranging a sauna building
Almost every owner of a summer house or private house dreams of building a bathhouse. At the same time, rarely does anyone order construction from specialized companies, since the price of such buildings amounts to a tidy sum. That’s why most people build bathhouses with their own hands.
We invite you to familiarize yourself with: Russian bathhouse with steamer
However, building materials these days are also not cheap. So you have to get creative when coming up with ways to save money. But the main thing is that such savings do not affect the characteristics of the steam room itself.
The photo shows a bath wall made of bottles.
One of the most interesting options is a bathhouse made of glass bottles, which we will talk about in this article.
The experience of folk craftsmen has shown that the bottle is an excellent product that allows you to create not only strong, but also warm walls and floors in a building. The principle of such insulation consists of an air layer that is formed from bottles, and accordingly, heat is retained in the room.
On the other hand, glass containers are highly durable - try crushing a bottle by stepping on it. This is simply impossible.
Thus, the following components of a bathhouse can be made from glassware:
- Foundation. And this is not just a budget option for those who want to save on pouring the solution. In fact, such foundations are very strong and completely eliminate the possibility of building subsidence.
Bottle foundation.
- Bottle bath floors are often used in such buildings. In this way, home craftsmen manage to create a truly warm base, which allows paired procedures to be carried out even in severe frosts.
- Bath walls can also be lined with bottles. Such walls are durable and warm. Most often they are arranged in two ways:
- Using frame technology. A frame is built from wooden slats into which the bottles are placed. A special sand-clay solution is used to fasten glass containers.
- Pillars are erected from bricks, between which walls are laid out from bottles.
Along with a glass one, a bathhouse can be built from plastic bottles, the price of which will be an order of magnitude lower, because plastic containers are much easier to obtain.
Advice! If you decide to build a building using plastic containers, then such walls will need additional reinforcement. The foundation and floor are not built on the basis of plastic containers.
Using plastic bottles to build a bathhouse.
The advantages of this method of insulation
- Of course, the most important advantage of this insulation option is its almost zero cost.
- Good thermal insulation characteristics of the material. Bottles perfectly retain heat inside the steam room.
- Sufficiently high speed, as well as ease of work. You can make a strong and reliable base from glass containers with your own hands in almost one or two days.
- Glass bottles are very durable and can withstand extreme mechanical loads and impacts.
Insulating the floor in a bathhouse with your own hands is very important.
Work process photo
To underestimate this part of the arrangement of the premises means finishing the work poorly, since then you will be haunted by two problems:
- Heat escapes through a floor surface with high thermal conductivity. Consequently, the cost of heating the steam room will increase significantly.
- The burning contrast of the cold floor and the surrounding hot air. This is not only discomfort for your body, but also subsequent condensation, which can lead to mold and rotting of the boards.
Floors can be concrete or wood. Based on this, we will consider the most convenient ways to insulate them.
Concrete floor
Insulation of the concrete floor in the bathhouse occurs after the construction of the entire building.
Tip: it is recommended to use materials with high compressive strength, since the installation of a reinforced grating and a layer of cement screed will follow on top.
Results
What other materials can be used for insulation, besides bottles (glass and PET)? For this procedure, you can also use glass jars, if, of course, you can set everything according to the thickness of the ceiling. True, it will be more difficult to save them, and equipping such containers with a sufficient number of lids is not so easy. There is an option to take dishes with screw-type necks. Cans can be installed together with bottles with the bottom up, providing a relatively flat base for the screed. It is not contraindicated to make thermal insulation from dishes with different volumes, as well as containers made from heterogeneous raw materials. The main thing is that it fulfills its task - to keep the heat in the bathhouse.
Leak-proof floor in the bathhouse: features and implementation
A leak-proof floor in a bathhouse is one of the most common options for arranging flooring in a Russian bathhouse. Such a system can be performed on either a wooden or concrete base. It has a rather complex design, but its environmental and aesthetic advantages ensure wide application. To reduce the cost of construction, all work can be done with your own hands, but with mandatory consideration of all current sanitary standards.
Wooden floor in the bathhouse
One of the main problems of a bathhouse is rotting and destruction of the floor under the influence of moisture accumulating in the material. These processes develop especially strongly in wood, which is still the main material for the construction of bathhouses. To reduce the destructive impact, two main designs of flooring are used that eliminate the accumulation of moisture: pouring and non-leaking varieties.
On a note! The simplest way to remove water from the floor is to let it flow freely into the ground, which is ensured in a pour-over design by forming gaps between the flooring boards.
Concrete or wooden leak-proof floors in a bathhouse have a much more complex design, which ensures the tightness of the coating.
A leak-proof wooden floor in the bathhouse is constructed in the steam room and washing room
Thus, a non-leaking floor in a bathhouse with your own hands is a coating that prevents the penetration of water into a wooden or other base, with a system capable of ensuring its drainage along the floor surface into a local sewer or soil that has good water permeability. In this design, waterproofing plays a primary role.
In addition to the requirement for the tightness of the coating, a number of other requirements are put forward for such a floor. First of all, the value of thermal insulation increases, because The drained water should not cool the bath. Liquid drainage must be ensured by gravity, which necessitates the formation of slopes to the drain holes.
Finally, water currents should not cause bare feet to slip, and the flooring should dry quickly to prevent moisture from accumulating on the surface. Naturally, the requirements for sewage and disposal are increasing. The drained water must be drained away from the bathhouse foundation and not accumulate under the floor.
Liquid drainage must be ensured by gravity, which necessitates the formation of slopes to the drain holes
How to make a leak-proof floor in a bathhouse? Its typical design includes the formation of a subfloor and a sealed floor covering with holes in the direction of which a slope is formed sufficient for gravity flow of the bottom along the surface. If the soil under the building is sufficiently hydroscopic, the groundwater is deep, the bathhouse is not overused, and the environmental situation allows it, then the waste liquid is discharged from the underground directly into the ground. But even in this case, a sand and gravel bed should be laid to filter the water.
In case of hard, clay or rocky soil, trays are installed under the floor that receive water and send it for disposal into storage or filter wells. The main condition: in the subfield, i.e. between the floor covering and the ground, water should not stagnate. It is also necessary to prevent the formation of condensation on the lower surface of the floor. For this purpose, reliable ventilation of the underground space is ensured.
When installing floors in different bath rooms, the following unwritten rule is usually followed. The floor in the washing compartment is formed below the floor level (8-9 cm) in the dressing room and rest room, to prevent flowing water from entering these compartments. In the steam room, on the contrary, the floor structure is raised slightly (up to 10 cm) to retain heat.
A leak-proof wooden floor in a bathhouse with your own hands is one of the classic options for arranging a bathhouse. Its typical design looks like this:
- compacted soil base;
- cushion (filter) in the form of a layer of sand and crushed stone;
- waterproofing;
- logs made of wooden beams;
- sheathing;
- waterproofing membrane;
- thermal insulation layer;
- vapor insulation;
- wooden board or timber;
- finishing floor covering.
Beams for a wooden floor in a bathhouse
To construct a wooden floor in a bathhouse, larch, linden, aspen, birch, fir, alder, cedar, and pine can be used. The subfloor and load-bearing elements are usually made of cheaper wood, for which pine is quite suitable. It is better to provide the finishing coating with larch, linden, and aspen.
The preparatory stage of arranging the floor includes removing the fertile layer of soil and compacting the soil. The pillow is formed from a layer of sand and crushed stone 20-25 cm thick and carefully compacted. Waterproofing made of roofing felt is laid on it, and it is laid with an overlap of about 15-20 cm. Preparation of the floor base is completed by installing support posts and backing beams.
We suggest you read: How to properly lay stones in a sauna stove
A waterproofing membrane, thermal insulation (usually mineral wool) and a vapor barrier with a foil layer (foil up) are laid sequentially between the joists.
Next, the so-called subfloor is formed. The support beams are attached to the posts with a metal angle and secured to the foundation using anchors. Then, logs made of timber measuring 40x40 mm are mounted on the beams. When installing them, the required slope towards the drain is immediately provided, and the slope should be about 10 degrees, which ensures a level difference of 2 cm per meter of floor.
Between the lags a waterproofing membrane, thermal insulation (usually mineral wool) and a vapor barrier with a foil layer (foil up) are laid sequentially. Layered and film materials are attached to the joists using a furniture stapler. The joints should be sealed with adhesive tape. Isofix tape is well suited for these purposes. When laying, vapor insulation is applied to the wall at a distance of about 20-22 cm.
If water cannot be discharged into the ground, then trays are installed under the floor
The final flooring is made from tongue-and-groove boards 30-40 mm thick and 15-20 cm wide. The boards fit tightly together during installation. They are attached to the joists with self-tapping screws or nails, and their caps must be recessed into the wood. A hole of the required size is cut out in the area of the word. It is advisable to install a drain on the drain. It is recommended to leave a gap between the subfloor and the finishing coating for ventilation.
On a note! For large areas of bathhouses, the support columns are made in the form of a columnar foundation.
Why dig a hole about 40-45 cm deep, the bottom of which is covered with a cushion of sand and crushed stone. The concrete pillar is poured into the formwork, in which the reinforcement is mounted. This support rises 4-5 cm above the surface.
If water cannot be discharged into the ground, then trays are installed under the floor. Water must enter them through the drain hole and be discharged beyond the perimeter of the bathhouse into special collection containers. In this case, it is advisable to make a hydraulic lock from a layer of clay on the ground surface.
To increase the durability of the bathhouse, a concrete floor is often erected. When constructing such a floor, it is necessary to immediately plan and install a drainage system in its final form. For this purpose, a water collector is usually formed in the form of a drain pipe with a diameter of 20-25 cm, which goes into the drainage ditch.
The concrete floor in the bathhouse itself is made in this order. The soil surface is leveled and compacted. A layer of broken brick (about 10-13 cm) and crushed stone (8-10 cm) is poured on top with thorough compaction. After this, a bottom layer of concrete 5-6 cm thick is poured. After it dries, roofing felt waterproofing, expanded clay insulation (9-12 cm) and reinforcing metal mesh are laid. Finally, the concrete screed is filled with a layer of concrete of about 7-10 cm, forming the necessary slope and drainage holes.
Concrete floor in the bathhouse
On a note! When preparing a concrete mixture, additives are introduced into it to increase the water resistance of the material. One of the effective additives is perlite.
In addition to concrete floors, other structures are used in modern baths. The metal non-leaking floor in the bathhouse is highly reliable. In this case, stainless steel sheets or sheets of non-ferrous metals are used. The main advantage is ideal waterproofing. The disadvantage is the high cost. Ceramic tile floors are widely used in the washing area.
The leak-proof floor in the bathhouse receives well-deserved attention. Its design is much more complex than that of pouring systems, but its reliability is significantly higher, which increases the service life of the entire structure. In addition, this system is simply necessary when increased environmental requirements are imposed on wastewater.
Preparing rooms and surfaces
If for some reason the floor was not insulated during the construction stage, you will have to dismantle the old floor covering
It is recommended to insulate the floor during the construction stage. If for some reason this does not happen, you will have to dismantle the old floor covering.
After dismantling, it is important to check the suitability of the rough beams (they make up the rough floor). Damaged ones must be replaced with new ones.
To avoid rotting, they are treated with an antiseptic.
You cannot coat the material that will be used in the steam room with an antiseptic. When heated in this room, harmful chemical fumes will appear.
Insulation of the floor in different rooms of the bathhouse - steam room, wash room, relaxation room - is done in its own way. This is due to the different temperature conditions and humidity levels that are observed in them.
How to properly clean a bathhouse
From time to time the question arises of how to clean a bathhouse. A sooty ceiling, dirty shelves and floor can ruin the pleasure of taking hygiene procedures.
Basic Rules
How to clean soot in a bath? There are certain rules for this. For example, wooden surfaces covered with a layer of soot should not be wetted.
Wood is a hygroscopic material that quickly absorbs moisture. Together with water, everything that has settled on the surface - soot, soot, bodily fluids, etc. - will be absorbed into the structure of wooden elements. Once the dirt is absorbed into the surface of the wood, it will be almost impossible to clean the shelves in the bathhouse, walls, floor or ceiling.
Therefore, when deciding how to clean soot from walls or floors in a bathhouse, you should categorically refuse to use such substances and materials as:
- laundry soap;
- water;
- sponges;
- spray guns.
All of the above products can only be used for final cleaning of wooden surfaces, when the carbon deposits have already been cleaned dry.
All work on cleaning the bathhouse from soot and soot must be carried out using special protective equipment:
- blind safety glasses;
- respirator;
- thick rubber gloves.
All this will help prevent combustion products from entering the respiratory tract.
Solving the problem of how to clean soot in a bathhouse begins with a vacuum cleaner. To do this, you need to walk it on wooden surfaces. Next, you need to carefully sweep away the soot and soot from the walls and ceiling with a broom.
Prepared surfaces must be cleaned with specially impregnated sponges. They are sold in hardware stores. During the manufacturing process, such sponges are impregnated with special compounds that destroy soot and soot.
Sponges get dirty quickly, so you need to purchase several of them at once. You can extend the service life by cutting off the soiled layer of the sponge. When the soot and soot are completely removed, you can clean the surfaces of the walls, floors and ceilings with aqueous solutions of detergents.
Abrasive powders cannot be used in this case. They spoil the structure of wooden surfaces.
On a note! It is advisable to use degreasing powders and/or gels. They are added to hot water.
To clean hard-to-reach areas, it is better to use a mop with a long handle.
Surfaces are washed 2-3 times. In this case, the water must be changed periodically, adding a new portion of detergent to it.
When the question of how to clean the lining in a bathhouse from soot has been resolved, you need to rinse off the cleaning solution with clean water. For this it is better to use running water. It is better to feed it from a hose under low pressure.
At the end of the process, wipe the washed surfaces dry with a clean soft cloth. You can use an old bath towel. A large amount of moisture or poor thermal insulation may cause the lining to turn black. In this case, the answer to the question of how to clean the lining in a bathhouse will be a grinding machine, but this is if the darkening has affected only the surface layer of wood.
To clean walls lined with clapboard, you will need an angle grinder with a power of no more than 1 kW and a flap wheel with a diameter of 125 mm (grit size no more than 40 units). The lining is sanded in such a way as to remove the darkened layer to a depth of approximately 3 mm.
If the blackness has been absorbed to a great depth, the lining can be painted. But not in the steam room. No paint coatings are used here at all. You can replace the darkened lining partially or completely with new material.
Impregnating compositions for bleaching darkened wood, prepared on the basis of chlorine, are not recommended, since the carbon particles that determine the dark color of the walls are practically not discolored by compositions containing active chlorine.
Over time, unaesthetic dark spots appear on the surface of the bathhouse logs on the outside, which spoil the appearance of the structure.
Liquid bleach can be used to remove such stains. It is applied to a surface that has been previously cleaned of dust and dirt. For work, brushes with artificial bristles are used, which need to be changed periodically, because the cleaning composition corrodes them. Before applying, you need to test its effect in an inconspicuous place.
The product is carefully distributed over the entire surface and left for some time according to the instructions on the package. Then you need to rinse the surface with running water from a hose. Next, the bathhouse is ventilated to remove the pungent odor of bleaching agents.
If the blackening penetrates to a greater depth, the logs can be sanded with a grinder. In this case, safety precautions must be observed.
To clean the shelves in the bathhouse, you can use a car wash. Water is supplied through it mixed with air and under high pressure. This helps to easily remove the top layer from darkened wood. In this way you can also clean the floors, walls and even the ceiling in the bathhouse.
We invite you to familiarize yourself with: Country house bathhouse made of foam blocks
To thoroughly clean the floor in the bathhouse, you can use a plane, preferably with an electric drive. First, the floorboards must be carefully removed and thoroughly dried, then processed with a plane. In this case, the top layer of wood on each side is removed to a depth of 5 to 10 mm.
This type of cleaning often results in sharp edges on the floorboards. They can be removed with a belt or vibratory sander. You can also use these devices to clean up darkened wood instead of using a plane.
If the darkened layer of wood is thin, you can simply sand the surfaces with sandpaper. An electric drill with a special attachment will help make the process easier. You can only work with completely dry surfaces.
This method will help you get into corners and other hard-to-reach places. There is no need to remove individual elements.
This treatment is often recommended when answering the question of how to clean aspen seats and other wooden surfaces in a bathhouse. After processing and sanding with sandpaper, they will not only be clean, but also absolutely smooth.
How to clean a chimney in a bathhouse depends on the nature of the contamination. With use, types of clogging may occur such as:
- soot and soot, which accumulates very quickly when burning household waste;
- condensation that forms due to irregular use of the bathhouse;
- foreign objects accidentally falling into the chimney.
All of these types of contaminants ultimately impede the free circulation of air and the escape of smoke through the chimney. This may cause carbon monoxide poisoning. Condensate is a weakly concentrated acid solution. Under its influence, the chimney masonry begins to collapse from resinous deposits.
If you use a sauna regularly, you need to make a schedule and determine in advance when and how to clean the pipe in the sauna. Carrying out such work regularly will preserve the chimney and stove and allow you to use the sauna without any problems.
How to clean a chimney
The chimney and pipe in the bathhouse are cleaned chemically and/or mechanically. In a special store you can purchase liquids and/or powders for cleaning the chimney. Detailed instructions are printed on the packaging. After reading it, it will become clear how to clean a pipe in a bathhouse.
A good answer to the question of how to clean soot in a bathhouse that has accumulated in a chimney would be a “log chimney sweep.” It is impregnated with special chemicals. During combustion in the furnace, smoke of a special composition is released. As a result, the soot becomes soft and pliable. After 2 or 3 days it can be removed with brushes without much difficulty.
For mechanical cleaning of the chimney you will need the following tools and devices:
- rope and/or rope;
- weight (ball);
- brush-ruff (preferably on a thin metal cable).
First you need to check the safety of the structure. Then you need to remove any objects that accidentally got into them from the pipe and chimney. For this purpose, a brush-ruff is used, selected according to the size and shape of the pipe.
A special modern brush will make cleaning work easier. It comes with a handle consisting of several links. This allows you to adjust the length of the brush as needed. During cleaning work, any brush must be moved inside the pipe, gradually moving it lower and lower.
Such work must be performed in a special set of clothing, which must include:
- overalls or suit;
- respirator;
- gloves;
- protective glasses.
If the chimney is not very dirty, you can call a specialist. He will clean it using a special high-power vacuum cleaner. This will remove soot from the chimney through the firebox opening. The use of special means will help resolve the issue of how to clean the chimney of contaminants and how to clean the pipe of soot in a bathhouse.
Cleaning the tank
Due to the hardness of tap water, the question periodically arises of how to clean the tank in a bathhouse from scale that settles on the walls and bottom. Since scale is formed from lime deposits, it must be cleaned with acid.
Acid can only be used of organic origin. For example, lemon or vinegar. Any inorganic acid is unsafe for the metal from which the tank is made. It should be remembered that the amount of acid used to clean the tank should approximately correspond in weight to the amount of lime deposits on the walls of the heating tank.
On a note! Installing a special filter at the inlet will help prevent the formation of large amounts of scale.
The water passing through it will be purified from a significant amount of impurities. This will greatly reduce the level of scale formation.
Cleanliness in the steam room
The steam room in the bathhouse requires special attention. After all, when using brooms, particles of plant pigment from stems and/or leaves are absorbed into wooden shelves and walls along with moisture. Therefore, the question inevitably arises of how to clean the steam room in a bathhouse to give it a fresh and pleasant look.
The problem of how to clean linden lining in a bathhouse, especially in the steam room, can be solved in different ways. If the wood darkens slightly, you can use special liquid detergents and/or paraffin oil.
The cleaning liquid is applied to the darkened surfaces manually using a piece of foam rubber or a regular sponge. The pre-detergent must be diluted with water. How to do this is detailed in the instructions.
Paraffin oil is gradually applied to pre-dried surfaces using a dry sponge. In this way, you can not only clean the lining in the steam room, but also give the wood water-repellent properties. This will protect the wood trim and various items from severe and rapid contamination.
Recommendations for using plastic bottles
Some are afraid to insulate the floor with plastic containers, considering them not strong enough for this. In addition, everyone knows that plastic dishes are subject to rapid deformation. However, PET bottles are used for floor insulation no less often than glass bottles.
Below are recommendations that you can follow to create a strong and reliable foundation:
- To prevent bottles from deforming and add strength to the future floor, it is enough to fill them with sawdust, sand, dry clay or other bulk materials.
- Work on preparing the base and laying plastic bottles is carried out similarly to installing a floor made from glass containers.
- Installation of an insulating structure made from PET bottles is best done at an air temperature of 20-25 degrees.
- When preparing a concrete solution, the cement-sand mixture must be diluted with heated water, which helps to slowly cool the air inside the plastic container. As a result, optimal pressure is created on the walls of the dish, which helps to strengthen them until the solution begins to harden.
- The screed must be reinforced, and the size of the mesh cells should be no more than 150x150 mm.
Necessary materials
To complete the work you will need the following materials:
- river or quarry sand;
- medium-sized crushed stone or screenings;
- reinforcing mesh frame with a cell size of 50-80 mm, made of steel wire with a diameter of at least 6-8 mm;
- concrete solution consisting of sand, cement, crushed stone. Mix the ingredients in a ratio of 3:1:5, dilute with water until creamy;
- wood or ceramic tiles for finishing.
