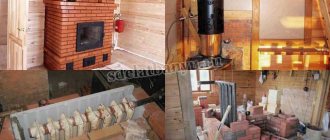
Despite global progress in the field of gasification, in some settlements there is no main fuel supply. As an alternative, you can build a brick stove with a water heating boiler with your own hands. This will reduce the cost of heating the building and solve the problem of lack of hot water supply.
A brick stove with a water heating boiler will reduce heating costs.
Features of a brick kiln with a water heating boiler
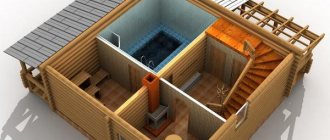
Since ancient times, people have heated their houses with wood. This is a cheap and effective way to organize a heating system, which is still in demand today. In cities and cottage villages where there is no central gas supply, stove systems are becoming quite popular. However, they are not capable of heating a large room with several floors, an attic and a basement.
To increase the efficiency of wood burning, you can connect a water circuit to the stove. It will ensure uniform distribution of heat throughout all parts of the building and provide access to hot liquid for domestic needs.
System characteristics
When choosing a stove system for your home, you need to clarify the following parameters:
- Power. The performance of the installation affects its dimensions and weight. If the stove is small, then it does not need to be equipped with a solid foundation. More massive units require a reliable foundation.
- Heated area. It determines the heating efficiency. For 50 cc m of room you need a 2 kW boiler.
Devices with a water circuit are used in cottages with an area of more than 180 square meters. m.
Principle of operation
In addition to the fuel loading compartment, a heat exchanger is installed in the furnace. It is built into the chimney or firebox. The water passing through the register is heated and then sent to pipes and radiators, ensuring efficient heat transfer. Liquid circulation in the circuit is created by a temperature difference or a pump.
Construction of a brick stove with a water heating boiler.
During the heating process, water increases in volume, so an expansion tank is used to prevent the equipment from exploding. In models with a closed circuit, it is installed in any convenient place. When it comes to open systems, the container is at its maximum height.
The pressure is released using an automatic air vent.
Advantages
Water-cooled furnaces have several positive qualities:
- Energy efficiency and cost-effectiveness. The construction of the structure does not require large financial costs. At the same time, to purchase firewood for the entire winter season, you will have to spend no more than 5–10 thousand rubles.
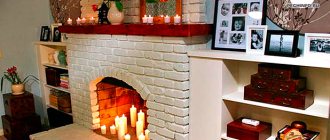
- Design. Stoves complement the interior of any room and hide defective areas.
- Autonomy and independence from gas supply lines. The structure can be installed in any home, regardless of its location.
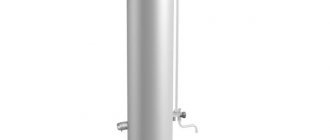
In addition to intense heat transfer, such a unit maintains a high water temperature in the circuit for a long time.
What pipes are needed?
Instead of radiators, pipes (80-120 mm in diameter) are usually used. They are better suited for stoves (provide sufficient water volume in the system).
The main thing here is to choose the right material:
- Stainless steel;
- Metal-plastic;
- Polypropylene.
On a note! For brick stoves heated by wood, the best option is steel. It can withstand high temperatures (up to 100 Cº or more). Other materials are not designed for this load (maximum 95 Cº).
Types of systems
Furnaces with a water circuit differ in the features of coolant circulation. In some systems, fluid movement is ensured by a temperature difference, while in others it is achieved by a pump.
Natural
Liquid circulation is determined by physical processes and does not depend on power supply. At the same time, for the correct operation of the system, the installation of pipes with an increased diameter is required. The oven takes longer to heat up, but it cools down more slowly.
Natural circulation does not depend on power supply.
Forced circulation
The equipment has a pump that operates in continuous mode and is responsible for the constant movement of coolant between the radiators. Its disadvantage is its dependence on electricity supply. If your area often experiences power surges or other network failures, it is better to install an uninterruptible power supply with rechargeable batteries.
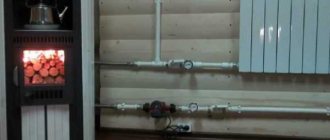
We make a UPS and connect the voltage stabilizer of the gas boiler
UPS is an uninterruptible power supply. It is needed to ensure that the equipment continues to work when the power is turned off. And the stabilizer will protect the boiler from overloads during frequent power surges in the network.
An uninterruptible power supply can be purchased at the store. But if you do it yourself, it will be cheaper
Stores sell a variety of uninterruptible power supplies and stabilizers. They are not cheap. You can try to make an uninterrupted unit yourself. It is impossible to make a stabilizer yourself. The rules for choosing it are:
- For a 220-volt network, choose a single-phase stabilizer; for a 380-volt network, choose a two-phase one.
- Power - from 20 to 40 kW depending on the volume of the boiler.
- The stabilizer can be installed on the floor or mounted on a wall - this does not affect its operation.
Focus on the following technical characteristics of the stabilizer:
- type - electronic or relay;
- response time - a few milliseconds;
- input voltage range - from 140 to 260 volts;
- operating temperature range - from +5 to +40 0C.
The stabilizer is mounted next to the boiler in a dry place where access to water is excluded. It should not be overheated or frozen.
A stabilizer for a gas boiler will help maintain the voltage in the network at the level required for the heater to operate
How to assemble an uninterruptible power supply with your own hands
To produce a UPS you need:
- current converter (220 volts). It is needed so that a voltage of 220 volts is supplied to the boiler from the battery;
- battery (helium batteries have proven themselves well);
- charger (minimum 15 amps).
The instructions for assembling the UPS look like this:
- The converter is connected to the battery using wires with a cross-section of 4 millimeters, observing polarity. Usually there are “+” and “-” indicators at the connection points (sometimes the polarity is indicated by different colors of the wires). The positive from the converter must go to the positive from the battery. The same goes for the negative wire. The converter is connected to the battery using two wires. Their cross-section must be at least 4 millimeters
- The boiler is connected to the converter via a socket. It is already included in the kit; there is no need to install anything additional. Thus, three parts of one system - the boiler, the converter and the battery - are connected to each other.
- When the battery is discharged, a charger is connected to it.
The converter is connected to the battery using wires, connecting plus to plus, and minus to minus.
Such a unit will not operate automatically. You will have to turn it on yourself when the electricity suddenly goes out.
Preparatory activities
Organizing stove heating involves preparing drawings, choosing a suitable location for pipes and radiators, as well as competent calculation of power. Next, a register is made or purchased and the structure with a built-in heat exchanger is laid.
Calculation of power and dimensions
The efficiency of a heat exchanger is determined by the materials from which it is made. Cast iron products of the MS-110-300 and MS90-300 series have a power of 0.14–0.16 kW/sq. m for the rib. Taking into account such figures, it is possible to predict the number of sections for heating each circuit. For 10 sq. m of area you need at least 1 kW. For a building of 60 sq. m. requires a register with a power of 5.5 kW.
The efficiency of a heat exchanger is affected by the materials from which it is made.
The dimensions of the furnace system are 1020x1160x2380 mm. The heat exchanger has dimensions of 750x500x350 mm.
Required materials and tools
To assemble the stove you need to prepare:
- A sufficient amount of fireclay and solid bricks with fire-resistant properties.
- Furnace and blower doors.
- Grate.
- Steel corners and strips.
- Valves for ovens and cooking chambers.
- Pre-furnace sheet.
The tools you will need are a basic stove set and containers for mixing the solution.
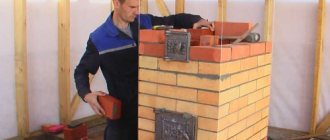
Laying a brick stove with a water heating boiler
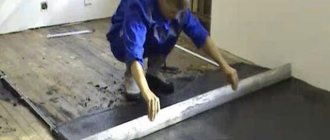
The manufacture of the system begins with the construction of the foundation and the preparation of the necessary materials. Initially, the first brick row is laid out, excluding any distortions. It is important to avoid vertical or horizontal deviations, since the future reliability and efficiency of the structure depend on this.
The reliability and efficiency of the structure depends on the bricklaying.
Masonry features you need to know about
- Maintaining order is a prerequisite for the construction of a brick oven with a water heating boiler. Otherwise, you may block certain channels poorly, etc.
- The thickness of the seams should be from 3 to 5 mm. It is important that this thickness is the same everywhere. In addition, make sure that the seams are located strictly in a horizontal straight line.
- Performing ligation of sutures is the same mandatory condition as strictly following the order.
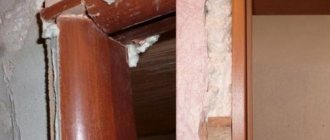
- All metal furnace elements are installed simultaneously with brick laying. If you leave this for later, that is, try to do it after finishing laying the row, you may not be able to install certain parts.
- The door is secured to the masonry using metal wire. Having pulled it through the holes in the door itself, the ends are mounted directly into the seam of the brickwork. When the solution hardens, the connection will be as strong as possible.
- Having laid 2-3 rows, leave them for a day to dry. It’s better to take your time and do everything efficiently than to build a stove in a day and then discover a lot of flaws in it.
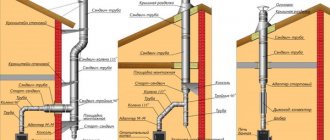
Heat exchanger placement options
The main element of the furnace unit has a complex structure. It can be installed both in the chimney and in the combustion chamber.
Down the chimney
With this method of installing the heat exchanger, the firebox will heat up evenly and to the maximum level. The heating intensity is adjusted by the length of the coil.
Due to the lack of direct contact with fire, the element retains its performance properties longer. In this case, installing a heat exchanger in the chimney leads to an increase in the dimensions of the candle.
The register can be integrated into an already finished structure only after dismantling the chimney. To avoid mistakes, you need to design the masonry order in advance.
Into the furnace
This option increases the efficiency of the furnace system, since under the influence of flue gases the pipe will heat up to the maximum. External and internal coils slightly cool the external surfaces and maintain the optimal degree of heating.
Under the influence of gases, the furnace pipe will become very hot.
The heat exchanger has 2 pipes. The top one is combined with the pipe and storage tank, and the bottom one is combined with the heating circuit.
How does the combustion duration of solid fuel increase?
The dream of many homeowners is to install a solid fuel boiler, to which they do not have to run with firewood every 4-6 hours. Taking advantage of this, manufacturers and sellers of heating equipment apply the prefix “burning duration” to all heat generators, including pellet ones, which operate independently for up to 7 days.
Varieties of classic boilers with an enlarged fuel chamber
The duration of the combustion process is usually justified by using the smoldering mode with a limited air supply. But burning wood and coal in this way is ineffective, and here’s why:
- Wood and coal boilers reach their efficiency of 70-75% during maximum combustion. When smoldering, the efficiency of the unit decreases to 40-50% (like a conventional potbelly stove).
- Smoldering firewood produces little heat energy. Who needs a “long-lasting” heat generator that does not fully heat the house?
- Freshly cut wood of certain species (for example, poplar, willow) and low-calorie fuel cannot be burned normally in smoldering mode.
Factory boiler with an enlarged firebox, where wood burns from top to bottom
In fact, long-burning solid fuel boilers are those that have an enlarged fuel chamber, only its size affects the duration of the process, all other things being equal. The principle is simple: the more wood in the firebox, the longer it burns and produces heat.
Household boilers that can operate for 8-12 hours on wood and up to 24 hours on coal from one start are of the following types:
- classic, with forced air supply;
- operating on the principle of top combustion (such as the Baltic “Stropuva”).
It is quite possible to make these designs of TT boilers at home if you have the necessary tools and practice in welding. You can also find drawings of mine boilers using solid fuel and sawdust on the Internet, but such heaters are quite bulky and difficult to manufacture, and therefore deserve a separate topic.
Algorithm of actions: step-by-step instructions
In order for a stove with a water heating boiler to provide maximum heat transfer, it is necessary to design it correctly: follow the order of the masonry and take into account stove construction technologies.
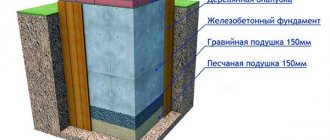
Foundation
The type and thickness of the base are determined by the dimensions of the heat generator. Classic Russian stoves require massive strip pedestals. For small systems, a concrete pad of 10-15 cm is suitable. In some cases, it can be fixed to a frame made of reinforcement.
Brick
Fire-resistant ceramic bricks are used for external walls. The foundation can be built from used material. In this case, it is better to line the internal coatings of the firebox with fireclay stone. The façade will be finished with facing bricks.
Brick is used to install external walls.
Solution
The masonry mixture is prepared according to the classical scheme: sand and clay are poured with water and mixed with cement until a homogeneous consistency is obtained. You can also purchase a ready-made solution with special additives.
Masonry
For a strong foundation, it is important to form high-quality seam binding. They should not coincide, as this will affect the strength of the structure.
It is better to place the seams of the bottom section in the center of the bricks of the next row.
Negative aspects of designs
To assemble a stove yourself, you need experience in masonry and a set of professional tools. In addition, you should understand the installation of the heating system.
Other disadvantages of the units:
- Fire hazard. Since the stove has an open fire, it is necessary to take safety measures to prevent the ignition of flammable objects.
- Solidity. The structure takes up a lot of space, so its location should be considered at the design stage of the facility.
- Uneven heat distribution. It is always much warmer near the stove than in other rooms.
- Slow heating stop. When using closed circuit models with a circulation pump, the water may boil in the event of a power outage. To avoid such problems, it is better to choose devices with combined coolant circulation.
- The need to drain the liquid when the oven is rarely used. If you do not do this, it will freeze, destroying important elements of the structure.
- Possibility of carbon monoxide poisoning. To minimize possible harm, it is necessary to correctly form the chimney channels.
Cast iron radiators as a boiler
You can build old radiators into a brick stove, and they will serve as a boiler. Cast iron built-in water heating elements have their own characteristics, for example, cast iron does not react very well to open fire. Nevertheless, this method is used quite widely. You can use the M-140 radiator, which can easily be found at demolition sites of five-story buildings. If you weld a dozen sections, you will get a heater with an area of 3 sq.m and 18 liters of capacity. A flat boiler with the same characteristics would require a lot of space. Such boilers can heat large areas.
Before the radiators are welded together, they must be disassembled, cleaned of dirt and thoroughly rinsed with a hot 6% hydrochloric acid solution. Then rinse again with water. Then change the cardboard spacers located between the sections, as they will simply burn out. Instead, use asbestos cord impregnated with graphite powder and natural drying oil.
The radiator elements should be assembled in a certain sequence. Screw nipples with their right and left threads into the sections to be connected, then wind an impregnated asbestos cord around them and tighten both nipples with a wrench, making sure that there is no misalignment of the sections. After connecting two sections, you can attach a third, then compress the radiator to check the quality of the assembly. Now you can install the risers.
You can position the cold water inlet and hot water outlet diagonally. The other two holes can be plugged to allow water to circulate through the entire volume. The radiator must be mounted in the smoke duct located behind the firebox. This will help avoid contact of cast iron with open fire: the boiler will be heated by hot gases.
You can increase the natural circulation of water in such furnaces by running a return line pipe through its foundation and the space under the floor, which will increase the temperature difference between the return and hot lines. The battery in the furnace is installed with a slight slope to allow air to escape and enter the system. For cleaning, you can build an additional door into the smoke channel itself.
Helpful tips and general expert advice
In some rooms it is necessary to build stoves into a niche or install them on rectangular / square bases. To do this, you will need to mark and pour the foundation. After assembling the body, taking into account the order, secure the doors, combustion chamber, hob and other elements.
During the first heating, you need to heat the stove to maximum. This will allow you to evaluate its performance and effectiveness.
Drawings of the future stove can be created with your own hands or ordered from professionals. If you do not have experience in design, it is better to entrust the work to specialists. They will offer ready-made schemes tailored to your requirements.