January 31, 2020
Read later
We will send the material by email
Leveling floors with cement screed is a very labor-intensive job, especially if you need to get a perfectly smooth and even surface for laying the finishing coating. This problem is much easier to solve with the help of self-leveling mixtures and get a better result. Those who choose this option will find detailed instructions on how to make a self-leveling floor with their own hands step by step. Accurate adherence to the recommendations will allow you to create both a solid foundation for any type of floor finishing and an independent finishing coating.
Self-leveling floors can serve as a finishing coatingSource materialyinfo.ru
Expert answer
A self-leveling floor, in fact, is no different from a regular screed, the only difference being that liquid self-leveling systems are used for this. The thickness of such a coating is small and most often is no more than 5 mm, and it can be a finishing coating or used in the form of a quick-hardening mixture. The latter is intended for arranging the base for floor coverings such as laminate, linoleum or parquet boards. The main advantage of self-leveling systems is that when spreading, they can easily fill existing unevenness and at the same time “bring out” the horizontal to the ideal. Of course, if you follow the technology, you won’t be able to install such a floor at an angle. The mixture will tend to take a horizontal position, or, more simply put, flow to the lowest point.
However, there is information that some home craftsmen were able to install a self-leveling floor at an angle. To repeat their result, you will have to deviate a little from the technology. The mixture is diluted with less water - and its fluidity is greatly reduced. You will have to level the surface manually - using a long spatula or a rule, having previously installed inclined beacons. The best self-leveling floor that can be recommended for arranging an inclined surface is the finishing leveler Vetonit 3000. While the mortar is setting, you will have to adjust the surface several times as a rule, otherwise slipping of the mixture cannot be avoided. I would like to immediately warn you that it will most likely not be possible to obtain a perfectly smooth “mirror” floor - the surface will need to be polished to perfection using abrasives. However, maximum accuracy and diligence will allow you to achieve the desired result - practice confirms that what you have planned is quite feasible.
The main building material at any stage of construction and repair is concrete. This is due to its technical characteristics and properties, as well as its low cost compared to other similar materials. In certain situations, pouring sloped floors may be useful. In the process of performing work, there are certain nuances that must be taken into account without fail. If the concrete screed technology is not followed, then you don’t have to think about strength.
What you need for work
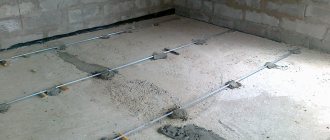
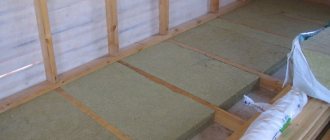
Before arranging the inclined screed, backfill with sand.
To perform inclined cementing you will need:
- Factory dry mix or individual ingredients for screed, such as cement, sand, crushed stone.
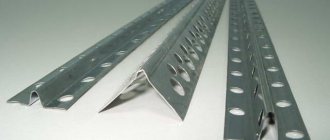
- Beacons.
- Thread and level.
- Concrete mixer.
- Vibrating screed or mop (to reduce the cost of the process).
- Bucket and shovel.
Filling the screed at an angle is carried out in three stages:
- Installation of beacons for cementing.
- Strengthening the poured surface with steel reinforcement.
- Pouring concrete.
You also need to follow some rules:
Careful surface preparation
To do this, debris and vegetation are removed from the site and then compacted if necessary. Creating a sand cushion up to 5 cm thick or equal to the thickness of the screed. Backfilling of crushed stone up to 5 cm thick; it is important to compact this layer thoroughly into the sand. Correct installation of beacons. It is important here to avoid mistakes, otherwise you will not get an even angle of inclination. Ensuring protection of the laid screed
Drying out of fresh cement is the main problem, leading to a decrease in the strength characteristics and durability of the finished surface. Therefore, after installation, it is important to water the material evenly for three to seven days.
Application area
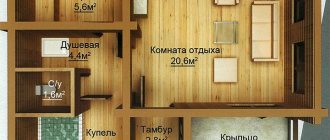
The most popular among rooms where concrete screed is laid on a slope is the bathroom. In addition, external territories cannot do without such a device.
These include entrances to the garage, personal plots, and premises of economic importance. Screed in a bathhouse or when installing shower cabins, the floor is also actively installed with some slope.
Such a screed device is necessary in places of unorganized outflow of water in order to compensate for the difference between adjacent surfaces. If you have an idea about the process of installing a concrete floor, then no difficulties will arise during the work. There are no special features. But some recommendations are worth considering in order not to deviate from the technology itself.
Main advantages
Installation of a flat roof, installation of a roof
Self-leveling flooring for a bathroom has its positive features, which is why it is gaining immense popularity. These include:
Low layer height. At the same time, all characteristics of self-leveling floor technology are maintained at the highest level. This type of floor can withstand a load of 10 MPa. At a minimum, a filled bathtub will look easy on the frozen solution. It can even be arranged over old tiles if it is difficult to remove. The main thing is that the surface is carefully prepared for installation. It is very important to coat the base with a primer before pouring the self-leveling floor to increase the level of adhesion. It is not uncommon to have a “warm floor” in the bathroom. It is sometimes difficult to hide it. But a self-leveling floor for a bathroom is perfect for these purposes. According to the technology of laying tiles, it is allowed to cover the heated floor immediately with tile adhesive. But subsequently, the spatula used in the work can damage the entire structure. Even minor damage to the cable will lead to failure of the entire system.
But these are only some of the positive qualities characteristic of a room such as a bathroom. In general, self-leveling flooring has a large number of advantages, due to which it is in demand on the market among construction companies and customers.
Installation features
The drainage in the required room can be completed using the following methods of pouring floor screed:
During installation, you should carefully and constantly check the functionality of the drain itself in the room. Otherwise, you will have to waste time on drilling and cleaning in the future. In this case, the level difference should not exceed 20 mm for each meter of the shower or bathtub surface. Normal operation will not be possible at higher slopes. In the future, it will be problematic to lay tiles or any other type of flooring.
Installation of a floor with a slope
The drain is most often located in the central part of the room or with some offset to one of the corners. In the first case, there will be fewer problems due to the uniform distribution and installation of beacons over the area of the room. When the drain is located in a corner, the beacons will have a different order.
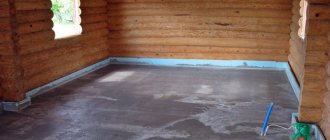
Base structure
We must not forget about the quality work done to clean the base from the old screed or any other coating. You can spend less effort and remove only all damaged areas, but in the future the remaining elements may manifest themselves in a negative way. For work, a hammer drill can be used to remove concrete. Particular attention is paid to the junctions of walls and floors.
If during the preparation process floor defects are identified (cracks, crevices, potholes, etc.), then they should be repaired with the prepared solution. All further measures can be carried out only after the solution has dried. Only in this case will it be possible to know how to fill a floor on a slope.
When the surface is ready, you should proceed to the waterproofing layer. The following types of materials are suitable for this:
- Coatings. They have excellent waterproof properties and are able to withstand high humidity and not allow it to pass through. In addition to the floor surface, they are also applied to walls. It will be enough to raise it to a level of 10 cm. The number of layers of the solution will depend on the type of coating being installed. All details will be written on the packaging of the material. You should pay attention to the drying time, since only after this can you begin all subsequent activities aimed at pouring floors with a slope.
- Pasting. Presented in the form of rolls, which are spread on the base with an overlap of each sheet of 100-150 mm. Most often, roofing felt is used, which has become part of the practice of renovating an apartment.
- Emulsion bitumen. But the duration of service is no more than 5 years. It is worth thinking about whether it makes sense to spend money on such materials in order to start the work all over again over the course of several years.
Instructions for creating a decorative coating
This task in itself is simpler, since a self-leveling floor made from polymer mixtures can only be poured onto an already leveled base. Otherwise, you will have to make a thick layer, which will lead to unreasonably high costs. In other words, a decorative self-leveling coating is created after all the steps described above have been completed.
If you need a single-color colored floor, then the selected and tinted mixture is simply poured over the primed surface and rolled with a needle roller. Since it is laid in a thin layer and has good fluidity, you can do without beacons. To ensure that the solution penetrates into corners and hard-to-reach places, immediately after pouring it, you can use a spatula or squeegee to initially distribute the mixture.
The plastic mixture itself spreads over the surface Source viprusstroy.ru
To create a floor with a pattern or a three-dimensional effect, you will have to spend more time and effort. You can use one of the following techniques: pour a transparent polyurethane compound on top of a banner fabric with a pattern glued to the floor or on top of a composition of decorative elements, stones, shells, stone chips, coins, etc. laid on it.
The production of a 3D floor with a backing made of synthetic banner fabric with a pattern is shown in the video:
The second option, how to make a self-leveling floor with your own hands, is more complex: it requires multi-layer pouring with each layer drying for several days. If you immediately form a layer of the required thickness to completely cover the decorative composition, it will take even longer to dry.
The formation of layers for such a floor is carried out until the desired thickness is achieved. Source pol-inform.ru
The self-leveling floor can be used no earlier than 7-10 days after pouring.
Fixing beacons
This stage and the choice of a specific beacon option will depend on what methods of filling the screed are chosen. If the drain is located in the central part of the bathroom or shower, then the sequence of work is as follows:
- Initially, the beacon is installed in the direction from the existing drain hole to the far corner from the entrance to the room.
- Regarding this lighthouse, marks are made on the walls using a level for subsequent elements. It will be very difficult to apply a long rule in your work, since the area of the room is small. In this case, a wide and narrow spatula will be optimal.
Lighthouse installation diagram: 1 - frieze lighthouse row;
2 — intermediate auxiliary beacons; 3 — reference beacon on the wall; 4 — lighthouse rows; 5 - mooring cord for laying the lighthouse row. It is more problematic to install beacons when the drain hole is located in the dressing room or bathtub in the corner. Here attention is drawn to the fact that there will be different lengths of beacons. Of course, no difficulties should arise. The main thing is to approach the installation with all seriousness.
Necessary materials
In order to carry out work on the construction of a floor for a shower stall, you will need not only certain materials, but also some skills and accuracy.
A room with high humidity requires a special approach to installation, since the slightest neglect can cause a lot of trouble for residents and neighbors of the lower floors during constant use of the cabin. To carry out the work, you will need the following tools:
- building level;
- roulette;
- water-based markers;
- trowel;
- container for diluting concrete mortar;
- tile cutter (if mosaic cladding is planned, then this item is skipped).
This is just a list of necessary tools, without which work would not be possible.
In addition, you will need the building materials themselves, which must be moisture resistant and suitable for the climatic conditions of the bathroom:
- waterproofing mastic (preferably bitumen);
- roofing felt;
- siphon;
- plastic pipes necessary for connecting the drain and sewer;
- expanded polystyrene sheets with a thickness of at least 50 mm;
- dry mixes for cement mortar (cement and sand without impurities);
- waterproofing tape;
- waterproof tile adhesive;
- tile grout;
- spatula and rubber sponges;
- silicone sealant.
A specific quantity designation will not be given in the list, since the designed designs of shower cabins are different for everyone, and material costs will be calculated based on these features.
The only thing you need to know is the scheme for introducing cement mortar. To do this, you will need to take 4 parts sand to 1 part dry cement and dilute with water until a thick mixture is formed.
It takes at least 3-4 days for the solution to completely harden, but it must be prepared immediately before starting work.
Important! Silicone sealant is required to seal seams and joints to ensure waterproofing. In any case, you will get a sealed and reliable structure, but it is better to protect yourself and play it safe.
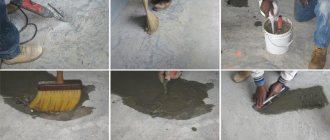
Preparing the mixture
To work, it will be necessary to prepare a high-quality solution. You can purchase ready-made options in the store, or mix everything yourself, following the proportions and recommendations. For streets and external areas, you should choose a higher grade of cement - M600. Its strength will be at the highest level. Before pouring the floor in a bathhouse on a slope, you should buy a grade of cement no lower than M400.
Fragility is ensured if the mixture has been lying for a long time and has not been used. It is very important to pay attention to the date of manufacture and service life.
To mix all the ingredients of the future solution, you need to take a concrete mixer. With its help, you will obtain a homogeneous solution with better strength characteristics.
The ratio of sand and cement M400 is 1 to 4. In the future, you just need to gradually add water, obtaining a thick slurry. There should not be any sand impurities visible.
The solution should be somewhat thicker than when installing a concrete screed in other rooms. This will contribute to the full formation of the slope. In this case, surface unevenness is allowed, since they will subsequently be eliminated with tile adhesive. If the defects in the screed are obvious and conspicuous, then cutting with diamond wheels must be used.
Slope of paving slabs, purpose and methods of arrangement, laying technology
Soft roof types and methods of roof installation
To obtain high-quality paving, it is necessary to follow a technological process that has a number of features. One of its requirements is the slope of the paving slabs, which is formed to drain water.
Why do you need a slope when laying paving slabs?
When laying paving slabs, there must be a certain slope of the surface, which is created to drain melt or rainwater.
As a rule, it is indicated as a percentage, for example, a sidewalk surface slope of 1% is 1 cm per 1 meter of coverage.
The choice of the required slope of the path is made depending on climatic conditions and some features of the surface to be covered. So, the most optimal option is a slope of 1%, it is enough for water to drain and it is quite convenient for moving along the path.
Technology for laying paving slabs with a slope
The first thing you need to do is decide on the elevation mark. The tiled slope should be organized so that water is drained away from the structures as quickly as possible into drainage grooves, which are laid on the underside of the path or other covering.
Important! If there are no trays for water drainage, ice may form on the path in winter. The height mark is determined using a level. If one is not available, a hydraulic level is quite suitable
The elevation mark is determined using a level. In the absence of one, a hydraulic level is quite suitable.
Twine or fishing line is stretched between two elements. After which a level is brought to it (parallel to the twine, practically without touching it) and the required slope is displayed. Wooden pegs are used as marking elements, which are installed in several places, especially at turns.
Having selected the elevation points, you can proceed to preparing the underlying layers of the base, which also affect the duration of use of the paving slab coating.
Stages of creating a foundation
Any construction process is divided into stages, and preparing the underlying base for tiles is no exception.
Taking into account the future slope of the path and the markings made, the soil is excavated, and a drainage layer or concrete base is laid in the resulting depression. Its depth depends on the load placed on the tile; the greater it is, the thicker the underlying cushion needs to be made. On average, 25 cm is enough.
The first layer is gravel or crushed stone, it makes up 2/3 of the total thickness of the future path. It must be laid with compaction of all elements to ensure stability of the pillow and prevent shrinkage of the base.
To fill the voids, a layer of sand is laid, no more than 2 cm. To obtain a dense layer, the sand is sprayed with water during compaction.
The last layer of the cushion is a waterproofing material that prevents the base from being washed away during rainfall.
Finishing layer
After completing the basic work, the final layer is backfilled, consisting of sand or concrete mortar. It must be at least 7 cm.
Sand must be laid in accordance with the marking elements so that laying the tiles is easy.
The concrete base also provides for laying a drainage cushion of gravel and sand. The next layer is concrete mortar.
It can be prepared using different methods, but the most common is a mixture of sand, cement and lime.
The consistency of the concrete solution should not be too liquid, but such that it can be leveled with a rule and create the necessary slope.
To maintain the contours of the tile sidewalk, it is recommended to install formwork.
It is difficult to determine which is better, concrete mortar or sand base; it all depends on the characteristics of the surface to be coated.
To summarize, we can say that the slope of the sidewalk plays a big role in the long-term use of the tiles. To lay it correctly, you need to make markings and prepare the base, which consists of several elements, the choice of which is made depending on the characteristics of the future coating.
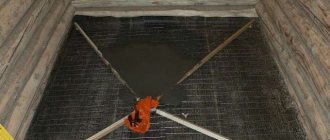
Reinforcement process
A reinforcing mesh is placed between the exposed beacons, which improves the quality and strength of the poured mortar. An alternative is steel rods. The main thing is to fix them correctly and securely. They should not be located directly on the base, but somewhat raised above it. Concrete pours are suitable for this.
Currently, fiberglass is increasingly being used instead of any metal elements. Fiber allows you to reduce the total weight of the finished solution when installing on a slope, and also increases ductility and strength after drying. Despite its fluidity, the solution with fiber fiber fits perfectly even at an angle. If we take into account the cost, it will be even lower than purchasing a metal mesh.
Reinforcement is simply necessary if concrete is poured indoors not in one stage, but in several. If you bypass the laying of metal mesh, the concrete will begin to crumble and crack.
How a flat roof slope is created
The slope of a flat roof is a layer with variable thickness that forms a slope on it. It can be formed on the roof both before and after the installation of the thermal insulation layer. How to make a slope on the roof depends on its supporting structure. In some cases, the angle of inclination is created directly by itself, arranged in the design position with a slope of 1.5-2.5%; in others, this is either technically impossible or simply turns out to be economically unjustified. In such cases, the slope has to be created additionally.
For comparison.
- The corrugated sheeting is laid with a slope, since if a heavy slope is laid on it, then an extra load will be created for the profiled decking and foundation.
- In the case of concrete coverings, everything is completely the opposite - installing heavy slabs of precast reinforced concrete or a monolith at an angle is much more difficult than sloping the roof with expanded clay or cement-sand mortar.
Screed installation
When there is no experience in performing such types of work as pouring the floor in a bathhouse on a slope, then you should seek help from specialists. They will tell you that installation is best done in two stages.
To begin with, prepare a solution that is thicker and contains more crushed stone. This will turn out to be a kind of base. The second layer of concrete is thicker and almost without crushed stone. The time delay between two stages should not exceed a day. If you skip more, the bottom layer will begin to dry out and will hardly be able to adhere to the second one.
Do-it-yourself shower tray, floor screed along beacons on a slope
Expert builder Viktor Petrovich says:
Today we continue to tell and show you how to properly make a sloped screed in a shower podium. Before this, we built a shower podium out of stone, installed a “fiftieth” fan pipe to this shower podium, installed beacons, primed it, and made several layers of coating waterproofing. And now we will directly make the screed downhill.
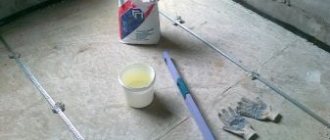
Primer
Before pouring the screed, we will use the Aquastop Pro primer. In this case, it is better to take a pink bottle. There are also blue containers of the same type on sale, but we recommend the pink ones, since, from experience, it penetrates the surface better and has better adhesion (adhesion). We dilute the primer in the bath, take a roller and prime the surface of the shower tray.
Prime the surface
Preparing for screed
We are waiting for the primer to dry and we can make the screed. Our pallet configuration is of a peculiar, irregular shape. Accordingly, in order to level everything here and pull the solution along the beacons, you need an appropriate rule or you need to prepare a special board. In our case, we took a flat small board, this is our wooden frame. And we will use it, and it is with it that we will pull the tie.
To level the screed we will use a solution called “cast concrete”. It is made on the basis of cement with the addition of certain additives. What are they needed for? So that the solution is more plastic, does not crack and is well leveled.
The thickness of our screed is small - up to 3 cm, so our screed does not need to be reinforced. But if the thickness of the screed is more than 3 cm, then you will need to use a reinforcing mesh. Also, the “cast concrete” solution can be used from 1 to 8 cm of screed. That is, they can easily seal some cracks and potholes up to 8 cm thick.
To ensure that the solution does not flow into the recess where our drain is located, we use polystyrene foam. We cut rectangles of a certain length from a piece and place them in the form of formwork in the desired place on the pallet. From the side of the ladder we fix them with stones that we had left over from work.
We will install foam formwork
Then we make a control measurement of the beacons using a level: are they properly fixed in the plaster mortar? If everything is smooth and the bubble is in the center, then we continue to work further. We also check the slope: is it even? We also use the level rule and compare the movement of the bubble at different points: it should move the same distance at two beacons. In our example, there is a slope - you can fill the screed.
Making a screed
First, we mix our “cast concrete” solution: mix the dry mixture with water with a construction mixer, then let it stand for a while, swell and mix again. That is, as usual, we stir twice. Then we carefully pour it into our tray and level it. We leave our screed until tomorrow for the solution to harden.
Leveling the screed with a board
Then we will remove our foam formwork that protects the ladder area. Let's install the ladder horizontally in the right place, put a corner with a diameter of 5 cm in it for a larger turn. And we'll fix our pothole. As a result, we will have a flat surface of the shower tray floor, going downhill.
Quality mixture
It is not difficult to learn how to pour a floor on a slope. Everything comes to the same conclusion with experience. But it is very important to take care of a high-quality mixture. The properties can be improved by adding various additives and components that improve the characteristics of the finished solution. The screed begins to compact on its own if plasticizers are added to the composition, and artificial fillers help increase strength after hardening, resist cracking and the appearance of fragility.
The slope angle is considered optimal up to 10-12 degrees. It will be enough for excess water to be removed into the drain in the bathroom or bathhouse. In addition, it is often possible to do without reinforcement. It is worth remembering that anyone can fill the floor on a slope. You just need to adhere to the technology and the result will please everyone.
As a rule, after a concrete floor has been laid, its surface is far from ideal. You cannot lay tiles on a “crooked” floor, as this is a violation of technology. The thickness of the glue joint should be less than 5 mm, and this can only be achieved if the floor is properly prepared for laying tiles. Mixtures for self-leveling floors can help with this.
What is roof slope and why is it needed?
It's no secret that a flat roof is not actually completely flat, since a prerequisite for the reliability of such a roof is a correctly made slope.
The very concept of slope implies the construction on a flat roof of one or several small slopes of 1 - 5 degrees. These slopes must be made so that water flows freely into the drainage funnels.
Let's try to figure out why we need the obligatory slope for flat roofs?
Why do you need a roof slope?
First of all, a completely flat roof will greatly damage the material from which it is made, and its upper layers, which protect it from leaks, will suffer most of all.
On such a roof, no matter how perfectly level it is installed, due to very poor drainage, water will constantly stagnate in small depressions. In the warm season, this water will not cause much harm, since it will evaporate very quickly. In winter, cycles of freezing and thawing of water will occur, destroying the upper layers of the roof.
To all this we can add that such a roof will not self-clean, which means that, together with water, dirt will create a kind of swamp.
Dry mixtures for self-leveling floors
The main thing that needs to be taken into account when choosing a dry mixture for leveling floors is what layer should be poured. If there are potholes in the concrete screed, then it is necessary to measure the depth of the largest potholes using a tape measure. If the depth of the “pits” is 30 mm, then it is necessary to choose a mixture intended for a thick layer. For a thick layer, the dry mixture “Bolars Epreess 1050” (instructions for use) is suitable.
Self-leveling floor mixture "Bolars Epreess 1050". Layer thickness from 5 to 100 mm
When pouring a thin layer (1-10), choose a mixture designed for that thickness.
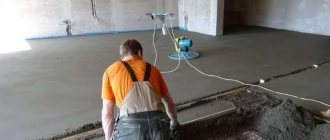
Fill
The efficiency of concreting is determined by the quality of the batch, which depends on the accurate calculation of the quantities of sand and crushed stone. If you overdo these ingredients, the mixture will be difficult to even out. As a result, irregularities form on the surface. For convenience, concrete is poured in two layers. The mixture with a high content of crushed stone is poured first. This layer should be well leveled, as it will be the basis for the second layer - a liquid solution without crushed stone. The thickness of the second layer should be 20-40 mm. To improve the internal adhesion of the two layers, the interval between concreting should be at least 24 hours.
Now you need to fill the screed itself. The prepared mixture is unloaded between the beacons and evenly distributed in excess along the height. This is done to remove it with a vibrating screed and get a flat surface. To do this, the device is placed on the formwork and dragged along it in a back-and-forth motion two or three times. In addition to leveling, the masonry is compacted, which improves the quality of the screed. Maximum compaction is achieved using a special vibration device. However, this mechanism is expensive. As an alternative, rebar can be used.
If the concrete does not bond well, it means the mixture was not mixed correctly. In the next batch you need to add more water. If you skip this moment, you will end up with a surface with an unaesthetic appearance. If you do not remove air from the concrete, the screed will not last long.