These Old Believers are surprised when they shout that fire-resistant bricks are not needed in the furnace.
Such fanaticism among practicing stove makers looks especially incomprehensible and strange.
Or do they change their addresses and appearances after each stove, or do their customers feel sorry for them?
Please understand correctly, I am not judging anyone, I just don’t understand this position and I don’t understand what they are counting on and what their motivation is.
Here is another oven without refractory, let's look at the result.
Choosing the right material
In order for the stove to generate heat more efficiently, not smoke and not be a fire hazard, you need to carefully study the information about the brick and choose it correctly.
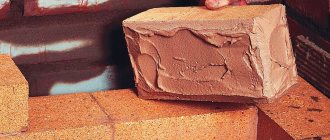
First, let's figure out what kind of bricks are stoves made of? In the kiln business, high-quality durable ceramic and fireclay bricks are used. The better it is, the longer the stove will last you. The bricks must not have chips or cracks and must be the same size.
The sound of a hammer hitting such a brick should be loud. On the contrary, unburnt, low-quality material will “sound” dull. The “correct” brick is always pink. The overburned one will be purple, and the unburned one will have a red-orange hue.
Typically, fireclay (fireproof) brick is used to lay a firebox. Ceramic - for laying the entire stove. Beginners often have a question: “Is it possible to lay the entire stove out of fireclay bricks?”
There is no particular need for this, since:
- the refractory brick gets very hot, which makes touching the stove dangerous;
- it costs more.
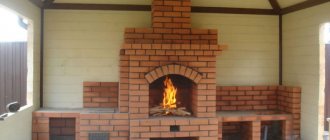
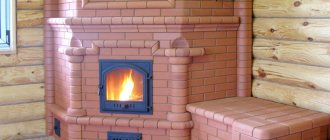
Operating principle of the Pompeii furnace
The efficiency of the Italian pizza oven is due to the technical design features.
Principle of operation
When solid fuel burns, two streams of hot gases arise inside the dome:
- Convection flow that comes from the firebox itself.
- The reflected flow comes from the walls of the dome.
It is also noteworthy that the temperature in the Pompeii oven is self-regulating.
Movement of cold and hot flows
The hotter the wood burns in the stove, the greater the amount of gases released. Rushing upward in a powerful stream, they block the flow of oxygen in the section of the pipe mouth. Consequently, the intensity of combustion decreases, and hence the temperature decreases.
When the temperature drops, the flow of hot gases also weakens, again opening up access to oxygen.
This cyclical process helps regulate the optimal temperature in the oven necessary for cooking bread, pies, pizza and any other food.
As can be seen from the figure, it is the dome that is the main element of the furnace, accumulating thermal energy from the fire.
Having analyzed the operating principle and design of the furnace, we can summarize and highlight the main pros and cons of the Pompeii furnace design.
Benefits include:
- Fast heating. Already 30 minutes after kindling, raw food can be loaded into such an oven for cooking. While the heating time of a classic Russian stove is at least 2 hours.
- Good heat dissipation. Even after the wood has burned, the heat in the Pompeii stove continues to be maintained for several hours, allowing food to be “stewed.”
- The compact dimensions of the unit allow the stove to fit seamlessly into almost any summer cottage.
- Stylish appearance.
Stylish appearance
The disadvantages of the Pompeian stove include:
- Complexity of design. Unlike the traditional laying of a brick stove for a summer residence, skill will be required here to correctly lay out the dome, which is an integral attribute of the unit.
- High cost of materials.
- The need to build a strong foundation, since the stove is not light in weight.
Preparing tools and materials
To build a stove with your own hands, stock up on :
- trowel;
- wooden slats;
- oven hammer;
- with a knife;
- building level;
- rasp;
- pencil;
- square;
- metal tape measure;
- plumb line;
- container for mixing the solution;
- grinder with a diamond wheel.
Of course, construction cannot be done without the following materials:
- fireclay and ceramic bricks;
- dry oven mixture;
- steel strips and metal corner;
- doors of the firebox and ash pan;
- chimney damper;
- cast iron grates.
Features of clinker
Brick made using clinker technology from highly melting grades of clay has great strength (more than M300) and frost resistance (more than F 100).
The specific features of clinker are indispensable when laying the base layer of the foundation and the internal chimney channel reaching the cap, provided that the cladding is decorated with a different material.
Making the main part of the stove out of clinker is an expensive and unjustified pleasure, especially since the structure will be massive and heavy.
If the owner plans to make a compact stove in a bathhouse, clinker brick will be an ideal material that will allow heating the space no worse than a thick-walled cast iron “potbelly stove.”
Tips and secrets
Experienced stove craftsmen know various subtleties and secrets of stove construction. Let's talk about some of them.
- Before laying out the stove, draw up drawings and a masonry diagram . Check during construction that the rows are level using corner templates and straight edges.
- Cover the ceramic bricks with masking tape (6 cm wide). This will help avoid monitoring the mortar protruding between the seams from the front side. The solution will begin to dry, and all you have to do is remove the tape and sweep the masonry with a stiff brush.
- Do not chase the thickness of the mortar between the bricks: let it be moderately thin, then the stove will be strong and durable.
- What mixture is best for laying bricks? To build a strong and durable structure, you can prepare the mixture yourself or use a ready-made one. Without some experience and practice, it will be difficult to make clay mortar yourself. If you are new to stove building, use a convenient dry stove mix for your work. It is sold in construction supermarkets.
- The facing masonry needs thermal insulation from the combustion chamber. To do this, use a sheet of basalt cardboard (5 mm thick).
- A metal corner with a shelf width of 50 mm will help to adjust the levels of jumpers and other parts of the stove. Position the corner so that it can grip the brick on both sides. It should not be visible from the front side.
- Dampers, doors, and grate bars will fit securely into the grooves if the latter are of equal thickness to the parts themselves.
- Square metal rods 5 mm wide. and 1 m long will help to achieve a perfectly even seam between bricks. On top of the row of bricks, lay two rods, pre-lubricated with machine oil, apply mortar on top, then again a row of bricks, then you can remove the rods.
- To adjust the bricks to size, they are first laid out “dry”. After this, you need to soak them in water until the release of air bubbles from it stops.
- During installation, make sure that the mortar from the top row of bricks covers the bricks of the bottom row. Remove excess solution.
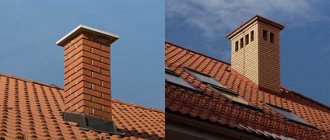
- The slope of the chimney should not exceed 5 degrees. This can be achieved using the following trick. After laying out the base of the chimney, use a plumb line and find a point on the roof in the direction of which the pipe will be located, and secure the self-tapping screw in this place. Similarly, set three more screws for the three remaining corners. Stretch bright threads on them and use them to lay the masonry.
Step-by-step instruction
Determine the location of the stove in the house.
- Do not place fire-hazardous objects closer than 38 cm around the stove.
- To prevent moisture condensation or reduced draft, do not place the oven in the space between windows or near external walls.
- Check that there are no rafters where the chimney pipe passes through the roof, and that there are no joists between floors.
- The stove should not interfere with free movement in the room where it is installed.
- It is better to install it at the same level as the roof ridge. This will help shorten the length of the chimney.
Laying the foundation correctly.
- Remember that it is best if the foundation of the house and the foundation of the furnace are not connected. This will ensure that both last longer. After all, temperature differences and loads create different shrinkage.
- For the foundation, we dig a hole one meter deep, cover it with 11 centimeters of sand, and fill it with a concrete solution on top.
- Make the foundation 15 cm wider than the stove itself. Make sure it is perfectly level and its surface is 19 cm below the floor level.
Let's start laying.
- For those who are building a stove for the first time, we recommend that you first lay out the bricks according to the dry pattern, and then start working using mortar.
- Using a spatula and trowel, we lay the first row of bricks, using only solid bricks and observing the following rule: vertically located seams do not coincide with each other.
- In the second row we install the blower door. It is equipped with four hinges that are attached to the stove. We attach steel wire (diameter 1.5 millimeters) to the hinges, bury its ends in the masonry, and coat the door with the solution.
- In the third and fourth rows we install a grate without using mortar and leaving gaps.
- We lay out the furnace firebox using fireclay bricks. Because it can withstand increased heat. It is not advisable to mix it with ordinary brick. We install the firebox door according to the same principle as the blower door, but first wrap it with asbestos.
- The rows following the firebox (9 - 12) are laid out according to the usual rules. In this case, it is necessary to control the smoothness of the walls of the firebox.
- Rows 13, 14, 15 form the arch of the firebox.
- In row 16 we install a cleaning door.
- From rows 17 to 20 we form a convector with a smooth inner surface.
- Rows 21 and 22 form a jumper. On the 23rd row we install another door for cleaning.
- Rows 24 to 26 are laid out like rows 17 to 19.
- Rows 27 and 28 are used to design the overlap of the upper pass and the outlet pipe of the stove. Rows 29 to 31 will close it and complete it.
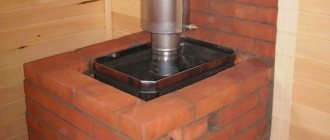
We arrange the chimney pipe.
You can create it yourself from sand-lime bricks or take a ready-made one, but properly insulated. Make sure that there are no chips or irregularities inside the chimney. Sometimes its inner walls are leveled using liquid glass.
After finishing the masonry, dry the oven for 2 weeks.
Chamotte
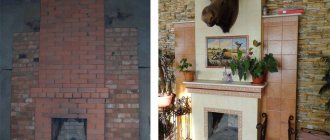
© Anatoly Smirnov A fireplace stove with a transparent firebox door is a common type of fireplace in the home
© Angel David Stock. XCHNG Regardless of what material the open fireplace is made of and what it is lined with, its main disadvantage remains its low ability to accumulate heat
This refractory material is obtained by high-temperature firing of clay until it loses its plasticity and removes bound water. To achieve this, the temperature in kilns is raised to 1500°C. The fireclay is then ground into a fine-grained or coarse-grained powder. Mixing it with various types of clay in certain proportions makes it possible to obtain fireclay ceramic refractory materials with specified properties.
Features of the operation of the firebox require fire resistance from fireclay, allowing it to work in direct contact with the flame. The material itself must withstand heating up to 1200°C (the actual temperature in the firebox can be 750–1000°C). The resistance of fireclay to thermal changes is also important, since the process of firing the furnace and extracting heat is accompanied by alternating increases and decreases in temperature. To test the suitability of fireclay for use in a firebox, manufacturers give it 30 cycles of heating up to 1000°C, followed by cooling with cold water, and the solution for connecting fireclay slabs into a single product must also meet the specified requirement - this guarantees that in the future there will be no cracks.
The basis of the range of fireclay products for the hearth offered by the market are blocks for laying furnaces, modules for chimneys and fireproof insulation of metal cassette fireboxes.
Fireclay chimneys fully retain all the properties of this material, including resistance to temperature changes and moisture resistance. They are also certified according to European standards. By the way, the use of fireclay allows you to organize the design according to a modular principle, which simplifies the installation of the hearth, while at the same time not limiting the flight of imagination of designers and leaving them room for creativity, up to the creation of original projects. Parts can have dimensions from 13.5 × 13.5 to 100 × 75 cm and are selected during production based on the specifics of a particular project - from elements for a fireplace with large glass to shaped products intended for assembling compact stoves. Thus, any product sample in the model ranges of various manufacturers has its own set of parts.
The Russian market also offers fireclay slabs for open fireplaces, which can be lined with any of the known materials. The shaped stones used for assembling fireboxes are equipped with profiles for connecting to each other “in a lock” according to the principle of mating parts. For ease of laying, in addition to whole modules, the kit also includes half and corner stones. Well, the protection of the walls of the house adjacent to the firebox is provided with the help of hollow fireclay bricks, which are suitable for use in other places with a slight temperature difference.