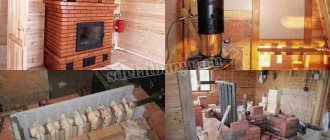
Small brick stoves without a foundation are great for country houses or temporary buildings, especially if the building is already ready, and there is no way to build a foundation for the stove in it. You can install a small stove on a regular floor, even a wooden one, as long as it is made of thick enough boards. Being equipped with a cast iron hob, it can be used not only for heating, but also for cooking. At the same time, this unit is more convenient to use than steel stoves, since it emits heat softly and can accumulate it in sufficient quantities (you have to add firewood less often).
It is not always possible to allocate space for a stove foundation, but there are stove options where a foundation is not required.
Many owners of already built country houses do not dare to build such a unit due to reluctance or lack of opportunity to build a foundation for the stove. In such a situation, you can build a miniature brick oven without a foundation.
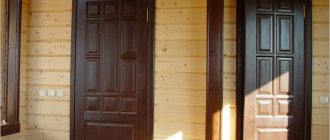
Wall cladding with tiled tiles for stoves
When installing a fireplace or stove in country houses, you will have to take care of thermal insulation of the nearest walls.
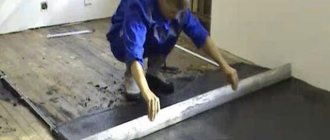
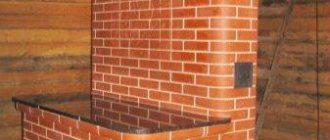
In this case, the enclosing corner of the internal OSB partition was lined with super-insulated boards. The material is ugly, so we decided to cover it with tiles for stoves. The walls were made of super-insulated material, lined with tiled tiles, and the fireplace stove was installed in a pre-prepared place.
| They decided to lay the tiles without a reinforcing mesh, and to ensure better adhesion between the tiles and the base, they used “Betokontakt” - an acrylic primer containing small pebbles. For reliability, the surface was coated twice, with a break of a day. Heat-resistant adhesive mastic was used to lay the tiles. Usually it is applied to one of the adhesive surfaces in a layer of 0.5 to 1 mm, but not more than 2 mm. In this case, it was applied directly to the tile - with five dots. |
| The laying began from the bottom from the corner. In this case, there was no need to set the horizontal lines, since the floor tiles were already laid and served as a guide. The thickness of the joints was adjusted using ordinary crosses for laying 1 mm tiles. |
| The tiles and joint thickness were selected in such a way as to avoid undercutting. However, in the upper part of the partition, near the ceiling beam, adjustments were required. To do this, we first prepared a paper pattern. It was used to make cuts on tiles. |
| After 24 hours, the crosses were removed, the seams were moistened with water and filled with grout using a rubber spatula. The mixture was diluted with a special latex additive for cement mixtures, which improves the technical properties of the grout, in particular, increasing its resistance to deformation loads in the form of sudden temperature changes. |
| After 10 minutes, use a damp sponge to thoroughly clean the tiles from traces of grout. To improve the hydration process of the cement contained in the grout mixture, the joints were additionally moistened several hours after grouting. |
| The edges of the tiled masonry and the ends of the wall were edged with wooden corners and plinths, combined with the floor plinth. For this purpose, you can use special plastic or metal strips for tiles, which give a beautiful, smooth edge. |
Point 7. Grounding
A stove that runs on mains power should be installed especially thoughtfully and competently. Even according to the rules, such an installation of a metal stove in a bathhouse is consistent with the fire inspection - it is so unsafe.
But, in general, the situation can be improved with the help of grounding - this increases electrical safety many times over. That is why modern cottages always have their own grounding circuit, which for some reason is often forgotten by bathhouse owners. But experienced stove-makers always recommend making a separate grounding circuit for your steam room for safety reasons, so as not to take the neutral wire coming from the substation - this is unsafe.
If for some reason difficulties arise with grounding, then a “grounding” is used, which connects the neutral terminals and the grounding wire of the electric masonry stove in the distribution panel. An RCD (protective shutdown) would also be useful in the bathhouse.
By the way, if the electric heater was purchased ready-made, the installation of the stove in the bathhouse can be entrusted to the selling company itself - such services are provided. And they will cost only 10% of the total cost of the equipment.
Base for a stove in a wooden house
When the stove has a small mass, it is necessary to slightly increase the strength of the floor. You can additionally make a flooring perpendicular to the main one. To maintain fire safety, asbestos material is laid at the installation site. The top is covered with a metal sheet. Construction can begin. If the stove is heavy, you will have to dismantle the floor.
Use of piles
General rules for bookmarking a database
If the stove is located away from the outer walls, the ground will not freeze, so there is no need to be afraid that the base will deform. A small indentation is made. There is no need to worry about soil heaving on sandy or rocky soils as long as the water does not lie too close to the surface, even if the equipment is located next to external walls.
When constructing the foundation, you need to monitor the vertical and horizontal levels. The height of the base depends on the distance between the ground and the floor. Must be below floor level, related to waterproofing. The base is covered with roofing felt so that the resulting moisture does not fall on the stove. If the base is higher, close to the floor level, dampness will transfer to the flooring.
Slab base for metal stove
This refers to a thin reinforced concrete slab. Applicable:
- concrete;
- fittings;
- filler.
Filler:
- crushed stone;
- pebbles;
- broken bricks, concrete fragments.
It is necessary that the materials are not too large, otherwise they will interfere with the installation of the reinforcement mesh.
Slab making
The slab can be selected when the ground is hard and a starting platform is needed. After waterproofing, you can begin laying the stove. If you need to raise the level, raise the base to the floor, lay out brickwork around the perimeter, the width of a brick. The space is covered with sand, and two rows of bricks in a bundle are again laid on top. Brick and cement mortar are saved.
Stone (rubble) base for a brick kiln
Large stones can be used to make a strong base for a very heavy stove. They make a hole, fill it up, tamp down the pillow, it will help the water not to accumulate. You can pour tar, mastic on top, cover it with roofing material, separating the lower wet layers. Stone masonry is laid on top of the waterproofing. The largest stones are laid around the perimeter, and smaller ones closer to the center. They try to make the outer sides even in a plane, vertically.
The structure can be erected quite high, it is necessary to monitor the dressing. After construction is completed, the concrete is given time to gain the necessary strength, and you can begin laying the stove. The top and sides of the cabinet must be coated with tar and mastic; roofing material may tear on sharp edges.
Reinforced concrete base
The design is similar to a slab, but has a greater height. To make a concrete mixture, use a recipe of 1: 3: 5: 0.5, where the following are indicated: cement, sand, gravel, water.
The ratio of water and cement should be as indicated in the diagram. Theoretically, the water-cement modulus should be 0.2, but due to the low viscosity, it is necessary to make the figure higher. An excessive increase in the number leads to a decrease in the strength of concrete, usually several times. The water-cement indicator varies depending on the brand of cement used.
Reinforced concrete base
A special feature is the use of reinforcement. Unlike the slab type, a column bond is required here. The point is the diameter of the rods. The main load in the slab type falls on the horizontal elements, while in the column type it is evenly distributed on horizontal and vertical planes.
Design Features
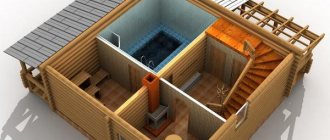
The main feature of the design of a furnace with a remote firebox is the independence and autonomy of the latter from all other elements. The remote combustion channel is welded to the main structure if it is light, or removable if it is heavy. Thus, the firebox with the door is located through the wall in the adjacent room. It is usually made in a rectangular or square shape; it is slightly wider at the place where the door is attached. There are models in which the external channel is located not in the next room, but on the street. This option is not very common, it is found mainly in commercial saunas, where one person looks after the firebox without the need to enter the sauna room itself. This model of heater can be made of metal or brick, but more often there is a combined option - a metal body lined with brick.
Thermal screens
How to install a stove in a bathhouse on a wooden floor and protect wooden partitions from high temperatures? For steel and cast iron units, the following types of screens are used:
Fire protection will protect the tree from fire and charring. The material is mounted on the wall surface, in some cases through thermal insulation inserts. They lay out a brick covering or line it with natural stone or ceramic tiles. Another option is to install iron sheets on the partitions and ceiling. It is recommended to use stainless steel, which is attached to the boards with a heat-resistant gasket, or basalt cardboard can be laid on top of the layer.
Brick barriers can be laid on the sides of the stoveSource bg.decoratex.biz
Protective types protect users from various burns of contact and remote origin. In this option, the firebox itself is lined, with the obligatory arrangement of an air gap of 3-7 cm. The thickness of the finishing material is half a brick, but some builders make masonry using a quarter of a whole brick. When installing the stove, the iron screen is also attached at a certain distance from the body.
A wooden wall and floor can be protected by metal shields Source banya-ili-sauna.ru
A floor heat shield made of steel sheet will protect boards located near the heating device. It is recommended to use a sheet measuring 70x50 cm; it is attached along the front part of the firebox, while a layer of heat-insulating building material is laid between the wooden floor and the metal. Basalt or asbestos cardboard is suitable.
In addition to its protective qualities, the screen will give the furnace unit a complete appearance.
Fireproof lining
Not all modern heaters come with a heat-reflecting screen. Since the upper part of the stove can heat up to 200–250 °C, installing it closer than 35 cm from the walls cannot be considered safe. In any case, due to intense thermal radiation, the wooden finish will dry out greatly and lose its durability.
In order not to distance the stove from the walls, it is proposed to cover them with refractory material, fortunately there are a number of options. The simplest is clinker or bassoon brick up to 50 mm thick. If the base of the walls is wood, which is typical for frame buildings, the lining is carried out using a pre-filled plaster mesh. It would also be a good idea to treat wooden surfaces with fire-retardant compounds.
Other ways to construct a heat-reflecting screen include lining with soapstone tiles, natural volcanic stone or magnesite slabs. The final choice is best made based on the availability of materials and their decorative value for your steam room. It is also not prohibited to use sheet steel coated with heat-resistant non-toxic paint and a basalt cardboard backing up to 2 cm thick. Obviously, the fireproof lining of the furnace should be carried out before covering the walls with wood.
The edges of the screen should be brought under the rectangular side and plastered with cement mortar so that the wood trim can be decorated with a gate with an end strip. Ultimately, the lining should cover the walls 35 cm on either side of the stove body. The height of the lining on top is at least a meter, but usually it is extended all the way to the ceiling.
Project No. 1 – compact mini-fireplace
This hearth is suitable for heating a room of 16-20 m² in a country house or a small country house. Another option for using the structure is as an outdoor barbecue built in a garden gazebo. A special feature of the fireplace is the side convection channels that heat the air in the room. The size of the building is 102 x 51 cm.
To lay out a mini-fireplace, you will need the following materials:
- solid ceramic brick – 240 pcs. (chimney pipe is not taken into account);
- inspection door 24 x 14 cm – 1 pc.;
- cast iron grates 18 x 14 cm;
- valve 25 x 14 cm;
- stainless steel sheet 1 mm thick, size 500 x 1000 mm;
- sheet of black or galvanized metal, laid in front of the firebox, dimensions - 70 x 50 cm.
Sectional drawing of a mini-fireplace.
There are outlets for convection channels on the side walls. The mini-fireplace shown in the drawing is laid out in the following order:
- The first tier is solid. On the second, 3 air channels are laid - 2 side and one in the middle, located under the grate.
- On the third row, the bottom part and the grate nest are formed (made 5 mm wider than the product). Then the grill itself is installed.
- From the 4th to the 10th tiers a fireplace insert is built. On row V, 2 metal rods Ø5 mm are laid for mounting a stainless steel sheet.
- In the 10th row, the rear brick protrudes a quarter into the firebox, the side stones move outward by 40 mm. The width of the firebox in this place is 49 cm.
- The ends of the side stones of the 11th tier are filed at an angle of 28° to the vertical line. You will get the supporting platforms of the arched vault. 2 stones in the depths of the firebox are placed on edge.
- The vault is built from 9 stones, cut in the form of a trapezoid with base sizes of 65 and 52 mm, as indicated in the order. The circle radius is 51 cm.
- On the 12th tier, the formation of the vault is completed, the upper steel rods are installed and a stainless screen is installed.
- Tier 13-14 forms the outlet openings of the convection channels. An inspection door is installed here.
- 15th row - the ceiling is being built, 16-18 - the beginning of the chimney.
The master will tell you in detail the algorithm for laying a mini-fireplace in his video:
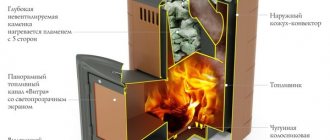
Functional purpose of individual parts
Fuel is loaded into the firebox and ignited. The combustion activity and intensity of heat release are directly related to the damper - with a larger opening, maximum air enters the firebox and the wood burns better. If the design involves an open firebox, the intensity of the fire does not need to be adjusted.
To regulate the air supply you need a grate. An important point is the timely removal of ash, which collects through the grate into the ash pan. Usually it is raked out or shaken out, depending on the presence of a built-in or retractable system.
The fireplace chimney removes the accumulated combustion products to the street. To prevent gases from spreading inside the house, the chimney is often equipped with forced draft force. It is a fan. For the construction of a chimney, it is allowed to use only heat-resistant bases: brick, ceramics, heat-resistant steel.
We install a chimney
To remove combustion products, it is recommended to use sandwich-type chimney pipes. In this case, it is better to arrange a section of 1–1.5 meters from the stove with a non-insulated steel pipe: it is easier for it to make turns, and the possibility of installing a tank or coil remains possible.
For the passage, two cuttings are performed: in the ceiling and roof; in the absence of an attic, they are combined. An opening in the ceiling is cut 25 cm from the chimney insulation casing, the space is filled with basalt wool.
The passage through the roof is made with a standard roof cut with a tin flange. In this case, you will need to cut out the wooden parts of the sheathing 30 cm from the pipe and strengthen the rafter system. When assembling chimney elements, it is not recommended to seal the sockets; they are already compressed when heated.
Varieties
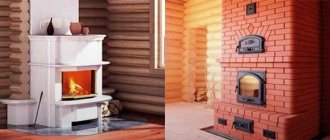
The material of manufacture determines two types of furnace units - brick and metal. The brick oven is made of refractory fireclay bricks and lined with ceramic. The metal structure can be made of different metal alloys.
The most accessible option is to install an iron stove in the bathhouse. The metal warms up quickly with low fuel consumption. The weight of the stove structure varies depending on the dimensions of the firebox and heater, on average 100 – 400 kg. A cast iron stove is characterized by heavy weight and increased heat accumulation.
READ MORE: How to make a wooden floor in the kitchen question
The advantage of such units is obvious:
- economical and fast installation;
- low labor costs during installation;
- compact size and weight;
- the tightness of the structure increases safety and reduces the leakage of carbon monoxide.
The disadvantage of using a metal stove is the rapid cooling and uneven heating of the room. When fuel burns, the metal quickly cools and stops giving off heat.
The stove heats up to 500 degrees, which can lead to burns if touched carelessly
The further the distance, the lower the temperature. Disadvantages can be neutralized by installing a brick case.
Brick furnace structures do not have the negative aspects of metal units. Uniform and long-lasting heat will remain for several hours after heating. But to heat a brick oven, you will need a lot of firewood and at least 2 hours to heat the brick.
The skill of masonry, the preparation of a solid foundation and its impressive size pose a challenge when installing a brick stove.
Depending on the location of fuel loading in the furnace design, there are separate types of heating units:
- Fuel loading is carried out from the steam room. When installing oven equipment in a steam room, proper installation and additional ventilation are required. If the bathhouse is made of timber, then the stove is placed according to fire safety rules. When the firebox is open, oxygen burns out from the room, so you need to ensure high-quality ventilation. The advantage of placing the stove in the steam room is constant control and the ability to quickly regulate heating.
- The furnace firebox is located in the dressing room. This location is relevant for a wood-burning stove. This is optimal from the point of view of cleanliness and ease of fuel loading. In this case, it is planned to erect a frame wall between the steam room and the dressing room.
- Fuel is supplied from the street. This option is suitable for mini-baths or seasonal summer cottage buildings when heating with coal. Fuel is loaded from the street side, which can cause inconvenience when loading and monitoring the stove.
Furnace structures can be of various shapes - cylindrical, rectangular, barrel-shaped, with high or low sides. In addition to the firebox, the design of the stove may include a tank for heating water and a container for the heater.
Fire door passage
A remote firebox for a sauna stove is an ideal option. When burning, oxygen and warm air do not steal from the steam room, there is no wood dust and debris, there is more free space. This installation is the most difficult to do on your own.
There is an opinion that a bathhouse is built around a stove; at least, it is strongly recommended to install a partition between the dressing room and the steam room only after the final installation of the heater. It is noteworthy that before the construction of this wall, a heat-reflecting screen should already be laid out to the height of the stove.
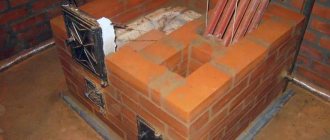
At a distance of 50 cm from the walls of the firebox neck, two 100x60 cm beams are installed vertically; they are tightly adjacent to the furnace lining. The beams are aligned in the plane of the partition and secured with steel angles to the floor and ceiling. From these beams, a frame wall with a 100 mm layer of insulation is built on both sides; wooden lining is sewn onto a horizontal sheathing of 20 mm planks.
The space between the beams is filled with hollow clay bricks; the neck of the firebox must be carefully lined on both sides. The binder for masonry is a mixture of cement, sand and fireclay clay in a ratio of 1:2:5. The mixture of clay and sand is soaked for a day, cement is added immediately before use. Please note that both sides of the wall will be visible, so it is recommended to carry out the masonry using steel rods 10 mm thick, and carefully trim the extensions with a grinder.
How to build a stove correctly
In the vast majority of cases, construction begins with the construction of a foundation for a future heat source. An exception may be outdoor mini-ovens, which due to their low weight are sometimes placed directly on the concrete screed of the yard. All others, regardless of location, must be built on a solid foundation. Moreover, it is not allowed for the foundation of the stove to be connected to the base of the house or placed close to it; it is necessary to leave a gap of at least 5 cm, and preferably 10.
If the house has a good foundation in the form of a cement screed, and the total weight of the stove does not exceed 750 kg, then a foundation is not required; masonry can begin directly from the screed, having previously laid sheets of asbestos and roofing steel. The structures presented in the previous section weigh over 750 kg, and therefore it is necessary to provide a reliable foundation for them. There are 2 types of foundations for the furnace: rubble and reinforced concrete.
Regardless of the type of base, you first need to dig a hole whose dimensions exceed the area of the stove by 10 cm in each direction. The depth depends on the thickness of the upper layer of chernozem or other subsidence soil, while the base of the foundation should rest on a denser layer. In the first case, the pit is laid with rubble stone and dressing, using a solution of the following components:
- sand – 6 parts;
- cement – 1 part;
- lime mixed with water - 1 part.
All voids between the stones are also filled with this solution, and the upper part, located at a depth of 80 mm from the floor, is also leveled with it. The reinforced concrete base is poured with formwork and reinforcing mesh, having previously poured a 10 cm thick cushion of crushed stone onto the bottom of the pit.
The furnace is laid according to the procedures, observing the thickness of the joints within 3...5 mm. A few recommendations:
After laying each row, it is necessary to control compliance with the vertical and horizontal using a plumb line and a building level. The mortar can be applied to the brick with a trowel or by hand; light tapping of the stone after placing it in place is allowed.
The remaining mortar is removed from both sides of the wall, and the inside is wiped with a wet rag to create a smoother surface.
This is necessary to ensure the least resistance to flue gases. When installing fittings and water tanks, it is important to ensure that there are no gaps between the masonry and the metal surface; the joints must be carefully filled with a solution, otherwise the stove will begin to smoke. Upon completion of construction, it is necessary to wait 2 days until the solution dries completely, after which you can test fire the stove, starting with a small amount of firewood. How to build a small stove at home is described in detail in the video:
How to build a small stove at home is described in detail in the video:
Brick oven
Full ceramic brick is the best option for laying a stove in a wooden house with your own hands
Pay attention to the quality of the material. High-quality bricks have approximately the same burning color and have no defects, and the geometric shapes should not differ
Features of laying a brick oven
The masonry of the furnace has a strict pattern, violation of which is fraught with consequences such as destruction of the finished structure or an asymmetrical result.
The first row requires especially careful laying; this will be the key to perfectly right angles and long service life of the unit. Before starting work, it is recommended to soak the bricks in a ladle of water. When starting work, take care of purchasing the necessary materials and accessories. Cast iron elements are the best option for a brick oven: for the oven, stove, firebox door, ash door, cleanout, ladle, grate and valve. The ladle can be used as a tool in the construction of a furnace. Professional stove makers also have their own kits for laying stoves. You can rent them or buy them at hardware stores.
Everyone chooses a clay solution or a solution from manufacturers for themselves, but experts recommend taking ready-made solutions because of their improved qualities. Clay mortar is made from sand and clay with water.
Stove makers share a trick: they get the same thickness of the seam by using two thin wires as a spacer between the bricks.
Here are some more tips to know:
- Compliance with bandaging of seams will increase the strength of the masonry.
- Before laying bricks in the mortar, it is exposed and adjusted dry.
- It is better to round off turns for the release of gases for a smooth exit.
After laying 2-3 rows of corners, vertical guides are installed in the form of ropes or wooden slats. The ropes are tied to the nails on the four sides of the stove and to the ceiling.
The grate must be cast iron so that the fallen coals burn out there. Therefore, this element is installed with a gap and sometimes with a bevel. It is safe to burn coals in such a place. Then the combustion door is installed on a mounting wire, which is placed in the seams so that it does not melt during prolonged combustion of the fuel. For the rest, bricks, boards and other devices will help.
The last row on which the slab will be installed is first laid without mortar to outline the location of the slab. We select a groove, put an asbestos cord in it, and only then place it on the solution. Cooking stoves at this stage can additionally be equipped with full-fledged ovens and even a tank for heating water. In the absence of an electronic oven, a stove oven can perform its functions.
When working on laying the chimney, do not forget about the need to install a valve on the summer flow channel. It is located in the inner corner of the cooking compartment.
The walls of the hood are laid out up to the opening in the ceiling. The stove is covered with several bricks, and the gap between them is filled with mineral wool. This is done in order to provide additional thermal insulation and increase heating.
Next, you should lay out a decorative brick band along the top of the finished structure, and begin constructing the chimney pipe. The brick version is more durable compared to asbestos and metal.
Ready! You were able to install a stove in a wooden house! Now all that remains is to carry out the exterior finishing in accordance with your individual preferences and tastes.
Thus, through the centuries, the wood-burning type of heating still remains the main type of fuel in the country.
And when choosing the type of stove, you should pay the most important attention to fire safety. Despite the fact that the masonry process is not an easy and time-consuming job, you can do it yourself and be satisfied with it
Dimensions and location of the hearth in the room
When choosing the design and drawings of the fireplace, pay attention to the dimensions of the portal, fuel chamber and chimney. The indicated dimensions are selected according to the area of the heated room and are related to each other by the following ratios:
- cross-sectional area of the chimney pipe - 1/9 of the portal quadrature;
- the depth of the firebox is made 1.5-2 times less than the height of the portal opening;
- the area of the open opening is 1/50 of the square footage of the room.
If you make a large fireplace in a small room, the chimney draft will not have enough air flow. The fireplace will begin to smoke into the room or “suck” air from neighboring rooms, along with the heat. It is permissible to build a small structure in a spacious room, but the heating will be minimal - the fireplace will decorate the living room and play the role of a barbecue.
For the convenience of determining the size of the firebox and smoke exhaust duct, depending on the square footage of the room, there is a ready-made table:
According to their shape, fireplaces are divided into 2 types - wall-mounted and corner. In the publication we provide a description of the first type - it is relatively simple. To build corner-type home fires, you need to gain experience in the stove business. Having decided on the dimensions of the heater, select a place for installation, taking into account our recommendations:
- Place the fireplace in the central part of the interior partition. If a private house is under redevelopment, renovation or construction, the rear wall can be brought into the adjacent room by making an opening inside the partition.
- It is not advisable to build a fireplace near the outer wall - some of the heat will go outside.
- Think about convenience - do not place the structure near interior doors and do not place furniture close to each other.
- Carefully study the design of the ceilings and rafter system so that the chimney pipe does not fall into the load-bearing beam or onto the edge of the reinforced concrete floor slab. The minimum distance from the wall of the flue to the rafters is 10 cm (taking into account fire-resistant furnace cutting).
When choosing a site for a fireplace, do not forget about the foundation. In a residential area, you will have to dismantle the floors, dismantle the screed and dig a pit without affecting the existing foundation of the building. Remember if there are house utilities installed in the selected location - sewerage, water supply or heated floors. The basement under the room is also a problem; not every ceiling can withstand the weight of the masonry.
Treatment of wood against fire
Additional means of protecting wooden structures located in the immediate vicinity of an iron stove are fire-retardant impregnations and mastics. Beams, load-bearing structures, floors and walls adjacent to the furnace are subjected to this treatment. Mastic has a higher level of fire protection, and the impregnation is almost colorless.
Fire retardant treatment can be carried out by both representatives of the Ministry of Emergency Situations and the owners of a wooden house. In the latter case, before starting to operate the stove, it will be necessary to obtain a certificate from the inspector of the Ministry of Emergency Situations about the compliance of its installation with the requirements of the safety regulations.
All leading European and Russian manufacturers of solid fuel stoves describe in detail the rules for installing equipment and fire safety requirements in their technical documentation.
Video description
You can see about water heating from a wood stove in the following video:
Equipment for water stove heating
For the water circuit you will need:
- pipes;
- radiators;
- water pump;
- expansion tank;
- heat exchanger;
- drain valves;
- shut-off valves;
- thermometer;
- filter.
With a well-thought-out layout, stove heating can heat a fairly large house of 2-3 floors Source lestorg32.ru
Selecting a model and installation location
Before we begin, we need to decide which model we will install. Accordingly, this choice will largely determine the location, since fireplaces and stoves in a wooden house cannot be placed everywhere.
Wood-burning structures are the most complex in equipment
To understand the main tricks, it is worth studying the table:
Variety Where can it be placed Wood/coal The most difficult case: the structures have a significant mass, in addition, when the fuel burns, an open flame is formed, which, upon contact with wood, can cause a fire. Regardless of the material of manufacture (metal or brick), as well as the shape (wall-mounted or corner), you can install a solid fuel fireplace in a wooden house with your own hands on the ground floor, on a prepared foundation, and preferably in a fairly spacious (from 20 m2) room.
Electric They are compact in size and safe to use, so they can be placed almost anywhere – as long as the power supply allows it. An ideal option if you are planning to install a fireplace on the second floor of a wooden house.
Biofireplaces combine the features of solid fuel and electric models: on the one hand, they are quite compact, which allows them to be placed almost anywhere, on the other hand, they function with the formation of an open flame. It is for this reason that portable biofireplaces are usually used on the terraces of wooden houses, and stationary models are placed with the same precautions as conventional wood-burning structures.
Biofireplaces also require a protective circuit
It should also be noted that before installing a fireplace in a wooden house, you should consider its effectiveness as a heating device. That is why they are usually placed on interior walls, at the maximum distance from window and door openings.
If you have decided on a location, then it’s time to learn how to protect the building from fire. And in the following sections we will consider the most difficult option from this point of view, namely, we will describe how to install a stove - a fireplace in a wooden house.
Floor installation
When designing a device for the floor, you need to know its weight, based on which you can calculate the strength of the floors. Matching the weight of the structure and the rigidity of the installation area will prevent the floor from breaking. There are special online services that allow you to make such a calculation. All you need is accurate information about the cross-section and size of beams and joists.
Using approximate load values, we will consider options for constructing a floor covering on which the heating device will subsequently be installed.
Installation of a brick oven and its features
The construction of a brick kiln is distinguished by its complexity. Depending on the type and design of the furnaces, most of the work cannot be done independently without qualifications and certain skills. It is better if the brick stove is built by a highly qualified stove specialist.
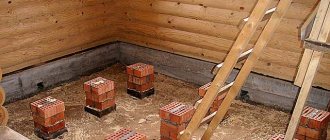
Before installation, the foundation is laid out in accordance with the dimensions of the furnace. Often in wooden houses, brick stoves are located in the kitchen, since most of them have hobs.
In the place where the stove will be located, it is necessary to insulate the underground space using roofing felt or roofing felt, then decide on the location of the chimney and make the appropriate markings. Please note that the chimney should only be placed between the rafters and beams. Under no circumstances should the integrity of the load-bearing elements of the ceiling and roof be compromised when installing a chimney. It is best to place the chimney in the space between the rafters near the outer wall of the house, since this location is considered the most optimal for a wooden building.
A brick oven is not just a lined box; any masonry scheme includes several chambers that must have certain parameters. Source pechki.net.ru
To finish a finished brick oven, you can use fire-resistant plaster or heat-resistant tiles. The second option is the most preferable, since the tiles have good heat transfer.
Video description
About a wood stove in a heating system, watch the following video:
When choosing, you should first of all pay attention to the technical and operational characteristics:
- dimensions of the furnace itself;
- availability of additional devices;
- thermal capacity;
- the material from which it is made.
Brick and metal are the most popular materials for stove construction Source teplomact.ru
Required materials and tools
To build a fireplace stove, you do not need any special equipment. All the tools necessary for this can be found at every owner:
- Bayonet and shovel.
- Big crowbar.
- Hand-held circular saw.
- Hacksaw.
- Building level.
- Yardstick.
- Plumb.
- Large square.
- Rule for leveling a concrete base.
- Containers for water and masonry mixture.
- Deep vibrator.
- Trowel.
- Mallet with a rubber striker.
- Pliers.
- Hammer.
To fill the foundation you will need the following materials:
- Material for waterproofing. You can use roofing felt or thick polyethylene.
- To make a reinforcing grid, use reinforcing bars with a cross section of 0.8 cm.
- Sand.
- Fine-grained (from 20 to 30 mm) crushed stone or large granite screenings.
- For the manufacture of formwork - edged boards, plywood or OSB boards.
- Concrete mixture grade M 300 or M 400.
- Nails and screws for strengthening formwork.
- Wire or plastic clamps for fastening reinforcing bars.
- Fireclay brick of SHA brand 8 standard parameters.
- Red refractory brick grade M 150 in regular sizes.
- Facing material.
- Cement.
- Clay.
- Metal corners made of steel with a shelf width of 50x50 or 60x60 mm.
- Metal gate valve.
- Insulating heat-resistant material made of asbestos or basalt.
It is convenient to use ready-made material from hardware stores as a masonry mixture. Such mixtures are specialized for the construction of such structures.
Large selection
Date: September 25, 2022