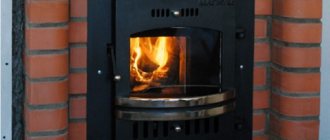
An excellent option for organizing an autonomous heating system in a private house or bathhouse is a stationary stove with a water heating boiler.
Such a device is practical and economical, has high heat transfer and efficiency, which allows you to effectively heat rooms of various sizes in a short period of time.
It is quite easy to organize such a system yourself, without involving expensive specialists.
How does a water heating system with a furnace work?
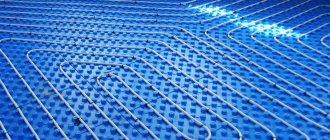
A brick stove, supplemented with a water circuit, allows you to quickly and evenly heat the rooms of a fairly large (up to 100 square meters) house; It is advisable to install it in a house with an attic or second floor. The operating principle is simple: the heat released during fuel combustion heats the coolant (in private systems it is water), which circulates throughout the premises and distributes thermal energy.
For a system to work effectively, it must be built according to certain rules. The easiest way to implement a water circuit is with natural circulation of water. It is based on the physical phenomenon of expansion of water (like any liquid) when it is heated.
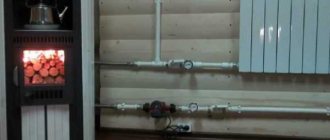
The basis of the system is a furnace with a heat exchanger. The functions of the heat exchanger are performed by a metal container equipped with pipes (fittings) and connected to the pipes of the system. The heated water is distributed along the heating circuit, and circulation becomes possible due to the difference in the specific gravity of hot and cooled water.
Water heating organization diagram Source holodine.net
The water heating system also includes the following elements:
- Expansion tank. A storage tank that prevents damage to the system when pressure increases.
- Circulation pump. It increases the speed of movement of the coolant along the circuit, causing thermal energy to be distributed faster and more evenly.
When installing water heating with a stove, you can rely on standard wiring diagrams. But the stove is a specific source of heat; it heats up and cools down slowly, and the heat is released unevenly. Therefore, for high-quality home heating, it is necessary to take these features into account.
What is the essence of the problem
The heating boiler was invented precisely to replace the stove as a heat-generating device in heating systems (CO). The boiler is a continuous operation device that ideally requires the user only to periodically reload fuel and seasonal maintenance. Its fundamental difference from a furnace is its automation, which maintains the combustion mode optimal for a given operating mode. Automation is not necessarily electronic; it can be a non-volatile combination of bimetallic plates, springs and levers.
The oven is a manually operated intermittent device, which is why it is cheaper. It's not about the automatic transmission. It's about the very fundamentals of the approach to design and production. Specifically, in the methods of organizing complete combustion of fuel. If we continue the shipbuilding analogy, then the boiler is no longer a displacement vessel, but a glider. Which can also float like a steamship, but will show its full qualities only when it reaches the redans. However, planing requires relatively calm water; a properly constructed and adjusted CO, figuratively speaking, is what it is for a boiler. The furnace (continuing the same analogy) under the control of an experienced crew can go at full speed in significant seas. Thanks to this reserve of operational endurance, it is possible to adapt the stove for water heating. Full speed (the same analogy) will be quieter than that of a glider (maximum thermal efficiency 60-65% versus 80-95%), but, “going at economic speed in calm water,” the specific fuel consumption for heating a unit of cubic capacity of a house can do not exceed that of the boiler.
Note: the thermal efficiency of heat-generating devices is a complete analogue of the efficiency for internal combustion engines.
Pros and cons of the system
A brick stove with a built-in water heating boiler has the following advantages:
- The system is more energy efficient; The efficiency of a design with a built-in heat exchanger is several times greater than that of a traditional stove that heats one or two, and not the largest, rooms.
Installing a heat exchanger in a furnace Source oboiman.ru
- The system is economical in operation. A brick oven cools down slowly; After the wood has burned through, the pipes will remain hot for two to three hours. Less firewood will be needed, and the cost of purchasing fuel will be reduced.
- Minor financial investment. The water circuit is installed simultaneously with the laying of the furnace. A self-made heat exchanger will cost an order of magnitude cheaper than a purchased boiler.
- The location of the stove does not affect the quality of heating; you can install radiators anywhere.
- With a thoughtful arrangement, the boiler is masked by the stove structure and does not in any way affect the comfort of the room.
It is worth remembering the following design disadvantages:
- To independently assemble a furnace with a heat exchanger, experience is required, and it is quite specific. If you have never made brickwork or installed heating systems, your first experience is unlikely to be completely successful.
- Installing a water kennel into a finished stove is not a good idea. In practice, many additional problems arise, and the cost of disassembling, assembling and installing the boiler is comparable to the cost of a new furnace structure.
Using stove heat to heat water Source ytimg.com
See also: Catalog of companies that specialize in engineering systems (heating, water supply, sewerage and others) and related work
- A brick stove with a water circuit needs a carefully designed design, taking into account the size of all the rooms that are supposed to be provided with heat. It still remains a fire hazard, so when operating it you must adhere to all fire safety rules.
- There remains a risk of carbon monoxide poisoning, which a chimney made according to the rules will help to avoid.
- Heat cannot be completely distributed evenly: the room near the stove will always be warmer.
In general, installing a heating system in a house, including a stove, boiler and batteries, is considered a cost-effective solution. At the same time, such a design has nuances that should not be forgotten during design and construction. The most important are the following subtleties:
- Brick has high thermal inertia, and you will not be able to instantly stop the stove from heating. This can be a problem for a closed loop with a circulator pump. If there is a power outage (even for a short time), the pump will stall, and the coolant in the circuit will only need one minute to boil. We need a combined system with artificial and natural water circulation.
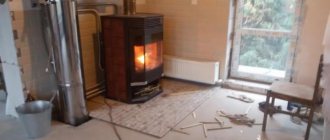
Fireplace stove with water heating circuit Source fastbuildings.ru
- A stove with a heat exchanger cannot be used in the summer: it will start heating the circuit, and you will not be able to stay in the house due to the heat. But you cannot light the firebox without water in the circuit: the metal will overheat, which will lead to its burnout.
- If the system is used irregularly (for example, at the dacha), then during long breaks the water is drained. If you forget about this, frozen water will successfully damage the circuit.
- From the point of view of operational safety, a stove with a water heating boiler is inferior, for example, to a gas boiler with a heat exchanger, the operation of which can be stopped by simply turning off the tap.
Masonry technology
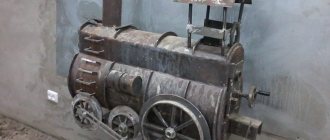
Before you start laying the stove with your own hands, you need to choose a diagram and draw an order plan with your own hands; it is better to use ready-made, proven diagrams. An example of such a stove is the Kuznetsov stove with a heating register built into the smoke duct on one side of the stove.
Kuznetsov stove, video
To lay such a stove with your own hands in a private house, you will need the following materials:
- concrete for the foundation;
- red solid brick;
- refractory fireclay brick;
- masonry mortar or its components: clay, clean dry sand, clean water;
- metal pipes for making a heat exchanger.
You also need to buy ready-made elements: grate, doors, dampers, dampers, roof penetrations. The price for these elements is usually quite high, so you need to calculate in advance what exactly is needed.
Required tool:
- trowels and trowels;
- rubber hammer;
- grinder with a circle for bricks;
- levels, plumb lines, twine;
- roulette.
Do-it-yourself sequence of operations
- Mark the position of the future furnace and pour a rod-reinforced foundation 5 cm below the finished floor level. It should not come into contact with the foundation of a private house.
- After the foundation has completely dried, two rows of masonry made of red solid bricks are laid out according to the order scheme and drawing on ordinary cement masonry mortar; their purpose is to level out possible unevenness in the foundation and lay the foundation of the furnace.
- The next rows are laid on clay masonry mortar according to the chosen pattern, observing the dressing indicated on it. The solution is made from pre-soaked red clay, quarry sand and clean cold water. The optimal ratio of clay and sand is determined experimentally.
Properly prepared masonry mortar should not be too plastic or crumbly. You can check it this way: roll a ball the size of a tennis ball out of the solution and drop it from a height of 1 m onto a flat surface. It should be slightly deformed, covered with small cracks, but not crumble.
- The thickness of the joints between the rows of bricks is no more than 5 mm. The smaller the seams, the more uniform the structure of the stove and the better the heat transfer. The jointing is carried out immediately as the laying proceeds.
- The doors are installed like this: an asbestos sheet in the form of a strip is placed on the previous row of bricks at the location where the door is installed, and the door is placed on it. Annealed wire, each at least 40 cm long, is pre-inserted into the holes in the corners of the frame. This wire is fixed between the rows of masonry. If this is not done, sooner or later the solution will crumble and the door will fall out. They lay several rows, all the time checking the position of the door according to the level. An asbestos strip is also laid over the door and brick is laid on top.
- The firebox is lined with fireclay bricks. Red ceramic is not suitable for these purposes - it will crack over time, and the vault may collapse. In diagrams, fireclay bricks are usually indicated in yellow.
- Under the hob, grooves are made in the brick to the thickness of the slab. This is done to reduce heat loss and prevent smoke. The plate is placed on the solution.
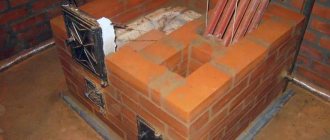
- A homemade heat exchanger is installed in the smoke channel during the masonry process at the stage of laying the row through which the lower fitting exits. It is installed in the combustion chamber when laying the bottom row of the firebox. There must be a gap of at least 5-7 mm between the heat exchanger and the brick.
- It is imperative to provide cleaning doors in the smoke channel with the heat exchanger, since soot will settle on the register, which will worsen its heating. The number of doors must provide access for cleaning to any part of the heat exchanger.
- The upper part of the smoke channel is equipped with a damper or damper. The chimney itself can be either brick, or you can buy and install a sandwich chimney. In this case, you need to follow the rules for passing pipes through the roof, and make fluff on brick pipes.
The distance from heated metal elements to combustible structures must be at least 25 cm! Passages through the ceilings are insulated with basalt fiber or other non-combustible materials!
- After the oven has dried, it is carefully heated, without overheating, several times. Check the draft, stability of firewood combustion, and absence of smoke leaks. After this, you can install an external heating circuit and fill the system with water. The oven is ready for use.
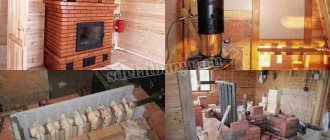
Heat exchanger location options
Stoves with a water circuit are used not only in residential buildings, but also in large baths equipped with a rest room, a separate shower or, for example, a locker room. The design of a stove with a boiler (heat exchanger) is most often implemented in two ways: the boiler is mounted directly in the firebox or in the chimney. Less commonly, a container of water is mounted in the body of the stove, next to the fireplace.
Securing the heat exchanger pipe in the side wall of the furnace Source 1-teplodom.ru
Work order
You can make the equipment yourself or buy a factory unit.
When installing yourself, it is important to consider the following points:
- First, the heat exchanger is prepared;
- Then the circuit is mounted and connected to the thermal boiler;
- Before building a furnace, a pit is dug, then a layer of crushed stone and broken brick is made in it (the foundation should be 2-3 cm higher than the floor level);
- The furnace structure is being erected.
Heat exchanger shape
Furnaces with a self-made water circuit are equipped with several types of heat exchangers. When choosing and constructing a boiler for a stove, the complexity of manufacturing (cost and labor), as well as placement possibilities, are taken into account.
In addition, the choice of design is determined by the purpose. For example, in a bathhouse it is desirable to quickly heat a volume sufficient for washing, which involves intense heat transfer. And for the heating system of a residential building, gradual heat transfer from fire to water is preferable.
Heat exchangers differ not only in shape, but also in the material of manufacture. By correctly combining shape, material and placement, the efficiency of the system can be significantly increased.
Tubular steel heat exchanger Source 1-teplodom.ru
The following types of heat exchangers are possible in the designs of brick kilns:
- Coil. This is the name given to a pipe that is bent at different angles. The advantage of the coil is that it heats up quickly, the disadvantage is that its volume is usually small and is not suitable for large areas. It is mounted behind the firebox or inside it; if the coil has the shape of a spiral, then it goes to the chimney.
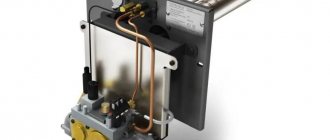
- Register. The heat exchanger resembles a pipe radiator and can consist of pipes of different diameters. It is valued for its versatility and energy efficiency; The installation location is selected according to the general scheme.
- Water jacket. A type of tubular device, mounted inside the firebox or placed on the chimney. The design is prone to leaks, but is efficient; There is no need to disassemble the oven for installation.
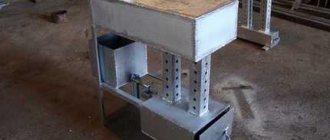
- Flat type heat exchanger. Installed in houses and baths, a practical option in terms of manufacturing, installation and maintenance. It looks like a flat container and is installed next to the firebox. For correct operation, it is necessary to comply with the technical parameters: inclination and location of the forward and return pipes. Optimal for heating circuits, as it heats water as quickly as possible.
Homemade combined heat exchanger Source etokirpichi.ru
Selection of materials
The job of the heat exchanger is to ensure that the coolant transfers as much heat as possible. Therefore, it is recommended to pay attention to the thermal conductivity properties of the material. Copper pipes conduct heat seven times better than steel pipes. Based on this, we can conclude that to transfer the same amount of heat, you need to install 3.5 m of copper pipes or 25 m of steel products.
Heat exchangers made of red metal are the most economical in operation. However, copper is a very expensive material. Therefore, to manufacture such a device, it is more advisable to use steel pipes, the diameter of which should be at least 32 mm.
If coal is used as fuel, it is recommended to use cast iron pipes to create the apparatus, since this material has better strength properties. In addition, it is more slowly susceptible to the destructive effects of fire and high temperatures.
Improving system efficiency
When choosing the configuration of a boiler for a heating furnace, many factors are assessed and their influence taken into account as a whole. To improve the efficiency of the heat exchanger, the following ideas are taken into account when designing it:
- Efficiency increases if you use materials with increased thermal conductivity. Copper has the best thermal conductivity, but it is expensive. Therefore, the optimal solution would be heat-resistant stainless steel.
- Provide the maximum possible surface area (with given dimensions).
- Calculate the optimal height difference between the forward and return pipes.
- The heat exchanger should not interfere with the combustion of fuel (if located in the firebox) and the removal of gases (if it is installed in a chimney).
- The amount of energy transferred is directly dependent on the area of the heat exchanger and the temperature difference between the different media.
Homemade copper coil for heating from a stove Source ultra-term.ru
Algorithm of actions: step-by-step instructions
In order for a stove with a water heating boiler to provide maximum heat transfer, it is necessary to design it correctly: follow the order of the masonry and take into account stove construction technologies.
Foundation
The type and thickness of the base are determined by the dimensions of the heat generator. Classic Russian stoves require massive strip pedestals. For small systems, a concrete pad of 10-15 cm is suitable. In some cases, it can be fixed to a frame made of reinforcement.
Brick
Fire-resistant ceramic bricks are used for external walls. The foundation can be built from used material. In this case, it is better to line the internal coatings of the firebox with fireclay stone. The façade will be finished with facing bricks.
Brick is used to install external walls.
Solution
The masonry mixture is prepared according to the classical scheme: sand and clay are poured with water and mixed with cement until a homogeneous consistency is obtained. You can also purchase a ready-made solution with special additives.
Masonry
For a strong foundation, it is important to form high-quality seam binding. They should not coincide, as this will affect the strength of the structure.
It is better to place the seams of the bottom section in the center of the bricks of the next row.
Briefly about the main thing
If a brick stove is supplemented with a water heating circuit, then such a system can significantly (up to 100 square meters) increase the heated area of a house of any configuration. The design has high efficiency and good heat transfer, evenly distributing energy throughout all rooms.
To select or make a high-quality heat exchanger, you need to take into account its shape, location and material of manufacture. The design should follow the shape and dimensions of the firebox (or chimney) as accurately as possible; only in this case the efficiency of the system will be maximum.
Ratings 0
Important nuances
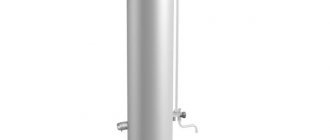
A heat exchanger for water heating, made of smooth structure pipes, is called a register. The device resembles a kind of lattice. Simpler designs, which are presented in the form of a rectangular or cylindrical tank, are no less popular.
When manufacturing a heat exchanger for a furnace, it is recommended to follow the following rules:
- The space inside the device must be 5 mm or more. Otherwise, the water may boil quickly.
- It is important that the thickness of the pipes is at least 3 mm, otherwise the material will quickly burn out.
- The distance between the heat exchanger and the walls of the combustion chamber must be at least 10 mm so that the metal can freely expand when heated.
At the finish line: building a chimney
When constructing a chimney, please note that the distance from this part of the stove to the wooden walls of the building (house, etc.) must exceed 40 cm. This is due to fire safety requirements.
The size of the part of the chimney extending beyond the roof is approximately 38x38 cm. And its internal diameter is equal to half a brick.
By the way, it is possible to replace the part of the chimney protruding above the roof with a regular pipe. This will greatly facilitate the stove maker’s task, speed up the process of laying the stove, and even reduce the cost of the work.
Another important nuance: the places where the roof comes into contact with heating elements must be treated with asbestos-containing compounds.
Installation features
The easiest way to install the device is during the construction of the furnace. Otherwise, it may be necessary to dismantle some part of the masonry.
Sequence of actions:
- A prepared heat exchanger for a tubular furnace is installed on the finished foundation in the place for the firebox.
- During further construction of the heating device, small gaps are left for the exit of rolled metal products.
- After completing the construction of the furnace, the heat exchanger is connected to the general heating system, which is filled with water.
- The heating device is being tested.