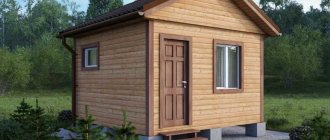
Benefits and Features
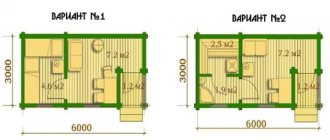
Projects and layouts of 6x6 baths are very convenient:
- the average size allows, in addition to the steam room and washing room, to build a resting place;
- does not occupy a large area on the site;
- square shape allows rational use of space;
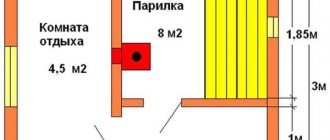
- for 36 sq. m. you can make a spacious steam room, a shower or a small pool, a bathroom, a tipping bucket, a relaxation room and a small hallway;
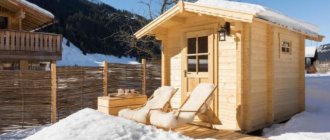
- the layout of a 6x6 bath house with an attic increases the usable area by almost 2 times;
- minimizes heat loss from the bath;
- helps create a spectacular exterior of the building.
In addition, the space under the roof can be used as a billiard room, gym or guest bedrooms. The last option is especially relevant when the main house has not yet been built - during this time the owners can live in the attic.
Cozy attic interior Source stroysoyz.ru
When creating the design and layout of a 6 by 6 bathhouse, you should pay special attention to insulation, steam and waterproofing of the upper floor so that there is no condensation. And also think about high-quality ventilation of all rooms.
Frame bathhouse with attic: advantages
The advantage of such a structure in small summer cottages is as follows:
- By building a bathhouse with an attic floor, you get a “2 in 1” structure, where you can take a steam bath and spend the night.
- If in the future it is planned to build a large house, then such a bathhouse will serve as a house for guests.
- During the construction of a good-quality country cottage, you will not have to resolve issues with a temporary shed (change house).
- If the site is small and you are not planning major construction on it, a bathhouse with an attic is an ideal option for saving space for garden beds and a recreation area, because you do not have to carve out space for two separate buildings.
Frame bathhouse 6x6 with attic
Advantages of frame technology:
- efficiency, both during construction and during operation
- easy and quick to install with your own hands
- frame bath does not require shrinkage
- can be built at any time of the year
- wide selection of finishing materials
The appearance and layout of a frame bathhouse is practically no different from a bathhouse made of timber (logs).
Projects for frame buildings also include a vestibule, a washing room, a steam room and a bathroom, and in the attic, as a rule, there is a recreation room that you can use at your discretion.
However, there are differences between them that make frame projects stand out against the background of their log counterparts:
- a frame bath is much cheaper than exactly the same one, but made of logs or timber (you can save even more if you do everything yourself)
- Unlike a log house, which cracks over time under the influence of external factors, the lining of a frame bathhouse made from a block house retains its original appearance
- due to the lightness of the structure, the load on the foundation is several times less
- It takes much less time to build a frame bath
- in the steam room, the frame design provides for upholstery with aspen lining, which perfectly withstands any temperature and creates a useful microclimate
- Non-flammable materials are used for thermal insulation, which allows frame baths to retain heat perfectly
Frame bathhouse with attic and small veranda
Project and layout
The layout of a 6x6 bathhouse makes it possible to implement many ideas. If we limit ourselves to only a standard set of rooms (rest room, steam room and washing room), then they will be spacious and roomy. In this case, the place for relaxation should be larger than the steam room, since usually 2-4 people steam, and the whole company relaxes. In addition, you will need space for a large table, benches, and fairly wide aisles. It should be borne in mind that in winter it will be cool without at least a small vestibule. It is also convenient to leave shoes, outerwear in the dressing room to keep them moisturized, and firewood.
The layout of the 6 by 6 bathhouse also includes other rooms mentioned above. So for a full bathroom you will need only 1.5 square meters. m., for a shower room - 3-5 sq. m. If the recreation room is reduced in size, then you can build a small swimming pool 2x4 m or provide a dousing bucket.
Interior of a rest room with a well-shaped shower bucket and a grated floor area for this Source static.wixstatic.com
Bathhouse with attic
An interesting design for a bathhouse with an isolated attic, when the staircase to the 2nd floor is located in the hallway and to get to the top you do not need to enter the territory of the bathhouse complex. There are 3 rooms in the attic (office and 2 bedrooms).
If one room on the second floor is used for a bathroom, the other for a kitchen, you will get a one-room apartment. Source m-strana.ru
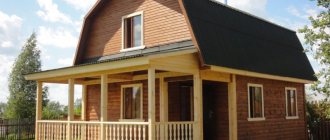
Bathhouse with terrace
By “terrace” we mean open flooring, but:
- if you provide a balcony in a bathhouse with an attic, then the open area will be protected from precipitation from above and from wind from the sides;
- the roof or attic can be made external and supported on poles;
- the terrace can protrude beyond the projection of the roof, getting as close as possible to the landscape;
- be a two-level or terrace-deck extended along part of the perimeter of the bathhouse or an attached deck of various configurations;
- have different types of fencing.
If the size of the recreation room does not allow you to create a full-fledged swimming pool, you can create it here or nearby, under a canopy.
The layout of a 6x6 bathhouse with a terrace depends on the area of the latter:
- 4 sq. m is enough for a tea ceremony;
- 2 m width - in case of extension along 1-2 sides of the bathhouse;
- 10-20 sq. m - for receiving guests.
Diagram of a bathhouse with a terrace and access to the attic Source static.tildacdn.com
The advantages of a bathhouse with a terrace include:
- an outdoor recreation area appears or increases;
- protection of the entrance from adverse weather conditions;
- additional decorative element of the exterior.
The view from the terrace should provide aesthetic pleasure, so the surrounding area should be landscaped accordingly (flower beds, lawn, conifers, alpine slide, rock garden, fountain). The deck can be close to the pool or have a path (stairs) to it.
Gorgeous view from the terrace-deck Source pbs.twimg.com
Corner bath
The main advantage of the 6 6 bathhouse layout in the corner version, as opposed to the square one, is its energy efficiency. Since the stove is located in the center of the structure, the heat spreads evenly to both wings and is retained longer. While heating a bathhouse with a square configuration will require significantly more firewood to make it comfortable in all rooms.
In addition, such a bath can be located in a corner, on a small or irregularly shaped area.
Corner bathhouse with a Japanese-style terrace on the outskirts of the site Source www.free-lancers.net
The classic layout assumes the following arrangement of zones:
- the steam room and the relaxation room meet at right angles;
- a through-type heater with an elongated firebox is in the center of the plan, which allows heating the entire volume of the structure as efficiently as possible;
- possibility of creating an interesting terrace.
But despite all the positive aspects of the structure, one should take into account the difficulty or impossibility of constructing an attic or a significant loss of usable space in it. The interior space of the bath itself will also decrease.
The internal area of the bathhouse becomes smaller by almost a quarter Source i0.wp.com
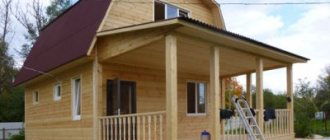
Bathhouse with veranda
A bathhouse with a veranda under one roof allows you to admire the landscape beauties while staying warm in the cold season.
Construction made of rounded logs with a glazed veranda Source roomester.ru
See also: Catalog of wooden bathhouse projects
Here you can install a small barbecue oven and provide a vestibule.
Plan diagram of a bathhouse with a veranda Source www.srubdomabani.ru
The veranda can be larger than provided for in the standard layout or even built separately and not affect the design area of the bathhouse.
Bathhouse with dressing room
A dressing room, as such, in a relatively small room (36 sq. m.) will take up a lot of space, which is better used for other, more priority purposes - to enlarge the steam room, for a bathroom or a plunge pool. But a small dressing room, perhaps with a wardrobe, would be quite appropriate.
The dressing room in the dressing room will not take up much space Source ileds.ru
Construction of a 6x6 frame bathhouse with an attic
If the area of the plot allows, then the most optimal project would be 6x6 m. - it will perfectly accommodate all the necessary premises, in addition, the above-mentioned dimensions will make them quite spacious and comfortable.
If possible, choose a site for construction that is level, and if this is not found, then try to level the existing territory as much as possible.
When the project is ready, you can begin building a bathhouse using frame technology. Next, you can familiarize yourself with one of the many DIY bathhouse projects.
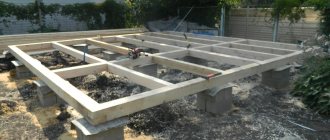
Foundation for a frame bath with an attic
For a frame structure, a strip foundation is quite suitable:
- remove the fertile soil layer
- we dig a trench and lay a cushion of sand, crushed stone and gravel in it (you can use ASG)
- fill everything with molten bitumen and lay the concrete in a pre-installed formwork made of boards
Frame bathhouse on a pile foundation
Before building the frame
- As soon as the foundation hardens, we lay a layer of roofing felt on it, which will serve as waterproofing, and make the bottom frame of the structure. For this we use timber 150x100 or 150x150 mm.
- We connect the joints with nails.
- We install logs made from 150x50 mm boards on the harness.
- We treat the harness and joists with an antiseptic according to the instructions and leave until completely dry.
Frame for a frame bath with an attic
From 150x50 mm boards we make frame posts and rafter system parts (everything is done in accordance with the project).
Bath frame
Walls of a frame bath with an attic
- We install two racks in the corners, and several intermediate ones between them
- we install the sheathing (in our case, these are OSB boards) - we fasten the boards to the frame with self-tapping screws (using a screwdriver when doing the work yourself will significantly save time and effort)
- do not forget to periodically check the position of the sheets with a building level
- Simultaneously with the installation of the slabs, we install subsequent racks to which the sheathing will also be attached
So, by installing the racks and attaching OSB sheets to them, we install our entire frame structure (do not forget about door and window openings).
Construction of a frame bath wall with an attic
Roof of a frame bath with an attic
- According to the project, we assemble the truss structure on the ground;
- We lift the finished structure and attach it to the frame racks.
- To make the work more convenient, we attach a temporary ceiling to the beams. We apply markings for attaching the sheathing to the gable of the building.
Mansard roof
Do not forget that all wood that we use for construction must be well dried and treated with fire protection. This is necessary so that the house is not eaten by bugs, which is especially important in houses located in close proximity to the forest.
- between the counter beam and the rafters we lay a layer of special film for ventilation
- We attach the roof sheathing directly to the rafters, then we install the roof
- When the installation of the roofing material is completed, we attach OSB sheets to the gables of the building
Interior and exterior finishing of a frame bath with an attic
- We insert windows and doors into the openings and begin interior decoration.
- To arrange the ceiling, you can use the same OSB boards - we attach them to the beams from below.
- We insulate the ceiling and walls with a layer of insulation; in addition to the insulation, we lay a layer of “screen” foil into the walls of the steam room. Glassine is mounted on top of the insulation.
To arrange the floor, we use boards left over from the temporary ceiling when installing the roof (we remove the boards from the beams and nail them to the joists).
Typically, steam rooms in baths are equipped with a stove-stove, and boilers for heating water are installed in the dressing room near the common wall with the steam room (the wall between the steam room and the relaxation room must be brick - this is required by fire safety standards). You can use ordinary building bricks.
Finishing for a frame bath
In principle, the exterior finishing can be done simultaneously with the interior. This approach will significantly save your energy and time.
The frames of internal partitions can be made during construction and the final finishing materials can be immediately attached to them (this can be either a block house or lining).
As for the interior decoration, it all depends on the purpose of the room.
So, for a rest room you can use a block house, and for other rooms - wooden lining.
Exit to the attic can be arranged in the dressing room by making a hatch in the ceiling and installing a ladder.
Interior finishing with block house under timber
The ceiling in the steam room must be additionally insulated and lined with clapboard. If you decide to draw up a project and build a sauna with your own hands, you should take into account that additional insulation of the steam room ceiling significantly reduces the ceiling height.
According to standards, the ceiling height should not be less than 2.1 m.
What to consider when planning
When choosing a particular project or planning independently, you should be guided not only by your own desires, but also rely on existing standards. The size of the compartments in the bathhouse, based on the expected number of visitors, should more or less meet the following standards for 1 person:
- 1.5 sq. m. – steam room;
- 1.5 sq. m. – washing room or shower room;
- 1 sq. m. – rest room;
- 1.3 sq. m. - vestibule;
- 0.8 sq. m. - locker room.
The shelf in the steam room must be at least 180 cm long and 90 cm wide. The furnace firebox must open into the rest room.
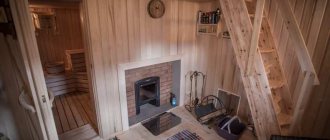
A firebox with transparent glass creates additional comfort in the relaxation area Source pechi-troyka.ru
The rooms in the building are arranged in the following sequence, starting from the entrance:
- vestibule, if provided;
- locker room, if provided;
- restroom;
- dressing room, if provided;
- washing room (shower room);
- steam room
A shower or font is often combined with a dressing room in order to save space.
Final stages of construction
Particular attention should be paid to such points as the outer cladding of the building, insulation of the bathhouse, thermal insulation of the attic and masonry of the heater. On the outside, the bath frame can be sheathed with OSB or DSP sheets. These materials are characterized by increased water resistance and non-flammability, and they are also reliable and practical.
Insulation of bath walls
The key to the efficiency of any bathhouse is its insulation. After all, the longer the heat remains inside the room, the better.
For insulation, modern thermal insulation materials are used: polystyrene foam, mineral wool. They allow air to pass through very well, which allows the walls to breathe. This property can extend the life of the bathhouse by several decades. To properly insulate the walls of a bathhouse, adhere to the following installation technology:
Detailed diagram for insulating walls in a bathhouse
An example of insulation of frame walls of a building
- Upholstery of the frame on the inside with a special film. It is secured with slats.
- Laying polystyrene foam or mineral wool.
- The insulation on top is covered with film and foil. All seams must be taped.
- Wall upholstery with wooden clapboard.
Thermal insulation of the attic
Don't forget about the attic. It must be properly insulated. For insulation, materials such as glass wool, mineral wool, and foam are usually used.
Thermal insulation diagram of the attic in the bathhouse
These materials are laid on the ceiling of the bathhouse, leaving small gaps for air circulation. The inside of the attic roof is waterproofed using a vapor-proof film. This helps prevent moisture from getting into the bath itself.
Thermal insulation design of a frame bathhouse roof
All thermal insulation materials are fire resistant. Therefore, they are recommended for use specifically in a bathhouse, since there is a source of open fire, namely a stove-stove.
Furnace laying
A stove-heater is one of the main attributes of any bathhouse. Not everyone can lay it out correctly. It is best to entrust the laying of the stove to a professional stove maker.
The only thing you can do yourself is to determine its location and make a high-quality and reliable foundation for it.
Option for installing a stove in a bathhouse
An example of a folded brick stove for a bathhouse A stove for a bathhouse must meet the following parameters: compactness, reliability, safety, ease of use, and the ability to heat the air in the steam room of the bathhouse to a temperature of 100 degrees. You can also use a modern electric stove-stove instead of the usual stove. Recently, such stoves have become increasingly popular among the population.
The process of laying a sauna stove made of bricks
As can be seen from all of the above, building a frame bathhouse with an attic on your own site is not such a difficult process. Having such a bath has a lot of advantages. The first place is, of course, the bathhouse itself. It can only bring joy and health benefits to a person. It is worth remembering that a frame bathhouse with an attic, compared to a conventional frame bathhouse, requires a person to invest additional money in it. This mainly involves the purchase of thermal insulation, waterproofing, and finishing materials for the attic. Therefore, the choice in favor of one or another type of bath remains entirely with the owner of the site and entirely depends on his capabilities and needs.
Which material to choose
Before building a bathhouse, a natural question arises about the building material. The internal microclimate, durability and appearance of the building largely depend on it. The constant exposure to steam, water and high temperature should also be taken into account. From time immemorial, bathhouses were made of wood and it is not surprising - this is perhaps the best option today:
- Such walls are vapor permeable, this is especially important for a bathhouse.
- Wood has low thermal conductivity, which helps retain heat indoors.
- Wood withstands temperature changes.
- Coniferous species, when using special compounds, can withstand moisture for a long time, especially larch.
- The natural smell of wood promotes complete relaxation.
Log bathhouse with attic, balcony and terrace made of Siberian larch Source srubsssr.ru
See also: Catalog of companies that specialize in the construction of bathhouses and the manufacture of bathhouse vats
High-quality materials, be it timber, logs or boards:
- should not have dark spots;
- the core of the timber should be of a uniform shade, slightly darker than the outer fibers and occupy less than ¾ of the section;
- minimal amount of resin and branches;
- loose cut structure is unacceptable;
- humidity up to 20%.
The latter indicator is measured with a moisture meter in the presence of the customer. If such a service is not provided, then you should think about the feasibility of the purchase.
Measuring the moisture content of pine timber Source kelohouse.ru
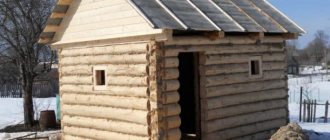
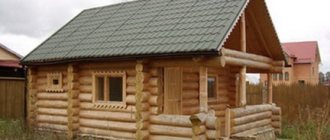
Wooden baths are built from rounded or chopped logs and edged, profiled, glued timber.
Chopped log
Manual felling means harvesting wood using axes and saws, followed by processing with a scraper. In this case, the bark is removed white, but the hard layers remain. The work is very hard, requiring dexterity, physical strength and knowledge of the matter, it can only be performed by specialized craftsmen. This undoubtedly affects the final cost of the material.
Crowns made of chopped logs, “bowl” connection Source askkirov.ru
To eliminate unevenness and equalize the diameter, planes and debarkers are used. This log has many advantages:
- not subject to mechanical and climatic influences, moisture;
- the natural texture and pattern are unique, and the buildings are unique and authentic;
- thermal insulation is higher than that of rounded logs and timber;
- no finishing required;
- very long service life.
If the material is prepared according to all the rules, then it has no shortcomings. The construction of a bathhouse and the preparation of logs should be trusted only to professionals, then there will be no gaps, cracks, different diameters and, as a result, loose laying and “cold bridges”, cracking due to non-compliance with technology.
Advantages and weaknesses of frame baths
What are the advantages of bathhouses built using frame technology? Here are the main advantages :
- budget type of construction;
- there is no need to involve construction equipment;
- the frame stands on a lightweight foundation;
- rapid heating of the room due to low thermal conductivity;
- beautiful appearance thanks to the internal organization of communications;
- the bathhouse is immediately ready for use, since there is no shrinkage;
- materials are environmentally friendly;
- It’s quite easy to learn how to build it yourself, even from online videos;
- construction takes place at any time, regardless of the weather, because there are no wet construction cycles;
- Ready-made frame baths can be finished on the outside to suit every taste.
Are there any disadvantages to a frame-based bathhouse ?
Rumor has it that the walls of frame baths are prone to the formation of fungus. Indeed, the room heats up quickly and cools down quickly, so this problem is relevant. We advise you to find the right approach to thermal insulation and under no circumstances skimp on the quality of insulation. An economical option in the form of polystyrene foam should not even be considered, as it quickly ignites.
But mineral wool in slabs or rolls is much better. This material allows steam to pass through, does not burn, and allows the walls to “breathe.” To cover all joints and achieve the best result, frame bathhouse projects should include two-layer insulation: the first five-centimeter layer in the slabs + an additional one made of rolled material of the same thickness.
Useful: Photos of frame houses
It is also worth mentioning the negative reviews from the owners of frame baths related to shrinkage. After just two years, for some owners, the structure shrinks up to 10 cm, and the finishing inside and outside is deformed. Most likely, this is the result of incorrect selection of wood for the frame. We recommend choosing lumber after kiln drying.
Based on the above, the disadvantages of technology in frame bath projects are as follows:
- wall insulation must be carefully thought out; you will have to spend money on good materials;
- antiseptic and fire retardant for wood processing are two more mandatory expense items;
- You should buy special, more expensive wood.
However, each relative minus can be leveled out with the help of a competent project . We will talk about this further.
Video description
About the hand-cut sauna and its cost - in this video:
Rounded log
The bark is removed from this material using cutters using special equipment, resulting in a perfectly flat surface and a strictly cylindrical shape. Laying is simplified, the logs fit tightly to each other without forming gaps. The buildings turn out to be neat, although somewhat monotonous in appearance.
Rounded log Source krd.specdispetcher.ru
Although the production itself is cheaper and faster, the final cost is not much cheaper than chopped logs. Since natural protection in the form of cambium and sapwood is removed, the wood becomes susceptible to pests, rot, mold and requires treatment with fire retardants, antiseptics, and special varnishes.
Edged timber
The cheapest material in this segment has a rectangular cross-section and a length of up to 6 m. It is made from various types of trees, but for the construction of a bathhouse it is better to take larch or alder. But pine is more often used, since it is available and costs less.
Edged timber Source images.ru.prom.st
For a bathhouse, a beam with a cross-section of 10 x 20 cm is most often chosen, but in regions with a harsh climate, the thickness of the walls can be 30 cm. The beam is often made from undried wood, and in the process of evaporation the material will deform and crack, so it will create smooth walls. To prevent this from happening, be sure to check the humidity level before purchasing.
Installation time for a frame bath with an attic
A team of three builders usually takes ten days to build a frame bathhouse.
If you have assistants and you decide to do everything yourself, without resorting to the help of hired workers, then this approximate plan will help you:
- laying and arrangement of the foundation – 3 days;
- installation of strapping and logs – 3 days;
- construction of the rafter system – 2 days;
- installation of doors, windows, installation of roofing materials and interior and exterior finishing work - 2 days.
Note: you should not strive to strictly adhere to the deadlines given in the plan. The main thing is attention and accuracy - only in this case you will get a good result, and a bathhouse built with your own hands will become a source of pride for you and your family.
More information about building frame baths here. Read about how to build a frame house with a bathhouse here. Everything about panel baths and their construction is in the article.
Review of typical projects
Bathhouse measuring 6 x 6 m made of rounded logs with an attic, terrace and balcony Source banyamsk.ru
One-story bathhouse made of profiled timber with a covered terrace Source stopdacha.ru
Corner bathhouse made of timber measuring 6x6, area 30 sq. m Source gnezdom.ru
Project of a frame bath with an attic
It all starts with a project that you can buy, order from an architect, or create yourself, describing in detail how to build everything yourself - the choice is yours.
Typically, projects of any buildings contain the following main points:
- total area
- detailed location of premises
- type of floors
- communications
- Construction Materials
Approximate project of a frame bath with an attic
What to pay attention to
When you have decided on the project and materials, you need to choose a place for construction, type of foundation, finishing and roofing. Don’t forget about the stove - if the heater for the steam room does not have much weight, then for a massive fireplace in the recreation room and a wide pipe passing through the attic, a separate foundation will be required. Also at the foundation stage you need to take care of communications and the pool bowl.
Monolithic pool bowl Source www.stroy-birzha.ru
To prevent your feet from freezing, it may make sense to think about warm floors, for comfort in the attic space - about insulation, interfloor and roof vapor and waterproofing, ventilation. Don’t forget about the latter when laying the lower crown of the walls. The wood must be treated appropriately.
Step-by-step technology
When all the materials have been purchased, and the tools have been collected in a pile and humbly waiting in the wings, it’s time to move on to practical actions. And it’s worth starting with the project. You should build a frame bath only after you have decided on the layout . If you want to arrange, for example, a bathhouse with a veranda and a barbecue under one roof, then reflect this desire in your working design.
- What size plot do you have?
- Do you want to separate the steam room and sink?
- Are you ready to sacrifice a rest room for the sake of extra meters in the dressing room and vestibule?
Find the answers to all these questions - and then it will be easier for you to decide on the design of your frame bathhouse. In addition, the Internet is now full of ready-made projects and drawings . All that remains is to adjust the scale and take the tools into your own hands. However, do not forget that you are based on the size of the area at your disposal. And it goes without saying that for complete comfort you should take care of a certain usable area around the building. And in case of frequent use of the bathhouse during the winter season, you should even ask about the veranda .
Work on the foundation
- we drive pegs around the perimeter of the proposed frame bath and make a ditch approximately 0.6 meters deep, the width can be determined in each individual case, but not less than 0.4 meters;
- fill the vacated space with sand to approximately 1/3 of the entire depth and fill it with water on top, after which we compact it thoroughly;
- we fill in the prepared gravel, and on top - a layer of sand, which is then leveled with soil using a building level;
- we make formwork from reinforcement and fill everything with concrete;
- The final touch is insulation with roofing felt; a thin layer of it is enough.
Leave your foundation for at least a week - during this period it will settle well and “gain strength”.
Walling
- dry the lumber prepared for the construction of the walls of the frame bath; it is best to choose linden or aspen, since these species have an excellent ability to retain heat;
- after erecting the wooden frame, treat the inside of the boards used with any antiseptic, and the outside with varnish, and it is advisable to use at least 2 layers of it;
- make a harness from timber and fix it from below;
- secure the beams in each corner with regular nails and support them with metal posts so that they do not disturb their balance;
- fill the base posts with concrete;
- mount intermediate support posts; the same material that you use for the basic structure is suitable for them;
- decorate the floor by laying out timber, give preference to a section of 0.15 meters.
Erection of the roof
- select eight ceiling beams cut at a certain angle;
- align the outer rafters, and then fasten a few more directly in the center;
- arrange the remaining ones through the ridge, fixing them to the capital structure from different sides;
- the next step is to install vertical posts to improve the strength of the base;
- if the frame bathhouse you make with your own hands has an attic, then think about an exit for it in advance;
- those rafters that protrude beyond the edges are sequentially processed - we cut out the beams with our own hands, and then we nail the boards and fix the battens.
We insulate the walls, floor, ceiling
- one of the best options is mineral wool, but roofing felt should be abandoned, since during operation it can release harmful substances into the air and cause a nasty odor;
- we place roll-type insulation between the vertical posts, and then secure it with slats;
- We have already protected the floor from moisture with timber, and now we use expanded clay - it is cheap and retains heat well;
- To insulate the ceiling with your own hands, you can use polystyrene foam, but you should protect it with a vapor barrier film - this way you will avoid an unpleasant odor and can extend the life of your frame bathhouse.
We design windows and doors
If your project includes openings for windows and doors, now is the time to fill them. Don't forget that both windows and doors must be securely sealed. During breaks between using a frame bath, the room should be ventilated as thoroughly as possible.
Interior decoration
The logical final touch is the pleasant interior decoration of the frame bath. Making it yourself will not be difficult. Moreover, the key to comfort is not only a reliable design and high-quality materials. It is also important to carry out competent finishing work so that every person feels as comfortable as possible in the bathhouse and can fully relax. That's why:
- the ceiling can be finished with pine upholstery - this not only looks impressive, but also reliably protects the materials from the harmful effects of high temperatures;
- the stove is finished with red ceramic brick or its fireclay version - this way the heat will be retained much longer, and the air in the steam room will be more humid and pleasant;
- the walls are finished with clapboard - it’s inexpensive, but very practical and, by the way, quite nice. You can use different types of lining, or better yet, its spectacular European version.
How to choose a place
According to the norms and rules, the bathhouse should be located no closer than 12 m to the well, 8 m to the house and the neighboring plot, 3 m to the fence. It should be placed on the leeward side of the main buildings (house, summer kitchen, gazebo) so that the smoke is carried away to the side. Besides:
- for better outflow of water, the place for the bathhouse should be elevated or have a raised foundation (pile or strip);
- in the absence of a central sewerage system, a drainage pit is placed at a distance of 5-6 m, drainage is made at the bottom, the walls are laid out with bricks and concrete;
- It is advisable to plan the bath so that the steam room faces south for faster heating.
Also, when drawing up a project, it should be taken into account that due to the thickness of the walls, the internal area is less than the total.
Placing a square bathhouse with a small terrace on the site Source avatars.mds.yandex.net
The durability and functionality of the bathhouse depends on who will implement the project. Therefore, you should choose only a professional company. It may not be mega popular, but it must have good specialists on its staff to avoid substandard services. There is also special equipment, photo reports on completed projects of similar baths in the portfolio. Based on photos of already completed work, you can estimate 30% of their quality.
Bathhouse made from “wild” hand-cut logs Source i.pinimg.com
Briefly about the main thing
A bathhouse measuring 6 x 6 is not very large for constructing a full-fledged swimming pool and billiard room, but it is not small at all - a company of 8 people will feel free in it.
There are projects with an attic, terrace, veranda, porch. Enough space for a plunge pool or small pool.
The best material for the implementation of the project is wood (logs, timber).
It is better to entrust the implementation of the project to professionals.
Ratings 0