What are the conditions of the steam room casing?
As you know, in a steam room the highest air temperature is in the upper part. The closer to the ceiling, the higher the temperature of the steam. With proper ventilation arrangement, fresh air enters the steam room from the outside from below, which, rising upward, is heated to the desired steam temperature. The heated steam, circulating through the steam room, falls down. Along the way it gives off its heat and, having reached the lowest level, has the lowest temperature.
At the same time, its relative humidity undergoes the opposite changes, that is, the higher it is, the lower the humidity. Thus, unfavorable conditions for wooden structures and elements are created in the lower part of the steam room.
These are important conditions that should not be neglected when finishing a bath. After all, the wooden parts located at the bottom of the steam room will experience increased exposure to wet steam both during and after steaming. And this cannot but affect their service life due to wood rotting.
Types of fastening material
The lining is nailed down with finishing nails with small heads. The heads are slightly visible, there is a high probability of chipping the wood of the panel tenon. Fixing with nails is a less effective method compared to self-tapping screws and clamps.
Correctly fasten the strips with small self-tapping screws (2.5-3 mm). Some craftsmen first recommend making a hole using a thin drill, then fixing the screw to prevent chips or cracks from forming. This method is mainly used for hard wood (oak, elm).
Claymers are the best option. You can nail any type in such a way that the connecting element will not be visible from the outside. It is a small complex bent metal holder. One side of it is inserted into the tenon, covering it, and the platform leg is nailed to the sheathing.
How to install the lining correctly?
When using a block house for external walls, the first thing to do is to impregnate them with compounds that prevent the penetration of moisture, antiseptics. The timber and panels are also coated with products that increase resistance to the external environment, the formation of mold and mildew. For this purpose, moisture-resistant impregnations, antiseptics, special varnish, and stain are used. After treatment, the wood must dry.
Horizontal installation is carried out in such a way that the spike is on top. This rule will prevent water from penetrating into the gaps between the planks. Metal profiles are used less often. First, metal brackets are attached to the wall, then the profile is fixed to them according to the level.
Installation of sheathing under the lining
They start with markings. It is necessary to measure and beat off two perfectly even vertical lines, top and bottom, with a distance of 5 cm from the floor and ceiling using a coated cord.
- Next, the frame is fixed to the wall. Begin by installing the top and bottom horizontal panels. They are installed along the marked lines. Then you need to nail the beam vertically (with a distance of 5 cm from the corner of the wall), connecting it with horizontally installed planks to form the basis of the perimeter.
- The size of the timber is selected based on the unevenness of the walls. If they are relatively even, then you can take a thinner one (10x20 mm). Vertical fastening is most often done on a frame made of 20x40 mm elements. The perimeter of the sheathing must be perfectly level; each stage is checked using a level.
- The beams are installed vertically in increments of 50 cm. A reinforcing frame is placed horizontally between them as spacers, including the space around windows and doors.
Nowadays they make bars for sheathing with a drilled longitudinal gap for fastening, or special metal plates with a slot for connecting elements. Thanks to this, the so-called “floating frame” is fixed, which prevents its deformation during shrinkage of the building and expansion during temperature changes.
The easiest way to install a vertically installed plastic lining. It differs in that it almost does not form seams. It can be attached using staples and a stapler, since it is quite light, or thin self-tapping screws can be used. Do not tighten them too much so as not to deform the plastic.
It is better to connect MDF to the sheathing with self-tapping screws or clamps. Due to the dense structure, it will be difficult for nails to enter the surface of the tenon, and chips may form. With clamps, the wall will look more aesthetically pleasing, since they are not visible at all, and can also be easily dismantled if necessary.
When installing wooden panels and eurolining, all types of fasteners are used. The nails are driven into the tenon at a slight angle. The occurrence of cracks and chips is minimized. Self-tapping screws must be screwed in strictly perpendicularly. The best way for regular lining is with clamps. The lining, characterized by the presence of an offset side profile, is fixed to the wall sheathing using any method. The connection point is covered by the next plank. The adjustment is carried out using a mallet, a rubber hammer, or take a piece of lining and insert it into the groove, lightly tapping it.
It is important to pay attention to the following points:
- An expansion joint (3.4 mm) is left between the panels. For the same purposes, a 5 cm indentation is made from the ceiling and floor. The seams are covered with corner molding for the ceiling (fillet), and below - with a floor plinth. The first element is always inserted vertically from the corner of the doorway with the tenon (ridge) forward. The latter is trimmed to the size of the remaining gap. Using a stop, for example, a nail puller, it is inserted into the wall slot.
- The peculiarity of ceiling installation is that it is difficult for one person to carry out. Fundamentally, the scheme is no different. Thin self-tapping screws with a sharp end are more convenient; working with clamps is more labor-intensive. Expansion joints are also left on the ceiling along the edges.
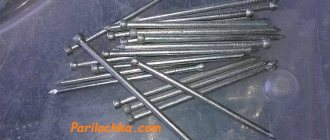
- Not all types of wood are used in the bathhouse. Pine and spruce are not suitable, as they release resins at high humidity and temperature. Most often, cladding is selected from linden, aspen, hardwood, Canadian cedar, and larch. The sheathing must be made floating. The ideal option for cladding is eurolining. It has an elongated spike and longitudinal grooves on the reverse side where wet condensation accumulates and drains. Nail only on galvanized, copper nails and self-tapping screws. The planks should not be driven tightly together with a mallet, leaving a gap for thermal expansion of the wood.
Which is better, vertical or horizontal finishing of the steam room
To give a logical explanation for this issue, we will first consider the option of finishing a steam room with a vertical lining arrangement, and then assume that the wall cladding is horizontal. After that, we will draw conclusions about which is better.
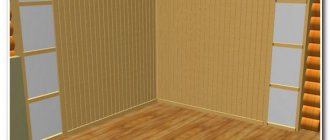
Vertical arrangement of the lining
When the lining is positioned vertically, it heats up unevenly. So, in the lower part adjacent to the floor, its heating temperature will have the lowest value, and near the ceiling - the highest. In this case, the air humidity at the bottom will be the highest.
It is not difficult to imagine what will happen if you repeatedly heat and cool a sufficiently long wooden element. This is its unpredictable deformation: bending along a plane, propeller-like, warping and other changes in the original shape.
And if its opposite parts are exposed to air with varying degrees of humidity, then, on top of everything else, wood rotting processes may also occur. Unfortunately, this will apply to all elements of vertical cladding in the floor area along the entire perimeter of the steam room.
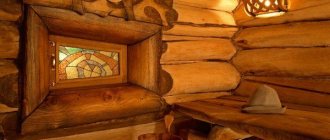
Examples of vertical finishing of steam rooms:
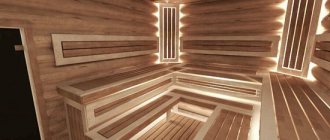
Horizontal arrangement of the cladding
In contrast to the vertical arrangement, with horizontal fastening of the lining, each of its elements is located on one corresponding horizontal level (row). Therefore, the temperature of its heating along the entire length will be practically the same. This equally applies to the humidity of heated steam. Such conditions are the most favorable and will not cause excessive deformation of the sheathed wall.
However, it should be noted that all cladding elements will be in different conditions, corresponding only to their horizontal row. But this circumstance will in no way affect the general condition of the wall decoration.
Unlike vertical cladding, with this option for finishing a steam room, in the most unfavorable conditions there will be only one bottom row, directly adjacent to the floor. It will be most susceptible to mold and rot. But replacing only the bottom row when repairing is not the same thing as replacing all the vertical cladding elements that are rotten in the lower part.
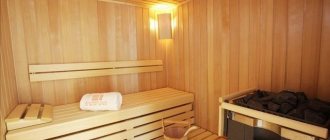
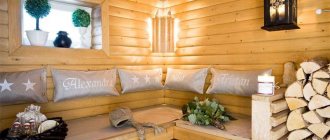
Examples of horizontal cladding of steam rooms:
Choosing the best way to decorate the walls in a steam room
Based on the above, the only correct choice suggests itself in favor of the horizontal arrangement of the lining. If you need to replace rotten lower trim elements, this will be easy to do.
Therefore, when initially finishing the steam room, you need to choose the right direction for laying the lining. You need to start from the very top, orienting it with the groove down. All subsequent elements are assembled from top to bottom using the “groove-to-tenon” method. That is, each subsequent lining must insert tenons into the groove of the overlying element.
With this method of fastening, water that gets on the wall will not get into the gaps between adjacent sheathing elements, which will prevent the possibility of their rotting. In addition, to remove the lowest paneling, it will be enough to unscrew just a few screws. Therefore, in the very bottom row, it is secured to the sheathing with wood screws. With this fastening method, it will not be necessary to disassemble the entire casing to replace one damaged element.
As for vertical finishing, this option is certainly possible. Moreover, he is often chosen. But we must take into account the negative sides of this method. For example, if you need to replace one paneling in the middle of a wall that is rotten at the bottom, you will have to disassemble and then reassemble half of the normal paneling. But this will not be so easy to do, because during the operation of the steam room, all the cladding elements change their original shape, and re-joining will be fraught with certain difficulties.
It’s good if you need to replace just one cladding element. And if you have to replace several, and even on different walls! Compare, with a horizontal arrangement, only one or two of the bottom rows can rot, and with a vertical arrangement, all of them (in the worst case). I think everyone understands what this will lead to.
The influence of laying direction on the durability of sheathing
Under normal temperature and humidity conditions in the room, the direction of laying - horizontally or vertically - does not affect the durability of wooden lining, not to mention plastic. But this factor will be of great importance if you nail wooden boards in the bathroom or in any of the bathhouses and saunas. The same is true for exterior cladding or laying lining in an unheated room, for example, in a garage.
For a garage, lining is also suitable as finishing
Let's consider the positive and negative factors of various methods of laying lining for rooms with sharply different microclimates.
By vertically positioning the panels you can achieve:
- facilitating conditions for natural removal of condensation from walls;
- reducing material consumption (there is no need to cut each panel to size);
- speeding up the coating installation process.
Horizontal placement of the lining ensures:
- identical operating conditions for each row of boards;
- ensuring good ventilation of the room due to the presence of longitudinal gaps between adjacent panels of material;
- facilitating repairs when it is necessary to replace one or more boards that have become unusable.
At the same time, horizontal laying creates conditions for ensuring greater durability not only of the lining itself, but also of its frame, since when the boards are placed vertically, condensate will constantly accumulate on the sheathing beams. This means that in order to prevent the substrate from rotting when placed vertically on the sheathing frame, you will have to attach additional support bars on which the sheathing will be mounted. It is clear that the size of the room will decrease as a result.
The question of whether to lay the lining horizontally or vertically is also important for room ventilation. For example, when laying horizontally, natural ventilation noticeably deteriorates, therefore, it is necessary to equip the room with a forced supply and exhaust ventilation system, which is expensive and labor-intensive to install.
Summarizing all of the above, we can conclude that for rooms with special operating conditions it is more profitable to place cladding panels not vertically, but horizontally, even at the expense of the labor intensity of finishing work. In a bathhouse, attaching the lining horizontally is much more profitable, since the boards below will wear out faster from moisture, and it will be easier to replace them than the whole thing in the case of vertical installation.
Conclusions and recommendations
At one time, when choosing a method for covering a steam room, I settled on the horizontal option. It has been serving well for several years without any serious damage or changes to its original shape. Every year I am once again convinced of the correctness of the choice I made.
Based not on empty space, I recommend that you also choose a horizontal arrangement of the lining. True, you have the right to do as you see fit. In any case, I hope that this article will help you take into account the above nuances so that finishing the steam room is not done in vain.
And finally, watch this video about horizontal installation of lining. Find mistakes that should not be made when decorating a bathhouse with your own hands. And I’ll tell you about them immediately after watching the video.
So:
- For a steam room, the lining must be made of wood such that when heated it does not release resin.
- The installation direction is incorrect. Even if water doesn’t get on the casing, you can’t escape the dust. And when washing the wall, moisture will inevitably get into the gaps between adjacent elements. And this will create conditions for wood rotting.
- Regardless of the nature of the room, horizontal cladding should start from the top, securing the first element with the groove down. Then neither moisture nor dust will be scary. For example, water will flow down the wall, going around the longitudinal joint along the outer surface of the groove, and will in no way be able to get inside the joint.
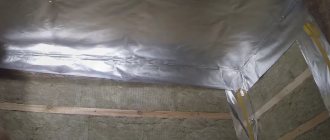
- There is no air space between the inner surface of the lining and the second layer of vapor barrier. To ensure air circulation and thereby prevent the processes of wood rotting, 20-30 mm thick strips should be placed on top of the vapor barrier on the vertical posts, and the lining should be fixed to them. The space under the lining will provide natural air circulation, drying and removing excess moisture.
- Remember, what you can get away with in an ordinary room is unacceptable in the steam room of a Russian bath
with its rather extreme conditions.
Go to the main article-content: Decorating a bathhouse with your own hands
Dear friends! If it’s not difficult, share it on these social networks with your friends. Thank you!
Laying the paneling correctly
It doesn’t matter at all what method you use to cover the walls, you will still have to level them. Of course, walls are often leveled with putty, but now this work is not cheap, takes a lot of time, and is complicated by finding a specialist who can do an excellent job of stretching the walls. And even with this leveling of the wall, you may not achieve a successful result, because you cannot put a lot of gypsum mixture on the roughest defects of the wall. Many people choose to use plasterboard for the walls, but this is only a rough draft and they will need to apply finishing touches to the walls in the form of painting, wallpaper, etc.
The easiest way to hide uneven walls is with clapboard or shalevka. It will turn out neat, impressive and smooth. And here it doesn’t really matter what material you choose - because, regardless of whether your lining is made of wood or plastic, you will get the same result - a perfectly smooth monolithic wall covering.
Bath solution
Let's consider the pros and cons of each method of attaching lining in a bathhouse:
| Criteria | Vertical | Horizontally |
| Moisture | + Easier for moisture to drain | + The frame is vertical and there are no obstacles to the drainage of condensate that forms on the foil behind the lining. + The lining is laid with the tenon facing up and water will not get into the groove. |
| Ventilation | — The fastening beam goes horizontally, closing the possibility of ventilation under the lining | |
| Rotting | + Easy to replace bottom boards | |
| Floor repair | + It is enough to remove a couple of lining strips | |
| Shrinkage and cracks | — The temperature below and above has a significant difference. Expansion and shrinkage are more noticeable. | |
| Installation | + Easier, faster | |
| Price | + Cheaper |
How to build a sheathing?
There is no fundamental difference to which surface the lining is attached, but you definitely cannot do without a supporting structure. Lathing allows you to level the walls and provide additional insulation.
Installation of the structure is carried out as follows:
- You drill holes in each block in 60 cm increments.
- Using a level, apply a block and mark the drilling locations.
- Install and secure the piece of wood with dowels and nails. A regular dowel will also work.
- Fix the next element after 40-50 cm.
- Periodically check the evenness of the fixation using a building level.
- Drilling the surface is not always possible. It's okay - you can attach the slats with special glue. To do this, they are pressed tightly.
Design solutions
First, a few words about the design aspect of cladding with wooden lining.
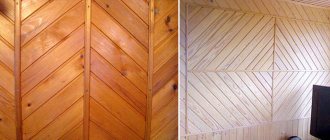
With a horizontal arrangement of the lining, the length of the wall visually increases, and a vertical arrangement will increase the height of the ceilings. Monotonous cladding can cause negative feelings. A combined finish looks good, for example: up to waist level - horizontally, above - vertically. An interesting option is mounting diagonally. When mounting the lining vertically on the wall, as well as when mounting it on the ceiling, the boards are mounted with a tenon towards the entrance. This disguises the gap in the groove of the lining.
In rooms with normal humidity, the cladding method is just a matter of taste. It’s another matter if it’s a bathhouse, unheated premises or external cladding.
Mounting features, installation methods
Do-it-yourself installation of lining on the ceiling can be done in several ways. For fastening, ordinary nails, clamps, staplers or screws are used. Below we will discuss the key features of each type of fastening and 2 installation methods: vertical and horizontal.
- Have you chosen nailing? Don't forget to use a finisher. This will allow the cap to enter completely into the wood. The work will look more neat.
- The simplest method is to chaotically nail the boards with nails with small heads. With a complex method, the nails are driven into the grooves of the lining, so they are almost invisible.
- Metal clamps are special devices that significantly simplify the installation process. They are selected in the store depending on the thickness of your boards. They are often sold in a ready-made set with nails. One side is screwed to the sheathing, and the other side is easily cut into the grooves with teeth.
- It is quite possible to carry out the installation using staplers - for this you will need a special gun.
- And the last proven method is the use of decorative screws. Even a beginner can get excellent results.
Work technology
In almost 100% of cases, interior finishing of surfaces is carried out according to the frame. The presence of the sheathing allows you not only to level the sheathing on which the decorative lining will be attached, but also to place insulation under the trim.
| Illustration | Installation stage |
| Preparation. We remove old finishes from surfaces, as well as loose plaster. We treat the walls with antiseptic impregnation. | |
| Marking. Using a laser level, we apply markings to the walls. According to the markings, we fasten the sheathing bars around the perimeter of the openings. | |
| Installation of sheathing. We fix the frame on which the wooden lining will be attached to the wall with anchors. If a large gap is needed for laying the insulation, we additionally install metal brackets. | |
| Alignment. We align the frame elements on a plane so that the casing does not warp. | |
| Thermal insulation. We install panels of thermal insulation material into the cells of the sheathing. We fill the gaps between the panels with self-expanding polyurethane foam. If necessary, cover the insulation with a vapor barrier. |
When the boards are positioned vertically, water drains more efficiently. But there is a risk of rotting of the lower parts
- Vertical sheathing is mounted on horizontal sheathing. Easier to install and more durable due to water flow through the joints. But if the boards below begin to rot, then all the material will have to be changed.
- The horizontal sheathing is attached to the vertical sheathing. Less convenient, but the bottom boards in a sauna or steam room can be easily changed every few years at minimal cost.
Bathhouse sheathed horizontally: if necessary, the bottom boards can be replaced
This is also true for other wet rooms (this includes an outdoor shower and a bathroom). But in dry rooms, the orientation of the boards is determined solely by aesthetic considerations.
We fasten the first board rigidly, and dock the next ones to it.
- Beginning of work. If the boards are mounted vertically, then we begin the sheathing from one of the corners. We fix the first elements on the sheathing with self-tapping screws or nails through the body of the board.
- Fitting elements. Both narrow and wide lining have a similar design: on one side of the board there is a protrusion (tenon), and on the other there is a recess (groove). When fitting parts, the tenon of one part is inserted into the groove of another, after which the structure is compacted by striking the edge with a hammer.
When fixing with a thin nail, drive the fastener into the lower protrusion of the groove diagonally
- Fixation. To fasten the sheathing elements, you can use thin nails or self-tapping screws (so that the caps are hidden by the edge of the groove of the next board). But it is most convenient to mount the paneling with clamps: a metal clip is placed on the edges of the groove and fixed with a nail, screw or bracket on the sheathing. The main advantage of this fastening method is to preserve the integrity of the wood.
Fastening the boards with a clamp allows you to avoid damaging the wood
- Horizontal docking. Both façade lining for exterior finishing and panels for interior cladding are often mounted horizontally. In this case, the first board should be fastened with the tenon facing up: this way the grooves placed on the tenon will “look” down and moisture will not flow into them.
By and large, doing the sheathing yourself is reminiscent of assembling a construction set: install one element, align it, fix it - and then install the next one.
When all surfaces are sheathed, it is necessary to perform a number of finishing operations:
- Installation of additional elements. We attach skirting boards at the bottom and fillets under the ceiling. We also install platbands, flashings, corner overlays, etc.
To remove all defects we use a grinding tool
- Grinding. In principle, this step is optional. But if we did not use the highest quality board, then it is advisable to treat all surfaces with sandpaper and remove dust from them.
Treatment of internal walls allows you to extend their service life
- Impregnation or varnishing. Indoor cladding is treated with water-based varnishes or wood oils. Lining for exterior finishing experiences more intense impacts, therefore, to preserve it, it is advisable to use professional impregnations with antiseptics, and after installation, treat the walls with facade paints or varnishes.
Outside, you can treat wood not only with impregnation or varnish, but also with facade paint