Wooden lining of the walls with clapboard adds stateliness to the room and classic elegance. But, rooms where the sun is present most of the day (southern) are not advisable to be decorated with clapboard. When exposed to ultraviolet light, it will quickly lose its color. After a few years, dark spots will begin to appear.
Walls are often lined with clapboard, especially in dachas and apartment loggias. This gives comfort, incredible coziness.
Classifying the material
When purchasing lining, the quality, cost of the material, and the room where the walls will be finished with lining will be taken into account. There are many options.
Natural lining is made from the following wood species:
- Conifers;
- Deciduous.
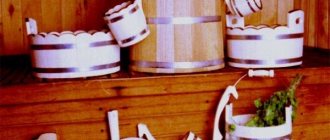
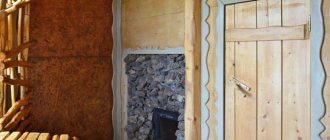
For example, hardwood panels are suitable for saunas and baths. Since they do not emit resin, like conifers, at high temperatures and significant temperature changes. Coniferous walls will not look neat and will be sticky. It is also easy to get burned by tar discharge.
Among conifers, only cedar from Siberia is a pleasant exception. Its wood is of a high class. The cost of such panels is decent. But the quality and durability will justify all the costs. Trees such as cedar, larch, pine, eucalyptus, and spruce are considered soft. Below is the wall decoration with clapboard in the photo, which will help you choose the design that you like best.
The most persistent are deciduous (ash, aspen, linden, alder). Linden is recognized as the best for baths. When the air temperature rises, it begins to release a slight odor, which has a positive effect on the human nervous system. According to quality, wood is divided into classes: premium/extra, a, b, c.
Required: processing solutions
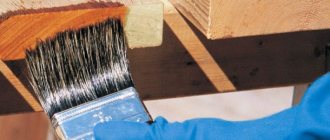
Do not neglect antiseptics and insecticides. This step extends the durability of the sheathing. The minimum level of treatment is a solution against fungus, rot, and mold. And insect control products should be used in houses standing on the ground - dachas, utility rooms. By the way, the cost of the compositions is not too high, and the right thing to do would be to play it safe and treat both the wooden frame and the wall with the ceiling in any room where the sheathing under the lining is being installed. The rules for using solutions are usually written on the packaging - read before you start spraying.
This is what a timber frame looks like
Types of installation
Naturally, before you start covering the walls with wooden lining with your own hands - an example in the video, you need to decide on its type and direction. Be it horizontal, vertical, diagonal, herringbone, diamond or brick laying, mixed.
Horizontal installation is considered a classic (in Russia, for sure). Has a positive effect on expanding room space. A small disadvantage that can be avoided (during installation, the grooves are directed downwards) is dust and moisture that collect at the joints of the boards. Following this recommendation, start laying from the top.
Vertical placement is the most popular among Finns. It makes the ceilings visually higher. This effect is especially important for low rooms. Installation of wall trim with clapboards begins from the most difficult angle.
Diagonal installation (and mixed) have differences in direction and aesthetic appearance. Installation is much more complicated than previous options. The interior, decorated with wood of different types and shades, looks especially bright and unusual.
It is easier to install wooden panels on walls horizontally with belts or vertically.
The vertical version of wall covering with clapboard is simply necessary for rooms with high humidity, places where frequent condensation is possible (bathhouse, kitchen, etc.). Because the horizontal method will not protect against excess moisture. The type of installation, when installing boards vertically, affects whether the tongue and groove will be cut, in what place, and by how much.
When mounted horizontally, the final result looks very attractive. Here the lining is installed, directing the ridges upward to protect the grooves from the accumulation of water. This will prevent the occurrence of rotting, microbes, and fungi in the future. When installing the first bottom board, the edge of its groove is cut off. This removes the pocket that will collect moisture.
The diagonal option for placing lining is used less often. This happens more difficultly, with a large amount of material waste. From the point of view of beauty, it is practically no different from previous installation methods. This DIY clapboard wall decoration will add zest to the room.
There are shaped styling: herringbone - a little difficult, but possible. A vertical sheathing is required, on which template-cut fragments of material will be mounted.
Wall cladding with diamond-shaped clapboard is more complex. The sheathing is made in the form of a framed cross. The bars are fastened diagonally in its quadrants. The labor spent on installing diamond-shaped lining is worth it. The result looks incredibly stylish and expensive.
Which mounting method to choose
Typically, the lining is equipped with a tongue-and-groove system, which allows the planks to be well fastened to each other. However, the material must also be fixed on the sheathing. This can be done with staples, clamps, screws and nails. The mount can be placed openly or hidden. In this case, you need to ensure that the entire structure is well fixed and the lining is not damaged.
Fasteners should not damage the lining
Kleimers
This fastening option can be considered the most accurate, but at the same time the most complex of all. It involves driving nails directly into the grooves. Thanks to this they will be hidden.
Kleimer is the most complex type of lining fastener
The clamps will fix the lining as efficiently as possible. But it is important to choose the right size of nails. It is selected depending on the thickness of the grooves. Often, clamp sets already have nails.
Video: how to fasten lining using clamps
Mounting gun with staples
The staples are fired from a gun into the groove of the board and securely fix the lining to the frame part. But it is very difficult for beginners to do this the first time.
Decorative screws
Fastens boards with high quality without losing the aesthetic beauty of the material.
Nails and screws
Both should be attached diagonally. So, the strip is clamped into the groove of the previous strip of material, and the cap presses it to the base.
How does installation work?
Everything happens in order.
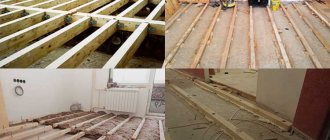
The sheathing is being done. Without it, channels appear where moisture collects, dampness appears in the room, fungus may develop, and the wall will even begin to rot. Therefore, they carry out repair work according to all the rules. Even if the walls of the house are perfectly smooth and are themselves wooden, it is still necessary to install sheathing before covering the wall with clapboard.
The clapboard wall decoration is installed with mandatory channels for ventilation (they are specially cut out in the boards). No way without lathing. It should be made of wood, like the panels. This is important, because the material acts as a damper. Particularly important when using min. materials on the walls. The same function is supported by gaps (deformation) between the wall itself and the boards. Connectors range from 5 mm and larger.
For example, there are often cases where wooden boards are laid on steel sheathing (as when installing drywall). After a short time, the material begins to expand and cracks appear. But, having removed the plinths several years after installation, it is discovered that the seemingly smooth surface of the wooden sheathing has only slightly moved around the edges. It doesn’t matter what type of sheathing will be, the basis for its installation is the same for everyone: the sheathing bars must be positioned strictly perpendicular to the boards.
Don’t forget about the bars that are located at the edges:
- The ends of the boards should not hang;
- When installing the lining diagonally, its sheathing must have a frame (solid);
- The thickness of the bars starts from 20 mm, width - from 30 mm;
- The size of the installation step of the bars is at least 4 boards wide;
- From the ends, the fastening points are placed at a distance starting from 50 mm.
General recommendations
There are two main options for covering the surface with clapboard: adhesive and frame. The first requires a perfectly flat plane. Therefore, the preferred method is the construction of a sheathing. In addition, it allows you to create additional space for insulating the room.
The construction of the frame provides additional opportunities for insulating the room
To attach the lining to the wall you will need:
- Tool. In this case, you need to prepare: a drill with various attachments, a level (plumb bob), a hammer, pliers, an electric jigsaw or a hand saw.
- Slats for the frame. A solid wooden beam with a cross-section of 30*60 mm is ideal for this purpose. The substrates are immediately prepared. They are used to level racks.
On a note! If the surface has a significant slope, then setting up a wooden beam will be a rather complicated procedure. In this case, a metal profile is used.
- Fasteners: self-tapping screws, dowels, nails, clamps; if required, additional elements for the frame (suspensions).
You should know that before covering with clapboard, even if the frame method is used, preliminary preparation of the surface is required. The procedure is simple; the old decorative layer is removed, and all defects are well covered. Additionally, priming is carried out.
Some laying rules
In order not to spoil the finished repair, when installing the lining, follow some rules:
- Do not install lathing directly on a damp, porous wall;
- The wall must be properly prepared;
- The best option is cement plastering;
- If the room is dry, there are smooth walls plastered with concrete - the bars are secured with EC staples (which are used for drywall). These are plates that have been perforated.
To ensure that everything is done masterfully, the bars are chosen as smooth as possible. The staples are attached to the walls, the middle block is installed (placed first), along the edges of which the staples are bent, and the ends of the blocks are secured. Next comes the bending of the intermediate brackets, the block is mounted completely (without deformations). Subsequent bars are leveled with the middle one and placed evenly along this plane.
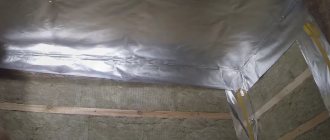
The surest preparatory method for walls under lining is to carry out a vapor barrier. For some rooms this is extremely necessary (kitchen, bathhouse, hallway, etc.).
Decorating walls with clapboard with your own hands requires care.
The wall must be completely leveled, insulation must be placed on top, with the foil side facing out. The insulating material (on special tape) is placed with an overlap (15 cm). Next comes the fastening of plywood pads (of the required thickness, at least 8 mm) to the wall under the bars. Then sheathing beams are attached to them.
This results in a well-ventilated spatial gap (between the lining and the insulating material).
The basic principle of laying lining is to start work from the most difficult small places; finish in large, simple sections.
When the wall is already covered with clapboard, the baseboards are attached. Covering walls with clapboard yourself helps you save money and find interesting solutions. An analogy with laminate flooring is appropriate here.
Video description
The entire sequence of work is clearly shown in the video:
Important! It is also prohibited to connect lining panels end to end for the interior decoration of a seasonal home.
Features of interior finishing with block house and imitation timber
Only thin and narrow panels of this type of lining can be mounted on clamps; other standard sizes are mounted on nails or self-tapping screws. But if the wooden house is for seasonal use, and in winter there are “visits” in it, then in any case it is better to choose traditional mechanical fasteners.
There are two options for fastening with self-tapping screws:
- open method - for “thick” panels;
- through the base of the tenon , or a hidden method (for panels of medium thickness).
Fastening through the base of the tenon is more difficult, but this method is the most reliable for panels of large thickness.
To decorate the corners of a block house, one of four techniques is used:
- sawed down the panels at an angle of 45°;
- through a connecting beam with a side equal to the thickness of the panel in the wave;
- using a wooden corner or two boards connected at an angle;
- adjusting the panel on one side of the wall to the profile of the other wall, but for this, the layout relative to each other is shifted by half the width of the panel.
It is the latter joining option that allows us to obtain the most reliable imitation of a room inside a wooden frame made of rounded logs. Although the execution of a figured neckline will require some skill in marking and fitting. And it will take longer.
This method of decorating corners requires precise marking and mastery of the tool.
Advantages of the material
Lining made of natural wood has a number of advantages that are known to many. Let's look at the main ones:
- Environmentally friendly finishing material;
- There are no emissions of substances that negatively affect humans;
- Allowed for use in children's rooms and rooms where allergy sufferers live;
- Duration of operation (if you periodically carry out special processing of wood, it is maintained in ideal, new condition);
- Wood paneling does not burst or scratch;
- Not afraid of damage (minor mechanical);
- It is easy to realize any design fantasy (due to different wood species, their coating with varnish and paint);
- Withstands temperature fluctuations (certain types of wood);
- It is moisture resistant;
- Modern types of panels have high fire safety;
- Withstands significant influences both indoors and outdoors (one of the main differences from plastic lining).
Lathing for lining: step-by-step instructions
Preparation of the bar
The material for work should be prepared in advance. The timber should be kept for several days in the room where the finishing will be done. This will allow the building materials to acclimatize, and their temperature and humidity will become similar to that in the room.
Next, the sheathing elements are treated with an antiseptic compound (if possible and, if necessary, with an insecticide). This can be done either using ordinary brushes, processing everything in order and carefully. If the volume of work is large enough, then you can build a small trough from boards and cover it with polyethylene. We pour an antiseptic composition there and dip each of the bars. This option will provide high-quality protection against mold and mildew.
Antiseptic trough
Preparing the walls
While the timber is drying, we prepare the surface of the walls. To do this, mark the width of the racks using a pencil and using a level so that all the lines are as even as possible. Such a “drawing” will allow you to clearly see how the entire structure will subsequently look, simplifying the work and controlling the correct location of the sheathing elements.
You should also determine the starting point for installing the sheathing. It can be the lowest corner available in the room (we find it using a water or laser level). After the necessary measurements, we draw out the wall and draw a horizontal line.
Marking Lathing with timber
How to hide wall defects
If the unevenness is significant, then it is necessary to secure the beam using special hangers, which should be positioned in a line (every half a meter) and secured perpendicularly. The prices for this type of fasteners are low, so the costs will not increase significantly. When fastening, the ends of the hangers are bent in the direction of the bar, after which it is leveled and fixed. This option is convenient due to its simplicity and accuracy: you can level surfaces quite quickly and easily.
Wooden wedges can also be used: they are the most important element for leveling significant unevenness in the surface of the walls. Prepare a certain number of wedges of different sizes in advance and treat them with antiseptics. As practice says, they tend to come in handy in most cases.
Hangers will help align the frames evenly
The installation of the sheathing under the lining is constantly monitored by level. We check the position of the bars and only then fasten them. To strengthen the angle, you can install a jumper in these places. This ensures maximum rigidity of the frame and simplifies fastening in corners.
Tricks, nuances
Once the material is purchased and delivered to your home, it needs to be adapted to the future location. Before finishing the walls with clapboard (example in the photo), the panels are dried for 1-2 weeks indoors or outdoors.
If the material was located outside, it will have to be left for another day or two in the room where repairs will be made to decorate the walls. This manipulation will avoid possible deformation of the boards on the wall.
Then, no longer worrying about possible unpleasant consequences, they proceed directly to work.
Craftsmen prefer to fasten the boards to the sheathing with special clips (mounting):
- Drilling;
- Starters;
- Kleimers.
Claimers are the most productive. Installing one mounting point takes a couple of seconds. They do not spoil the wooden lining.
Required protection:
- Grinding;
- Primer;
- Coating with acrylic varnish (colorless, tinted).
The varnish will not only protect against damage and radiation, but will also add fire resistance to the material.
Why do you need finishing?
Cladding walls with clapboard has plenty of positive aspects. First of all, thanks to this type of finishing, you can get not only an attractive appearance of the walls, but also their high environmental friendliness, since the panels are made of pure wood.
In addition to the naturalness of the raw materials, it is worth noting the ease of installation of such material; even an amateur can cope with this task. However, often after installing the lining you will have to apply additional coating in the form of paint or varnish in order to achieve a long service life from an aesthetic and practical point of view.
Having thought about the question of how to sheathe a house with clapboards, they usually try to solve two primary problems during the renovation:
- Protect the house from natural influences , especially in unstable climates;
- Carrying out work for cosmetic purposes to add beauty to the room.
It is important! The price of the lining is really attractive. It is also worth considering the fact that you can do it yourself to install the panels without the help of specialists.
Varnish and paint selection
Means to maintain the excellent appearance of the panels for a long time are used in the initial stages, before covering. And walls covered with natural clapboard, an example in the photo below, must be treated upon completion with additional colorful materials.
In addition to them, to give a spectacular finish to the lining laying, at the end of the repair, the wood is coated with tint compounds.
It is based on a couple of components that greatly influence the appearance of the finish. Varnish happens:
- Alkyd;
- Acrylic;
- With a water base;
- Polyurethane;
- Mixed (acrylic with polyurethane).
Alkyd takes a long time to dry. For faster drying, use special. solutions. This varnish will give the room a sharp, not very pleasant smell, which is difficult to dissipate. But these little things can be tolerated, because the alkyd will give the boards reliable protection from moisture.
Acrylic – quick-drying. Used inside and outside buildings. Moisture-resistant, tolerates high temperatures well. The presence of many shades and colors is attractive. All surfaces treated with this varnish can be washed without problems, dirt and dust can be easily removed from them.
Water-based varnish is the safest and most environmentally friendly among all products. Dries quickly, odorless. Characterized by the absence of chemicals. solvents. There are water- and dirt-repellent varnishes. Caring for materials coated with this varnish is very simple. The cost is quite high.
Polyurethane. The most versatile one today. It will prevent the wood from turning yellow. Shades are offered in brightly saturated, semi-transparent shades. The product is presented for every taste. Do not forget about the primer of the required tone, especially if the choice fell on a light varnish color.
An interesting, practical, often used when covering walls with boards yourself is impregnation of wood with oil. Thus, the panels acquire an unobtrusively shiny, beautiful tone.
For our climate, in order for the board to look perfect for more than 10 years, it must be treated with acrylic varnish in two layers.
Calculation of the required number of parts
They should be taken with reserve. Perhaps some part will be damaged during transportation and installation. There is a certain percentage of defects in ready-made kits. Each prefabricated element must be checked upon purchase.
The calculations use the area of the visible part that is not hidden by the grooves and protrusions covering the joints. To find out the required number of prefabricated elements, the floor area is divided into it, taking into account the finishing of the walls.
If the last row turns out to be cropped, you need to calculate how it relates to the whole. If its width is half the size of the whole, it will require half the material to create it. The boards can be cut and each half used as a separate prefabricated element.
- Doors and partitions
How to cover a door with clapboard yourself
Vertical cladding of a frame house
The advantages of frame construction are the ability to quickly build a house, make it warm and beautiful. It was difficult to cope with the volume of work together with Kirill. We worked as a team of 4 people. The frame was installed earlier; the company that produces ready-made home blocks itself delivered and installed them.
Vertical cladding of a frame house
I calculated how much lining we would need to cover the walls outside and inside, taking the size from the frame drawing. Now the lamellas have been cut in advance. The length of each board was 5 cm less than the height. The idea to sheathe the block house vertically with clapboard belonged to my nephew. Original design and practicality were combined in this solution. The textured wall looked decorative and original on the streets. The water flowed down the varnished surfaces without stopping.
Horizontal slats for fastening the lining simultaneously held the mineral wool laid in the space of the frame. To begin the trim, we first nailed the slats horizontally to guide the trim slats vertically. We will screw fasteners into flat bars. A detailed action plan can be seen in the video. We decided to do the street front façade last.
By this time, a plan for the decorative design of the outer cladding should be born in the head of our assistant Kirill. The appearance of a private home is of great importance. We used fasteners with clamps. They made it possible to fix and guide each board separately, maintaining a gap for expansion. The end bar was installed at the top. An ebb tide was installed below.
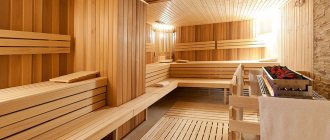
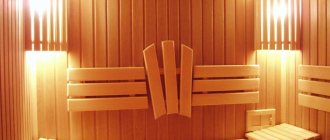
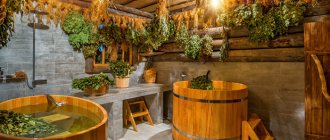
Covering saunas and baths: what's the difference?
Bathhouses and saunas differ in humidity and temperature.
In the sauna, the air is dry with humidity up to 8% with a permissible temperature range of 80–140 degrees.
In the Russian steam room, high humidity is always maintained with an indicator of up to 70%. In this case, the maximum permissible temperature is up to 100 degrees.
There are no restrictions on the choice of tree species for sauna cladding, with the exception of pine. Raw materials are less susceptible to moisture and therefore last longer. Installation method: vertical, horizontal.
For lining a Russian bathhouse, it is better to take lining made of alder, linden, abasha, and larch. The combination of several breeds at the same time looks beautiful. The installation method is predominantly horizontal.
Decorative rock
- creates a beautiful natural look;
- favorably emphasizes the relief of noble stones;
- undergoes final finishing.
One of the advantages of using decorative stone for interior wall cladding in a wooden house is the low cost of the base material. As a rule, this is gypsum, but there are also options combined with cement. The latter, as a rule, are a little heavier, but in any case much more convenient for cladding than “wild” stone. The only downside is the increased demands of this cladding material on the wall surface. It must be perfectly smooth, otherwise the created relief will not be so expressive. In order to cover the walls with decorative stone, it is best to use tile adhesive or liquid nails. The first option is recommended if the cladding material is made on the basis of a weighted mixture of gypsum and cement, the second - for cladding based on lightweight gypsum that is convenient for cladding.
Cork
- 100% environmentally friendly;
- excellent sound insulation;
- magnificent relief;
- solid and expensive look.
This is the case when the obvious visual advantages of a cork correlate with its technical characteristics and the numbers on the price tag. This option is certainly suitable for a respectably furnished wooden house, in which a lot of money has been invested. If you plan to cover the walls inexpensively, then you can use a little trick - use cork to decorate individual wall fragments. In this case, the costs will not be so high - and nothing will interfere with the pleasure of contemplating the spectacular wall cladding in the house. It is better to glue cork to a wall in a wooden house using special contact glue. It grips the sheet perfectly even with low consumption. Of course, before this it is necessary to prepare the surface of the wall itself:
- remove irregularities;
- clean from dust and debris;
- remove any remaining old material.
It is best to thoroughly level the walls before doing this, but if you don’t really want to do this with plaster, then gypsum board sheets will be an excellent and, most importantly, inexpensive alternative.