0
08.11.2021
Major home repairs require a complete replacement of the electrical wiring; sometimes a separate line is required for some household appliances. When performing the task, attaching the cable to the wall plays an important role. Wires can be fixed in different ways, depending on the materials used.
Mounting clamp
General rules and features
Page navigation
Classical fastening of a wire to a wall requires compliance with certain rules:
- the distance between fasteners is from 40 to 50 cm;
- the dowel, self-tapping screw or screw must be screwed in all the way, then their heads will not damage the insulating layer;
- cords should be laid evenly, without creases, excesses should be hidden in secluded places;
- cables in the building are laid in a straight line.
A smaller distance between fixation points is allowed. When turning, they are placed every 10 cm; this approach prevents the cords from sagging and helps to securely fix them.
Fastening with clips
These elements are used for open type wiring. The clips look neater visually and come in different sizes. Parts are made from various materials:
- Metal - made from metal strips. When installing, the cord is initially wrapped around the cord, then the holes are aligned and fastened to the surface. The clamps are used for ceiling and wall mounting and require many holes to be drilled.
- Plastic - with the help of plastic clips, the corrugation is attached to the wall, for external and hidden types of gaskets. For each pipe diameter there are corresponding volumes of elements. They are mounted on wooden surfaces with self-tapping screws, and on concrete surfaces with dowels. With their help, you can install either one or several lines to secure a wiring bundle. Due to the design of the components, a single block is assembled; each has special locking grooves located on the side, which allows them to be attached to each other. The final result is smooth and neat.
Self-adhesive clamps are made of plastic or metal and are used to secure cables of various shapes. Before carrying out the procedure, the surface of the future installation site must be cleaned of dirt and dust.
How can I secure the cable to the wall without drilling? Velcro clips do not require creating holes in fragile or expensive material.
There is a single-sided adhesive tape on the back of the element. The device is suitable for furniture, plastic panels on which wires will be attached.
The last option is the nail variety, made in the form of plastic staples with special slots. They have different shapes and are used for wooden and other materials with a similar density. Clamps with a nail help secure telephone and television cables with a small cross-section.
Clips for corrugation
What are we going to mount it on?
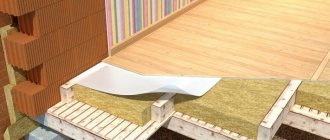
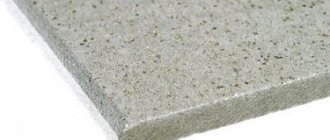
The bases for fastening cables are mainly divided into hard and soft. By solid we mean metal, concrete, brick. Under the soft ones, respectively, is wood or plaster. There are also so-called brittle bases - plasterboard or lightweight concrete. The last type of base is thin fiberboards.
Solid foundations. A dowel-nail is considered a universal fastener. The disadvantage of this method of fastening is the lengthy process. It is necessary to drill each hole and insert a dowel.
Soft bases. When working with soft bases, self-tapping screws or nails are used. Installation is as fast and simple as possible.
Brittle bases. There are several options for fasteners: fasteners with an adhesive base; dowels of special design.
Thin bases. Small nails are suitable. Fastening the cable to a wall with a thin base can also be done with staples.
Construction mixture
The solution is used for hidden forms of laying wires in grooves created in walls and ceilings. To complete the task, a gypsum building mixture is used, installation with its help is called “freezing”. The technique is not particularly complicated.
For large volumes of work, the need to frequently prepare a black solution and fix the wire leads to a decrease in the speed of completing the task. But the process is justified in many cases.
After forming the alabaster mixture, the cable is covered with it in separate places, spaced at the same distance from each other. The procedure is performed at maximum speed due to the rapid setting of the gypsum.
Mortar is used for single cords, sometimes as a secondary fastening for multiple cables to secure previously installed brackets or dowel clamps. After completing the main process, the furrows are filled with plaster mixture and covered with wallpaper on top.
Use of building mixture
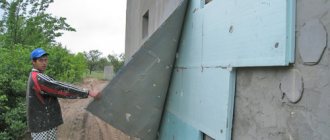
Open
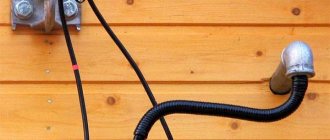
Typically, this type of electrical wiring fastening is in demand in wooden houses, sheds and outbuildings. At the same time, there is no need for grooves, which significantly speeds up the process itself.
Cable channels
Cable channels are a modern and most practical way of openly fastening wires. A special role in this is played by both a rather attractive appearance and a low price. The practical advantage is that you can easily secure a group of wires. Installation of the channel is quite simple. It is necessary to remove the cover, secure the channel to the wall using self-tapping screws, lay the cable and reinstall the cover simply by snapping it into special latches.
Clips
This method of fastening is only permissible if the wires are located in plastic or corrugated pipes. It is important to choose the clips according to the pipe size! Next, we proceed according to the standard plan:
Most often, this type of fastening is used when there is a need to conduct external electrical wiring.
Insulators
For this type of fastening , the wires must first be twisted into a tight bundle. Next, porcelain barrels crash into the wall and become the basis for securing the wiring. Advice: in order not to waste time on twisting and fixing it, you can purchase already prepared strands in specialized stores.
Nail and other staples
This method of fastening is widely known even among non-professionals. This type of fastening is used for laying both telephone and television cables. There are two types of staples : flat and arched.
All such staples come with nails, so fastening them should not be a problem. Quite a practical option for installation above the baseboard. The disadvantage is the rather low strength of the nails themselves, so you should always have such staples in reserve in order to replace damaged ones at any time. To fasten thin wires, experts recommend using a wire. Externally, it is similar to a screw and is screwed into the wall in the same way, and a cable is screwed onto the directly protruding thread.
Installation site
This method is used when the wire needs to be laid over tiles. The mounting pad does not require drilling any holes or hammering nails. It is attached with a self-adhesive side and holds quite firmly. It is not recommended to use this type of fastening in rooms with high humidity.
Separately, it is worth considering the issue of wiring the cable through the wall.
To do this, it is necessary to drill a hole larger in size than the sleeve installed in it. In this case, you need to adhere to several rules: Above, we discussed the optimal and effective modern methods of attaching wires to the wall, which should not cause much difficulty even for an untrained person. However, be careful and before laying the cable, make sure that it is not connected to a live line!
Source
Homemade cable fasteners
There are not always suitable brackets, clamps or platforms at hand for installing wiring. These elements can be easily made with your own hands, but visually they will be inferior in design to factory components. If done carefully, the fasteners will be a worthy replacement for branded products.
Installation elements are made from various materials, presented:
- single-core, two-core power wires;
- plastic;
- galvanized sheet, etc.
Depending on the selected material, work is carried out according to the following rules:
- two-core cables are cut into pieces, their length is matched to the wire being attached, and a self-tapping screw is inserted into the middle of each;
- single-core, pre-cut pieces are wrapped around the dowel head;
- Strips of tin are cut and a nail is driven into the middle.
With self-made fastenings you can sew up one or more cords at the same time.
The advantages of homemade devices are considered to be:
- easy manufacturing and installation;
- no need to search for a product and then purchase it in a store;
- possibility of repeated installation and replacement of homemade products.
Homemade options
Tips for choosing
It is necessary to select types of wire fastening based on the load created by the weight of the cable bundle. It is important to prevent possible breakdowns or ruptures of elements over time, that is, it is better to play it safe and use a more powerful and reliable type of fastening than a weak and cheap one.
The dowels and screws for fastening must match each other and the diameter of the hole, otherwise the fastening may fall out and the self-tapping screw may not be screwed into the dowel.
Despite the apparent simplicity of attaching cables, before purchasing parts, it is worth thoroughly deciding on their choice and, if necessary, conducting a test test. This will save you money and ensure high quality work.
Quick-drying mortar (gypsum, alabaster)
Gypsum plaster can be used to fix cables in grooves or corrugated sleeves. A small volume of solution is placed every 50 cm; after the process is completed, the groove in the wall is covered with mounting tape.
The advantage of this approach is presented:
- speed of laying cords;
- low price;
- the ability to perform without the use of specialized clamps.
The disadvantage of this method is that it is difficult to install the corrugated hose in the groove. Replacing it when damaged also causes problems.
Cable trays - for hidden laying of large bundles
Illuminating the ceiling with spotlights requires laying a large number of cords, fixing them on the ceiling. In standard apartments, the role of the latter is played by a concrete slab, in which drilling many holes is problematic and time-consuming. For such cases, suspended cable trays are used. Products are made of perforated metals or galvanized wire.
Cable trays come in different sizes, each with its own type of fastening. Studs, T-shaped or L-shaped hangers can be used. The installation process is simple:
- the structure is assembled;
- mounted on a ceiling surface;
- wires are laid in it.
They can later be attached to the grilles with ties, but this procedure is usually not necessary.
Trays of non-perforated or perforated metal are used when laying armored cords inside walls with increased fire hazard properties, including frame houses.
Perforated tray
We fix it to the ceiling
All of the above mounting options are applicable for mounting to the ceiling.
In the case of suspended ceilings, the cables are secured with plastic clamps to the ceiling hangers. Cables are laid in protective corrugated sleeves.
Significant volumes of wires are placed in special trays. They are installed to the existing ceiling using adjustable hangers.
Plastic and metal staples
Products made of plastic and metal are common means for openly fixing wires.
Visually, the mount looks like an arc with a recess for a round cord and an additional hole for a self-tapping screw. In plastic varieties, the nails are placed at the manufacturing stage. Fastening components come in different sizes.
Plastic is used for work in residential premises; metal ones are more suitable for firmly securing cables. The latest products have 1 or 2 legs.
Plastic staples
Cable channels of various sizes
This option is considered a common method for open type strengthening of wires and is characterized by increased convenience. The cable channel is made of galvanized steel, non-flammable plastic or aluminum base. Visually it looks like a U-shaped structure.
The technical box is used for laying wires; it is closed on top with a one-sided or double-sided lid. There are many varieties of products that differ in color, material, size, and moisture protection.
There is also a division according to execution, the devices are:
- floor;
- mainline;
- baseboard;
- parapet subspecies.
Installation of a cable channel requires preliminary wall marking and further fastening to the surface with self-tapping screws and dowels (it can be glued with liquid nails). Correct installation requires experience.
Trunk cable channel