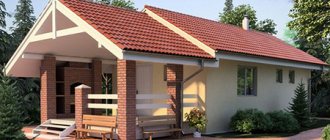
Russian bathhouse is the historical name of a bathhouse, the heating of which is based on direct steam coming from a stove heated with wood. The average air temperature in such a steam room is 60–80 degrees. But for each person you can choose the most comfortable vaping mode. A Russian wood-fired bathhouse is considered very useful for various diseases, and is simply designed to bring joy and pleasure to a person.
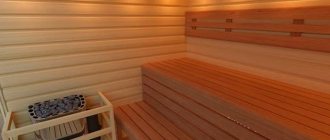
Interior design option for a Russian bath
Main differences from other baths:
- Temperature conditions. For Turkish it is 40-60 degrees, Finnish - more than 80, for Russian - 60-80;
- Type of steam. Dry or wet;
- Soaring culture. With brooms, a massage scrub, or just sweat and take a shower;
- Design. With heated floors, with stoves made of wood and brick or metal.
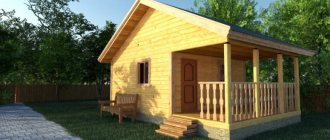
When building a Russian bathhouse, it is important not only the stove itself, but the entire structure of the building as a whole. The best option is to build a room from solid logs. Ideally from the so-called wild. There are other types of bathhouse designs, classified based on the materials from which they are constructed.
Frame baths
It is believed that frame baths are the easiest to build. You can even build a structure according to such a project with your own hands.
Project of a Russian bathhouse built using frame construction technology
The technology is based on connected frame panels, which, when installed on a prepared foundation, form load-bearing walls. Next, a ball of insulation is laid. Boards are laid on it. If you do everything according to the drawings, then this construction method will not take much time and labor.
Russian
In a Russian bath, as a rule, the average temperature reaches 45-70 °C. In this regard, the steam condenses and settles on the body, due to which it is cleansed of various types of contaminants. Due to the hot, humid air, the entire body and the organism as a whole warm up.
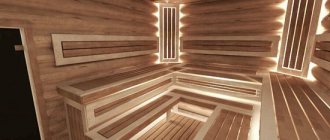
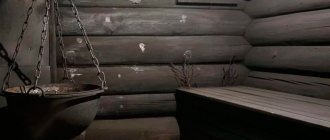
Russian steam room in black style
The design consists of three main parts:
- dressing room - can be of a cold type and intended for undressing and dressing, and placing clothes. The warm waiting room is designed for free time and communication. In the first case, it is equipped only with hangers, shelves and cabinets, in the second, an additional table, chairs, sofas, and cabinets for storing dishes intended for tea drinking can be installed. In some cases, televisions and other equipment are installed;
- steam room - the main process of steam treatment of the body takes place here. It is the most complex in design, and there must be a furnace that heats the stones, which are subsequently doused with liquid and form steam. For comfortable placement of visitors, sun loungers, or, as they are called differently, shelves, must be installed;
- washroom - designed for bathing with the use of chemical personal hygiene products, so there are benches for placing basins and buckets, but in modern conditions such rooms are equipped with a bathtub or shower. There should also be cabinets and shelves for placing containers with soap, gels, shampoo and other products.
Calculation of required area
1 4
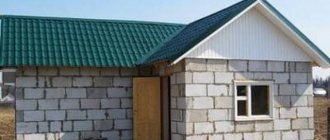
Aerated concrete baths
Baths made of aerated concrete or foam concrete allow you to save firewood for heating and have high thermal insulation properties.
Example of aerated concrete bath
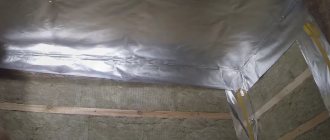
It is convenient to cover walls made of these materials with self-adhesive foil. Thanks to this, the room quickly warms up and maintains the desired temperature for a long time.
But most often baths are built of wood. These are both cobblestone and log structures. Let's take a closer look at the process of building paired rooms from these materials.
Bathhouse project
Based on the area, steam rooms can be divided into small, medium and large. The layout of the bathhouse will differ depending on its size.
Little ones
Small bathhouse projects are usually designed for small families and for personal use. Such bathhouses have an average of 16 m2. Their drawing provides for combining a locker room with a rest room. Small buildings are most often built by people with their own hands.
Project of a small bathhouse for a couple of people
Average
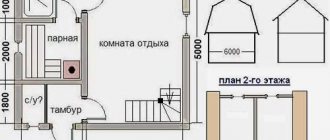
The design of such a structure is on average 20 m2. The drawing provides for a steam room, a shower room, a relaxation room, which is also a dressing room, and possibly a small veranda. In a typical project, these rooms are located sequentially next to each other.
Large
The area of large baths varies between 30–40 m2. Here the locker room and rest room are located separately from each other. There is also a spacious veranda. The listed bathhouse projects are usually ordered by people of average income.
For wealthier people, as well as for commercial use, there are designs for more spacious and varied buildings.
For example, with large or small swimming pools, with several relaxation rooms and steam rooms. Such baths can accommodate a large number of vacationers at the same time.
Cooling and relaxation area
In order to cool the body, a separate room is set up in the bathhouse (or it is taken outside).
The minimum area of the pool is 6 m², and the depth is 1.3 m. It is important that it is possible to lower the water level for children to at least 0.5 m. The area of the pool is calculated as follows: 50 cm² per place in the steam room
The pool is located next to the steam room.
Pool in the bathhousePool in the bathhouse
The walls and bottom of the pool are lined with light, non-porous and easy to clean material (for example, frost-resistant tiles). The bottom is sloping towards the drain. Also, for a comfortable descent, you should take care of steps with railings.
The floor next to the pool is also sloping towards the waste bins. Water will be supplied through a special hole in the bottom, and its excess will be drained through a special groove into the sewer. If the water level is 50 cm or less, then it must be changed all the time.
Construction of a swimming pool in a bathhouse
Water should be regularly chlorinated (maximum chlorine concentration - 0.3 mg/l). In addition to water, snow can be used for cooling, as well as ordinary fresh air in a closed structure connected to the bathhouse.
Bathhouse project with a swimming pool
The area of the cooling zone is calculated as follows: 2 m² for each place in the steam room. The room is furnished with benches in the required quantity, it is desirable to have green spaces.
Where to build a bathhouse on the site
When choosing a bathhouse project, you should also take into account the location of construction. An excellent option if there is a natural pond nearby. You can also make an artificial lake or pool. Of course, there is such a way out as putting a font or a bucket of cold water, but this will not replace complete immersion after a hot steam room. The soil and surface of the site are of no small importance for construction. Based on these factors, it is determined which foundation and structure is best to use for a Russian wood-burning bathhouse.
6x8
- an excellent option for a fairly spacious area;
- you can place not only a separate sink and steam room, but also a relaxation room and a terrace;
- placement of several functional areas at once;
- For the foundation, you should choose a strip type of foundation.
Surely every owner dreams of such a bathhouse. In total, such a building gives almost 50 square meters, which can be used to realize all your ideas. A 6x8 bathhouse project with an attic may include placing not a guest room upstairs, but also a billiard room, a games room, and even a storage room. However, you should ensure reliable waterproofing of the attic and take the ventilation system equipment seriously. Still, there can be no talk of any comfort in the same billiard room if the air is characterized by high humidity, and the floor smells of rot and other not very pleasant aromas, indicating deformation of the base.
You will also need to think about air conditioning in the summer season, since the steam room will in any case transfer some of its heat to the attic. If all these issues can be resolved, then you can safely envy you, since a successfully implemented project for a 6x8 bathhouse with an attic is a unique opportunity for a pleasant holiday at any time of the year.
Material selection
The construction of a Russian bathhouse from logs or beams requires the choice of high-quality material. So, the most suitable would be larch, spruce, and pine. All this wood is characterized by longevity and ease of processing.
- Larch. A very hard wood. It can last up to 300–400 years. When constructing baths, it is often used only in the lower balls due to the fact that it is quite difficult to process. Bathhouses made from larch logs do not require special protection with antiseptics. Since this breed is quite expensive, it has not been used very often lately;
- Pine. A Russian wood-burning bathhouse is most often built from this type of wood. Pine logs are mostly straight, hard and easy to process: trimming, planing, making the necessary notches. The resinous species of this tree have a natural barrier against water;
Pine bathhouse project - Spruce. In the construction of wooden structures it is used less frequently than pine, but is also quite common. It has a slightly loose structure, which has a more favorable effect on thermal insulation. A little more difficult to process than pine;
- Other types of wood. When building a bathhouse from logs or timber, you can also use less common wood materials, aspen, for example. The main thing is that the tree is alive and healthy.
Foundation for a bathhouse
The main task of the foundation is to take the loads of the walls and protect them from excess moisture. A Russian wood-burning bathhouse is often built near a reservoir, so when creating a bathhouse project, you need to calculate a foundation that will be protected from landslides and subsidence.
- Strip foundation. It is considered the most universal type of base for a bath. Can be built on most soils.
When drawing up drawings of such a foundation, the dimensions of the building, slopes, possible subsidence, and water depth are taken into account. - Columnar foundations. Since we are building a Russian bathhouse with our own hands, this is an ideal option for us. It will save money on the purchase of materials. A columnar foundation is ideal for structures made of logs and timber. Rarely used when using heavy materials for construction. Pillars made of metal and concrete are placed at the corners of the building and at the intersections of walls. For small bathhouses, you can also use wooden columns - the so-called chairs. Pile foundations are usually used on loose and flooded soils.
- Monolithic foundations. A continuous layer of cement with crushed stone is laid under the area of the entire building. Excellent protection from excess moisture, subsidence, and has high reliability.
- Foundation for the stove. We should not forget about the base for our stove. Since it is the basis of a good bathhouse, all elements must be carefully thought out and reliable. Typically, brick and sheet steel are used to build a stove. Depending on this, the foundation for it will be selected. It is preferable to fill the pit under a brick oven with sand, fine gravel, a metal frame and fill it with concrete. The top edges are treated with several layers of tar. If the furnace is metal, then the pit is filled with crushed stone, then there is cement and a ball of roofing felt or other waterproofing material and a concrete pad on top.
Walls
For the construction of a Russian bathhouse from logs or beams, as mentioned above in the article, coniferous types of wood are best suited. Usually they take logs from 200 to 220 mm. The dimensions of the timber are 150 by 150 mm.
This is what a beam for building a bathhouse looks like
It can be edged, glued or profiled.
The Russian wood-burning bathhouse was originally built from chopped logs. Now this material is used either by villagers or by those who strive for everything natural. If you are building a bathhouse with your own hands, then it is most economical to cut down the necessary trees. Or you can order a log house project with installation, and then complete the further details yourself.
The process of building a bathhouse from logs and from timber is somewhat different. It is easier to build a bathhouse yourself using the last mentioned material. The construction of a building from logs requires a lot of knowledge and skill.
Bathhouse made of logs
Initially, you need to select the required material. The lower and upper diameters should not differ by more than three centimeters. The wood should not have any cracks, large knots, or blue stains.
Log sauna project
The construction process itself involves laying logs on logs, with notches made at the ends to fit tightly. This design is called a crown. Where the window is planned, five crowns are made at the bottom and two at the top. On the door sections there are two at the bottom, five at the top. The crowns are fastened together with wooden brackets approximately every 1.5 meters. The bottom ball of the logs is called the frame. The hardest and best types of wood are chosen for it.
Often, to protect against getting wet, a gasket is made from a board, which is treated with various antiseptics or wrapped in several layers of roofing felt.
A trim crown is placed on the gasket, which is pressed together from below to make the fit tighter. Crushed stone or bricks are placed under another log, which naturally stands a little higher, thereby eliminating the gap above the ground. Next, the crowns are laid one after another. On the upper logs the joints are made oblique.
An example of laying logs for a bathhouse
After the walls are erected, they are caulked. This can be done in two stages. The first time was when the frame was built, and the second time after drying and shrinking the logs - about a year and a half later. Caulking a house is laying insulation made of fibrous material - tow, moss - between round pieces. The insulation is driven in using special tools so that its edges protrude at least 50 mm on both sides of the wall.
Benefits of a ready-made solution
Developers are offered standard projects for every taste and often in varying degrees of readiness, from a bathhouse for shrinkage to a turnkey bathhouse. The finished project is recognized as the most convenient option for future owners, beneficial for many reasons:
- Professional drawings. You purchase a package of documentation fully prepared for implementation. All drawings and calculations were carried out by specialists, checked, and often tested several times. Often you will have the opportunity to see a completed project live.
- Possibility of making edits. Many construction organizations accommodate customers halfway and allow some changes and additions (in the location of utilities or in the size of premises) in the drawings for free.
- Saving money. Prices for ready-made bathhouse projects are lower than for those that are developed individually. The design engineer has long taken into account all possible costs and minimized construction risks.
- Save time. You can start building the bathhouse immediately.
Standard design of a bathhouse with dimensions ready for constructionSource strbuild.ru
Quality. A construction team that has dealt with similar projects many times will work without errors and without delays; the process is thought out to the smallest detail.
An individual project is needed if the customer’s wishes for some reason do not fit into existing solutions, or the site has special features. Developing a bathhouse from scratch (sampling options, agreeing on project details, selecting materials) can take a long time. Construction will also take longer.
Bathhouse made of beams
Again, we initially select good material. The timber should not have wormholes or traces of being eaten by beetles, it should look perfectly even and smooth. The easiest way to build is to order a ready-made project with detailed drawings and numbered beams. It will be a little harder to do it with your own hands, but the joy from constructing the structure will be greater. The foundation, as in the version with logs, must be finished with various waterproofing materials.
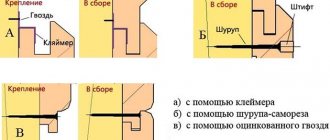
Slats are laid on it, the purpose of which is to protect the base from subsidence and the timber from rotting. The space between the foundation and the tree is filled with foam. After this, the first crown is laid. For it you need to choose the thickest and most reliable materials. So, if our main beam measures 150 mm by 150 mm, then it is better to take 200 x 200 mm for the lining. The following crowns are stacked one on top of the other, strictly maintaining a horizontal level. There are three ways to fasten the beams together:
- Nails without heads;
- Wooden quarter-deck;
- A spring unit called “Strength”.
The top balls of the crowns are not attached, since they will need to be removed to lay the floor. If desired, each level can be caulked for better heat retention.
How to build with your own hands?
You can start building even before the logs arrive. It is recommended to prepare the foundation in advance. When creating it, you should focus on the drawing of the building that you will build.
Foundation
Since buildings made from rounded logs are significant in weight, the foundation for such a bathhouse must be very strong. Usually it is made as a tape. This is a rather complicated process, but it is quite possible to cope with such work.
First you need to correctly mark the territory in vertical and horizontal planes and prepare trenches.
- Draw a plan using a laser level.
- Then you will need to install the cast-offs and tighten the threads.
- Dig trenches. When determining its depth, you should focus on the weight of the building, the depth of soil freezing and the type of soil. Most often, the required depth is determined by professionals.
Having prepared the trenches, install the formwork and pour the foundation.
- Pour and compact gravel (layer about 15 cm).
- Then you will need to pour sand and compact everything again.
- Assemble the formwork from unedged boards and install it.
- Create reinforcement elements. Assemble two gratings (cells 200x200 mm) using reinforcement 1 cm thick. This can be done using tying wire or welding. Place one of the gratings at a distance of 50 mm from the foundation (its upper edge). The second will need to be placed at a distance of 50 mm from the bottom of the trench. Using lengths of rod, connect the gratings to each other. Then it will be necessary to install the reinforcement frame.
- Then the formwork will need to be filled with concrete. After this, make the surface as smooth as possible and let it dry. Concrete material, which is based on Portland cement, becomes hard within 24 days.
Waterproofing
Before starting construction, you need to prepare the foundation: waterproof it. You can use roofing felt for this.
- Spread melted bitumen on the foundation and place roofing felt on it.
- The surface must cool down. After this, stick the roofing felt again and wait for it to cool.
First crown
If the construction project was ordered from a company that specializes in such construction work, all materials will be numbered. You will also receive a diagram showing how to assemble the structure correctly. Assembly will need to be carried out following step-by-step instructions.
- First we build the first crown. To find materials that are designed specifically for this, refer to the diagram. The diameter of the logs for the first crown is usually slightly larger.
- To ensure that materials are positioned correctly, use a level. The first crown is in a horizontal position.
- The gaps between the logs and the foundation will need to be filled using foam.
Construction of walls
It will be necessary to lay insulation on the first crown. You can use jute or tow. Then assemble the second crown, install it and fasten it together using wood dowels or metal pins. It is recommended to drill holes for them during the manufacturing process. Next, the building will need to be erected according to the same scheme.
The two top crowns should not be fastened together. When shrinkage is complete, they will have to be removed to install the ceiling beams. To protect the bathhouse from the effects of liquid while it shrinks, protect the frame with roofing felt and unedged boards.
Caulk
The technique that is usually used to give the bathhouse additional tightness is called caulking. You need to use tow as a sealant: drive it into the existing cracks.
Usually jute and linen tow are used. Jute tow is more resistant to rotting, while flax is softer, so it is easier to work with.
Start driving the seal from the bottom. Only one wall should not be caulked, otherwise distortion may occur. The cracks need to be filled both outside and inside.
Roof
The roof can be made either gable or single-pitch. Construction is carried out according to the same principle as in cases with other roofs. When choosing material for a bathhouse roof made of rounded logs, people focus primarily on cost.
Natural tiles go very well with wood, but not everyone can afford such a rather expensive material. You can use ondulin, ordinary galvanized steel.