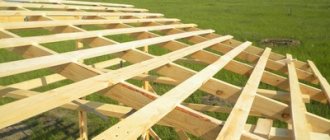
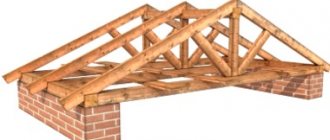
The reliability of the entire roof depends on the correct installation work. The main structural elements are the rafter legs.
To provide stability, the elements are secured using side braces, a metal angle or staples. The beams are connected to each other at the ridge part of the floor; below, the rafters are attached to the mauerlat. The element can withstand the maximum load; lumber with a cross-section of 15 × 15 or 20 × 20 cm is used for its manufacture.
Features of various rafter systems
The type of rafter system is chosen based on how the load-bearing walls of the building are located. Each such system requires its own additional elements, tightening or supporting.
Sloping rafters
What are the differences between a system with so-called inclined rafters? In addition to the main load-bearing walls, it has one more (or even more than one) support point. Thanks to this, most of the load on the walls is removed.
As additional supporting fasteners, side “headstocks” and racks are used, which are attached to the floor beams and support the ridge. The beams themselves also serve as tension for the structure, lightening the load-bearing walls from the load of the rafter system.
Such rafters are usually attached to the Mauerlat with sliding joints, capable of moving when the walls deform or shrink, protecting the roof structure from damage. This is especially important for newly erected buildings, since any new building, under the influence of temperature fluctuations and soil movements, will certainly shrink.
Hanging rafters
Which rafters are called hanging rafters? Those that, apart from two side walls, have no other supports. In other words, they seem to hang over the internal space of the building itself.
It is clear that in such a case the main load from the entire roof structure falls on the Mauerlat.
Hanging rafters are attached to the mauerlat exclusively with the help of rigid connections, which completely limit the possibility of movement: after all, the frame structure has only a couple of support points. According to its structure, the system of hanging rafters is considered to be a spacer system - this is why such significant pressure is exerted on the walls.
To remove some part of the load from the walls, special additional elements are used (bolts, struts and headstocks). They pull the entire system to the ridge beam, distributing the load on the walls evenly. Crossbars are installed parallel to the floor beams, with the help of which the rafters are pulled together.
Such additional devices provide the structure with greater reliability.
Several important rules when attaching rafters to the Mauerlat
In order for the connections of such important elements to be sufficiently reliable, it is important to follow the rules developed specifically for this:
What materials can it be made from?
The structure is often made of wood, using wooden beams or boards fastened together. Often a steel profile is used. The choice depends on the weight of the roof.
Wooden beam
The timber is placed under the rafters along the perimeter of the roof. With this arrangement, the load is evenly distributed to each point on the walls of the house. There should be no knots on the timber, and if there are any, their size should not exceed 2/3 of the thickness of the wooden product. When arranging the Mauerlat, knots will interfere with the main structure, so it is better to avoid them. If there are many knots on the beam, then a break may occur in the places where they form.
Boards fastened together
In frame construction, when the roof is light in weight, boards fastened together can be used. This design is not suitable for a heavy structure - the boards will not withstand the high load. This material is suitable for roofing without insulation and additional elements that increase weight. The boards are attached around the perimeter of the building. For the Mauerlat, it is advisable to use durable material that will not crack during use and exposure to external factors.
Steel profile
Instead of wooden products, steel structures are often used. This material is more durable, as it can withstand increased loads. The steel profile is represented by a square section or round metal pipes. The use of steel as a support for the roof implies the presence of metal lining around the perimeter of the external walls. The device is suitable for a gable roof, and beams can also be used. The harness is secured to the outside of the wooden belt.
Rafter fasteners
To ensure reliable connection of the parts of the rafter system, special fasteners are used. Rafter fasteners are wooden and metal products that are used when installing components of the rafter system. These include wooden elements
:
- bars;
- scarves (triangular overlays);
- dowel;
- thorns.
Metal elements
:
- nails;
- screws;
- bolts complete with washers and nuts;
- staples;
- clamps;
- overlays;
- loops;
- sliders/sleds;
- anchors;
- serrated plates;
- nail plates;
- corners;
- perforated tapes, etc.
The choice of rafter fasteners depends on the requirements for the strength of structural units, design loads and roof configuration.
How to install the Mauerlat yourself
Let's look at how to do it yourself and mount the Mauerlat correctly. To make the frame, the material from which the elements of the rafter system are made is used.
The material for the Mauerlat can be used:
- wood;
- steel profile.
It is important to ensure the continuity of the supporting contour and reliable fixation of the joints. In most cases, a reliable roof slat is made from square-section wooden beams with a side size of 15 or 20 cm
It is not advisable to increase the cross-section of the beam, which is associated with additional costs and increased load on load-bearing walls. If the material of the required cross-section is not available, you can make a support beam of a composite structure using boards 5 centimeters thick.
Carry out construction activities for installing the Mauerlat according to the following algorithm:
- Clean the supporting surface of the main walls from construction debris and dirt.
- Lay two layers of waterproofing material around the perimeter, which can be ordinary roofing felt or polyethylene.
Prerequisite: the Mauerlat must be laid closer to the inner edge of the wall and there must be at least a little protection on the outside
- Cut blanks from wooden beams, the length of which corresponds to the size of the walls.
- Carry out cutting of corner joints and joints of timber.
- Treat the workpieces with antiseptic impregnation and fire-retardant compound.
- Mark the coordinates of the holes for fastening the support frame elements, using a flat board attached to the fasteners.
- Drill the beam, ensuring that the holes you make are perpendicular to the top and bottom edges.
- If necessary, join the beams using an oblique cut, self-tapping screws, nails or bolts.
- Secure the corner elements of the resulting frame using plates or staples.
- Connect the assembled roof plate to the fasteners and secure according to the chosen fastening method.
- Check the horizontal installation of the support frame using a building level.
- Install shims, if necessary, to ensure the required position.
Installation of rafters to the mauerlat
This work will be required to complete various rafter systems. When installing layered or hanging rafters, you can use a rigid or sliding connection. The choice of a specific type of rafter fastening depends on the design features.
Craftsmen advise making the cut not in the mauerlat, but in the rafters. This is due to the fact that otherwise the bearing capacity of the Mauerlat will be weakened.
With a rigid connection, the elements are securely fixed and no displacement is possible. This type of fastening can be achieved if corners with a support bar are used to mount the support of the rafter leg on the mauerlat. An alternative is to cut a saddle cut into the rafter. It is further secured with nails, threaded fasteners and bolts. In addition, you will also need twisted wire to connect the fastening point and the anchor in the wall.
Arrangement of a reinforced belt
After the concrete has hardened, a beam is placed over the rods protruding from the reinforcement. Even on the shortest wall, there must be at least four 12 mm rods in the armored belt for attaching the Mauerlat. When choosing pins or wire, the belt must also be made with reinforcement.
The thickness of concrete when constructing an armored belt cannot be less than 5 centimeters. As soon as the mixture is poured, it is necessary to ensure that air cavities do not form in it, which can be seen by the bubbles that appear.
This process violates the homogeneity and strength characteristics of the armored belt, but it is necessary to lay the mauerlat on it, which in fact is the foundation of the roof. Air bubbles will disappear if you pierce the not yet hardened concrete with a reinforcing bar. After 10 - 12 days, the formwork is removed after the mixture has hardened and become strong.
Next you need to do waterproofing. As an insulating material, roofing felt is laid on the finished armored belt.
What is a Mauerlat and its functions
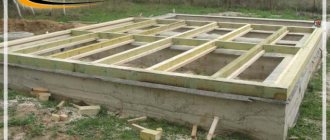
The roof structure includes many functional elements, as it provides protection for the load-bearing walls of the building. One of these components of the rafter system is the mauerlat, which is a row or crown of timber laid on the top of the walls. The Mauerlat is in contact with the upper area of the walls along the entire perimeter of the building, which ensures the performance of the functions assigned to this row of timber.
The Mauerlat has a simple design
The simple design of the Mauerlat ensures its functionality and maximum efficiency. The beam system serves to evenly distribute the weight of the roof over all walls of the building, which is necessary to prevent skewing and deformation of the roof. This is the first function of the Mauerlat, and the second is to hold and fix the roof on the walls.
The roof truss system is attached to the Mauerlat
Design and features of the Mauerlat
Above, we have already indirectly noted that brick walls can withstand vertical loads well, but have low strength under bursting forces. To increase the resistance of the walls to horizontal pressure from the rafter legs, a rigid box is assembled from the mother beam. It is laid along the center line of the wall or its inner edge, securely fixed and protected from solar radiation, precipitation and other atmospheric influences.
To fasten the wooden base of the rafter system to the wall of concrete blocks, an armored belt is constructed into which threaded rods are installed.
The mauerlat laid on the wall must be protected from moisture. To do this, a brick or concrete surface is covered with roofing felt. After laying the beams, the edges of the rolled waterproofing are wrapped around the beam and secured with furniture staples or nails with wide heads.
Arrangement of armored belt
To strengthen the upper part of a brick, stone or aerated concrete wall, a reinforcing belt of reinforced concrete is constructed before laying the Mauerlat. For these purposes, you can use the same solution that is used in the construction of the foundation. To prepare it you will need cement, sand and crushed stone, which are mixed in a ratio of 1:1.5:3. No more than 1 part of water should be added - the mixture should remain fluid and at the same time not be too liquid. Otherwise, the characteristics of concrete will be reduced.
- Before pouring concrete, wooden formwork up to 25 cm high and a width equal to the thickness of the masonry is installed along the edge of the outer wall.
- Strips of construction mesh are laid inside the formwork, which are used to reinforce the structure.
- Every 25–30 cm, anchor bolts or threaded rods are attached to the mesh.
Before pouring concrete, threaded L-shaped studs are attached to the reinforcement frame - in the future they will be needed to fix the Mauerlat to the wall
- They try to pour the concrete in one go, covering the metal frame by at least 3 cm.
- When pouring, the solution must be bayoneted or compacted by vibration to prevent the formation of voids.
To prevent contamination of the working part of the studs with the solution, the threads can be wrapped with tape or adhesive masking tape.
Reinforcement allows you not only to strengthen the wall, but also to precisely level it, which is especially important for masonry made from a material such as rubble stone. If it is necessary to strengthen the upper part of the wall made of aerated concrete blocks, then you can do without formwork. It is enough to cut down the jumpers between the blocks of the top row, which form the necessary continuous gutter.
Requirements for lumber
The timber and boards used to make the supporting structure must meet the most stringent selection criteria. Most often, pine and other coniferous lumber is used for these purposes. This is due to both the low weight and sufficient strength of such wood, as well as minimal warping when drying. In some cases, round timber cleared of bark is used, one side of which is cut on a circular saw to fit as closely as possible to the wall.
The lumber must be as dry as possible, so before use it is kept under a canopy for a long time or excess moisture is removed in a drying chamber. This will serve as a guarantee that during operation the timber will not move along with other elements of the rafter system.
To protect the Mauerlat from biological factors, the support beam is treated with antiseptic compounds. They will help prevent fungal damage to the wood, which can weaken the power structure or lead to its complete destruction.
Treating timber with antiseptic and fire-retardant impregnations will protect the wood from biological influences and increase the fire safety of the structure
To impregnate timber, it is advisable to use combined formulations that include both antiseptic agents and fire retardants. This way you can not only protect the wood from mold, but also make it resistant to open fire.
The general condition of the support beam is also important. It should not have critical cracks and so-called dead knots, which stand out in black against the background of healthy wood. For particularly critical cases, which undoubtedly includes the construction of a mauerlat, experts recommend using lumber harvested in winter.
Installation of pitched roof rafters
For fastening the truss system of a pitched roof, there are several approaches that differ significantly.
If the rafters do not lean against the side, but lie at the end of the wall, then they are attached directly to the walls using anchor bolts or screws, if embedded in the wall.
The second option is to attach the rafter legs to a beam that is pre-installed on the wall.
With this option, there are significantly fewer holes in the load-bearing wall.
After the beam is securely fixed to the wall, the rafter legs are secured using bolts or self-tapping screws.
To increase the reliability of the connection, angles are installed on the sides.
Mauerlat connection along the length
This type of structure requires a large length of timber. Most often, you have to splice wooden blocks together.
There are several connection options:
- oblique cut . The timber at the joints is sawn obliquely with ends 0.15 of the section height. The length of the connection should not be less than the height of the Mauerlat multiplied by two. The connection point is bolted through and through. This method is perfect for connecting the Mauerlat along the length;
- "in the paw." This method is suitable for corner joints. For one beam, the lower part of the joint is cut at a right angle, and for the second, the upper part is cut out. The connection point, as in the previous case, is tightened with a bolt. Right angles do not allow the Mauerlat to move.
Properties of sliding supports
Features of application
In most cases, the use of sliding supports for rafters is justified when constructing log objects. The fact is that structures made of wood give the greatest shrinkage. In general, this is somewhere around eight percent of the total volume.
Important! The shrinkage process of a building is greatly influenced by humidity and the building materials used. In the worst case, uneven shrinkage of the object is observed
After all, not using sliding supports for rafters greatly harms the fixing elements, causing them irreparable damage. As a result, the rafters lose their performance qualities. The tightness is compromised and the risk of collapse increases.
In the worst case, the object shrinks unevenly. After all, not using sliding supports for rafters greatly harms the fixing elements, causing them irreparable damage. As a result, the rafters lose their performance qualities. The tightness is broken and the risk of collapse increases.
In the worst case scenario, you have to completely replace the cover. It is much cheaper and more practical to use sliding supports for the rafters from the very beginning. This is an ideal option for log houses and other houses, the main materials for the construction of which are logs.
Design Features
The main feature of sliding supports for rafters, the circumstance that justifies their use in modern construction, is the absence of rigid fixation. A similar effect can be achieved thanks to metal elements that can be moved if necessary.
Sliding supports are installed on the upper logs, which must be load-bearing. Otherwise, the meaning of using these structural elements is lost.
If we compare conventional fixing structures with sliding supports for rafters, then in the second case specific structures are used. Unlike bolts, staples and self-tapping screws, they provide the mobility necessary for the structure.
The moving elements of the sliding supports for the rafters consist of metal strips. In this case, one part is attached to the rafters, and the second to the logs. But stripes are not static objects. They have a moving joint.
Attention! Special screws are used for installation. The point is that ordinary self-tapping screws are not able to cope with the load that will be placed on the moving elements of the roof
Another advantage of using sliding supports for rafters is the relatively low price, and they can be purchased at any hardware store
The point is that ordinary self-tapping screws are not able to cope with the load that will be placed on the moving elements of the roof. Another advantage of using sliding supports for rafters is their relatively low price, and they can be purchased at any hardware store.
The sliding elements are made of galvanized steel. In addition, they have ready-made mounting holes. So you don't have to drill or finish anything. This technology allows the rafters to easily change their position. This ensures that the entire roof is sealed.
Roof pressure
Surely everyone understands that mass roofing materials create very strong pressure on the walls. There are several components to this force:
- Weight of the finished rafter system
- Weight of roofing materials
- Atmospheric precipitation in winter (snow)
These variables are very easy to take into account when calculating, but there is still some threat - natural phenomena, for example, strong wind. To ensure that such cases are not unexpected during operation, it is necessary to focus on the maximum load values in the calculations. I can give the following as an example. For the central regions of the Russian Federation, the wind-snow load on a standard roof (gable roof 30 - 40°) is about 150 kg/m2, and for houses in the far north it will be about 600 kg/m2. If your calculations are incorrect, your roof will simply be crushed and you will have to make urgent repairs.
Now you understand how important it is to take into account all possible loads when selecting a rafter system. But besides all this, do not forget about the usual laws of physics
If your roof has a high degree, then you can avoid the accumulation of snow on its surface, but at the same time the pressure from the wind will increase many times due to the increase in the size of the roof. The same thing happens in the opposite case. If you make a flat roof, the wind loads will decrease, but more snow will accumulate on the plane.
It’s up to you to decide what’s best, but I can say one thing: a flat roof can be equipped with special heaters; of course, they will consume a large amount of electricity, but at the same time you will avoid the accumulation of snow cover on your home.
If you plan to equip the attic as a living space, then you will need to insulate it, and this, again, will add additional weight to the Mauerlat. Calculate all loads with a large margin and then you will never know there are problems with your roof.
Construction of layered rafters: basic rules
A layered rafter system is used when it is necessary to cover spans with a maximum length of 6-6.5 meters. If there are load-bearing structures (walls or columns) in the interior of the building, then it is possible to additionally install racks on them.
One of the most functional parts is the sliding type rafter support, since it can be used to attach various intermediate rafters to the Mauerlat.
Since large spans are very rare in private construction, layered systems are mainly used in individual buildings.
According to technology, the support for the rafter leg is the mauerlat. If we are talking about a wooden building, its function goes to the top row of walls. This nodal connection is of utmost importance.
When tightening the rafter legs using a crossbar, you can increase the span length to 8 meters, with one support - up to 12 meters, with two supports - up to 16 meters.
It is prohibited to lay wooden rafters on stone walls, since condensation will constantly form on them, which will have a destructive effect on the wood. To prevent possible rotting of wooden parts, it is necessary to insulate the Mauerlat. The same rule applies to all areas where wooden elements are adjacent to metal or stone structures.
The first step is to secure the Mauerlat. This part is essentially a beam with parameters 150 x 150, 150 x 200 mm. The process is carried out using pins. They must be concreted into the wall at least 40 cm deep. The bolts are secured in a similar way. For this purpose, twisted wires are used, the minimum diameter of which should be 6 mm. Their laying is carried out at the stage of wall construction no higher than the third row of masonry (counting is carried out from the top row).
Fastening of layered rafters to the Mauerlat can be done using brackets. Similar requirements apply to timber laid on top of external structures - the beam.
When constructing houses, a system of layered rafters based on wood is used. The manufacture and use of such metal parts is impractical and quite problematic.
It is convenient to connect and fasten rafter beams, support beams and other parts using fasteners in the form of teeth, tenons, and frying pans, widely used in carpentry.
One of the most important points is the accurate calculation of the layered rafter system even before the installation of the rafters begins.
Preparing to create a reinforced belt
Its thickness is calculated taking into account the projected loads acting on the roof of the building. They can be permanent (the weight of the rafter structure and roofing pie) and temporary (wind and snow). In any case, the width of the reinforced belt cannot be less than this parameter near the walls.
To get a strong belt, you need to use cement grade M400 and higher. It should be filled in one go. To prepare the mixture, take cement, pre-washed sand and crushed stone in a ratio of 1:3:3. Plasticizers are used as additives to reduce the water content in the solution and, as a result, increase the strength of the armored belt.
It is important that this element is laid continuously on both sides of the external walls of the building. The formwork for it can be building blocks that have a U-shape. Also, to complete the outer row, sawn blocks with a width of up to 10 centimeters are used. You can build formwork from OSB boards and even use standard wooden boards.
Fastening depending on wall material
The rafter legs are secured to the mauerlat with a notch and auxiliary connections - metal fasteners or wooden plates. The support on the beam can be rigid or sliding depending on the material of the walls.
Wooden
In timber, log or frame buildings, the upper crown or frame serves as the mauerlat. To absorb loads and maintain stability, the upper crowns must be firmly fixed to the lower parts of the wall using dowels and brackets. In frame buildings, the rafters are installed exactly above the posts and, together with other structural elements, form a rigid frame.
Wooden buildings are prone to shrinkage, especially in the first few months. The fastening of the rafter system should not be rigid and motionless, so that uneven stresses do not arise in different parts of the structure, and the possibility of deformation of structures relative to each other remains.
To ensure the mobility of the support unit, sliding joints are used. They consist of 2 steel elements - a bracket that is attached to the rafters, and a corner mounted on the upper crown.
When the house shrinks, the structures shift, but the rafter system remains stable and retains its geometry. After the movement is completed, the sliding supports can be replaced with rigid connections.
Brick
Such buildings are strong and stable and can withstand heavy loads. When installing a rafter system, the mauerlat is laid on a layer of double waterproofing. It is placed as close as possible to the inner surface of the wall to increase the resistance of the structure to wind loads.
Waterproofing Mauerlat
The support beam itself is fixed with staples to wooden plugs in the brickwork or mounted on studs walled up in the wall.
The attachment point of the rafters to the Mauerlat is rigid, which eliminates movement. To do this, grooves are cut in the lower part of the beams in the shape of the support beam, which prevent them from moving along the axis. When installing, the parts are fastened with corners, nails or holders. If it is not possible to select a recess, bars are sewn to the bottom of the rafters to act as a stop.
Aerated concrete or foam concrete
Such walls are not prone to shrinkage, but, like any masonry made from piece materials, they are not sufficiently resistant to bending and stretching. In addition, aerated concrete does not hold fasteners well and is quite fragile.
To create a solid foundation, a reinforced concrete belt is poured under the rafter system. To secure the Mauerlat to its surface, it is necessary to provide in advance for the installation of vertical studs with nuts.
After the concrete has hardened, waterproofing is laid on top of the reinforced belt, then the Mauerlat. The washers on the studs are twisted and slightly recessed into the surface of the beam.
Installation is carried out in the same way as in the case of brick walls. A groove is cut in the rafters so that its walls fit snugly against the Mauerlat. To strengthen the fastening, corners, holders, and nails are used. For large spans in brick buildings, it is also recommended to install an armored belt. It creates a rigid frame and increases resistance to wind, snow and seismic loads.
Mauerlat manufacturing materials
The Mauerlat can be made from wooden beams, boards, logs, as well as from metal profiles - channel, pipe, I-beam.
- Most often, the Mauerlat is made of timber. Its cross-sectional size to a certain extent depends on the size, and therefore the weight of the future roofing system, as well as on the size of the rafter legs.
However, given that the Mauerlat must be firmly laid along the end of the wall, distributing the load, the concealing or bending stresses in it are small, and the wood copes well with compression loads. Therefore, in most cases, the mauerlat does not require complex calculations of the section, and beams with sides that are multiples of 50, starting from 100×100, are usually used.
The table below shows the cross-sectional sizes of lumber most often used in the construction of roof structures in individual construction.
Table of sizes of wooden elements of the rafter system:
| Elements of the rafter system | Lumber cross-section, mm |
| Elements of the rafter system | Lumber cross-section, mm |
| Mauerlat | Timber 100×100, 100×150, 150×150, and sometimes more. |
| Rafter legs | Board or timber 60×150, 80×150, 100×200 – based on calculation results |
| Runs | Beam 100×100, 100×150, 100×200. |
| Tightenings (crossbars) | Board 50×100, 50×150. |
| Racks | Beam 100×100, 150×150. |
| Struts, fillies, cornice box board | Board 50×100. |
| Wind end and hem boards | Board 20×100, 25×150. |
The timber for the mauerlat must be selected carefully, paying attention to its evenness and integrity. It is not worth purchasing deformed, deformed lumber even for the sake of economy, since it will be more difficult to install it on flat wall surfaces without creating internal stresses in it. The wood should not have deep or wide cracks or knots.
Knots are dangerous not only because they differ from all wood in their density and the release of resin from them, as many people think, but also because they significantly weaken the timber. In addition, if a rafter fastening gets on a knot, it will be more difficult to screw a fastener into it or drive a bracket into it, and besides, they will not hold well in such a wood structure.
- Boards fastened together are used for lighter rafter systems that do not have an insulating “pie”, for example, when building a country summer house. For this version of the Mauerlat, for example, boards 30÷50 mm thick, laid in one or two layers, are suitable.
- Mauerlat is rarely made from metal elements, but profiles are sometimes used for combined options, which include both wood and metal.
When using this option, the load from the rafters is distributed not only onto the wood, but also onto the pipe laid on top of the beam through wooden inserts and pulled to the Mauerlat with clamps. When choosing pipes to reinforce the Mauerlat, you must adhere to some selection criteria:
- since the pipes will be passed through through holes in the lower part of the rafters, they should not have too large a diameter - 40÷50 mm is enough.
— you only need to take a new pipe, and before installation it must be coated with anti-corrosion paint.
Holes in the rafters for the passage of pipes must be made at a distance of approximately 100÷120 mm from their lower edge.
Cutouts are made in the wooden mauerlat, into the bottom of which the end side of the rafter leg will rest. Sometimes on the Mauerlat board, holes for installing rafters are formed by fastening pieces of timber 80÷100 mm high at a certain distance from each other. The width between the installed sections of the bars must exceed the thickness of the rafters by approximately 8÷10 mm, so that it fits freely into the prepared gap.
Due to the fact that the rafters will not be rigidly fixed to the Mauerlat, but installed on sliding fastenings, the system will be able to move slightly when the structure shrinks.
This diagram shows an option using a combined version of the Mauerlat, consisting of a wooden beam and a pipe extending beyond the load-bearing walls along their length. This design feature allows you to immediately make the basis for a protective canopy on the gable part of the roof.
Rafter attachment points
The rafter legs are connected to each other and to other elements of the system in several places:
- Mauerlat (upper crown, trim);
- ridge or ridge knot;
- vertical supports;
- floor beams;
- connections of rafters with eaves fillets;
- with a long slope, the legs themselves can be fused.
Connections are made with or without cutting. Hardware used for fastening:
- The corners allow connections to be made without sawing. They are attached to the timber with self-tapping screws or ruff nails;
- perforated tapes and plates;
- brackets made of two-millimeter galvanized steel. They are secured with nails, self-tapping screws, and anchor bolts. LK fasteners are similar;
- “sleds” that provide sliding fastening of the rafters. This method of fastening prevents destruction of the system when the house shrinks;
- bolts and nuts, self-tapping screws, wire ties.
Let's take a closer look at how individual nodes are executed.
DIY roof of a frame house step by step instructions
Almost any roof can be reproduced on your own, and as for the roof for a frame building, there will definitely not be any difficulties. The most important thing is to select the necessary material, and then just follow some rules and look at the drawing.
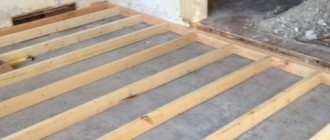
- The whole point of the first stage is to install the Mauerlat. Of course, there is no need to install it and it can be attached to one of the frame beams, but almost all developers still install it. Before installing it, you need to take care of the waterproofing layer. For which roofing felt is ideally suited. It is wrapped around the mauerlat and fastened with a construction stapler so that it rests on the support beam
- Next comes the installation of the rafter legs. They are fastened using nails, self-tapping screws, corners or metal plates. The pitch of the rafters is calculated individually and, as a rule, this value lies in the range from 0.4 to 1 m. The cross-section of wooden products also affects this parameter. The support beam for the rafter legs will be a Mauerlat with rigid fixation, however, you already know quite a lot about it. If the span between the rafters is more than five meters, then it is necessary to install special supports
- Then the sheathing is installed. Before purchasing material for this stage, you should think and decide what kind of roofing will be used, because for soft materials a continuous sheathing is used, for example, OSB sheets. As for, say, a metal profile, then bars with a cross-section of 5x5 cm in increments of 0.5 m are suitable here
- Next, a roofing pie is arranged
- As the final stage - laying the roof covering
If you don’t understand anything, then perhaps you will understand this issue if you watch a video about how to create the roof of a frame house with your own hands.
In what cases is a Mauerlat required?
Mauerlat is often called the roof foundation. This design, made of logs or timber, allows not only to securely fasten the rafters, but also to ensure uniform load transfer to the walls and foundation of the structure
.
For structures whose walls are made of piece materials (brick, foam concrete or aerated concrete blocks, etc.), installation of a Mauerlat is necessary
.
This is due to the fact that walls of this type do not cope well with point, undistributed loads. In addition, blocks made of foam material are not strong enough to securely fix the rafter system - fasteners can be torn out of the block under load. Thus, installation of a Mauerlat is required.
In order for the wooden beams laid on the longitudinal walls of the building or along the entire perimeter (depending on the type of roof) to be firmly attached to the base, it is recommended to first create a reinforced concrete belt in the upper part of the walls. Fasteners for the support beam are embedded into a monolithic beam with a height of 200 mm and a width that matches the width of the wall.
These are anchor bolts or studs with a diameter of 14 mm, located strictly vertically. To eliminate the possibility of them being pulled out of the concrete under high loads, the lower ends of the studs or bolts should be bent. The embedded fasteners are located in increments of no more than 1.5 m.
preparing an armored belt for the Mauerlat
In the timber from which the Mauerlat is mounted, holes should be made corresponding to the location of the studs. The beam is put on the studs, washers are put on the free threaded end of the fastener and nuts are screwed on. This technology allows you to securely fasten the roof base to the wall.
What is the Mauerlat made of?
The roof truss system is most often made of wood. The Mauerlat is also made from the same material. In wooden houses, the role of the Mauerlat can be played by the last crown of the walls, which is securely fastened. In buildings made of aerated concrete, brick and other similar materials, the mauerlat is constructed using wooden beams with certain parameters depending on the dimensions of the walls.
High quality wood is optimal for constructing a mauerlat
The Mauerlat is attached to the walls using metal anchors. To do this, bolts are fixed in the brickwork, the length of which is greater than the thickness of the beams. Then the places for the holes are marked on the boards, the beams are laid, inserting the ends of the bolts into the holes. Special nuts are screwed on top, securely fixing the Mauerlat. Thus, to create the basis for the rafter system, wooden beams with a cross-section of 150 or 200 mm and anchor bolts longer than the thickness of the beam are required.
Fastening principles
In order to efficiently connect the fastenings of the rafters to each other in the ridge unit, the most common tools are required: a pencil, a tape measure, a saw, a building level, a screwdriver and fasteners. The quality of work depends on compliance with the following rules:
- The type of fastening used for each connecting sheet is determined during the calculation and design of the rafter system. To avoid confusion, this information is reflected in the drawing.
- So that all fastening points have the same size and angle, they are made from one, pre-marked and manufactured template.
- If a bolt or self-tapping screws are used during the fixation process and it is necessary to make holes, then their diameter must exceed the dimensions of the fastening element. This prevents the wood from cracking, warping and warping.
- When tightening bolts, screws or driving in nails, do not bury them below the surface of the boards, but, on the contrary, leave a small gap so that the wood is not damaged when humidity changes.
- Each connection of the rafter legs in the ridge should be tight, but not tight. After installation is completed, it is necessary to check the tightness of all components.
The ridge unit of the roof is the area that bears the heaviest load. Therefore, the bearing capacity of the entire rafter system depends on the correct calculation and quality of the rafter connection.
When you can’t do without covering the Mauerlat
If the structure is built of wood, or erected using a frame type, there is no point in attaching the Mauerlat as a separate structure. The wall, or rather its upper part, can handle its functions quite well.
If the building is made of brick, foam blocks, aerated concrete and other similar materials, then its walls must be reinforced with Mauerlat. The same material is used for its construction as for the roofing.
Typically, wood is used in this capacity, which is a relatively cheap material, quite affordable, environmentally friendly and quite convenient to work with.
This device can be made from metal, but this material is more suitable for large industrial buildings, in which the load on the roofing system significantly exceeds that in residential buildings.
To ensure the strength and reliability of the wooden Mauerlat structure, it is preferable to use solid beams made from solid wood.
In the case where the wall is too large and it is not possible to select the material of the required length, the individual beams must be connected as securely as possible.
It is necessary that the place of their connection be exactly in the middle of the wall, so that each of the parts of this beam is as long as possible.
Let's put it this way: if there is a six-meter long beam and a four-meter long wall, then you will need two equal pieces of four meters each, and not two and six.
Types of fastenings
Wood is a natural material that, in the process of equalizing humidity and drying, causes significant shrinkage, which is why the linear dimensions of the structure change. That is why experienced craftsmen recommend erecting a roof for timber and log houses a year after construction, when the shrinkage process passes from the active to the passive phase. If you fix the wooden frame elements rigidly, then after drying the roof of the house may become deformed. Therefore, the following types of fastenings are used to connect rafters:
- Tough. Rigid fastenings are those types of fastening fittings that are not able to compensate for changes in the size of wood during the drying process. They provide a strong, reliable fixation, however, they can cause deformation of the frame, leading to changes in the geometry of the roof, leaks, or even collapse of the structure. This type of fastener includes metal corners, metal plates and wooden “chocks”.
- Mobile. Movable fastenings are methods of fixation that, due to parts sliding along their axis, can compensate for changes in the dimensions of the rafter frame during the process of shrinkage of the structure. The frame, secured with sliders or slides, “breathes” along with the house, adapting to its dimensions without causing deformation. With the help of such fastenings it is possible to erect roofs for wooden houses that have not undergone the shrinkage process.
Sliding rafter system
Roofing equipment
With your own hands - How to do it yourself How to make a two-flight staircase to the second floor with your own hands photo drawings Do-it-yourself two-flight staircase to the second floor
In addition to hand tools, developers are willing to resort to electrical equipment, which speeds up the installation process and makes it much easier. Agree that cutting with an electric saw is much more convenient than using a standard hacksaw.
- Electric plane and electric saw
. These tools will be useful when installing wooden sheathing elements and the rafter system as a whole. - Electric drill and screwdriver
. Everything is simple here too. Used for fastening roofing materials
When laying steel sheets using the seam method, you will need a special machine that creates pictures along a length equal to the slope. By the way, a painting refers to individual metal elements interlocked with each other, which will subsequently be laid on the roof. As a rule, they are assembled on the ground and only then lifted to the workplace.
In addition, during the cold season, some roofing coverings tend to freeze, so developers use gas burners. They are also used as tools for melting mastic.
Almost any construction requires a crane, so if you are going to use very heavy structures, resolve this issue with some company before starting construction - this will save you a lot of time.
With hanging rafters
These are systems in which the rafter legs rest only on the external walls without intermediate supports (load-bearing walls). For gable roofs, the maximum span is 9 meters. When installing a vertical support and a strut system, it can be increased to 14 meters.
The good thing about the hanging type of gable roof rafter system is that in most cases there is no need to install a mauerlat, and this makes the installation of rafter legs easier: there is no need to make cuts, just bevel the boards. To connect the walls and rafters, a lining is used - a wide board, which is attached to studs, nails, bolts, crossbars. With this structure, most of the thrust loads are compensated, the impact on the walls is directed vertically downwards.
Types of rafter systems with hanging rafters for different spans between load-bearing walls
Gable roof rafter system for small houses
There is a cheap version of the rafter system when it is a triangle (photo below). Such a structure is possible if the distance between the external walls is no more than 6 meters. For such a rafter system, you can not make calculations based on the angle of inclination: the ridge must be raised above the tie to a height of at least 1/6 of the span length.
But with this construction, the rafters experience significant bending loads. To compensate for them, either rafters of a larger cross-section are taken or the ridge part is cut in such a way as to partially neutralize them. To give greater rigidity, wooden or metal plates are nailed on both sides at the top, which securely fasten the top of the triangle (also see the picture).
The photo also shows how to extend rafter legs to create a roof overhang. A notch is made, which should extend beyond the line drawn from the inner wall upward. This is necessary to shift the location of the cut and reduce the likelihood of the rafter breaking.
Ridge knot and fastening of rafter legs to the backing board with a simple version of the system
For mansard roofs
An option with the installation of a crossbar - used when organizing a living space under the roof - an attic. In this case, it serves as the basis for lining the ceiling of the room below. For reliable operation of a system of this type, the crossbar cut must be hingeless (rigid). The best option is in a semi-frying pan (see picture below). Otherwise, the roof will become unstable to loads.
Rafter system of a gable roof with a raised tightening and a crossbar insertion unit
Please note that in this scheme there is a Mauerlat, and the rafter legs must extend beyond the walls to increase the stability of the structure. To secure them and dock them with the Mauerlat, a notch is made in the form of a triangle
In this case, with an uneven load on the slopes, the roof will be more stable.
With this scheme, almost the entire load falls on the rafters, so they need to be taken with a larger cross-section. Sometimes the raised puff is reinforced with a pendant. This is necessary to prevent it from sagging if it serves as a support for ceiling cladding materials. If the tie is short, it can be secured in the center on both sides with boards nailed to the nails. With a significant load and length, there may be several such belays. In this case, too, boards and nails are enough.
For large houses
If there is a significant distance between the two outer walls, a headstock and struts are installed. This design has high rigidity, since the loads are compensated.
Gable roof rafter system for a large span and ridge and rafter insertion units
With such a long span (up to 14 meters), it is difficult and expensive to make the tie in one piece, so it is made from two beams. It is connected by a straight or oblique cut (picture below).
Straight and oblique cut for connecting the tie
For reliable joining, the connection point is reinforced with a steel plate mounted on bolts. Its dimensions must be larger than the dimensions of the notch - the outermost bolts are screwed into solid wood at a distance of at least 5 cm from the edge of the notch.
In order for the circuit to work properly, it is necessary to make the struts correctly. They transfer and distribute part of the load from the rafter legs to the tie and provide structural rigidity. Metal pads are used to strengthen connections
Fastening struts for a rafter system with hanging rafters
When assembling a gable roof with hanging rafters, the cross-section of lumber is always larger than in systems with layered rafters: there are fewer load transfer points, therefore each element bears a greater load.
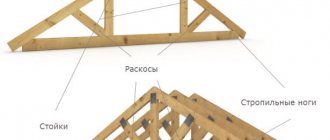
Classification of connecting nodes
The roof frame consists of a number of elements, solidly fastened together in the middle. But the main operational load is borne by the rafters, which is why the functional characteristics of the roof and the gas safety of the entire structure depend on the strength of their fastening to the Mauerlat and their connection to each other.
Rafter systems, hanging and layered, transfer the load from their own weight, the weight of the roofing pie and atmospheric influences to load-bearing walls and other structures. The lower ends of the rafters rest on a support beam or Mauerlat, the upper ends are fastened in pairs freely to each other or mounted to the ridge girder. In addition, for the sake of structural rigidity, additional supports, crossbars, struts and other elements are used. If it is necessary to increase the length of the rafters, the rafter legs are multiplied. In general, rafter connection nodes can be divided into a small number of main groups
:
connection unit with the “foundation” of the roof”; ridge connection unit; fastening unit for additional elements of the rafter system; joining rafters near the extension.
Extension of rafters
Connecting the rafters along the middle allows you to make a rafter leg of the required size from the available lumber. More often, goodbye splicing is performed using the following joining methods
:
end-to-end; overlap; method of oblique cutting; in three boards; with support on the purlin.
Butt mount
. For splicing, the abutting ends must inevitably be cut off at 90° below the house. After tightly combining the resulting ends, a wooden mask or a metal fastening element (plate with teeth) is mounted on the rafters at the junction. Board overlays are installed on both sides and nailed in a checkerboard pattern with nails of the appropriate length, or fastened with self-tapping screws.
Oblique cut method
. The ends are trimmed under the house at 45°. The cut ends are joined, and then a through hole is drilled in the middle for bolt fastening. The bars are tightened with a bolt with a diameter of 12 or 14 mm with a wide washer.
Overlap fastening
. The wooden elements are laid with an overlap and the entire length of the river is sewn together with nails, which should be staggered. In some cases, studs with nuts and washers can be used. Such a connection of river rafters does not require precise cutting of the ends.
A long rafter leg can be made using three boards and spacers. In this case, one of the boards is laid in the middle of the other two with an overlap of at least a meter and fastened with nails in a checkerboard pattern. Then, wooden spacers equal to the thickness of the middle board are inserted into the empty space in the middle of the outer boards and nailed, to ensure the rigidity of the structure.
The connection of rafters of a length with support on an intermediate cycle is carried out in a small case, sometimes all rafter legs are built up at the same distance from the roof overhang. The horizontal cycle is mounted on racks that rest on the internal load-bearing wall or columns. In the case where the domicile of the splice falls on the purlin, there is the potential to provide the necessary rigidity of the long rafter leg. Both parts of the rafters are connected to each other by staples or other elements, and are also attached to the purlin with nails.
What affects the rafters
Before you start making rafters, you should decide on their type, method of fastening and linear dimensions. Only in this case can you be sure of the strength and safety of the structure.
How do various factors influence the parameters of rafters?
Physical factor Brief description of the effect on rafter parameters
Roof load size
The rafters must withstand snow and wind loads. During calculations, you need to take the actual maximum values of snow cover from the tables of building codes and take into account the strength and wind rose. The data allows you to find out the total load on the roof slope depending on its area and angle of inclination. Next, you can determine the size of the rafters, their number and pitch. In this case, a safety factor must be included. The fact is that lumber does not have stable and uniform strength values; too many unforeseen factors influence these indicators. In most cases, 50×150 mm or 50×200 mm boards are used to make rafter legs.
Roof type
Gable roofs can be layered or hanging. For hanging roofs, you need to make rafters from stronger boards
In this case, the method of fixing the elements to the Mauerlat is taken into account. If a notch is made, then the width of the boards should increase by the amount of the notch. The fact is that cutting in this place automatically reduces the width of the material that takes the load
If you make a cross cut 60 mm long on a 200 mm thick board, then only the remaining width of 140 mm is taken into account. Accordingly, if, when calculating the loads, rafters from 200 mm boards are selected, but during fastening unintended cuts of 60 mm are made, then the width of the blanks for the rafters increases to 260 mm. This remark is made for those who like to abuse various notches and cuts for the persistent areas of the ends of the rafters. Currently, there are many special devices that allow you to firmly fix the rafter in the desired position without filing
The fact is that the cut in this place automatically reduces the width of the material that takes the load. If you make a cross cut 60 mm long on a 200 mm thick board, then only the remaining width of 140 mm is taken into account. Accordingly, if, when calculating the loads, rafters from 200 mm boards are selected, but during fastening unintended cuts of 60 mm are made, then the width of the blanks for the rafters increases to 260 mm. This remark is made for those who like to abuse various notches and cuts for the persistent areas of the ends of the rafters. Currently, there are many special devices that allow you to firmly fix the rafter in the desired position without sawing.
Purpose of the building
For residential buildings, rafters must have a safety margin of at least 1.4 of the design values. For non-residential buildings the coefficient is reduced to 1.2. Conclusion - the size of the rafter boards on houses is larger than on garages and other extensions.
Purpose of attic spaces
Residential attic spaces (attics) must have an insulated roof. The width of the rafters must correspond to the thickness of the insulating layer. At the same time, you need to adjust the pitch between the rafter legs depending on the standard width of the insulation. If in a given climate zone the optimal thickness of roof insulation is 200 mm, then it is recommended to choose the same width for the rafters. Various extensions of narrow rafter legs during roof insulation are not considered the right solution.
This knowledge will help you make the right decisions both during the manufacture of rafters and during their fixation directly on site. Mistakes in the construction of a rafter system are too expensive; you should not be overly self-confident.
Mauerlat for different types of roofs
The design of the roof base does not imply significant differences in the construction of different types of roofs. For simple gable roofs, the Mauerlat is always placed on the walls, as it serves as a support and connection layer for the rafter system and load-bearing elements.
Depending on the type of roof connection, the type of Mauerlat fastening is determined
If it is planned to equip a residential attic in a house under construction, then the construction of the Mauerlat is carried out using conventional technology. In this case, complex methods are not used, and the timber is attached to the walls with anchors. A special point is careful insulation, as well as waterproofing, since the attic should be comfortable.
The Mauerlat for the attic roof has a standard design
Hip roofs have a rather complex structure and therefore the Mauerlat system must be as strong as possible. The basis for a hip roof is created according to general principles, but the load on it is slightly greater than with a simple gable roof. To do this, it is best to attach the base to an armored belt.
The hip roof has four slopes
To build a roof with two slopes, you need a Mauerlat securely attached to the walls. The main load is carried out on two walls on which the roof slopes rest. In this case, fastening with or without an armored belt is suitable.
For a gable roof, the Mauerlat can be fastened using any method
Attaching rafters to the mauerlat of a gable roof
A “live” example of installing a gable roof rafter system will help you better understand all the nuances. This is the most common design in private construction.
A brick house with an internal load-bearing wall. It is rational to use a layered scheme with the rafters supported on the mauerlat and ridge girder.
For rafter legs, 50x150 mm boards are used. A mauerlat with a cross-section of 200x200 mm is laid around the perimeter of the house, and a wall of 150x150 mm is laid along the inner wall.
The Mauerlat is connected along its length by an oblique notch, and in the corners it is joined “in half a tree”. Attached to the armored belt with studs and nuts.
In buildings with brick walls, unlike wooden houses, the Mauerlat is rigidly connected to the rafters. A notch is used - a groove is cut in the lower part according to the configuration of the support beam. Additionally, the parts are fixed with metal fasteners.
How to make a gash
Cutting a groove is the most critical moment when preparing rafters for installation. Various methods are used:
- The whole board is aligned with one end along the mauerlat, the other along the ridge girder. Based on actual measurements, markings and cuts are made. The next rafters are cut according to the first blank.
The slope angle of the slope is calculated using trigonometric formulas and sawed using a miter saw with a protractor. This method is most often used in factory settings when many rafters need to be prepared.
You can mark the corners with a square with a built-in protractor. It is inexpensive and easy to use. Professional builders use the Swanson Speed Square. This device allows you to quickly measure and mark angles in spatial structures - roofs or stairs.
The easiest and fastest option is to cut out a template. Even if you only have a tape measure and a pencil, you can easily make it from scraps of a board or sheet of rigid material - fiberboard, OSB, chipboard. Trigonometric calculations or protractors are used, with the help of which the contour of the groove with the desired characteristics is drawn. After cutting with a circular saw, the template is ready.
To install a gable roof, you will need 2 templates - for the support and ridge assembly. For convenience, a block is placed on the lower edge of the pattern, which will serve as a stop when marking.
Rafter preparation and installation
In gable roofs, the rafter legs can rest not only on the ridge and mauerlat, but also on intermediate posts. To avoid errors in measurements, you need to take the highest point as a basis and control the distance only from it.
This template is needed for making rafters
Preparation begins with trimming the ridge end using a circular saw. The Svenson square or template is set at the desired angle and the cut is made.
If a notch is provided for attachment to the ridge girder, a seat is selected in the upper part of the rafters according to the markings.
From the junction point of the rafters on the ridge (along the axis of the purlin), the estimated length to the mauerlat is measured. Using a template or Swenson's triangle, the seat is marked and carefully cut out with a circular saw or chain saw. For convenience, the sawing depth is set equal to the thickness of the board plus 1 mm.
It is recommended not to finish marking lines to the end, so that later they can be modified with a hacksaw. This will allow you not to reduce the working height of the section if the saw goes too deep into the board.
The depth of the “saddle” should not exceed one third of the width of the rafter
The eaves overhang is sawed off along the already mounted rafters along the cord. All that remains is to try on the rafter leg in place, adjust the landing grooves until they fit tightly and secure the connections with metal corners.
The cuts must be made very carefully to ensure maximum fit. Gaps of no more than 2-3 mm are allowed. It is forbidden to place wooden wedges in curved, loose joints. Over time, they dry out and fall out, and the attachment becomes unstable.
Basic methods of installing a Mauerlat
Having chosen the material for making the base for the rafters, you need to decide whether a reinforcing belt will be poured along the top of the wall. This structural element is reinforcing and is usually installed on block, brick or fill walls, giving the roof a reliable foundation. If the walls are monolithic, or the brickwork is made in several rows in thickness, then the reinforcing belt is abandoned in order to simplify the work, save money and lighten the entire structure of the house.
Thus, there are two types of arrangement of the base for the Mauerlat - with and without filling the reinforcing belt.
To ensure high-quality ventilation of the attic space and avoid rotting of wooden structural elements, experts recommend fixing the Mauerlat 300÷500 mm above the attic floor beams.
Attaching the Mauerlat to the walls can be done in various ways, depending on the existing base:
- The mauerlat beam along the entire perimeter of the building is rigidly connected into a single frame. Since lumber usually has a standard length of 6 m, the mauerlat is assembled from several pieces of timber. They are spliced together with an oblique cut or half-timber, and the joint is additionally fastened with self-tapping screws, screws or wooden dowels.
The corner units of the frame are fastened with metal plates or brackets. The frame can additionally be fixed with brackets to the wall. One side of this element is driven into the Mauerlat, and the other into the wall. In the presented mounting diagram for the Mauerlat, this type of fixation is shown on the left side.
A half-wood connection can be made using a pin embedded in the wall in advance, or with anchors driven into the through holes of the combined parts of the beam.
This type of fixation of the Mauerlat to the walls is possible without a reinforcing belt.
- On the right side of the diagram presented above, the installation of timber on a reinforced concrete belt is shown, into which studs are embedded at a certain distance to secure the Mauerlat to them.
This installation method is used for lightweight backfill walls or those built from foam concrete and gas silicate blocks. In such a design, the main load from the rafter system falls on the reinforcing belt, and the Mauerlat distributes it evenly along the entire perimeter.
Let's consider both cases - with and without a reinforcing belt, in more detail
Installing a Mauerlat on a wall without a reinforcing belt
Basic installation and mounting options
There are four options for installing a mauerlat on a brick wall without a reinforcing belt. The simplest and therefore most common is when the beam is fixed on top of the wall to a waterproofing material:
— For the entire thickness of the wall surface, when the walls are one brick thick.
— At the level of the inner surface of the wall, into which a wooden plug ¼ brick deep is embedded below the upper end. In this case, the bracket is driven into the Mauerlat and the plug.
— At the level of the inner surface of the wall, on the upper edge of which, in front of the Mauerlat on its outer side, a wooden plug beam of a smaller cross-section, treated with a bitumen primer, is fixed.
- At the level of the inner surface of the wall, on top of a cork board pre-fixed on it, having the height of a brick.
The installation of a wooden Mauerlat on the wall is thought out in advance, taking into account the preparatory stage, which is carried out even when laying the walls:
- The masonry rises above the floor beams by three or four brick courses. The surface of the wall must be flat. Then another row of brick is laid, but on the inside of the wall, instead of a brick, a processed timber plug is installed, having a thickness equal to the height of the brick.
Then another brick row is laid on top, covering the auxiliary wooden element.
Next, a waterproofing material is laid along the inner edge of the wall, on top of which a mauerlat beam is laid. On the remaining surface of the width of the wall, next to the Mauerlat, another row of brick is laid - this will protect the wooden part from external moisture. On this horizontal side, the timber must also be separated from the brick by a layer of waterproofing
After the mortar in the masonry has completely hardened, a bracket is driven into the mauerlat and the auxiliary beam-plug, which secures the wooden base to the wall.
rafter mount
- In the second case, the wall is laid entirely from brick to the required height. When laying the next row, approximately in the middle of the wall thickness, wooden plugs treated with bitumen are installed, and a “shelf” for the mauerlat is left on the inside. On the outside, next to the cork, a brick is placed. Next, waterproofing is spread over the surface, and a Mauerlat is fixed on top of it, which is secured with staples to the plugs.
- In the third option, all work is carried out in the same way as the second, but the masonry ends two rows before the desired height. Then, at the level of the inner edge of the end of the wall, plugs impregnated with bitumen are embedded, having a width greater than the width of the mauerlat, by approximately 50÷60 mm, and a height equal to the height of the brick. Next to them, a row of bricks is placed the width of the wall or with a protrusion outward. On top of the wooden plug, at a distance of 10–15 mm from its inner edge, a mauerlat is laid, which is covered from the outside with one row of bricks.
The masonry is carried out with a shift of bricks outward by 30÷50 mm, while a stepped ledge is formed. Due to the fact that the outer brick row rises above the level of fastening the Mauerlat, additional thermal insulation of the structure is provided, which is not observed in the simplest fastening option, when a wooden beam is simply installed on the waterproofed upper end of the wall.
It is worth paying attention to waterproofing. This material is installed so that it separates the raw wood from the brick or other masonry material. For waterproofing, not only roofing material can be used, but also linokrom, technoNIKOL or hydroisol.
Fasteners
The Mauerlat can be finally fixed to the wall in various ways - with staples, wire, threaded rods or anchor bolts. How this is done will be discussed below.
Wire twist
If you plan to fasten the Mauerlat with twisted wire, then it is laid along the inner edge of the wall, and brickwork is done along the outer edge.
To work, you will need steel wire - “rod rod”, having a diameter of 5 ÷ 6 mm. It is laid at the stage of wall construction 4-5 rows of masonry to the top, usually folded in half. The free length of the ends of the wire on both sides of the wall should be left so that it is enough for twisting on the inner edge of the installed Mauerlat.
The twisting itself is carried out using a pry bar or crowbar.
Another option for fastening the Mauerlat by twisting is to pass the ends of pre-embedded wire through through holes drilled in the timber.
In this case, the wire is raised from both sides to the edge of the wall, then it is bent and passed through the through holes of the Mauerlat from below, and then twisted so that the beam is tightly pressed to the upper surface of the wall. Fastening using twisting is carried out in steps equal to the step of installing the rafters - the connecting nodes are between adjacent rafter legs.
Staple fastening
As mentioned above, in some cases, wooden plugs are embedded into the brickwork, which have a width and height equal to the size of the brick. Sometimes they use a cork made of timber, running along the entire wall parallel to the mauerlat.
Corks must be carefully treated (impregnated) with a bitumen primer to prevent the wood from absorbing atmospheric moisture. The insertion of wooden plugs has already been described above, and all that remains is to consider attaching the Mauerlat to them using staples.
In order for the bracket to fit neatly into the wood without splitting it in two, it is recommended to drill holes according to the markings, equal in diameter to the ends of the bracket. Then the bracket is installed in the designated holes and driven into them with a hammer.
Installing the Mauerlat on studs
Another option for fastening the Mauerlat is to install it on metal threaded rods or on reinforcement rods embedded in the masonry. This fastening method is used if the walls of the building will bear a high load. The studs are usually placed between the rafters at a distance equal to the installation pitch of the rafter legs. This distance can sometimes be increased, but in any case it should not exceed 1500 mm.
Fastening is performed in the following order:
- Sections of reinforcement are prepared, bent in the lower part in the form of the letter L, or studs with a diameter of 10÷14 mm, in the lower part of which a horizontal section having a length equal to the length of the brick is welded. This shape of the pin is necessary for a more rigid installation of the element in the masonry.
- If you choose an L-shaped version of the stud or reinforcement, then it will be enough to deepen it into the masonry by three rows, that is, approximately 200 mm. If even studs are installed, it is recommended to embed them at 350-400 mm.
- The next step is to lay waterproofing material on the top row of masonry. To ensure that the waterproofing lies evenly on the wall surface, holes are cut in the rolled material where the studs reach the surface.
- Next, markings are made on the Mauerlat beam for the holes through which it will be put on the studs. This process can be carried out quite simply, even without a ruler and pencil. To do this, the beam is installed from above, on the protruding studs, and it is tapped from above with a hammer in the areas where the fasteners are located. There should be dents on the beam through which through holes will be drilled. The diameter of the holes must exceed the diameter of the stud by 2÷3 mm so that the beam can be easily put on the fasteners, without distortions.
- If the beam is installed on studs that have threads at the top, then a wide washer is put on them and the nut is tightened. If the Mauerlat is mounted on reinforcement, then its free end must be bent at a right angle and secured to the surface of the beam with powerful nails, which are driven in and then bent.
Anchors
This type of fastening is suitable for a power plate that will bear both light and heavy loads. The main difference between anchoring a beam to a wall is that it does not require any preliminary embedded elements.
The anchor fastening consists of two elements - the expansion anchor itself, installed in a hole drilled for it in the wall and timber, and a screw, which is inserted into it, and on which a nut is screwed on top. When the nut is tightened, the screw moves upward progressively, together with the conical head, which moves the “petals” apart and ensures reliable fixation of the fastener.
Installation work on installing the Mauerlat using this method is carried out in the following order:
- Waterproofing material is laid on the wall.
- The mauerlat beam is laid on top of it.
- Next, markings are made along which through holes will be drilled.
- The anchors must have a diameter of 10÷15 mm, respectively, the holes are drilled with a drill of 12÷17 mm. The drill must pass through the timber and go deep into the wall by at least 180÷200 mm.
- The next step is to drive anchors with a screw part into the holes, onto which a nut is then screwed using a wrench, under which a wide washer is placed.
Fastening the Mauerlat to the reinforcing belt
A reinforcing belt under the rafter system will never be superfluous, even if the walls of the building are strong enough, since attaching the Mauerlat to it is as reliable and durable as possible. For some buildings, a reinforcing belt is simply necessary, for example, this applies to backfill walls or walls built from aerated concrete blocks. Aerated concrete is quite fragile and holds fasteners very poorly on its own.
Creating a reinforcing belt
The reinforcing belt for installing the Mauerlat can be made without help. Of course, if the work is carried out by one person, it will go much slower, but the main thing in this case is the opportunity to save money.
The reinforcing belt is a ribbon of concrete, inside of which there is a metal frame made of reinforcement. The width of the belt should correspond to the width of the wall, its height is 200÷250 mm, and it runs along the entire perimeter of the building. It is very important to ensure that the number of fasteners should be equal to the number of rafter legs. Therefore, having calculated the number of rafters in the roof structure, the pitch of the location of the fastening embedded parts is calculated.
In order for the belt to be strong and not crumble, M400÷500 cement is used to prepare the solution, and the finished concrete from it is poured into the formwork in one go.
The solution for pouring the reinforcing belt is made from cement, crushed stone and sand, in proportions 1: 3: 3. Sometimes plasticizers are added to the mixture, which allow the poured solution to dry evenly and reduce the amount of water used when mixing it.
Briefly, the process of pouring a concrete belt is shown in the table below:
| Illustration | Brief description of the operation performed |
| Illustration | Brief description of the operation performed |
| The first step to fill the reinforcing belt is to install the formwork. It can be made from different materials. Most often, boards are used to mount this box, and bars are used to fasten them together. This is the most affordable material, which, after the belt hardens, can be removed and reused. It is quite possible to use third grade lumber. To prevent the poured solution from seeping into the gaps between the boards and into the joints between them and the wall, it is necessary to secure dense polyethylene on the inside of the wooden walls, which can be removed after the concrete has hardened. | |
| Another formwork option consists of two layers - plywood with a thickness of at least 10 mm, fixed to the wall from the outside, and insulating material installed from the inside of the structure and pressed against the plywood sides. | |
| It is advisable to install the insulation on the waterproofing sealant, and also use it to glue the corner joints of the material, and then wait for it to dry. Then the solution poured into the formwork will remain completely inside the formwork. | |
| Another option is permanent polystyrene foam formwork. It consists of hollow blocks that are assembled into a single structure, and it is also advisable to fix them on the wall using waterproof sealant. This design is both formwork and a thermal insulation layer, which will reduce the impact of a powerful cold bridge through the concrete belt and will retain heat in the attic. However, it makes sense to use foam blocks or an internal layer of thermal insulation on the formwork if the roofing system itself is fully insulated. Whatever material the formwork is constructed from, its upper edge must be carefully aligned horizontally using a level. | |
| The next step is to assemble the reinforcing structure. Reinforcement is installed along the inner walls of the formwork, along the upper and lower edges, with a distance of 15÷20 mm from the top and bottom. | |
| The reinforcement is tied with thinner wire, and the shape of the frame should generally follow the shape of the internal space of the formwork. | |
| The individual parts of the reinforcement are fastened together with twisted wire. | |
| In order to create the necessary clearance between the internal walls and the reinforcement system, and at the same time the structure is fixed in one position, special clamps are installed on the reinforcement rods. | |
| The star fastener is most often used to create a gap between the formwork wall and the reinforcement, which must be filled with a layer of concrete mortar. The clamps are produced under different numbers, which determine the thickness of the concrete layer that will separate the reinforcement and, in this case, the insulation, and in other cases, the outer edge of the wall or formwork being poured. That is, the reinforcement structure is completely hidden inside the concrete and will be completely safe from corrosion there. The distance can be from 15 to 75 mm. The clamps are installed in increments of 500÷750 mm. | |
| Having finished reinforcing the formwork, studs are installed at a distance equal to the pitch between the rafters, since in this option they are embedded in the belt reinforcing the building. The bottom of the pin should be L-shaped. It is installed on this bend at the bottom of the formwork, in the middle part of the reinforcement structure, and is rigidly fixed with twisted wire in two places - on the horizontal lower and upper lintel. The studs must stand strictly vertically and on the same line, and rise above the future belt by the thickness of the Mauerlat, plus 50÷80 mm. | |
| The next step is to fill the formwork with concrete mortar, the surface of which is leveled along the walls of the box. Leveling the surface of the reinforced belt is done using a rule or a flat board. |
After the reinforcing belt has hardened (this process should take at least 15–18 days, or even more depending on its thickness), you can proceed to the installation of the Mauerlat. This process will no longer differ in any way from a similar operation when the studs were embedded in the brickwork.
Video: an original solution to the problem of creating a reinforced belt under the Mauerlat on an aerated concrete wall
Other ways to install mounts for the Mauerlat
In addition to what was mentioned above, there are other ways to fasten studs into the concrete of a reinforced belt for installing a Mauerlat.
log staples
A. Formwork is installed according to the same principle - from boards, plywood or foam permanent blocks. In addition, the walls of the formwork can even be made of ordinary or aerated concrete bricks.
- A reinforcement structure is also installed inside the formwork, but the studs are mounted differently before pouring the mortar into the formwork.
- The wooden walls of the formwork are fastened together with jumpers, installed at the same distance from each other - it must correspond to the spacing of the rafters. The middle is determined on the slats, and a hole is drilled at the found point with a diameter 2÷2.5 mm larger than the diameter of the pin.
- Next, the pin itself is installed in the hole, having a height of 100÷150 mm greater than the height of the belt and Mauerlat. From below, the stud is screwed into a nut - at the point where it rests on the bottom of the formwork, that is, at the end of the wall of the house. Additionally, it is advisable to secure the stud with two nuts on the jumper itself in order to install it strictly vertically. The top nut will then be easy to remove when removing the formwork. All other studs are installed in the same way.
- When all the embedded elements are installed, the concrete solution is poured into the formwork and leveled to the level of the walls.
If in this way the studs will be installed in formwork made of brick or aerated concrete, then wooden overlays with a hole for the stud can be simply installed without even securing them to the walls.
The concrete solution in the formwork must harden and gain strength for at least 15 days. Stripping is allowed only after the concrete has gained at least 70–75% of its brand strength.
B. Mauerlat can be anchored to a reinforcing belt in the same way as to walls built from other materials.
B. If it is decided to fix the wooden beam with wire, then it is screwed to the reinforcement, which is prudently installed inside the formwork and protrudes from both sides of the belt.
Waterproofing layer under the Mauerlat
Waterproofing is laid on the end part of the wall or on a concrete belt to preserve the Mauerlat timber from penetration into the wood by capillary action from building structures and, accordingly, to prevent decomposition processes. It is recommended to lay waterproofing over the entire width of the wall, and for a better fit of the material to the wall material, it is fixed to bitumen mastic, which in itself is a good waterproofing agent.
Holes are cut in the waterproofing material if it is mounted on top of embedded studs. The material must stretch, since there should be no folds or gaps between it and the concrete belt.
You need to work with mastic carefully so as not to spoil the outside of the walls, especially if it is not covered with finishing material.
A few words about fastening the rafters to the Mauerlat
As mentioned above, the purpose of the Mauerlat is to evenly distribute the load from the rafter system over the entire surface of the wall. And how it performs its function will determine how the entire roof structure will behave when exposed to additional loads in the form of wind or snow drifts.
There are two ways to fasten the rafters to the Mauerlat - rigid and sliding, and which one to choose primarily depends on which rafter system is chosen for installing the roof - layered or hanging.
- Rigid mount
Rigid fastening implies the complete exclusion of displacement of any parts of the system. It is most often used for a gable layered rafter system, which has additional support in the form of a permanent partition inside the building.
To install a rigid structure, several types of fastening are used:
— Support beam and metal corners.
— Cutting the rafter leg into the mauerlat and additional fastening with corners. The cutout in the rafter should not be larger than ⅓ of its width.
— Fixation of the rafter leg using ties and a metal corner.
— Notching using a cutout in the Mauerlat and staples driven into the rafters and Mauerlat.
— Additionally, a notch on a rafter resting against the mauerlat is often secured with nails driven in at an angle.
It should be noted here that if a house is built from a log or timber, the role of the mauerlat is most often performed by the top log, to which the rafter legs are attached.
- Sliding mount
Sliding fastening is most often used in a gable hanging system, where the rafters rest only on the external load-bearing walls and do not have additional intermediate support. Sliding elements attached to the rafters and the mauerlat allow the structure to move when the house shrinks or when the effect of external loads on it increases.
This design is especially important for wooden log houses, since after construction shrinkage is inevitable, sometimes reaching up to 15%, and, as a rule, it occurs unevenly.
Deformation processes of the elements of the rafter system can also affect during its operation. So, in rainy times, wood can swell from moisture, since it is quite hygroscopic, and in winter frosts and extreme heat it can dry out.
Sliding fastenings help maintain the integrity of the structure, because when it settles, its individual parts can move along with the wall.
rafter mount
In addition to sliding fastenings of rafter legs to the mauerlat, a hinge made of movable plates can also be installed as a ridge connection. This type of fastening of elements also helps the roof structure remain intact when its geometry changes during periods of shrinkage or other vibrations.
In order for the roof to be reliable in any situation, before installation it is necessary to draw up a drawing and calculate all the parameters. If the process of erecting a rafter system is being carried out for the first time, then the best option would still be to seek help from specialists, since the strength of this structure depends on many nuances that are simply unknown to a beginner due to inexperience.
At the end of the publication - another interesting video - a home master shares his experience of installing a Mauerlat on a monolithic wall.
Fastening rafters without a Mauerlat
If the Mauerlat is not used, and the rafters are attached directly to the floor beams, the load from the weight of the entire roof is distributed pointwise.
To do this, use elongated beams, which should protrude 40 cm beyond the line of the walls. A string is pulled across the beams - this way an equal angle is maintained when fastening. This string will serve as a guide when grooves begin to be cut under the soles of the rafters. How are beams and rafters secured? There are three popular methods:
- emphasis at the end of the beam;
- persistent tooth;
- spiked tooth.
The number of teeth required (two or one) depends on the angle of inclination of the rafter sole. The rafter ends are inserted into the grooves, additionally securing the rafters to the beams with steel angles or a bolted connection. A single tooth is sufficient if the connection to the beam is made using a notch.
How to properly lay murlat on walls
There is a certain order in how to correctly place the Mauerlat. When constructing a gable roof, it is mounted on the finished building frame parallel to the ridge along the entire perimeter of the walls. During installation, the main task for the home craftsman is to check the levelness using a level.
When even the slightest unevenness is detected, it must be eliminated: protruding areas are cut off, and those below the required level should be raised using linings.
Then they begin to prepare the timber, which will become the Mauerlat. The wood is treated with a disinfectant and fire retardant and dried well. The timber is applied to the place of fixation and marks are made where the holes will be drilled. Individual sections of the Mauerlat are connected into a common structure with a direct lock and additionally fastened with nails. At the corners, the timber is fastened with an oblique cut or using a straight lock.
After laying the Mauerlat, they begin to build a “bench”, for this:
- Measure the distance between the opposing parts of the Mauerlat.
- The resulting value is divided in half and the middle of the span is marked.
- The marks are connected so that the axis of the “bench” is formed.
Focusing on it, they begin to build the lower run. It would be more convenient to completely make a “bench” with the bottom girder in a horizontal position, and then lift it and secure it vertically according to the axis of the floor.
How to attach the rafters to the mauerlat?
Although fastening is carried out in various ways, the fastening elements are standard for all methods.
- Fastening steel angles designed for fastening all kinds of metal structures;
- Nails;
- Connecting metal plates;
- Anchor mounting angles;
- Mounting plates;
- Mounting plates;
- Supports of beams and beams;
- Corner connector;
- Mounting profile;
- Height-adjustable anchor.
All these fasteners can be used for such work. The corner KR is most often used. It is the most common fastening element of the rafter system. It perfectly holds such structures together and adds strength to them. Mounted with self-tapping screws.