mark_kr
9987 1 2
mark_kr October 4, 2016Specialization: professional in the field of construction and repair (full cycle of finishing work, both internal and external, from sewerage to electrical and finishing work), installation of window structures. Hobbies: see the column “SPECIALIZATION AND SKILLS”
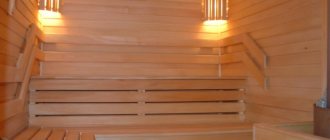
Only natural wood can cope with the heat from the heater!
Decorating a steam room in a bathhouse with your own hands is an extremely important undertaking. And although the masters do not have a single recipe, and there cannot be one, everyone agrees on one thing: it is very important to minimize heat loss, since this is the only way we will ensure even and stable heat, to maintain which we will not have to constantly burn cubic meters of wood or kilowatts of electricity.
In practice, achieving such a result is not easy, but if you follow the advice I have given (I managed to test most of it in practice), then everything will work out!
Selection of materials for arranging a Russian bath
As a rule, the traditional material for finishing a steam room is wood. If you plan to save some money, then it is better to pay attention to pine; however, you should not purchase the cheapest variety of this material, since during the operation of the steam room, low-quality pine will release an excessive amount of resin, which is not very good for visitors.
It is best to pay attention to the linden tree. This wood does not get very hot, which makes visiting the sauna more comfortable. In addition, such material is not afraid of high temperatures, so it does not lose its external properties for quite a long time.
The finishing of a steam room in a bathhouse can also be done with wood from birch, poplar and other durable species. Larch is able to dry well, which helps create the most comfortable microclimate in the steam room. You need to figure out how to make a steam room correctly in order to avoid obvious mistakes.
The use of low-quality wood boards as finishing for a steam room is considered absolutely unacceptable. You need to choose between wooden lining and solid wood. Also, you should not purchase chipboard, MDF and other similar materials, since they are toxic and fire hazardous, in addition, they are afraid of moisture, that is, when interacting with it, such materials soon lose their external qualities.
As for other nuances, in this case you need to build on your preferences and budget.
Basalt cardboard characteristics
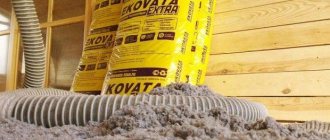
The main difference of this material is its high thermal insulation and sound insulation. It is non-flammable, fire-resistant and fireproof. At the same time, basalt cardboard has extremely low hygroscopicity, in other words, it is not able to absorb moisture from the air. The temperature of use of this material is +500 degrees, while for a short period it can withstand up to +700 degrees. Another reason why cardboard should be used in a bathhouse is that it has excellent vapor permeability. It has increased resistance to microorganisms and rodents, does not crumble, does not rot, and is resistant to vibrations and thermal-oxidative aging. The approximate service life of this material is 50 years.
At the same time, basalt cardboard is very easy to cut; this can be done even with a simple knife. The sheets bend well and can take any shape, which allows for excellent thermal insulation of the bath room. Parts made of such material can be fixed using special glue
When cutting, it is necessary to take into account the shrinkage of the cardboard, which can occur from exposure to elevated temperatures. In case of high humidity, the sheet may bend, but after drying it will return to its previous shape.
In total, it can withstand more than two thousand cooling and heating cycles.
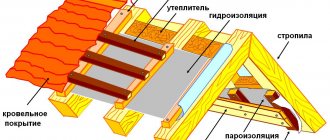
Heating and ventilation systems
The core of the Russian bath is the heater stove. The best materials for the construction of such a furnace are considered to be: natural stone and refractory brick, which can also be used simultaneously.
Brick is ideal because it can effectively accumulate heat, while stones make it possible to create the necessary steam. A properly designed stove, together with high-quality insulation materials, can retain heat for up to 15 hours.
The finishing of the steam room in the bathhouse must be associated with the installation of high-quality ventilation. As a rule, natural ventilation is never enough for normal air circulation. There are many ventilation systems, each of which is selected individually, depending on operating conditions and other structural features of the bathhouse.
Finishing a steam room in a bathhouse with your own hands involves installing a drain hole designed to drain water. This will prevent excess moisture from accumulating, which means that mold will not form in the steam room and other unpleasant phenomena will not occur.
How to decorate a steam room with your own hands
The sequence of finishing the steam room
It is clear that even before the start of work, the owner of the bathhouse must draw up a project and clearly understand what he wants to get in the end. That is, all sorts of “second thoughts” and “crisis changes” are extremely undesirable. They take a lot of money, effort and time, and the result is often worse than planned.
It is best to draw up your project in the form of a sketch, even without following all the intricacies of drawing, as long as it is clear to you. An inquisitive owner will find an application on the Internet that allows him to make such plans.
An easy-to-execute plan that shows quite well the scale of future work
Sometimes you have to draw up two or three plans, and then choose the optimal one, taking into account the advantages of others that were rejected. The result should be a document that becomes the basis for further work. It must also take into account the location of lamps, ventilation ducts, a window to the street (if it is planned), the position of the stove taking into account fire clearances, and other nuances.
If the plan is clear, you can start counting the materials needed for the work. As a rule, they are purchased with a small reserve, that is, approximately 10% more than the calculated quantity.
Well, then you can start, following a certain sequence of stages of work.
- The first step is to prime the bare walls, floor and ceiling if this has not been done before. For a wooden base, take soil with protection from biodestruction and fire, for a mineral base (concrete, brick, etc.) a deep penetration composition, preferably with an antiseptic against mold.
Priming the bases is the key to their durability, especially in specific bath operating conditions.
- Wiring is laid to the locations of the lamps.
- Lathing is being done on the walls and ceiling - for the future finishing of the steam room.
- The recommended step is to lay the outer layer of a diffuse waterproofing membrane. In some cases it is mandatory.
- A place is allocated for a stove-stove - there the finishing will follow its own rules.
- Channels for ventilation in the steam room are cut or otherwise organized. Similarly, areas are prepared for the passage of a chimney pipe through a wall or ceiling.
- The insulation is laid between the sheathing posts.
- The insulation is immediately covered with a vapor barrier. There are possible options here – we will discuss them below.
- The surfaces around the heater are being arranged in terms of creating a fireproof base and sections of the wall.
- The floor is being covered. This can be ceramic tiles or solid wood.
- The installation of the door frame, installation and careful adjustment of the door to the steam room is carried out.
- Consistently, starting from the ceiling and moving to the walls, the surfaces are lined with wood (most often with ready-made lining).
- After this, there is the final stage, which includes the installation of shelves and other pieces of “furniture”, installation of lamps, etc.
It was, so to speak, a “general excursion”. Now let's take a closer look at these stages.
Video - a competent approach to finishing a steam room from the Ruspar company
Installation of wiring for lighting fixtures
It is clear that there is no need to plan any electrical devices, except for lighting, in the steam room. That is, there will be no sockets or switches. The exception is the presence of an electric heater, which requires a powerful power line. But this is a special case, and amateur efforts are not welcome here - the installation of such equipment should be entrusted to professionals.
This means that only the lamps remain, which will be turned on from the dressing room. That is, everything is limited only to wiring for lighting.
Expert opinion: Afanasyev E.V.
Chief editor of the Stroyday.ru project. Engineer.
Ideally, it is best to use a high-quality cable of the VVG-NG type - it has perfect dielectric capabilities of double insulation, and resistance to moisture and elevated temperatures. And the NG index also speaks of non-flammability. For lighting fixtures, a minimum VVG section of 1.5 mm will be more than sufficient.
But even such reliable insulation does not eliminate the need to enclose the wiring in 16 mm polypropylene or metal corrugation. Moreover, it is better to give preference to a metal one if the bathhouse is equipped in a wooden frame. And if there is a passage through the wall (and this is most likely what will happen), then a metal sleeve is also used, which is filled with polyurethane foam after laying the wiring.
To penetrate through a wooden wall, an additional sleeve must be used.
It is extremely undesirable to leave exposed wiring in the steam room - it is better that it immediately fits under the trim to the lamp.
The line to the lamp has been laid and will be covered with a wooden finish.
You need to understand correctly that you can’t put just any lamp in a bathhouse - you need a degree of protection of at least IP44. True, acquiring them in our time is not a particular problem. And besides, very often the lamps in the steam room are covered with decorative wooden grilles, which gives soft diffused light - and nothing more is needed here.
Bathrooms and bathhouses require special lamps!
This is understandable - not every lighting device is adapted to conditions of high humidity and elevated temperature. How to choose a waterproof lamp is described in detail in a special material on our portal.
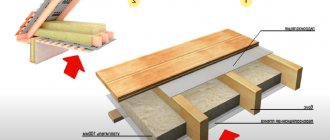
Installation of sheathing, external waterproofing
Wooden beams are most often used to install the sheathing. Its cross-section depends on the planned thickness of the steam room insulation - that is, one section size must correspond to this parameter. The second size, in width, is usually 40 mm. So that it is possible to drive a nail or screw a self-tapping screw into such a rack, and not split it.
The direction of the sheathing is selected depending on the planned direction of the finishing lining. That is, the guides must be perpendicular to the skin. The rule is general for both walls and ceilings.
Installation of lathing on the still bare ceiling and walls of the steam room
The mounting step of the guides is chosen so that the insulation fits tightly between them. Mineral wool is most often used, and in its types the predominant size of blocks or rolls is 600 mm. So between the axes of the guides you can mark 600 mm - due to the width of the beam, the gap “in the clear” will be approximately 560 mm. And the insulation block will fit with the required pressing density to the bars.
It is clear that you want to see the walls in the steam room smooth. Therefore, when installing the sheathing, it is possible to correct defects in the geometry of the room by placing scraps of boards of the required thickness under the guides. Similarly, they achieve evenness of the future ceiling. A slightly different approach is to use metal direct hangers to fasten the beams. With them it turns out even easier - the guide is simply fastened with self-tapping screws in the desired position, and the protruding “ears” of the suspension are bent inward or simply cut off.
Option for fastening sheathing parts on direct hangers
Now a few words about the need (or not) of a diffuse vapor-permeable membrane between the external wall and the layer of future insulation.
To make the right decision, you need to correctly understand the function of this barrier. A good example is the Ondutis SA115 Smart superdiffuse membrane. It will perfectly prevent the penetration of water and wind from the outside into the insulation layer, but will not become an obstacle to the free release of excess moisture from the mineral wool. Just what you need.
But if the bathhouse is installed in a permanent building, including a log house, where the walls are dry and by themselves will not allow either precipitation or wind to pass through to the insulation, then the need for such expenses (and the membrane is not cheap) is not particularly visible. And the free release of steam will be ensured.
But if the walls are clearly thin, or if they feel damp from the inside, such a measure would be useful. Or for a frame wall - the need for such a waterproofing, windproof, vapor-permeable barrier is not even discussed, it is absolutely necessary!
Vapor-permeable waterproofing barrier in a frame wall: 1 – external cladding; 2 – diffuse membrane; 3 – thermal insulation layer; 4 – water vapor barrier membrane; 5 – internal lining of the steam room.
If a membrane is needed, it is attached to the sheathing guides so that there is space for subsequent installation of insulation. When laying and fixing, one should strive to disturb its integrity as little as possible.
And one more thing - this all applies only to external walls. For internal partitions such a diffuse barrier is not needed.
Ondutis SA115 Smart
Arrangement of a place for a sauna stove, ventilation ducts and an opening for a chimney pipe
These stages are somewhat indirectly related to the actual finishing of the steam room. But there is no escape - without their implementation it is impossible to move on.
The location for the heater must be indicated on the plan initially. There are a lot of specific requirements for his choice, both in terms of safety and from the point of view of “pure construction geometry”, taking into account the passage of the chimney pipe, which should not fall on either the floor beam, or the frame wall post, or the roof rafters.
At the same time, ventilation issues are also resolved - there’s no way around it! There are a great many options for its organization, and giving any recommendations without taking into account the features of the building, the size and “geometry” of the steam room, the type and power of the stove is simply pointless. Yes, and it is impossible in the limited format of an article devoted to finishing a steam room.
This illustration alone shows four ventilation schemes. But in reality there are much more of them.
The most important questions when creating a steam room
Each of these aspects requires its own detailed explanation. We will try to help! So, you can go to a publication entirely devoted to the organization of ventilation in the bathhouse . Another very informative article will introduce the reader to the correct installation of a sauna stove . And one more recommendation - be sure to look at the most common mistakes made when installing a sauna stove , and how to avoid them.
Laying insulation and creating a vapor barrier
The turn of the insulation has come - it’s time to lay it between the sheathing guides.
But first, a few words about the optimal material for these purposes. But here everything is simple - you probably won’t find anything better than basalt wool.
This insulation has an enviably low thermal conductivity (coefficient λ is approximately equal to 0.04 W/(m×℃)) and excellent elasticity, making installation easier. And its mass is small, so it will not burden the structure.
TechnoNikol stone wool - the packaging directly states the recommendation for insulating baths.
TechnoNIKOL Rocklight
Modern types of basalt insulation have a sufficient degree of hydrophobicity so as not to absorb moisture and not become “blotter”. In combination with waterproofing, which is discussed below, there will be both the required insulation and protection of the walls from moisture.
Under no circumstances should you use insulation based on polystyrene (PPS). Perhaps they are cheaper, and their insulating qualities are slightly higher, but from a safety standpoint, it is better to refrain.
Spraying polyurethane foam is a truly effective method of insulation, and more harmless compared to EPS. However, the cost of such thermal insulation can be daunting.
PIR boards are becoming one of the most modern insulation materials. But even with them, widespread use is still limited by the too steep price.
PIR plates specifically for baths - with a reflective surface... If funds allow, then this is perhaps the best option.
But for now we are talking about stone wool. Blocks (or mats) of insulation are placed between the sheathing guides. They start from the ceiling and then move to the walls. For reliability, they are tied, for example, with construction twine running in a zigzag. However, sometimes fixation is not required at all - the insulation is placed so tightly between the bars.
An option for fixing the insulation with construction twine.
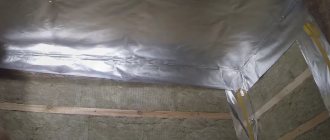
After installing thermal insulation, it is mandatory (and this is not even discussed) to lay a reliable vapor barrier. It is important not to confuse it with diffuse vapor permeable - this is what many people do! But what specific form it will take is something to think about.
- The simplest and probably cheapest option is to use regular plastic film. But, alas, it’s not the best for a bath. It’s easy to break through such a film and not even notice it. And one more thing - its “activity” is limited only by its role as a barrier to water and steam.
- Another option is a special vapor-tight membrane created specifically for such purposes. It is stronger and more durable, but still “works” one-sidedly.
Conventional type vapor barrier membrane.
The red stripe is clearly visible - the boundary of the minimum overlap of neighboring stripes. Membranes are usually laid and fixed to the insulation with horizontal strips in sequence from bottom to top - then drops of condensation will not fall into the mineral wool. An overlap of at least 100 mm must be made, which is then glued with waterproof tape. It is convenient to secure the membrane with staples using a stapler.
- But the best results in terms of efficiency and reliability are shown by foil materials. This is a reliable barrier to water vapor, resistance to temperatures, and, most importantly, a reflective effect that allows you to retain heat indoors.
Such materials include:
— Rolls of foamed polyethylene with foil on one or even both sides. A classic example is, for example, penofol. It is good, in addition to being completely waterproof, because its porous layer of polyethylene also provides a noticeable increase in insulation.
Penofol roll.
— Multilayer polyethylene vapor barrier membranes with an outer layer of aluminum foil also perform well. For example, UTAFOL N AL 170 Special.
YUTAFOL N AL 170 Special
— The best option is to immediately use mineral wool slabs designed specifically for baths. Such thermal insulation has one side already “by default” made of foil, and all that remains is to lay it end-to-end without gaps.
Foil vapor barrier is most often laid end-to-end, without overlap. But with the obligatory sizing of all joint lines with aluminum tape. This creates a common, continuous, vapor-tight and heat-reflecting surface of the insulated wall and ceiling.
Sealing the joint line of reflective vapor barrier
It is advisable to complete this stage of work by installing the counter-lattice. To do this, slats of the same width, 10 or 15 mm thick, are placed on top of the sheathing beams.
Counter-lattice stuffed on top of a laid vapor barrier.
What does this achieve?
- Both the insulation and the vapor barrier are finally securely fixed to the sheathing.
- There will be a gap, the so-called ventilation gap, between the foil vapor barrier and the inside of the finishing cladding, which will prevent the lining boards on the walls from getting wet.
- In order for the reflective effect of a foil barrier to work, one way or another, at least a minimum air gap in front of it is required.
It is clear that the finishing trim will now be attached to the counter-lattice strips.
Furnace installation and floor finishing
We won’t talk about installing the stove for a long time - a link to very detailed material on this subject has already been given above. We can only add that the section of the floor intended for the heater is often made slightly higher than the general level. It is either covered with a sheet of metal or laid with durable heat-resistant tiles, preferably porcelain stoneware.
At the same stage, sections of the walls directly adjacent to the stove are finished with non-combustible material. Here too - or, more simply, metal (for example stainless steel) sheets, or tiles, perhaps with imitation of natural stone.
A fairly simple option to implement is a screen made of brickwork.
What about the rest of the floor area? This depends on the preferences of the bathhouse owner. In the steam room, the floor can be covered with tiles, most importantly - non-slip. The second common option is natural solid wood flooring. Moreover, oak, oddly enough, is undesirable on the floor.
We make the floor in the steam room ourselves!
You will have to work hard in any case, but with our tips it will be easier. Options for arranging the floor in a steam room are discussed in detail in a special article on our portal.
Installing a steam room door
After the heater has been brought in and installed, and the flooring in the steam room has been completed, it is time to finally install and adjust the door. This task is very important, since the door must effectively retain heat, but at the same time, it must open easily and close tightly, without leaving any gaps.
And again we will take the path of providing more detailed information - similar material is already available on our portal.
Specifics of installing a door in a steam room
This design can be made independently or purchased as a ready-made kit for the desired opening size. Both options are discussed in the article on installing a door in a steam room .
Finishing the ceiling and walls with clapboards, installing shelves
At the final stage of finishing, the ceiling and walls are covered with natural lining. Naturally, work on the walls will be carried out in parallel with the creation of a frame for the shelves and their installation.
First of all, what material is preferable to choose?
The store offers lining options made of softwood and hardwood. Pine is undesirable only because of its high resin content. At elevated temperatures, drops of resin can protrude from the wood grain and cause very unpleasant burns. So larch and cedar are suitable pine needles (it is preferable, but also more expensive).
Deciduous lining can be represented by birch, linden, alder, aspen, oak and some other species. Including the expensive, but very good African abashi tree for a bath. Oak is also very good, but not cheap. The optimal option seems to be linden or alder, a little “thinner” - with aspen. But birch, unfortunately, is extremely short-lived, and in a couple of years it will become unusable.
Linden lining for a bath
The use of special impregnations that increase the resistance of wood to water and steam, created specifically for bath conditions, is encouraged. Sheathing parts can be pre-treated with such compounds before installation - this is, of course, preferable. But more often they are limited to processing only the outward facing side of the sheathing after its installation.
An example of antiseptic impregnation for a bath
Installation of the lining is carried out in any of the convenient ways - with self-tapping screws, with nails driven into the groove or with the help of clamps. The method with self-tapping screws is simple, but leaves caps peeking out, which is undesirable. It is important to have a good hand with nails, otherwise you can spoil a lot of material. So clamps are the best option for a beginner.
The principle of fastening the lining to the clamps is clear and simple.
When installing the lining, you should constantly monitor the verticality (horizontalness) of the cladding parts, since without this you can make an increasing error, which will soon become very noticeable visually.
And so, in principle, installation of lining is a stage that even novice craftsmen can do well. Especially if they have video instructions at their disposal.
Video: Cladding the walls of the steam room with clapboard - recommendations from the master
Naturally, when installing both insulation and lining, you must not forget to route the power cables for the lamps through them. As a rule, there are not many of them, so this task will not be particularly difficult.
As already mentioned, in parallel with the upholstery of the wall plane, work is underway to create a frame for the shelves. The fact is that the wall trim and frame are often “mutually integrated” parts. This should be displayed in advance on the finishing diagram, the importance of which was discussed above.
Instead of a textual presentation of the principles of installing bath shelves, you can watch a meaningful video in which everything will be much clearer.
Video: Secrets of the right shelves in the steam room
In fact, the installation of shelves and lining completes the main large-scale finishing activities. Yes, it is possible that the surfaces still need to be polished (if necessary) and impregnated with protective compounds.
At the very end there are all sorts of little things left, like putting lamps, a thermometer, a clock, and decorative parts in place. Sometimes a plinth is installed between the ceiling and walls to hide the joint. But this is not even especially welcome - there is no need to create an additional place for possible accumulation of dampness.
That’s it, the finishing can be considered complete – and “move on to water procedures”!
If after reading the material you realized that decorating a steam room yourself is expensive or time-consuming, then we recommend that you consider the Ruspar company - https://ruspar.ru/otdelka-parnoy-pod-klyuch, where we drew inspiration from when writing this material.
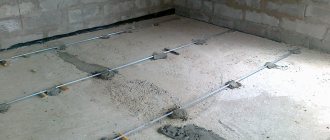
Floor finishing
To install the floor, edged or tongue-and-groove boards are used, and the process itself consists of several successive steps.
First, carefully level the base and get rid of all debris.
Next, the concrete screed is poured. If the rough base is fairly even, then you can do without a screed. In this case, the base is covered with a layer of sand, about 10 cm thick.
At the next stage, 25x25 cm brick columns are laid on the base, which will serve as support for the logs. The height of the posts is determined by the height of the floor so that it is at least 15 cm higher than the sink cover.
Now the logs are laid and attached to the posts. The logs, as a rule, are taken with a cross-section of 25x25 cm, and the pitch between them should be about 100 cm.
Next, the boards are laid, starting from the far corner relative to the entrance to the room. Galvanized self-tapping screws are used as fasteners, screwing them in so that the caps are recessed into the wood a few millimeters.
When laying the floor, a slight slope of 10 mm per meter of base should be maintained. In addition, the floor design must include a drain sufficient for timely drainage of water.
When the process is not possible
So, we answered positively to the question of whether it is possible to glue tiles in the bathroom onto old tiles. In what cases is this procedure impossible? First of all, when more than 40% of the old coating is in poor condition. In this scenario, work will be meaningless. It’s easier to be patient and spend a little money, but remove the old tiles, prepare the floor and walls and lay a new tile covering. You can’t use old tiles as a base even if they seem to be intact in appearance, but when pressed they seem to crunch. This indicates that there are voids underneath. And such a surface will not be able to withstand the weight of the new coating for long.
Wall finishing works
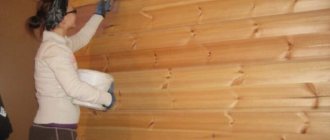
It is best to cover a steam room in a bathhouse with wooden clapboard. First, the lining needs to be brought into the bathhouse and left there for several days so that the material has time to acclimatize (for more details: “How to cover a steam room in a bathhouse - how to choose the right wood”). During the work process, all material will need to be coated with an antiseptic composition.
At the initial stage, the frame is assembled. The material is selected based on the calculated load level. If you plan to attach shelves to the walls, then it is better to make the frame from timber, otherwise you can get by with simple slats.
When deciding on the type of fastening of the frame elements, take into account how the lining will be attached later. In any case, the direction of the frame beams and slats should be perpendicular to the direction of the lining.
First, the first and last slats are attached to the wall using self-tapping screws. The pitch of these guides must correspond to the width of the insulating boards.
Next, a waterproofing film is fixed over the frame, after which they begin laying insulation, which can be mineral wool.
At the next stage, they begin laying the vapor barrier layer. To secure individual sheets of material, it is best to use a construction stapler.
Next, when finishing the steam room in the bathhouse with your own hands, they begin to install the lining. Fastening the sheets begins from a remote corner. Self-tapping screws or other similar fasteners are used as fasteners.
After all the walls are covered, you can move on to finishing the ceiling. It is highly undesirable to treat walls with varnishes or paints.
Laying restored tiles
Laying ceramics is done from the bottom up, maintaining a given gap between the tiles by inserting fixing crosses. A layer of tile adhesive is applied to the back surface of the product, slightly thicker than under the border tiles. The sheet is applied to the surface at the installation site and pressed to the level of the old cladding. Excess adhesive squeezed out from under the tiles is immediately removed. To properly glue the last tile, a layer of glue is placed on its back surface more accurately, since it is difficult to squeeze out excess through narrow joints with adjacent products.
The tile may fall off the wall or floor along with the glue and from the glue
After 1-2 hours, when the glue has set, the tile joints are cleared of mortar to perform grouting, which can be done the very next day.
If the wall or floor cladding was repaired in the kitchen, bathroom or toilet, then the tile adhesive and grout mixture should be selected from the “moisture resistant” group, which also contains antifungal additives.
To ensure that the repaired section of the wall or floor does not stand out from the general background, you can partially remove the old grout from the seams on the old cladding and rub the joints with fresh grout used for repairs.
Installation work on ceiling finishing
The ceiling in the steam room is also best covered with clapboard. You can use edged boards or bars as a frame. The pitch of the sheathing must correspond to the width of the insulation boards. A layer of moisture-repellent material is attached to the frame.
Next, the gaps in the frame are filled with insulation, usually basalt wool. In this case, the slabs of material must be carefully aligned in order to prevent the appearance of any gaps or gaps.
Now a layer of vapor barrier material is attached to the insulation to the beams using a construction stapler. Laying should be done with an overlap of 20-30 cm. The joints are glued with aluminum construction tape.
At the next stage of finishing the steam room in the bathhouse with your own hands, they proceed to installing the lining. Strips of lining are attached to the slats, while maintaining a gap of 1.5-2 cm between the outer row and the wall. This is necessary so that air can circulate freely behind the cladding (for more details: “Cladding with paired lining - how to do it right”).
After covering the entire surface of the ceiling, you can begin installing the benches.
Coatings
Finnish floor oil
It is probably worthwhile to dwell in more detail on the compositions that are suitable for covering the walls, floor and ceiling of a steam room.
As already mentioned, we have impregnations and varnishes at our disposal. Paint is usually not used in a steam room. And it is advisable to use varnishes from a new generation - acrylic, for example.
The same compositions for walls are suitable for lining, and for timber, logs. The same compositions are used for walls and ceilings. Thus, we get two groups of coatings - for the floor and for the walls and ceiling. Is it worth adding about paints for stoves?
The floor only needs covering if it is not made of ceramic tiles. Wooden floors can be covered either with floor impregnations (the manufacturer must somehow state the fact that its coating will not be slippery, because we are talking about fatty compounds), or with varnishes, but in this case it is advisable to use not just acrylic varnish, but with additives that increase its abrasion resistance, as well as water resistance.
The walls were discussed in the previous chapter.
Here are examples of such compositions:
For walls and ceilings - Belinka “Sauna Interier”, Tikkurila “Supi Saunasuoja”, Senezh “Sauna”, Teknos “Sauna Natura”.
For the floor - Tikkurila “Supi Lattiaolju”, its varnish “Unica Super” (dilute varnish:white spirit in a ratio of 3:2, apply in 1 layer).
Installation of benches in the bathhouse
The appearance and size of the benches in the steam room can be anything, it all depends only on the preferences and financial capabilities of the owner.
The main thing is that the material for the steam room in the bathhouse in this case is selected correctly. When selecting material, it is worth considering that future benches are installed in a steam room, which is a room with constant excessive humidity and high temperature.
The wood must be free of knots, resins, and not cause allergies. Often, when building shops, poplar, oak, aspen or linden are chosen.
These types of wood have a number of undeniable advantages:
- Resins and other harmful elements do not protrude from them during the heating process;
- quick drying;
- have a pleasant smell;
- do not heat up to temperatures that can burn the skin;
- have a pleasant appearance;
- pleasant to the tactile sensation.
It’s nice when the shelves in the steam room have rounded ends - it makes them look more beautiful. It is preferable to install them in two or three floors against a wall located on the opposite side to the heater. Although, everyone has the right to adjust the project based on their preferences.
It is worth noting that the shelves should be located at a sufficient distance from the stove so that people do not accidentally get burned from contact with the unit. You need to know how to make shelves in a bathhouse correctly from a safety point of view. If plaster was used as a finishing coating, or simply masonry was left, the distance to the shelves should not be less than 50 cm.
The distance between the ceiling of the bathhouse and the top shelf should also be maintained - it should be between 1 and 1.2 meters.
Application of basalt cardboard
The fibrous material was developed exclusively as an environmentally friendly insulation material. However, due to its high physical characteristics, it began to be used not only to reduce heat losses, but also for other purposes.
Carrying out thermal insulation
Basalt cardboard is an environmentally friendly and absolutely safe insulation material, which is recommended for use in residential premises. The material is used to cover loggias and balconies, as well as entrance door panels. Almost zero hygroscopicity allows the use of fibrous insulation sheets in stainless steel screens for saunas and baths.
The heat insulator is suitable for external and internal insulation of building envelopes built from timber or chopped logs. Basalt cardboard is used for cladding interfloor floors in industrial and residential buildings. Often, fibrous heat insulator is also used for floor insulation, when assembled using the “warm floor” system.
As a soundproofing material
The structure of basalt cardboard provided the heat insulator with the ability to absorb noise in the low, medium, and high sound range. Fiber sheets are often laid between gypsum board and gypsum board. This allows for a good level of sound insulation. Fiberboard is included in many noise-absorbing materials, especially panels. It is also installed when floating floors are installed. Thus, this type of insulation is used to soundproof the surface of the floor and walls.
Application for household equipment
Fibrous material is used for insulation in various types of cooling and heating structures to protect against the temperature influence of the environment. Basalt cardboard has become a safer alternative to asbestos sheets. It does not contain harmful substances and does not lose its performance properties when used in the lining of chimneys and pipelines. Heat-resistant substrates are also made using fibrous sheet cardboard. They are used in stove structures, as well as in the arrangement of floors, ceilings and walls. The insulator is used to wrap heating elements in boilers for both industrial and domestic use. Dense basalt sheet is used for thermal insulation of frying ovens, kitchen gas and electric stoves, refrigerators and cold rooms. The material is also used to wrap water pipes and air ducts in supply ventilation systems.
Organization of lighting in the steam room
To properly decorate the steam room, you need to properly think through the lighting. In this case, it is worth relying on the characteristics of the microclimate of the bathhouse - high temperature and humidity. The lamps in it should be installed clearly in the corners or near the ceiling, because in such places the air is heated the least, and the light, based on this location, will be as pleasant as possible for the eyes.
To obtain the softest and most diffused light, it is better to use fiber optic lamps. In addition, unlike conventional lamps, they are among the safest devices that can be used in such extreme conditions.
No matter what type of lamp you choose, they should be equipped with heat-resistant shades. To slightly decorate the lampshades, they can be hidden behind beautiful wooden grilles.
As a result, the bathhouse will only need to be slightly equipped with additional accessories, such as ladles, buckets, brooms, and so on, after which the steam room can be put into operation.
From the above we can conclude that arranging a bathhouse with your own hands is not something mega complicated. Yes, this is labor-intensive work that requires full dedication and responsibility from the performer, however, guided by all the proposed instructions and rules, you can create a truly attractive and, moreover, functional interior.
Advantages of basalt cardboard
Thermal insulating basalt cardboard is used during the treatment of areas of thermal equipment that are extremely sensitive to elevated temperatures, such as, for example, the insulation of heating and thermal furnaces, the insulation of dampers, boilers, pipelines, and doors. Basalt sheets are used for a heat-resistant layer between the stove and the floor, pipe and roof, where other materials cannot be used. It is also used for thermal insulation of storage tanks of any type, thermal boxes, mixers and ladles. Basalt cardboard is used as part of various structures, for example, a “sandwich”, which is assembled from layers of paper and cardboard. It can also be used to insulate joints in building structures of various purposes.
Due to its environmental friendliness, this material can be used as thermal insulation for heaters, boilers, and other equipment for household purposes.
- High degree of thermal and noise insulation.
- Fire resistance.
- Environmental Safety.
- Does not affect the corrosion resistance of metals.
- Biologically stable (does not attract rodents and microorganisms).
- Retains properties at high temperatures (up to 700°C).
- It is not resistant to moisture, so additional protection is necessary.
Thermal insulation of heat pipelines, oil and gas pipelines, and other types of communications exposed to temperature changes and other aggressive factors. As an insulating and soundproofing material in the construction of structures for various purposes (industrial and residential). As a thermal insulation material for various containers, tanks, boilers, etc., provided that the surface temperature is between -180 degrees and +700 degrees. Thermal protection and insulation of refrigeration units. As fire protection for air ducts and other structures. As an insulating and soundproofing material in interfloor ceilings and wall partitions.
Basalt cardboard with foil is one of the varieties of basalt cardboard, the main feature of which is the presence of foil on one side. Like other types of similar cardboard, the material is made from basalt rock fibers, which are formed into dense sheets that can have a significant thermal insulation effect. Thanks to the foil layer, this effect is doubled, since the thermal energy is reflected into the room and is retained even better. In addition, basalt cardboard with foil can also be used as sound insulation, as it has excellent sound absorption properties.
This is a non-flammable, fireproof and fire-resistant material that practically does not absorb moisture from the air. Foil basalt cardboard fits perfectly under the screen and pre-furnace sheet to ensure maximum thermal protection of wooden surfaces in the sauna. Able to withstand temperatures up to 1000C. In terms of its characteristics, basalt cardboard is superior to the widespread asbestos cardboard; it has improved sound absorption, thermal conductivity, and service life.
Advantages of Basalt cardboard:
Environmental friendliness. Basalt cardboard is an absolutely environmentally friendly material. It does not contain or emit harmful substances even when exposed to high temperatures. It is used in industries such as microbiology, food industry, pharmaceuticals, which require stricter environmental control of production.
Heat and sound insulation. Thanks to its light fibrous structure and random arrangement of fibers, basalt cardboard has increased heat and sound insulating properties. Its use will allow you to effectively perform high-quality insulation, reducing noise levels and heat loss.
Fire safety. The use of cardboard prevents the spread of flame, which minimizes your risks. The products belong to the group of non-combustible materials (NG). The melting point of the fibers is over 1000C.
Durability. In the absence of mechanical damage, the service life of the material is unlimited.
Ease of installation. The material is easy to handle, allowing you to install it yourself.
The price is for 1 sheet of basalt cardboard.
Preparing the base
The floor must be clean and dust-free
The preparatory stage is the main part of any construction work. Ensure that the floor surface is level, otherwise it will not be possible to lay the tiles perfectly. A prepared base helps to achieve high-quality cladding.
A large layer of adhesive will not help hide unevenness. If there is an old coating, dismantle it, then form a screed and waterproofing. For leveling, you can choose any method: dry, wet or warm floor. An important point is to follow the work technology.
Dismantling involves removing thresholds, baseboards, old tiles and other irregularities from the surface that prevent installation close to the wall.
Preparation for installation
Before you begin laying tiles, you need to prepare the floor surface for work.
Before starting to describe the installation process, it should be added that on a tiled floor it is easier to make a slope for draining water. But in general, the work is no different from laying ceramics in other rooms. The only difference is in the use of adhesive and grout paste.
Returning to the aspect of creating a slope, we will assume that the concrete floors have already been poured at a certain angle. When laying tiles, all that remains is to withstand this difference without overdoing it with glue. Immediately before work, the surface is completely cleaned of the smallest dust so that nothing interferes with the adhesion of the glue to the surface.
The glue is applied with a notched trowel.