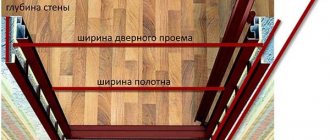
Do-it-yourself door trim with clapboard
A new product rarely needs finishing. As a rule, doors, windows, furniture and so on are selected taking into account design requirements and personal preferences. However, there are exceptions, for example: decorative finishing of this model is not provided or is not suitable for the owner.
Do-it-yourself door finishing
Products that have been in use for a long time, but have retained their functional qualities, often need to be redesigned to restore their attractive appearance. Doors are no exception.
What should you consider when choosing the type of metal entrance door finish?
Those who decide to decorate the front door themselves need to know the features and characteristics of the materials in order to choose the most suitable one. To successfully complete finishing work and create a high-quality and durable finish, the following points must be taken into account:
- Location of the entrance structure. Metal doors are installed both in apartments of apartment buildings and in private residential buildings. The external surface facing the street is exposed to the external environment. If the door is installed at the entrance to the apartment, then it is protected.
- Aesthetic function. The part of the door located outside a private house is an element of the facade of the building. When choosing a finishing method, shade and texture of the material, you need to focus on the basic design style of the building. A hint in working on the inside of the entrance structure is the interior design of the hallway.
- The need for additional insulation and insulation. Metal doors do not always provide the required level of insulation. In addition, metal conducts sound well, so when creating the external and internal cladding of an entrance door, you should choose a type of finish that enhances its insulating characteristics.
Finishing material – lining
The cladding consists of narrow slats made of different types of wood - both solid wood and laminated wood, or, less commonly, plastic. The latter option is recommended for finishing internal panel doors, as it does not have sufficient mechanical strength. Lining retains all the excellent properties of wood, but is much more affordable.
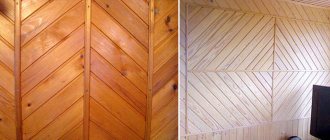
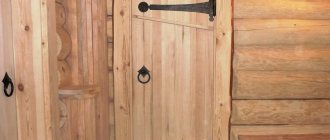
- Wood – both deciduous and coniferous tree species are used for production. The raw materials must be well dried - no more than 12% humidity, and treated with antiseptic compounds that increase the resistance of the lamellas to the action of fungi. Just as for other finishing materials made of wood, the cost of the product depends on the species and its grade: slats made of oak or beech cost significantly more than finishing boards made of pine or spruce. When choosing a material for external work, it is recommended to give preference to denser wood. The photo shows an entrance door covered with wooden slats.
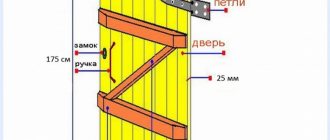
- Installation – lamellas are available in a fairly wide range of sizes. For door cladding, it is recommended to choose dies of minimum width. Installing them is extremely simple, so you can do it yourself: the slats are tightly joined using a tongue-and-groove fastening and form a perfectly flat, beautiful surface.
In this case, the boards can be laid in any order: vertically, horizontally, at any angle, or even in a pattern by laying the lining in different directions. The material consumption is higher, but the effect is very original. The photo shows a sample with a “pattern” of lamellas.
Positive aspects and characteristics of the material
Why do all professional builders recommend making a door to a bathhouse or utility room out of clapboard?
It's all about the positive properties of the material listed below:
- availability;
- durability, long-term operation;
- speed of work;
- low price;
- thermal insulation;
- pleasant appearance;
- ease;
- a lining door can be installed in a room with a high degree of humidity;
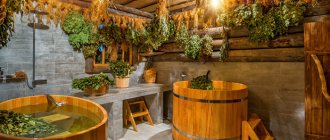
- well suited as a material for a bath door (when steamed, such products release useful elements into the air);
- possibility of painting with any paint;
- soundproofing;
- solid material is fire resistant;
- making a door from lining is simple, no special knowledge is required;
- some species are resistant to fungal manifestations.
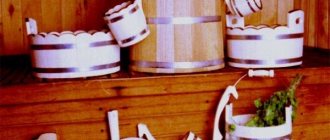
What is the appearance of the lining? These are narrow wooden slats that are practical and reliable. For their manufacture, they usually take solid wood of various species, less often plastic.
When creating products, the raw materials are carefully dried and treated with a special composition to make the material resistant to parasites and fungi. The price of lamellas will depend entirely on the wood used as a basis.
Their lining doors: advantages and disadvantages
Wooden slats are used to cover the door structure. This method is popular not only because it is affordable, although this is also not the last factor.
- Thermal and sound insulation - it is known that of all finishing materials, wood and products made from it are characterized by the highest rates. Wooden lining is no exception. Covering both old and new doors with slats significantly affects the level of insulation of the apartment from noise and cold.
- Strength - of course, is inferior to steel sheet, but lining made from hard rocks, for example, larch, is able to withstand the actions of vandals.
- Moisture resistance is low. The indicator is increased by mandatory treatment of the lamellas with protective agents and varnishing. It is recommended to repeat the procedure periodically.
- Resistance to fungus depends on the wood. Varieties with a high resin content are insensitive to rotting; less resistant ones are impregnated with antiseptic compounds.
- Fire resistance is an indicator that also largely depends on the wood used. Hard rocks burn reluctantly and are more fireproof. It is recommended to treat soft ones with a special product.
- Painting - most of the material is quite easy to paint, which allows you to “fit” the door into almost any interior.
Materials and tools used
- Pine boards.
- Lining 1 cm thick.
- Nails.
- Door hinges and handles.
- Primer for wood.
- Varnish or paint.
- Saw or electric jigsaw.
- Drill with an end mill with a diameter of 10 mm and a working part length of 5 cm.
- Hammer.
- Roulette.
- Metal ruler.
- Pencil.
In order to make a door with your own hands using lining, you do not need any special skills or knowledge. To do this, it is enough to have a little knowledge of the tool. You can, of course, order a new door according to your dimensions, but this will cost much more than making such a structure yourself.
How to cover a door with clapboard: wooden
Carrying out the process with your own hands is not at all difficult. Before starting work, it is necessary to adapt the material: the lining, if we are talking about cladding on the inside, must be in the room for at least a day to get used to the microclimate.
- The lamellas are treated with antiseptic compounds and opened with varnish. As a rule, the processing procedure has to be carried out independently, since the lining for the most part goes on sale in a “raw” form, that is, unprocessed.
- The door leaf is removed from the hinges, the surface is cleaned, and all fittings are removed - locks, door hinges, handle.
- The slats are cut to size depending on the chosen installation method.
- Laying starts from the left edge. The first panel is installed exactly along the edge, the position is checked with a level. Fastening is carried out with finishing nails, as they are the least noticeable.
- All subsequent lamellas are joined into the groove of the previous one and secured in the same way. The ends are sanded.
- It is recommended to varnish the finished product again, and after drying, replace the fittings.
In the video, the installation of a lining door with your own hands is presented in more detail.
How to sheathe a metal sheet
The procedure is close to the case described above. But, since the steel sheet is much stronger, the fastening is carried out differently.
If the sash can be removed from its hinges, then for convenience this should be done.
- The fittings are successful - locks, hinges, handle, door peephole.
- The surface of the canvas is cleaned.
- The lamellas can be secured to the steel surface with clamps - the latter are screwed with metal screws using a screwdriver.
- If the door is to be insulated, then a sheathing of wooden slats should be installed. The frame is also fixed with self-tapping screws. Thermal insulator - foam rubber, polystyrene foam, cut to size and placed spaced between the slats. If necessary, the material can be glued to the surface of the canvas. The slats are tightly joined and secured to the sheathing with finishing nails.
Features of using the material
There are many options for covering entrance or interior doors with clapboard. Depending on the location of the canvas and its contact with the street, front door or rooms, you need to prepare wooden panels. To avoid bending of the strips or swelling of the cladding already installed on the door, the lining must be kept indoors for several days. The microclimate must match the conditions in which the wood will be used.
The fibers of the material will have time to absorb excess moisture or, conversely, dry out. Then the door leaf, finished with slats, will not have any bending of its geometry or drying out with the appearance of cracks.
You need to buy only dried lumber. If the boards are damp or under-dried, then over time they will acquire the desired structure already in a solid structure, which will cause the appearance of cracks and gaps between individual elements.
Before finishing and constructing the door lining, you need to coat each strip of material with means to protect against harmful microorganisms and fire. Most compounds impart some tint to the wood, which must be taken into account. It is best to do a small test on the end of one of the planks to see how the wood will look after applying the product.
Attention: Lining is a universal material, used for finishing door structures made of metal, wood or plastic. Although working with metal and plastic surfaces is a little more difficult than working with wood, the cladding can be done without any unnecessary complications.
Selection and preparation of lining
You decide for yourself which lining to buy. The material has 4 classes:
- in the European version it is A, B, C;
- in the domestic version - 1st, 2nd, 3rd class.
Both options have an Extra class - the best lining.
Choose Extra or 1st class (A) for finishing the door. Other classes have a lot of knots on the doors that fall out over time.
For finishing doors it is better to take the thinnest strips:
- the thickness of domestic lining starts from 12 mm;
- thickness of eurolining - from 12.5 mm.
As for the configuration or type of planks, the best option would be Eurolining, Standard, Shtil, Softline or Landhaus. The price for Landhaus and Eurolining is higher than for other models.
The American texture is not suitable for doors, Blockhouse is good, but the thickness is 40 mm, if sheathed on both sides, the total thickness of the leaf will be at least 150 mm
When choosing, it is better to take strips that have compensation grooves on the reverse side; in the photo above, the Shtil, Eurolining and Softline models have them. Such cuts protect against deformation.
Stain can radically change the color of wood
In the store, look for steamed lining, it has a deep antiseptic impregnation; at home you cannot saturate wood like that. The color can be changed with stain.
You need to sand all the planks with sandpaper, then cover them with one layer of varnish and when it dries, lightly sand it again. Any varnish for outdoor use is suitable for these purposes.
If your door faces the street, then it is advisable to use urethane-alkyd yacht varnish
Selection of material for construction
After determining the dimensions of the future door, it’s time to think about what material it would be best to make it from. Wood is most often used for such structures. You can assemble it from boards up to 30 mm thick, but their weight will be quite large.
Related article: Dowel for aerated concrete and other fasteners in porous materials
Options for patterns when decorating doors with clapboard.
Use plywood sheets - but then the price of the material increases. And you will still need boards to create the frame. To combine low weight and acceptable financial costs, you need to do the following:
Fabric preparation
Preparing the door for finishing:
- All removable parts from the canvas must be removed , i.e. locks along with locking plates, peepholes, handles, etc.
- In steel doors, the inner panel is often removable ; it also needs to be dismantled.
- Then the canvas can be removed from the awnings and placed on trestles or something similar, but personally I find it more convenient to work without removing the doors.
It is easier to trim the doors in a horizontal position.
If your doors are already painted with some kind of paint, there is no need to peel it off. At this stage, the main task is to protect the metal from corrosion.
- Bare metal must be cleaned with a metal cord brush and degreased with an alcohol-containing solution.
- Paint with any paint (except water-based) in one layer - the color does not matter.
Features of a metal door
Construction of a metal door. The beginning of preparatory work with a steel door has no fundamental differences: as in the case of a wooden door, unfasten the door from its hinges, clean the surface, remove all fittings and place it at a convenient height for work (table, chairs, etc.). Prepare the lining for work by cutting it to the required length. The stage of attaching the slats to a metal door can be accomplished in several ways. For example, you can use clamps for direct fastening to the canvas using self-tapping screws and a screwdriver. Liquid nails also find their application here. Another method involves making a wooden frame from a narrow beam according to the dimensions of the door, to which the slats will be attached. By tightly joining them to each other and fastening them with nails to the sheathing, as in the case of a wooden door, you finish the job by sanding the edges. The frame itself is attached to self-tapping screws along the perimeter of the surface of the metal door leaf. By the way, this method is good if you need to insulate the door. In this case, the thermal insulation material is placed behind the sheathing; if necessary, the heat insulator should be glued to the surface behind the frame base. To complete the work, as in the case of a wooden system, treat it with varnish, wait for it to dry, and, having returned the fittings to their place, install the doors back.
We also cover all the decorative slats, which, by the way, can be made in a different color, and then the door will turn out to be even more original, so there is complete freedom of imagination and a field for small experiments.
Finishing technology
Finishing the door with clapboard starts from the front side; in a day you will definitely cover the façade, and the inside can be put off for later. But before that you need to secure the internal sheathing.
Lathing inside the door
You need to make a wooden sheathing on which you will attach the planks from inside the home.
- select a wooden block according to the internal thickness of the canvas and screw it along the perimeter of the canvas and on the stiffening ribs;
There is a profile pipe inside the door - the metal lining will not hold on to it, so a wooden beam is attached next to it
- The easiest way is to drill holes in the front sheet of metal and screw the bars through them with self-tapping screws;
- You can use the same scheme to screw the sheathing to the supporting frame of the canvas ; it is usually made from a profile pipe or secured to the corners.
Front trim
First you need to decide on the sheathing scheme. Scheme options are shown in the photo below. I recommend schemes numbered 2, 4 and 5.
Schemes for cladding entrance doors with clapboard
Some craftsmen recommend installing the cladding with glue, but this should not be done! Due to temperature changes and vibration loads, the lining will peel off within a year.
The easiest way is to screw the planks right through from the front. This is vertical cladding option No. 2.
- cut off the tenon from the first plank and apply it to the edge;
- step back 20–30 mm from the ends of the plank at the top and bottom and drill through holes with a diameter of 2 mm in the center;
- in the plank, drill a countersunk hole for the screw head with a depth of 5–7 mm and a diameter of 7–8 mm;
- screw the bar with metal screws;
- then the tenon of the next plank is driven into the groove of the already fixed one , and it is also fixed with self-tapping screws; the rest are fastened in the same way;
- the outermost strip is cut along the width and is also fastened with self-tapping screws;
- when the plane is sewn up, to be sure, you can put another row of screws in the center;
Instead of expensive cashing, the screws can be covered with a 20x40 mm strip
- the screws can be covered with wooden casing , nailing it to the lining (as in diagram No. 2);
- You can do without cashing using dowels. If there is a deep recess for self-tapping screws, wooden furniture dowels are driven into these holes, after which they are cut flush with the plane of the doors, as a result, the attachment point is almost invisible.
Finishing from the inside
Before sheathing the inside of a metal door with clapboard, it is advisable to insulate the door leaf. To do this, take foam plastic the thickness of the door, insert the sheets inside, and fill the cracks around the perimeter with foam.
The lining can be fastened according to the traditional scheme with clamps:
- A tenon is cut off on the starting strip and, just like on the outside, it is screwed through with a self-tapping screw to the wooden sheathing.
- On the reverse side, a clamping tongue is inserted into the groove , after which it is nailed to the sheathing bar.
It is better to screw the kleimer with a self-tapping screw
- Next, insert the tenon of the next plank into the groove of the fixed one and fasten it on the reverse side with a clamp; according to this pattern, the entire plane is sewn up.
- The outermost strip is screwed to the sheathing with self-tapping screws.
- When the cladding is completed, it is advisable to varnish the lining a couple more times, after which the door fittings are hung.
The door hardware is attached last.
How to choose lumber for sheathing
The choice of lining for finishing a door is not limited to determining the grade, species and shape of the lamella. There are a few more important points.
- Drying degree. The moisture content of lumber should not exceed 12%. It is advisable that it drys under natural conditions. This takes several months, so forced drying is also used. This is also an acceptable option. Damp wood cannot be used. After assembly, it will continue to release moisture and will inevitably become deformed.
- Appearance. It is advisable to inspect the slats before purchasing. An unscrupulous seller may try to sell low-quality products under the guise of high-quality ones. There should be no defects or chips on the planks. Pale blue or greenish spots are not acceptable. This is a sign of developing fungal diseases.
- Quality of locking connections. Experts recommend always checking this circumstance. To do this, you need to take two plates from the pack at random and try to click the lock. The grooves must fit together accurately, without irregularities or difficulties. If you have problems when trying to click the connection, it is better to look for another lumber.
It is advisable to buy material treated with special compounds. It is more expensive, but the factory processing is worth it. It is carried out in special cells where special conditions are created. They cannot be repeated at home. Therefore, treatment with the most expensive compounds will not give the same result as factory treatment. The photo below shows the material processed in the factory.
Instagram leinosmarket
Instagram lesark.ru
- Doors and partitions
How to insulate a metal entrance door for the winter in an apartment or private house
Finishing with clapboard, or where to start
China today produces everything it can, from disposable lighters to high-tech smartphones. Of course, everyone knows the quality of the products produced there, but they also make doors.
There is zero protection against such a door, and anyone, even the most unlucky and cunning attacker, will open it in a matter of seconds. There is an alternative: order the door from local manufacturers. This will already be a worthy product, made of high-quality steel and with reliable locks, but the cost will be completely different.
We, in turn, offer another alternative option that will help you save money and get a door that, in terms of decorative qualities, will be in no way inferior to factory products, and perhaps even ahead of them. So, we finish the metal door with wooden clapboard.
The horizontal lining also looks very interesting on a metal door
Why did we choose this particular material?
It's simple, it has a number of characteristics that you won't find anywhere else, here are just a few of them:
- External attractiveness. Few materials can compete in beauty with natural wood. We will not paint over it with rough paint, but on the contrary, we will emphasize all the characteristic features and highlight the texture pattern, and it will look very interesting.
- Additional thermal insulation. Wood itself is an insulator (see How to insulate a door with clapboard). It perfectly maintains temperature, and at the same time has the ability not to accumulate condensation underneath, which inevitably occurs on the door leaf due to constant cold bridges.
- Soundproofing . A factor that is especially relevant for residents of apartment buildings. A simple door without finishing completely allows sound to pass through, and as a result, you know everything that is happening in the entrance, just like your neighbors, who are aware of your household affairs. Wood serves as an excellent sound insulator.
- Easy to install. You can do the finishing yourself, you don’t need experience, knowledge or a sophisticated set of tools, all you need is to just read this article to the end, and strictly follow the instructions, without skipping a single step, and after just a few hours of work, you You will be surprised how much your door will be transformed.
- Resistance to mechanical damage. The wood can withstand accidental touches, and even if the panel is significantly damaged, you will only need to replace one segment of the finish without redoing it completely, and this process will take no more than an hour of your time.
- Durability . Properly treated wood can last for decades, without losing its quality and decorative qualities.
Well, have you assessed the benefits? Then feel free to order a door without finishing, which will cost mere pennies, stock up on lining, and go ahead.
Preparing the door for finishing
Doors without decorative finishing, or as experts call them “pieces of iron,” are made from a single sheet of metal at least 2 millimeters thick.
Advice! If the manufacturer, when ordering a door, tries to convince you that a sheet thickness of 1.5 millimeters is quite enough, this is a reason to say goodbye to it, since steel thinner than two millimeters is produced in a cold way, and therefore has a much smaller margin of strength and reliability.
As a rule, the sheet has a layer of paint, so additional protection of the canvas is unnecessary. Ideally, the door is painted with hammer paint or polymer. This coating lasts much longer, but will cost a little more.
The entire stage of preparing the door for finishing consists of several stages:
- Remove the door leaf from the hinges. We won’t need the frame until installation, so we set it aside, and if we are talking about an already installed door, then we simply remove it from its hinges and place it on a table or trestle.
- We unscrew all the hinged options: locks, peepholes, door handles. We won't need them for now either, so we put them aside.
- Remove the sealing tape. During the process of installing the lining, it will inevitably be damaged, so you will have to buy several meters of new tape, and at the very end of the process, stick it on again.
That’s basically it, the door is ready for finishing, but it’s too early to start.
Preparing the lining
Wood in its pure form has a number of disadvantages, but thanks to modern technologies and materials, these disadvantages can be easily eliminated:
- Moisture absorption and swelling.
- Easy to ignite, and as a result, a fire hazard.
- Temperature expansions.
- The appearance of blue spots on the surface, which indicate the formation of mold.
- There are always bugs inside.
All this can be solved in just one way - by covering the lining with deep penetration impregnation, but before that, the panels must be cut to the required size in order to be able to pass through all the parts, including the ends.
The size of the lining is cut not according to the height of the canvas, but minus the thickness of the decorative strip. This lath is called three-quarter by carpenters, since it does not have a solid base, but a three-quarter base.
If you look at such a strip from the end, it will resemble the letter G, in which the vertical side must strictly correspond to the thickness of the selected lining, and the horizontal side is the area that will be covered on the panel by this very strip.
So, in order to calculate the size of the lining, you need to measure the net size of the door leaf and subtract the rail from it, as a rule it will be about minus two centimeters. Now, we cut off all the panels we need to this size, and proceed to painting.
Leatherette upholstery
So, how to cover a door with leatherette with your own hands? The process has some differences for wooden and metal structures, but the preparation stage and the necessary tools are almost identical in both cases.
Preparation for upholstery
To install the coating yourself, you will need the following tools:
- sharp stationery knife and large scissors;
- industrial stapler;
- hammer;
- pliers;
- screwdriver;
- brush.
Before starting work, you will need to remove all fittings from the door (peephole, handles, lock). Then the structure is removed from the hinges and inspected for any defects; if any are found, they must be eliminated. Next, the leatherette must be cut to the size of the door, making an allowance of 10-15 cm on all sides. In addition, you cannot do without cushioning material, which will give the upholstery the required volume. If the door is not located inside the dressing room, but goes out onto the street, then it is advisable to take care of its insulation. The following materials can perform this function:
- isolon tape – has a long service life (about 70 years), is effective, but quite expensive;
- foam rubber - can last about 15 years and has average heat retention properties;
- batting - service life is 30 years, has good performance, but makes the door structure somewhat heavier.
Wooden door trim
The upholstery process begins with laying insulation, cut to the size of the structure, on the prepared door leaf. The material must be secured using a construction stapler or nails; before this, you should lubricate the surface of the door with glue for a more durable fixation. Next, comes the crucial stage of attaching the upholstery. To do this, it is better to use special decorative nails, matched to the color of leatherette or the rest of the door fittings. The upholstery fabric is laid in such a way that the overlap on all sides is the same. Then the edges are folded inward, ensuring that the fabric is evenly folded and tensioned. Now all that remains is to fix the leatherette with nails at equal intervals around the perimeter of the door leaf. After the fabric is securely fastened, you can give the covering a pattern using decorative braid and upholstery nails. Ready-made pattern diagrams are given below, but you can also invent something new, focusing on your taste and imagination.
Schemes for decorative fastening of leatherette
Metal door trim
Upholstering a metal door is done a little differently, but the process is even simpler than with wood. After all, you won’t have to nail leatherette to the metal, and this part of the work is the most labor-intensive. After preparing the canvas, which is identical to that described above, the door is removed from its hinges and placed in a horizontal position. The insulation is attached to the metal using glue, taking care to lay it correctly the first time to avoid further displacement. Then the leatherette itself (part of the material with an overlap) is attached to the ends of the door, lubricated with glue. It is better to start from the top, then fix the material from the side of the hinges and the lock, and complete the installation with the bottom end. At the same time, it is important to avoid the occurrence of folds and distortions. After the glue has dried, use a sharp stationery knife to remove excess material and reinstall the fittings. When cutting holes for door handles, locks, etc., do not forget that the slots should be smaller than the dimensions of the fittings. Otherwise, the holes may become noticeable and spoil the appearance of the structure. At this point, the work is completed, and your front door not only looks updated, but also provides additional heat retention in the house.
Finished design
The missing tool can be borrowed from friends or rented. After preparing all the necessary equipment, you need to remove the door from its hinges and place it on the trestles.
Installation of lining
As we mentioned above, finishing a metal door begins from the inside, and the first stage is not attaching the lining. First of all, you need to secure two decorative slats - on the side of the hinges and on top, but for this you need to cut a 45-degree angle.
It is best to use a tool for these purposes called a carpenter's miter box. In essence, this is a template on which the degrees of angles are strictly marked. We simply put a rail in it and cut off the angle we need.
Advice! To cut decorative slats, it is better to use a hacksaw; it has fine teeth and will not leave large nicks.
After the strip is cut, we paint the cut area with impregnation and screw it to the canvas using self-tapping screws. For black self-tapping screws, it is necessary to pre-drill a hole, and the thickness of the drill should be slightly less than the thickness of the screw itself.
The ideal step between fastenings is considered to be 15 centimeters, but it would be more correct to divide the rail along its entire length into equal sections, then it will look more attractive.
The outer part of a metal door with a window without finishing
So, the two slats are secured, and now we know the place where the opposite corner should be cut off. The cut can be done without removing the strip from the door; just unscrew the outer screw and lift the board under the miter box. Thus, we have four cut slats, and two of them are already attached to the door leaf.
Now it’s time for the lining, and in this case this is the easiest stage. There is no need to fix the panels, they will be pressed by the slats, locking handles and peephole, so we simply insert the panel into the groove, not forgetting to cut off the outer panel along its entire length.
Now, we fix the remaining slats, and the finishing is almost ready, but where now to look for the lock and the peephole?
Don’t be alarmed, you haven’t made any mistake, just pick up a drill, install the longest and thinnest drill in it, turn the door over, and from the side where there is no finishing yet, drill a hole, exactly in the middle of the place where the handles and peephole
Now we turn the door over again, and using a cutter or a special burr, we widen the key holes for fastening handles and for the peephole. Everything is so simple and you can’t make a mistake, as if you were looking for a drilling location, taking measurements with a tape measure.
External side
Here the finishing technology is no different, we also saw and screw the slats, we also insert the lining, and drill holes for the locks and peephole.
The only difference is that the screws pass through the sheet of metal, and their ends will stick out on the other side, where the leaf adjoins the door frame, therefore, after the finishing is completed, we turn the door over and cut off the protruding screws with a grinder. By the way, if you don’t have a grinder at hand, you can simply knock them down with a hammer.
Hardened screws break easily even from a slight blow, so there will be no problems with this.
Final stage
Well, we have come to the final stage, which includes gluing the sealing tape and installing all the components. Advice! Apply the sealing tape gradually; there is no need to remove the entire protective layer at once, as there is a high probability that the tape will tangle and stick together. Tear off the protection in small sections, gradually gluing the tape to the door leaf, previously cleaned of dust and dirt. Now all that remains is to install the locks and the peephole. There is nothing complicated here, especially if you remember how they were filmed.
Entrance doors with clapboard That's all, we hang the door back on the hinges and check the work; if everything was done correctly, then no difficulties should arise, since we did not interfere with the design of the door itself, and therefore could not disrupt the functionality. How Apparently, finishing a door with your own hands is not a complicated process at all, which will require a minimum of time and effort, and if you have not yet decided on the material, we recommend that you watch the video in this article, which does not show finishing instructions, but presents metal doors with clapboard. It’s much easier to visually understand what your door will look like, and if you use a little imagination, you can create a real masterpiece yourself, as shown in one of the photos above.
What kind of fabrics can be veneered: instructions and photos
Lining is such a pliable material that it can be mounted on any surface.
Doors made of any material can be sheathed in this way: Let's look at it in detail:
- Most often, plastic sheets already have the necessary decorative qualities and a sufficient level of noise and heat insulation that it is simply irrational to decorate them additionally (what and how can you insulate with clapboard?).
- Wooden panels are the easiest to cover with panels due to the “softness” of wood compared to metal products.
- Sheathing metal structures is more difficult, and the process itself takes much more time. It is best to do this cladding on canvases removed from the hinges. It is very difficult to attach panels to a steel frame, so it is recommended to remove the fittings.
What will you need for the job?
To return the canvas to a neat appearance, it is upholstered with different materials and decorated with fittings. It is quite possible to do this yourself. To cover wooden doors you will need:
- scissors;
- pencil;
- roulette;
- hammer;
- construction stapler;
- construction and decorative nails;
- assembly adhesive;
- necessary accessories;
- insulation;
- pliers;
- screwdriver;
- mites;
- material chosen for finishing.
Why trim doors?
Wooden planks decorate the structure. But this is not the only advantage it gives. Let's list everything.
- Additional thermal insulation. Wood is a good insulator. It retains the heat coming from the apartment. Another plus is the absence of condensation that appears on the inside in the area of cold bridges.
- Additional sound insulation. Wood dampens sound waves, and the amount of noise coming from outside will be significantly reduced.
- Durability. With the right choice of material and proper care, the finish will last for several decades. It will not lose its operational and decorative properties.
- Strength. The wood is resistant to mechanical damage. Even strong enough impacts leave only scratches or chips. They can be sanded or sealed. In the most difficult case, the damaged bar is replaced with a new one.
- Easy installation. The design of the planks greatly simplifies their assembly, thanks to this, even a novice craftsman can cover the doors with clapboard with his own hands.
All these advantages are relevant only for correctly selected and installed lumber without errors. Otherwise, the wood will “show” all its shortcomings. These are swelling and rotting under the influence of moisture, expansion and contraction under the influence of temperature fluctuations, fire hazard, damage by microorganisms and insects.
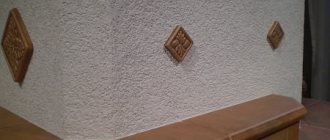
Plastering the base of the internal door slopes
Scheme for finishing the openings. You can finish a surface in this way both outside and inside the room. Here it is very important not to make a mistake with its type and structure. In the modern construction industry market there is a wide variety of materials with which you can make any surface smooth and even. Thus, a decorative type of plaster is not afraid of temperature changes and high air humidity. To decorate the side parts of the doorway, the following types of plasters are used:
- starting;
- finishing
- First, the base is coated with starting plaster. It is laid in several thin layers. This method will help to achieve a solid base of the plaster.
- An assessment of the general condition of the door jamb is made in advance. To eliminate visible defects, you should use starting plaster, leveling the surface to good levels. Once this job is completed, the base should dry. After this, it is cleaned with emery cloth.
- Then a finishing coating is applied to the finished surface, which completes the work begun by the previous material. It masks the remaining potholes and chips as much as possible. As soon as the surface dries, it is sanded.
- As soon as the above work is completed, painting of the finished base or wallpapering it begins. In this case, you should choose a material that suits the appearance of the room.