Over time, any wood loses its original appearance and darkens. In some cases, the cause of darkening and even blackening is mold bacteria, which multiply very quickly in undried wood. But even completely dry wood becomes dark over time due to exposure to sunlight and moisture. That is why the wood is sanded before applying the coating.
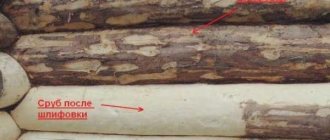
Sanding a log frame allows you to remove the top blackened layers and prepare the wood for further processing.
What tools are best to equip yourself for polishing a log house?
Sanding wood with a grinder is the most common and affordable way to sand a wooden house. Typically, an angle grinder is used for grinding a frame made of planed logs. Using a grinder is also convenient for sanding grooves and ends of logs. Actually, with this tool, if you have the skills, you can process any lumber.
Model selection
There are both household and professional models that differ in power and performance. You shouldn’t buy the cheapest grinder; its power is unlikely to be enough to polish the entire frame. Expensive professional models are also not the best choice for home use. They operate at high speeds and are distinguished by considerable weight and power. A non-specialist, without the knowledge of working with such a tool, can simply ruin the surface being sanded, leaving dents on it.
It is best to opt for:
- semi-professional models with power from 800 to 1000 W. This will be quite enough to polish the frame.
- It is advisable to buy a tool with a rear air intake rather than a side one, so it will become less clogged with dust.
- You should also pay attention to the cable length. A cord that is too short is inconvenient to use.
Nozzles for an angle grinder
To work, you will have to stock up on attachments on which the abrasive is fixed. There are two types of nozzles:
- Rubber
- Plastic.
It is more convenient to work with plastic nozzles; although they are thinner than rubber ones, they last longer. Rubber ones quickly deteriorate, and in addition, if the rubber nozzle accidentally touches the wood, it will leave an ugly black mark on the surface of the wood, which is very difficult to remove.
Abrasive wheels
For grinding use regular
or flap grinding wheels. Sanding a log frame is a very dusty job. A lot of dust is released, which, together with tree resin, gets clogged into the disc, the abrasive quickly wears off, so the grinding wheels quickly become unusable.
During rough processing, one disk is enough for about 3-5 meters of log, then it has to be changed. Consumption depends on the condition of the wood and the type of surface. How many fine grinding discs are needed depends on how thoroughly the initial processing was carried out.
The alpha disk, which is a metal disk with pobedite chips soldered onto its body, has a longer service life. Grinding timber with an alpha disc allows you to significantly save on consumables. A disk clogged with sawdust can simply be cleaned with a wire brush and you can continue to work calmly.
Today it is not difficult to acquire the necessary tools for carrying out the procedure. You should arm yourself with:
- grinding machine;
- cutting machine;
- chisel.
Modern technology certainly makes the task easier. You need to learn how to use a grinder by adjusting the pressure. Excessive efforts can lead to defects; you cannot make mistakes so as not to spoil the appearance of the building. The corners and inter-crown depressions are ground with a grinder; the recesses are processed manually with a chisel. It is better to use a chisel 20cm wide.
Important! When choosing tools, you should pay attention to weight, so as not to put too much strain on your hands and power. Tools with low power will heat up, significantly reducing productivity. High-quality tools are produced by Makita, Bosh, DeWalt, and the domestic Interskol is also worthy of attention. The equipment is high quality and durable.
For a timber frame you need a belt sander; its use will ensure a smooth surface. Equipped with a special dust collection bag, the machine will make subsequent cleaning of the room easier. I'll round the surface of the logs with a belt machine, it's difficult, a grinder and special attachments will come in handy here.
The correct power of the cutting machine is 600-900 W. Nozzles with different degrees of grain. Initially, use a coarse-grained nozzle (40), then take a nozzle 80-100. Disc 125mm, speed 10-12 thousand, preference should be given to a machine with a rear air intake and a long cord that provides freedom of action.
Important! For work, it is more convenient to use two machines, so as not to overheat and not change attachments; first work with the attachment with large grains, then with fine ones. Using plastic attachments; flexible plastic with an abrasive layer is more convenient, leaves no marks and lasts longer.
Types of cutting attachments for grinding wood angle grinders
Sanding boards with a grinder is one of the main tasks for which this tool is used. Special care is required from the craftsman, since wood is a fibrous material. To avoid the appearance of burrs, chips, and large scattering of chips, you need not only reliable fixation of the workpiece, but also special attachments: standard diamond cutters will not work. The work is performed with special grinding attachments.
For rough processing
Primary processing of wooden products is carried out using grinding discs of the following types:
- Roughing. This type of nozzle is used to remove old, hard-to-clean coating from the workpiece: varnish, dried paint. There are steel wire bristles across the entire area of the disc.
- Cord brushes. After the initial rough processing, the wooden surface is smoothed and leveled with cord brushes made of wire or rigid wire bundles of a horizontal or perpendicular arrangement.
- End Designed for cleaning the ends and edges of wooden boards, aligning miter cuts.
For grinding and polishing
Following rough initial processing, the wood is sanded and polished. The following types of disks are used for this:
- Petalaceae. The most famous and widespread type of attachments for angle grinders. The disc looks like a flower with long thin petals, the role of which is played by an abrasive material. The petal attachments wear out slowly. As you sand, it is recommended to gradually replace coarse-grained nozzles with fine-grained ones.
- Adhesive abrasive wheels. They are glued with Velcro onto the round metal attachment of the grinder. The kit comes standard with several circles – usually five. A worn disc can be easily removed from the attachment and replaced with a new one. The abrasive wheel contains sandpaper, felt, sponge, and high-density fabrics.
Cutting discs
To cut wood with a grinder, cutting circles are used. They are made of tungsten carbide, a high-strength powder material, since cutting work requires increased durability. Do not use a cutting wheel for stone, metal or ceramics on wood. The consequences can be disastrous: the wooden workpiece will be damaged, the disk will break, the grinder itself will burn out.
In addition to the diameter and cutting depth, the key classification parameter for cutting wheels is the shape of the teeth:
- straight – for soft wood;
- variable beveled - for all types of wood;
- trapezoidal - for fiberboard, medium-density chipboard, laminate.
If you look at a cutting disc, the notches along the circumference or slot immediately catch your eye.
Cut-off with different teeth and slots
This is a special design solution that prevents overheating of the material. For example, when working with stone or metal, the water cooling method is used, but this is not applicable for wood. Therefore, the manufacturers did everything in advance to minimize the risk of the wheel overheating.
Important! On all modern angle grinders the standard shaft diameter is 22.2 mm; on older models this size may be smaller or larger. A cutting wheel can be placed on a shaft of a smaller diameter using an adapter attachment, but it will not be possible to install a disk of this type on a large shaft.
Sanding the log in grooves and corners
Regardless of what kind of log the frame is made of, the grooves are polished with grinders. Moreover, the nozzle is taken smaller than the disk used (for example, for a nozzle diameter of 115 mm, the abrasive is set to 125). If the disk and the attachment are the same size, the tool may jam in the groove during operation. In this case, the grinder will be torn out of your hands, which can lead to injury.
You have to use chisels to finish the logs in the corners
If the disk is larger in size, then you can work calmly. Although it wears out quickly at the edges, you can work like this without fear of injury.
The corners of the log frame remain the most problematic for processing. The only reliable method for processing them is with chisels. Using this tool, the top thin layer of wood is removed. This can be done before or after stripping the entire log. Not so important.
The ends of the logs are sanded with a grinder with a 40-grain abrasive wheel. By adjusting the speed, you select the speed at which the tool is easy to control. Achieving perfect smoothness here is unrealistic, and it is not necessary, so sanding with fine grain is not done. When further processing with primers, varnishes or other compounds, increased attention is paid to the ends - they absorb better, so you have to lubricate more generously.
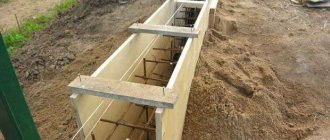
We invite you to read: How to knit reinforcement for beginners: methods, norms and rules, frame for the foundation
Sanding logs – still by hand?
It is quite possible that you have not yet reached the stage of sanding the logs and have decided to take an interest in all the preparation processes ahead of time. One of these stages is sanding, or, in professional terms, debarking, that is, getting rid of the bark. This is done as quickly as possible immediately after cutting, within 2-3 weeks, since a dried log will be even more difficult to process.
There are many ways to bleach a log, and most of them are quite labor-intensive. The first method is sanding with a scraper, a tool that is a curved blade with two handles at the ends. The staple can be replaced with a sickle by wrapping the sharp edge with a piece of durable cloth or stretching a piece of hose. If this tool is not available, use a sharpened bayonet shovel or an ax.
You can make sanding logs easier by making cuts along the log with a chainsaw. This will make the process easier, but you will still have to work with the same scraper, ax or shovel. Oddly enough, many do not even suspect that work can be simplified and speeded up significantly, turning monotonous physical labor into a fairly easy task. You can remove the bark with an electric planer, but the blade will often become clogged with bark. In addition, this method will not give such a clean wood surface as a scraper.
On an industrial scale, of course, they use automatic machines, which cost a lot and take up a lot of space. You can't put one like this at home. Industrialists also use jet-hydraulic debarking - this is a relatively new method brought to us from Canada. Cleaning of bark is carried out with a stream of water, which is supplied under pressure of 280-350 atmospheres. Of course, for this you need to buy expensive equipment.
Surface degumming
Conifers are known to contain large amounts of natural resins. On the one hand, this circumstance is an advantage, since the resin content protects the tree from rotting and mold formation. But on the other hand, resin prevents good adhesion of paint to wood, and when sanding it spreads over the surface and spoils the appearance of the wood. Therefore, before processing the needles with a grinder, it is necessary to remove excess resin.
How to remove resin from a log before sanding? Suitable solvents for this are: acetone, white spirit, turpentine, purified gasoline. You just need to apply the selected product to the wooden surface, and rinse off the residue with warm water.
Processing of logs inside the house
All actions are identical. When sanding a frame made of planed logs, if the wall inside will not be lined with anything, add one more pass for finishing: with an eccentric sander with a 120 abrasive disc. This will allow you to achieve a perfectly smooth surface.
The inside of the log house is polished to furniture smoothness.
Proper wood processing increases the durability of the structure, eliminates wood damage, and reduces the costs of subsequent maintenance and repairs. It is better not to save on purchasing funds. High-quality compounds purchased from reputable stores guarantee reliable protection of wood from natural aggressions, rot, fungus and mold. When purchasing protective mixtures, you should pay attention to the warranty period.
Impregnation is applied manually, with a brush or spray. To improve aesthetic qualities, many use impregnations with coloring pigments. For proper processing you need:
- antiseptics;
- flame retardants;
- glazing compounds.
Antiseptics block mold and rot, fire retardants increase resistance to fire, glazing compounds make the surface more beautiful.
Important! It is preferable to purchase Valtti Pohjuste antiseptic from Tikkurila, Neomid 440, Neomid Bio Color. Antiseptic Valtti Color favorably emphasizes the wood texture. The products are not cheap, but worth the money spent.
Consumption of the composition is approximately 1 liter per 1 m² of sanded surface. White spirit is used to wash hands and arms.
Sanding is an important stage in the construction of a log house. You can do it yourself, or you can invite specialists. The cost of work is 300-400 rubles per 1 m². Sanding a large house is a costly undertaking, there are no major difficulties in the work, the choice is yours.
Grinding the grooves of logs is always done with a grinder. The grooves are processed with a nozzle smaller than the disk. If the attachment and disc are the same size, this may cause the machine to jam.
To process the ends, use a grinding wheel with 40-grit sandpaper. Usually in these places they limit themselves to rough and medium processing, without grinding the ends to perfect smoothness. Immediately after grinding, the ends are treated with protective impregnations and antiseptics.
Antiseptic and fire retardant - against fungus and fire!
As a rule, sanded wood is treated with several compounds. Firstly, it is a glazing antiseptic - a special impregnation that protects the log from fungus and other putrefactive phenomena, from insects, and gives the wood dirt- and water-repellent properties. This composition is very difficult to wash off from the surface, so the logs will not be afraid of any precipitation.
After the antiseptic, a composition is used that gives the wood a special color or texture - quite often such compositions also have protective properties, primarily from weather conditions. Lastly, the logs are coated with fire retardants - compounds that prevent the wood from burning. All compositions can be applied with a regular brush or sprayed.
- Author: Manager Andrey
Rate this article:
- 5
- 4
- 3
- 2
- 1
(0 votes, average: 0 out of 5)
Share with your friends!
What mistakes are made when working independently?
The grinder is the main tool used for processing logs made from chopped logs, the surface of which contains bark residues, knots, cracks and other defects.
- For primary rough processing use:
- special grinding and polishing wheels;
- wire brushes;
- universal bases to which replaceable sanding attachments with coarse grain No. 30-60 are attached.
A grinder with these attachments copes well with the uneven surface of hand-cut logs. As a result of primary processing, all more or less large defects and protruding parts are removed from the surface.
- For stripping logs with old paintwork, bowl-shaped stripping attachments with twisted wires are best suited.
- The next stage after roughing is fine grinding, the purpose of which is to completely level the base and prepare the surface for painting or varnishing. It is performed using grinding wheels with fine-grained nozzles No. 80-120.
- If polishing of logs is planned, this operation is best done using fabric attachments.
It is not recommended to sand the entire area at once. It is advisable to treat the surface in parts, dividing the wall into certain zones. In this case, grinding productivity will be higher than when processing large areas.
A grinder is the most convenient and affordable tool for grinding, but in unprofessional hands it turns into a rather dangerous device, which can cause a lot of problems if handled improperly. Home craftsmen who do not have the skills to use an angle grinder very often make mistakes, which are the main reason for poor-quality grinding.
A typical mistake is working with an angle grinder at high speeds. Inexperienced craftsmen often find it difficult to choose the optimal disk rotation speed. As a result, the tool literally “burns” the wood at high speed, damaging its outer layer. In addition, high speeds contribute to the rapid clogging of the abrasive with wood dust, which shortens the service life of the nozzle.
Another common mistake is pressing too hard on the device while sanding. This is the most common reason for the formation of dents and grooves on the body of logs and beams, which spoil the appearance of the wood. Getting rid of these marks is not so easy; you will have to re-sand, which is not always effective.
- When working with tools, you should not allow high speeds. This will leave unevenness and grooves on the walls.
- When sanding coniferous timber, you must first remove any remaining resin. If this is not done, grinding will spread the resin over the surface in a thin layer and it will be almost impossible to remove it.
- Defects in the timber that are not coated with adhesive will become disheveled after sanding and will look more unsightly.
- After coating with varnishes or water-based paints, the pile rises. For complete leveling, after the first coating, re-grind with a wheel No. 120. You can use chemical-based compounds; they do not affect the pile.
- Sanding is carried out before the main finishing and installation of windows, doors, and ceilings. This will make it easier to remove wood dust, of which there will be a lot.
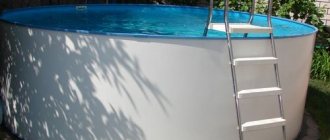
We invite you to familiarize yourself with: Construction of a concrete pool bowl
The faster sanding is completed, the easier the work will be. Over time, the wood hardens and performance will decline. Try to sand immediately after or during construction.
Required Tools
The right tool is the key to quality grinding. For easy and fast work, choose a tool that is not too heavy and has high power. Too heavy a weight will reduce productivity by 2-3 times, and low power will increase operating time!
Sanding the walls and ends of a house or bathhouse is done using a grinder, grinder and special discs. A standard belt sander will not work for a semicircular log. This tool is used to process a flat surface. It is suitable for a bathhouse or a house made of timber.
For a house made of rounded logs, it is better to use a grinder with attachments made of a sanding disc with sandpaper in the shape of petals. Choose a lightweight angle grinder with a power of 850 W. It is better to take a tool from a well-known and trusted brand. Preview photos on websites, collect reviews on forums and among friends. Do not take the first tool you come across, as it may turn out to be of poor quality and simply fall apart after two or three days of work.
It is important to choose the right nozzles. For external sanding of rough parts of walls, choose wheel No. 80
Wheel No. 120 is suitable for external processing of smoother and softer areas. Grinding of the ends begins with wheel No. 30, and nozzle No. 60 is used to remove the old paintwork. Tools with larger grain attachments are used for primary processing, and smaller ones for finishing.
Be prepared to change attachments frequently. The abrasive wears off during operation and becomes clogged with resin and wood dust. To extend the life of the attachment, the tool is treated with a wire brush and white spirit. However, even after cleaning, the speed and productivity of work will still decrease.
How to sand timber walls
The tools used are the same as for processing logs. A specific choice can only be made by assessing how deeply you need to remove the top layer of wood.
If the bathhouse is made of profiled or laminated timber, most likely you do not need to level anything. Just remove the top darkened layer, if there is one. In this case, if you have a sufficient level of proficiency with an angle grinder, you can work with it. If you don't have enough experience, use an eccentric sander. It will take longer, but the result will be guaranteed to be at least good.
Timber needs to be sanded in different ways. Depending on its geometry
If the walls are made of ordinary timber, then you will have to do a lot of leveling. You can’t do without a grinder here. Moreover, in some places it will be necessary to remove a couple of millimeters of excess - non-ideal geometry and errors in cutting bowls lead to the fact that the difference can be quite significant.
I found a video fragment about a very interesting Pobedit grinding disk, which, it seems, can easily cope with rough grinding and easily remove excess thickness.
If the bathhouse is made of profiled or laminated timber, most likely you do not need to level anything. Just remove the top darkened layer, if there is one. In this case, if you have a sufficient level of proficiency with an angle grinder, you can work with it. If you don't have enough experience, use an eccentric sander. It will take longer, but the result will be guaranteed to be at least good.
If the walls are made of ordinary timber, then you will have to do a lot of leveling. You can’t do without a grinder here. Moreover, in some places it will be necessary to remove a couple of millimeters of excess - non-ideal geometry and errors in cutting bowls lead to the fact that the difference can be quite significant.
Unlike hand-cut logs, rounded logs and beams have a smooth surface, which causes certain difficulties when processing them with a grinder. One awkward movement - and deep grooves and depressions will appear on the surface of a beam or rounded log that will remain there forever.
Working with an angle grinder is not for beginners; it requires certain skills. An angle grinder is a high-speed machine and, if handled improperly, can damage the surface. Do not press the tool too hard onto the area being treated. Sanding should be done with smooth circular movements, holding the grinder at an angle of 45 degrees. Grinding and polishing of timber should be done at low speeds. High speeds can lead to thermal destruction of the top layer of wood.
Before starting grinding work, the walls need to be inspected. If there are pieces of the “Radial Structure”, in other words, peeling off, then during grinding they will become shaggy and damage the tool. Such places are treated with an adhesive composition, after which the walls are allowed to dry for about a day. This technology has proven itself not only for timber with natural moisture, but also for chamber drying.
After sanding, you should not wait, but it is better to immediately treat the walls with special compounds.
When grinding, special attention should be paid to the ends.
Sanding the ends
The ends after the construction of a house from profiled timber are most susceptible to all kinds of influences. They absorb moisture instantly, and when coating, the consumption of paints and varnishes at the ends is 5 times higher. The ends must be processed especially carefully.
Our grandfathers used a blowtorch or a hammer to save the ends. Roasting is an old and proven method that really increases the life of wood. But at the same time, the appearance of the timber changes to unattractive, as in the photo. The ends were tapped with a hammer to completely connect the fibers and plug the channels. This makes the surface hard and smooth.
Modern methods and numerous attachments allow processing until the ends are completely smooth. To do this, first use nozzle No. 35 and gradually reach 120. With proper sanding, the ends will not absorb paint as forcefully and are less likely to crack. They need to be treated with special compounds for the ends. You can use liquid glass.
After sanding, all dust from the walls must be carefully removed. Particular attention is paid to connecting locks. Indoors, dust can be removed using a simple vacuum cleaner and a long-bristled brush. It is blown out from the outside and cleaned with the same brush.
Corner processing
For grinding corners, it is recommended to use the same grinding attachments, but having previously upgraded them. The rubber part of the nozzle is cut to 6-7 cm in diameter. This makes it easy to treat hard-to-reach places.
If there are completely inaccessible areas, then you can use a chisel or a block with sanding paper.
Grinding of rounded logs can be carried out partially or completely. It all depends on the quality of the material. The rounded log reaches the buyer already treated with primers and antiseptics. This layer will be removed during sanding. Therefore, after grinding, the rounded log is immediately coated with impregnations and antiseptics.
The rounded log needs to be sanded dry, after shrinkage at home. Before sanding, check the caulk and reapply if cracks appear. It is important to caulk before sanding as it can be damaged while working.
There is no need to process a rounded log with coarse attachments. They use a grinder for grinding; it is more difficult to work with a machine on rounded surfaces. At the first stage, the rounded log is sanded with a grinder with nozzle No. 100. It will raise the hairiness. Then No. 125 which will level the surface. Corners and connecting parts are processed manually.
We suggest you familiarize yourself with: Do-it-yourself spark arrester for the stove
If you sand without errors, the surface will look smooth as in the photo and pleasant to the touch.
Possible errors when performing grinding
Regardless of the tool used, it is important to adhere to general advice from specialists in work tactics. Initially, you should minimize the risks of the formation of grooves, cuts and other irregularities
Keeping the frame polished at low or medium speeds will help you achieve a smooth surface without defects.
With your own hands, hard-to-reach areas should be treated, covering as large an area as possible, since uneven distribution of point impact also contributes to the formation of flaws.
Passes along grinding or polishing lines should be kept as short as possible.
It is important to consider that repeated processing increases the risk of the formation of uneven geometry of the wooden segment. The optimal scheme is to strip with equal force in parallel lines
In the case of sandblasting, the smoothness and uniformity of sanding will depend on the uniform movement of the nozzle over the target surface. The slightest delay at one point will lead to a violation of the shape of the structure.
When is the best time to sand?
There are a lot of possible answers to this question. Traditionally, the frame is sanded after at least the main shrinkage has passed. During this time, the log dries out and it becomes easier to work with. It is extremely difficult to remove even a thin layer from raw wood. If you need to level it, it will take a lot of time, money for disks and effort.
On the other hand, if you have a frame made of dried timber and logs, then you can sand and process it right away. In this case, having placed the frame under the roof, it is sanded, immediately treated with impregnations and left to shrink in this form. This is done infrequently, although no one forbids it. They usually act according to the usual scheme.
The log house is sanded after it has settled.
On the other hand, if you have a log house made of dried timber and logs, then you can sand and process it immediately. In this case, having placed the frame under the roof, it is sanded, immediately treated with impregnations and left to shrink in this form. This is done infrequently, although no one forbids it. They usually act according to the usual scheme.
Execution of work
Since a minimum of time should pass between grinding logs or beams and processing, processing must be done along the crown. You can start from the top or the bottom - it makes no difference, but they sand one wall completely, then move on to the other. You can coat with impregnations and primers immediately after completing the treatment of one wall, having first removed the dust.
Questions often arise about what to do if there are blue spots or other dark spots on the wood. These are traces of fungal activity. They do not affect the quality and safety in any way, but they spoil the appearance considerably.
The blueness of the wood spoils the appearance
If you want to use light transparent paints for finishing, you will have to fight with the color. For this purpose, there are special compositions for bleaching wood. In this case, the procedure is as follows:
- bleach wood;
- carry out rough grinding;
- if traces of blackness remain, bleach again;
- final polishing.
Then comes the treatment with fire retardants, primers and finishing compounds.
This video presents the experience of a man who polished a log frame himself. He goes into some interesting detail, so don't waste 20 minutes.
Corner processing
Sanding a log frame is a labor-intensive process, and its technology has various variations. Some experienced craftsmen believe that in order to polish a frame, you need to wait until the shrinkage is complete, while others clean it as the walls are being built to avoid damage. To make the right decision, it is necessary to take into account the quality of the building material.
It is recommended to carry out the main work on the facade and internal surface of the log house walls using an eccentric grinder. Depending on the number of builders, the general plane must be divided into sections on the basis that in one day the contractor sands from 6 to 8 square meters. It should be taken into account that the area should not be left unpainted for more than 3-4 days, as the material will darken and will have to be cleaned again.
1. First, you need to sand the rounded log with coarse sandpaper (No. 40). Using this abrasive, the top layer of wood is removed, all defects, fungal and mold damage are eliminated;
2. final cleaning is done with fine sandpaper (No. 100). In this case, leveling occurs and the wood pile raised during initial sanding is removed. The plane should be smooth and pleasant to the touch.
After finishing grinding the main surface of the area, it is necessary to refine the grooves and corner joints of the frame. You can sand the grooves between the logs using a grinder with a plastic attachment. To ensure safety, its diameter should be slightly smaller than sandpaper. Otherwise, there is a risk of injury when the attachment gets jammed between logs and the grinder is pulled out of your hands.
The most common mistake made when processing a wooden cottage or sanding a log bathhouse with your own hands is the wrong choice of tool, which is associated with the desire to speed up the routine process. An overly powerful grinder operating at high speeds easily damages the structure.
Sanding a house made of rounded logs involves the generation of a large amount of dust, so the work must be carried out with personal protective equipment. It is recommended to use clear glasses with side curtains, a respirator mask, a hat and gloves. Shoes should be comfortable and durable. You can sand sections of walls at height using professional scaffolding or high-quality scaffolding made locally.
Technology and work procedure
The grinding process includes steps such as:
- rough grinding;
- medium processing;
- fine processing;
- final sanding before applying varnish.
The first stage of the work is to divide the entire surface of the wall into several sections, which will improve the quality of sanding work and cover the walls with paints and varnishes in a timely manner, because this must be done on a clean surface within 1–3 days. After dividing into zones, grinding is carried out with coarse grains. The wood is then covered with fluff, which is subsequently removed with petal discs of finer grain. The process of fine processing refers to work with a chisel. Final polishing to a perfectly smooth surface is done with your own hands using grout and sandpaper.
Professional polishing of logs
Specialists offer professional polishing services. Our craftsmen are highly qualified and know all the subtleties and nuances of grinding with an angle grinder. We use a professional tool with the necessary set of attachments, which has high performance and provides excellent grinding quality.
Calculate the cost of painting and insulating your home right now
Select types of work:
Select materials:
Do you have accurate measurements of the house?
By clicking on the button, you consent to the processing of personal data
Tags: log, tool, log house, grinding
« Previous entry
Mistakes when painting a log house unqualified
If the desire to save on professional services for some reason outweighs the guarantee of the quality of the work performed, then after a while unsightly results such as stripes, stains and simply peeling areas on a recently painted surface are very likely. In such cases, the quality of the paint product is not always to blame. Unprofessional builders, due to inexperience, make basic mistakes that affect the final result:
- The facade is not properly prepared for painting: poor-quality sanding (or lack thereof) leaves the surface rough.
- The painting technology (sequence) is violated.
- Work is carried out in unsuitable conditions (high humidity or under the scorching sun).
- Newly erected (naturally damp) walls are painted.
- Incompatible materials were selected for painting.
Peeling of paint is caused by a violation of technologySource otdelka-expert.ru