- Installation
- Is a Mauerlat needed if there are beams?
- Fastening sequence
- How to secure
Many homeowners strive to build their country houses themselves. There comes a time when they are faced with the question of whether it is possible to build a roof with their own hands and how to do it. In any case, it is important to remember that this work is quite labor-intensive and requires a competent approach and strict adherence to a certain sequence.
One of the important stages of roof construction is the correct installation and fastening of the murlat. This is a specific support that absorbs part of the force created by the roof structure.
About attaching the rafter legs to the Mauerlat
Over the years, the roof is exposed to various external loads, sometimes they can be significant.
Therefore, to ensure high reliability, careful design calculations and selection of building materials are necessary. Fastening structural elements is an important step in the construction of the roof of a building. The behavior of the roof in cases of heavy loads from fallen snow or strong wind will depend on the way in which the rafter leg is attached to the mauerlat.
The roof structure uses mainly elements made of wood, which can absorb moisture and then dry out from exposure to high temperatures. This suggests that a completely rigid connection of the entire structure should not be allowed to avoid ruptures. There are only two ways to attach rafters: rigid and sliding.
Rigid type of connection
This type of connection completely eliminates any method of movement between structural elements. To achieve this goal, two methods are used. This is the use of corners with hemmed support bars and the creation of cuts or a saddle on the rafter leg.
When the first fastening method is used, the rafter rests on the mauerlat through a support beam, the length of which can be up to one meter. The rafters are fixed with corners on both sides, which eliminates the possibility of its displacement.
The second method is used more often in construction. With this connection, the nails are driven in at an angle relative to each other so that they intersect in the mauerlat. The third nail is driven in vertically, which creates a very rigid connection between the rafters and the floor beams.
For insurance with both types of rigid fastening, additional connections of the rafters to the wall are used. For this purpose, anchors or wire are used.
Sliding type of connection
A sliding joint is a hinge joint in which there are two degrees of freedom. They are achieved by allowing one of the structural elements to shift. Usually this rafter has the ability to move slightly. This can be achieved as follows:
- A notch is created on the rafters, which is used to lay them on the mauerlat. Fastening can be done with nails, which are driven in from the sides and diagonally. Instead of nails, a metal plate with holes or a construction staple is sometimes used.
- A single fastening with a metal rafter plate that extends beyond the wall.
- The connection is made using special metal fasteners called skids.
Attaching the rafters to the floor beams using any of these methods allows the rafter leg to rest against the mauerlat, but there is little opportunity for movement relative to each other. It is advisable to use sliding joints in the construction of houses made of logs and timber. Distortion of the geometry of the walls of the house due to shrinkage or shrinkage will not lead to destructive effects of the structure.
Experts recommend assembling such structures on the ground. There is a good opportunity to correctly mark and adjust all structural elements, and then install everything on the walls of the building.
Main connecting nodes
The main components of the rafter system are:
- rafter truss - connection of a pair of rafters, braces, as well as racks and braces;
- ridge knot - combination of two opposite rafters;
- a link made of a mauerlat and a rafter resting on it;
- a module including a run, a stand and a bench;
- connection of the rafters with the strut and the stand.
The most complex element of the roof frame, according to the author, is the roof truss, which is distinguished by the fact that:
- assembled on the ground, and then transported to the roof, since this is the only way to successfully fit one wooden part to another;
The roof truss consists of at least three elements
The ridge knot also has several features:
- formed as a result of connecting two opposite rafters due to special cuts or notches;
There are many methods for creating a ridge knot.
The rafters and mauerlat become a single link, which is characterized by the following:
- the connection occurs due to cutting in each rafter leg, corresponding to the shape of the element that serves as a support for it;
The rafters are secured to the mauerlat so that they do not move to the side
A module of purlins, racks and beams is formed by driving construction brackets, steel dowels or overlays made of steel strips into the places of their connections.
An assembly of a beam, a rack and a purlin allows you to divide the load between the external and internal walls of the building
Struts, racks and rafters are assembled into a single module, creating cuttings. To prevent their connection from being weak, construction staples are used.
An assembly of struts, posts and rafters allows you to soften the pressure on the internal wall of the house
Installation of rafters on a log house
Installing rafters on a log house has its own characteristics, since structures made of wood change their geometric dimensions during the shrinkage process, as well as with changes in air humidity.
The last crown of the frame should be checked for horizontalness so that the rafters lie correctly and evenly transfer loads to the structure. Then the installation locations of the rafters are marked. If the gables of the structure are made of timber or logs and the ridge beam rests on them, then the technology for installing the rafters differs from standard rigid fasteners using notches with a tenon and metal corners.
Pediments made of logs or timber change their size during the shrinkage of the log house, decreasing by 10-15 centimeters in height. Thus, rigid fastening of the rafter legs to the walls and ridge girder will lead to deformation of the rafter legs, and, as a result, cracks will form in the entire roof or in the gables during shrinkage. To avoid such consequences, special sliding fasteners are used when installing rafters.
.
When determining how to install rafters on a log house, it is necessary to take into account that in this case the connections of the rafter legs in the ridge part are made movable - it should be possible to change the angle when the gables shrink. To do this, the rafter legs are attached overlapping with a bolted connection, or using special metal mounting plates (in this case, end-to-end with a required gap).
The lower part of the rafter leg can be attached to a groove made in the upper crown of the wall. In this case, the rafter is installed with an overhang, the size of which is determined during the design. If necessary, the rafter leg is installed with the lower edge on the log without a groove. An option is also used when the attachment point for the rafter leg is a horizontal beam.
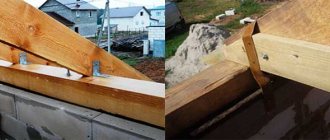
In all cases, a special fastening element made of durable metal – a “sled” – is used as fastening.
. The fastening can be open or buried type. It allows the rafters to move without deforming the roof. Before attaching the rafters to the frame, you should select the correct fasteners. Models differ in the stroke length of the moving element (from 60 to 160 mm), the number of holes for fastening.
If the roof will experience serious snow loads, “sleds” are mounted on both sides of the rafters. When installing a sliding joint on a log house log, it is necessary to prepare a flat platform for the plate fastening site.
What is a Mauerlat
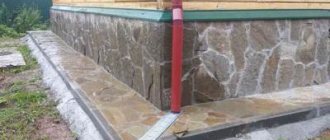
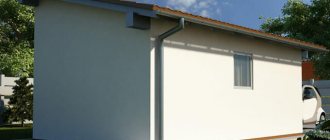
The word Mauerlat arose as a derivative of the German “wall” and “crossbar”. This perfectly describes the essence of the design. Mauerlat (mother log, matitsa, uterus) is a power frame made of beams, which are located along the perimeter of the load-bearing walls, taking on the load of the roof and distributing it evenly. If we consider the crossbar in the overall design of the roofing system, we can see that it has rather modest dimensions (shown in brown in the photo).
The support is made entirely of wood. For this, a beam with a cross-section (thickness) of 150x150 mm is used. You can replace it with three boards 150x50 mm thick, nailing them together in such a way as to form a beam of the required thickness. Other parameters are also acceptable, but the ones indicated are optimal and are more common. For example, a roof with a thickness of 100 mm will not support it, and a beam of 250 mm will not be able to support a wall.
Extension of rafter legs
The following methods are used to splice rafters and lengthen them with fillets:
overlap The length of the overlap is at least a meter, the nails are driven in a checkerboard pattern;
end-to-end The parts are cut down at right angles, joined and secured on both sides with wooden plates. These two methods apply to a flat board;
with an oblique cut. The ends of the square beams are cut down diagonally, connected, and fixed through with a pin. When drilling a hole for a stud, make sure that there is no play left, which will cause unnecessary bending load.
This is how the rafters are attached.
If you are not confident in your own abilities or you do not have time to do this, contact us at STM-Stroy. We will install a rafter system for you or perform a complete roof installation quickly, inexpensively and efficiently.
+7(495) 241-00-59
Installation and repair of roofing and facade coverings from economy to VIP class
Calculate online
my experience is your saved money and nerves.
I advise everyone who contacts me, even if you later leave to join another brigade. Ask questions, don’t be shy, I answer everyone - it’s free
+7(495) 241-00-59 I am available for calls 7/24 - I will be happy to help you, please contact me!
Fasteners
Metal products are used to attach the rafters to the Mauerlat:
- nails 150 mm long;
- self-tapping screws;
- rafter corners;
- beam holders;
- sliding supports;
- serrated plates;
- perforated pads;
- staples;
- bolts, studs with nuts.
It is desirable that the fasteners be galvanized or stainless. Regular one quickly corrodes and breaks down, causing loose connections.
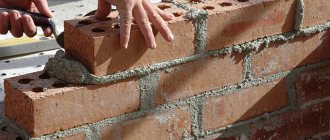
For nails up to 6 mm in diameter, pre-drilling of holes is not required. With a larger cross-section, to prevent the formation of cracks, you need to drill a socket with a size equal to 0.9 of the diameter of the nail. In wooden buildings, as well as in small brick buildings, brackets are used to secure the mauerlat and rafters. Wood is prone to splitting, so it is recommended to pre-drill the holes.
How to install rafter legs on floor beams?
Once the floor beams are ready for the rafters to be installed on them, proceed to fabricate the rest of the structure and connect the rafters to the beams.
To connect the rafter leg to the beam, its end is cut at the desired angle, or a more complex cut into tenons is made. Let's look at both of these options.
Connection of rafters with beams without cutting
You can do without cutting if you use fasteners later - this is a normal solution. So, to make a simple cut on the rafters, make a template:
- Step 1: Take a building square and place it on the board.
- Step 2: Mark the cut location at the top of the rafter.
- Step 3: Using a wood protractor, draw a line parallel to the first saw across the rafter. This line will help you determine the line from the weight on the edge of the building.
Here's what it looks like in practice:
Making such rafters is much easier than for cutting. The main thing is to correctly determine the angle of the roof and the correct location for the future cut:
As a result, in real life such a design looks like this on a gable roof:
Types of cutting a rafter leg into a floor beam
The mounting configuration itself depends more on the angle of inclination of the slope. For example, for a roof with steep slopes, where the snow load is small, you can use a single-tooth mount. With the single tooth method, additional tenons are often made to help the rafters not move under loads. And for such a spike you will already need a nest in the beam.
But, you probably know that any such places can weaken the beam, and therefore their depth should be no more than 1/4 the thickness of the beam and no closer than 20 cm from the edge of the beam (to avoid chipping).
But if you have a roof with a slope of less than 35 degrees, then it makes sense to use a double tooth, because such fastening allows you to achieve high strength of the joints. As in the previous version, you can add two spikes.
With this method, each tooth can have the same or different depth. For example, you can cut the first tooth only 1/3 of the thickness of the support beam, and the second - half:
The bottom line is that two rafter legs in a structure supported by beams are secured with a tie. But, if the ends of these legs slide, then the integrity of the tightening will be quickly compromised. To prevent such sliding, it is necessary to insert, or rather, cut into, the rafter leg into the very tightening with the help of a tooth - with or without a spike.
In the process of cutting the rafters into the end of the tie, you need to move the tooth as far as possible. If you need to strengthen the fastening of such rafters, then use a double tooth. Another point: the teeth themselves can be of different sizes.
And finally, it is advisable to fasten the end of the rafter legs with twisted wire so that the wind cannot tear off such a roof. As a wire, it is better to take galvanized wire, and fasten it with one end to the rafter leg, and the other to a crutch, which is first laid in the masonry of the wall at a distance of 30-35 cm from the top edge.
Here is a good example of a neat cut-in rafter, which at the same time serves as a floor beam already in a hipped roof:
Metal fasteners for such a unit are still necessary, because the notch itself cannot support the rafter legs under load.
Process Features
A well-reinforced floor base is the key to the longevity of the room where the beams are installed. Here, fasteners and the technical component of installation are of great importance (special methods of fastening + rules for performing work).
Elements of beam fasteners are made of high-quality steel or aluminum, they are represented by angles, anchors, steel plates, canopies, joists, screws, screws, nuts, rods. Also, for some types of beams, for example wooden ones, a special cutting and tapping technique is used. There are also mixed methods of fastening products.
Regardless of the technique used and the materials on which the beams are attached, they are always connected to the wall as a floating system. The main thing when working with them is the quality of installation, since it affects the reliability of the floors and the support of the entire ceiling and roof structure.
At the same time,
during the installation process the following types of beam structures are used :
- I-beam;
- channel;
- Reinforced concrete, with long reinforced rods inside;
- wooden.
Knowing the features of fastening floor beams to different surfaces is important because this will allow you to correctly select fastening elements and calculate the load that the supports will withstand.
At the same time, the frames for the roof and attic will be securely fastened, and there will be no problems with arranging waterproofing, vapor barrier and insulation, since the surface with the beams will be ready. The method of attaching beam products depends largely on the type of building used . For example, some frame-type houses and SIP panels already have installed beams and are tightly fastened even under production conditions. In standard buildings (brick, monolithic, concrete), beams are installed after the formation of a reinforced belt.
In construction, standard beams are most often used for floors, represented by a cross-sectional section of 150 x 150 (mm) or 200 x 200 (mm), but there may be other dimensions that are created for individual orders in production conditions.
All work related to beam fastenings, manufacturing and installation of the beams themselves are based on the application of basic technical standards:
- GOST 27017-86 - products for fasteners.
- GOST 4981-87 - wooden beams.
- GOST 19425-74 and GOST R 58966-2020 - metal beams (I-beams and steel).
- GOST 20372-2015 and GOST 20372-90 - reinforced concrete beams.
The standards provide references to all possible provisions and standards that must be adhered to at all stages of preparation and work. All of them guarantee the end result of a strong, reliable building, with a reinforced attic and roof frame.
Important features characterizing beams are associated not only with the type of building, but also with the composition of the material from which they are made:
Wooden beams , most often made from logs, can be used in various houses, including aerated concrete and foam block ones.
But they are always attached to the walls, subject to the provision of longitudinal play.Wooden beams do not put additional load on the foundation; working with them is easy and quick. Also, they are affordable.
Modern beams are carefully impregnated with antiseptic and polymer agents, which make them more resistant to atmospheric changes. But, despite this, it is recommended to wrap the ends of the beams and their surface, when arranging layers of attic floors, with waterproofing and vapor barrier (cold attics) to extend their service life.
- Metal beams for floors are I-beams with cross-sectional sections resembling the letter “H”.
This group is made from high-quality steel grades. I-beams are durable, strong, can withstand heavy loads and are not prone to deformation. Their only drawback is their heavy weight. Therefore, they are most often used for monolithic and brick buildings, and are laid using lifting mechanisms. - Reinforced concrete beams are suitable for panel houses, which are represented by the same composition (reinforced concrete) as the panels (concrete + reinforcement).
They are most in demand for high-rise buildings. They are distinguished by strength, durability, and uniform load distribution. They can be ordered not only standard, but also the desired (individual) length. In the conditions of the enterprise, they are formed from durable grades of cement and reinforced rods from 12-15 (m).
Important! Of all the listed types of floor beams, the best are considered to be wooden ones, made from dry, high-quality wood.
There is a large selection of these products on the market, they have a good price-quality ratio, and competent calculations for the use of these building materials will not require new repairs for floors for several decades.
What materials can it be made from?
The structure is often made of wood, using wooden beams or boards fastened together. Often a steel profile is used. The choice depends on the weight of the roof.
Wooden beam
The timber is placed under the rafters along the perimeter of the roof. With this arrangement, the load is evenly distributed to each point on the walls of the house. There should be no knots on the timber, and if there are any, their size should not exceed 2/3 of the thickness of the wooden product. When arranging the Mauerlat, knots will interfere with the main structure, so it is better to avoid them. If there are many knots on the beam, then a break may occur in the places where they form.
Boards fastened together
In frame construction, when the roof is light in weight, boards fastened together can be used. This design is not suitable for a heavy structure - the boards will not withstand the high load. This material is suitable for roofing without insulation and additional elements that increase weight. The boards are attached around the perimeter of the building. For the Mauerlat, it is advisable to use durable material that will not crack during use and exposure to external factors.
Steel profile
Instead of wooden products, steel structures are often used. This material is more durable, as it can withstand increased loads. The steel profile is represented by a square section or round metal pipes. The use of steel as a support for the roof implies the presence of metal lining around the perimeter of the external walls. The device is suitable for a gable roof, and beams can also be used. The harness is secured to the outside of the wooden belt.
Installation ↑
To construct the murlat, wooden beams are used, which are laid in a plane parallel to the future ridge. They begin to install it during the construction of walls. For example, in the case of brickwork, you can do the following:
- closer to the top, approximately 4–6 rows below the edge, lay a thick wire at intervals of 1 m; the wire is firmly fixed inside the masonry in the center; the length of the free ends should be sufficient to subsequently wrap around and tie around the support beam without any problems; after construction is completed, visible parts of the fasteners are hidden, for example, by applying a layer of plaster.
To prevent rotting of the murlat beams, they are waterproofed by laying rolled material such as roofing felt.
When arranging the Mauerlat along the perimeter of the walls, it is necessary to check not only the reliability of the fixation, but also the horizontalness of the support beam.
Sliding method of fastening rafters
This method is used to build a rafter system in wooden log houses.
Sliding type of rafter fastening
The fact is that the log house must stand under the roof, during which time it shrinks. Shrinkage, as a result, slightly changes the position of the rafter system; in the case of rigid fastening of the rafter legs, either deformation of the rafter system will certainly appear, or the stability of the top row of the frame will be disrupted. It is this row that plays the role of the Mauerlat. In order to increase the area of support of the rafters and the mauerlat, you need to remove the sharp edge of the latter. Otherwise, large loads will cause the beam to be pressed into the corner of the Mauerlat, and the rafter system will begin to change its position. This will be done unevenly around the perimeter of the log house - the rafters may significantly disturb their original position, and the roofing will become wavy. And this can break its tightness, resulting in leaks with all the very negative consequences.
Sliding rafters can be installed only if the rafter system has support in the upper part on the ridge beam and vertical stops; to enhance the stability of the structure, it is advisable to additionally install braces or headstocks. A specific decision should be made taking into account the size of the bathhouse, construction material and architectural characteristics of the roof.
The rafters rest on a ridge beam
Rafter system
Sliding method of fastening rafters
Step 1. Install the ridge beam according to size. It must be located exactly in the middle of the bathhouse, otherwise the angle of the slopes will be unequal. We have already described in the article above what difficulties the unequal angle of inclination of the slopes causes during the construction of eaves overhangs.
Scheme of rafters with a sliding support
Step 2. Begin installation by installing the outer gable rafters.
Example of installation of the first roof truss
For sliding fastening you need to buy special clamps; they need to be installed on both sides of each rafter.
Step 3. Take the dimensions of the rafters along the length, determine the specific locations for their installation.
Step 4. To increase the plane of contact between the rafter leg and the Mauerlat, remove the corner of the beam. You can remove the angle along the entire perimeter (difficult and time-consuming) or only in the places where the rafter legs rest. To do this, make two cuts in the mauerlat at a distance slightly greater than the width of the rafter board.
Using a chisel, carefully remove the wood from the cut and level its surface. We advise you not to neglect this advice; such a simple installation method will make it possible to significantly increase the stability of the entire rafter system. In addition, there is no need to use other methods to ensure the system’s resistance to longitudinal wind loads.
Step 5
Carefully place the rafters on the prepared seats and secure them with floating metal mechanisms. They must be installed in such a position that most of the protruding unit allows the rafters to fall down; it is in this direction that shrinkage occurs
Rafter installation diagram
Sliding mounts
Step 6. Stretch ropes between the outer gable rafters on the slope of the eaves overhangs; mount all remaining rafters along the rope. If necessary, adjust the length of the structures. At the same time as the legs, fix the ridge parts of the rafter legs with a hinge joint.
This type of rafter system is considered the least stable. Despite the fact that the forces pushing apart the rafter legs are much less than the forces acting on bending, the sliding legs are the weakest unit of the entire structure.
There is another type of sliding method, it is more reliable in strength, but is only suitable for baths made of rounded bursa or round whips - the sliding method with a cut along an arc.
Sliding method with a gash
It is a little more difficult to make; each rafter at the point of contact with the upper rim of the frame must be cut in an arc. For cutting, it is better to use an electric jigsaw. The depth of the cut is no more than 1/3 of the width of the rafters. The mark can be removed from the end of the beam, the rafters can all be made the same. Such a connection has an additional degree of freedom, but at the same time eliminates axial movements - the reliability of the entire rafter system increases.
Sliding rafters
Diagram - rafters with sliding support and cuts
Combined system: alternating supported rafters
Today, this version of the roof is also practiced, which consists of several especially strong trusses located at a distance of 3-5 meters from each other, and the gap between them is filled with construction pairs.
In simple terms, several powerful main trusses, two or three, are installed on the roof, and they support the entire run. And already in the space between the main trusses, ordinary rafters rest on such purlins, according to a simpler scheme.
Those. here, not all rafters rest on the floor beams, but only some, and the rest rest on the mauerlat. This way the entire load is perfectly distributed! And the concept of such a system is simple: the main trusses are made according to the hanging rafters scheme, and the secondary rafter legs are made according to the layered principle, relying only on the beam:
In fact, the whole secret of such a combined system is that here the layered rafters are laid directly on the triangular hinged arches. In this cunning way, bending stresses completely disappear from hanging rafters, and only tensile stresses remain. And this suggests that here it is possible to significantly reduce the cross-section of the rafter elements. In other words – save money!
As you probably already guessed, in your case, the method of supporting the rafters on the floor beams will depend on what kind of object you are building: a garage, a bathhouse, a country house or an entire country complex. In any case, all these methods have been tested, are actively used in practice today and deserve attention no less than the more familiar use of the classic Mauerlat.
How to attach rafters to floor beams - Construction and repair
The strength of a roof is the total strength and quality of all its constituent elements: rafters, beams, ridge girders and sheathing. And also how tightly and competently these elements are connected to each other. After all, almost every one of us is capable of understanding the cross-section and calculation of the roof load, but how can we secure the rafters so that the roof serves faithfully for at least half a century?
In fact, this is a whole science, and each type of roofing assembly has its own pros and cons, and the same type of fastening can have a very different effect on the strength of different roofs. Therefore, let's approach this issue with all responsibility!
As you can see, everything can be done with your own hands:
Attaching rafters to floor beams
Floor beams sometimes act as a kind of alternative to tightening. Most often this happens during the construction of light attics - it’s more convenient. But you can only attach the rafters directly to the floor beams if you are confident in the reliability of the walls of the house. Because in this case there is no Mauerlat, and, as a result, the load on the walls is not distributed evenly - now it is point-loaded. And this is worse, of course.
By the way, there is a big difference in how to attach the same rafters to the floor beams of single-pitched and gable roofs. So, the greater the load the roof experiences, the fastening should be done with a double tooth, while for single-pitched roofs one is enough. By the way, a double tooth usually has two spikes.
The most durable fastening is obtained if you make a notch, and with an additional tenon, which will also prevent lateral shifts of the rafters due to loads. On the other hand, it is important not to weaken the beam itself at the same time. Therefore, the cutout for the rafters should be made no closer than 25 cm from the edge (this will also help to avoid falcons), and only 1/3-1/4 deep from the thickness of the beam itself:. To prevent the rafter leg from sliding off the Mauerlat, a special recess is made in it
And in the Mauerlat itself they sometimes make another one, a counter one - this is only more reliable, and the stubborn lock turns out to be strong
To ensure that the rafter leg does not slide off the mauerlat, a special recess is made in it. And in the Mauerlat itself, sometimes they make another one, a counter one - this is only more reliable, and the stubborn lock turns out to be strong.
True, the Mauerlat itself will be significantly weakened by this - take this into account. You can do something like this with it only when the Mauerlat is made of hard hardwood and has good strength.
The grooves alone will not hold the rafters in place, so be sure to additionally use metal fasteners. If your connection is stationary, it will be enough to drive nails at an angle, and for more unreliable structures, use clamp connections and metal plates. Forged wire, which is mounted into the wall for these purposes, will also help.
Another type of fastening of rafter legs to beams is bolted:
- Step 1. At the end of the beam that protrudes, make a triangular cutout. The hypotenuse of the cutout should be at the same angle as the angle of the rafters.
- Step 2. We also saw the lower part of the rafter leg at the same angle.
- Step 3. We place the rafter on the beam with a cut and fix it with nails.
- Step 4. Perpendicular to the rafter leg, we drill a hole for the bolt - through, so that the bolt can be entered from below through the cutout in the beam.
- Step 5. We put a washer on the bolt and tightly fix the entire assembly with a nut.
Upon completion of fastening, be sure to check the strength of all connections.
Is it possible to do without filling the armored belt?
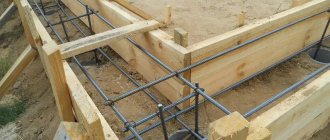
This element is required for construction in seismic areas with a calculated value of more than 7 points, on problematic soils, and foundations made of prefabricated reinforced concrete.
The armored belt allows you not to go beyond the recommended SNiP parameters and performs such functions as:
- antiseismic;
- load-bearing element;
- distribution of point loads;
- binder on the walls, vertical forces on the frame.
For walls made of aerated concrete blocks, it is recommended to install an armored belt even on the top of the foundation. It will help maintain the geometry of the frame during subsidence or washing of the soil.
How to do it correctly - with or without an armored belt
An individual residential building belongs to class 2 of responsibility and class 6 in terms of long-term operation. When building from aerated concrete blocks, the joint venture recommends not only installing an armored belt under the Mauerlat, but also between each floor. The reasons for this are inextricably linked to safety.
It is allowed (but not recommended by any joint venture) to install a mauerlat on top of aerated concrete walls without installing a reinforced beam for buildings of class 3 responsibility and category 10 durability. These include outbuildings - garages, warehouses, premises for keeping poultry and animals.
When a house is installed in a zone of seismic activity less than 7 points, on a reliable basis the customer can take risks and install the Mauerlat on aerated concrete walls. This is not even considered in projects.
Installation of rafters on a log house
Let's look at an example of how you can connect rafters to each other in the ridge area.
Step 1. To connect the rafters end-to-end, you need to saw off their upper part in such a way and at such an angle that two opposite elements meet each other above the ridge beam.
How will the rafters be connected?
Step 2. Next you need to make two wooden overlays (the shape is shown in the picture). They are applied on one and the other side of two previously joined rafter legs.
You also need to make two wooden overlays
Step 3. After this, the linings need to be secured with long nails on the rafter legs. You can also connect the rafter legs in the ridge area using a special toothed plate.
Fastening wooden linings
A special plate can also be used
The last crown of the frame should be checked for horizontalness so that the rafters lie correctly and evenly transfer loads to the structure. Then the installation locations of the rafters are marked. If the gables of the structure are made of timber or logs and the ridge beam rests on them, then the technology for installing the rafters differs from standard rigid fasteners using notches with a tenon and metal corners.
Pediments made of logs or timber change their size during the shrinkage of the log house, decreasing by 10-15 centimeters in height. Thus, rigid fastening of the rafter legs to the walls and ridge girder will lead to deformation of the rafter legs, and, as a result, cracks will form in the entire roof or in the gables during shrinkage. To avoid such consequences, special sliding fasteners are used when installing rafters.
When determining how to install rafters on a log house, it is necessary to take into account that in this case the connections of the rafter legs in the ridge part are made movable - it should be possible to change the angle when the gables shrink. To do this, the rafter legs are attached overlapping with a bolted connection, or using special metal mounting plates (in this case, end-to-end with a required gap).
In all cases, a special fastening element made of durable metal – a “sled” – is used as fastening. The fastening can be open or buried type. It allows the rafters to move without deforming the roof. Before attaching the rafters to the frame, you should select the correct fasteners. Models differ in the stroke length of the moving element (from 60 to 160 mm), the number of holes for fastening.
If the roof will experience serious snow loads, “sleds” are mounted on both sides of the rafters. When installing a sliding joint on a log house log, it is necessary to prepare a flat platform for the plate fastening site.
Use of chemical anchors
To attach a wooden beam to a wall where there is no reinforced belt, you can use chemical anchors. They appeared on the market not so long ago, but have managed to prove themselves well. Chemical anchors are divided into the following types:
- Capsule design. An ampoule containing a special composition is inserted into the hole made under the anchor. After contact with air it begins to harden. A pin is driven into the prepared hole, which breaks the tightness of the ampoule. After 30-45 minutes, the composition in the hole polymerizes, forming a reliable connection.
- With cartridge. The anchor design contains a pipe filled with a polymer composition. A dispensing gun is used to supply the mixture into the hole. The polymer hardening time is about 45 minutes.
Chemical anchors, despite their high cost, are very reliable. The service life of such connections reaches 50 years. The polymer composition penetrates deep into the pores of aerated concrete, providing a high degree of adhesion.
The installation of an armored belt under the Mauerlat is extremely necessary for walls made of lightweight materials (for example, aerated concrete). This prevents the house from collapsing under the influence of the load arising from the roof.
The reinforced belt for laying the Mauerlat is a reinforced concrete beam. To attach the Mauerlat in this case, threaded studs are used. For brick houses, you can use wire, plugs, or anchors to secure the beams.
Nodal connections of the roof frame
The main key element of the entire frame is the Mauerlat. It is made from a thick beam with a cross-section of 15x15 cm and is laid parallel to the ridge on the axes of the walls. Subsequently, the rafter legs will rest on it. The main task of the Mauerlat is to redistribute the mass of wooden structures (rafters and sheathing), roofing pie and finishing coating onto the load-bearing walls and foundation of the main building. In addition, it will bear the main load from wind and precipitation. In this regard, the fastening of the Mauerlat to load-bearing walls should be as strong as possible.
There are 2 ways to fix the Mauerlat on the walls:
- Along the perimeter of a large building, a reinforcing belt is poured in the upper part of the walls. Metal studs with M12 threads are installed into it every 2 meters. Subsequently, the Mauerlat will be placed on these studs and tightened with washers and nuts. If the house is small, then the Mauerlat beam may not be laid at all. The rafter legs will be attached directly to the studs embedded in the wall.
- A fairly reliable connection can be obtained if you use steel wire. The middle of the wire is placed under the bricks 3 rows before the end of the masonry. The length of the wire should be enough to firmly pull the Mauerlat to the wall. As in the first case, the rafters can be secured in this way without laying the Mauerlat beam. However, this will create a point load on the walls, which can have a detrimental effect on their integrity.
The pattern of fastening the rafters to the Mauerlat beam can be sliding or rigid. In this case, everything will depend on the type of rafter structure (hanging or layered), as well as the shape of the roof.