If you have now come close to the issue of choosing the design of the rafter system, the first thing you need to decide is how exactly you will transfer the load from the roof to the house. For example, in the classic design of a rafter system, the rafters are evenly supported by their ends on the walls or the mauerlat, along the entire perimeter or on both sides, depending on the shape of the slopes. But often today, rafters are attached directly to the attic floor beams, and not to the mauerlat, and this technology has its own valuable advantages.
We will now tell you how to correctly install roof rafters on floor beams, what technical solutions exist and how to make such fastening units.
How to fasten the rafters?
When erecting a roof, it becomes necessary to securely fasten the rafters to the base to transfer the resulting snow and wind loads.
Otherwise, deformation may occur, requiring new repair costs. As a rule, when building a light roof for country buildings (bathhouse, house, etc.), a structure with layered or hanging rafters is chosen. Let's see how to properly attach rafters to beams so that the structure will serve for many years, reliably protecting the building from snow, rain and gusts of wind.
Roof installation
Now, when constructing a pitched roof for a bathhouse with your own hands, they step by step proceed to treating the beams and boards with an antiseptic agent, after which they are dried. After this, the beams are placed on the rafters directly on top of the waterproofing layer and proceed to covering the finished frame with boards. Based on the type of roof, the width of the gaps between the boards can vary from 10 to 150 mm.
After the sheathing is done, you can proceed to installing the finishing material - corrugated board, slate, metal tiles or other roofing covering. It is attached using self-tapping screws with special linings that prevent moisture from entering through the holes.
Calculation of the rafter system
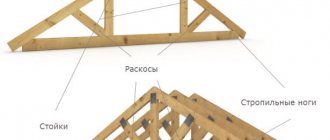
First you need to find out what rafters are. These are load-bearing structures of a pitched roof, made of rafter legs, which are placed at a slope, inclined struts and vertical ones.
If necessary, they can be “tied” from below with horizontal rafter beams.
The loads perceived by the rafter system can be temporary or permanent. The first include such phenomena as people going onto the roof to repair or maintain the roof, snow and wind loads, as well as special loads, such as seismic vibrations affecting the building.
Constant loads are the weight of the roofing structure as a whole.
Table of wind load values on the rafter system
Calculation of load indicators on the rafter system is performed as follows:
- The snow load indicator is determined by multiplying the calculated value of the weight of the snow cover per square meter of horizontal surface and the conversion coefficient from the weight of the snow cover of the ground to the snow load on the roof. The value of the multiplicand is taken according to special tables depending on the area where the building is located, while the multiplier (coefficient) is taken equal to 1 when the slope of the roof slopes is less than 25 degrees and 0.7 when the slope is 25-60 degrees. If the slope is over 60 degrees, the coefficient is not taken into account.
- The average wind load parameter is calculated by multiplying the value of the wind load characteristic of a certain area (also taken according to the tables) and a coefficient taking into account the change in wind pressure with height, which is taken according to the table and depends on the type of terrain.
General information
To better navigate this topic, you need to know what rafters are, what they are, what they are attached to, and in what cases one or another type of rafter system is chosen.
Rafters are the load-bearing structures of pitched roofs, which take on the entire load from the roof and the snow cover on it, transferring it to the walls of the building. In private housing construction, they are most often made of timber or large-section boards placed on edge. Much less often, metal structures are used in the form of prefabricated elements or ready-made trusses. What and how to make the rafters from is decided based on the calculated load on them and the customer’s preferences.
Metal rafter system Source dawaihati.com
Structurally, rafters are divided into hanging and layered:
- Hanging rafters are installed on small houses, garages and other outbuildings, in which the span between the walls is no more than 5-6 meters. Their upper ends are connected to each other without additional support, and the lower ends, resting on the walls, are tightened with horizontal elements - ties. Tightenings reduce the bursting loads from the rafters on the walls, taking them upon themselves.
Additional tightening increases the span to 8 meters, and struts resting on the tightening - up to 10 meters Source obustroeno.com
- Layered rafters are installed on buildings with large spans over 10-12 meters with an average load-bearing wall or supporting columns. Their upper ends rest on the ridge girder, which in turn is supported by racks resting on the bench - a horizontal beam lying on columns or an internal wall. If the problem of how to install rafters on a pitched roof is being solved, then a layered structure is also chosen, since in it the role of a ridge girder is played by a higher wall.
In this case, tightening is not necessary due to the absence of tensile loads Source remoskop.ru
What you might need
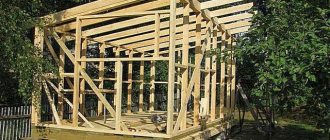
Installing rafters on floor beams is, most often, a necessary measure. As mentioned above, it is best to attach the rafters to the Mauerlat. In this case, the entire load will be evenly distributed around the perimeter of the wall, which will increase its service life. But if the roof rafters are still attached to the floor beams, then you should prepare for this.
First of all, you should stock up on mounting hardware. For such work, the following materials and elements are most often used:
- steel corners;
- self-tapping screws;
- thick wire ties;
- plates;
- bolts with nuts;
- WB brackets;
- LK fasteners.
- types of reinforced corner KR;
- perforated mounting tape TM.
When purchasing, you should be very careful about your choice. Rafters are an important element of the roof. Therefore, their fastening must be reliable. In this regard, when choosing devices and materials, you need to pay attention to their quality. Metal elements must be free of rust. Also, fasteners must be of high quality. It’s better to pay a little more, but get a reliable and durable mount.
Of course, you shouldn’t forget about the rafters themselves. Here you need to approach the selection of material responsibly. First of all, you need to calculate the rafter system to find out what section you will need. You can use special programs for this. They enter data on the roof area, materials used, loads, and so on. The result of the program calculations is a cross-section of materials and an approximate drawing of rafter attachment points.
After this, the material is selected - it can be either wooden beams or boards. Here you need to carefully “study” the material. Boards or timber should not have signs of rotting, large knots or cracks. In addition, the wood must be aged. In this case, there will be little moisture in it, which means that the rafters will not begin to warp over time.
Installation
Now we get to the step-by-step instructions. However, it is worth noting that no instruction will be complete enough to reveal all the nuances of the work ahead, so it remains advisable that the builder have at least basic experience with tools and construction in general.
Construction instructions, installation step by step
Grazing
Take all necessary measurements. If you are working in a log house, draw a line along the level where the deck boards will lie. If you have walls made of a different material, check the horizontality of the mauerlat or strapping beam. If it deviates from the horizontal, prepare the necessary tabs.
Boards can be very different - edged, unedged, tongue and groove. But whatever they are, they need to be cut taking into account the approach to the wall of at least 5 cm (more is possible).In the ceiling crown, as we said above, you need to cut out a “shelf” on which the boards will lie. To do this, you can use an ax or chainsaw. “Shelves” are cut out on two opposite walls only.
The boards are laid out on the mauerlat in the same way, only there is no need to make a ledge.
Fastening can be done with self-tapping screws or nails.
Then bars or boards placed on the end are laid out on top - all this across the length of the flooring board. From below they are attached through and through with self-tapping screws. This is a necessary measure to ensure that the boards do not “play” in the future.
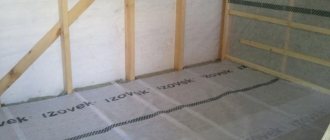
Next, we cut and lay the vapor barrier, securing it to the base with a stapler.
We lay the selected insulation on the vapor barrier.
We cover everything with waterproofing (some do not cover it).
From below, we adhere to the chosen design solution - either we leave the existing one as a finished ceiling, or we fill unedged boards with a shift, or we make a sheathing and cover everything with clapboard.
In the steam room, of course, some owners will stuff the bottom with foil, put the sheathing on top of it and cover it with clapboard. This is done to reflect infrared radiation back into the steam room.
Hemmed
As agreed, we believe that we already have the ceiling beams. We take measurements and set the horizontal lines exactly to the level on the wall. We stretch the construction threads.
We fill the cranial beams in accordance with the horizontal lines (this is one of the options, there are others). The skull beam provides a ledge on which the boards will rest between the beams.
We cut the boards and lay them in the transverse direction of the beams on the skull beam. Secure with self-tapping screws or nails.
On top, without covering the beams, we lay a vapor barrier. This means that the upper section of the beam remains open, the vapor barrier fills only the formed “containers”. This is necessary so that the wood of the beam can release moisture.
We lay insulation on the vapor barrier secured with a stapler.
We cover it with waterproofing (vapor barrier does not breathe, but hydro - breathes, releases steam from the insulation).
On top of the beams, either a subfloor or a finished floor is laid.
The bottom trim remains. Here too it depends only on the design decision. See a similar point on the floor ceiling above.
You will find a step-by-step guide on how to make a steam room ceiling in a bathhouse with your own hands on this page.
Additional support
In cases where the rafter leg needs to be unloaded, struts or racks are installed, as a rule, not on the floor beams, but on a beam that is laid on load-bearing walls. This design is called layered.
Structures supported on load-bearing walls are called layered
But, there are cases when the building has neither internal load-bearing walls nor columns. As a result, the structure can only be made hanging.
The classic hanging system involves resting the leg on only two points - the mauerlat or floor beam and the ridge girder. However, if the building is large or the roof is flat with long slopes, it may be necessary to strengthen the structure to prevent deformation of the slopes.
Diagram of the hanging system
In such situations, racks and struts installed on the floors come to the rescue. Let me remind you that struts, unlike racks, are installed at an angle. Most often they are mounted on both sides of the post supporting the ridge girder, but there are other options for their location.
The posts are attached to the rafters using serrated plates
The connection between the post and the beams is usually done using serrated or perforated plates. The installation of slopes will also be carried out, the only thing, as when installing rafters, is that the ends are cut at an angle equal to the angle of their inclination.
On a skate
When constructing roofs, modern craftsmen use several types of fastenings for the rafter system on the ridge:
- joint to joint;
- for a run;
- overlap onto the upper ridge run.
Butt-to-butt connection . At the top, the rafter segment is cut at an angle (which is equal to the planned roof slope). And then they rest on the opposite leg, where circumcision is performed in the same way, but only in an asymmetrical direction. It is better to do this using preliminary templates. In some cases, the cut is performed during installation, and the cut is made through 2 beams.
The installation for the run is similar to the above variation. The differences will be in the installation of the ridge beam itself. This design is highly reliable, but it cannot always be abused, since it will require additional installation of support beams. As a result: the attic is not very convenient for further use. This method will allow you to complete the installation of pairs of rafter legs on site, without any preliminary “curtsies” or templates. In this case, the upper segments of the legs rest against the ridge beam, and the lower segments rest against the mauerlat.
Overlap on the ridge run. Here, the installation is carried out in the same way as in the previous version, only the upper joints of the rafters are overlapped, touching from above not with their ends, but with their sides. In this case, the fasteners will be bolts (or studs as an option).
Design
Design is an extremely important stage of construction. It is on it that drawings are made, materials are selected and fastenings of rafters to floor beams are selected. It is very important at this stage to correctly calculate the wind and snow load. The weight of the entire system will depend on the calculations performed.
At the stage of designing the roof and attaching the rafters to the floor beams, it is necessary to take into account the load-bearing capacity of the walls. If you make the roof too heavy, the entire building may collapse in one moment.
There are a number of factors that need to be taken into account when designing the roof and rafter attachments to the floor beams:
- roof shape,
- roofing material,
- layout of internal supports,
- rafter system,
- roof slope angle,
- length from one wall to another.
Conclusion
Now you know how to attach rafters to floor beams, and in which cases it makes sense to use this method of installing the rafter system. If any of the above is not clear to you, ask questions in the comments and I will be happy to answer you.
Did you like the article? Subscribe to our Yandex.Zen channel
December 28, 2022
Roofing works, Roofing, Structural elements
If you want to express gratitude, add a clarification or objection, or ask the author something, add a comment or say thank you!
Principles for calculating beams and rafters
At the pre-construction stage, rafters and floor beams are calculated. When designing a roof frame, one should take into account the climatic features of the region, first of all, the characteristic snow and wind loads. Based on the tabular data and the requirements of SNiP regarding permissible deflection values, the sections of the elements of the rafter system are calculated - roof beams, rafters, truss parts. Among other things, it is necessary to perform structural calculations to determine the spacing of beams. The distance between the beams determines the installation pitch of the rafters.
Horizontal beams are laid on walls or mauerlat perpendicular to the length of the building. When designing, it should be taken into account that the beams on both sides must extend at least 40 cm beyond the plane of the wall. To ensure the necessary accuracy, the outer beams are mounted first, and then their ends are connected in pairs with tensioned cords, relative to which the remaining beams are laid. Closer to the ends, special grooves are made in the beams for secure fastening of the rafters.
Fastening parts
Wooden and metal parts are used for the installation of rafter systems. The first include: block, triangle and dowel, etc. Metal in fastener parts is quite widely represented: nails, angles, bolts and screws, clamps and brackets. As well as special devices for installing rafters, which are called “sleds”.
Fastenings of this kind are used during installation work on load-bearing floor beams during the construction of wooden buildings. Their main advantages: no cutting into the beams themselves is required, and fastening is carried out using bolts with screws of large nails.
Is a Mauerlat needed if there are beams ↑
When hanging rafters rest on floor beams that are laid directly on the wall, then with this arrangement serious point forces arise that affect the building structures. As a rule, a similar approach is practiced when constructing a wooden house. In this case, this is justified, since due to the horizontal arrangement of the logs and beams used in the construction of the walls, the loads they experience are evenly distributed.
For brickwork or when using cellular blocks, undistributed pressure can be disastrous - in places where the floor beams are located, the walls begin to crumble at the edges. It is for this reason that the pressure should be dispersed. To do this, it is recommended to lay murlat on its ridge, which is made from thick wooden beams. Thus, the positive answer to the question of whether a Mauerlat is needed for floor beams in such structures is beyond doubt.
If the roof structure involves the connection of rafters and floors, then it is first necessary to ensure reliable fastening of the floor beams to the mauerlat. The latter will actually be assigned the unloading function.
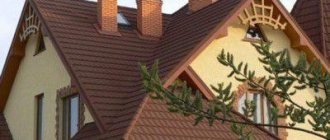
Deciding on the roof structure
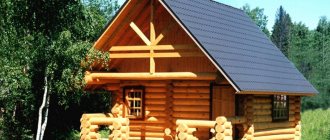
The bathhouse must have a roof that reliably retains heat inside the room. This is achieved by reducing the area of the log house, then its heating takes an order of magnitude less time and fuel. The room is additionally insulated, which also reduces heat leakage to the outside.
The location of thermal insulation is a criterion for the classification of the roofing structure:
- Cold. This type of roofing involves insulating not the slopes, but the floor in the attic. This room turns out to be cold, so it is mainly used as a pantry. To insulate the floor, fill-in thermal insulation is usually used, which is capable of not releasing heat from inside the heated bath.
- Warm. Here the insulation is laid between the rafter slopes. The cost of a warm roof for a log bathhouse is much more expensive, and it takes more time to arrange it compared to a lean-to roof. However, the attic space turns out to be warm, which makes it possible to place a recreation room there. The space between the rafters is usually equipped with mineral insulation in the form of slabs or mats.
How to make a gable roof yourself?
The main purpose of this article is to consider the process of self-construction of a gable roof for a private country house. Why gable? The fact is that this form is the most convenient both in terms of financial costs and ease of installation compared to other configurations. Another option is a shed roof, however, it is practically unsuitable for low-rise construction and is usually used only for extensions, garages and other similar structures. However, you can find very successful solutions with pitched roofs.
Construction crews may construct the same roof in slightly different ways. Probably, some method can be called more reliable and simpler than the one presented in this article, but this is a topic for another discussion. There are two types of gable roof trusses: in the first case, the rafters are laid on the mauerlat, in the second, the rafters are laid on the floors of the previous floor. This article discusses the second option.
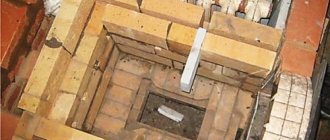
Calculations hereinafter are given for a brick box measuring 8x8 meters and 3 meters in height. As with other roof construction options, the first step here is to install the Mauerlat. The Mauerlat should be mounted on the inside of the walls, and the outside should be covered with bricks for aesthetic reasons. During installation, it is necessary to ensure that the upper part of the Mauerlat does not protrude beyond the facing brick by 2-3 cm. This is necessary so that the load of the roof falls on the Mauerlat, otherwise it will be transferred to the facing brick, which is fundamentally wrong.
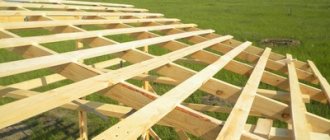
Floor beams
The next step is the installation of beam floors. First you need to install the outer floor beams. Their removal will determine the width of the cornice. The width of the cornice, depending on the wishes of the customer, can be 40-50 cm. The beams are special beams, the cross-section of which must be calculated separately, taking into account various aspects (snow load, wind load and other factors).
First of all, we install the beams indicated by the numbers 1,2,3,4.
For the specified brick box measuring 8x8 meters, the cross-section of the beam is chosen to be 100x200 mm. When the outer beams of the section are installed, it is necessary to tighten the lace along the top and align the other beams. In this case, it is usually necessary to either trim the Mauerlat under them, or lay thin plywood. What is noteworthy is that this has to be done often, especially considering that the ordered timber may be slightly different in cross-section. If you order 200 mm timber, they can deliver 190-210. This is the kind of equipment used in sawmills in our country.
The pitch of the beams must be taken into account based on the pitch of the rafters that will be laid in the future. For example, if you take floorboards 50x150 mm, then it would be good to choose a pitch of 60-70 cm, even better to stop at 60 cm, taking into account that roofing insulation usually has this width. After installing long beams, you need to install short ones. The step for them is most often 1 meter.
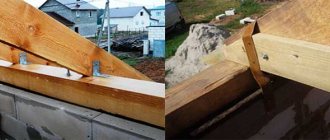
To attach beams to the mauerlat, 150-gauge nails are suitable. Sometimes the use of self-tapping screws and metal rafter corners is allowed. Basically, if builders use a variety of fasteners, the result is an easier job. The variety of fastening elements makes life much easier for an inexperienced builder, because there is no need to bother with creating nicks and cuts.
Flooring boards
The next step is laying the boards. It is acceptable to use inches and floorboards. There is no need to fasten them, they are only necessary so that you can walk normally. Next, you should install the ridge beam. To do this, you first need to install 50x100 mm posts using a level or plumb line and strengthen them with temporary spacers. It would be optimal to choose a step for racks in the region of 3 meters. First of all, the outer posts are installed, then the laces are pulled between them, then the intermediate ones.
Finishing
Since we briefly mentioned above the different options for finishing the ceiling in a bathhouse, we will correct this by talking about long-popular or recently fashionable solutions for this finishing.
How to hem, what to sheathe with
Let's start with the fact that there is an option when no finishing is carried out at all. You immediately lay or hem the sanded boards and nothing else underneath. The option is normal if everything else is done efficiently.
In general, it’s worth talking about three more options - tongue and groove boards, lining and unedged boards.
Tongue and tongue boards are expensive, usually used for floors, provide good grip through a tongue and groove joint that does not allow water to pass through, and look just great. But it all comes down to price; after all, this is not the most budget option.
Lining is the most common method of covering floors, long chosen by bathhouse owners. It is advisable to attach the lining to the ceiling in a bathhouse using lathing - slats packed onto the previous layer of boards in order to create a ventilation gap between them and the lining. In this case, the necessary ventilation is provided, which dries out those water vapors that inevitably penetrate through the thin profiled boards, which are the lining.
The ceiling in the bathhouse is lined with clapboard
Unedged boards are a fashionable solution today for bathhouses built in ethnic style. The principle is simple - take an unedged board, clean it, polish it, but the edge remains uneven, even often its unevenness is artificially enhanced with the help of a tool. The result is something that looks authentic to the ethnic style.
Since the edges of the boards are uneven, it will not be possible to ensure a fit. Hence the decision to hem such boards in two layers with a shift that covers the joints of the previous layer. Accordingly, below you see beautiful uneven edges, between which you can see a narrow strip of the layer above.
How to fasten the lining
For those who would like to learn more about the technology of installing lining, we recommend that you read our article on lining the steam room.
Methods of fastening rafters
In the lower part, the rafters can be connected both to the Mauerlat and to the floor beams. Sometimes, for example, during frame construction, they are fixed directly to the wall. And in the upper part, the rafter legs are combined with the ridge. Each designated node can be created in several ways.
Connection with Mauerlat
Rigid fastening of the rafters to the Mauerlat ensures that there are no displacements of the assembly elements. It is performed by cutting in a certain sequence:
- To speed up the work, make a template from a piece of board or thick cardboard. A line is drawn on the workpiece, departing from the side edge at a distance equal to 1/3 of the rafter width, and then the point of contact with the mauerlat beam is marked, along which a second line is drawn, perpendicular to the first.
If the rafter width is more than 200 mm, then the cut is made at a depth of 70 mm
A triangular cut allows the rafters to rest against the mauerlat
Builders without experience can take note of the technology of attaching rafter legs to the mauerlat with a stripe of a thrust block. With this method of creating a node, as the author of the article noted, it is possible to change the position of the rafters until it becomes completely correct.
To connect the main elements of the roof frame to the Mauerlat with a stripe of a thrust bar, do the following:
- On the roof, rafters are first installed to form gables. They are fixed with metal corners for a while.
The support beam allows you to fix the rafter without cutting
The rafter and support beam are fixed to the Mauerlat with metal corners
When building a roof frame for a wooden frame, which always shrinks, they prefer to use the sliding method of attaching the rafters to the mauerlat. Thanks to it, it is possible to avoid deformation of the rafter structure and deterioration of the stability of the top row of logs, which replaces the Mauerlat.
The choice of sliding rafters is justified only when a ridge beam is provided for the main elements of the roof frame, into which they could rest with their upper part.
When the rafters are fixed to the mauerlat using the sliding method, certain steps are taken:
Content
Of course, building a roof with a Mauerlat is more understandable and logical, because This method has been practiced for a very long time and has been studied, but you need to study the support of rafters on beams, and you will not find as much useful information as our website provides anywhere.
But when is such a rafter system needed and why such difficulties, you ask? Look, the approach is indispensable when:
- the construction site has rather fragile walls and it is difficult to lay the mauerlat on them;
- the roof of an old house is being rebuilt, but the bench is already old;
- the rafter system is quite complex and it requires intermediate supports, but there are none inside the house;
- for someone who is building a house, this method in itself seems more acceptable.
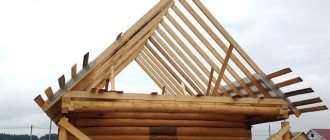
And it’s hard to imagine a real mansard roof without supporting the rafters directly on the beams outside the walls:
Convinced? Believe me, this technology has as many advantages as the classic one.
What was used to cover the ceiling of a bathhouse in past times?
Residents of villages and towns of past centuries used everything that nature provided to improve their homes and utility rooms. These are materials such as:
- priming;
- fallen or specially dried leaves;
- caked straw;
Straw - needles;
- moss;
- shavings or wood chips;
- sand;
- fire (waste from flax processing);
Bonfire flax - dried stems of large weeds;
- ash;
- clay.
Dry birch and oak leaves were especially popular. It was believed that they were able to impart a special “spirit” to the bathhouse, providing health benefits.
Dry leaves as insulation
Caked straw was used everywhere. It looks like dense, irregularly shaped briquettes that are difficult to break even with a strong stream of water from a hose. The ancestors knew that filling the ceiling in a bathhouse was a serious matter, and they used not only insulation, but also a waterproofing agent - clay.
Insulation with clay and straw
Experts are convinced that some materials cannot be used to fill the ceiling of the steam room. The temperature in this room is too high, so its improvement requires insulation with a low flammability coefficient. The “pie” of the backfill ceiling of the steam room was like this:
- clay coating;
- layer of soil or sand.
Options for traditional backfilling of the bathhouse ceiling (layer arrangement from the attic floor to the roof)
| Layer order | Option #1 | Option No. 2 | Option #3 | Option No. 4 |
| 1 | birch or oak foliage 5-10 cm | Birch bark | clay | shavings or sawdust mixed with clay |
| 2 | soil, sand or ash 10-20 cm | moss | priming | sand |
| 3 | turf, root-up | perennial weeds growing on the ground |
Truss installation
The assembled trusses are mounted above the ceiling beams. To align them vertically, they are temporarily supported by spacers. The outer trusses are installed first. For a more precise adjustment, it is best to use a plumb line that is tied to the crossbar. At the final stage, the structure is further strengthened using jibs.
After the outer rafters, they proceed to installing the remaining trusses. They are leveled using the same method, maintaining 1 m gaps between the trusses. After securing the entire rafter system, they are connected by a canopy made of two long boards, which are fixed at the top on both sides of the roof.