- At the location of the water tank
- Sauna stove with boiler
- What you need to know about operation
- Coil for furnaces
Having made the right choice of heating equipment, you can steam and wash without purchasing and installing a boiler. A reliable, modern, spacious heat exchanger for a bath will perfectly cope with the role of a heater: it will be able to supply the required volume of hot water to the storage tank. In this article you will learn about the options and operating features of the technical tool that exist today, practical advantages and the most popular models.
What it is
The device is used to heat water in the bath. Its operating principle is based on the physical properties of hot water, expanding and rising upward, while cold water remains below.
Typically the heat exchanger is small in size, so the liquid in it heats up quickly. Two pipes are connected to it - below and above. Thus, hot water through the upper pipe, replaced by cold water from below, rises into the tank, which can be located either in the steam room or in an adjacent room, usually in the sink. In this case, low-temperature water is constantly added to the heating device through the lower pipe without forced supply.
Options for heating water in a bath from a stove
The following models are distinguished:
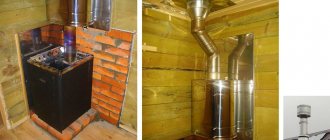
1. Samovar-type container - installed on the outlet pipe of the chimney. Heating occurs due to the heat of the flue gases escaping into the chimney. A tap for dispensing hot water is connected to the fitting at the bottom of the tank. If you don’t have a washing machine, then this option will be an excellent solution for heating. We recommend paying attention to the following operating conditions:
- the use of a samovar-type tank is allowed only with bathhouse stoves;
- It is prohibited to operate an empty tank while the stove is operating;
- If you want to get a “Finnish sauna”, this option for heating water will not suit you, since if the steam room is heated for a long time, the liquid will begin to boil, which is why heavy steam is formed.
2. A samovar-type heat exchanger (small in size with the ability to connect to a tank), which can be located anywhere. It is convenient because, if available, the tank can be placed in the washing room. One of the obvious advantages over other options is that it quickly heats the water.
3. Heat exchanger, which is installed on the starting chimney.
4. Starting chimney + tank-backpack - an option with being in a steam room and the absence of controlled convection to warm up the room. The container comes into contact with the wall of the chimney pipe, due to which the liquid is heated. Among the disadvantages, it can also be noted that this model does not have protection from hard infrared radiation, and in case of strong heating, the water begins to boil.
5. Convector chimney with a heater built into it.
Features: the register is located inside a pipe from which 2 identical ¾-inch fittings with internal thread come out. Using pipes, the device is connected to a tank hanging in a convenient place.
May be:
- Built into the oven - when scale appears, it loses efficiency.
- Located near the chimney (on it) - it provides heating to the required temperature more slowly, but nothing settles on its inner surface, it is easy to access, and its repair is not difficult.
The choice depends on the user: what to give preference to, performance or ease of maintenance, saving usable space or fuel.
Selection of materials
The choice of material for the heating tank only seems simple. The most common option is steel. The main advantage is low cost and ease of manufacture using conventional welding operations. However, in the conditions of a Russian bath at constant high temperature, high humidity and exposure to superheated steam, this material quickly rusts and its service life is short. In addition, water in a rusty container may take on a corresponding tint. Protection using paint coatings will not work due to the risk of fire when coming into contact with a heated oven. The painted structure can be used in a system with a heat exchanger.
Another option is cast iron. In a cast iron container, the water takes a long time to heat up, but it also takes a long time to cool, which makes it possible to retain heat even after the furnace has stopped firing. Disadvantages: heavy weight, high price and problems with corrosion.
The best option is stainless steel. Of course, it is much more expensive than ordinary steel sheet, but it does not corrode and can last for many years. The most common steel grades for the manufacture of sauna heating tanks are 8-12X18H10 (304) and 08X17 (430). Stainless steel containers are quite light, have excellent thermal conductivity, and the coefficient of deformation during sudden temperature fluctuations is negligible.
In principle, it is possible to use ready-made enameled tanks. However, such containers are good as long as the enamel protective coating is intact. When the slightest chips appear, active corrosion begins
This means that enameled tanks require increased caution during operation, which is very difficult to ensure.
The question of how to heat water in a bathhouse is decided independently, based on specific conditions. The simplest option is to install a standard tank heated by heating elements and manually deliver it to the destination point in small containers.
Difference by type
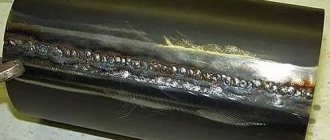
The simplest designs of heat exchangers are coils with ends removed from the tank: one takes in liquid at room temperature, the other releases hot liquid.
More complex ones are a system consisting of two metal tanks with anti-corrosion properties - cylindrical and rectangular in shape with connecting pipes.
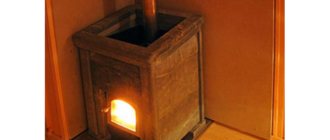
At the location of the water tank
There are two ways:
- This photo shows an option for installing a heat exchanger in a steam room and a tank in a wash room.
- The second option is to install a heat exchanger with a tank inside the steam room.
Advantages of installing a heat exchanger in a steam room
- high water heating speed;
- saving free space in the steam room;
- Wide range of options for installing the tank - in a steam room or in a shower room.
Gas heating system
When connected to a gas main, heating a bathhouse with gas is the fastest and most efficient option for the system.
The system has two implementation options:
- traditional heater equipped with a gas burner;
- gas boiler with installation of heating radiators and water pipes.
The undoubted advantage of such heating is the absence of unpleasant odors, the formation of soot and soot. At the same time, gas equipment has a compact body, low weight and does not require much space during installation. The power of a standard boiler reaches 45 kW, which is enough to heat a room up to 280 square meters. m.
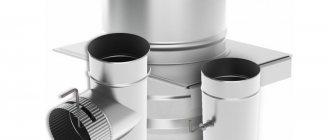
Features of installation and operation of the heat exchanger
Installed between the firebox and convector:
- built into the oven;
- attached to the chimney;
- or built into it.
The productivity of the device with a capacity of 5 liters is enough to quickly fill a 120-liter tank with hot water. It’s easy to use – just organize a timely supply of liquid (uninterrupted operation can be ensured by using a circulation pump) and “feed” the firebox with firewood.
When installing a heat exchanger (recuperator) for a bath, the following points must be taken into account:
- the total length of pipes for water supply should be laid at 3 m, which minimizes heat loss;
- with a connecting pipe diameter of 1 inch, it is permissible not to use a circulation pump.
The longer the heat exchanger is in use, the more justified the installation is from an economic point of view.
How to increase the efficiency of the water circuit?
Subject to certain recommendations, the fluid heating system can be optimized to obtain the greatest efficiency. When buying a heat exchange system or constructing it yourself, you should adhere to the following rules:
- The pipeline must be no more than three meters long - this is the maximum length. A longer pipe will help the hot water cool before it reaches the shower or radiators
- The diameter of the pipeline must be more than one inch: the circulation of liquid through the system will be better, the larger the diameter of the pipe. In addition, the large area of the pipe itself, when heated, will contribute to the flow of additional heat into the room
- It is recommended to buy an expansion tank for the system or make it open. Air access is required to normalize the process of coolant circulation and water heating
Rules for installing a heat exchanger on a sauna stove
The following rules must be followed:
- The heat exchanger must consume no more than 10% of the total energy produced by the furnace, then the latter will operate with good efficiency.
- The pipes must be laid so that the water flows by gravity, that is, at a 250-degree slope on the direct supply and 30-degree on the return one.
- It is important to reserve power for cooling after fuel burns.
- It is necessary to provide a sufficient volume of water for each individual model, because if there is too little of it, it will boil quickly, which can lead to the formation of deposits on the walls and a fire hazard, and if there is too much, you will have to wait a long time before taking a shower.
How to connect a heat exchanger if the tank is in a steam room:
- The entrance to the hot water tank should be at least 5 cm higher than the upper register fitting. This is necessary for better circulation.
- The upper register is from 1.4-1.5 m from the floor, despite the fact that the podium under the stove is 15 cm. The bottom of the tank in the steam room should be at least 1.5 m, and preferably higher.
- If the tank is 0.5 m high, then we have a total installation of 2.0 m. That means there is still half a meter to the ceiling. And here the question arises: how to fill the liquid. If there is a running water supply, then water will flow without problems.
Second connection option: we place the tank lower, and place the fitting for the supply circuit on the side. But there is a nuance: if the water level is below the upper fitting, there will be no circulation. It will stand in the heat exchanger and periodically reach a boil, but in the tank it will remain cool.
If you need to place the tank in the wash room, you should follow the same principles as when placing it in the steam room.
Gas heating
The implementation of such a heating system has several options.
- Firstly, as I wrote above, it is possible to install a “classic” heater, in which a gas burner will be used instead of firewood.
- Secondly, you can use a standard gas boiler (the same as in residential buildings). But in this case, you will have to take care of the equipment of heating systems (installation of heating radiators, laying pipes, connecting a gas-carrying pipe to the bathhouse or a cylinder connection system).
- Thirdly, there is the possibility of installing heating from the house. In essence, this is the same option as the previous one, but with its own characteristics and disadvantages. A separate heating main is laid from the boiler used to heat the house to the bathhouse. This option is very convenient if your steam room is adjacent to the house or is very close to it.
Gas heating baths
If the distance to the bathhouse is relatively large, then in order to use this system in winter it is necessary to bury the heating main below the freezing level of the soil and insulate it well. This will prevent the possibility of defrosting and help reduce heat loss.
True, the undoubted advantage of this option is the complete elimination of the problem of maintaining a constant positive temperature in the bathhouse. In addition, you can do all the necessary work (if you have a certain skill) with your own hands.
Water heating is rightfully considered one of the most convenient and effective methods of heating. In such a situation, there are also several options for manufacturing a system, which in any case will be powered from a furnace with a water circuit.
Fortunately, today in specialized stores you can easily select stoves that are ready for installation, equipped with a heat exchanger. This greatly simplifies the task of any builder of his own bathhouse. And now directly about the options.
Water heated floors
- External heating. It is done very simply and, in fact, is arranged in the same way as a brownie. Pipes located along the walls are connected to the furnace. Depending on the area of your bathhouse, a certain number of heating radiators are connected to the pipes. Hot water passing through them heats the structure and, when cooled, returns back to the boiler.
- Water heated floor. The principle of its operation is the same as in the first option. The only difference is that the pipes are hidden in the floor, which was previously insulated (I wrote about insulating floors in a bathhouse in more detail in other articles). This design is considered non-separable (although, of course, there would be a desire to break everything), and therefore requires a very careful approach to the procedure for its manufacture. In this case, I would recommend seeking help from specialists.
How and how to connect the external tank to the heat exchanger
Remember that the elements in contact with the stove become hot, their surface temperature exceeds 100 0C. Therefore, the pipes must be made of stainless steel (cast iron will not work, as it is susceptible to corrosion). But ordinary pipes are allowed to be made of metal-plastic; they can even be replaced with flexible hoses. The main thing is that the diameter is 1 inch or 3/4, otherwise the circulation will be poor.
Use tangit for seals, and paronite for fittings. Feel free to replace factory elements with non-standard ones, but made of heat-resistant material. Don't forget about the drain valve - it is simply necessary to preserve the system for the cold season or to quickly remove stagnant liquid. Otherwise, during frosts, the remaining water will freeze and burst the pipes.
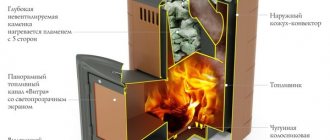
Review of furnaces with heat exchanger
There are built-in models of heat exchangers. Below we will look at the popular ones.
Sauna stove with boiler
Let's start with how justified such a decision is from an economic point of view. Installation of this device increases the efficiency of the equipment used. With it, exhaust gases not only fly away uselessly into the atmosphere, but also simultaneously heats water, which can then be used for bathing or other household needs. Therefore, it repeatedly justifies the fact of its installation in the long term.
Vesuvius Skif 16 VChT
Powerful and fast, with a right- or left-side location of the water heater, equipped with a mesh. It boasts a steel firebox with thick walls (8 mm), thanks to which it is not afraid of even constant exposure to high temperatures.
Tornado 20M2
Productive, heavy (125 kg). Equipped with a cast iron door, built-in heat exchanger and a spacious side casing designed for 240 kg of stones. Must be installed on a reinforced foundation. But the efficiency is impressive.
Harvia 20SL Boiler
A heater from a Finnish manufacturer, weighing 75 kg, with 40 kg of stones. Modern, with a recuperator in the form of a tank, with a remote structure and a built-in condenser, designed for a steam room with an area of up to 20 m3. It has stable legs and a stainless frame, has smooth shapes and an attractive design.
Installation and connection of the heat exchanger and tank in the bath
- Find a suitable location to mount the remote tank. If all the structural parts are located in one room, it is most often hung on the wall closest to the heating unit, 200-300 mm above the recuperator.
- Secure the wooden dies with dowels - these are the guides on which you will hang the tank. This is necessary so that the container does not touch the interior elements with its hot surface.
- Strengthen the assembly with brackets for greater reliability.
- Equip the remote tank with 4 pipes, then, using fittings, connect the first two with the corresponding ones at the tank (for direct and reverse water supply), close the third with a valve, and connect the shower (faucet) to the fourth.
- Install (at the lowest point) a valve on the reverse line to drain the water.
- Connect all elements and check the system for leaks.
What you need to know about operation
If you have read the instructions and purchased a heat exchanger for your bath, make sure that the following conditions are met:
- Fastening connections must be movable - this will help minimize deformation of the recuperator components under the influence of high temperatures.
- Seals must be made of heat-resistant materials.
- The capacity of the remote tank is selected so that it can accommodate the volume of water heated in 2 hours.
- It is important that full compatibility with the heating unit is maintained.
- The device should consume no more than 10% of the energy generated by the oven.
Operational safety
To prevent emergency situations, observe the following precautions:
- do not attach pipes directly to walls;
- Make sure that there is always enough water in the tank, otherwise you will quickly encounter a scale problem or even a fire hazard;
- constantly check the operation of the device and sound the alarm if it suddenly breaks down;
- Use only heat-resistant gaskets and regularly pay attention to their condition.
Let's talk about the rules of installation and operation
System calculation
If you decide to install the system yourself, you will have to make certain calculations. It will be difficult to absolutely accurately calculate the dimensions and volume of the system, and there is no urgent need for this.
For example, 5 kW is enough to heat a medium-sized room. This power can be provided by a heat exchanger with an area of 1 m². But the temperature in the furnace constantly fluctuates; when fully heated, 1 m² provides up to 9 kW, and when the furnace goes out, the power begins to drop rapidly and can drop by 5 to 10 times. Therefore, the area of the unit is taken with a significant margin, which makes it possible to equalize the heating of the liquid.
The configuration of the heat exchanger itself can be different; there is no consensus among experts. Some argue that stainless steel pipes are the best option, others prefer plates or manifolds consisting of 2 mating channels.
Connecting the system to the shower stall.
Tips for installation
If you decide to assemble the system yourself, then you should take into account several mandatory requirements.
- Tanks should be welded from metal with a thickness of at least 2.5 mm. The requirements for the upper, large tank are minimal; the main thing is that it does not rust or leak.
- The requirements for piping and the heat exchanger itself are somewhat higher; in the past, the most popular material for a heat exchanger was cast iron. Indeed, the material is very durable, does not corrode and holds the temperature for a long time. But cast iron also has serious disadvantages; it is heavy, which requires serious fastenings. And cast iron takes a long time to heat up.
- At this time, most experts prefer to assemble a system from stainless steel; its price is of course higher than that of cast iron or conventional steel grades that are susceptible to corrosion, but the savings here will cost more in the future. For the heat exchanger, stainless steel grades 08X17 (430) will be the most optimal; or 8-12Х18Н10 (304) they have optimal heat transfer parameters and meet all hygienic standards.
- As for the connecting pipes, naturally they should also be made of stainless steel. The drive pipe with cold water must initially, when leaving the large tank, fall slightly below the level of the heat exchanger; a drain valve is mounted at the lowest point and then rises at an angle of 2˚ to 5˚ to the entrance to the heat exchanger.
- The outlet pipe, through which hot water will flow into a large tank for a heated bath, must exit the heat exchanger, pass through the wall at an angle of at least 30˚ and connect to the tank.
The simplest samovar-type heat exchanger.
Important: pay attention to the cross-section of the pipes in the system must be at least 1 inch, otherwise the system will not operate stably, may overheat and require forced circulation of liquid. The optimal length of the entire pipework should not exceed 3 m
The system is designed exclusively for heating the room.
Do not forget that both the piping of the bath and the heat exchanger itself at all interface points must be equipped with special heat-resistant gaskets that provide sufficient damping clearance during thermal expansion of the metal.
Recommendations for safe operation of the system
- The pipework must absolutely not be rigidly fastened; all fastenings must be of the floating type, otherwise it will be deformed or fall off the fastenings.
- You should not get carried away with overly powerful heat exchangers; this system should take no more than 10% of the furnace power, because the main goal is to steam, and not to heat the water.
- The main tank for heating water in the bathhouse should be selected carefully; the best option is when the water in it becomes hot 2 hours after igniting the stove. If less, the water will boil and you will get excess steam. If it is more, you will waste a lot of fuel and the stove will take a long time to heat up.
- Wherever there is a threaded connection, the seals must be extremely heat-resistant, as a rule, it is an asbestos cord.
Of course, it’s up to you to decide whether to purchase a ready-made stove or assemble it yourself. But absolutely all experts agree that if you do not have sufficient skills in construction and plumbing, even the best instructions will not help you, and in this case it would be wiser to buy a ready-made, factory-made system and, if desired, assemble it using the included instructions.
The video in this article shows some of the subtleties of selecting a system.
The simplest heat exchangers
To make choosing a unit easier, we suggest you familiarize yourself with the following options.
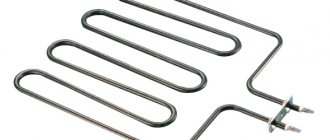
Coil for furnaces
The simplest version of a heat exchanger is a pipe (made of aluminum, copper or other ductile and anti-corrosion metal), bent into a spiral or, less commonly, of a different shape. The carrier effectively moves along it by gravity if its total length is less than 3 m. It is heated by hot air, and not by contact with fire. At the ends of this design, threads are made (external) for a fitting connection with the tank.
The coil can be placed directly in the firebox, inside or outside it. Its shape can be very different, starting from the simplest U-shaped horseshoes, continuing with the already mentioned spirals with different numbers of turns, and ending with complex welded registers. The latter are done to increase reliability and reduce energy losses, but since they are large in size, they are usually placed in spacious heaters.
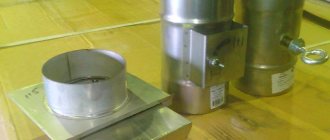
Rectangular tank on a pipe
This is another type - no longer an internal cylindrical container, but a structure consisting of an airtight body made of stainless steel.
The principle of operation remains the same - the heated liquid rises into the reservoir, the cooled liquid goes back. In implementation, a chimney with a diameter of Ф115mm (without the use of an adapter) or 110mm (with use) is suitable for it, and exhaust steam entering the room is almost excluded. True, the system must be sealed; it is important to replenish the structure with water in a timely manner.
Recommendations from experienced professionals
Here are some more tips on how to install a heat exchanger in a bathhouse as rationally as possible:
- If you do not plan to use a circulation pump, make the pipeline at a slope of 50 so that the liquid moves due to gravity.
- Do not take a tank that is too large and/or do not pour too much water into it, as it simply will not have time to reach a comfortable temperature in the time you need.
- Pay maximum attention to sealing - during assembly, do not hesitate to check the quality of each connection several times.
Choose durable materials and a suitable design, make the calculations correctly, and strictly follow the instructions and recommendations. A competent master knows how to make and connect a heat exchanger in a bathhouse, because correct installation will be the key to safe operation of the equipment, and therefore a comfortable bathing after the steam room.
Finally, a video about how the universal heat exchanger model works:
Our opinion on water tanks
In our opinion, the most convenient to use is . Once you have spent money on its purchase and gone to the trouble of installing it, you will enjoy the comfort that this type of water heater can provide for a long time.
On the other hand, mounted and mounted tanks are attractive due to their ease of installation. If we talk about tanks on the pipe, then they allow you to save thermal energy by preventing the heat from evaporating along with the escaping smoke.
Thus, all types of tanks have their advantages and disadvantages. Only you should decide which of them is most acceptable, based on the conditions existing in your bathhouse.
Some details of installing a remote tank can be found in the following video: