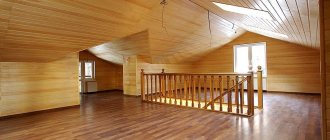
Wooden lining is ideal for decorating a modern home. This is an environmentally friendly, reliable and beautiful material for interior and exterior decoration. The best part is that installing it will not be difficult, and attaching the lining to clamps will help reduce work time and extend its service life. How is the lining installed on clamps, and what is the advantage of such a fastening element?
Kleimer
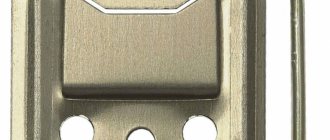
A clamp is a metal bracket that is attached with self-tapping screws and nails to the base, wall, sheathing and other surfaces. Installation is quick, convenient and most importantly reliable. The distinctive element of the clamp from the bracket is the hook, which firmly fixes the lining. This type of fastener is necessary where it needs to be hidden. Clampers are used for working with plastic, wood, PVC, lining, MDF, wooden and plastic skirting boards, slabs, etc.
Appearance and purpose of clamps
A clamp is a special bracket designed for fixing lining boards. A distinctive feature of such fasteners is their exact correspondence to the size and shape of the elements being fastened. How does the installation process work? First of all, the clamp is mounted on the base. This can be the wall itself, or a pre-made sheathing. If you have to attach the lining directly to a leveled concrete or brick wall, you will need special hardware. The option of attaching the boards to the sheathing, firstly, allows you to perform the sheathing as smoothly as possible, and secondly, it facilitates the work process itself. The clamp has holes that allow fastening with various types of fasteners: nails, screws, self-tapping screws. Then the boards are secured with hooks. There are clamps with additional tenon hooks.
Features of clampers
Claimers have always been and are no less in demand; they are used by professionals and amateurs in construction, interior decoration and other work. There is nothing complicated in their use, but it is still worth knowing some features.
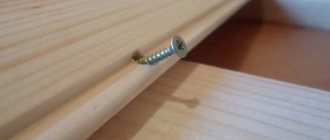
- The clamps are attached to self-tapping screws, which means that it is necessary to select the right drill so that it does not become loose later.
- The hole for the screw must be exactly the same as the screw itself - the same size.
- To ensure that the clamp stays tight and does not move, it is best to select it correctly, depending on the intended load.
These are the main features of clamps that are best to start focusing on.
This type of fastener is especially good where work needs to be carried out carefully and the details are not visible.
To the ceiling
In principle, everything is the same - the board is beaten on the sheathing, with or without clamps, on nails, staples or self-tapping screws. The last board can be placed in place using the method described above for the wall.
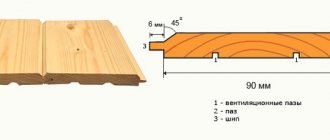
But here’s one interesting point: what did we do to ventilate the lining? They installed a sheathing that separates it from the vapor barrier. That's right, 5 cm is necessary for air to flow behind the lining. But Zhar-Gorynych says that there should be no junction of the lining with the ceiling or floor at all , there should be a gap there that leads just to the wrong side.
Why is he suggesting this? So that the board is moistened not on one side with subsequent penetration into the solid wood, but simultaneously on both sides. That is, moisture from the steam room through the cracks under the ceiling seeps to the inside, passes and settles, the lower crack near the floor provides traction. Everything was evenly moistened, and then, when it was time to dry, it would dry just as evenly .
As for beauty, he does not suggest leaving these cracks open. His diagram shows that the flashing is still installed, only with an indentation. To do this, it is hung on a suspension.
In general, watch the video and decide whether you agree with his argument or not:
We would agree with his point of view, if only because wood tends to expand, so it would be worth leaving at least compensation gaps, and they are calculated at the rate of 1.5-2 mm for every meter of wall. But he thinks bigger, of course.
Unfortunately, we did not find a suitable video on YouTube on how to attach the paneling in a bathhouse to the ceiling, so focus on the same technology that is used on the walls.
Pros of use
Fasteners for clamps have become so popular due to the fact that with their help, hidden work on the lining is carried out perfectly.
Advantages of construction fasteners:
- The kleimer holds the parts as tightly as possible.
- It does not damage the surface, and the work is much faster.
- The work happens very quickly, because the master does not spend time adjusting fasteners using metal plates or bent various parts.
- Clamps are sold in different sizes and are easy to match to the required fasteners.
- The material of manufacture can also be different, making it easy to select them according to the load.
- Claypers are especially good because they do not allow the products to become loose, they tightly bind them, gripping them and the part is very securely fastened.
- Fastening with clamps is very economical. There is no need to purchase additional materials for installation.
- To make the staples last much longer, they can be lubricated with anti-corrosion spray or ointment.
- The clamps do not bend and are made from high-strength materials.
Nothing complicated and at the same time incredibly simple and convenient to work with.
Selection of fasteners
Before you start working, carefully measure the distance and select the clamps according to size.
- It is very important to choose the right screws or nails. For example, it is better to use self-tapping screws where there is a large load, and nails where there is less load.
- The lining can be wider or narrower, its weight also varies. Therefore, it is advisable to fasten large sheets with larger and stronger clamps, and small ones with small ones.
- The staple has a tongue that comes in different heights, lengths and widths. But, if the height can be adjusted with pliers, then the other parameters cannot be changed. Therefore, it is worth taking this into account.
- Fixing parts is possible with a height of 1-2 mm for MDF and plastic.
- But chipboard can be fixed up to 3 mm.
- Eurolining up to 4 mm.
- If you need to trim a house with wooden clapboards, you will need stronger and larger 5 mm clamps.
- The Block House is secured using the largest and strongest 6 mm clamps.
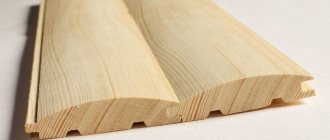
Decorating the house with a Block House made of wood from the outside
Clamps made of galvanized steel are the strongest and most reliable, although they cost a little more than metal ones, but using them you can be sure that the finish will not corrode or rust. In addition, they are suitable for outdoor and indoor use.
Varieties and sizes
There are several classifications of clamps that allow you to systematize the existing assortment, thereby facilitating consumer choice. First of all, you need to decide on the height of the bracket tongue. The minimum standard size is represented by elements with a height of about 1 or 2 mm . Next come the clamps for the lining, the height of which reaches 4 mm . Such models are usually used for eurolining. If you plan to cover it with chipboard materials, then it is advisable to use clamps with a tongue height of 3 mm.
Standard wooden forcing boards are usually attached to 5mm pieces. The maximum standard size is considered to be a fastener with a tongue height of 6 mm. This option is suitable for installing a blockhouse that imitates the log surface of houses. The thickness of the clamps is also important, since high mechanical loads can compromise the integrity of the skin.
Return to content
How to calculate clamps for fasteners
The low cost of clamps is a great opportunity to purchase them with a reserve. For 1 m2 you will need 20 pieces of them, but from our experience we recommend taking 30 pieces in reserve.
You can correctly calculate the number of clamps needed as follows:
- Measure the length of the lining with a tape measure.
- The location of the clamps is usually calculated at a distance of 40-60 cm. You can do +- 5 cm. It is better not to do less or more.
- The division works like this: the length is divided by the distance, plus one. Visually: 200 cm: 40 cm + 1 = 6 clamps per lining.
- Then you can calculate how many of them will be needed for all the linings and work.
- Example: 10 linings X 6 clamps = 60 clamps.
- Usually 100 staples are sold per package, but you can also find them sold individually in regular hardware stores.
It is very easy and quick to calculate how many clamps are needed for the job.
How to apply antiseptic to walls
Before you start treating the walls with an antiseptic, you must first clean them of dirt and dust, if any. To prevent such unpleasant phenomena as corrosion, rust, rotting or fungal infections of wall surfaces from forming on the walls in the future, it is necessary to treat them with an antiseptic.
It is best to purchase such building materials in specialized stores and more well-known manufacturers. Processing the walls does not take much time, but it is simply necessary. Without such a protective layer, the external clapboard finish will not last even 5 years, but with an antiseptic it will become durable. Of course, it is best to treat the walls with an antiseptic at least once every 3-5 years.
Experienced craftsmen spare no time and carry out the processing on both sides, the lining itself, which is first lightly rubbed with paper on the inside and the cleaned wall.
If necessary, do the following:
- The wood is cleaned with sanding paper;
- the wooden surface is primed;
- antiseptic is applied to the lining;
- The wood is varnished if necessary.
In this way, the surfaces are quickly and easily processed before you begin to attach the lining to the sheathing.
How to attach plastic lining
Plastic slats are a more popular type of material for finishing balconies and bathrooms than their wooden counterparts for a number of reasons:
- lighter weight, which reduces the load on the base plate;
- affordable cost;
- ease of installation;
- resistance to temperature and humidity changes.
Since PVC panels are not subject to rotting, any methods and fasteners can be used to fasten the lining. Plastic does not require impregnation and processing, unlike wooden boards. Lightweight PVC panels can be mounted with glue without constructing a sheathing, provided the surface is level.
Fastening plastic lining with self-tapping screws
With the help of lining, you can relatively easily and quickly give an auxiliary room an attractive residential look. Knowing the installation features will help you make the right choice of mounting method depending on the type of panel material and the purpose of the room.
Subscribe
Installation of sheathing
Be sure to measure the wall and mark where and how the lining will be attached. It is especially important to outline the connection level and stick to it as you work. Then choose the direction of fastening, it is best to do it perpendicularly.
In order not to move during installation, take chalk initially and mark out the lines for finishing, then the lining will definitely be fixed evenly. The design will look perfectly straight.
Purchase a woodworking tool in advance with which you will cut the lining. The best option would be if it is standard 2 m or 2.1 m, then it must be cut in half. The most optimal option for installation is 1 m, then the measurement of the distance for fastening the clamps can be calculated at 45-50 cm.
If the lining is made of a softer material, then as you work you need to look at it, you may need to make spacers for the clamps. But usually, this is extremely rarely necessary.
Choosing the method of installing the lining
There are three ways to attach lining to walls: glue, nails and clamps. The choice depends on the operating conditions and the condition of the walls.
You can glue the lining in a dry room on smooth walls. If it is thin (13-15 mm) and small in width (80-100 mm), it is quite possible to get by with just glue. For larger sizes, it is better to additionally fix them with nails, but you will need 30% less of them.
Lining on the walls is far from boring. In a wooden house this is an ideal finishing option
You can glue the lining onto relatively flat walls, but only small deviations are permissible. This finishing board is thin and bends, but due to the natural elasticity of wood, it can tear off in the depressions. Therefore, if the walls are not perfect, it is better to use a combination of glue and nails.
Types of lining and its profiles: Standard, Shtil, Eurolining, Softline, Landhouse, American, Blockhouse, Double-sided
You can use nails or screws to attach the lining either directly to the walls or to the sheathing. The second option is chosen due to uneven walls or due to the need for heat, sound and moisture insulation. Nails can be driven into a tenon or groove, or into a face (photo below right). The first option is called secret, the second - traditional. Not just any type of lining can be fastened into a tongue/groove, but only certain types (provided the protrusion/recess is of sufficient size). And this option is also only available for dry residential premises.
Methods of fastening the lining: with clamps and screws
Clamps (or clamps) are special fasteners for hidden installation of tongue-and-groove moldings (photo above left). Some types of lining fall into this category. If the material you choose has a wide and strong tenon/tongue, you can fasten it with clamps. This fastener is usually fixed to the sheathing, but it can also be attached to a wall lined with plywood.
Installation of lining
Important point! It is necessary to start work only in warm weather, when your face is at least +11. If the temperature drops, then the lining will be deformed in the cold, it can narrow or freeze a little and making fasteners will be problematic. You can easily damage the surface with self-tapping screws.
When starting to install the lining, decide how the sheets will lie: horizontally or vertically? In any case, it is necessary to take measurements, mark the location with chalk, cut the lining to the required size and prepare tools for installation.
So, to get started you need to:
- purchase a decorative corner;
- securing the starting board (horizontal installation);
- using a tamping board;
- make cutting of lining;
- tamping the lining with a mallet;
- purchase lining trim;
- check the quality of installation of the lining with a level;
- install the clamp in the groove of the lining;
- fix the clamps with self-tapping screws;
- fix the starting board;
- secure the installed lining with a clamp.
Use a decorative corner if necessary. With its help, you can perfectly hide installation flaws or simply give a beautiful appearance to the finish. Screw the clamps very carefully so that they hold tightly and are not overtightened.
Always use a construction ruler. With its help, you will not stray from a straight line and will not eat skewed. When making measurements initially, be sure to mark distances along the entire length of the wall based on the width of the lining, and this way during installation it will be much easier for you to take measurements that will accurately indicate whether the lining sheets have gone in the wrong direction. Which means they are installed exactly as they should be.
Practical advice
In order to increase the service life of the lining and preserve its original appearance, it is advisable to follow a few simple rules:
- The purchase of clasps must be carried out only in stores that have the appropriate specialization. This will allow you to buy high-quality fasteners that will not suffer from corrosion or fail.
- It is not recommended to use liquid sealants to form joints. This negatively affects the hardware and leads to their rapid corrosion.
- Upon completion of installation work, it is advisable to take measures aimed at protecting the lining. For this purpose, it is coated with varnish or other protective honeycomb. This coating also improves the appearance of the finishing material. Also, impregnation of the lining with paints and varnishes helps protect it from exposure to dampness and direct solar radiation.
The final stage of finishing Source www.owatroldirect.co.uk
- During finishing work, it is advisable to exclude direct contact of the lining with the base. This can lead to rotting and fungal damage as it will impair the ventilation of the walls. To solve the problem, vapor barrier substrates are used.
- Holes for sockets and switches are made after completion of installation work and before applying paint and varnish coatings. This can be done using a special flared saw or a drill attachment.
- All spaces remaining near the walls or floor are covered with skirting boards that match the color of the lining.
These simple rules help not only speed up the progress of work, but also increase the service life of the finishing material.
Fastening clamps to linings
It is not difficult to secure the linings using clamps; you have already prepared everything you need, all that remains is to carry out the installation.
Take a tool, it’s best to take one of these options:
- If you need to attach it to the sheathing, then you need self-tapping screws, a drill and a screwdriver; you can use a screwdriver, but this will slow down the work process.
- If you just need to connect parts, you can use nails and a hammer.
In any case, you will need a tape measure, a construction ruler and a hammer with a rubber end to adjust the fasteners.
Let’s say it’s clear how to work with nails and a hammer. But when installing with a drill and self-tapping screws, it is worth considering some features. It is necessary to take the same size screws and drill bit.
For example: self-tapping screw 3.5 x 35 mm = drill size 3.5 x 35 mm. Then the lining will be secured very firmly and will not become loose.
It is best to screw in the self-tapping screw with a screwdriver not too much so that it does not sink into the lining, otherwise the surface may be damaged. It’s better to carefully adjust it later with a screwdriver if you can’t immediately screw it in clearly with a screwdriver.
Now that everything is prepared, you can start working. Apply the clapboard to the sheathing and carefully screw it.
Advantages and disadvantages of installation
The main advantage of using clamps is hidden installation , which involves the formation of a wooden plank finish without traces of installation. This is especially noticeable if we compare methods of similar installation using screws and nails. In such cases, not only there is a risk of leaving external damage on the surface of the boards, but also it becomes impossible to disguise the caps. In this sense, cladding clamps provide reliable fastening without disturbing the appearance of the cladding .
Another advantage of clamps is wider possibilities in choosing the method of main fastening, to the wall or sheathing strips . Since the results of this operation will not be visible, you can use almost any means of fastening that can be combined with the standard size of the clamp itself.
But there are also disadvantages to such brackets - their cost and, nevertheless, insufficient strength for operation in conditions with increased loads on the walls. If vibrations of the foundation and walls are expected, then the clamps may simply not cope with their function.
Return to content
Types of fasteners
Using clamps
Working with clamps takes a little longer, but installation is much more reliable.
- The number of fasteners is calculated.
- Their location occurs on each line of the frame.
- You need to measure all the walls and mark the location of the clapboards with chalk.
- With a vertical arrangement, starting work does not matter.
- And with horizontal you need to start from the bottom.
- Surfaces are treated with an antiseptic if it is outdoor work.
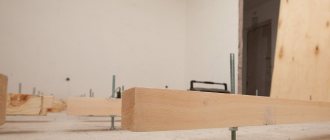
- The lining is attached to the sheathing, then the next lining is attached to it, etc.
It is best to purchase self-tapping screws with a size of 3x20 mm; they are not too large and not small. This type of fastener is hidden.
Using self-tapping screws without clamps
To connect the lining to the sheathing, you need to drill holes for the screws. Initially, a plastic self-tapping screw is inserted, then a metal one is screwed in. Thus, docking and strong fixation occurs, but this method is not hidden, the screws will be visible.
Using finishing nails
The use of nails is still relevant for fastening lining. For such work, nails with a small head, 30-40 mm long and no more than 1.4 mm wide are taken.
Nail fastenings:
- fastening in a groove (in a recess);
- fixation through a spike.
These fasteners and nails are more suitable for interior work. Open type of fastener.
Construction stapler
A construction stapler is often used to fasten the lining. But it is best suited for fastening plastic and PVC lining. For softer and more “obedient” materials that lend themselves well to this type of installation.
Fastening
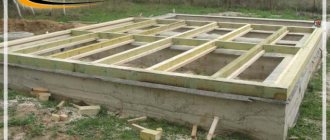
The first step is to install the frame for future cladding. The surface for mounting the clamps must be perfectly flat, so when attaching bars and beams, be sure to use a level or laser pointer. Tips before installing the frame:
- Wood must be treated with an antiseptic solution, which will protect it from rot, mold and pests;
- Metal profiles can be taken the same as when installing drywall, i.e. CD, UD, CW and UW;
- If the paneling is done in a damp room (bathroom, sauna, etc.), then a waterproof film must be installed on the frame, which will protect the base from destruction due to moisture.
How to install clamps and how to attach them to the lining:
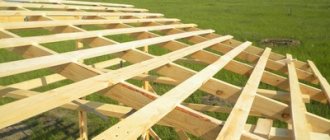
- First, the frame is installed. To do this, a certain area is marked using a laser pointer or level. In some cases, craftsmen pull the string. The starting point for marking is the lowest point of the ceiling. It is very important to measure all angles to accurately determine the lowest position;
- Afterwards the frame itself is installed. The average step is from 20 centimeters to 60 (depending on the chosen lathing and cladding material). There are two ways to install the supporting system: directly on the wall or on supports. Supports are relevant if the surface is uneven, with numerous depressions and bulges, but in this case you lose a small usable area. Therefore, most often craftsmen choose installation directly on the wall;
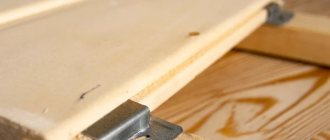
Photo - installation principle - When the frame is ready, the first sheet of lining is attached to it. It is installed flush against a corner or wall and tapped. In order not to damage it, a small piece of the same lining is taken for tapping. A small piece of wood sheet is installed on the panel and needs to be hit with a hammer several times to ensure maximum seal;
- After this, a clamp is installed under the lining sheet. 3 to 5 individual fasteners can be used. Their number depends on the size of the tongue and the length of the lining sheet;
- Fastening the clamps to the base is done with a stapler, nails or self-tapping screws and a screwdriver. There are two holes in the brackets; fasteners are inserted into them and screwed (hammered) until they stop. At the same time, the tongue gently clamps the panel, which allows installation to continue without external fasteners.
Photo - mount
The tongue of the clamps is so thin that it does not interfere with the further installation of the lining. But at the same time it has excellent rigidity and does not deform when sheathing. After finishing the work, no additional actions are required (putting fasteners, priming, etc.), with the exception of coating the lining with antiseptics on the outside.
If installation of several layers of lining or a solid board is required, then not an ordinary bracket is used, but a so-called House block. It is more durable and wider, its tongue height can reach 10 mm.
Photo – House block
Video: using clamps