Correctly building a log house designed for several generations of residents or users is not all. Only caulking of a log house, carried out in compliance with the tricks and discoveries invented by the masters of old times, will make it possible to erect a log house that, after 150, 200, or even 400-600 years, will remain suitable for its intended use. The subtleties of caulking technology for wooden structures have been developed by carpenters in northern countries for centuries. This publication is an attempt to bring together those of them that have survived to this day. Maybe, following it, you will guess something about caulking that your grandfathers and great-grandfathers knew.
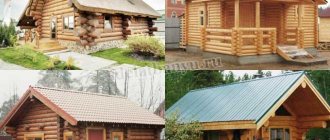
Take a look at fig. below. Residential buildings on it are more than 200 years old. The hut on the top left is definitely larger - it is an exhibit in the Suzdal Museum of Wooden Architecture. And those in the bottom row were restored using modern methods. And all these buildings are still suitable for housing; those that are not museums are inhabited. Because their builders knew not only how to select and prepare logs and build from them, but also how to properly caulk the frame.
Ancient log houses
Caulking a wooden frame with your own hands is quite painstaking and tedious work, although technologically it is not difficult. Individual wooden construction is being revived, and log houses are in demand due to their high consumer qualities; a real Russian bathhouse is built only with chopped wood. However, the standard service life of a wooden house is 40 years; real - up to 60-70 years. The standard service life of a wooden house has been adopted based on mass construction using standard technologies; The generally accepted caulking technology is also adapted to them, see for example. video:
Video: lesson on proper caulking
Note: hereinafter we adhere to the following. terminology: caulk – a special tool for caulking work and also the caulking process itself; caulk – materials for caulking.
Most of today's carpenters build conscientiously. But if one of them has to dismantle an old log house made of wild logs, he will understand that it is not only inter-crown insulation that needs to be caulked. It is also a kind of “solder”, which over time “glues” the frame together into a kind of monolith, extremely resistant to operational loads, external conditions and pests. It is not always possible to “tear” an old log house for scrapping with hand tools; you have to use special equipment. And if the building is intended for a museum, it can be completely removed from the foundation, taking out the windows and removing the doors from their hinges, loading it onto a vehicle, reloading it 2-3 more times along the way, and it will arrive intact: the cambium of a wild tree with caulk form a very strong seam . Treated lumber does not “glue” as firmly, but it is sufficient for the structure to last for more than 120-150 years. This article is about how to caulk a log house for a service life exceeding the standard.
Requirements for the components of the composition
Components for the production of concrete must meet the following requirements:
Materials for the production of concrete must be clean and free of organic and chemical particles. Cement is one of the important components of concrete and must be at least grade M 400. For concrete grade M350, cement must be at least M 500. Crushed stone is also one of the main components of concrete , its strength should be several times higher than the strength of concrete after the maturation period (28 days). It is recommended to use crushed stone for manufacturing, which has a strength of 800–1000 kgf/sq.
cm, this indicator will make it possible to produce concrete grade M450. You can also use crushed limestone, but up to a maximum of concrete grade M300. Sand for making concrete can be used from river or quarry sand, but it must be washed to remove clay and dust impurities. As a rule, fine and medium-grained sand is used to make concrete.
It is not recommended to produce various chemical additives at home when making concrete, as this will lead to a loss of its quality.
Materials
The quality of the caulk is determined equally by compliance with the technology and the materials used for caulking. They are divided into main and auxiliary. The main ones are natural; auxiliary, for example, for sealing gaping cracks during restoration - modern synthetic ones. Synthetic caulk has every chance of becoming the main caulking material over time, but has not yet passed the full test of time. Extrapolation from laboratory data gives a service life of 120 years for some wood sealants (see below). Most likely, it is much larger, but there is not yet enough data from nature to say exactly how much.
The undoubted advantage of natural caulk is that it contains the strength base of wood - lignin - and substances that can interact with living tissues of the tree. Both of these “blind” the logs or beams of a log house very firmly over time.
Note: in the cambium - the layer of dicotyledonous trunks that grows in width - there is still little lignin, and there is much more living tissue than in the deeper, increasingly lignified layers. Therefore, a properly caulked log house made from hand-barked wild logs is much more durable than one made from lumber.
So, you can choose the following material for caulking (see figure):
Materials for caulking a log house
- Moss, bog sphagnum or wood moss does not “glue” logs/beams together very tightly, but it does a good job of protecting the inner layers of wood exposed during processing from moisture and pest attacks. In a constantly warm room, seemingly completely dead moss can be awakened by moisture (herbarium specimens were able to be revived after 200-250 years) and damage the entire frame, so it is advisable to caulk unheated buildings with moss. Especially the bathhouse. A real Russian bathhouse is not only built from selected wild logs, but also caulked with marsh moss, see below;
- Hemp tow is an inexpensive material that is durable enough for caulking small unheated non-residential buildings: a log house for a well, a gazebo, a country house, etc. Not very suitable for heated buildings, because at temperatures slightly above room temperature and high humidity, it rots. In the old days, hemp tow was used to caulk poor peasants' huts that were heated in the black way, hence the very word “caulk.” Working with hemp tow is not very convenient: it clings strongly to wood and wooden tools, see below, and breaks with metal ones;
- Linen tow for caulking is expensive, but the best material for this purpose. It is unusually strong and durable (especially when impregnated with linseed oil): in mid-latitudes, archaeologists find pieces of linen fabric that have not yet decayed in Stone Age burials. The bandages of the mummies of Ancient Egypt were also woven from flax. It is very convenient to work with flax tow: it is just the right amount of slippery and elastic.
- Jute tape and cord for caulking are not very expensive materials; their properties are average between hemp and flax. It’s easy to use and allows you to use some techniques that significantly simplify and speed it up, see below. Suitable for caulking residential buildings for a long time: in the Himalayas, Karakoram and Tibet there are buildings caulked with jute that are over 200 years old. Therefore, the material of the article is focused more on caulking with jute.
- Strands of extruded polyethylene foam and polyurethane sealant are used for “aesthetic” caulking of log houses, the service life of which will definitely not be much longer than the standard, for example, made of laminated veneer lumber. Another purpose is to seal gaping cracks in unimportant parts of buildings, see below.
Planting and caring for Nordmann fir (Caucasian) seedlings
For planting and caring for Caucasian fir, a nutrient mixture is prepared consisting of the following components:
- two parts clay soil,
- three parts of leaf soil or humus,
- one part peat
- one part washed fine sand.
After the mixture has been prepared, it is worth adding another 10 kg of sawdust and 200 g of nitrogen fertilizers.
At the bottom of planting pits for Nordamna fir seedlings, especially if the land is characterized by a high groundwater level, it is necessary to lay a layer of broken brick or crushed stone of different fractions, at least 20 cm thick.
The bottom of the pit is loosened to a depth of 15 cm and weeded in advance to clear the ground of weeds and natural debris.
It is recommended to plant either in early spring, in April, or in the fall, during September. The best choice would be those seedlings that are at least 5 years old, since almost all varieties are characterized by slow growth.
When planting, it is important to pay attention to the soil: it must have sufficient moisture. It is advisable that work on planting seedlings on the site be carried out on a warm, cloudy day, even before carrying out work during rain
It is advisable to place seedlings at a distance of at least three meters; in the case of planting ornamental species, it makes sense to place them in a checkerboard pattern
It is important to know that almost all varieties prefer well-moistened soil in the form of loam, which, in addition, must be promptly provided with fertilizing and fertilizers. They have a developed root system, which ensures their wind resistance
Tool
Caulking a wooden frame for a long service life is not one of those jobs that can be done with improvised means. In the old days, many temporary log buildings, for example, hunting lodges, barns, etc., were hastily caulked with an ax and a blunt chisel or a piece of wood. She went to dig - well, we’ll stuff more, God knows what. But now a log house is an expensive pleasure and an indicator of prestige. Caulking a finished, occupied house is difficult and greatly reduces its service life, so when you decide to build a log house, you need to purchase a caulking tool.
Caulking tool
The most commonly used caulking tool is steel, top left in Fig. Stacked and curved caulking is needed, as shown there, for both primary and secondary caulking (see below): wedge-shaped and narrow are the corners, and curved caulking is tucked into the cracks; It is better to also have two curved caulks: approx. 8 and approx. 3 cm. Using road caulking, install a ribbon of jute or a strand (bundle) of tow for secondary caulking. Breaking caulking tools are also called wedges (not to be confused with a wedge tool for punching caulking seams in the hulls of wooden ships); they are used to remove old caulking when re-caulking; sometimes they “trample down” the secondary, see below.
Note: it is very convenient to caulk with an electric caulking tool (bottom left in the figure) with replaceable tips. Electric drills are available for rent, but there is no need to attach homemade tips to an electric or pneumatic hammer drill - it hits too hard, it will tear the caulk and damage the wood.
A very important tool is the wooden mouchel mallet. The mushel is constructed in the same way as a wooden leopard sledgehammer, but lighter, 0.8-1 kg, for which reason its firing pin is made of a smaller diameter. The blow with a mouchel is strong, but soft, without noticeable recoil, which is especially important when caulking with flax and jute. But hitting the caulk with the butt of an ax or a blacksmith’s sledgehammer is unacceptable; With a carpenter's hammer, instead of a mouchel, it is possible to use for caulking the jute of a log house made from a solid rounded log, in the center in Fig.
If you are going to caulk with moss, it would be better to stock up on hardwood caulks, straight and oblique, and a mallet instead of a mouchelle: a steel tool tears up soft moss too much, and you won’t get a high-quality caulk. Wooden caulking tools soon wear out; for a frame of 12 crowns you will need 3-4 sets of caulking and 2-3 beaters, for which on the right in Fig. Their drawings are given: wooden caulking is not easy to find on sale, and buying them is expensive.
Caulking order
Assembling a log frame with excess clearance to account for shrinkage
Good for the old days, i.e. Experienced and hardworking peasants caulked the log house, newly built from their own timber, twice: during the construction process, in rough form, and after its completion. They received timber for construction from the master or owner (monastery, land administration) selectively, and a smart man of that time, even before felling the timber, knew how it would settle and dry out. Therefore, when processing logs for a log house, the craftsman removed the excess on their edges (protruding ends) (item 1 in the figure on the right). The log dries faster at the ends and, under the pressure of the juices in the middle, tends to bend upward, as a result of which, already in the spring after winter, the crowns lay tightly on top of each other, pos. 2. Then the organic sap of the tree began to bituminize, the logs acquired additional elasticity and subsequently the log house settled evenly vertically.
If the timber was purchased externally, then no amount of experience will help you accurately predict the shrinkage of the logs. Almost all carpenters today are in this position, so the log house is caulked three times:
- Initially rough - in the process of construction;
- Initially outright - immediately upon completion;
- Secondary - after a winter or a year, the cracks that appear are caulked.
Note: under no circumstances should you remove excess logs from spans - as they dry out, they will tend to bend upside down, the corners will weaken and the entire structure will lose strength.
Methods for caulking with jute and tow
There are 3 methods of caulking with natural fibrous materials. Two of them (stretched and set) are applicable for both primary and secondary caulking, and the third, overlapping, is applicable in some cases.
When caulking in a stretch, the wings of the caulk protruding from the grooves are tucked under and tucked into the groove. For caulking in the set, the grooves are filled from the outside with additional caulking, on the left in Fig. The stretching is carried out mainly by primary caulk; in the set - secondary.
Caulking methods
The caulk is rarely caulked (in the center and on the right in the figure), only with oakum and only from the inside of the house, intended for additional interior decoration, so let’s put an end to this method right away. Moreover, there are no subtle features in it.
Caulking over the timber also has no technical meaning, it only requires extra material. But caulking over a log is completely justified: if you choose the right width of the boards, then you don’t need to trim the logs to a flat surface, the durability of the house does not decrease and its heat loss does not increase. To caulk on the surface under the caulking cover they release the so-called. in bunches (on the right in the figure) and after a year of shrinkage, they sew up the wall with boards flush with the tops of the logs. On the resulting surface you can immediately apply glassine (or felt impregnated with clay mortar) and a sheathing of shingles (under plaster), or steam-waterproofing and lathing from slats under the internal lining.
Draft
Caulking is done in rough form during the construction of a log house: before laying the next crown, a jute tape or strands of slightly twisted tow are placed and leveled on the previous one. The tow is applied tightly, without gaps, in a zigzag pattern; the bulges are produced smaller than for caulking, approx. by 3-4 times the width of the original gap. It would seem that the operation is elementary, but even here you can harm yourself without knowing it.
Incorrect and correct rough caulking of a log house
Laying the tape flush with the groove (on the left in the figure), hoping to finish it with secondary caulking, is wrong - the secondary caulking will crush the primary one and will itself be crushed, which is why the frame will not be able to settle evenly: the resistance of the caulk to mechanical compressive loads is great. In the center of the figure, firstly, only one wing of the caulk has been released, and even that is not a wing, but some kind of stub. Secondly, the logs there, by eye, are 260 mm wide, and the jute caulking is too thick, approx. for logs from 350 mm. Thick caulking does not in any way improve the strength or durability of the log house. The initial thickness of the uncompressed jute tape, depending on the diameter of the logs, is taken as follows:
- Up to 260 mm inclusive – 5 mm.
- From 260 to 350 mm – 7 mm.
- Over 350 mm – 10 mm.
The wings of a properly selected and laid jute caulk should protrude so that they hang freely, covering the log by approx. half, on the right in Fig. On the contrary, bunches of tow caulk should not hang down noticeably.
Note: a log house made of so-called logs. With a Finnish groove, without having much experience in caulking work, you need to caulk only with jute tape.
Finishing
The primary finishing caulking with jute is done using the wings of a rough caulking tape. For finishing caulking, additional strands of it are twisted with tow. This is another advantage of caulking with jute: the grooves are caulked with solid material, which makes the log house much more durable. Caulking with oiled flax can also be done “with a tuck” (with a tuck), see below, but such work requires much more experience, and the materials for it will cost much more.
Gates
The correct folding of the wings of the caulk is a very important condition for the reliability and durability of the log house, so we need to dwell on it in more detail. How you need to tuck the jute caulk depends on whether the wild log is going into the log house, or galvanized or glued; depending on this, a pioneer (rudimentary) or deformation longitudinal cut is made on it.
On a wild log, a rudimentary cut is made shallow in the groove. In this case, the wings of the caulk should be folded up, leaving a roll of 2-3 cm (2 fingers), pos. 1 in Fig. When the log house shrinks, a primary crack will appear from the rudimentary cut (not dangerous for the entire structure); the top log will seem to spread out to the sides (spread apart). The wings of the caulk will crawl along the solid bedding (bed) and after a year the roll of caulk will look like it will merge with the wood, pos. 2.
How to and should not make caulking turns when caulking with jute
If the wings of the caulk are tucked under the bottom, then the upper log, sitting down, can tear the caulk bed, which turns out to be a “blanket”), pos. 3. Within 5-15 years from construction, the log house caulked in this way will begin to be caulked, but the log itself will begin to split and may rot. It is also completely unacceptable to hammer caulk into the groove with an accordion, pos. 4 below: the upper log will tear the bolsters away from the bed (pos. 4 a) with the same result, but faster.
Rounded and glued logs have already undergone shrinkage and shrinkage; he only has the weight in the design. Therefore, the deformation longitudinal cut in such logs is made at the top, deep, throughout the entire sapwood and even slightly capturing the core. In this case, the upper log does not move apart on its own, but compresses the gap of the lower one, and now where to tuck the wings of the caulk is no longer significant. But pushing caulk into the gap with an accordion is still unacceptable, pos. 4b.
The procedure for finishing caulking
If you immediately push the caulk fold into place, the entire wing may come off: the logs hold the caulk tightly. Primary finishing caulking is done starting from the bottom seam, in this way (see figure and list below):
The procedure for producing primary finishing caulk
- The corners are caulked first from bottom to top. We use typesetting and, possibly, broken caulks;
- At a distance of 0.3-0.6 m (1-2 feet), the top of the caulking wing is slightly tamped into the gap with road caulking, this forms the so-called. stretch roller, on the left in the figure;
- Following the stretching roller, “with a delay” of 7-15 cm, the lower edge of the wing is tapped into the gap using type-setting caulks. As the stretch roller tightens, the top is still tucked, in the center on the rice;
- If you have time, it is advisable to caulk each seam in this way in 2-4 passes. Tamping the upper stretch roller is stopped when 5-6 cm of tow or 7-10 cm of jute tape remains in the wing. Then the bottom of the wing is finally lined with crooked caulks, on the right in Fig.
Note: recently, for internal caulking of log houses with jute, rolling with a roller has been increasingly used, simplifying and speeding up the work, see video:
Video: caulking a log house using the “roller” method
Secondary
The purpose of the secondary caulk is primarily to close the cracks formed after shrinkage of the finished log house. For a correctly initially caulked log house made of galvanized or laminated logs, secondary caulking is usually not required. Secondary caulking is done either with tow (better) or with twisted jute twine. Not a twisted cord, it is for a different purpose, see below! If the entire log house is first caulked with tow, then a secondary caulk may be needed immediately after the primary one, because Stuffing tow directly into a caulking seam with an even roller requires considerable experience. In this case, after the frame shrinks, a final “tertiary” caulk will be needed.
The main thing with the secondary (final) caulking is, firstly, to prevent the primary caulking from being squeezed out of the seams of the log house, in which the internal stresses have not yet completely dissipated, or, if the secondary caulking is done immediately after the primary one, the internal stresses have not dissipated at all. Secondly, crush the primary caulk as little as possible or not at all, because It is this that almost exclusively ensures the strength and durability of the structure. Therefore, secondary caulking needs to be done in 2 seams, starting with the bottom pair (item 1 in the figure):
The procedure for producing secondary log caulking
- The corners are caulked.
- Tow/twine is added to the bottom seam at a distance of approx. 30 cm from the corner. Tow is added, lightly tamping it with a road builder or wide or narrow caulk, depending on the length and width of the crack that needs to be caulked. The road builder is thin, but the type-setting caulks are thicker.
- In the next highest seam, add tow at a distance of 15-25 cm from the bottom one, i.e. longer in length, pos. 2 in Fig.
- Using crooked caulks, they tamp down the additional caulk alternately from above and below, moving along the seam from the initial corner and trying in every possible way so that the additional caulking does not crush the primary one, but wraps around its fold in an even roller, pos. 3.
Note: the caulking of a log house made of simple sawn timber without chamfers has a number of features, see for example. video via the link on youtube.
Cost and price range for the work performed on caulking a log house
The cost for the work performed can vary from 60 to 150 rubles. Prices for caulking are calculated per 1 linear meter. At the same time, each of the craftsmen takes into account not only the practicality of the material used, but also the technology being implemented, depending on the resulting seam between the logs or the customer’s desire for the materials used.
The height of the structure is also taken into account, which will require additional time to install scaffolding and scaffolding. The price increases starting from a building height of 1.2 - 1.5 meters. It is calculated taking into account the number of crowns up to a given height from the foundation of the building. At the same time, it is worth taking into account the number of nodes and indirect sections of walls that are present in each individual project. This also increases the cost of work. But each region of Russia has its own gradation, taking into account the demand for this type of construction and the availability of appropriate material for caulking.
| City | Price |
| Moscow | from 70 to 100 rub. |
| Saint Petersburg | from 70 to 100 rub. |
| Kazan | from 70 to 90 rub. |
| Rostov-on-Don | from 90 to 120 rub. |
| Krasnodar | from 60 to 100 rub. |
Caulk with moss
In caulking with moss, the main thing is no longer compliance with technological subtleties - in this respect it is much simpler than caulking with fibrous materials - but the preparation of material. More precisely, purchasing. Forest and swamp building moss goes on sale, but self-harvesting of tree moss is possible only in certain places very remote from civilization, and self-harvesting of bog moss in most developed countries is prohibited and punishable by law: in recent decades, the extremely important role of swamps as moisture accumulators and regulators has been revealed natural processes. In addition, mosses actively accumulate many useful and harmful microelements; swamp moss is a natural filter for radionuclides. By caulking with moss collected yourself, you risk not only infecting the frame with rot, mold and pests, but also yourself and your loved ones, which is no better.
The best moss for caulking is bog sphagnum, or cuckoo flax, pos. 1 in Fig: it never wakes up in buildings and releases substances that protect wood from damage. But it is impossible to caulk with bright green fresh sphagnum (item 2) - on the contrary, it will overheat and ruin the frame. You need to caulk with moss (both swamp and forest), dried until it withers without rotting, pos. 3. This moss is sold in bags (item 4). It must be stored in them until use, not allowing it to dry out completely: moss that is still slightly alive is suitable for caulking. Dried gray or brown building moss (item 5) is not caulk, but an insulating material. By the way, very good.
Note: you cannot caulk with rock and ground moss - there will certainly remain particles of the substrate with germs of wood pests.
Procedure for caulking with moss
They caulk with moss before winter. In the spring, when it gets warm but not dry yet, the hanging festoons are checked (see below) and the green ones are plucked out. Then the scallops are tapped into the grooves. It is very important to prevent the caulk from drying out: if the moss begins to crumble under the caulking tool, the entire caulk will never be intact, and every 2-5 years you will have to re-caulk, and the entire log house will not stand as long as it can. A year later, the building is checked and, if it is split, a secondary caulk is carried out with the same (!) moss.
Sphagnum moss is laid out in the grooves when assembling the log house as a mountain (item 1 in the figure below), because It cakes heavily under pressure. The festoons of bog moss should hang abundantly from the grooves, pos. 2. Immediately after assembling the frame, moss is added to the remaining cracks (shown by arrows in position 2), tamping the top with oblique wooden caulk. Quite easily reviving tree moss, on the contrary, is laid out sparingly but tightly so that there are no empty cracks, pos. 3. Its festoons should protrude from the grooves of the assembled frame for approx. half the palm of your hand, but not hanging down, pos. 4. Hanging ones (shown by an arrow in position 4) are cut off.
How to caulk a log house with swamp and forest moss
Instead of moss
In coastal areas you can find durable log buildings, caulked instead of moss with damask - sea grass eelgrass or eelgrass thrown ashore by storms. Damask is also a good insulator and as such is now sold dried, but caulking can only be done with damp, fresh damask. But caulking with damask turns out to be excellent: it releases salts into the tree, making it unsuitable for pests, and releases iodine into the air in the room. Which, as is known, among other beneficial properties, helps remove cumulative poisons and radionuclides from the body. They caulk with damask like moss, with some differences: they take it apart into flat strands and lay them out in the grooves of the log house in a herringbone pattern without gaps so that the ends hang down half a log. Upon completion of the assembly of the log house, the ends are tapped into the grooves with wooden caulk.
Gap sealing technology
Caulking a log house is a simple technological process that you can do yourself. This is one of the important stages of building a house, which involves a number of stages.
Caulking begins with sealing gaps in the walls of the house at the stage of its assembly. Primary insulation is not able to completely eliminate all seams. After all, upon completion of construction, a house made of timber undergoes shrinkage and drying out, which inevitably leads to the appearance of new gaps.
With the onset of cold weather, precious heat begins to escape through them, which negatively affects comfortable living. In the bathhouse, because of this, the temperature in the steam room quickly decreases. In addition, heat lost at low temperatures causes frost to appear on the outside of the façade. This excess moisture negatively affects the condition of the wood.
All this forces re-caulking after shrinkage of the walls of a wooden structure already 6 months after the completion of construction work. During this time, the timber manages to dry by 90%. The time required for shrinkage depends on several factors - the quality of the material, the time of its preparation, humidity and weather conditions. The complete shrinkage of the structure is completed in 3 years. The final third caulking is carried out before finishing the walls, when the log house has completely shrunk.
Houses made of rounded logs differ in many respects from buildings made of logs. Due to the ideal shape and size, the gaps in the logs are very narrow. But even in this case, caulking is necessary. Although you won’t be able to do this on your own. You will have to seek help from specialists. After all, you can overdo it and stuff small gaps with too much insulation material, and this can cause the walls to warp.
Synthetics and sealants
Synthetic caulking is used in combination with rough jute tape, or, for “aesthetics,” with twisted white jute rope. The rough tape is placed in the grooves of the log house under caulking with sealants without wings, flush with the edges of the groove. If the logs have a Finnish groove, then the edges of the tape should lie exactly on the longitudinal cuts in the log under the edge protrusions of the groove of the upper log.
Sealants for wood are chemically neutral polyurethane: silicone is less compatible with wood in terms of mechanical and physico-chemical properties (in particular, in terms of the thermal expansion coefficient TCR), and is destroyed under the influence of even very weak acids. In turn, the silicone solvent - acetic acid - spoils the wood, so do not try to replace special sealants for wood with ordinary construction ones. Synthetics are used to caulk mainly log houses made of laminated logs and timber - their estimated service life is the same as that of glue joints of laminated lumber.
Caulking with sealants is done quickly and simply: the initial composition is squeezed out of the tube into the groove, pos. 1 in Fig.. When it has set, the seams are puttied on top with a finishing compound to match the wood, pos. 2.:
Caulking a log house and sealing cracks in logs with synthetic sealants
There is also an “ultra-modern” method of caulking log houses built without rough caulking at all: cuts are made along the seams, strands of self-expanding polyethylene foam are inserted into them and sealed with wood-like sealant, pos. 3. In essence, this is no longer caulking, because This method is suitable for buildings made of lumber without shaped grooves, assembled on dowels and impregnated with water repellents (water-repellent impregnations). In addition, it is only suitable for selected chamber-drying materials that are completely dried and settled. And then what will happen with warping from moisture during operation - we’ll wait and see: in practice, “caulk-free caulking” has so far been used for no more than 10-12 years.
Let's return to caulking, which is still caulking, albeit synthetic. Finishing compounds darken when dry, so they are selected to match the wood using test strokes on the container. But in the light, the finishing synthetic caulk fades and the walls of the log house take on the appearance shown in pos. 4. Some people, since such “decoration” cannot be avoided, order caulking seams to be glued or filled with white twisted cord. How much this adds “aesthetics and respect” to the building is a matter of taste of the owner. And there is no arguing about tastes. Moreover, about the tastes of people who believe that natural wood needs additional “refinement”.
It is much more practical to use synthetic caulk to seal gaping cracks in logs, pos. 5 in Fig. On top of the sealant, the cracks are filled with any wood putty for exterior use, and the entire structure is rejuvenated. The putty has to be renewed every 2-3 years - it also fades in the light - but this doesn’t last long, it’s not difficult and inexpensive.
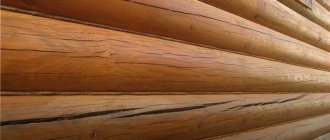
Longitudinal cracks in wood
What you should know in advance when choosing a wooden house:
- Despite all the natural advantages, wood retains natural disadvantages - hygroscopicity, susceptibility to decomposition, oxidation of the outer layer, torsion, drying out, shrinkage, etc.
- For all the cases listed above, there are modern “antidotes”.
- The log house requires constant maintenance during operation. Different works are carried out at different intervals (1/3/5/10 seasons).
- A house made of logs or timber will retain enough heat only in mild winters (up to -15 at normal humidity). For living in colder periods, insulation or increased heating will be required.
- The tree is afraid of wind, moisture and sun. Therefore, the ideal place for a wooden house is a natural environment (wooded area).
- Wood has the highest fire hazard of all building materials (for walls).
So, all the nuances have been taken into account, the house has been built or purchased, and we are ready to deal with all the problems, bringing the appearance and performance properties to perfection.
Due to the fibrous structure, a log or beam has defects that spread longitudinally. A transverse crack or dent occurs extremely rarely in the event of overload or rotting of the material. In such cases, the log is not subject to repair, but to complete or partial replacement.
Longitudinal cracks, based on their location in the structure (direction), are divided into:
- Direct. Approximately coincides with the axis of the log (timber).
- Spiral (uneven). Does not match the axis.
- Segmental. Uneven cracks with fiber transition.
In all cases, one selected method is used. As a rule, this is insulation and subsequent sealing of the sinus. This combined method is the simplest and most accessible today. It is suitable for cracks with an opening width of 5 mm. Smaller defects are sealed with a special sealant. The described method is perfect for a block house.
Question. Why not seal all the cracks with just sealant?
Answer. This will be very expensive due to the high consumption of sealant. At the same time, its thermal insulation properties are an order of magnitude lower than insulation.
- Thermal insulating filler. This could be a special thermal harness or just a strip of foam rubber.
- Sealant, professional gun.
- Metal knives and scrapers.
- Hand sprayer with water.
- Pieces of foam rubber, rags.
Attention! Before starting work, make sure that the wall material is dry (normal humidity). Treat the internal cavities with an antiseptic. 1
We clean the edges of the crack from sawdust, loose wood, and wood chips
1. Clean the edges of the crack from sawdust, loose wood, and wood chips.
2. Fill the cavity with a thermal tourniquet (foam rubber). On the outside, ½–¼ of the crack remains for sealant to be applied.
Attention! If you use foam rubber, you should not tamp it down too hard. Any insulation in a compressed state loses its properties. The thermocouple is not subject to crushing
The thermocouple is not subject to crushing.
3. Place the sealant in the sinus.
4. Using a foam brush, smooth the sealant along the edges so that you get a continuous smooth surface. For a better effect, you can wet the sealant with water from a spray bottle.
Attention! Don't do this with your finger. The quality will be low, but the risk of getting a splinter will be high. 5
Remove any remaining sealant from the surface with a rag.
5. Remove any remaining sealant from the surface with a rag.
The choice of sealant is the most critical part of this work, if you do it yourself or the “problem of a good craftsman” has been solved. An experienced specialist will advise you on the appropriate option. Most of these products are universal - suitable for any type of work. “Internal” sealants, as a rule, differ slightly in price from “external” ones. The companies that produce them have an assortment of related products - thermal rope, felt.
Sealants for cracks and joints of logs and beams:
The final touch - sanding
Caulking has not yet completed the construction of the log house until it is ready for flooring, installation of the attic floor, roof, installation of windows, doors, partitions, for finishing and equipment - it is desirable to sand the log house, but it is necessary to sand the inside. Especially - chopped from wild logs, debarked by hand.
Sanding a frame with sandpaper is extremely time-consuming, tedious, and this damages the outer most resistant layers of the wood. The frame is sanded using a hand-held universal grinder with nylon brushes. Worse - grinder with them; drive is too powerful. But the main thing here is still brushes for sanding wood, see video review:
Video: review of nylon brushes for sanding logs
Sanding a log frame with a brush is actually a controversial issue: the brush removes the bead of caulk, see fig.:
Sanding a log frame with a nylon brush
It is definitely clear that it is better not to touch the outside of the log house with a brush. However, there is a way to polish the outside of a log house - this is abrasive blasting. The abrasive used is... baking soda, which does not harm either the wood or the caulk. Of course, during your work you must observe all the safety precautions necessary for abrasive blasting. But the process itself can be carried out with a homemade sandblasting machine (sandblasting), because soft abrasive powder is used, see video:
Why do you need to caulk a log house?
A wooden house is very favorable for living. Wood holds heat well. But in log houses, gaps inevitably remain between the crown logs. They need to be closed to prevent the cold from penetrating inside the house. This operation is called caulking. With careful caulking, the house will be reliably protected from the cold even in the most severe frosts.
In addition to performing the function of insulation, caulk also protects a wooden house from rotting.
What you need to know about log caulking.
