How can I cover up cracks in a stove?
Whatever the nature of the damage to the stove, it will have to be coated in any case. This is done using special solutions that you can prepare yourself. The most popular ones to coat with are:
- sand-clay mixture;
- coating made of fireclay clay;
- oven glue;
- oven grout.
How to coat the stove and what mixture to choose depends on finances and available materials. For anyone who comes across stoves, it is recommended that you familiarize yourself with each type of mixture in more detail.
Sand-clay mixture
This is the most budget solution option, and the materials are available to literally everyone. For these reasons, this mixture is the most commonly used; it can not only be used to coat ovens. It turns out to be plastic and viscous, and the final result is high-quality and durable; it will not crumble or fall off. To get the correct solution you need:
- take one part of the clay and pour it with three parts of water, then leave to infuse for a day;
- the clay must be mixed and a little more water added to it;
- strain the resulting solution through a fine sieve (ideally 3*3) and stand until the water separates from the clay;
- drain the remaining water; at this stage, the consistency of the solution should resemble thick sour cream;
- add sand to the clay in equal proportions (there will be approximately 2.5 times more sand from the original amount of clay);
- mix the solution thoroughly, at this stage you will see whether it is ready (if there is a lot of clay left on the mixer, then add 0.5 parts of sand (you may have to repeat several times), if small clots remain on the mixer, then the mixture is ready for use).
Fireclay putty
Fireclay clay itself, as well as clay with sand, is a very popular material
Its most significant advantage is fire resistance, which is especially important for a stove. Due to this, the restoration is wear-resistant and can be applied to any surface.
This mixture can be found in all construction stores in 20 kg packaging, which makes the material affordable. Fireclay clay: how to dilute it for the stove? The answer to this question is as simple as possible:
- dilute one part of the clay with half of the water and leave for at least a day, but better for two;
- cover up cracks or seams (clean them well of dirt before doing this);
- It is better to carry out manipulations on a hot stove, but if it is still cold, then during operation it is necessary to start heating it (this will help identify defects before the solution dries completely and, if necessary, eliminate them).
Important! With all its accessibility, this method can truly be called the best - economical, simple, affordable and very effective. Fireclay clay is often used to plaster a stove.
Furnace glue
This is a solution that is intended exclusively for repairing furnaces. You can find one in construction stores. One of the best things you can use to coat the stove in your home. Its strengths are its good fire resistance and durability. The glue itself is obtained from a combination of fireclay powder and refractory cement in the base. Can be produced in hard or elastic form. The first is to plaster the entire surface of the stove, and the second is to fill the cracks. Furnace glue dries very quickly, so you should use a small amount for work. It is worth noting the disadvantage of this ready-made solution - the cost is quite high compared to other products.
Oven grout
There are 2 options for grout: homemade or ready-made purchased. Regarding the latter, we can say with confidence that the quality will be impeccable. This grout can be used to treat both stoves and fireplaces and can withstand temperatures of about 1000 degrees and above. Before treatment, the surface must be treated with water. The material can be used both for cracks and for the entire oven.
However, if you have a limited budget, homemade grout is also perfect. To do this you need to follow a few simple steps:
- pour the clay into a container and ensure its homogeneity;
- add water and let it brew for 12 hours;
- add four parts sand to one part clay mortar and mix everything thoroughly;
- add finely chopped straw in small portions (about 12 kg of straw per bucket of clay);
- add a pack of salt.
This kind of putty for stoves is almost as good as store-bought putty. After reconstruction, many people advise whitewashing the device.
Preparing the solution for use
So, we understand how to cover the stove, but it is worth noting that the prepared solution cannot be used immediately. In order for the final work to be of the highest quality, it is necessary to adhere to the following procedure:
- Mix all the components of the solution thoroughly in a whole container. This should be done in the evening to allow the mixture to brew.
- Cover the container with the solution with plastic film, which will not allow the water from the solution to evaporate. The solution must be left in this state until the next day.
- Stir the infused mixture in the morning so that the liquid that the clay pushed up is back in the solution.
- Start caulking the stove building.
Important! It must be remembered that the finished solution should not crack when drying. You can check its quality by rolling a ball from the resulting mixture in your palm. If such a ball cracks, then there is little liquid in the solution
A well-prepared mixture will stay on the stove for a long time and reliably, which will eliminate the need to smear it every year.
The condition of the furnace requires regular monitoring. The refractory brick, bonded with fireclay clay mortar, from which the stove is made, although capable of withstanding high temperatures, does not last forever. Over time, cracks may appear in the furnace masonry due to uneven heating of the material
.
Using a fireplace with through cracks poses a danger to human health, since harmful carbon monoxide enters the room
.
Consequently, the questions arise: how to cover the stove in order to prevent the appearance of cracks in a timely manner, how to eliminate the damage that has appeared, and what to do so that it does not crack again?
What kind of putty should I use?
Clay and sand
Covering cracks with a clay mixture is the most economical and easiest way to restore a stove structure. You can use any clay
It is important that it contains a minimum amount of impurities. If the raw material is of high quality, then after soaking it should have an oily, homogeneous and, most importantly, plastic structure
At the same time, the quality of restoration is no worse if the stove was repaired using expensive modern means. Before you start covering with clay, you should understand the features of preparing the solution.
How to make clay putty yourself
The preparation of the mixture is done in stages.
- Before mixing the components, the clay must first be kept (soaked) in warm water for 12 hours.
- Knead the softened clay until smooth so that there are no lumps left in it.
- To obtain a mixture for putty, you need to take clay and sand in a ratio of 4:2, respectively. The last component should be pre-sifted. The amount of liquid is taken depending on the moisture level of the components.
- If you want the stove to be white, add lime to the putty and knead everything thoroughly until a homogeneous consistency is obtained. The prepared mixture is covered with polyethylene and kept for 12 hours.
- The settled compound is kneaded a second time. Roll a piece of putty into a ball in your palms and squeeze it. If it starts to crack, you need to add water to the mixture.
- Lightly heat the oven, spray water into the cracks, and then start caulking.
- To prevent new defects from appearing, straw is added to the clay. A more reliable method is to use a plaster mesh. If the solution is applied to a surface covered with this material, you will forget about cracks for a long time.
Fireclay clay
Fire clay is often used to repair old stoves. The material has increased fire resistance. Furnace structures finished with it are durable. This material is sold in all construction stores and markets in 20 kg bags. It's inexpensive. The working mixture is prepared strictly according to the accompanying instructions placed on the packaging.
Grout
As a putty for brick stoves, you can use grout designed specifically for this purpose. Various similar formulations are sold in stores. They are expensive, but they are the best option for lining brick stoves, as well as fireplaces. If you are on a budget, prepare this remedy yourself. To do this you will need clay, sand, water, straw and salt. The clay should be thoroughly kneaded and filled with warm water. After 12 hours, add sand four times less than the first component to the mixture and knead, gradually adding finely chopped straw, not forgetting the salt. For four buckets of clay mixture, take 50 kg of chopped straw and a package of salt. The resulting composition can withstand temperatures exceeding 1000 degrees. Celsius.
Furnace glue
To prevent the formation of cracks in the stove structure, heat-resistant glue is used. This is a ready-made building material used for lining fireplaces. Sold in all construction stores and markets. Its main properties are heat resistance and durability. The adhesive composition consists of fireclay flour and cement with fire-resistant qualities. Glue for stoves can be soft or hard. The plastic product is used to seal cracks. The second is for plastering the surfaces of the stove. The main advantage of the glue is its almost instant drying. Therefore, it needs to be mixed in small quantities.
Main components
The clay composition varies depending on the components added:
- clay-sand;
- clay-cement;
- clay-lime.
Stove makers, as a rule, choose the first option. The proportions depend on what clay is used for the oven. If it is oily, the sand ratio will be 2:1, if it is medium oily it will be 1:1. Also, if the clay is of good quality, you can do without additives.
If you don’t want to measure out the components, you can take a ready-made composition. A 20 kg bag of clay-chamotte kaolin refractory mixture “Terracotta” costs an average of 250-300 rubles.
How to cover up cracks?
For these purposes, you can use several options that will reliably seal cracks in the walls and prevent gas from escaping into the room. Let's look at each method in more detail.
Fireclay clay
Before you cover cracks in the stove with fireclay clay, you need to know its advantages:
- the material is resistant to temperature during fuel combustion;
- high level of vapor permeability;
- resistant to moisture when heated;
- environmentally friendly material, safe for humans and animals, therefore can be used in residential premises.
To make the solution you will need to mix several ingredients:
- 1 part cement grade 500;
- 2 parts fireclay clay"
- 7 parts river sand.
The solution is mixed well and water is added. The consistency depends on the skill and type of work, but you should not make it very liquid or thick. To get rid of stones and lumps, the clay can first be soaked in water for several hours and the lumps of material can be crushed, and the cement and sand can be sifted. Such a solution will be plastic and laid on the surface in an even layer.
Plastering walls is easy if you have a certain skill
To do this, it is important to install beacons and, distributing the solution, level the layer on the wall. You will need to prepare a trowel or spatula, the size of which depends on the surface area
Clay and sand
This is the most affordable, inexpensive solution for plastering surfaces. Such a solution for the oven has sufficient plasticity and is not subject to destruction under the influence of high temperatures.
It’s easy to prepare the solution for use; for this you will need:
- prepare a large trough in advance, add the required amount of clay and completely fill the layer with water. For 1 bucket of clay, pour 3 buckets of water. The clay should soak for 24 hours;
- then mix the solution and add more water to it. We pass the slurry through a sieve, get rid of lumps and let the solution settle;
- drain the excess water, making the solution as thick as homemade sour cream;
- add river sand in a 1 to 1 ratio and mix the solution.
Expert opinion Pavel Kruglov Stove maker with 25 years of experience
Important! At this time, you can determine the quality of the solution. Having lowered the shovel holder into it, and seeing the adhering clay - in this case, you will need to add a little sand
Only after seeing small clumps of sand and clay solution on the holder can you start plastering the walls of the stove.
With this solution it is necessary to repair all cracks that appear, after wetting the surfaces and then plastering the stove in several layers. In villages, they still use the old method, adding horse manure to the prepared solution. This solution is obtained with increased thermal insulation properties. Hay plays the role of air layers that prevent the free passage of heat.
Grout
This oven putty is sold ready-made, but it’s easy to make yourself. The main advantage of this material is the ability to retain its properties even when heated to 10,000. Industrial materials are used for arranging and repairing stoves and fireplaces, but the price of such grout is high, so home craftsmen do it with their own hands.
The mixture for coating the oven is made in several stages:
- knead large lumps of clay and pour it into a trough;
- fill it with water and leave for 10-12 hours;
- pour part of the sand into the soaked clay, maintaining a ratio of 1 to 4, mix the solution well, adding 5 parts of chopped straw in small portions;
- Add 1 kg of coarse table salt to the finished putty and finally mix the solution.
The finished grout can be used to fill gaps between bricks, crevices, cracks and complete the first rough layer of plaster.
Furnace glue
In order to repair a cracked stove, you can buy heat-resistant special glue at a hardware store. Due to its properties, it is not exposed to high temperatures for a long time. It consists of the addition of fireclay clay and cements with high fire-resistant properties.
A plastic and hard adhesive mixture is produced. Using hard materials, the surfaces of the stoves are plastered. Plastic glue is used to fill cracks and seams between bricks.
When using this material, you must follow the instructions when diluting and using the heat-resistant substance. You should not make it in large portions; it dries out quickly and becomes unsuitable for work.
How long does it take to dry?
It is not recommended to use the oven until the solution is completely dry. When using different materials, this period may vary. Using heat-resistant glue as a putty, the layer of solution will dry within a few hours.
It will take more time for the solution of clay and sand to dry and form. In this case, you will be able to use the stove only after a day. Then the brick oven, protected from cracks with mortar, will remain crack-free for a long time.
Therefore, we do not advise you to rush, immediately flooding your Russian stove with a stove bench. Repairing cracks in a furnace is a simple but important job. The choice of material for the solution is a purely individual matter. The main thing is to do the work carefully and responsibly. Then your house will always be light and clean, without the smell of burning and smoke penetrating through the cracks in the walls of the stove.
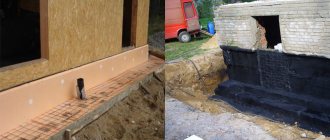
Brick kiln firebox repair
If the firebox is made of red rather than fireclay brick, sooner or later the brick begins to crumble. It sometimes falls off in quite large plates. There is no point in covering it up or reinforcing it with something. The temperatures will cause everything to fall apart.
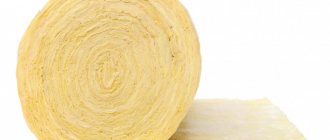
It is possible to stop the destruction of bricks in the firebox of a brick kiln only by reducing the impact of temperatures. To do this, it is necessary to make additional lining - install barrier walls that will take on the main thermal load. That is, the firebox (entirely or just the collapsing walls) is sheathed/covered from the inside with some kind of material. It could be:
The last two materials are rarely used, but they can be used if the volume of the firebox is small and you don’t want to reduce it with fireclay. The only thing is that you will need to come up with a fastening system, since in each case it is different. And keep in mind that the slabs should also not be placed close to the walls of the firebox, but with a small gap.
Such repairs to the lining of a brick kiln make it possible to avoid, or at least postpone for some time, more serious work, which sometimes includes a complete overhaul of the kiln, replacing damaged elements, and sometimes changing the design.
Plastering process
Large and small cracks increase in size. To do this, use a spatula, chisel, or hammer. Jointing will allow the grout to fill the gap as much as possible and adhere to the surface of the masonry.
Sequence of work:
- prime the surface of the crack from the inside with a special impregnation or plain water;
- heat the fireplace with a small amount of firewood;
- apply a thin layer with a brush to a warm surface to create a basis for future coating;
- on large chips, use a reinforcing mesh, thin fabric or burlap.
The main mass is applied in 2 layers, wait for it to dry and prime before applying the next one.
Reasons for furnace failure
• low quality of the solution used;
• violation of finishing technology;
• shrinkage of the brick structure;
• non-compliance with the rules for operating the stove.
If the stove sank due to an improperly poured foundation, smoke will pour out of all the cracks during the fire, the doors will no longer close tightly, and the brick will gradually begin to collapse. If such problems are discovered, you should immediately dismantle the entire structure, strengthen the foundation and lay it out again. However, in some cases you can do without radical measures.
The fact is that a slight shrinkage of the stove in the first couple of years is considered quite normal, and if we are talking about small cracks, they can simply be repaired correctly.
All other reasons can be easily eliminated; it is only important to figure out how to cover the stove so that it does not crack. If no one has lived in the house for a long time, then putty for the stove will not be needed.
A frozen chimney begins to work incorrectly, but the malfunction is easily eliminated. It is enough to warm up the riser by burning the paper, and the smoke will follow the desired path
If no one has lived in the house for a long time, then putty for the stove will not be needed. A frozen chimney begins to work incorrectly, but the malfunction is easily eliminated. It is enough to warm up the riser by burning the paper, and the smoke will follow the desired path.
If you do not know whether the stove worked before, then malfunctions in its operation may be caused by improper laying of the chimney or clogging of the channels with parts of bricks. In this case, major repairs cannot be avoided.
Well, and, of course, cracks in the chimney or in the stove itself lead to disruption of its operation and the appearance of smoke in residential areas.
Damage diagnostics
Therefore, at the first sign of smoke in the house, you will need to do the following:
- diagnose the furnace surfaces and find the fault;
- after this, immediately prepare a solution or buy ready-made material for filling cracks;
- cover the walls and plaster them again.
But first of all, diagnostics will help determine the size of damaged surfaces and the approximate amount of materials to be repaired. If the mortar has simply cracked due to high temperatures, you simply need to remove the layer of plaster and apply a new layer of high-quality materials.
It’s worse if the cracks are through and continue to expand after the work has been done. In this case, it may be necessary to call specialists to identify the causes and lay a new stove. Stone stoves are a complex structure, so you shouldn’t try to lay it out from a book; it’s better to entrust this work to an experienced stove maker.
Such cracks can no longer be simply covered up
In this example, you shouldn’t cover it up either. The brick was badly cracked.
If the cracks are small and their size does not increase, you can begin to troubleshoot the problem yourself. To do this, it is important to prepare a high-quality solution and apply it correctly to the wall. How to cover up cracks in a stove so that it does not crack from the heat - knowledge of the basic materials for making the mortar will help in this matter.
Examples of small cracks:
Example 1
Example 2
Example 3
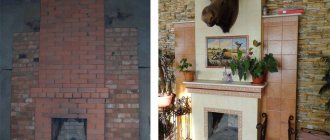
The importance of plastering work
Furnace finishing options are not limited to just applying layers of plaster. The cladding is done using fireclay or ceramic tiles, decorative stone, metal elements, and is also completely abandoned if the “bare” stove masonry looks neat and stylish. However, plastering, which was practiced by our ancestors, has its advantages and practical benefits:
- correction of masonry defects;
- leveling the surface of the walls;
- protection from insects that make nests in the seams between bricks;
- preventing the release of carbon monoxide into the room through cracks and gaps in the finishing layer;
- reducing the risk of fire;
- increasing heat capacity, which allows you to heat a house using less fuel;
- safety during operation, since the surface of the oven does not heat up to temperatures that could harm people.
In addition, plastering is an accessible and low-cost process.
It is also worth taking into account its versatility and flexibility in use. Plaster is effectively used in working with all types of stoves, from finishing from scratch to restoring old structures, and decoration possibilities are limited only by imagination
Advantages and disadvantages of clay compositions
The following features are highlighted as advantages:
- clay is a natural and environmentally friendly product;
- solutions perfectly absorb water and release it, which prolongs the service life of coatings;
- reasonable cost;
- the remains of the used solution are stored for a long time;
- the material perfectly protects the surface from mechanical impacts;
- the elasticity of the material allows it to be applied without any problems;
- Not only internal, but also external surfaces are finished with a clay mixture;
- using the solution, level and decorate the surfaces.
In addition to the positive aspects, clay-based plaster has a number of disadvantages, which explain most cases why clay cracks:
- There is no exact recipe for preparing the solution; craftsmen prepare the mixture using their own experience;
- there is a possibility that the surface will become covered with cracks;
- Such compositions are rarely used; there are few experienced craftsmen who know how to cover a stove with clay so that it does not crack.
How can you plaster a stove to prevent it from cracking: types and types
Plaster for stoves and fireplaces should be chosen carefully. Finishing the surface with typical building materials is unwise. Due to the variability of temperatures and their increased coefficient, heat-resistant brick oven plaster is selected. Elasticity indicators are also important in order to prevent cracking and crumbling of the walls during the firing of furnace equipment.
To plaster the structure, it is advised to buy a ready-made mixture for plastering stoves. An important component is clay of medium fat content, without the introduction of sand and extrusion.
How to plaster the stove to prevent it from cracking? There are different types of primer raw materials.
Heat-resistant type - has a general purpose to plaster the stove. The composition is selected for a temperature of 200 degrees. Finishing can be carried out by covering the entire heating area, not including the cooking zone and oven. A Russian stove, an English fireplace, or a bathhouse can also be completely plastered using a heat-resistant solution. Fireproof mixture - can withstand contact with open fire for a certain period of time, about 20 minutes. Fire-resistant plaster can also withstand indefinitely
When purchasing, these names are often confused, but this does not matter for the material, since the firebox and chimney are not plastered. The front part of the structure with an open firebox is coated with a refractory compound.
Heat-resistant composition - can withstand temperatures of more than 800 degrees, in contact and without contact with the flame. Heat-resistant material is used to finish the cooking area, which has a very strong heating system and difficult braking dynamics. It is useful to partially cover with heat-resistant plaster for stoves and fireplaces, 20-30 cm away from the exit of metal parts that can heat up to 400 degrees.
Simple DIY mixtures
It may be the case that for lower costs it is better to purchase elements of the material. Then you buy quicklime and extinguish it yourself; the fluff-lime material becomes covered with cracks within a year. The composition for plastering the oven in dry form must be sifted, the lime dough, milk must be kneaded well so that no unslaked curds remain.
Samples of solutions for plastering a stove with your own hands.
- Clay with sand and asbestos - ratio 1:2:0.1.
- Clay with lime, sand, asbestos – 1:1:2:0.1.
- Lime with gypsum, sand, asbestos – 2:1:1:0.2.
- Clay with cement, sand, asbestos – 1:1:2:0.1.
The purpose of the compositions is as follows:
- as an initial layer or main primer;
- second coating for priming or for the chimney;
- finishing layer for painting, whitewashing. It is possible to introduce pigments based on silicone into such a mixture. The clay is taken white or gray. The raw material is prepared in batches and is produced in 3-5 minutes, since the gypsum present instantly hardens. Therefore, the kneading is only mechanical, no more than 5 minutes;
- high strength composition for covering under decorative printed plaster.
Is it possible to prepare heat-resistant plaster yourself? To save time, it is possible to prepare raw materials yourself, following technological processes and mixing proportions. A simple heat-resistant mixture is kneaded as follows:
- sand is sifted;
- then it is combined with clay;
- raw materials are poured into containers;
- fluid is injected;
- The mass is stirred with a mixer until it reaches the consistency of sour cream.
The amount of sand and clay to plaster the walls of the fireplace at home will depend on the fat content of the clay. Add 3-4 measures of sand to fatty raw materials. To determine the fat content, the clay is placed in a bucket, water is added and kneaded until the consistency of sour cream. Then a little of the mixture is scooped up with a plate. When the clay covers the board by 1 mm, then it does not have a greasy structure. A thick coating indicates the fat content of the raw material.
Decorative compositions
Plastering the stove with decorative materials is quite possible to do yourself, as well as finishing it with brickwork and stone. For finishing, compositions without polymer pigments are applied. They are used instead of a covering, if there is a finishing surface, or as a second coating of the primer when plastering under brick or stone.
How to prepare clay
This solution is prepared in the following sequence:
- The clay is poured with water in a ratio of 1:3 and allowed to brew for 24 hours.
- After a day, it is stirred by adding water. The resulting mixture is filtered through a sieve with a mesh size of 3x3 millimeters and settled.
- The water is drained, after which the thickness of the clay should resemble the consistency of sour cream.
- Sand and clay are mixed in equal proportions.
- The readiness of the solution is determined by stirring it with a stick. If there is a lot of clay left on it, then you need to add sand to the mixture. The solution is ready when small clots stick to the stick.
Usually take 2.5 parts sand to 1 part clay.
How can I cover the stove to prevent it from cracking?
If the damage is small and superficial, you can remove the old layer of finishing from the bricks to re-plaster it. If the damage is through, you will have to dismantle the damaged area and restore it.
Several options for covering the stove to prevent it from cracking:
fireclay clay composition
This is a widely used material for restoring stove surfaces. Before use, fireclay clay should be kept in water for about two days.
composition of clay and sand
The cheapest version of the material, often used due to the plasticity and viscosity of the mixture, as well as durability after firing. For a high-quality solution you will need any clay, the main thing is that it does not contain any impurities. You can prepare it as follows:
- The clay is filled with water in a ratio of 1 to 3, after which it is infused for at least a day.
- After it has infused, it needs to be mixed with the addition of water. Then strain through a fine sieve and let it brew again.
- A properly prepared mixture should have a thick consistency.
- Mix clay and sand in proportions of 1 to 2.5.
After mixing the solution, you can check its readiness by rolling a small ball. If it cracks, it means there is not enough liquid in the solution. To increase the strength of the clay mortar, you can add asbestos, cement or gypsum to it.
Stove mixture
oven glue
This material can be purchased at the store, it is durable and fire resistant. The composition of oven glue includes fireclay powder and refractory cement. It comes in two types: solid and plastic mixture. The first type is used to wipe down the entire surface of the stove, the second type is used to fill the seams and cracks. To prepare the adhesive solution, you need to dilute it in small portions, because... it dries out quickly. For 1 liter of plastic mixture, you need to knead 5 liters of solid mixture. A plastic mixture is applied to the wetted bricks and all defects are repaired. A final coating in the form of hard oven adhesive is then applied.
special compositions for grouting ovens (you can purchase or make your own).
If it is not possible to purchase ready-made oven grout, you can prepare it yourself. To do this, as in the first two cases, you need to soak the clay and let it brew for 24 hours. Then add sand in a ratio of 1 to 4 and mix thoroughly. During the stirring process, you need to gradually add finely chopped straw, and at the end add a pack of salt.
How to cover a stove with clay so it doesn't crack?
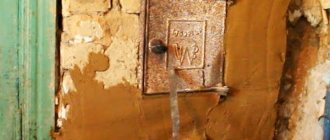
All existing cracks must be knocked out with a chisel and the brick must be cleaned. If the surface is completely plastered, the seams need to be cleared to a depth of about 1 cm. Before covering the stove so that it does not crack, all cracks, seams and cracks must be moistened generously with water or primer.
Stove
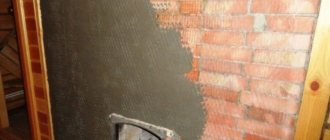
Before coating the stove with a clay solution, it is necessary to heat it to such an extent that its surface becomes slightly warmer. Then the stove is covered with a thin layer of liquid clay mortar and left to dry for a while. Then the surface is reinforced: burlap or a thin metal mesh is applied, this will strengthen the plaster. The burlap is glued overlapping, starting from top to bottom, and the mesh is attached with nails in the seams between the bricks. This sequence of actions is the same both for plastering the entire surface area and when it is necessary to cover individual areas.
Next, two layers of plaster, each 5 mm thick, are applied. A layer that is too thick will be uneven and uneven. When the surface is dry, it is rubbed, and after complete drying it is covered with lime mortar. If you do not plan to whiten the stove, you can add a little lime at the stage of mixing the clay solution, the clay will become lighter.
After the coating has completely dried (this will take at least 7 days), you can start heating it, but not before, otherwise it will continue to crack.
Grout
To seal a brick oven, you can purchase a special grout.
In stores there are various formulations that are produced specifically for these purposes. It’s worth noting right away that this option will cost you quite a lot, however, it is optimal for lining stoves and fireplaces. • clay;
• sand;
• water;
• straw;
• salt.
The resulting composition can withstand temperatures of more than 1000 degrees.
To properly coat the stove with clay, you must follow these step-by-step instructions:
The surface, cleaned of plaster, is generously moistened with primer or water. Using a chisel, knock out the gaps between the bricks. The oven is warming up. Using a trowel, apply the clay mixture into the cracks and spread it over the entire surface in an even layer. If you don’t have a tool, you can do the smearing by hand. The mixture does not cause irritation or damage to the skin. When the surface is dry, another layer of the mixture is sprayed
Particular attention is paid to cracks - there should be a dense layer of mortar between the gaps. Using a damp wooden trowel, grout in a circular motion to remove any unevenness.
The last step is plastering the stove.
The process of sealing with fire-resistant adhesive is carried out according to the same scheme, but includes an additional step. After filling the cracks with plastic material, the entire surface is treated with a hard type of glue so that the stove no longer smokes. It takes half an hour to dry, which can be spent on decorating
It is important to remember that the structure can be used after the solution has completely hardened.
A little history
More than 4 thousand years ago, one of our ancestors came up with the idea of lining the hearth with stones. Later, a kind of exhaust pipe made of leather was installed above it to remove smoke. This was exactly the prototype of the stove in the lands of the Slavs. For a long time, this design remained virtually unchanged, and even today, if you want to get to know it better, you can probably find such a stove in the bathhouses of nearby villages.
An obligatory stage in the construction of a furnace is its coating. For many years, the most reliable solution in this matter has been clay mortar.
Initially, the oven was made of stones that were not fastened together in any way, then they came up with the idea of using a mixture of clay and broken shards to coat the cracks between the stones. Over time, the design gradually changed, the stones were replaced by clay bricks. As a result of such transformations, the stove acquired a familiar appearance to everyone.
In Kievan Rus, the stove dominated the hut, because it warmed the house, they cooked food in it, and it treated rheumatism and radiculitis with its warmth much more effectively than advertised remedies. Therefore, it is not surprising that in those days a good stove maker was treated with almost more respect than a clergyman.
Nowadays, there are several types of stoves in use: Russian, fireplaces, heating, heating-cooking and sauna. But any furnace is usually made of refractory bricks, which are held together with refractory (so-called fireclay) mortar. Masonry today remains a difficult task - akin to art - and requires good skills and great skill from the performer.