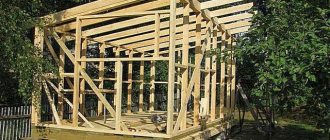
For any roof shape, including a pitched roof, the basis of the roof structure is the rafter system.
It must be strong and durable. The elements are made only from high-quality coniferous wood, treated with special protective compounds.
The correctness and strength of the connections, as well as the accurate calculation of the rafters carried out before starting work, are important.
How to do the job correctly?
The future roof should not only reliably protect the house from precipitation and other weather conditions, but also serve as a decoration for the building. Therefore, when choosing a rafter system option, climatic factors are taken into account, and installation is carried out in a certain order, allowing the structure to be beautiful, durable and stable.
All work is carried out in several stages:
The preliminary step is to create a template for the selected type of rafter system.
Two boards are lifted onto the ceiling, their ends are connected, and the others are spread apart and installed on the support beam.Fix the selected angle by installing a transverse jumper.
- The manufacture of rafters begins.
To do this, the template is lowered to the ground, making sure that the angle of the rafter legs is maintained. The first rafter is lifted onto the building and installed as a base. - The next stage of work is carried out at height. To do this, mark the cut location on the mauerlat and rafters. After preparing the cut, the production of the next rafter begins.
- After the two trusses are ready, they are installed at the edges, after which a cord is pulled between them. This is how the level of installation of intermediate rafters is determined.
- They begin to assemble the remaining trusses. The step between them should be about 80 cm. Assembly is carried out directly on the beams.
- The final stage of work includes the installation of supports and cross bars, installation of vapor barrier systems, waterproofing and thermal insulation. Lastly, install the sheathing (the base for attaching the roofing material).
Calculation of standard sizes of rafter beams
The size of the beam depends on the following factors:
- wall perimeter;
- roof structure;
- intended use of attic space (residential or non-residential);
- climatic features of the region.
The Mauerlat is selected so that its width is at least 1/3 of the thickness of the walls. The length is selected according to the length of the wall. If this is not possible, it is permissible to connect two beams of the same length. To ensure reliable fixation, the connection is made with an approach: grooves are cut out at the edges, making up half the thickness of the beam, after which the beams are fastened together with nails.
Mounting methods
The rafter fastening scheme is simple. It consists of parallel boards laid with support on two walls of the log house. For proper installation of rafter legs, transitional wooden elements are used.
You can choose the method of attachment to the mauerlat (beam laid at the base of the walls), to the top of the wall, and also use the top trim.
The rafter legs are installed obliquely at a certain angle. To make the fastening strong, the contact area of the individual elements is artificially increased in two ways:
- make cuts;
- saw down the upper and lower edges of the rafter legs.
The pitch of the rafters depends on the type of material and ranges from 60 to 90 cm. Installation of the rafter system is carried out according to the following scheme:
- Installation of load-bearing beams along the wall of the building. Roofing felt is laid along the end of the building, and prepared timber is placed on it.
- When preparing the beams and rafters, plan for the boards to extend above the roof overhang. The departure distance depends on the angle of the slope and is about 40 cm.
- The board is embedded into the Mauerlat for strength.
Video description
Video about the construction of a rafter system for a pitched roof:
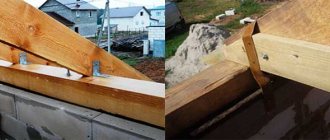
Modern steel rafter fasteners greatly facilitate the work of creating a roof frame. When using them, you should use the following tips and recommendations:
- all fastened wooden elements must have a thickness of at least 50 mm;
- The shaped fasteners should be fixed with galvanized screws or nails. Moreover, the nails should not be ordinary, but rough - with notches on the trunk, at least 40 mm long;
- symmetrically located fasteners can be additionally tightened with studs, tightening the nuts on both sides of the rafters.
Fastening with M12 studs Source mercabadom.ru
Fixing the rafter leg
A rafter leg is an element of a rafter or load-bearing system. It is an inclined beam that forms the basis of the frame.
The sheathing is attached to it, as well as thermal insulation, vapor barrier, and waterproofing systems, providing a comfortable atmosphere in the house.
This is the main component of the roof, which forms the slopes and angles of inclination.
The rafter legs take on the main load and distribute it evenly over the roof area. There are two known types of fastening rafter legs to the Mauerlat:
- Rigid or immovable
- Sliding (based on hinges) provides mobility and takes the load when the building shrinks.
In the design of a pitched roof, mainly sliding type of fastenings of rafter legs are used, since the probability of shrinkage of the building under the influence of climatic phenomena is quite high.
The sliding type of fixation makes it possible to take into account factors under the influence of which fastening units can be destroyed. In addition, it is possible to move the parts relative to each other to some extent.
Thus, the rafters are given the opportunity to adapt to the shrinkage of the walls.
Complex roofs
The more slopes and, accordingly, their intersections a roof has, the more complex the rafter system becomes. Thus, in multi-gable structures, part of the rafters rests not on the ridge (purlin), but on the valley beam. Such beams are called sloped valley rafters; they must be adjusted to the location and firmly fastened to prevent distortion of the structure as a whole.
For a hip roof, not only straight rafters are used (located at right angles to the ridge and mauerlat), but also diagonal rafters - along the lines of intersection of the slopes. Some of the straight rafters rest on them. A rigid fastening unit is also optimal here.
In hip roofs, most of the rafters are diagonal, and all straight ones (springs) rest on them. Due to this, precise fit of cuts and reinforced fastenings are especially important.
In arched roofs, instead of straight rafter beams, curved frames assembled from individual lamellas are used. The number of vertical posts with this design increases noticeably, since it is necessary to more evenly distribute the load over the curved composite element. The support of such arched rafters is only rigid, with a notch.
Types of fixation
Main types of fixation:
- If the roof is erected over a building with walls of equal height, it is classified as a layered one.
- If the slope is formed by a rafter triangle, then a hanging type of rafter legs is used.
In this case, they are fixed in the usual way, since their horizontal side rests on the Mauerlat and the joining area is quite significant (without cutting).
If the layered rafter legs are installed at an angle to the supporting fixation elements, then their contact area with the Mauerlat is too small. In order to increase the contact area and protect against movement, a notched fixation method is used.
By sawing the upper or lower edge of the rafter leg, the support area increases significantly, and, as a result, the stability of the connection increases. The cut can be made vertically or horizontally .
Recommendations for strengthening knots
Depending on how the rafters should be secured, fastening units with different degrees of freedom can be used:
Single degree of freedom fastening means that the rafter only rotates slightly around the fastening point.- Mounting with two degrees of freedom . In addition to rotation, a small displacement in the horizontal direction is also provided.
- Fastening units with three degrees of freedom - in addition to rotation and horizontal displacement, they also include displacement in the vertical direction.
Despite some possibility of movement, the rafters remain fixed quite rigidly. They must withstand the load placed on them.
For buildings of all types, a general scheme is followed: if one of the rafter nodes has a rigid fastening, then the paired one has a certain degree of freedom. This ensures displacement in the event of increased pressure.
The following types of node circuits are used:
- Rigidly fixed top and articulated bottom. It is used when installing roofs over extensions and on those objects where the difference in the height of the supporting walls is significant.
- The top and bottom are articulated and fixed. The scheme is used on isolated buildings whose walls have already undergone shrinkage.
The upper knot is made in the form of a triangular notch, the lower one - with a notch resting on the Mauerlat. - Free top and hinged-fixed bottom. The scheme is used for rafters with hanging edges and for extensions.
- Both nodes are movable. Used if fastening connections have a first or second degree of freedom.
- Rigid fastening to an inclined harness. Used in frame construction. Can be used for pitched roofs built over a concrete or brick building. It is considered the simplest and most accessible.
Main types of connecting nodes
The methods of attaching rafters to the surface of the Mauerlat differ in mobility in the range from 0 to 3. Absolute zero indicates a rigid variety, movable ones are designated by the third degree.
Hard
The Mauerlat is mounted when the load needs to be moved. The likelihood of deformation must be minimized so as not to change the load distribution on the supports. This result can only be achieved through a fixed connection. Some craftsmen create cuts at the junction, which increases strength and reduces the mobility of the nodes. The cuts are connected to the Mauerlat.
Movable sliding
Dynamic connections change the angle of fastening. This is necessary when the material swells and shrinks, which often happens with wood. This system has proven itself well in houses made of logs or natural timber. The tree necessarily shrinks, this leads to deformations. To avoid consequences, install a movable fixation. Before installing dynamic type units, care should be taken to create a reliable frame on the ridge beam. The nodes below are movable, so the maximum screed is organized at the ridge of the roof.
It is recommended to connect a rafter element, previously fixed in the ridge, to the crown of the log house.
The movable fastening system is implemented through the use of sliding type fasteners, better known as “sliders” or “slides”. This unit ensures free movement of the rafter legs, which reduces the deformation of the roofing system after shrinkage of the wooden structure. The slider protects the rafters from wind loads. Sliding fastenings are divided into the following types:
- Open. The system consists of two separate parts. There are 2 or 3 holes at the edges of the guide, the exact number depends on the manufacturer.
- Closed. Mounted as a monolithic structure in assembled form. A notch is pre-cut in the plate; its width should correspond to the width of the L-shaped area of the sliding fastening. Otherwise, the progress of the structure will be difficult, and friction will appear, which will cause bending and even damage to the rafters.
Fastening with several degrees of freedom is carried out by fixing with angles and brackets. The system is complemented by wire loops, steel mounting strips, metal strips or clamps. The devices do not limit the movement of the rafters, but protect them from being torn down.
Types of fasteners
When fastening the rafters of a pitched roof, three types of fasteners are used: fastening hardware, wooden connecting elements and metal elements. Let's take a closer look.
Fastening hardware
Fastening hardware involves driving or screwing into wood . When connecting rafters to a mauerlat or top trim, use:
- Rough nails 150-200 mm long. This method appeared a long time ago and is simple.
- U-shaped roofing brackets. The method is also reliable and simple.
- Self-tapping screws.
- Bolts. They secure through fasteners.
Wooden connecting elements
Wooden connecting elements are used for sliding fastenings. This method is used for houses made of timber.
The entire structure has the ability to “breathe” under the influence of weather conditions. The following elements apply:
- Gussets are triangular overlays that follow the shape of the angle of attachment of the ridge and rafters.
- Crossbars are wooden boards with edges cut to the angle of the rafters.
- Pins are a wooden fastening element that works in shear.
Metal parts
Metal fasteners made of galvanized steel are used in modern buildings. They are reliable, strong and durable.
Additionally, passivated connecting elements are used that are well protected from corrosion. The following types of fastenings are used:
- Metal corners for wood.
- Perforated metal plates (used to fasten rafters at the joint).
- Metal asymmetrical corner.
Reinforcing belt
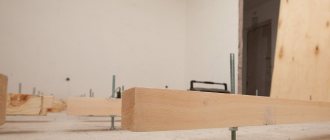
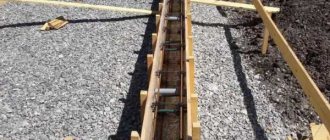
Scheme of fastening the Mauerlat to the armored belt.
This design requires additional labor and financial costs, but ensures maximum reliability and durability of the structure.
The most common method of making a reinforcing belt involves installing wooden formwork. A frame made of steel reinforcement with a diameter of 12-14 mm is mounted inside the formwork. The main rods are placed along the wall, and connecting elements made of rod or wire with a diameter of 6-8 mm are attached between them in the vertical and transverse direction. Vertical threaded studs are welded to the metal frame to install the Mauerlat. The stud installation step is 120-180 cm. After installing the reinforcing elements, concrete is poured. The mauerlat bars are attached to the studs using nuts.
When constructing a reinforcing belt, you can use standard U-shaped concrete blocks. Such elements are installed using cement mortar on the walls. A reinforcing frame is mounted inside the gutter using the described technology. After the frame is made, concrete is poured.
Nuances when building a shed
When building a barn roof, the rafter legs are attached to the load-bearing walls or to the mauerlat. To increase the length, so-called fillies are used - overhang bars.
Depending on the type of construction, three types of rafter legs are used. They transfer the load to the walls and foundation in different ways:
Sliding rafters are used to build a barn made of timber.
Their upper part is rigidly fixed. The lower one has a free fastening to a metal element (the so-called slip).Such a roof is not afraid of shrinkage of the building. It has the ability to fall without deforming.
- Layered rafters are placed on a brick or block structure that has internal partitions. This design is poorly adapted to loads.
- Hanging rafters do not have additional supports. They transfer all the load to the external walls. The roof truss is assembled on the ground and lifted up in finished form.
During the installation of the rafter legs, the gable and rear legs are first installed, and then, focusing on the stretched line, the rest are installed.
The distance between the rafters should not exceed a meter.
Then additional overhangs (fillies) and the last lathing are installed.
Types of rafter systems according to the level of load on the nodes
There are two types of rafters - layered and hanging. Main design features:
Hanging rafters are distinguished by the fact that their upper ends always rest against each other and there is no support under their junction. And in order to balance the load from the roof, the lower part of their rafters is connected with another element - a tie.
The result is a regular triangle, in which only the lower element works to stretch. Another beam in the roof, where the rafters also need to be attached, is called a beam. It is located horizontally and supports the ridge girder.
Features when building a canopy
A shed roof is erected over an extension to a house or a canopy, adjacent to the wall or roof of the main building. The lower ends are attached to the Mauerlat in the usual way. The peculiarity is in the installation of the upper part of the rafter legs.
- As a preliminary step, the required angle of inclination is determined.
- Then, taking into account the angle of difference, a wooden structure made of timber is installed.
- The fastening of the rafter frame to the wall of the main building must be movable, since due to different shrinkage rates cracks may occur
- An elastic layer of polyurethane foam or other soft material with low thermal conductivity is laid between the beam and the wall.
- If the roof of the canopy is adjacent to the roof of the main building, then the adjacent slope is dismantled and rafter legs are installed from the ridge of the main roof to the mauerlat of the extension.
To seal the junction of the rafter legs to the roof or wall, install a roofing apron (a strip with flaps that seals joints and seams).
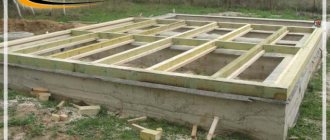
Why do you need a Mauerlat?
The Mauerlat is the foundation of the roof under construction, through which the weight of the roof is transferred to the walls of the house. Another purpose of this roofing element is to attach the roof structure to the walls of the house.
The lower part of the Mauerlat beams is waterproofed using roofing felt or any flexible building material that is impermeable to moisture. This is done to prevent rotting and destruction of wooden parts. Mauerlat is not always used in construction. For example, without a Mauerlat it is possible to build frame, log houses made of wood. In such wooden housing constructions, the functions of the mauerlat are performed by the timber at the very top or the top logs. The recommended dimensions of the Mauerlat bars are at least 10x10 cm. The optimal section is 15x15, 10x15 cm.
The wood is pre-treated with a special antiseptic that protects against rot and insects. The best option for installing a Mauerlat on the walls is to place solid beams along the entire perimeter of the roof. The beams are connected into one whole using a “direct lock” connection. The dimensions of this connection are determined by the dimensions of the beams.
The lock must be fastened with nails, which allows you to obtain elements connected into a rigid single system. The bars are located as close as possible to the inside of the masonry so that there is an equal distance to the outside of the wall along its entire length - no less than 5 centimeters. Often, a special protrusion is made at the outer edge of the wall - a brick parapet built on top; the mauerlat beam will then rest against it.
Important: you can attach the Mauerlat segmented - only directly under the legs of the rafters.
Calculation of rafter installation
When calculating the rafter system, emphasis is placed on the reliability and strength characteristics of the structure. It is necessary to choose the correct spacing between the beams. The parameter is calculated based on the distance between the reference points and the cross-section of the bars, as well as the design of the roof.
Calculation table
| Distance between rafters (cm) | Rafter length (cm) | ||||||
| 300 | 350 | 400 | 450 | 500 | 550 | 600 | |
| 60 | 4×15 | 4×17,5 | 5×15 | 5×15 | 5×17,5 | 5×20 | 5×20 |
| 90 | 5×15 | 5×17,5 | 5×20 | 7,5×17,5 | 7,5×17,5 | 7,5×20 | 7,5×20 |
| 110 | 7,5×12,5 | 7,5×15 | 7,5×17,5 | 7,5×17,5 | 7,5×20 | 7,5×20 | 10×20 |
| 140 | 7,5×15 | 7,5×17,5 | 7,5×20 | 7,5×20 | 7,5×20 | 10×20 | 10×20 |
| 175 | 10×15 | 7,5×20 | 7,5×20 | 10×20 | 10×20 | 10×25 | 10×25 |
| 215 | 10×15 | 10×17,5 | 10×20 | 10×20 | 10×25 | 10×25 | |