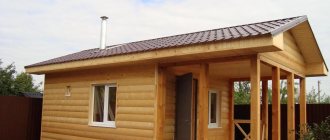
Wooden floors are considered the best finishing option. This is an environmentally friendly and warm material. But installing such floors on a concrete base is associated with certain difficulties. In order to perform this process technologically correctly, it is necessary to first fasten the logs to the concrete floor. It is not recommended to lay wooden floors directly on a concrete screed. The use of logs as additional elements will ensure floor ventilation and optimize heat transfer in the apartment. Accordingly, the floor covering will last much longer. Fastening the structure to a concrete floor is a simple process and does not require special knowledge and skills. We will introduce you to all the intricacies of performing these works.
Preparing the concrete base for laying the logs
Before you begin laying joists on a concrete floor, you must level the base. To do this, you need to make a screed on the floor from cement-sand mortar. We continue to work, only after the floor has completely risen, eat in about a month.
We lay waterproofing on the new concrete floor; to do this, take a film and make a span of about twenty centimeters. Where there are film joints, they must be taped with tape.
Also, before you start laying the logs, you need to lay sound insulation. It uses cork material or foamed polyethylene, the thickness of which should be no more than four millimeters. Sound insulation is installed to prevent impact noise.
Mounting methods
In order to attach the joists to the concrete floor, various types of fastening are used. The most commonly used method is to lay joists without attaching them to the concrete floor. In this case, rigidity is obtained due to the fact that the logs are attached to each other using boards or some other material. This method is certainly reliable, but there is a danger that the floor covering may move. For this reason, it is best to use the method of attaching the joists to the base of the floor using anchors or self-tapping screws.
Atypical situations
Sometimes in old houses, when trying to replace a wooden floor with a new modern design, you have to deal with atypical floor slabs. In these cases, you have to come up with non-standard ways of laying and fastening the lags. One such situation is described in detail in the following video. As you can see, in addition to standard methods of fixing load-bearing beams, you can come up with many more methods. In fact, it doesn’t matter how the logs are attached, the main thing is that they are correctly located in the horizontal plane and can withstand the vertical load.
Selection of lag
When you need to choose lags, you need to pay attention to a certain point:
- What kind of wood the joists are made of, as it determines the strength of the base.
- Cost of purchased logs. It would be better to use inexpensive coniferous wood, such as fir, pine or spruce. Third grade wood will also suit you; the main role is played by the humidity indicator, it should not be more than twenty percent.
- Sectional size of timber.
You need to choose the section size depending on what type of insulation you will use between the joists. Also, do not forget to take into account the height of the ceiling, because if they are small, the floor cannot be raised high.
Laying joists on a concrete base
Before you start laying the logs, the wood must be treated with a special antiseptic and then primed. This must be done before installation.
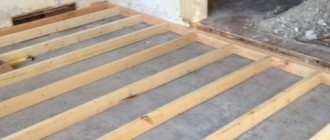
Once everything is prepared, we begin installing the logs. This is done in stages.
- It is necessary to distribute the logs throughout the entire subfloor. To do this, we place 2 logs along the opposite walls, and distribute all the remaining ones in a certain step. It all depends on how hard and dense the material is that will be laid on the joists. In accordance with the stiffer the material, the smaller the step will be. On average, this step ranges from forty to eighty centimeters.
- When the length of the room is greater than the length of the bar, then they need to be joined together. Using high logs, or if there will be a large load on the floor, then you need to make an end cut to connect the elements.
- Having laid out two logs along the wall, you need to set their height using a level.
- Stretch a cord between these joists along which you will lay all the others.
- Drill a hole into the joists and subfloor
- We insert a spacer piece of anchors or dowels into the hole in the concrete floor.
- Now you need to screw the bolt or self-tapping screw into the hole. One lag is secured with two or three anchors. If self-tapping screws are used, then fasten them every seventy centimeters.
- We put insulation between the joists.
- A vapor barrier must be laid on top of the insulation
- And the last step is the flooring.
Installation process
It’s worth clarifying right away that using floor joists is only advisable in apartments with high ceilings. This floor installation technology “steals” the height of the premises quite significantly. So, the installation of the logs occurs according to the following scheme:
- It is recommended to level the screed or concrete base. Otherwise, the elements will not be in the same horizontal plane. Accordingly, they will need to be leveled by placing plates. This can lead to the floors in the apartment creaking.
- You need to lay a layer of waterproofing on the base, or treat the concrete with a special mastic. In the first case, the use of soft materials should be avoided. Over time, they will sag, and the floor will no longer be reliable and solid. For a waterproofing layer, roofing felt or polyethylene film is perfect.
- The logs are treated with an antiseptic compound and cut according to the size of the room.
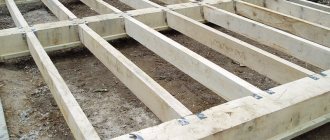
- The installation process begins with installing joists at two opposite walls. These elements are leveled using a building level and immediately fixed to the concrete floor. Then a string is stretched between the installed joists. It will serve as a guide for the installation of other elements.
- The remaining logs are laid. The distance between the elements directly depends on the thickness of the future floor covering.
- Insulation is poured between the joists. For this, ecowool or rolled materials can be used. In the second case, you need to mount the material as tightly as possible without leaving gaps between the layers.
- A layer of vapor barrier is laid down. This is a necessary condition for protecting the insulation from external influences. The vapor barrier can be attached using a stapler; the joints must be taped.
- You can lay a layer of plywood. This will serve as the basis for installing the flooring.
How to lay joists on a concrete floor
A floor laid on logs is a design that is more often used in private housing construction. But it can often be found in city apartments, when logs are laid on a concrete base of a floor covered with a screed, covered on top with a flooring made of boards or plywood. This design allows you to level any floor base; heat or sound insulation materials, as well as communication networks, are laid between the joists. And this is a big plus.
As for fastening methods, there are several technologies (old and new) that craftsmen use today. True, not all beginners know how to lay joists on a concrete floor, they do not know the nuances of the process itself, which often leads to a decrease in the quality of the final result.
Which tree to choose?
Types of materials
An important point in installing wooden floors is the choice of wood. For these works, the building materials market offers the following types of building materials for the consumer to choose from:
Six-meter boards can be used as covering material.
- Six meter boards. The thickness of the products ranges from 20 to 60 mm. Using grooves and tongues at the edges, the wood is joined.
- Two-meter parquet. These products are not only shorter in length, but also thinner. It is 18-25 mm. The joining principle is similar to the previous type.
- Engineering. They are products glued together from three layers of wood. Pine is used for the lower part, and the upper parts are made of valuable wood.
Criterias of choice
Wooden boards are used for both rough and finishing installation. If the wood flooring is planned to be covered with laminate or linoleum, then the quality of the material can be chosen even unplaned. If the wooden covering on the concrete base is the finishing one, then the boards chosen are tongue-and-groove with a planed surface. When choosing wood, the following criteria are adhered to:
To perform such work, the material must be carefully sanded.
- The wood must be dried, but not overdried, since excessive dryness leads to deformation of the boards under the influence of moisture and temperature changes.
- The material is purchased with a margin of 15%.
- The boards must be smooth, sanded and free from defects.
- Wood from different batches may differ in shade and texture, so experienced experts recommend buying boards of the same type.
- Regardless of the quality of the wood, the boards must be at least 2 m long.
- When installing flooring on a concrete base, raw materials made from softwood are most often chosen, as they are resistant to abrasion. Material made from oak and beech is more durable and expensive.
Methods for attaching lags
There are two main methods of fastening.
- By rigid fastening.
- By regulated.
The main difference between the two positions is that the first option is to install the logs in one horizontal plane and attach them to rigid fasteners once and for all. The second option is a floating structure, in which the logs are also rigidly fixed, but they can be adjusted in height if necessary. In this case, threaded adjustment is used.
Rigid mount lag
In this category today, three types of fasteners are used, one of which belongs to the old technology, two to the new one. The first has recently been used less and less, because new fasteners are made of metal, they are stronger and more reliable.
Installation of lags between wooden bosses
The bosses are fixed to the floor, and a joist is inserted between them. But now we need to align the laid beams in one horizontal plane.
- To do this, linings of different thicknesses are sawn from a sheet of plywood or from a lath.
- First, the logs laid along the edges are aligned horizontally.
- A thread is stretched between them anywhere and checked by level. If an air bubble inside the level has risen to one of the logs, it means that it is located above the second. According to the first one located above, it will be necessary to align all other elements. Instead of a thread, you can use a long rule if the distance between the extreme lags does not exceed 2 m. For this you can also use a long rail or metal profile.
- The laid first lag is firmly attached to the bosses with self-tapping screws.
- Now we need to raise the second outermost lag to the level of the first. Cut pieces of wood are placed under it in the places where the bosses are installed. Everything is checked with a level using a tensioned thread. At the same time, the location of the beam itself is checked; it must be horizontal.
- The joist is leveled; it must be secured to the bosses with self-tapping screws.
- Now 3-5 rows of threads are stretched between these two elements, which will define one horizontal plane. It will be necessary to place intermediate elements along them, securing them to the bosses.
Installation of logs to metal corners
Today, bosses are gradually disappearing into oblivion, because they have been replaced by more durable and reliable fasteners in the form of metal perforated corners. They are made of galvanized steel, which guarantees long-term operation. The thickness of the product is 2-2.5 mm, which provides increased fastener strength. Production technology – cold stamping.
The design of the corner has two elements that ensure reliability and ease of fastening. This is a stiffening rib and several holes of different diameters from 5 to 14 mm.
The process of installing joists on the floor in the corners is carried out in exactly the same way as using bosses. Only instead of the latter, metal fasteners are installed. The only thing I wanted to pay attention to was the fastening of the corners to the concrete floor. If a lag structure is constructed in this way in a city apartment, it is recommended to lay dense sound-proofing material under the metal fasteners. In principle, you can use pieces of old linoleum for this.
This is interesting: Laying linoleum on plywood 2022
Installation of logs with self-tapping screws, anchors or dowels
This is considered to be the easiest way to install and attach joists to a concrete base. Depending on the thickness of the timber used to construct the floor structure, the type of fastener is also selected. For example, bars with a cross section of 50x50 mm can be attached to the floor with self-tapping screws. With larger sizes, it is better to secure the logs with more powerful fasteners.
- You need to start by drilling holes in the joists themselves. The diameter is determined depending on the chosen fastener. The distance between them is 40-80 cm.
- The bars are laid at the installation site, and marks are made through the holes on the floor.
- The beams are moved, and according to the notes, holes are made in the floor.
- If self-tapping screws are used for fastening, then plastic dowels are inserted into the holes.
- First, the two outermost elements of the floor structure are installed and aligned in the same plane. Pads are placed under them near the fastening joints, and the horizontal position is checked with a level.
- Then the bars are simply attached to the floor with self-tapping screws, anchors or metal dowels.
- After that, 4-5 threads are stretched between these two lags, along which the remaining elements are aligned.
The length of the fasteners is selected depending on the thickness of the logs being laid and taking into account the gap between the bars and the concrete base. The most important thing is that the fasteners go into the concrete floor to a depth of at least 5-6 cm. This method of attaching joists to a concrete floor is not only reliable, the fasteners attract the joists to the base, creating additional rigidity of the entire floor structure.
Adjustable Mount
The idea to create adjustable fasteners for joists lay on the surface, because the threaded connection has been known for a long time. It is the rotation of the nuts along the threads of the stud that makes it possible to raise or lower the structural element. This simplified the process of aligning the bars relative to the floor surface. At the same time, installing wooden beams on such fasteners guaranteed their stability, rigidity and reliability. Therefore, today manufacturers offer a fairly wide selection of this type of fasteners that have flooded the modern market.
The simplest of them is a regular stud with M8-10 thread. Essentially, it is a round piece of metal with a thread cut along its entire (or partial) length. The product is coated with a galvanized layer, which increases their service life. The only thing you need to understand is how to properly install a stud in a concrete floor.
- You need to start by drilling holes in the joists themselves.
- The latter are laid at the place of their installation, and marks are made on the floor through the holes.
- The logs are moved to the side and holes are drilled in the concrete base to fit the diameter of the stud. The main requirement is the drilling depth, which should not be less than 6-8 cm.
- Special plastic dowels to fit the diameter of the stud are inserted into the holes.
- The fasteners are screwed into them. In this case, a wide washer and nut are put on top of the stud. With the help of the latter, the fasteners are pressed against the concrete floor. Here it is very important to align the pin vertically; a level is used for this.
- When all fasteners are installed, their protruding ends must be aligned in the same horizontal plane. To do this, strong threads are pulled between the four extreme ends to form a rectangle. All threads are aligned horizontally by unscrewing or screwing in the pins.
- The intermediate fasteners are then installed in the same way.
- Now the nuts are screwed onto the protruding threaded fasteners. Their location is determined by the thickness of the logs.
- Wide washers are placed on top.
- The bars are being installed on the studs.
- The washers are thrown on top and the nuts are screwed on and tightened until they stop.
There are many adjustable fasteners for joists in a purely structural design. For example, manufacturers offer a ready-made fastening structure consisting of a metal case, inside of which a pin is already firmly inserted. In this case, the body is attached to the floor with anchors, screws or dowels through 4-6 holes in the base of the device. At the upper end of the stud there may be a nut with a washer or a platform in the form of an angle with perforation.
Such fastenings are very reliable, especially for the lower part in the form of a wide base. It rests tightly on the floor, which increases the stability of the entire structure. In this regard, the hairpin loses. Therefore, you can save a little here by installing such fasteners less frequently along the joist installation line. The market today offers not only metal fastening structures, but also plastic ones. Fortunately, manufacturers provide guarantees on the strength of the product, because in the process of their production they use plastic with increased technical characteristics. The advantage of this option is the low price.
Pay attention to the photo below. It just shows such a plastic adjustable mount. It is not fixed to the concrete floor, which means it does not destroy its integrity, which in some situations is a necessary component of repair. Such stands for joists are called overhead. At the same time, the fastener allows you to adjust the height from 1.4 to 8 cm.
Self-tapping screws
Fastening with self-tapping screws is the most economical method. Self-tapping screws should be galvanized, with a diameter of at least 4.2 mm, and a length equal to the thickness of the logs plus 50-60 mm.
Through holes are drilled into the logs with a certain pitch, usually 500-600 mm, countersunk to hide the heads of the screws, the logs are laid out around the room, holes in the ceiling are drilled through the holes with a hammer drill to a depth of 60-80 mm, dowels are inserted into the holes and through the logs screws are tightened.
If necessary, spacers are placed under the beams for leveling. It is important to place the pads in the fastening areas.
Reviews
Alexey Belyaev, 52 years old, Kemerovo
My son and I decided to make a wooden floor in my one-room apartment. We bought studs as fasteners. It seemed not so simple, but we faced a big problem. The pins inside the drilled holes moved under slight loads. We decided to pour additional cement mortar inside and then insert the fasteners. The next day, some of the fasteners still did not inspire confidence. I had to abandon them and buy other more expensive ones, the design of which has metal platforms in the form of a base. But there were no more problems with them. So if someone decides to build a floor using joists, I recommend not saving.
Sergey Utkin, 39 years old, Moscow
At the dacha I decided to replace the old plank floor. When opening the flooring, it turned out that the joists were rotten. Therefore, without hesitation, I dismantled everything, backfilled it, laid a thick screed, and leveled the floor to the level of the foundation. But then I decided to install joists under the boards. I attached it to the corners, it turned out to be a convenient thing. The main thing here is to accurately position the fasteners on the floor, taking into account the thickness of the joists. Therefore, I first attached the corners on one side of the logs to the floor, then installed the beams themselves, and finally installed the fastenings on the other side.
Irina, 28 years old, Astrakhan
In our apartment, craftsmen installed a wooden floor on joists. Metal corners were used as fasteners. Now the neighbors downstairs say that when walking around our apartment, the audibility of footsteps has become strong. There was some kind of grinding noise. It turned out that the craftsmen did not lay a special material between the metal and concrete, which acts as sound insulation. Why open everything again now?
Installing a floor on the ground
Installing floors on joists is not as difficult as it might seem at first glance. They have a simple design; they can be made for an apartment, private house, or country cottage. Unlike concrete pouring, the weight of such a structure is less, but the floor is in no way inferior in strength.
To install logs, you need to follow fairly simple instructions:
Scheme of a wooden floor on joists on the ground
- First, the soil base is inspected, after which the soil is thoroughly compacted with a vibrator. If there is no such equipment, then the work can be done with a piece of large diameter log.
- A layer of crushed stone is then poured onto the ground; it should be approximately 5 cm. This layer will serve as the base.
- After this, it is necessary to construct the formwork for each support separately. A preliminary diagram of the location of supports is drawn up in accordance with the size of the room and the conditions of construction of the entire structure. If the formwork is ready, then pouring can be done.
- Next you need to build brick supports. In this case, a layer of waterproofing must be provided between the supports themselves and the base. This will reliably protect the structure from moisture. Another layer of waterproofing should be done over the brick support and a soundproofing gasket should be installed.
- Next, floor joists are installed. The boards are pre-cut into pieces of the required size, and then their surface is treated with an antiseptic and fire retardant. This will protect them from damage by insects, from mold, and make them more protected from fires.
- The logs are fixed to the supports with special dowels, which ensure reliability and stability. After this, you can lay a special cranial block, make a primary plank flooring, you can use ordinary boards for it. After rolling, you can lay out another layer of waterproofing material.
- A heat insulator must be installed between the joists. Various materials can be used in this capacity. Manufacturers offer a wide variety of insulation materials suitable specifically for floors on joists. In this case, you can take expanded clay, other bulk materials, foam boards, mineral wool boards.
- During insulation, it is necessary to ensure that no air layers or cavities remain, as this will negatively affect the condition of the thermal insulation and heat loss will be observed.
- After this, it is necessary to level the floor joists. The upper horizontal level is determined. All excess is cut off, and the horizontalness of the coating is checked with a building level.
- The finished floor is mounted from sheets of plywood or chipboard; any floor finishing materials can be laid on them. During installation, you will have to ensure that there is a temperature gap of 2 mm between the slabs, and 10 mm between the slabs and the wall. For strength, plywood can be laid in 2 layers, the total thickness of the sheathing is from 12 mm to 20 mm, it all depends on the requirements for the floor. It is necessary to leave a small ventilation gap between the sheathing and the insulation.
- After the floor covering is completed, it is necessary to once again check the horizontalness of the floor, and then sand the surface. To avoid damaging the sander, the heads of the screws should be sunk into the wood during fastening. The last step is laying the flooring. The process depends entirely on what material was chosen for the job.
How to install joists on a concrete base
Installing a floor on logs made of timber is a very practical and simple way to obtain a functional floor covering. In such a floor you can install any base for the floor, install heat and sound insulation, and hide any utilities such as electrical wiring or a heating system.
Conditions are also created for freer air circulation in the room. In addition, a perfectly leveled surface is obtained on which any final decorative coating can be placed without the risk of deformation.
There is nothing complicated in installing such a coating; installation can be done on your own without the involvement of specialists, and therefore additional costs. The price of carrying out work of this kind, taking into account the cost of all materials, will suit almost everyone. The result is a structure that does not overload the foundation of the house or the floors between floors, but can itself withstand significant loads.
This is interesting: Blow-drying for medium hair 2022
When considering this issue, doubt will inevitably arise whether it will be possible to securely fasten together such materials with different physical properties. In this material we will look at attaching joists to a concrete floor.
Installation on plywood base
Laying a wooden floor on a concrete screed can be done using moisture-resistant plywood, the thickness of which ranges from 12 to 18 mm. How it's done?
- Plywood is cut into squares 40x40 or 80x80 cm.
- Plywood sheets undergo rough sanding.
- The sheets are spread at intervals of 4 mm diagonally towards the future wooden floor. First, the plywood is fixed with glue, and then with dowels. It is necessary to retreat 10 mm from the wall. Laying plywood sheets is similar to laying bricks. The screw heads are recessed by 3-4 mm.
- The surface is cleaned of dust and dirt.
- The floorboards are attached with self-tapping screws to the plywood.
Laying wooden floors on a concrete screed is not difficult. If the installation technology is followed, such floors will last for many years and will provide warmth and a comfortable microclimate in the house.
Dear reader, leave your opinion on the article in the comments and share your secrets of installing wooden floors.
What is a floor on joists?
A floor on joists is a structure consisting of several functional elements:
Correct installation requires rigid fastening of all elements relative to each other to avoid displacement, deformation and constant creaking of the floors. True, opponents of this method argue that rigid fastening of the timber destroys sound insulation and contributes to the destruction of the screed.
As for the first doubt, it can easily be dispelled by studying how the lags are laid. Indeed, a rigid connection can create sound transmission bridges. But at the same time, a special shock-absorbing layer is placed under the base of each beam, which has sound absorption properties.
Another amount of noise is “eaten up” by the insulation laid in the cells. In addition, solid concrete conducts sound rather poorly, unlike wood, so it is unlikely that the noise level will change noticeably after repairs.
Ideas about the possibility of destruction are also unfounded, since a high-quality screed does not crumble when trying to secure the logs. If the screed begins to fall apart even before attempting to fix the joists, it means that it needs to be removed and the floor re-flooded, since such a base will not provide a high-quality flooring.
Another argument in favor of rigid fastening is the inability to independently check how well the materials are dried. Floating (not fastened with other elements of the system) installation will allow you to maintain the highest level of sound insulation. But insufficiently dried logs will eventually bend and distort the entire complex structure.
A floating floor gains strength literally under its own pressure. Insulation is installed in a lattice assembled from beams, and rough flooring is laid on top. But still, it is better to give preference to rigid fixation of logs made of timber.
Sequence of work
The first step is to assess the condition of the screed, if there is one, and prepare the base. If the screed is in normal condition, you can leave it, but if it is cracked or detached from the base, it is better to remove it.
The floor slab should be thoroughly swept or vacuumed with an industrial vacuum cleaner.
Some craftsmen level the base with a self-leveling floor mortar to make it easier to level the joists in the future. In this case, you must wait until the mortar mixture dries completely, otherwise the logs may begin to rot. The drying time is usually indicated on the packaging.
Next, the base is treated with a deep penetration primer, which will prevent the appearance of dust in the future. Waterproofing is performed to protect against moisture penetration into the insulation. For waterproofing, you can use thick polyethylene film, a special moisture-proof membrane or waterproofing mastic.
How to lay joists
First of all, it is necessary to select the highest quality materials. Coniferous trees are perfect for this task. It is necessary to ensure that its humidity is no more than 18%. After purchasing, you should give the beams a little rest, leaving them lying in the room where you plan to lay the floor. During this time, the wood will get used to the new conditions. After this, the material must be treated with antiseptics and liquids that impede the combustion process.
After making sure the wood is ready, you need to prepare the floor. It is cleared of debris and dust, all cracks are sealed, irregularities and protrusions are knocked down. Then you need to take care of waterproofing to protect the wood. Special mastic, rolled materials, and even regular thick film are suitable.
Substrates must be placed under the joists. You can make them yourself from thin pieces of wood, plywood or plastic, or you can buy ready-made materials at a hardware store. Make sure that these elements do not sag or become deformed, as this can cause gaps that are harmful to the wood.
When laying, you need to make sure that the logs stand perpendicular to the sunlight falling from the window. This installation will allow for uniform heating of each beam, which will reduce the likelihood of bending the material.
If fairly strong and thick sheets are chosen as the black coating, then the beams can be laid in fairly large increments. We must assume that the average width of the space between the joists is about half a meter, and the outer beams are placed at a distance of a couple of centimeters from the walls.
After assembly, the sheathing must be positioned horizontally. If desired, you can level the floor using a cement-sand screed, but the design of the joists allows them to be laid on the floor without additional leveling. Instead of a screed, it is enough to place pre-prepared substrates in the right places.
Each support at the bottom must be supplemented with a pad made of a piece of rigid material that is not subject to deformation (for example, linoleum). Soft materials will “sink” over time and lead to squeaks and noises.
Among the necessary tools:
- Hammer drill (or drill with a special mode);
- Fastening elements;
- Tools for preparing timber and other elements.
How to choose timber for lag?
It is necessary that the cross-section of the beam be rectangular, with an aspect ratio of ½ to 2/3
The correct selection of lumber that will be used to construct the deck for laying the finishing coating will guarantee the durability of the structure and its ability to withstand the proposed loads without deforming the surface. What should you pay attention to first?
Humidity. The timber, which is usually used as lag, must be dry. The moisture content of wood, regardless of the species used, at the time of installation work should not exceed 18%. This is a natural moisture indicator for lumber.
That is, the likelihood that moisture will occur or, on the contrary, further drying of the wood (both processes lead to deformation) with such a moisture content is minimal. Type of wood. Logs, unlike beams, have more support points, the number of which can always be increased. So the type of wood does not play a special role. Grade 2 or 3 lumber is quite suitable.
If there is a large knot or other defect in the timber that affects the strength, it is enough to install additional support in this place. Section. The main requirement is the shape of the end. It is necessary that the cross-section of the beam be rectangular, with an aspect ratio of ½ to 2/3. In this case, the lag will be placed correctly on the edge.
In this position, the block is maximally resistant to vertical load. The section size is selected so that its larger size allows for a sufficient layer of insulation to be laid, and the smaller one allows for easy laying and attaching (taking into account the possible joining of fragments) boards, plywood or OSB. The strength of the log can always be increased by installing additional supports. Type of wood. For the log, inexpensive coniferous timber is usually chosen - pine or even spruce will do.
It is advisable to place larch beams where high humidity is expected. Treatment. The timbers, dried to the required humidity, should be treated with protective impregnations. This will make the wood resistant to moisture, microorganisms and insects. If desired, you can treat it with fire retardants, which significantly reduces the flammability of wood.
Important! You should pay attention to the surface relief of the timber to which the board or slab material will be attached. If there are irregularities on it, they should be removed with a plane. This must be done before installing the logs.
Properly selected and processed lumber is half the battle. Now let's look at how to properly attach logs to a base, including concrete, in various situations.
How to secure the logs
Joists can be secured in several ways. Each owner chooses the method that is clearer to him or more affordable on his budget. Can choose:
Self-tapping screws are the easiest and cheapest way. It is enough to drill through holes in the beams and continue them into the bases. A dowel is inserted into the hole, into which a self-tapping screw is screwed, which should go a few more centimeters into the base.
Anchors are, in essence, practically the same self-tapping screws, only with a much larger margin of safety. They not only firmly attract the floor, but also have resistance to tearing out.
It is unlikely that the floor will ever be subjected to such loads, but the method nevertheless remains quite popular. Two or three anchors are enough for one room in an apartment. Their length ranges from 4.5 to 20 centimeters; it is better to choose those that go 5-6 centimeters into the base of the floor.
Metal corners are attached on one side to the joist, and on the other to the floor using self-tapping screws or anchors.
There is also a solution to the issue such as purchasing a regulated system. It will cost more than all of the options listed, but the height of the structure can be adjusted almost perfectly. The system includes special plastic bases and self-tapping screws, which are screwed in at the required level, and then the excess is cut off from above.
At the final stage, it is advisable to lay a vapor barrier layer on top of the timber. And on top of the resulting result, plywood or boards are laid. The result is an ideal, even surface on which any decorative flooring can be laid.
Keep in mind that in wooden houses you should not attach timber logs to the floor.
Installation of logs
The logs are cut to size, slightly smaller, 25-30 mm, than the length of the room, treated with a wood antiseptic, laid out on the floor, the outermost ones 20-30 mm from the walls, the rest - with the required pitch, set according to the level, attached to the ceiling of the selected way.
It is necessary to fasten them while maintaining strict horizontality, preventing even small fragments from sagging or protruding. It is best to use a laser level or plane builder for this.
If pads are used, it is best to select them in thickness so that one piece is enough and you don’t have to put several. It is recommended to fix the pads using liquid nails, silicone sealant or polyurethane foam.
How to attach joists to a concrete floor?
New technologies for laying floors have not been able to displace logs from construction, which are used as a base for wooden floors. The only drawback of logs is that after their installation the height of the room is significantly reduced, so it is more advisable to install logs in houses and apartments with high ceilings.
Scheme of laying support beams on a concrete base.
How the lags are attached to a concrete floor will be described below, but for now it’s worth talking about the advantages of such a flooring device over others. In the space underneath you can place electrical and other cables, as well as pipelines, for the installation of which you do not have to cut walls. In addition, floors on joists turn out to be much warmer not only because they are made of wood, but also because of the ability to lay insulation between the base beams. In addition, additional sound insulation of the room is provided. It is worth adding that a concrete base will be the most reliable support for lathing a wooden floor.
Materials and tools
The material for laying the subfloor is coniferous and deciduous wood. The most popular varieties are spruce and pine.
For the manufacture of logs, grade 2 wood is used, having a thickness of 50-60 mm and a residual moisture content of 12-18%. The moisture level of lumber is checked using a special device - a moisture meter. The construction timber must not contain falling knots, chips, holes or surfaces damaged by mold.
Fiberboard sheets or cork pads are used as underlying material.
You may also need:
- fastening parts;
- antiseptic;
- waterproofing material (polyethylene, water barrier, etc.);
- floor primer;
- sound and heat insulation products.
Fasteners
To attach the beams to the base, use:
- dowel nail;
- anchors;
- self-tapping screws;
- metal corners;
- brackets;
- stand bolts.
Dowel nail
consists of two elements: a nylon plug and a metal rod with a screw thread. The plastic dowel presses the part, and the bolt, when struck with a hammer, secures the connection.
Metal anchor
- This is a device designed for attaching a wooden beam to a concrete screed. It consists of a spacer mechanism with an internal thread and a bolt, when rotated, the petals of the device rest against the walls of the hole and secure the beam to the concrete base.
Self-tapping screw
- a metal screw with a sharp external thread. Can only be used in conjunction with nylon or wooden plugs. When screwing it into a plastic plug, it cuts the passage channel itself. This ensures the part is secured to the surface.
Tools for attaching joists.
Metal corners and brackets
made from steel or aluminum perforated profile. One side of them is attached to the floor, the other - to wooden joists.
Stand bolts
- these are studs with threaded couplings, by rotating which you can change the level of the future base.
The choice of fasteners depends on the following factors:
- Uneven floor in the apartment. Such work conditions require the use of adjustable fastening. The use of post bolts ensures that all laid logs will be in the same horizontal plane.
- Mechanical load level.
- Projected floor height.
- Humidity of the concrete base (presence of natural ventilation).
Tips for choosing lags
When choosing wood for the floor, the following material characteristics must be taken into account:
- wood type;
- humidity level;
- compliance of product quality with specified operating conditions;
- profile thickness and height.
For timber, you need to use unplaned boards of the second or third grade from deciduous and coniferous wood, except poplar and linden.
Defects in lumber that preclude their use in the construction of a wooden floor base:
- Pores with a diameter of 1-2 mm indicate a bark beetle infestation.
- Knots, chips, cracks or bark remains are a low-grade product.
- The surface is covered with spots of different colors - a sign of fungus and mold.
- Curvature is a sign of a violation of wood drying technology.
Joists on a concrete base.
The choice of joist width depends on the area of the room, the type of finishing coating and the expected load on the base. The larger the volume of the room, the wider the profile is needed.
The thickness of the logs, resting their entire plane on the floor slabs, should be 40 mm, width - 75-100 mm. The width of the timber laid on separate supports is 100-120 mm, thickness 40-50 mm.
The height of the logs is selected based on the size of the room and the presence in the project of recommendations for the installation of natural floor ventilation.
An ill-considered choice of profile sizes can reduce the height of the premises by 50-250 mm, taking into account the thickness of the final coating.
You can increase the load-bearing capacity of elements by increasing the number of support posts, which is much cheaper than buying a profile with a larger cross-section. When calculating the amount of lumber, you must also take into account that the installation of logs on a concrete base should be carried out at a distance of 20-30 cm from the enclosing structures.
The humidity of the purchased timber and gaskets should not be more than 18%. All joists and substrates must be treated with an antiseptic.
Tools
To install a wooden floor on joists, a set of specialized equipment and tools is required:
- Construction tape.
- Chalk or marker.
- Square.
- Hand or electric saw.
- Plane.
- Chisel.
- Hammer.
- Mallet.
- Electric drill for drilling holes for adjustable fasteners.
- Perforator for installation of anchors and dowels.
- Water and rack level.
- Screwdriver with bits of the required sizes.
- Scissors, including for metal.
- A knife with a durable blade.
- Swing brush or rollers for priming the floor.
Set of tools.
Preparing the base before laying joists
Most residential buildings have concrete floors. To lay the logs, they only need to be properly prepared. Of course, such work is quite labor-intensive, but for the long life of the wooden floor it is certainly worth the effort.
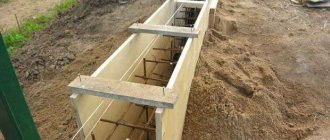
Pouring the foundation for joists in a country house
Scheme of pouring the base for the logs.
Those who build houses in suburban areas can be advised not to lay logs on the ground, but to install them on concrete, because even compacted soil does not have the same strength as a concrete floor. The easiest way to pour a concrete base is around the perimeter of the strip foundation.
This is interesting: Laying linoleum on a concrete floor with your own hands 2019
Concrete is poured onto a compacted and horizontally leveled bedding made of sand, crushed stone or AGS, the surface of which must be carefully smoothed to prevent breakthroughs of the waterproofing film laid on it. The ceiling must be reinforced. To do this, reinforcement or rods are placed on top of the waterproofing. There must be a gap between the reinforcing lattice and the bedding so that after pouring the concrete, the reinforcement will be thicker. After the concrete has completely hardened, which lasts about a month, a leveling screed is poured.
Apartment floor repair
Those who are going to lay joists in apartments where concrete floors were installed during the construction of houses should not “relax” either. More often than not, it turns out that foundation repairs are inevitable. True, in some cases it is possible to lay joists on a concrete floor without precisely leveling it (one of the sections will be devoted to this method), but it is imperative to bring the ceiling into proper shape.
The first priority in preparatory activities is to remove the old flooring. After this, the old screed is removed. Often it ends up in a dilapidated state. To remove it you will need:
Screed repair tools.
- perforator;
- scrap;
- construction hammer;
- shovel.
Using a hammer drill or crowbar, the old screed is removed down to the solid base. Noticeable protrusions also chip off it. After removing construction debris, cracks and depressions in the ceiling are sealed with mortar. After this, the base should be thoroughly dried. In the future, all operations both in apartments and in houses under construction are performed in the same way.
Preparing the base for leveling
An antiseptic composition and primer are applied to the dried base. After this, the overlap is treated with bitumen mastic in 2 layers. The mastic is also applied to the walls to a height equal to the thickness of the future screed. Please note that the smoother you make the screed, the easier it will be for you to install the logs, which all you have to do is lay them on an ideal horizontal surface. Therefore, create a plane before filling it. This operation is simple, but requires patience and precision in marking. To do this you need:
- painting cord;
- chalk;
- hydraulic level;
- dowel-nails;
- roulette;
- synthetic threads;
- gypsum;
- beacon profiles.
Scheme for placing beacons.
Make a chalk mark on one of the walls (near the corner). Apply it at any height. Using a level, place a point at the opposite end of the wall. Stretch a cord rubbed with chalk between the marks and, pulling it back, beat off a horizontal line on the wall. Make lines on the other walls in the same way. Using a tape measure, determine the point on the floor furthest from the chalk line. Place a mark opposite this point on the wall, move up 2-3 cm from it and place another mark. This will be the level of the future screed.
Measure the distance between it and the chalk line and place marks along it near the corners of the walls. Pulling the cord between them, beat off horizontal lines. Along them, drive 3-4 dowel nails into each wall. Pull the thread between the opposite surfaces.
The screed plane is ready. Now you can place beacons under it. They head from the far wall towards the entrance. The extreme profiles are located 15 cm from the walls. The distance between the beacons should be 20 cm less than the length of the rule. The profiles are attached to the base with gypsum cones, the pitch of which is 30 cm. After the gypsum has hardened, the solution is poured and leveled with the rule.
How to prepare the bars?
While the screed is drying, start preparing the lag. It is best to use coniferous wood for them. When purchasing, choose the straightest beams. When calculating their number, you need to take into account:
- the distance between the walls of the room (it is better to avoid laying composite logs);
- the thickness of the floor covering, on which the distance between the beams depends.
The table shows the dependence of the floor joist pitch on its thickness.
| Board thickness (cm) | Support beam pitch (cm) |
| 2 | 30 |
| 2,5 | 40 |
| 3 | 50 |
| 3,5 | 60 |
| 4 | 70 |
| 4,5 | 80 |
| 5 | 100 |
The following table provides data on the relationship between the distance between the joists and the thickness of the plywood or OSB floor.
| Sheet thickness (cm) | Support beam pitch (cm) |
| 1,5 | 40 |
| 1,8 | 45 |
| 2 | 50 |
| 2,2 | 60 |
It should be noted that plywood and OSB are superior in strength to solid wood materials.
After purchasing floor joists, they must be thoroughly dried.
Drying of the beams is carried out in a room protected from direct sunlight.
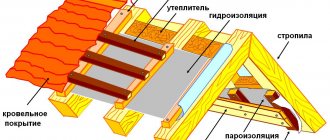
Figure 1. Diagram of an adjustable stand with sound insulation.
The screed froze and the joists dried out. You can start installing them. In front of it, waterproofing made of polyethylene or bitumen is laid on the floor. The beams are treated with antiseptics and fire retardants. After this, their installation begins.
Laying support beams
There is a way in which the beams are attached to each other, but are not attached to the base. A flat horizontal plane is ideal for this technology. First, the beams are laid out around the perimeter of the room, but not close to the walls, but at a distance of 2-3 cm from them. They are tightened with self-tapping screws into a box. After this, the remaining sheathing beams are laid. They are directed along the short walls of the room. Self-tapping screws are also used to tighten the sheathing. The correct installation of the joists, even on a level base, must be checked with a building level.
There is another method for installing lags. It eliminates the possibility of the support sheathing moving during operation of the floor. The beams are attached to the base with self-tapping screws screwed into dowels or anchors. Fasteners made from anchor bolts (screws) with a cross-section of 10 mm seem to be more reliable.
Its pitch can be 1 m. Fastening with self-tapping screws with a diameter of 6 mm is carried out every 0.5 m. Anchors can be screwed into concrete through holes drilled in the beams. The depth of their immersion in the screed should be 5-7 cm. The depth of screwing in the screws should not be less than 5 cm. When attaching the logs with self-tapping screws, metal corners are used. It is necessary to add that between the beams and the screed you need to put gaskets of the same thickness from pieces of roofing felt or linoleum (they need to be placed in the places where the beams are attached).
Using Anchors
To obtain reliable and long-term fastening, you can use anchors for floor joists. In addition to holding the beam in one place, they also attract it to the surface, giving the entire system additional rigidity.
In essence, the anchor is a dowel, but much stronger. Its advantage is its high pull-out resistance, so it is used when installing very heavy structures that create a large load on the fasteners. The probability of the floor on the joists completely tearing away from the concrete base is approaching zero, so fastening can also be done with self-tapping screws. However, anchors are quite often used for these purposes.
So, how to secure joists to a concrete floor using anchors? This method is carried out similarly to fastening with self-tapping screws. Identical holes are made in the beams and concrete floor. To prevent the bolt head from sticking out, it must be hidden without damaging the wood; for this, the logs should be countersunk beforehand.
Typically, 3-4 anchors are required to secure one joist within a room. The locking element of the anchor should be inserted into the hole in the floor, then a bolt should be screwed into it through the beam.
Anchor bolts are produced in various lengths: 45-200 mm. When choosing the length, you should take into account the thickness of the log plus 6 cm for penetration into the base. It is recommended to purchase anchors with a diameter of 10 mm.
To obtain reliable and long-term fastening, you can use anchors for floor joists. In addition to holding the beam in one place, they also attract it to the surface, giving the entire system additional rigidity.
In essence, the anchor is a dowel, but much stronger. Its advantage is its high pull-out resistance, so it is used when installing very heavy structures that create a large load on the fasteners. The probability of the floor on the joists completely tearing away from the concrete base is approaching zero, so fastening can also be done with self-tapping screws. However, anchors are quite often used for these purposes.
So, how to secure joists to a concrete floor using anchors? This method is carried out similarly to fastening with self-tapping screws. Identical holes are made in the beams and concrete floor. To prevent the bolt head from sticking out, it must be hidden without damaging the wood; for this, the logs should be countersunk beforehand.
Typically, 3-4 anchors are required to secure one joist within a room. The locking element of the anchor should be inserted into the hole in the floor, then a bolt should be screwed into it through the beam.