Despite the wide range of electric and gas boilers on the modern market, solid fuel stoves are in no hurry to lose their positions. Thanks to their autonomy of use and affordable price, they are the optimal choice for country houses, cottages and bathhouses.
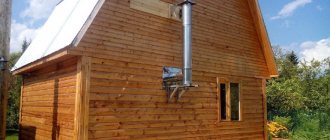
For proper and safe operation of the stove, it is necessary to correctly design and install the chimney. But often, at the stage of building a house, people miss the need to install a chimney simultaneously with the construction of walls. This problem has many solutions: output through ceilings, roofing. The best option would be to install a chimney through the wall, which will not only help to significantly save interior space, but also reduce the number of units and passages through the ceilings.
We will tell you in this article how to carry out installation correctly and what materials are best to use.
Installation of a chimney from sandwich pipes through a wall
Design Features
Despite the huge selection of materials for the construction of chimneys, the most widely used today are double-circuit steel pipes, popularly called “sandwich”.
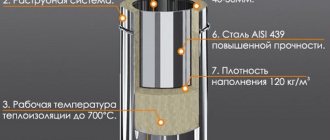
The sandwich type chimney is a two-layer structure. Between two metal pipes of different diameters there is a layer of heat-insulating material, which simultaneously serves as insulation and insulation.
Video: Chimney made from sandwich pipes
Compared to single-circuit pipes, which are made from steel 0.5 mm thick, the double-circuit design is characterized by increased fire safety and better technical characteristics. To install a chimney outside the building, single-circuit pipes are not recommended. After all, due to only one layer, they are simply not able to retain heat in the cold season. Due to a sharp temperature difference, condensation forms in such a chimney, reducing draft and creating blockages in the pipe.
Construction of a double-circuit sandwich pipe
Therefore, to install a chimney through a wall, the best option would be to purchase sandwich pipes. The popularity of such a double-circuit chimney is due to its low price compared to a brick chimney, attractive appearance, excellent technical characteristics, fire safety and long-term operation.
In addition, you can do the installation of a chimney made of this material yourself. And although there are some nuances and subtleties here, even a beginner can cope with the task if you strictly follow our detailed instructions.
Instructions for laying bricks
Perhaps the most traditional chimney option. This option is used as an external casing, but we recommend that such pipes be lined with a stainless steel pipe.
Features of a brick pipe: main disadvantages
This is the difficulty of assembling such a heavy structure if you do the assembly yourself. High cost – this is one of the most expensive options. And:
Selection of material and preparation of solution
There are currently several types of bricks on the market. Red is the most average option. Burnt, as it is commonly called, is suitable as a material for a chimney, but it cannot be said that it is the best choice. It is better to choose a dark sample, which is also called burnt. It is the most fireproof and durable, designed for just such tasks.
But the pink color of the brick indicates that no strong heat treatment was used during its production.
A mixture of clay and river sand is suitable for the solution. You can add cement. It is important to choose a pure mixture, without impurities and small debris. When choosing clay, focus on the one that was mined at a significant depth of more than two meters.
The proportions are two to one, more sand accordingly. And remember that before work the mixture is soaked for two days. Only in this case will the correct consistency be achieved.
The order of laying the main parts
The first step is to lay out the nozzle pipe. This is a small element located immediately above the heating or furnace system. The height is small, 5-6 bricks will be enough. A regular rectangular shape is used.
Next, the fluff, the thickened part, is installed. It is laid out in gradual increments of diameter in half-brick increments. Its usual dimensions are 600 by 450 mm. And immediately behind it the main pipe begins, right up to the neck; a cap or umbrella is installed at the finish.
Advantages and disadvantages of sandwich pipes
- The thermal insulation layer prevents the outer pipe from heating to a critical temperature.
- Compact and versatile in use.
- The smooth surface of the inner casing increases the chimney draft.
- Low price compared to ceramic material.
- Operating temperature up to 850 degrees (for single-circuit pipes, for comparison, 5000).
- Easy to assemble.
- The fire safety of the home increases.
- Easy maintenance compared to a solid pipe chimney (less soot accumulation).
- Does not create additional noise when drafting smoke.
The only drawback of the multilayer structure is the decrease in sealing after a long time. Due to sudden temperature changes, air can enter at the junction of sections.
Arrangement rules
Carbon monoxide is almost impossible to detect; it has no taste or smell, and is invisible visually. Moreover, it is heavier than air, so it settles and remains in the room. In this regard, it is necessary to follow the basic rules when installing the heat generator and chimney:
There are standards put forward during installation work depending on the type of fuel used. These are SNiP 41-01-2003, NPB 252-98 and VDPO. Ignoring them can cause many violations that affect the quality of the heat generator. Incorrect selection of the device can lead to overheating of the floors, insufficient draft leads to soot settling, and a leaky assembly leads to smoke in the room.
Technical characteristics of sandwich pipes
- Material. Basalt fiber (mineral wool) is mainly used as a thermal insulation material. This type of insulation is resistant to high temperatures and chemicals. Mineral wool has excellent thermal insulation/sound insulation properties and is laid with a thickness of 30-60 mm. Due to their fireproof properties, multilayer pipes can be used in houses built from any material. More expensive alloys with a high degree of heat resistance are used for the inner casing.
The inner layer of the sandwich pipe is mainly made of galvanized steel, and the outer layer can be made of copper, brass, stainless steel, etc. The scope of the pipe and the price depend on the content of alloying materials, various alloys and the thickness of the heat-insulating layer.
Sandwich pipes galvanized and stainless steel
- Connection type. Sandwich pipe elements are connected in two ways: corrugated edges and sockets. The advantage of a corrugated connection is ease of installation, but to ensure tightness, a large amount of sealant is required, and this increases the cost of the chimney. With a socket connection, a high degree of tightness is achieved due to the presence of a wider chamfer on one side of the pipe. The advantage is a high degree of tightness, due to which the design can be used for gas boilers. But the downside is the complexity of installation and the need for very precise adjustment of all parts.
Types of sandwich pipe connections
How to assemble a sandwich: using smoke or condensation
An important point is the choice of method for assembling the chimney. The question is especially relevant when it comes to the installation of industrial chimneys.
So, there are two basic types - condensate or smoke assembly. We definitely recommend condensate assembly: each subsequent pipe is inserted inside the previous one. Do not forget that the installation of the chimney goes from the bottom up to the heat generator.
When collecting by condensate, moisture flows down the inner wall and does not settle on the pipe, accumulating soot and corroding the walls. Another important point when assembling by condensation is that moisture does not enter the thermal insulation layer of the sandwich chimney, thereby not destroying it. This increases the service life of stainless steel pipes.
| Type of furnace or boiler | Average combustion temperature in ℃ | Sandwich pipe thickness in mm |
| Gas | 60 | 25 |
| Gas condensing | 110-180 | 25 |
| Diesel | 150-250 | 25 |
| Gas piston | 450-600 | 50 |
| Solid fuel | 400-700 | 50-100 |
| Wood burning | 300-600 | 50-100 |
Chimney installation rules
- In no case should the chimney be laid in the place where communications pass (electrical wiring, sewerage, etc.).
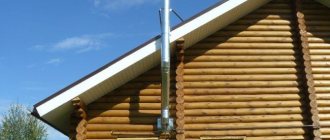
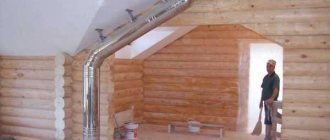
- To minimize heat loss, it is recommended to locate most of the structure indoors.
- The outer part of the chimney must end with a deflector to prevent precipitation from getting inside. Don't forget about the snow guard. They will protect the gas outlet channel from damage.
- Keep the step of fastening the structure to the wall no more than one meter to avoid further curvature of the chimney.
- The place where the pipe passes through the wall must be additionally protected with thermal insulation material. To do this, the diameter of the hole needs to be made slightly larger than the diameter of the pipe.
- The sandwich pipe cannot be installed as the first pipe above the combustion tank. It is preceded by the so-called “sandwich start”.
- The length of horizontal straight sections of the chimney should not exceed 1 m.
- When designing a chimney, make sure that when passing through the wall there is a single pipe without joints. All connections must be visible and directly accessible.
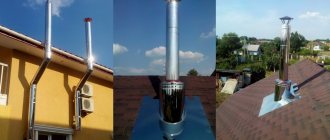
Selecting the type of chimney outlet
A chimney through a wall can be done in two ways. The first option involves raising the pipe closer to the ceiling and then exiting. The second option represents a design that goes directly from the boiler in a straight line.
With the second option, almost the entire chimney ends up outside the house. The advantage of this type of design is that only one elbow will need to be used, which will affect the efficiency of traction. And the likelihood of soot plugs forming is much less.
Chimney outlet options
Before performing installation work, it is necessary to draw an assembly plan, calculating the diameter of the chimney and its height. There are some factors to consider.
Warm air rises, which means the higher the chimney, the greater the draft. It also depends on the diameter, so it is very important to correctly determine what size chimney you need. Its size is also affected by the power of the heating device.
You can get acquainted with the variety of chimneys and choose the appropriate option for your home at Isolux.ru
Calculate the diameter of the structure
The diameter of the double-circuit pipe directly depends on the size of the boiler installation pipe. Therefore, it is difficult to draw an installation diagram without knowing what type of heating device will be used. A simple rule applies here: the inner casing of the sandwich should in no case be smaller than the pipe itself. You can take more.
For example, if the diameter of the outlet pipe is 120 mm, then the internal diameter of the sandwich pipe should be the same size or larger. In no case should you allow “narrowing” at the junction of the pipes and throughout the entire chimney, otherwise this may affect the draft.
Determining the chimney diameter
The diameter of the chimney is also affected by the type of heating device. Therefore, if you are building a smoke exhaust structure before purchasing a stove or boiler, then immediately take into account its power.
If the power of the heating device does not exceed 3.5 kW, then you can limit the diameter of the internal casing to 80 mm. For more powerful boilers (up to 5.2 kW), the pipe size should be increased to 95 mm. The larger the diameter of the inner pipe, the faster it will cool.
Determining the height of the chimney
Calculating the height of the chimney pipe depends on the overall height of the house. If the height of the house is small (up to 5 meters), the height of the chimney in any case should be at least 5 meters. A short chimney can cause “smoke” in the house, and the power of the device is significantly reduced due to poor draft. And an excessively long pipe will increase fuel consumption, as if “forcing” the operation of the heating device, which affects the low efficiency of the heating system.
Calculation of chimney height based on boiler power
The optimal pipe length is considered to be in the range of 5-10 meters.
If the house is higher than 10 meters, then we focus on the ridge of the roof. The chimney should be 0.5 meters higher than the ridge to avoid creating turbulence. Consider also the material from which the roof is made. If the roof is covered with flammable material, then the top of the chimney should be 1 meter from the ridge.
How will we assemble the sandwich: by smoke or condensation?
Before starting construction work, you should decide on the type of assembly of the pipes themselves: “smoke” or “condensate”.
Sandwich pipe assembly options
The “smoke” design is characterized by building sections inward (visible clearly in the figure):
Inner tube: The bottom element is inserted inside the top element of the sandwich.
The outer pipe is built in the same way as the inner one. The lower section is inserted inside the upper contour.
Each subsequent section is built upon the previous element, as if being put on top. This type of chimney connection is best used in stoves with high combustion temperatures.
The “condensate” design is built using the opposite method:
Inner tube: take the upper section of the sandwich and insert it into the lower part.
Outer pipe: Here you have to do the opposite method. Take the lower element of the outer pipe and insert it inside the outer pipe of the upper element.
With this construction, condensate flows freely along the outer casing of the chimney into a special sump.
When is it better to use this assembly scheme?
- at low temperatures of combustion products;
- for external installation of a chimney;
- in stoves with a long burning function;
- in fireboxes with smoldering combustion.
Differences between smoke and condensate connections
Considering our task - to assemble a chimney outside the house, the choice of the type of sandwich connection is obvious. Pipes outside the house, when exposed to low temperatures, will cool faster, which means that the likelihood of condensation forming is high. Under the influence of moisture, soot begins to dissolve, forming acids. These substances pose a serious threat to pipe surfaces.
What tools are needed for installation through a brick or concrete wall?
- screwdriver;
- construction gloves to protect hands;
- ladder;
- knife;
- electric drill (for attaching the bracket);
- building level (to check the verticality of the chimney installation);
- perforator (for a hole in the wall).
What materials are needed for installation?
- metal box (pipe);
- dowels;
- sandwich pipe set;
- silicone sealant (necessarily heat-resistant!);
- tee (necessary to change the direction of the smoke and connect the pipe directly to the firebox of the heating apparatus).
- knee (450 or 900);
- support console, bracket (the entire structure is supported on it);
- clamps for connecting sections;
- foiled mineral wool (for insulating the pipe opening);
- plug (protective umbrella from precipitation and debris).
Criterias of choice
When choosing a bracket, consider the following factors:
- chimney diameter;
- maximum and average distance from the wall;
- wall material and pipe material.
If the distance from the wall is short, plate wall mounts are chosen; as the clearance increases, you will have to switch to cantilever structures.
A small diameter pipe can be secured with a clamp on a stud; for heavy sandwich structures, a more reliable fastening will be required.
Video instructions for installing a chimney through a wall
Now let's take a closer look at each step of the instructions:
| Place for chimney | We determine the place where the heating device will be located, and therefore the chimney will be laid. Consider the overall structure of the house, the exterior and the installed communications. Ideally, the outer part of the chimney should be on the gable side. If this is not possible, then you will need to install it from the side of the slope, taking care of the safety and stability of the structure. |
| Preparing the chimney outlet | We prepare the place where the heating device will be installed. The stove itself (fireplace, boiler) is installed on a non-combustible base. Make sure that the plane is perfectly level. To do this, check it with a building level. |
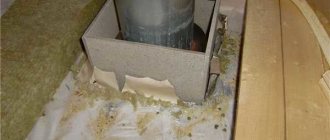
| Marking the wall for the chimney | We use a marker on the wall to mark the future opening for the chimney passage. To do this, measure the height of the stove and the smoke exhaust pipe. Consider not only the diameter of the pipe, but also the fire safety standards of the thermal insulation layer that will need to be laid between the pipe and the wall. It doesn't matter what shape you make the hole: square or round. This does not affect fire safety in any way if all standards are met. Consider the size of the box. Double-check the size of the box and the markings on the wall. If everything matches, then proceed to cutting the hole. |
| Insulating the pipe and bringing it out through the wall | We make a hole through the wall using a hammer drill. We make insulation from non-combustible materials. For brick or concrete walls, mounting foam is suitable, but asbestos sheets can also be used. |
| Diagram of a pipe passing through a wall | We insert a box made of non-combustible material into the resulting opening. According to industrial safety standards, the thickness of the pipe must exceed the thickness of the ceilings by 7 cm. |
| Installation of the horizontal part of the chimney | We install the horizontal part of the chimney. To do this, we connect a single chimney (starting sandwich) to the branch pipe using the “by smoke” method, that is, insert the starting sandwich inside the branch pipe. Be careful to ensure that the connection is made at a strictly 90 degree angle. |
| Bringing the pipe out and fixing it | We fix the sandwich strictly in the center of the box, and fill the distance between the walls of the pipe and the opening with heat-resistant insulation (you can use foiled mineral wool). From the outside of the wall (from the street), we close the opening with a box plate. |
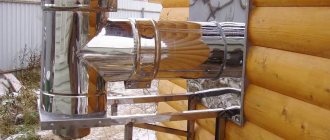
| Tee installation | We bring the pipe through the wall to the street and connect the tee. The lower part of the tee is allocated for condensate collection. The element may end with a removable glass, which will have to be removed and cleaned periodically during operation of the chimney. It’s better to purchase a model with a fitting and a small tap. Maintaining such a chimney will be much easier. It is enough to connect the hose to the fitting and unscrew the rotary tap, thus draining all the condensate. But keep in mind that the substances that accumulate at the bottom of the tee are very toxic. Therefore, do not drain them through the hose directly to the house, but take them to the side at a safe distance. Also make sure that there is not a single joint in the path of the sandwich through the wall. If the length of the pipe is not enough to lay it through the hole in one piece, then cut the previous element with a hacksaw and make a joint to the entrance. |
| Support bracket for chimney | We mount the support bracket using dowels from the external wall of the house. It will bear the main structure, so take care of its reliability and stability. The bracket can be built independently, using stainless steel pipes that are welded at an angle of 90 degrees, with additional support. |
| Sandwich pipe connection | We assemble the chimney from individual sections of the sandwich using the previously chosen method (“by smoke” or “by condensate”). You can easily figure out how to do this, since one part of a double-circuit pipe is always of a smaller diameter. We “strengthen” the joints of the connected sections with metal clamps. Simply wrap the clamp around the pipe, pull it tightly along the diameter of the sandwich and tighten with bolts or nuts. Treat the joint area additionally with sealant. The fastening step should be approximately at least 1 meter, but more frequent fixing is allowed to avoid curvature of the chimney. Whatever assembly element you choose, it is best to install elbows and tees “on condensate”. All joints are treated well with sealant. |
| Sandwich panel pipe secured with brackets | We fix the structure along the length of the entire chimney with additional ties and brackets. Make sure that the clamp does not come into contact with the pipes. The solid part of the double-circuit pipe is fixed. If the height of the pipe above the roof exceeds 2 meters, then it is necessary to secure it with a metal cable or an additional bracket under the roof. |
| Deflector | We put a deflector or protective umbrella on the top of the pipe, which prevents debris and precipitation from getting inside. The choice of deflector or protective umbrella determines the type of heating device. According to building codes, the installation of a deflector on the chimney of a gas boiler is not carried out. For such a device it is better to install a weather vane. It will prevent the gas boiler from blowing out, creating turbulence and improve draft. |
Instructions for installing a chimney through a wooden wall
In general, the installation process through wooden walls is similar to installing a chimney through a concrete or brick wall, however, some nuances related to fire safety should be taken into account. The maximum temperature at which wood begins to char is 2000. At 3000 it begins to burn.
Unlike the previous installation, here it is necessary to pay great attention to the insulation of chimney ducts through the ceilings, so as not to burn the house and not to smoke the interior. Moreover, this applies to the entire length of the chimney, starting from the heating boiler and ending with the roof of the house.
We will need the following tools for work:
- screwdriver;
- sharp knife;
- electric drill (for attaching the bracket);
- jigsaw;
- drill;
- building level (to check the verticality of the chimney installation).
Prepare the following materials:
- metal box for passage through a wooden wall;
- dowels;
- sandwich pipe;
- sealant;
- tee;
- elbow (450 or 900) depending on the design of the chimney;
- bracket;
- clamps for connecting sections;
- asbestos sheet;
- foiled mineral wool (for insulating the pipe opening);
- protective cap, spark-extinguishing mesh.
| Wall marking | We determine the location of the pipe outlet (along a horizontal line from the stove or under the ceiling). Draw out the required hole diameter with a pencil or marker. When calculating the overall design, do not get carried away with too many bends and transitions, as this may affect the further efficiency of the heating system. Two or three transitions with a change in direction will be enough, and even then try to use a guide angle of 450. Also take into account the distance of the chimney duct from the wall. According to fire safety requirements, it must be at least 50 cm for wooden walls. |
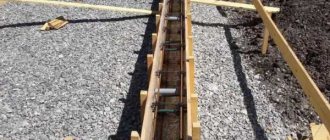
| Preparing the stage for the boiler | We prepare the place where the heating device will stand (fireplace, stove, boiler). Taking into account wooden floors, you need to make a podium of cement screed above the floor to a height of 20 cm or (if this is not possible) lay a heat-resistant coating of galvanized steel - asbestos cardboard. |
| Boiler with protective screen | If there are wooden walls at a distance of less than 50 cm, then it is necessary to build a protective screen made of brick to the height of the boiler. When installing a solid fuel stove (stove), it is advisable to separate the brickwork from the wooden wall with additional thermal insulation (asbestos-cement sheet). Make sure that the plane is perfectly level. Always check with a building level. |
| Pipe with protective box | We make a hole in the wall (consider not only the diameter of the pipe, but also the place where the heat-insulating layer is laid between the pipe and the wall). We install a protective metal box. We carefully insulate the distance between the inserted box and the wall with basalt fiber. Additionally, to increase fire safety, we wrap the passing pipe with asbestos sheet. |
| Exiting the chimney pipe through the wall | We remove the pipe from the boiler strictly at an angle of 900. This is a very important point and any deviations are not allowed here, as this will subsequently affect the efficiency of the heating device. We make sure that there is no pipe joint in the section of the transition through the wall. If you see that the length of the pipe is not enough, you need to trim the previous pipe and build a solid sandwich element onto it. |
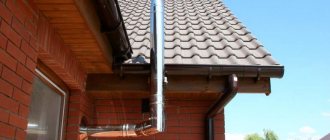
| Installation of an external screen | We carefully insulate the pipe passage through the wall with heat-insulating material, and screw a metal plate onto the outside of the house with self-tapping screws, protecting the wooden surface from overheating. |
| Chimney tee with support | We install a tee on the pipe, which will serve as a smoke direction vector. The lower part of the tee is designed to collect condensate. We make sure that it is clearly positioned perpendicular to the chimney outlet pipe through the wall. All seams are carefully treated with sealant. We attach a stable support to the wall of the house or to the ground, depending on the overall design of the chimney duct. |
| Sandwich pipe connection | We begin the vertical expansion of the gas exhaust channel from the bottom up according to the previously selected type (“through smoke” or “through condensate”). |
| Installation of the chimney on brackets | Every 100 cm (60 cm is possible) we fix the chimney to the wall with metal brackets. We ensure the strict verticality of the structure. To do this, use a level, checking that there is no deviation. It is also very important to make fastenings opposite the solid part of the chimney duct, and not at its junction. We fix the upper part of the pipe with a metal clamp and be sure to install a snow retainer on the roof so that the structure is not damaged by precipitation. |
| Protective cap | We install the cap on the sandwich cut using bolts or self-cuts. To improve traction, use a deflector. When installing a chimney in a wooden house, you can play it safe and attach a spark-extinguishing mesh to the deflector. It will protect the roof from sparks. This metal mesh will also reliably protect the chimney from leaves, birds, and debris getting inside. |
As you can see, installing a chimney through a wall does not require high qualifications or more experience. The main thing is to correctly calculate the height and diameter of the chimney and purchase high-quality material.
If you pay attention to all the points and strictly follow the instructions, you will definitely cope with this task. And the video will help you visually study the process of installing a chimney.
Elements of modular systems
To draw up an installation diagram, purchase components and subsequent assembly, you need to understand what parts are used in a double-circuit chimney. We list the main elements, accompanied by photographs:
- straight sections of sandwich pipes 25, 50, 100 cm long;
- tees at 45, 90°;
- elbows 90, 45, 30 and 15 degrees;
- transitions from a single-wall pipe to a double-wall pipe - “start sandwich”;
- rotary gates (flaps);
- condensate collectors and various heads;
- ceiling passage units (abbreviated PPU);
- support platforms, brackets;
- fastenings – crimp clamps for guy wires;
- pitched roof sealing elements called master flash or “kryza”;
- end caps, skirts.
Note. Here is a partial list of chimney parts. There are direct channels with inspection and condensate drainage, floor stands, inspection hatches, and crosspieces.
Double-layer pipes are connected to other fragments using the socket-profile joining method. In a more accessible language, the connection is called “tenon-groove” or “male-male”, as you like. When manufacturing each shaped part (except for the end parts), a tenon is provided on one side and a groove on the other.
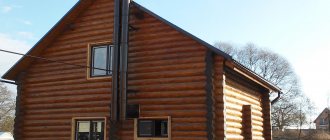
Scheme of installing a chimney along the outer wall of a country house
As an example, we suggest considering the assembly diagram of a wall-mounted sandwich chimney starting from the boiler:
- We connect a single-wall pipe to the output of the heat generator through a coupling, then mount the starting adapter onto the sandwich.
- We connect to the transition a straight section of a double-circuit pipe facing the street. There it is inserted into the tee.
- Below the tee we place an inspection section, then a support platform and a condensate collector. The structure is placed on a wall bracket.
- We rise from the tee in straight sections, fasten it to the wall every 2 meters with sliding brackets, and compress the joints of the elements with clamps.
- At the end of the chimney we install a cone without an umbrella (for a gas boiler), a simple cap or a deflector.
Comment. If a horizontal chimney duct crosses a wooden wall, you need to cut a square opening and install the PPU in accordance with fire safety requirements.
When you need to get around the roof overhang, we use 2 bends at 30 or 45 degrees. We secure the end of the chimney with guy ropes so that it does not sway in the wind, as was done above in the photo. Watch the video for professional installation of a sandwich pipe for a steel furnace:
Briefly about the main thing
A stove chimney is an essential part of any stove. It has a vertical design and allows you to effectively remove smoke from fuel combustion to the street. The pipe operates on the natural law of draft, the force of which in turn depends on the cross-sectional area of the chimney duct and the height of its location relative to the roof ridge.
According to the type of construction, chimneys are:
- Mounted.
- Wall ones.
- Indigenous.
Their main parts are fluff, riser, otter, neck, head, cap. The main advantages of a brick chimney are the ability to store heat, stylish appearance, affordability, and fire safety. Disadvantages: heavy weight, accumulation of soot, difficulty in installation. The masonry must be carried out strictly in accordance with the instructions. The chimney duct must be cleaned at least once a year using effective methods.
Ratings 0
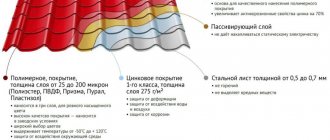
Grades of steel used, wall thickness
For stoves, fireplaces and other types of heating systems, different types of fuel are used - solid, liquid and gas. Exhaust gases are discharged through steel chimneys, which come in different brands and have different wall thicknesses.
| Stainless steel grade | AISI 321 | AISI 304L | AISI 316L | AISI 304 | AISI 309/ 310 | AISI 316Ti | AISI 430 | AISI 439 |
| Wall thickness (inner tube), mm | 0.6, 0.8, 1.0 | 0.8 | 30 | 0.8 | 0.8-1.0 | 100 | 1.0 | 0.8 |
| Exhaust gas temperature, ℃ | 600-800 | 120-200 | 150-250 | up to 300 | up to 1000 | 450-600 | up to 900 | up to 850 |
| Thermal insulation thickness, mm | 50-100 | 30-50 | 30-50 | 30-50 | 100 | 100 | 30-50 | 40-50 |
*
Characteristics of steel grades for chimneys:
| AISI 304 L | The material can withstand temperature changes and other climatic influences. Has high anti-corrosion properties. |
| AISI 316 L | Alloying additives help improve acid resistance. Connected to a diesel system. |
| AISI 304 | Used for the manufacture of chimney pipes in a private house, which are connected to gas equipment. |
| AISI 309/310 | Used for stoves and fireplaces that run on solid fuel |
| AISI 316 Ti, 321 | Steel grades that are often used for the manufacture of chimney systems. They have high heat and acid resistance properties. They are the best choice for diesel and gas systems. |
| AISI 430 | The metal has a low carbon content. Used to make sandwich pipes. It has high strength and anti-corrosion properties. |
| AISI 439 | This is a type of AISI 430 steel to which titanium has been added. The metal is corrosion resistant and durable. Sandwich pipes are made from it, which are used together with heating systems with low power (less than 3.5 kW) |
In a metal modular chimney design, the chemical composition of the material is of great importance. Alloying additives increase strength, anti-corrosion, hardness, ductility and the ability to withstand shock loads.
Roof fixation
Fixation of pipes from a sandwich chimney through the roof is carried out according to a similar algorithm as through the ceiling.
All wooden elements with this technology have high protection; the distance under such circumstances is reduced to 15.5 cm. The calculation is made that in the roof area the chimney is well blown by an air flow and cooled. This fact is a reason to reduce the distance to the rafters covered with thermal insulation. Such rules apply only when the roof is not treated with insulation from the inside. If thermal insulation exists, the same standards apply as for interior spaces on lower floors.
Kinds
The construction of the chimney is carried out strictly in accordance with the requirements of regulatory documents, mainly regarding the reliability of the structure. Strength is especially important when installing sandwich chimneys due to their large weight and dimensions. Brackets are used for these purposes.
There are several types of products:
- The chimney support bracket is attached at the lowest point of the vertical line. The weight of the entire structure rests on it. It can be equipped with a strip with an inspection hole and a condensate collector.
- Wall fasteners with a clamp and legs of a certain length are designed to fix the pipe along its entire length.
- The telescopic bracket is made in the form of a round clamp on one leg with a mounting plate. In this case, the length of the leg can be adjusted.
The first type has corner supports that can provide reliable support for the pipe. The vertical posts of the corner have holes for screwing in anchors. The wall parts consist of 2 parts: the first includes a clamp with legs, and the other is fixed with bolts after the chimney is installed in place.