Author: Yuriy Fedorovich Kolesnikov, thermal power engineer
Almost exclusively metal stoves are covered with brick. They are relatively inexpensive, compact, light in weight (for a stove), and heat up quickly. Metal furnaces of modern designs are very economical: their thermal efficiency reaches 85% or more. But at the same time, metal stoves quickly cool down, and when fired, they produce a powerful flow of thermal (infrared, IR) radiation, which can cause the fire of flammable objects nearby. The body of a metal stove (if it is not a stove in a steel case, see below) sometimes becomes red hot during combustion, and a burn from it can be very severe.
It may be necessary to line the stove with bricks in the following cases:
- To precisely coordinate the properties and qualities of the oven with the sanitary and hygienic requirements and conditions of a particular room. Its volume recommended in the furnace specifications is a very relative parameter;
- To reduce the fire hazard and injury hazard of the oven, if it cannot be installed exactly according to the requirements. rules;
- To increase the heat transfer time of the furnace after combustion;
- For decorative purposes, brick cladding serves as a kind of aesthetic bridge between the metal of the stove and, for example, wooden walls. Decorative cladding, as a rule, also carries out the functions according to paragraph 2.
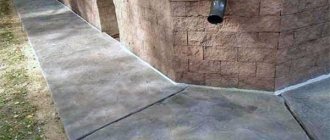
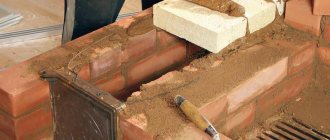
Laying brick rows
The brick “lining” of the stove should be half a brick thick.
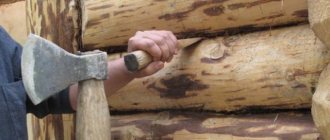
It is erected at a certain distance (up to 100 mm) from the steel body so that it does not burn out due to overheating. The greater this distance, the longer the stove will last; but if there is a need to quickly heat the brick case, the gap is reduced to a minimum of 10 mm. Seams can be made with a width of 2 to 5 mm, ideally 3 mm.
Without sufficient experience, applying such a thin layer of mortar using a trowel can be difficult, so it is better for a beginner to do it directly with his hand.
It is better to moisten the bricks before applying the mortar to improve adhesion.
Metal stove lined with bricks
Row No. 1 must be checked with a building level - it must be strictly horizontal.
In the 2nd row it is necessary to leave several holes through which cold air will be sucked into the space between the stove and the brick wall. To install such vents, it is not necessary to break off the quarters from the bricks - you can simply rotate them 90 degrees (poking them outward).
After laying the second row along the corners of the future case, it is necessary to pull the nylon cord strictly vertically - to do this, you need to drive nails into the ceiling and into the seam between the 1st and 2nd rows. These will be guidelines that will help you draw the corners without distortions.
If, when hammering a nail into the ceiling, it deviates slightly to the side, it can easily be corrected with a hammer, simultaneously checking the verticality of the stretched cord with a plumb line.
Even better is to install an ordering rail. The risks present on it will help to lay out the rows strictly horizontally, so that constant monitoring by the building level will not be required.
Facing
Before you line a metal stove in a bathhouse with bricks, you need to prepare for work.
Preparatory activities
You can start laying only after the concrete and brick base has dried. A metal stove is installed on it, and future cladding is marked around it.
But first you need to install a fireproof shield made of any fire-resistant materials on the wooden walls around the fireplace.
Insulation of wooden walls and floors with mineralite
If you decide to prepare masonry mortar from clay, then you need to fill it with water for several days and carefully sift the sand. Since it is difficult to cover an iron stove with bricks and not stain its body with mortar, before starting laying it should be protected with paper, cardboard or film, securing them to the walls with tape.
To prevent water from the solution from being absorbed into the brick, it is soaked in water about half an hour before starting work.
Soaking the brick
Masonry
When deciding how to brick a cast-iron stove, it is better to choose half-brick masonry. A thicker screen will take longer to heat up, and a thinner screen will cool down faster.
The laying of the first row begins from the far corner, laying a whole brick
It is very important to lay it out evenly and neatly, since all subsequent rows will be aligned with it. They are laid out alternately, with an offset of half a brick. Don't jump over the row, first raising the corners and then filling the space between them.
Laying is done offset
- The permissible thickness of the horizontal seam is 8-10 mm, vertical 3-5 mm.
- The seams are filled completely with the solution, its excess is immediately removed from the surface with a trowel.
Bricks that go beyond the plane are knocked down with a hammer or mallet
During the laying process, you need to constantly monitor the verticality of the walls and corners using a plumb line or building level.
A cord stretched along the upper edge of the row will help to keep the row strictly horizontal.
Auxiliary vertical stands will make work easier
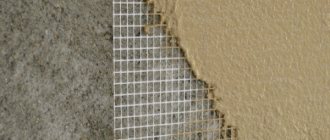
To strengthen the masonry, reinforcing mesh can be placed in the seams every two or three rows.
The photo shows the reinforcement of the masonry with metal mesh
Also, every two or three rows you should unstitch the seams until the mortar loses its elasticity, and wipe the surface from any remaining mortar with a wet rag.
Joining seams
When laying out the walls, it is necessary to leave ventilation holes in them: at least two at the top and two at the bottom. Cold air will flow into the lower ones, protecting the oven from overheating, and heated air will come out through the upper ones.
Furnace ventilation diagram
- As an option, you can line the stove with bricks laid in a checkerboard pattern with holes between all adjacent elements.
- Around the doors of the firebox and ash pit, masonry should be carried out taking into account their full opening.
The brick will have to be cut if it prevents the doors from opening
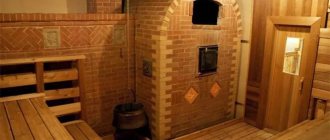
Where to finish the masonry is up to you. If you have a stove with a stove or heater, it is only brought to the top of the body. You can raise it to the ceiling. Or you can make figured masonry with a vault and chimney lining, turning an ordinary potbelly stove into something like a fireplace.
Metal stove for a bath, lined with bricks up to the pipe
Option with full height masonry and pipe lining
The brick portal turned an ordinary stove into a real fireplace. Now you need to let the solution dry for at least a day. It is desirable for this to happen in natural conditions, so it is better not to heat the stove for now.
What to make it from?
Several variants of furnace designs have been developed. This can be a simple barrel in which firewood is placed on top and the air flow is blocked by a gate valve. It will take more time to produce an analogue of industrial samples with a system of convection pipes and a separate gas combustion chamber.
The simplest and most uncomplicated scheme is a Butakov stove made from a gas cylinder. In this option, you can do without convection pipes or use 2-3 convection inserts.
We will examine in more detail the production of an analogue
an industrial design of a rectangular shape and a complete circuit of convection tubes and a system of pyrolysis long burning of wood. This design is the most productive and economical.
But during the manufacturing process it will be necessary to perform turning and drilling work. You can take the dimensions and bend angle from industrial sample pipes. The amount of material required for work depends on the chosen option and the dimensions of the furnace.
Masonry
The production of fitting brickwork is carried out “dry” without mortar. The fitting masonry is made directly on the floor close to the parallelepiped frame with gaps between the elements of 7 mm.
Upon completion, a contour of the brick cladding is outlined on the floor for further laying it with mortar. Angles must be constantly monitored horizontally and vertically.
Work begins from the corners, constantly checking their horizontalness. Nails are driven into the side seams of the fireplace to tighten and secure the cord for laying an even row of cornices without deviations. Between the brick gap is filled with mortar.
Do you need a cast iron brick?
The thermal advantages of cast iron stoves are great and undeniable, see the video below. Is it possible to improve a cast iron stove with brick lining? No way. First, cast iron is already a very good material for a stove. Lining a cast iron stove with bricks is generally the same as covering a brick stove: there will be no visible effect, but there is a lot of work and expense.
Second, cast iron is a brittle material with a large TCR. Under a brick lining, any furnace overheats beyond what is specified according to the specifications. The best structural cast iron (there is also raw cast iron for conversion into steel) will soon crack in a furnace under a brick. If a cast iron stove needs to fit into the interior, then the optimal means for this is decorative elements separate from the stove or overhead decorative elements made from cold forged parts.
Arrangement of the foundation for a metal furnace
Before laying brick over the unit, you need to thoroughly prepare and strengthen the base for it. Since metal structures are light in weight, they do not require a separate foundation for the furnace, but brick cladding will provide an additional load of tens of kilograms.
Not every floor covering can withstand such a mass. For this reason, before covering the boiler with bricks, it is imperative to dismantle the floor and arrange a separate foundation - columnar or monolithic.
Most often, a monolithic base is made. To do this, the floor under the stove is dismantled. The foundation parameters should be such that there is a gap of 10 to 15 centimeters between the future brick cladding and the metal body of the unit.
First, they dig a hole approximately 30 centimeters deep, pour crushed stone and sand onto the bottom, compact it, install reinforcement and fill it with concrete mortar. The foundation will harden in about 2 weeks.
To arrange a columnar foundation, pillars are installed at the corners of the facing box and in places of the highest load. The advantage of this base is that no drainage or waterproofing is required.
The sequence of actions during the construction of a columnar foundation is as follows:
- Markings are made at the corners of the furnace for mounting the pillars.
- Dig holes located strictly vertically, having a depth of about 50 centimeters.
- A 10-centimeter layer of sand is poured into the bottom of all holes and compacted.
- Prepare a solution of cement and sand in a 1:2 ratio; it should have the consistency of thick sour cream.
- The solution is poured over the layer of sand in a 10-centimeter layer. Crushed stone or brick chips are added to it.
- After hardening, brick pillars are laid out so that they rise 7–10 centimeters above the floor.
- Install the lower trim beam. The most reliable way would be to lay the channel around the perimeter and weld the edge.
The use of concrete pillars is allowed. You can make sure that they are vertical using a building level.
Step-by-step cladding technology
- The bricks for laying are soaked in water for about 40 minutes.
- If the walls of the stove will be visible after laying, then before starting work it is advisable to wrap the stove with film so that you do not have to clean it later from any remaining mortar.
- If the stove was sold with a convection casing, it must be dismantled, since its role will now be played by the lining.
- To mark, stretch a fishing line or cord vertically along the corners of the future masonry. If the floor is wooden, you can nail two vertical bars to it on both sides of the stove. They are fixed using wooden spacers.
- Mix the solution. You don’t need to do much – half a bucket is enough.
- Brick laying begins from any convenient angle. For this, only whole material is used, which is carefully, guided by a cord or fishing line, laid flat - “in half a brick.” Each brick is carefully leveled. Excess mortar is removed immediately before it dries; the outside of the masonry is wiped with a rag; burlap is good for this purpose.
- The seams should not contain voids and be of the same thickness (5-7 mm).
- It is advisable to reinforce the second row with mesh. It is cut into strips of the required size and laid on a brick, with mortar on top. The mesh should not stick out from the seams. The corners are reinforced with pieces of wire to tie the entire row into one. The second row needs to start from the same corner, but take not a whole brick, but a half, so that the seams are offset by half a brick - this is necessary for bandaging and strengthening the structure.
- In the third or fourth row, you need to leave several holes for hot air - usually two or three are made on two opposite sides of the masonry, the size of half a brick.
- The next 5–6 rows are made continuous; dressing the seams is mandatory. Do not forget to check each row with a building level for the horizon and vertical, so as not to “fill up” the masonry. Constantly monitor the thickness of the seam.
- In the areas where the firebox and ash pan are located, the brick should not interfere with the doors opening. The bricks must first be laid without mortar, their location must be accurately determined, and, if necessary, cut to the required size with a grinder.
- The row above the door is covered with two pieces of steel strip or corner - on the outside and inside of the masonry. The laying is carried out on it.
- In the penultimate row, two more holes should be made for air circulation - as described above. In this way, it will be possible to achieve proper circulation - cold air below will flow under the heat shield and exit from above already heated.
- The work is usually completed when the masonry reaches the upper level of the furnace. Sometimes the brick is laid up to the ceiling, completely covering the chimney.
- Wait at least 48 hours for the solution to dry completely.
- After drying, the brick can be given a more beautiful and rich appearance. To do this, rub it with a stiff brush, which is moistened with a solution of laundry soap. After this, the surface of the masonry is rinsed with clean water.
If the stove is very powerful, it is covered with a special lattice method, leaving gaps between the elements of 10 cm.
For a round stove, the masonry is made round. The technology is not much different from the standard one, although placing the brick in a circle is a little more difficult. Holes for air circulation are made symmetrically on both sides of the masonry. During the work, the main thing is to maintain the same distance between the walls of the stove and the inside of the brick over the entire area.
A little more about pyrolysis...
The essence of pyrolysis lies in the process of technological gas-generator combustion. When solid fuels such as coal, pellets, peat briquettes or firewood are burned, the room warms up. The operating principle is similar to that of a dry distillation boiler. The pyrolysis system is due to its exothermic properties, and can heat the incoming air due to the heat generated. The fuel is ignited and the fan turns on when the door is closed. The high temperature regime (200–800 °C) and low oxygen capacity in the pyrolysis combustion furnace lead to a chemical process - the wood decomposes into coke and pyrolysis gas. Also, when wood burns, it can form methyl alcohol, acetone, vinegar and resin.
The released gas combines with oxygen and goes into the combustion process. The smoke generated during combustion does not contain bad carcinogens and other dangerous components. Burnt fuel produces thermal energy, which heats the room. The water contained in the boiler enters the heating structure in a hot state with a simultaneous return supply. The coolant is also used as a coolant. This is how a boiler with a bottom-mounted chamber functions.
Features of the stove lining installed on a wooden floor
When the bathhouse has a concrete floor, there are no questions about the arrangement of the base of the stove and the cladding around it. But with wooden flooring, before you start laying around a metal stove, you should consider a lot of questions.
First of all, it is important to decide whether a foundation is needed. To do this, the weight of the brick structure is calculated and the endurance of the wooden floor is assessed.
In some cases, it is enough to simply additionally strengthen the load-bearing logs. But the safest thing to do is to pour a foundation under the brickwork. It is up to the owner to decide what it will be: strip or pillar.
If the foundation was not laid during construction, then it will be necessary to dismantle a certain part of the floor and dig a pit, since the foundation for the furnace formwork must be located at the same depth as the base of the building itself. In size, it should be 15-25 cm wider than the furnace screen itself.
First of all, you should calculate whether the floor will support the weight of the foundation
The foundation of the stove should not be connected to the main one; if the firebox is located near a load-bearing wall, then a distance of at least 5 cm is provided between the two foundations. The gap formed between them should be filled with heat-insulating materials. The height of the stove foundation should be 10-15 cm below the floor level.
It should take about a month for the foundation to dry completely. And only after that work continues. Several layers of roofing felt or roofing felt are laid on top as a moisture-proof material. Then two rows of bricks are laid, each subsequent brick of the second row is laid offset relative to the previous one so that the seams overlap. Now the foundation for the furnace screen is ready.
Even if the floor and foundation joists seem strong and reliable, capable of supporting the weight of a brick screen, a number of preparatory work will be required. A base for installing the oven and screen is being organized. The base must be non-flammable and strong; the following materials can be used:
- A sheet of metal fixed over a thermal insulation layer;
- Two rows of brickwork that are laid on a wooden floor;
- Ceramic tiles resistant to high temperatures;
- Artificial or natural stone.
Tiles
A special three-dimensional ceramic form was invented for lining stoves many centuries ago. The tiles are installed simultaneously with the laying of the stove and are securely fastened with wire in the brick seams.
The multicolored relief patterns are amazing. Stoves and fireplaces decorated with tiles are considered high art.
Design
This is the very first stage, during which several important points should be taken into account, especially for functional fireboxes:
- It is necessary to determine the location for the equipment in the room relative to the walls and furniture arrangement. At the same time, do not forget about fire safety: the distance from flammable surfaces to the firebox is at least 700 mm.
- The base for the equipment is recommended to be made of concrete with a height of 300 mm. The perimeter of the foundation should extend beyond the dimensions of the firebox by 250 - 300 mm on each side.
- The recommended gap between the firebox and the plasterboard structure is 50 mm.
- An air vent box should be provided.
- Podium. The design must provide air flow for heating and support the weight of the firebox.
- The thickness of the fireproof wall finishing and a technical gap of 100 mm between it and the firebox.
- To accurately determine the dimensions of the portal, you should take into account the parameters of the facing material: profiles: guide – 27×28 mm and rack – 27×60 mm). For cladding, it is recommended to use fireproof or moisture-resistant plasterboard with a thickness of 12.5 mm.
- The design of the portal and its decoration should fit organically into the interior.
The listed parameters will help you avoid installation errors.
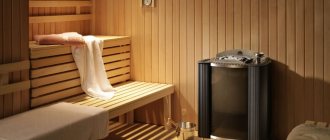
Why enclose the heater in the steam room?
Homeowners who want to set up a steam room in their home at a cheaper price buy an iron or cast iron stove, or even order a homemade one. Heaters of the middle and highest price categories are equipped with special convection screens that protect people in the steam room from hard infrared radiation coming from the hot steel walls of the firebox.
There are 3 reasons why owners have to line the stove in their bathhouse with bricks:
- budget and homemade heaters made of metal do not have protective screens;
- the need to protect the wooden lining of the steam room from fire when the stove is installed close to the walls;
- Wood stoves with steel walls are not able to retain heat for a long time; the temperature in the steam room quickly drops after the wood burns out in the firebox.
The lining of a metal stove immediately solves 2 problems: it protects against burns from infrared radiation and accumulates heat, like a battery. Due to the good thermal capacity of the brickwork, such a screen will transfer heat to the bathhouse for a long time after the firebox has died down.
How to cover a metal stove with bricks
Before proceeding directly to the lining, you should understand that the brick should not lie close to the walls of the furnace. A distance of 5 or 10 cm is considered optimal.
This air gap is necessary to compensate for the difference in heating of the materials. Rapidly heating metal in direct contact with the brickwork will cause the stove to overheat. Therefore, at the first stage you will need a pencil and a tape measure. You need to mark the boundary of the masonry. The metal sheet is screwed onto self-tapping screws or nailed in such a way that its area completely covers the masonry site.
A sheet of asbestos cardboard is attached on top of it. Its thickness must be at least 4 mm, and it must be smaller in size than a metal sheet. If the stove is not placed on a wooden floor, but on another non-combustible base, then such fire safety measures will be unnecessary. A diluted purchased mortar or a self-prepared mixture along with bricks and trowels should be brought directly to the installation site. To improve the operation of a metal stove , half a brick of masonry is enough.
It allows you to save both building materials and mortar. This method of installation implies that the spoon side will be facing the “viewer”. The bricks are laid in a row on the base lengthwise.
Each of them is connected to each other by a layer of solution. Subsequent rows of masonry are shifted relative to the previous one by half a brick. The joints of the bricks do not match, so the entire structure is strong.
With standard dimensions of building materials, the thickness of the resulting masonry will be 120 mm.
Immediately before laying, the brick is lightly wiped to remove excess moisture. The first row is made solid, without technological holes. The second row must have ventilation outlets. Their width should not exceed five centimeters.
They should be duplicated several more times. That is, continuous rows of masonry need to be interspersed with those left by “windows”. The number of rows with holes depends on the size of the stove.
Such ventilation is needed so that the heat from the hot walls does not remain inside the brick casing, but goes outside and evenly fills the room. Each row of masonry is done using a level. A portion of the mortar is added (or removed) to the brick so that the rows do not deviate from the horizontal and vertical. To level the brick, you can lightly tap it with a mallet or trowel, slightly moving it in the desired direction.
- Excess mortar that unsightly floats onto the rows must be removed immediately, so that after hardening you do not have to make unnecessary efforts to separate them from the masonry. In the place where the oven door is located, you need to make the lining in such a way that it does not interfere with opening, placing firewood, ignition and cleaning the firebox from ash. The metal angle is useful to strengthen the top side of the doorway.
Material selection
It should be immediately noted that in order to line a metal stove with brick, you need to use a material that has special characteristics. The brick must be of high quality, with high fire resistance, heat resistance, and its structure must not contain voids. High-quality fire bricks can be recognized by their red color. The lining is made with the following types of bricks:
- Silicate
- Ceramic
- Clay
- Fireclay (fireproof)
The first two types are usually used as cladding. Solid clay brick is used for laying pipes, chimneys, fireboxes, and direct lining of the body - this applies to a wood-burning stove. If you plan to use coal as fuel, it is better to lay the firebox and lining with fireclay bricks, which can withstand high temperatures of up to 1800 degrees. In addition, you can use used bricks, having first cleaned them of the remnants of the old mortar. Using embossed bricks you can create a beautiful, original screen for the stove.
The required amount of brick is calculated based on the dimensions of the stove and the area into which it is planned to expand the space around it. In addition, you need to take into account the laying of the base, which will require a row of one or two bricks. You also need to consider the installation method - on the narrow side of the brick or on the wide side. The first option is more economical, but ineffective from the point of view of the operation of the stove.
Masonry material can be prepared in four ways:
- Mortar of refractory clay with cement;
- Made of cement with adhesive for porcelain tiles;
- A solution consisting of clay and sand;
- Ready-made fireproof oven mortar based on red clay.
Experience shows that the best and simplest solution is clay-based. There are many varieties of this material, therefore, in order to guess the correct proportions, it is recommended to first mix the sample with the same amount of sand and clay, then adjust the volume of one or the other in the composition of the mass. If there is too much clay, it will crack as soon as it dries. If there is too little, it will not set well. Often brickwork is reinforced with reinforcing mesh. This is necessary in cases where the foundation is too weak to support the weight of the furnace with lining.
In addition to materials for masonry and mortar, you will also need roofing felt for the base of the stove as a waterproofing and fireproof material.
What is best to take for finishing
If the stove fulfills the designer’s intention and is part of the composition, then it is better to use plastic molded face stone for its finishing. It is almost always second grade; this is exactly what is needed for the shell of the structure.
When building a new one, the facing brick is placed outside:
- In this case, the finishing happens by itself, and you can kill several birds with one stone - the stove looks beautiful, begins to breathe freely, and turns out to be quite durable, because the seams are tied as expected;
- If you plan to veneer an old stove, then you don’t even have to think about bandaging the seams because the old ones are already dry. But the so-called thermal kicks will sooner or later do their dirty work and the lining will begin to fall. Previously, in such a situation, they acted as follows - first, the stove was lined with unglazed tiles containing lime mortar, and the brick itself was laid on top using the same mortar. The tile acted as a kind of damper. Now everything is much simpler, and it costs less: masonry mortar for cladding is mixed with aluminous cement;
- It also happens that the fireplace, according to the design decision, should look organically with the interior. In this case, there may be three options: hand-molded Yekaterinoslav brick, narrow decorative brick, clinker facing tiles. The latter type will not be cheap, but in terms of quality it is the most suitable: the clinker slab is durable, adheres well to the mortar, and is available in a wide variety of textures and colors. In addition, the stove will breathe - after all, the clinker has a small number of pores, and the tiles are too thin;
- Narrow brick is suitable for constructing fireplaces. But if you use it to finish the stove, it will not breathe. You need to buy it carefully: manufacturers often use polymer additives. According to the quality certificate issued for narrow bricks, its heat resistance should not be less than one hundred and forty degrees.
Covering a metal stove
When deciding how to line an iron stove with bricks with your own hands, you should first decide on the materials that will be needed for the work.
Choosing mortar for masonry and bricks
Masonry mortar can be of three types:
- Sand-clay. which is considered a classic of stove solutions.
- Cement mortar. to which fireclay clay (fireproof) is added.
- The cement mortar is mixed with glue. intended for porcelain stoneware.
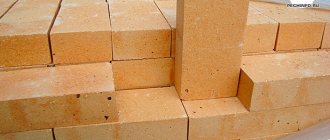
Now let's move on to the question of what kind of brick to line an iron stove with. To do this, you should not use ordinary building bricks, but special oven or fireclay bricks. According to the production technology, this material is an ordinary ceramic brick made from fireclay - fireproof clay.
Fireclay refractory brick.
The modern market offers various varieties with a textured surface, which allow you to greatly transform a stove of a simple design, but are somewhat more expensive. Double sand-lime brick M 150 is not suitable for these purposes, since its thermal conductivity is not very good, and it cannot withstand high temperatures.
Laying brick rows
A standard metal stove is laid out very simply - half a brick in a checkerboard pattern (that is, offset by half a brick relative to the previous row).
Advice! If there is a shortage of refractory bricks (for example, fireclay), you can lay the blocks on edge, this way you will be able to save money, however, the protective screen will be thinner, and accordingly, all the properties of such masonry will be somewhat reduced.
We cover the iron stove.
The instructions for carrying out the work are extremely simple and consist of several tips:
The first row of masonry is considered the most important, because it determines the distance between the metal screen of the furnace and the brick wall. Different information sources give different recommendations on this matter, suggesting a gap of 1 to 10 cm.
When calculating the gap, one should proceed from the following considerations: too small a distance will lead to excessive heating of the metal screens, which will reduce the service life of the furnace itself. If you provide too much indentation, the brick walls will take too long to warm up. Therefore, a gap of 5 cm would be ideal.
Advice! When laying bricks, it is advisable to soak each of them in water. This allows you to strengthen the adhesion of the mortar to the surface of the brick block.
- Ventilation holes should be allowed in the masonry. This will allow air to circulate better between the masonry and the metal. In places of such “windows” the brick is laid end-to-end first (button method). So in each “window” there are two holes.
- It is advisable to lay bricks through the row with reinforcing mesh cut lengthwise, which will add strength to the structure.
Cleaning masonry from mortar
After the work is completed, it is necessary to let the masonry stand for several days. About a day later, you can start cleaning the stove from the solution, stains of which are probably present on its walls. And this procedure actually turns out to be much simpler than it might seem at first glance.
For this you can use a drill with a special attachment in the form of a metal brush. Thus, within half an hour your stove will be completely cleaned of stains. This brush leaves dark stains on the brick, and to remove them, you need to wash the stove with a household brush, which is soaked in a soapy solution.
Oven cleaned of solution.
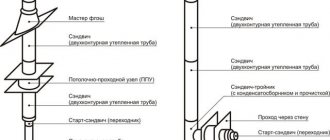
Installation of a metal stove with a remote firebox in a log house
Let's consider the option of installing a fireproof anti-shrink wall made of LV mineralite. A special fastening method will allow installation in the log house before it shrinks, and the floating design of the fastening elements will prevent the rigid wall from deforming.
Minerit LV
Minerite
Step 1. Prepare the opening in the wall. We cut it out with a chainsaw according to the markings.
Hole in the wall
Step 2. Cover the inner surface of the opening with mineralite. We saw the mineralite sheet into three pieces. We cut out two vertical pieces based on the height of the opening minus 10 cm. We cut out the horizontal part with a length equal to the width of the opening minus 2 cm. The width of the mineralite section should be equal to the thickness of the timber or log from which the wall of the bathhouse was built.
Step 3. We nail foil to the inside perimeter, and then mineralite. First, we fix the vertical sections with nails, then the horizontal ones.
Step 4. It is necessary to make an opening in the mineralite sheets, which will protect the wall from the heat of the stove. The remote furnace firebox will pass through this opening. We take measurements of the remote firebox, then make markings with a pencil and cut the sheet so that there is 3 cm on each side between the remote channel and the sheet.
Installation of foil and mineralite. Finishing of the opening can be done both before and after installation of the main slabs of refractory material
You can do it differently - first we fix the sheet on the wall, and then we cut the opening for the remote firebox.
Mounting mineralite to the wall
The sheet is fixed, you can cut out the opening
Step 5. Drill oval holes in the sheet for self-tapping screws. When shrinkage occurs, the screws will move downward inside these holes, while the sheet will remain motionless. We fix the foil insulation on the wall (with a stapler), and then use self-tapping screws and a washer to fix the mineralite sheet (we mount the sheet on the steam room side).
Step 6. We attach the second layer of mineralite with an air gap of 3 cm. To do this, you need to purchase a mounting kit with ceramic or steel bushings.
Mounting kit
Once again, you need to drill oval holes, but be sure to make sure that the fasteners of the first and second sheets do not end up at the same point.
The photo shows a diagram of the installation of a protective screen made of mineralite. Double-layer sheathing. If the stove has an external firebox, make an opening according to the instructions
When joining two sheets at 90 degrees, we make cuts at the ends at 45 degrees for a more aesthetic appearance.
After installing the sheets, we install the stove on the base. We adjust the legs, making sure that the external channel is located exactly in the center of the opening cut in the mineralite. We take foil-coated basalt wool and place it tightly between the walls of the outlet channel and the mineralite. In this case, the foil should “look” towards the steel walls of the channel.
Adviсe
Craftsmen use different methods of installing stoves and protecting walls. So, for example, in a log bath it will be more convenient to install mineralite on a wooden sheathing. Antisepticize the 50x50 mm bars, drill holes for self-tapping screws and fix the sheathing posts exactly vertically. The mineralite will already be fixed to this sheathing with self-tapping screws.
Lathing
If you plan to cover the wall from the inside (from the steam room side) with mineralite for further finishing, for example, with a coil, and finish the portal with brick from the outside, then it is worth carrying out the work in the following sequence:
- From the side of the steam room, fix a sheet of mineralite;
- cut a hole for the outlet channel;
- secure the horizontal guides from the plasterboard profile. Fasten the strips with self-tapping screws at the top of the opening, along the bottom and exactly above the opening for the fuel channel;
- install the vertical posts of the sheathing from the profile, fix them with self-tapping screws through the shelves;
- take basalt wool and lay it between the sheathing posts;
- sew up the opening with mineralite (from the dressing room side);
- install the stove in its place;
- Now, on the side of the dressing room, fill the opening with brick (don’t forget to put insulation in the cracks), and on the side of the steam room, apply decorative finishing with stone.
Lathing and insulation
View from the steam room and dressing room
Fixed furnace portal
Walls and chimney after finishing with a coil
The process of finishing the oven itself
The work on installing the furnace does not end there. Be sure to install a water tank and a heat exchanger, if they are provided for in the design, install the chimney in accordance with fire safety rules, prepare and lay the stones in the mesh.
Self-production
Before you start building a device with your own hands, you need to study its diagram:
The assembly sequence of this unit is no different from the installation of gas generator furnaces. The basis of the device is a metal barrel.
To get a high-quality unit with safe, economical and efficient heating, follow the instructions below:
- Using a grinder, you need to cut off the top of the barrel, smooth out the sharp edges with a hammer and bend them down.
- It is necessary to cut a circle with a diameter of 1.5-2 cm in a steel sheet. This is much smaller than the corresponding size of the barrel itself.
- In the cut out element you need to make a hole with a diameter of 10 cm and weld a steel pipe of the same size to it.
- You will need to attach channel sections to the bottom of the product using a welding machine and install them so that they can move freely inside the barrel. During operation of the unit, metal beams will put pressure on the fuel.
- A damper is mounted on top of the pipe, and the pin is installed strictly vertically.
- This element must be fixed by welding. A hole needs to be drilled at the edge of the valve, cut from steel with a diameter similar to the corresponding pipe size. After installation, the pin should cover the product.
- The damper is screwed on with a nut. Installing this element allows you to further monitor the volume of incoming air, as well as the intensity of the device’s operation.
- The side of the lid must be leveled with a hammer. The edges need to be bent outward to ensure a tight fit and adherence to the base.
- You need to make a hole in the lid with a diameter of 10.5 cm. To do this, you need to stock up on a chisel.
- The pipe needs to be welded to the pancake and brought out through a hole made in the lid, which then needs to be welded.
- For the base of the furnace, you can prepare a not too deep brick platform.
- In the upper part of the device body, you need to cut a hole with a diameter of 15 cm. A smoke channel will pass through it, which is 1.5 times longer than the body itself. A previously measured section of pipe is welded to the hole on top of the structure.
- You need to make a small square hole at the bottom of the device, then weld the door to it. This will be an ash pan - a hatch for collecting ash, where a box is installed for convenience and ease of cleaning.
- The lower part of the chimney pipe is carefully welded. It is desirable that the product stands on legs.
- An elbow is welded to the channel and the furnace is connected. The structure is fixed with a clamp. A fiberglass base is preliminarily placed under this device to ensure the tightness of all connections.
If there is no barrel, then you can use a fire extinguisher for the base of the stove, from which you need to remove the body. A gas cylinder is also suitable for these purposes. The device is assembled in a similar way.
Materials and tools
When deciding how to properly line an iron stove with bricks, you first need to decide on the materials suitable for this. They must have special characteristics.
Brick
The main material for cladding must be of high quality: without voids, with high heat resistance and fire resistance.
You can choose which brick to line an iron stove in a bathhouse from two options:
Clay brick. It is used for lining the body, masonry of the firebox and chimney of a wood-burning stove. It can be ordinary, front, or with a decorative front surface.
Ordinary solid brick
Facing brick
Facing brick with decorative surface “oak bark”
Using shaped bricks you can create unique shapes
Fireproof fireclay brick. Withstands temperatures up to 1800 degrees. It is recommended to be used for masonry and lining of coal-fired stoves.
Fireclay brick
The approximate quantity is calculated depending on the method of laying (half or quarter brick) and the perimeter of the cladding. In this case, the dimensions of the furnace itself and the distance between it and the lining are taken into account. This also includes the amount required to construct the site, since it is possible to cover a metal stove with bricks only on a solid foundation.
With this type of masonry, the brick is placed on a spoon - a narrow long part
Solution
The ideal masonry mortar is made from clay and sand in certain proportions, which depend on the quality of the clay. Without experience, it is very difficult to do it. Therefore, it is best to buy a ready-made refractory mixture based on red clay.
Before covering the cast-iron firebox with brick, you just need to dilute it with water, as required by the instructions on the package.
Heat-resistant terracotta mixture
In addition to bricks and masonry mixture, masonry mesh and fire-resistant sheet materials may be needed to create a protective screen for wooden surfaces. And also roofing felt as a waterproofing material.
Tools
The following tools will be required to complete this job:
- Container for solution;
- Trowel for typing it;
- Hammer for adjusting bricks;
- Pickaxe for dividing them into parts;
- Jointing for seams;
- Ordering is a strip with divisions applied to it, the distance between which is equal to the height of one or several rows, taking into account the thickness of the seam;
- Construction level and plumb line for level control;
- Cord for controlling the evenness of horizontal rows.
Tools required for masonry A sponge or rag and a bucket of clean water will also help to remove the mortar from the front surface of the masonry.
Ceramic tile
Glazed metal tiles are a way to decorate your fireplace without breaking the bank. You can choose tiles that imitate brick, granite, or marble finishing. It looks good in combination with decorative brick or plaster.
Modern technologies make it possible to print photos on ceramic tiles. Decorative tiling of a brick fireplace is economical, but gives a good result. The pattern on the fireplace can be chosen to suit any interior.
Note! The surface of the tile does not resist temperature deformation well; it is not used for lining stoves. The facade of fireplaces heats up slightly, so tiles are suitable for cladding.