Flooring is necessary when building a private new home, but also when you need to replace old rickety parquet, covering or floorboards that constantly creak.
Installing a wooden floor on joists is an excellent solution. They will not only get rid of squeaks, but will also improve the thermal insulation of your home, level the surface and help hide various communications and wires from prying eyes. You will learn below how to make a wooden floor in this way in your home with your own hands.
What is a bottom harness?
During the construction of a house, a pile, strip or monolithic foundation can be laid
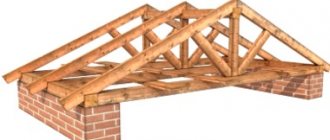
under the structure. The floor frame of a house includes the following important components:
- beam;
- main beams (joists);
- secondary beams.
During the construction of a house, a pile, strip or monolithic foundation can be laid under the structure. In the case of assembling the first two, it is assumed that the lower frame will be installed from timber, which would serve as the basis for the subfloor beams. The difficulty of installing beams lies in their weight. They can create a large load on the fastening elements, which will lead to deformation of the base.
That is why a special cut is made in the wall or frame beam into which the beam is inserted. Various types of fasteners can be used to secure it. However, in the process of choosing them, it is very important to consider the degree of their strength and durability.
Competition between rounded and chopped logs
The debate about which log house is better, a log house made of rounded logs or a chopped log house, has no resolution. There are opinions that log houses are warmer, although the warmth of a log house depends on the type of interlocking of the logs and on the quality of the assembly. It is believed that a rounded log house is easier to assemble, although factory-made logs do not guarantee their exact fit when assembled.
The question of which log house https://domizbrevna.com is better, chopped or rounded, or maybe a log house, can be answered by time, the quality of the log house’s assembly and compliance with construction technologies.
Assembly Recommendations
Treating logs with antiseptic impregnations
When installing a subfloor in a house, it is very important to choose only high-quality strapping timber. During the operation of the coating, it will be the one that will experience the heaviest load. And if the quality of the wood or fastening is mediocre, the base can easily become deformed. In the process of assembling timber strapping, experts pay attention to the following points:
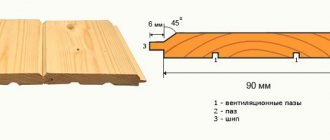
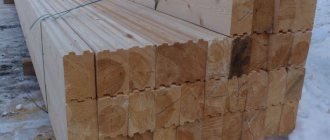
Dimensions of timber for installing logs
- The timber must be precisely calibrated and sized;
- To eliminate the possibility of wood rotting, the timber must be treated with an antiseptic;
- When assembling the frame in a frame house, it is advisable to give preference to logs made of coniferous wood (they are less hygroscopic);
- The timber frame must be laid clearly horizontally, otherwise some of the parts of the structure will experience a large load during operation;
- You can fasten the strapping logs to the support posts using clamps, metal brackets, anchors and U-shaped galvanized profiles.
Preparatory stage
The preliminary stage before laying the first crown of timber on the foundation is to prepare the material and tools.
Everything you need for the job is presented in the table below.
It is recommended to give preference to lumber with a large number of annual rings.
For a log house, the height of the strip base above the ground surface should be at least half a meter. Additional construction is often done with bricks.
The material for row 1 can be treated with waste oil, and the rest with antiseptic compounds.
Before starting construction, it is recommended to check all lumber for minor defects by marking these sides. They will place the timber up or down. The sides with bulges should be lateral.
The beams should be processed carefully so as not to miss any area. Otherwise, it will serve as a source of spread of the putrefactive process. The quality of the selected material is of paramount importance in ensuring the durability of the building.
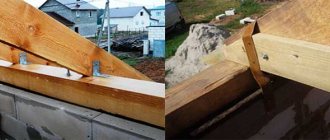
Methods for installing joists in the house
Options for fastening joists in a wooden house
Installing joists in a wooden house opens up a fairly wide range of options for attaching beams to beams. According to the installation method, they can be divided into two types:
- Wall mounting. This method is often used when installing joists on the second floor of a house. The construction of the floor involves laying the beams “in a spacer”. A special cut is made in the wall along the width of the beams, after which they are inserted into the formed grooves and fixed with fasteners. The advantage of this method is that the beam itself lies completely on the beam and does not create a large load on the anchors and brackets with which it is secured. That is why fixing the joists in the wall is optimal when arranging the floor of the second floor of the house;
- Attaching to timber. In this case, the elements can be attached to the first crown of the strapping “end-to-end” using fasteners. In this case, the timber is not sawed, but simply joined to the logs and secured with anchors or horseshoe-shaped profiles. Also, to install the floor of the first and second floors of the house, a cut is made in the beam itself for fastening to the frame. Technically, it is quite difficult to embed logs into the strapping material, but such structures have a long service life.
Design advantages
An example of installing an insulated interfloor floor in a wooden house.
Why is installing a subfloor with beams so popular? Despite the fact that the process of attaching wooden battens to the base is very difficult, it is still in demand. Why? The beam base provides the floor with the following technical advantages:
- Improves heat and sound insulation performance;
- Provides a more uniform distribution of the load on the floor, which ensures a long service life of the subfloor;
- The timber does not contain synthetic substances and therefore can be used for flooring in residential premises;
- When arranging a non-ground floor of a high-rise building, it is more advisable to use wooden elements to finish the floor base, which do not create a large static load on the interfloor floors;
- An air gap can be formed between the trim and the beams, which will create optimal conditions for underground ventilation;
- Using a wooden beam, you can not only install a warm floor, but also level it if necessary.
Beam mounting options
A set of metal fasteners for creating a wooden frame
When repairing the floor of the first and second floor of a private house, various types of fasteners can be used. Each of them has its own advantages and disadvantages. To assess the feasibility of using each of them, let’s consider the most popular types of fasteners in more detail:
How to cover a ceiling with plasterboard in a wooden house and methods of fastening
- Perforated brackets. This type of fastener is made of sheet steel coated with anti-corrosion compounds. They can have different designs depending on where the beam is attached. Corner versions of perforated brackets are L-shaped. They are fixed in the joists using powerful self-tapping screws with a cross-section of at least 3 mm;
- Steel corners. The fasteners securely tighten the timber and beams together, but in the absence of at least some support under the joists they can experience a large load and, as a result, become deformed. You can attach the corner to the frame and beams using anchors or self-tapping screws;
- U-shaped holders. The holders are horseshoe-shaped overhead grooves into which beams are inserted. They are mounted only in the strapping beam, simulating a standard cut, but at the same time do not violate the integrity of the strapping logs;
- I drank it through. This method of attaching lags is one of the most budget-friendly, although labor-intensive. The timber is specially sawed, making cuts along the entire length of the log. A beam is placed in the formed cut and secured either simply with self-tapping screws or with the fasteners that were listed above.
Technology for laying timber on various types of foundations
The timber is laid on the foundation with or without securing it. If structural elements are joined to locks, then if dismantling is necessary, the entire dismantling process becomes much more complicated.
Fixing beams on piles
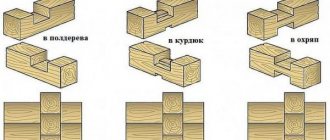
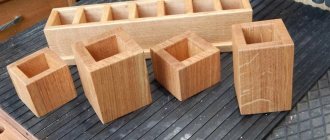
The joining of beams in the corners is carried out in the following basic ways:
- in half a tree with a tenon, when on one beam the upper half is cut off (the length of the width of the lumber being joined), and on the other - the lower half;
- into the paw, while the cut out connecting parts of the logs are connected without including their end parts.
The latter option has received the greatest practical distribution. The photo below shows, in addition to the main ones, rarely encountered methods of connecting beams without and with residue.
Options for joining beams together
The sequence of actions showing how to correctly lay timber on a strip or slab base is as follows:
- determine the evenness of the tape or slab;
- if necessary, level their surfaces;
- choose the optimal method of joining lumber;
- With a smaller diameter than the studs used, holes are drilled in the beams;
- anchors are concreted;
- lay the lower crowns;
- fix them with nuts, having previously placed washers under them;
- use nails to connect the corners of the structure;
- check the level of the laid row;
- Use a plane to cut off any irregularities.
If, when pouring the base, fastenings were provided for the lower beam, embedded in concrete, then this greatly facilitates the entire process, speeding it up. In this case, the studs are inserted into the not yet hardened solution a third of their length every 50 cm. The minimum number of bolts (fasteners) for each crown should be two. The lumber is pre-prepared by drilling holes of the required diameter with the required pitch. Do not tighten the nuts too much to avoid distortion.
To secure the crowns to the piles, caps (for example, U-shaped) are mounted, which have holes on the sides for fastenings. The supports are first coated with roofing felt (2-3 layers). The beams are mounted in grooves, connecting in the chosen way in the corners. They are connected to the supports using pins or screws.
If the heights of the piles differ slightly, then timber is cut out in the required places.
The technology of overhead installation involves the absence of fastening of lumber to the base. The entire installation process is carried out similarly to the option involving rigid fixation, only without the use of fasteners.
The crowns must be connected at an angle of 90 degrees. Otherwise there will be problems with the further construction of the building. If you follow the technology, checking the geometry of the structure being built, then the likelihood of deformation of the building will be minimized over time.
The installation process of the first row of timber is shown in the video below.
Various methods of laying the first crown of timber on the base have their supporters and opponents. There is no clear opinion on this issue. Most experts recommend that the first row be secured because of the possibility of foundation movement. The rigid mount will take over the movements. Only under heavy loads can the harness move, tearing out the anchor. Reliable fastening will give stability to the constructed structure.
Features of installation of floor joists
An example of connecting beams of dovetail locks
When arranging the floor of the first floor of a house, you need to take care not only of high-quality assembly and fastening of the strapping, but also of processing the wooden components of the floor base. The work of attaching beams to the first rim of the trim includes the following features:
- All wooden elements of the sheathing must be treated with antiseptic agents;
- If the foundation for the rough foundation has a strip or pile device, it is worth taking care of additional waterproofing of both the floor and building materials;
- When arranging the floor of the second floor, it is more advisable to make a “dovetail” (cut) under the logs, since this method provides a more rigid fastening of the logs to the frame;
- To securely fix the logs in the wall, be sure to use fasteners - “horseshoes”, corners, etc.
The methods of attaching the logs to the timber frame are determined by several factors: the number of storeys of the house, the weight of the beams, the moisture content of the base, and the type of foundation. The most reliable way to secure the logs in the frame is to install them in special grooves (cuts), which take on most of the load created by the weight of the beams.
We recommend that you familiarize yourself with how you can strengthen the logs of the second floor of the house.
How to build a subfloor that provides a durable floor covering?
After laying the first crown and treating it with fire protection, they begin to arrange the subfloor for the timber bathhouse. The work is carried out in several stages:
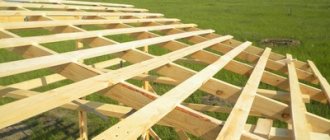
Subfloor construction.
The beams are being installed. Under the logs, timber with a section of 100x150 mm is used. The boards are laid on the narrow end of the lag. The logs are cut into the lower crown, for which a step of 70 cm is provided. When laying long logs (more than 3 meters), they use underlays, which act as a beam with a section of 150x200 mm.
- The side of the lag from the bottom side is fixed using cranial bars (50 by 50 mm).
- The floor base is placed on the cranial bars. Laying is carried out so that no gaps form between the boards, in other words, tightly. In this case, boards are not attached to the bars and beams.
- Next, the bathhouse floor is insulated from timber. The insulation system is as follows: a waterproofing layer, an insulating layer and a vapor barrier layer.
- To form a ventilation hole, a counter batten is laid along the length of the beams.
- The boards are laid, thus creating a subfloor.
All available corners must be laid out clearly at 90 degrees so that the geometric proportions of the house are considered correct.
A check is made to ensure that the lengths of the two opposite sides are the same, and the diagonals between the opposite sides of the timber house coincide. If everything is correct, this means that the angles are accurately drawn.
When laying the lower rows of the crown of timber baths, one should not rush, as the work will affect the evenness of the walls.