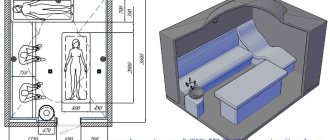
Making a sauna with your own hands is the dream of every home owner. But building a full-fledged Russian bathhouse will take a lot of time and effort, require serious financial costs, and you also need to have a lot of knowledge and skills to cope with this grandiose construction. If the dream of taking a steam bath at home does not disappear, you can try a compact, inexpensive and most healthy option for an infrared saunarium.
The popularity of this type of steam room has long crossed the borders of Japan, where the first infrared cabin was created in 1967. At first they were used as medical equipment for medical procedures. Later, in the 90s of the last century, the device began to be called an infrared sauna and its area began to be used every day as a home steam room. The innovation was first picked up in the USA and Western Europe, and later fashion moved to the east. Currently, in Russia there is a real boom in the popularity of infrared saunas. They have long ceased to be an attribute of a fitness club or beauty salon; many owners are trying to install such cabins in their homes and even apartments.
In this article we will find out what an infrared sauna is, what its advantages and healing properties are, and consider the possibility of arranging this comfort item at home with your own hands.
We build an infrared sauna with our own hands - all the nuances of construction from A to Z
Inexpensive and healthy, infrared home saunas are gaining popularity all over the world today.
Even in Russia their use is akin to a boom. But invisible heat was discovered two hundred years ago by English scientists who noticed that temperature increases already beyond the red light of the solar spectrum. The idea was quickly picked up by the Japanese, who are especially sensitive to their health, and thanks to one of their doctors, half a century ago they discovered a way for deep penetration of heat during such warming of the human body. This is how zirconium emitters were invented, which emit waves with a length of 2 to 5.6 microns and which have a powerful positive effect on the human body. Article on the topic: Living fence at the dacha, what to plant in Siberia
Now the infrared sauna is one of the integral elements of modern homes in the USA and Western Europe. Such luxury has long ceased to be an attribute of fitness clubs and beauty salons in Russia - all this can be easily equipped even in a cramped Khrushchev-era building, not to mention the fact that the question of how to build a sauna of this type in a dacha is not even raised.
So, how to make an infrared sauna yourself and what are its advantages over conventional steam rooms.
Infrared sauna - installation recommendations
First of all, you need to obtain permission from the BTI and the fire department to install an infrared sauna in your apartment. This will help you avoid fines and ensure complete safety. Ready-made saunas - installation recommendations:
- the sauna room should be 2 times larger than the sauna itself;
- it is very convenient when the infrared sauna is located near the shower;
- between the ceiling of the room and the ceiling of the cabin there should be a distance of 10 cm, and if a steam generator is installed, then 20 cm;
- There should be a free space of approximately 5-7 cm between the cabin and the walls of the room in which it is installed.
Ventilation
As for ventilation in such a product, it is simply superfluous here, since during the procedure in this type of sauna there is no formation of elevated temperatures and steam. In this option, it is enough to simply create a small hole, which will make it easy to adjust the special valve to open and close inside the booth itself. You don’t have to create such a hole at all, but make sure that the sauna is ventilated periodically, not when it is turned off.
How to assemble an infrared sauna with your own hands
Before building an infrared sauna, you need to select the material to assemble the box. Use environmentally friendly and breathable materials. Wood is excellent, but you should not take types with a high resin content. The essential oils released by pine or spruce can cause unpleasant symptoms: dizziness, nausea.
Various options for finishing an infrared sauna.
To decorate the steam room, linden, alder or aspen are used. Although aspen darkens over time, it will last a long time. Alder has an attractive appearance, but does not tolerate moisture well. The optimal price/quality ratio is considered to be linden lining. It is easier to assemble walls from MDF boards or plywood with a thickness of at least 10 mm. The size of the box is selected individually and depends on your free space.
Article on the topic: How to assemble a log bathhouse into a paw
Assembling a sauna box
A frame is assembled from 50x50 mm timber and covered with MDF. The inside of the steam room is insulated with mineral wool. It is important that the box is airtight, so it is necessary to cover the surface inside with a vapor barrier and foil. All joints are taped with special foil tape.
A simple design of an infrared sauna with hinged doors.
Any doors can be installed in the infrared sauna, since there are no high temperatures in the steam room. You can take any, even interior. The main thing is not to coat the door with varnish or paint, since you want to breathe in the steam room with a natural woody aroma, and not with chemicals.
A small canopy is made inside and a wooden grate is laid on the floor. A small ventilation hole is made in the wall into which the grille is inserted.
Electricity is supplied inside and the lamp is hung in a special moisture-resistant shade. You can use a simple lamp, since there will be no direct contact with water, as well as high temperatures in the steam room.
Infrared emitter for steam room
The main point is to choose the right infrared emitter. How quickly the steam room will warm up and how useful it is will depend on its power and quality. Study the wavelength of the emitter and calculate how many pieces are needed to warm up all surfaces of the sauna. The emitters are installed so that there are no blind spots in the booth.
Emitters are located throughout the sauna cabin.
Infrared emitters can be in the form of plates that are hidden under the finishing in a steam room or in the form of hanging structures. The most effective is the use of infrared plates. When choosing infrared emitters, ask the seller for a license for the product. On the market you can find Chinese fakes, the price of which is several times lower. But what is the benefit of such warming up is difficult to answer.
Ready-made infrared saunas have built-in emitters with waves selected for the size of the steam room, therefore, when purchasing such a design, the buyer will avoid overpayments and mistakes.
It is difficult to calculate the number of infrared emitters for a steam room yourself, so contact a specialist.
Assembly of the structure
During the assembly process, haste is unacceptable, as it can lead to the most unexpected consequences. To ensure that work goes smoothly, it is necessary to plan all stages of assembly in advance. In short, you need to make a plan.
Step 1. First, a strong and reliable timber frame is created. The dimensions of a sauna designed for two people should be approximately 2x2x1.1 m. The shape, as already mentioned, is rectangular.
First, a strong and reliable timber frame is created
The racks are attached to the lower base and reinforced with jumpers. Another rectangle similar to the base is installed on top. At this stage, the door hole is also formed. All work is carried out carefully, with utmost precision.
Step 2. Next comes the sheathing of the frame. The inside of the sauna is lined with natural wood, and for the exterior you can use fiberboard or OSB.
First, the frame is sheathed from the inside, electrical cables are supplied, and only after that the outer cladding is carried out.
Material for building an infrared sauna with your own hands
For the interior decoration of infrared saunas, tree species such as alder, cedar, linden and others are often used. These trees are an ideal option for interior decoration . The choice of breed depends on your preferences and financial capabilities. To make it more clear what this or that type of wood is, some of their characteristics will be given below.
Article on the topic: How to make a chimney for a bath through a wall
- Linden has a beautiful texture, is easy to process, has a small number of knots and smells pleasant.
- Siberian cedar . This breed has a beautiful color and texture and is distinguished by a rich odor. In addition, this breed has antibacterial properties.
- Canadian cedar has a pleasant color and beautiful texture. The price of this breed is higher than others.
- Aspen . This wood has similar physical and mechanical properties to linden. This breed has the lowest cost.
- Alder . Alder wood has a uniform and very fine structure; it is characterized by low hardness and poor resistance to fungi. But it is distinguished by excellent resistance to deformation.
The above characteristics of a particular type of wood will help you make the right choice.
How to make an infrared sauna with your own hands: installation of equipment
Let's start by studying the requirements for electrical wiring of an infrared sauna - the wires used must be double insulated and withstand a voltage of 400V and a current of at least 15A. As for its connection to the home wiring, there are no special requirements - you can either make a permanent connection using a separate circuit breaker, or get by with an ordinary outlet, which greatly simplifies the matter.
When installing infrared sauna equipment, special attention must be paid to the selection and location of infrared emitters. In particular, you need to select their dimensions, pay attention to the presence of a ceramic coating on the heating element itself, the length of the emitted waves, the quality of the protective grilles and the possibility of installation in different positions. By the way, special attention must be paid to the location of the emitters - they must create a single field, the task of which is to have a uniform effect on the entire human body.
DIY infrared sauna installation photo
The optimal location of the emitters is considered to be the following: two rear ones, located from the person’s back, two front ones (mounted in the corners towards which the person is facing while sitting in the sauna) and one foot one. In principle, if you provide a seat for a person in the center of the cabin, then you can settle on an angular arrangement of all emitters. In any case, a very important point is to maintain the height of their installation above the floor level - as a rule, it is 10-12 cm.
Article on the topic: What is a stake fence
At the final stage of assembling and installing the infrared sauna, the control panel is installed. As a rule, a section of the body on the front surface of the cabin is allocated for it. Exactly opposite it, inside the sauna, are humidity and temperature sensors.
Well, that's basically it. As you can see, making an infrared sauna with your own hands is quite simple - as they say, if you have the desire, everything else will follow. Yes, I completely forgot to say that you can install such a sauna not only in the bathroom. By and large, it can even be installed in the kitchen if you like. The main thing is to meet three basic requirements: the floor must be level, the room dry and, if the sauna is installed in a niche, then its dimensions must exceed the dimensions of the sauna by 10-15 cm.
Choosing an apartment
Victor took the matter seriously and from the very start he was looking for an apartment suitable for a sauna. It just so happened that in most Minsk high-rise buildings it is impossible to build a sauna even in theory.
— The first thing I paid attention to was the presence of an electric stove. If electric stoves are installed in the house, then, as a rule, the networks can withstand high loads. In addition, we needed an apartment with two bathrooms, and at least one of them had to have room for a sink, toilet and Jacuzzi. I was going to convert the second bathroom into a sauna, because by law it can only be placed in a ventilated room.
As a result, Victor bought an apartment in a new building on Skryganova, which is part of the Cascade residential complex. The apartment had two bathrooms and an electric stove. Most modern new luxury buildings would be no worse from this point of view, but technical problems could arise with “resale” and standard housing.
Article on the topic: Which chain-link is better for a fence
“I myself live in a panel house built in the 1970s,” says the entrepreneur. — My apartment has a 7 kW instantaneous water heater. Aluminum wiring is installed throughout the house, as was done in Soviet times, but a separate cable is installed on the panel for the water heater. So, when I turn it on, the voltage in my network drops from 220 volts to 200, the lights begin to blink, and the traffic jams are knocked out. In a word, without normal power grids you shouldn’t even start.
Do it yourself!
Needless to say, purchasing the necessary equipment is not cheap. But nothing is impossible. You can assemble the sauna yourself. To do this, first of all, you need to understand what exactly you want. There is plenty to choose from. Saunas can be constructed from the following elements:
- panels;
- frame;
- standard blanks.
A sauna made from standard preparations is usually installed in the open space of a summer cottage and very rarely - indoors. It consists of beams or logs. The materials are connected using tongue-and-groove technology, which ensures the strength of the structure, and the crowns are connected using grooves and bolts. The thickness of the walls depends on the temperature of the surrounding space.
Layout of infrared heaters in the sauna.
A do-it-yourself infrared sauna can be made from panels on a frame. This design is very convenient and easy to install even in apartments. You can select the desired size of the panels: manufacturers produce both large parts (one panel is an entire wall) and smaller ones.
The choice depends on the size of the room where you plan to install the sauna, and on your preferences. If you are not satisfied with the proposed design, you can assemble another one from smaller parts. In this case, you have more options regarding the size and shape of the cabin.
The panel structures are also connected using the tongue-and-groove principle, making the cabin strong, reliable and airtight. Such a sauna can be easily disassembled and moved, and special channels allow you to easily lay the necessary wires in the walls. The dimensions of the panels are usually very accurate, so installation does not present any difficulties.
Article on the topic: Is it possible to use fuel briquettes for a bathhouse?
A frame shower cabin with an infrared sauna is easier to assemble and costs less than a panel one or from prefabricated ones, but for some reason this type of structure is not widespread. This may be due to the need to independently adjust each element to size.
Our compatriots are accustomed to doing everything with their own hands, turning to specialists only in extreme cases, however, if you meticulously calculate everything, it turns out that installing a frame sauna, even with the work of installers, is cheaper than installing any other structure.
Electrics
To create an infrared sauna, there is no need for water supply or sewerage; it only requires a separate power supply. You cannot connect the IR cabin to a common outlet, much less to an extension cord. It is better to run a separate power branch from the common panel box and make a separate high-quality outlet.
Electrical connection in the IR cabin
In order to supply infrared heat to the sauna cabin, special infrared emitters are installed. They can be purchased in specialized stores, but before that, calculate the required number of these electrical appliances. Using the example of a single-seat IR cabin, we can give some calculations of the emitters:
- One small emitter is installed in the space under the bench, and it is directed to warming the legs.
- A heater of sufficient size is also installed in the back area of a person sitting on a bench.
- Two small heaters are installed on the sides of the seated person.
This number of electrical appliances is usually sufficient for one person to perform procedures. According to this calculation, you can calculate how many electrical appliances are required for a double or triple version of an infrared sauna.
Infrared heater
Another important point when choosing electric infrared heaters is their quality; you should not skimp here. Since the heaters are the basis for the high-quality operation of an infrared sauna, they must be reliable and durable. As already mentioned, such devices should be purchased in specialized stores and it is advisable to obtain a warranty card upon purchase.
What are infrared emitters
The discovery of thermal radiation belongs to the British astronomer William Herschel.
The discovery was made in 1800, and they began to put it into practice only in the second half of the 20th century. The discoverers were, of course, the Japanese. Their doctors discovered the benefits of heat for the human body when heat waves penetrate deep into the body. The first artificial wave emitter was the zirconium heater. Zirconium retains heat well and therefore development began with it.
Later, other types of infrared heaters appeared. Industrial-type emitters were also produced in the Soviet Union, but, unfortunately, they were not widely used.
Today, throughout the world, thermal emitters are used in many industries and in everyday life. Among domestic applications, infrared saunas . For Europe and America, such saunas have become commonplace. It has now become fashionable for us to equip our home comfort with an infrared bath. Moreover, anyone can do this.
Contraindications for use
Despite the wide range of beneficial properties, infrared radiation is not suitable for everyone. Harm from an infrared sauna can become real if the installation is not used rationally. In practice, there are a number of contraindications for use:
- All diseases accompanied by thyrotoxicosis.
- Malignant neoplasms and precancerous conditions.
- Benign tumors of most locations. Doctors warn that both ultraviolet and infrared radiation can stimulate the degeneration of benign cells.
- Skin diseases of autoimmune and fungal nature.
- Hypertonic disease.
- Heart failure.
In addition to contraindications to the use of an infrared sauna, the individual reaction of the body to radiation in various doses is assessed.
How to make an infrared sauna with your own hands
Making a mini sauna in an ordinary apartment is not difficult. You just need to choose reliable materials so that they last two or three years and do not cause a fire.
Tools and materials
Materials for building an infrared steam room:
- lining made of aspen or linden;
- timber 4x4 cm for the frame;
- wooden corners and cornices;
- glass door;
- wooden board for a sunbed, 2 cm thick;
- five IR heaters;
- wiring with double insulation and a cross-section greater than 1.5 mm².
Article on the topic: How to properly steam an oak broom in a bathhouse
Tools required for installation:
- five-meter tape measure;
- meter level regular or electronic;
- hammer, screwdriver and screwdrivers;
- hacksaw and jigsaw;
- hammer drill for installing the frame and attaching it to concrete walls.
IR emitters from Italian companies ITM or AEG are equipped with moisture-resistant housings. They are not subject to wear. The Germans produce not only wear-resistant materials, but also their heaters are famous for their economical energy consumption. The choice of IR emitters is up to the owner.
After the materials and tools are selected, the design begins.
Design
They design a bathhouse using a special program on a computer, turn to engineers, or make a design drawing themselves, if their level of knowledge allows.
They develop a scheme and determine the amount of materials that will be needed during construction. The estimate includes ten percent more material than needed. This rule is followed in any construction.
Specifications
Technical conditions must comply with SNIP standards.
- The power of electric heaters is not less than 230 degrees.
- Humidity 50 percent.
- The distance of a person from the emitters should be more than 60 cm.
- The material from which the steam room is made is not treated with chemicals.
- Foot heaters are installed under the sun loungers, corner heaters are installed in front of the seated person from different angles, and the rear radiator is installed behind the back.
It is recommended to comply with these requirements to avoid health problems.
Cabin assembly
Assembling the booth begins with the frame. The beams are attached to the wall using dowels and directors. At the same time, the base for the door is installed. Then the cabin is sheathed on the inside with clapboard, and on the outside with chipboard or OSB.
Attention! Before the outer casing is made, cables are laid and IR emitters are installed.
Loungers and IR heaters are installed. The joints are sealed with sealant and decorative elements.
Design requirements
The structure must be reliable and firmly attached to concrete walls and floors. Despite the required strength, the steam room should be easy to disassemble and assemble. All cracks are tightly sealed with sealant to prevent drafts.
Article on the topic: Where to build a bathhouse and barn
The varnish coating used to cover the lining must be water-based. And electrical elements are installed in accordance with fire safety standards.
Tools for work
To make an electric oven you will need the following set of materials and tools:
- Steel sheets or body from an old washing machine. Often a variety of available materials are used.
- Fasteners.
- Welding and grinder for metal work.
- Durable gratings for fencing stones.
- Stones (durable fireproof stones can be purchased at a specialty store).
- Power cable with high quality insulation.
- Rheostat for optimal control of the power of the device.
- Cement board as a heat-resistant base.
- Temperature sensors.
- For decorative finishing, you should purchase only special paint.
A construction marker, tape measure, file, and pliers should also be prepared. We must not forget about our own safety by first preparing personal protective equipment (respirator or mask, protective mask for welding, thick rubberized gloves).
This arrangement allows for optimal heating of the air in the sauna cabin. During the renovation process, you should either leave a niche in the floor without wood paneling, or use a stone slab as a fire-resistant base.
