Sauna structure
As a rule, setting up a sauna does not require very large premises, unlike a Russian bath. If the sauna is designed for 3-4 people, it can occupy an area of 3.3 m2. For a number of visitors of 5-6 people, 4.5 m2 of space is enough. In terms of dimensions, such a sauna will have 2.1 m in height, 2 m in width and 2.4 m in length, and two tiers of shelves are installed along the wall. If desired, you can even equip a very small single-person sauna, the dimensions of which will be 2.1 m in height and 0.8 m2 in area.
Note that when building a sauna bath in a country house, it is very important to adhere to the height parameters of 210 cm in order to build in a standard 190 cm door, and the length of the wall opposite the entrance to 200 cm. This will create the necessary circulation of air flows in the steam room, as well as create optimal temperature and humidity on the top shelf.
When using a sauna, it must maintain an optimal temperature and humidity ratio. The air should not move due to strong changes, otherwise a person may receive thermal burns. This happens because in the sauna the skin is heated to the maximum permissible 45-50 ºС, and any movement of hot air leads to the fact that sweat does not have time to cool the skin. Therefore, in order to prevent hot drafts, ceilings should not exceed 210 cm in height.
The presence of a window in the sauna steam room is not at all necessary if it is located in an apartment or house. But in some buildings it is better to provide a window with double glazing.
As a rule, there is no need to connect the water supply directly to the steam room, since the shower is installed in a separate room, where a font can also be installed with your own hands. To clean the steam room, a simple rinse with water pressure from an extended hose is sufficient. At the same time, it is imperative to provide a drainage system so that excess water can be disposed of.
The oven is allocated a place at the corner closest to the entrance. It must be equipped with a protective fence, regardless of the type of oven.
Briefly about the main thing
Setting up a good sauna is difficult, but it is possible. The result will justify the effort spent on it. Natural materials should be used in your work - they retain heat better. The ideal option is a log house on an earthen foundation. In finishing, you should also give preference to wood.
It is imperative to put insulation between the walls and the finishing. To quickly ventilate the room, you need windows in every room.
It is better to install a metal or electric stove, but you can choose other options.
If the sauna is a separate building, then there should be more rooms in it than if it occupies a room in the house.
Ratings 0
Materials for the floor, walls and ceiling of the sauna
The optimal solution would be to install a sauna in a wooden house, since this will achieve the most acceptable microclimate in the steam room. However, it is allowed to install saunas in buildings made of brick or concrete. It’s just that such buildings need to be additionally sheathed on the inside with wooden clapboard.
The construction of walls in a sauna requires mandatory insulation. It is placed between the outer wall and the inner lining, covered on the steam room side with a layer of vapor barrier. The best insulation is considered to be stone wool in slabs or rolls. However, it needs vapor barrier protection, since it absorbs moisture and does not release it.
Wood is considered one of the best materials for walls in a sauna, since in this case the insulation will be able to freely pass steam from the steam room, while remaining dry. But when interacting with cold stone walls, cotton wool is not able to release moisture, so it breaks down quite quickly.
When laying insulation in several layers, it is worth remembering that each subsequent type of material, in the direction of the external walls, must have greater vapor permeability.
To protect the stone mineral wool in the sauna wall, it is covered with a foil vapor barrier material that does not allow steam or moisture to pass through, and does not allow the formation of condensation. In order for the insulation to be as effective as possible, a film overlap of 20 cm is made where the walls meet the ceiling.
Room layout
There are many possible planning solutions. It all depends on the size of the family budget and personal preferences. Some people prefer several multifunctional rooms.
And for some, a modest-sized room with a stove and a couple of shelves will be enough. A popular idea is a swimming pool. But here you need a drawing, which will significantly affect your wallet.
As for the dimensions of the sauna, each user should be allocated a minimum space of 3 cubic meters. m. However, experts advise abandoning an overly spacious room - it is difficult to warm it up.
Doorways and windows in the sauna
For ventilation and lighting of the sauna, a window is provided in a separate building. It is best to make it small, approximately 70x50 cm, to prevent large heat losses. And if it is dull, that is, will not be used for ventilation, double frosted glazing is performed.
A prerequisite for proper operation of the sauna is its thorough ventilation. The frame of the ventilation window must be adjusted to the frame and sealed with felt or foam rubber.
The glass is inserted into the frame using a rubber seal and casein lubricant, and glazing beads are added for additional strength.
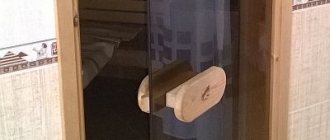
Since wood can become deformed, dry out or swell due to exposure to high humidity and contrasting temperatures, it should not be used to make a sauna door. The optimal material would be tempered glass, which always retains its shape, fits well on the hinges, fits easily into the door frame and does not heat up too much.
You can complement the glass door leaf with a handle made of a heat-resistant material, which is especially important from inside the sauna. To make the door close more tightly, silicone sealant is used, which ensures an absolute, gap-free fit of the leaf to the door frame.
Stage 2. Preparing consumables
Let’s make a reservation right away that it’s not worth saving on building materials, because in the future all costs will be more than recouped by an attractive appearance and a long service life. The general list of materials and tools will look something like this:
- support pillars (the described structure will be built on a columnar foundation);
- timber 10x15 cm;
- garden auger;
- slats 6x4 cm;
- mounting level;
- roulette;
- nails or screws;
- septic tank;
- primer mixture;
- sand, crushed stone, concrete mortar;
- glassine;
- cladding boards;
- Styrofoam;
- foil for vapor barrier.
After preparing everything you need, you can start working.
Types and characteristics of sauna stoves
A fully functional sauna structure and equipment is impossible without installing a high-quality stove. As a rule, solid fuel stoves are used in saunas, mainly wood, gas and electric. True, gas devices have hardly been used lately, so we will not dwell on them in detail.
The advantages of wood stoves are:
- high speed of temperature rise;
- lower cost of fuel for operation;
- independence from external energy sources;
- the ability to heat up stones faster in heater stoves, which affects the microclimate inside the sauna - dryer, soft steam is obtained.
We also note a number of disadvantages of wood-burning stoves:
- Wood stoves themselves give off heat much worse than electric ones;
- due to the presence of an open flame, the risk of fire is increased, so the safety standards of such devices must be observed;
- A prerequisite for installing a wood-burning stove is the presence of a chimney, the construction costs of which may exceed those of the stove itself. If there is no chimney, use electrical installations.
If we are talking about an apartment or a private country house, then for a sauna you need to buy exclusively electric stoves, since they are easier to operate and safer. Control is simplified due to built-in electronics, which allows you to set a certain temperature, humidity and not worry that the oven will overheat.
When calculating the power of the electrical network, it should be taken into account that for every 1 m3, about 1 kW of energy will be required. So, to power a sauna with a volume of 10-12 m3, you will need a power of 9 kW and a three-phase network. If it is not possible to provide a sauna with energy reserves in the apartment, it is better to opt for either infrared cabins or solid fuel stoves.
When installing a stove in an apartment or house, you should take into account the manufacturers' recommendations, so as not to get burned on a heater installed on a walkway, for example. Finnish stove manufacturers have proven themselves best.
Steam room frame
First you need to install and sheathe the ceiling. Only then do they move on to building walls. This algorithm ensures the reliability and rigidity of the corners of the room, and it is also the simplest.
- Before you begin installing the frame, you need to measure the diagonals of the room - it must be strictly rectangular in shape. If this is not the case, it should be corrected.
- For the frame, pine beams with a section of 50*50 are used. The installation option depends on how you plan to place the lining.
- It is necessary to retreat from the wall at a distance equal to the thickness of the thermal insulation. The frame should be installed from the corners.
- The outermost beams along the perimeter are fixed with long screws or anchors. For ease of installation of intermediate elements, a tensioned thread is used.
Since the stone stove is mounted on a ready-made wall structure, the embedded parts should be provided ahead of time - they must match the mounting holes of the heating device.
Sauna stones
It is very important to choose the right stones for laying in the stove. Not every mineral is suitable for this, since simple stones can be quite fragile. It is optimal to use soapstone, gabbro-diabase or jadeite, the evaporations from which are beneficial for the human body.
For stoves, stones with a rough surface are used, on which water is retained, gradually boils and evaporates. Do not use stones with cracks or defects - they will quickly crack from overheating.
Periodically you need to sort through the stones to remove damaged ones and replace them with new ones. The frequency of this procedure is once a year, subject to weekly use of the sauna. When heating the sauna twice a week, the stones should be inspected once every ½ year. That is, the more often you use the steam room, the more often you need to check the condition of the stones.
The electric furnace is tightly laid with stones in the spaces between the heating elements, but air must pass freely through the masonry.
Wood burning stoves are filled with stones on top of the firebox, so only a few are needed. If the stones are heated by a metal casing, the stove must be heated during the entire time the sauna is used so that the stones do not cool down. Although these stoves heat up faster, they produce denser heat that is harder to tolerate.
Another type of oven with a special mesh, into which you can put much more stones - about 150-300 kg. Thanks to this design, the firebox is lined with stones on all sides. Although such a stove requires more time to warm up, it produces dryer, delicate steam, more suitable for a sauna.
Stage 4. Sewerage
The steam room and washing room require a wastewater disposal system. To do this, at the lowest point (and the floor, as we remember, should be on a slope), a small gap will be left, under which the gutter will be laid. If the floor is slotted, then a 5-centimeter gap is left in the appropriate place, under which a concrete base is constructed with a slope towards the center. The base will serve to collect wastewater.
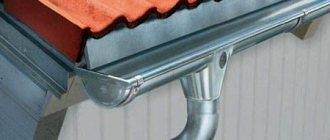
Sauna drainage
Note! If the steam room and washing room are separate, then the gutter can be installed under the wall between them.
Regardless of the chosen method of flooring, the installation of the sewer system proceeds as follows.
Step 1. Before laying the flooring, sewer pipes should be laid. To do this, ditches are dug with a slope of 2 cm/1 linear. m depth from 55 cm to 60 cm.
Example of laying sewer pipes
Step 2. Then the bottom is covered with a 15-centimeter sand cushion, which is compacted taking into account the slope.
Step 3. Polypropylene pipes ø10 cm are laid. A gutter is connected to the pipes.
Step 4. Plumbing fixtures (sink, toilet) are connected to the system, if provided.
Drainer
Note! The gutter can be a plastic or asbestos-cement product. Wood was used in the past, but for obvious reasons it quickly deteriorated. The minimum diameter of the gutter is 5 cm.
From the outside, the system is connected to a sewer pit or septic tank.
Example of water supply
Sauna ventilation system
Ventilation must be provided in the sauna, since ventilation through the walls cannot be due to their heat and vapor insulation. For every 1 m3 of steam room volume, a ventilation hole with an area of 24 cm2 is required.
The arrangement of vents for ventilation involves installing a window 30 cm from the floor near the stove to provide draft. On the opposite wall, a ventilation hatch is cut 30 cm from the ceiling.
Cold air enters through the lower passage, which, passing through the stones, gradually warms up and rises. The upper ventilation window allows fresh air inside, which displaces the stagnant air in the upper part of the sauna. Forced air ventilation is not recommended so as not to cause thermal burns on the skin.
Electronic sauna control allows you to create any temperature and humidity regime, whether you want a dry and hot sauna, or prefer a wet and cooler sauna.
Stage 6. Thermal insulation
Thermal insulation
Ceiling insulation scheme
To insulate the ceiling and floor, 10-centimeter thick foam is used. First, the boards are covered with plastic film with an outlet of 4-5 cm. Foam boards are mounted between the logs, and the gaps are filled with polyurethane foam. Then you can use one of two options:
- lay a wooden floor;
- Fill the insulation with screed and lay the tiles.
The second option is preferable, because the tiles are easy to clean and are not sensitive to high levels of humidity or temperature.
The purpose of sauna insulation
Ceiling insulation is carried out according to the standard scheme:
- foam is inserted between the joists;
- the gaps are filled with foam;
- The vapor barrier material is attached using a stapler (foil side up).
Vapor barrier
Vapor barrier
All that remains is to lay the wiring and cover the walls and ceiling with clapboard.
Prices for thermal insulation materials
Thermal insulation materials
Video - How to select and secure lining
Note! If electricity is required only for lighting, then 2 kW is sufficient. But if you plan to connect household appliances (washing machine, hair dryer, etc.), then the wiring power must be at least 5 kW.
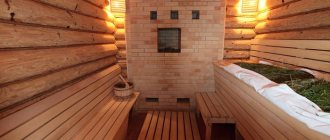
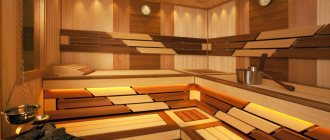
Interior Design
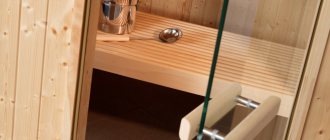
As a rule, two tiers are built inside the sauna for sitting and lying areas. Right angles between the walls and benches allow you to fully utilize the steam room area. All benches are made exclusively from wood. Spaces of 1.5-2 cm are left between the boards to ensure ventilation of hot and cold air in the sauna.
The width of the top shelf should be at least 50 cm so that a person can lie on it comfortably. Additionally, the front of the bench is equipped with a stand on which you can rest your feet. A distance of 70 cm should be left between tiers.
100-105 cm are left from the top bench to the ceiling so that a person can feel the maximum effect of the sauna. If the size of the room allows you to place shelves in only one tier, it should be taken into account that a very tall person, when sitting on a bench, should not reach the ceiling.
There is no plunge pool or buckets of water placed inside the sauna, since the shower and relaxation room are located separately. There are enough showers in small rooms. But equipping a swimming pool will be very useful if you have a large area. This way out is not only healthy, but also pleasant. Read also: “How to choose and install a dousing bucket for a bathhouse and how to make such a bucket yourself.”
The relaxation area warms up to a comfortable +25 ºС. The exception is when the outside temperature is above +35 ºС. However, it is extremely undesirable to install air conditioning in the recreation area - it can significantly undermine your health.
Required Tools
To build a sauna base you need:
- carpentry tools;
- shovel;
- trowel;
- building level;
- concrete mixer;
- wheelbarrow;
- container for preparing the solution.
Concrete mixer can be rented
If you plan to mix the solution manually, then you need to prepare a metal container and a shovel. You can also use a construction mixer or a high-power electric drill with a special attachment.
A mixer attachment will help facilitate the process of mixing cement.
During the construction of a sauna, it is impossible to do without an electric jigsaw. With this tool you can make cuts and cuts to achieve unusual shapes in different materials.
An electric jigsaw will allow you to cut a piece of wood into any shape.
conclusions
Our message for those who want to start building a sauna turned out to be 11 points, also a lot, but not at all in order to resign this wonderful recreational facility. On the contrary, take a closer look at the entire description again.
Apart from taking care of the foundation and walls, building saunas with your own hands is quite simple. Maybe that’s why they are so popular in existing areas, when there is no need to worry about the foundation and walls, and all attention can be paid to creating a sauna atmosphere. If you have any questions, be sure to watch the video in this article, which details the entire construction process.
Did you like the article? Subscribe to our Yandex.Zen channel
Price issue
It is difficult to answer definitively how much it will cost to build a sauna. There are a number of factors that influence the overall cost. The main one, as noted earlier, is whether the premises are being converted or a separate extension is being built. Another factor is the area of the steam room. In addition, the cost is affected by the materials used for the cladding, the number of lamps, other furniture, doors, etc.
Tiled floor in the sauna
| Sauna, recommended temperature and humidity characteristics | Meaning |
| Temperature under the ceiling, °C | 100 |
| Temperature in the middle part of the room, °C | 60-90 |
| Humidity, % | 5-20 |
| Temperature in the rest room, °C | 18-20 |
| Recommended duration of procedures | no more than 2 hours |
| Floor temperature, °C | at least 40 |
| Absolute humidity, g/m3 | 40-60 |
Possible errors during construction
A sauna in a private home has its pros and cons, but the owner can minimize the disadvantages of installing a built-in steam room if common mistakes are avoided.
The most serious miscalculations during design and installation:
- insufficient distance between the wall of the room and the sauna - the formation of condensation and the inability to pass between the walls;
- the use of non-heat-resistant wire in wiring - electrical problems and emergency situations;
- poor ventilation - inability to comfortably stay in the sauna for a long time and at high temperatures;
- lack of waterproofing of the floor - through the floor, moisture can escape outside the sauna and cause a lot of damage to the residential building;
- non-compliance with fire safety rules - danger of fire;
- wrong choice of wood type - not every wood can withstand the extreme conditions of a sauna;
- incorrectly selected stove power - usually this means insufficient power, due to which the sauna cannot warm up to the desired temperature.
Render House specialists are engaged in the construction of cottages with saunas. On our website you can familiarize yourself with typical projects. Also, if you wish, we will develop an individual house project.