Pay maximum attention to this element of the heating system
Installing a chimney in a wooden house with your own hands - conventional and coaxial
We will now try to establish the differences between these chimneys, find out how they are installed, and in addition, we will give you the opportunity to watch the video in this article.
Installation of a sandwich chimney. Recommendations from experts
FORUMHOUSE users are well aware that high-quality installation of a metal chimney directly affects the safety of living in a cottage. We have already written about how to choose a heating system for a private home. It's time to talk about the features of installing a steel chimney.
1. What is a sandwich chimney
Despite the large selection of materials for installing smoke exhaust systems, reliable steel sandwich chimneys are most widely used in private housing construction.
A sandwich type chimney consists of two pipes of different diameters inserted into each other, and all the free space between them is a place to be filled with non-combustible insulation - mineral wool.
Mineral wool simultaneously plays the role of insulation and insulator.
Sandwich chimneys have the following main advantages:
- High installation speed and low cost compared to brick chimneys;
- Low weight of the smoke removal system;
- Smooth internal walls of the chimney provide good draft and help reduce soot formation;
- The use of acid-resistant stainless steel grades guarantees a long service life of the chimney.
The temperature of the flue gases directly depends on the type of heating boiler and the type of fuel used. The higher the temperature of the exhaust flue gases, the more the pipe and, accordingly, all the structural elements through which it passes, heat up. The following table will help you understand the dependence of the flue gas temperature on the type of boiler and the type of fuel used.
It should be remembered that unprotected wood begins to char at a temperature of 200 ° C. Well-dried wood can ignite from an open flame source at a temperature of 270-290 ° C. And if a wooden surface is subjected to constant heating for more than 24 hours in a row, then it can spontaneously ignite already at a temperature of 170° C. Therefore, when installing a sandwich chimney, it is important to observe all fire safety measures. And any mistake made at this stage can lead to dire consequences - fire and loss of property.
Urban:
– Two of my friends’ houses burned down due to an improperly installed sandwich chimney. Moreover, in both cases, the fire occurred in the place where the chimney exit was located through the wooden ceiling.
According to statistics, up to 80% of fires occur precisely because of improperly installed chimneys. Therefore, when choosing and installing a chimney, you must adhere to SNiP 41-01-2003 “Heating, ventilation and air conditioning.”
2. Chimney: distance to the floor slab and correct penetration
As practice shows, the greatest number of questions arise when calculating the distances from the chimney to wooden floors.
VadimPro:
– I built a house with a distance between the rafters of 60 cm. And only then I found out that according to existing standards, my chimney does not fit into this distance.
And again SNiPs come to our aid:
vova230:
– According to the standards, when driving through wooden floors, it is necessary to maintain a distance of 38 cm from the inner pipe of the sandwich to the combustible structures. All this space must be filled with fireproof material. If the standard passage does not provide this distance, then the dimensions of the furnace passage must be further increased.
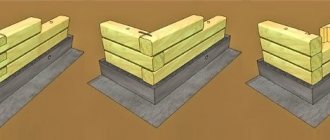
If the chimney is laid through protected wooden structures, the distance can be reduced to 25 cm.
Protection of wooden structures - joists, ends of rafters, sheathing - is ensured by a galvanized sheet with an asbestos sheet of at least 5 mm thick laid between it and the wood.
Galvanization performs the following functions:
- Prevents the spread of fire in the ceiling;
- Provides uniform heat dissipation;
- Shields and reflects thermal radiation coming from the pipe.
In the case of tunneling between floors with a single-pipe steel chimney, the distance to unprotected wooden structures must be at least 50 cm!
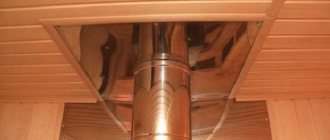
Also, the parameters of the chimney should be calculated in such a way that the chimney pipe passes through the ceiling entirely - without joints with other elements. The chimney itself is installed through a passage pipe-cut, which is a metal box.
Alexey Telegin , a specialist from the forumhouse.ru portal from Moscow, recommends:
– According to the standards, the thickness of the cutting (metal box) should exceed the thickness of the ceiling by 7 cm.
Sealing the floors where metal pipes pass from the stove with basalt fiber cardboard
Installation of polyurethane foam chimney
The process of installing grooves in a wooden floor can be divided into a number of successive steps:
1. Cut a hole in the ceiling with a size of at least 700x700 mm.
2. If necessary, remove or strengthen the floor beams.
3. We sew up the perimeter of the cut opening with fireproof materials, super insulation, etc.
4. For tightness, we place a sheet of basalt cardboard under the superisol.
5. We make a supporting frame from a galvanized profile, which is used when installing gypsum boards.
6. The dimensions of the frame are calculated for the PPU (ceiling-passage unit) fastening units.
7. We close the opening with sheets of mineralite or superisol with a hole for the passage of the inner part of the polyurethane foam.
8. We fix the foam.
9. Install the sandwich pipe.
10. We insulate the lower part of the polyurethane foam and the space around it with non-flammable insulation, this will avoid freezing and the formation of frost and condensation.
It is better to install a smoke removal system and
Metal chimneys
Chimneys made from sandwich pipes (see Sandwich pipe for chimney) have gained well-deserved popularity:
- Convenient and quick installation.
- Lightweight structures do not require a separate foundation and do not require a foundation.
- Filling with mineral (basalt) wool of the required thickness provides the necessary thermal insulation.
- The smoothness of the inner walls does not allow soot to accumulate and does not disrupt the draft air flow.
- The pipe has a complex structure; an acid-resistant grade of stainless steel is used for the internal channel, this guarantees the durability and safety of the smoke removal system.
Scheme of a sandwich pipe.
When choosing a chimney, you should not forget about the flue gas temperatures shown in Table 1.
Therefore, the thickness of the internal stainless wall of the pipe should be:
- from 0.5 mm for gas, diesel and pellet boilers;
- from 0.8 to 1.0 mm for stoves, sauna stoves and fireplaces;
- from 1.0 mm for coal boilers.
The thickness of the thermal insulation layer should be up to 100 mm in the case of stoves, fireplaces and coal boilers, and in the case of automated boilers the layer thickness should be up to 50 mm.
Overlap
I repeat once again that an undoubted convenience is the availability of ready-made elements for all occasions. If one supplier does not have it, then we can easily find another supplier who can supply all the necessary kit.
- In the case of interfloor slabs, we take ready-made factory-made cutting.
- This cutting is called attic or interfloor.
- The inner diameter must match the outer diameter of the sandwich pipe.
- We cut out a square hole between the beams, corresponding to the size of the square part of the cutting; you can make a reserve to wrap the metal with another 1-2 layers of non-flammable basalt cloth.
- We pass the chimney through the round hole.
- Filling the space with basalt wool
Mounted cutting. The space between the pipe and the metal wall is also filled with mineral wool.
Roof
The problem of how to install a chimney through the roof is solved in much the same way as in the case of overlapping. We take ready-made elements, in particular ready-made roof trim, some call it roof trim. They come in different sizes and with different slope angles.
- Installing a roof passage unit is still much more difficult than installing a floor passage unit.
- The distance from the pipe to the tree must be at least 250 mm on each side. The hole and chimney are covered from above with a special element - a roof.
- This roof is inserted from above under slate or tiles, and from below is placed on top of the tiles.
- On top of the roof, a kopinik is put on the chimney pipe and clamped with a clamp. This provides protection from precipitation.
- The space between the chimney and the rafters is filled with non-flammable mineral (basalt) wool and covered from below with a metal reflector.
Passage through the roof.
Passage through the wall
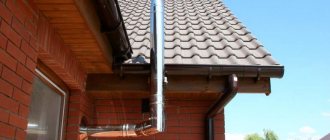
Often, sandwich-style pipes are led outside the house and run along the outer wall. This has its positive aspects in that there is no need to carry out labor-intensive passages through the floors and roof. And the fire hazard is reduced. In this case, a horizontal passage is added through a vertical wall (see How to route a chimney through a wall).
From the point of view of thermal insulation, this node for passing through the wall is no different from the node for passing through the interfloor ceiling. The installation is complicated only by the fact that the log wall can shrink. And here there should be a sliding fit of the cutting.
What do building codes and regulations (SNiP) say about this?
SNiP 41-01-2003 “Ventilation, air conditioning and heating” regulates the main aspects related to the arrangement of various autonomous heating systems. Since this publication is devoted to an analysis of the design features of the passage of a chimney through the attic floor, it is necessary to pay special attention to section 6.6 - this is “Stove heating”, and its subsections.
In some cases, these existing rules become a real problem for owners of private houses when arranging their home heating system. Such difficulties arise due to the fact that some of the requirements for modern heating systems and materials used for thermal insulation are clearly outdated. However, despite possible obvious contradictions, regulatory organizations rely on this guidance and demand compliance with established standards.
It must be remembered that if a stove is installed in a newly built house, then it will be necessary to legalize its presence with the fire services, otherwise it will simply not be possible to register the property. Such a permit is issued on the basis of a document drawn up by an employee of the controlling organization who accepts the building. If during the inspection serious violations of current standards are discovered, then there is no escape - the mistakes will have to be corrected. Therefore, it is best not to immediately deviate from the established standards.
The design and location of both the stove itself and its chimney are strictly regulated by current building codes and regulations
Not everyone likes the dry language of regulatory documents, and that is why they are simply afraid to look into them. Let's try to outline these rules for them in a few paragraphs:
- The thickness of the walls of a brick chimney in the area of its passage through the floors, roofing or walls (partitions) must be greater than along the main height. This thickening is called cutting.
According to existing standards, the cutting thickness is calculated taking into account the thickness of the pipe itself. Craftsmen often use the colloquial term “from smoke” in this regard. So, the standard cutting size is:
- 500 mm if the pipe borders a building structure made of flammable material (which, of course, includes a wooden floor).
- 380 mm - for those cases when the materials of the building structure are protected from fire by a layer of plaster of at least 25 mm reinforced with steel mesh, or a metal sheet with an asbestos lining underneath with a thickness of at least 8 mm.
- The height of the chimney cut must be at least 70 mm greater than the thickness of the ceiling. By the way, SNiP does not stipulate from which side these millimeters should “look out” - from below, on the ceiling, or in the attic. Judging by the forums, there is also no unanimity among the masters. But, as a rule, customers ask for a flat ceiling in the room, so a 70-mm step can be located in the attic. However, if you read the forums again, you can come across cases where fire inspectors demanded a 70-mm “side” both at the top and bottom. And it was not possible to convince them otherwise.
- It is not advisable to attach the chimney section rigidly to the floor materials or to rest it on any building structures. True, there is no categorical prohibition in this regard, but one should still adhere to such a recommendation so that the deformation of one element that occurs for some reason does not entail the destruction of another.
- The space between the cutting and the building structure is filled with non-combustible materials. The list of materials is not specified, but in practice those that can be classified as thermal insulators are usually used - expanded clay, vermiculite, mineral wool.
- If the pipe is cut through the opening of a wall or partition and flammable materials, then its thickness cannot be less than the thickness of the partition itself. In this case, the cutting must be done along the entire height of the wall.
- When the pipe passes through the roofing, cutting is also often performed, which in this place is called “otter”. In any case, the distance from the outer walls to any elements of the roof structure made of combustible materials must be at least 130 mm for a brick pipe, and 250 mm for a ceramic pipe without thermal insulation (when using insulation with a heat transfer resistance of at least 0.3 m²×ºС/ W – 130 mm). The roof section at the passage point should only be made of non-combustible material.
- When constructing a stove and its chimney, it is important to maintain the distance to walls and partitions. This gap has its own name - retreat. The amount of derogation is also regulated by the requirements of SNiP:
What materials can be used for fire protection when installing polyurethane foam?
Both brick, ceramic, and metal parts of interfloor cutting units are heated to temperatures that create a risk of wood fire. To reliably isolate the flammable elements of the ceiling pie, you need to make a gasket made of protective materials.
Slab fireproof material based on cement with the addition of limestone, mica and cellulose. Withstands constant heating up to 150 °C. When exposed to higher temperatures, the organic filler of mineralite burns out and it becomes brittle. This general name refers to a fibrous insulation consisting of molten threads of various inorganic natures. This can be either minerals (basalt, dolomite, etc.), or blast furnace waste, slag. Slag wool does not lose its properties up to temperatures of 300°C; in a hotter environment, sintering of the fibers occurs - binders and water-repellent additives are not as resistant to fire as the mineral component. As a result, thermal conductivity increases sharply. Rigid mineral board of the PZh-175 brand is positioned as a fire-resistant material. It is capable of maintaining insulating properties up to 1000°C. It is produced in thicknesses from 2 to 10 mm. This is a material that perfectly protects against fire; it not only does not burn, but also does not smolder. Harmfulness may be considered a limitation on its use - asbestos vapors are undesirable in a bathhouse. All asbestos gaskets on the steam room side must be covered with metal. A highly effective and absolutely environmentally friendly heat insulator, which belongs to the group of non-combustible materials. Its thickness is 5 mm, the thermal conductivity coefficient increases slightly with increasing temperature, and it operates reliably at temperatures up to 900°C.
What should be the distance from the chimney to combustible structures?
When installing a chimney, it is necessary to comply with a number of fire safety requirements and rules, since the chimney passes through the ceiling and roof, where elements of wooden structures are necessarily present.
Following fire regulations, you should retreat from the flame, that is, the inner surface of the pipe to the combustible structures, a distance of 380 mm (38 cm).
And from the outer surface of the pipe to the border of combustible structures there must be at least 130 mm (13 cm).
In accordance with these measurements, the hole for the chimney should be made.
The gap between the ceiling and the pipe must be filled with non-combustible thermal insulation in order to minimize heat loss. From below, the thermal insulation is hemmed with a sheet of iron.
Experienced stove-makers call this distance “from the smoke.” The count is taken from the wall of the chimney chimney smoke duct to the edge of the combustible structures.
This distance is regulated by the regulatory document SNiP 41-01-2003, and in particular its section 6.6 “Stove heating” and its subsections.
There are two main types of chimneys - brick and metal. When passing through the ceiling of a wooden pipe, cutting (fluffing) is done (expanding the external dimensions of the pipe, while maintaining the same dimensions of the chimney), and when passing through an iron pipe, a penetration is made in the form of a sleeve made of non-combustible material.
These parts of the stove are precisely designed to “distance” the chimney from combustible structures (for example, wooden ceilings.
The distance “from the smoke” to the combustible material in the chimney should be 500 millimeters according to the standard, just in case the materials are combustible. And 380 millimeters is allowed, if the same combustible materials are protected by a layer of plaster at least 2.5 centimeters thick with metal mesh reinforcement.
The cutting height above and below the ceiling must be at least 70 millimeters.
The chimney cut should not be rigidly fixed to the overlap. This is because a wooden house will still move (sit down) and it’s bad if the ceiling deforms the masonry, which means cracks and the release of gases and possibly even sparks, with all the consequences. It is better to create a distance and insulate it with mineral wool or expanded clay.
On the roof of a building, the distance from the outer edge of the brick chimney to the combustible structures must be at least 130 millimeters, and from the ceramic one at least 250 millimeters.
The upper edge of the stove itself should also be at a regulated distance from the ceiling.
So, if the ceiling above a brick stove is not protected by plaster, then the distance from its upper part to wooden structures should be at least 35 centimeters for periodic firing and at least a meter for long-burning stoves. If the ceiling is plastered, 25 and 70 centimeters respectively.
Ceramic chimneys
In recent years, a chimney in a wooden house is often made of ceramics (see Ceramic pipes for chimneys):
- This is actually a modular system, installation is carried out from prefabricated elements of complete factory readiness.
- Inner tube made of heat-resistant, durable and acid-resistant ceramic.
- Due to the smoothness of the inner surface of ceramic pipes, soot does not accumulate on them and there is no turbulence in the draft flow.
- Due to the significant weight of the chimney system, installation of a foundation is required.
Scheme of a ceramic chimney.
Stove in a bathhouse: features
In the vast majority of cases, this is a wood-burning, cast-iron or steel structure, often equipped with a water heater. Sometimes the product is covered with stone, but usually they do without such covering: the body and pipe in this case also act as heating elements.
The most common type of chimney pipe is steel. Firstly, the material is quite resistant to chemically aggressive substances. Secondly, it is relatively light in weight. And thirdly, the high thermal conductivity of the metal in the steam room is an advantage: the heat from the chimney goes to maintain a high temperature in the room or is used to heat the water in the tank.
However, this same property is also the main disadvantage: the pipe becomes so hot that there is a danger of ignition. Even placing the smoke exhaust duct too close to a wooden wall significantly increases the risk of fire.
The location where the smoke exhaust duct passes through the ceiling must be selected and marked in the design. This greatly simplifies the work, as it allows you to pre-cut a hole of the required size.
When arranging a chimney, you must follow a few more rules.
The passage of the pipe through the ceiling should not only not affect the supporting structures, but also be at a certain distance from them: the minimum distance of the chimney from the supporting ceiling beam or wall is 13 cm.
No contact is allowed between the walls of the chimney and the ceiling, regardless of what material is used - steel, ceramics, etc.
The gap between the edges of the hole and the chimney duct must be carefully insulated, otherwise it will not be possible to maintain a high temperature in the steam room. The use of materials with synthetic components as a heat insulator is not allowed. For example, basalt wool with a foil coating is used, but with lavsan - absolutely not.
The passage section is sealed from below with a stainless steel sheet. Galvanized iron is not recommended.
You can improve the heat dissipation function of the chimney, and at the same time protect the wall near the stove using a heat shield. You can make it yourself - it’s a sheet of stainless steel polished to a mirror shine. The photo shows a heat shield in a bathhouse.
The best way to ensure compliance with all fire safety rules and ensure proper thermal insulation of the steam room is the installation and installation of a PPU - ceiling-passage unit.
PPU is a tin box with holes the size of the chimney pipe. The finished product, which can be bought in a store, is dismountable, since its installation is carried out in parallel with the chimney. However, the device can be made with your own hands.
The sides of the box with holes are large because they are fixed to the ceiling. As a rule, the lower part is fixed in advance on the box.
Before installation, the product is covered with aluminum foil to seal the seams.
The polyurethane foam is inserted into the holes in the ceiling and secured to the surface with self-tapping screws. Then a section of the chimney is taken out, and expanded clay is poured into the space of the box. You can also use basalt wool, although expanded clay is more affordable.
Put on the removable part of the box and screw it to the ceiling.
The pipe into the bathhouse through the ceiling and roof must be exactly vertical, and the hole in the roof, accordingly, must be made exactly above the hole in the ceiling. After installation, the chimney is thermally insulated with mineral or basalt wool, always foil-lined.
To insulate the passage through the roof, steel linings are used.
The video demonstrates the process of constructing a chimney channel with your own hands.
Greetings, dear readers of the Sam Samych blog, today we will talk about a rather relevant and difficult topic - how to make a pipe in a bathhouse through the ceiling with your own hands. This article will come in handy for those who do. In the previous article, we already learned how to correctly install guide beams under the ceiling and provided a special osmosis for the future furnace.
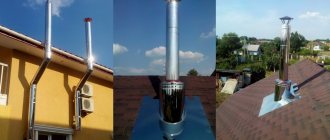
Ready-made option for installing a chimney
But if you have already installed the ceiling and bought a stove, but did not provide any holes, then it does not matter, then I will tell you how to act correctly in such a situation.
In this article we will look at how to install a pipe correctly and according to what standards, how to make a box in the ceiling and much more. I'll start with some useful tips for novice stove makers.
For you, dear bathhouse attendants, I have compiled an up-to-date set of rules and requirements that will give you an idea of the installation of a chimney. So, let's begin:
- Be sure to install the stove ceiling box. This design dissipates heat from the pipe and eliminates the possibility of fire in the ceilings. Expanded clay is used as insulation for chimney pipes, min. cotton wool, foam glass, etc. Under no circumstances should the box be filled with earth, much less sand. Sand has a high heat capacity coefficient and can retain heat for a long time, which we do not need at all.
- The recommended height of the assembled chimney is 4-5 meters. Recommended from the link.
- Most often, the chimney is located near the wall. The proximity of the finishing, and in our case, eurolining, can lead to a fire, then a special stainless steel protective screen is installed in this place.
- According to GOST, the distance from the chimney to the guide beam is at least 13 centimeters. The diameter of the pipe with additional insulation is 320-330 mm. It turns out that the distance between the guide beams should be at least 60 centimeters. This distance is valid when using special insulating chimney pipes.
- Follow the recommendations about.
- When using conventional ceramic pipes, the distance should be at least 25 centimeters on each side of the pipe.
- After the stove, only a thick metal pipe is used! Insulators, stainless steel will not withstand such high temperatures, so only a metal pipe. The height of the pipe must be at least a meter. Closer to the ceiling, I recommend using sandwich pipes with insulation.
- No more than 3 bends (elbows) along the entire length of the chimney.
- All connections must be visually visible.
We recommend that you use sandwich pipe where it passes through the ceiling. The market currently offers many varieties of sandwich pipes, in which the insulation thickness is 30, 40, 60 millimeters. I recommend that you use special chimneys with an insulation thickness of 10 centimeters, this is much more reliable and safer.
In order to fix the chimney in the ceiling hole, you need to make a special box, the so-called cutting. This item is for those who want to cut a chimney pipe through the ceiling with their own hands, and if you already have one, you can skip these instructions for making a ceiling assembly yourself.
An example of what not to do
If you don’t want to bother, then I recommend that you buy ready-made industrial cuttings; they are inexpensive and of very good quality. There are many options for making ceiling units, but the meaning is always the same - a round hole is made in the middle of the square plate into which a sandwich pipe is inserted. This plate has stainless steel screens on the sides, which limit the spread of heat.
Example of a ceiling unit
If you decide to do the cutting yourself, then perhaps you are faced with the question - what to make the ceiling assembly from? In fact, there is nothing to choose from - only stainless steel. Some craftsmen make it from galvanized steel, but this is a bad option - galvanizing releases many harmful substances when heated strongly. Now let's move on to creating a ceiling fluff with our own hands:
- We decide on the size of the ceiling screen. The average diameter of a sandwich pipe is 200 millimeters (we recommend taking a pipe with 100 mm insulation), therefore the hole in the stainless steel sheet must be several millimeters larger in order for the pipe to fit into the hole. We cut out a stainless steel square that will cover the size of the pipe by 10-20 centimeters on each side.
- We mount a screen, square or round, on the reverse side of the (attic) stainless steel. The screen should be wider than the sandwich pipe, but should extend a few centimeters from the edge of the stainless steel.
- We cut a square hole in the ceiling of the bathhouse, slightly smaller than the size of the screen. If you provided the hole during the process of laying the ceiling, then you are great? The hole can be made with an electric jigsaw or chainsaw.
- The edges of the ceiling should be insulated with mineral wool or similar thermal insulation material.
- There is no need to attach the stove pipe to the transfer case; it must have free movement when heating and cooling.
- On the side of the bathhouse, between the screen and the lining, a small layer of heat insulation is laid. The stainless steel sheet itself is attached to the ceiling with galvanized screws.
Rules for passing through the ceiling
The passage of the chimney through the ceiling must be carried out in accordance with the rules to ensure the safety of the entire house. In this area, the proximity to flammable materials is minimal, so insulation should be maximum. Certain rules also depend on the materials from which the chimney is made.
Let's look at how to install a chimney through a wooden ceiling, what distance and width is required. In this area, the brick chimney must have thicker walls than in other places. It should be 50 cm when there is no additional insulation and the pipe borders on materials that can easily ignite. If there is plaster with a thickness of at least 25 mm, then a width of 38 cm is allowed. The height of this cut above the ceiling must be at least 70 cm.
Between the building structure and the cut in the chimney opening through the wooden ceiling, it is imperative to fill the space with non-combustible materials. The thickness on each side must be at least 15 cm. Metal chimneys through wooden coverings must have penetration through sleeves made of non-combustible materials.
Do-it-yourself cutting for a chimney
tin for making cutting boxes;
stainless steel sheet;
sheet of gypsum board or basalt cardboard;
The material for filling the box is expanded clay, but dry clay can also be used.
The pipe passage in this example is carried out at the stage before finishing the ceiling. This is not important; the sequence of operations does not change.
The ends of the hole are laid with strips of mineralite; it is enough to provide thermal insulation along the edge, where the metal will come into contact with the ceiling structure.
Insert the box into place and cover the hole with a stainless steel sheet. To make sure that the ceiling in the area adjacent to the box will not char or catch fire, this is done through a thermal protection sheet. The decorative overlay is attached to the sheet. As a result, a reliable and beautiful screen is obtained above the stove near the chimney.
The bathhouse is a wooden structure, which means it is extremely fire hazardous. Therefore, special attention should be paid to the issue of competent implementation of ceiling cutting - leading the chimney through the ceilings between floors or onto the roof.
What do you need to know about a chimney in a wooden house?
In a wooden house, when installing a chimney, you need to know not only the installation rules, but also the temperature in the heating devices due to certain combustion products. It also differs as it moves away, depending on the design of the system itself. Below is a table indicating the range of such temperatures.
Today, there are established rules for installing chimneys that must be followed to ensure fire safety and generally preserve the structure. They are contained in the document by which the controlling government authorities are guided. This is SNiP 41-01-2003 “Heating, ventilation and air conditioning”. Information on the distance of the chimney pipes to the wall, to the ceiling, its dimensions, insulation and installation rules for each type of material is described in detail here. You can read more about it later.
Fire safety standards and regulations
Any developer can become familiar with what chimney equipment is considered safe according to SNiP 41-01-2003.
SNiP 41-01-2003 (Heating, ventilation and air conditioning)
We are interested in clause 6.6.22, which dictates a setback of 130 mm in the area of passage through the floors for a brick pipe made with wood protection. It is known that brick and concrete pipes have lower heat transfer than modern metal pipes, which are most often used in baths. This means that when arranging the cutting of a single-walled metal pipe without thermal protection, you should be guided by other deviation numbers that are indicated in Appendix “K”:
500 mm to wood without thermal protection;
380 mm from the heated pipe to the flammable pipe behind a layer of thermal insulation.
These figures should be considered as distances from the smoke inside the chimney to the tree.
Manufacturers of stoves and chimneys provide documentation that necessarily indicates the possible value of the distances to ceilings made of various materials. They should be used as a guide when independently constructing a passage for a bath pipe through the ceiling.
Chimney passage through a wooden ceiling
Proper installation of the chimney pipe through the attic floor, rafter system and roof is no less important than compliance with all other requirements when building the stove itself. The fire safety of the house, and therefore of everyone living in it, as well as the efficiency of the heating device, will depend on how reliably these components are equipped.
Chimney passage through a wooden ceiling
The passage of the chimney through a wooden ceiling must be especially reliable, since in this area the heated walls of the pipe are in close proximity to flammable materials. In order to protect the floor elements, various thermal insulation materials and special devices can be used - there is no shortage of them on the market today.
Such work must be carried out with the utmost responsibility. Therefore, in order to understand these issues, you should familiarize yourself with the current requirements of regulatory documents, consider the process of installing a chimney through the ceiling in order to carry out everything strictly according to the rules established by regulatory organizations.
Why comply with them?
Many people do not pay attention to how the passage is made through the interfloor material and the roof. It doesn’t burn out, doesn’t spark – and that’s fine. But, under certain circumstances, failure to comply with certain standards can easily lead to a fire. Also, inconsistency of installation parameters will cause problems when passing a fire inspection.
Problems may also arise when the heating boiler starts working. An incorrectly installed and assembled smoke outlet will be ineffective. “Draft overturning” occurs, which leads to the appearance of smoke in the room.
There is also a certain ratio of draft force to stove power, which allows you to heat the house with maximum efficiency. If the draft is weak, combustion in the stove will be poor, with a lot of smoke, and too strong draft leads to rapid combustion of fuel and a decrease in the efficiency of the stove.
Ceramic chimneys for wooden buildings
Modern industry produces high-strength and fireproof modular chimneys from high-quality ceramic materials. They are a kind of constructs that are assembled locally from several elements.
ceramic chimney
Such a chimney may consist of multilayer material. Its inner surface is made of ceramic material, which is particularly resistant to heat and acids formed during the reactions of combustion products. Their internal surface is very smooth, which prevents the formation of soot and creates smooth and powerful traction. But such a chimney system has considerable weight and requires special skill during installation.
Standards for the distance from the pipe to the walls
According to SNiP (Appendix 16), there are certain standards for the distance from the surface of the pipe to materials prone to fire, described in the table below.
Table 1
| Sandwich pipe thickness, mm | Indentation for the partition, which is protected from fire, mm | Indentation for partition not protected from fire, mm |
| 120 | 200–260 | 260–320 |
| 65 | 380 | 320–500 |
This appendix describes the norms for the distance between pipes and walls. The wall material may not be fire resistant, so they, like ceilings, need insulation. For this, mineral wool and a sheet of galvanized steel are used, mounted on top of the insulation.
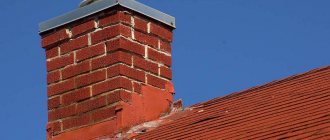
Brick chimney in a wooden house
The traditional material for making chimneys in wooden houses is refractory brick. When laying chimneys, you need to pay special attention to tying the bricks together. To connect the elements of a brick chimney in the interior of the house, you can use a mixture of cement and limestone, but when laying bricks in a chimney in an open space, pure cement mortar should be used. The thickness of the seam between bricks in such masonry should not exceed one centimeter. The brick should be red and not hollow.
The inner surface of a brick chimney is exposed to the aggressive effects of combustion products and condensate. As a result, chips and collapses may occur on internal surfaces. To avoid such negative aspects, an asbestos-cement pipe is placed inside a brick chimney, and the space between the brick and the pipe is filled with concrete mortar. This way you will carry out the so-called “liner” of the chimney.”
Chimney passage through a wooden ceiling
The figure given in the article shows how you can install a chimney through a wooden ceiling.
You can use asbestos layers when passing through the ceiling. In this case, the distance between the pipe and the floor wood will be 25 centimeters.
If an asbestos gasket is not used, the distance between the pipe and the tree will have to be increased to 38 centimeters.
Connecting chimneys to wooden walls
Just as when passing through a ceiling - when adjacent to wooden walls - chimney pipes must be reliably thermally insulated.
connecting the chimney to a wooden wall
The standards here are the same as when passing through the ceiling: 25 centimeters when using two layers of asbestos gasket and 38 centimeters when there is no gasket.
The entire structure can be covered with brickwork on the sides.
If you are installing a chimney in a new, not yet settled log house, then it is better to place it on a wooden panel that can move relative to the wall. In this case, the subsidence of the log house over time will prevent the destruction of the brickwork of the chimney and pipe.
The passage of a chimney through the roof of a wooden house
When venting a chimney through the roof, the distance between its heating elements and the rafters should not be less than 13 centimeters. A heat insulator must be placed in the gap between the pipe and the rafter wood. Basalt wool can be used as it. When choosing wool for thermal insulation, make sure that it does not contain organic binders and that it is resistant to high temperatures.
chimney passage through the roof
If materials with a low ignition threshold are used as roofing on the roof, for example, sheet roofing material, then the distance to it should not be less than 25 centimeters. The space between the combustible material and the chimney pipe must be covered with a fireproof roof. Slate can serve as such a protective material. It will not transfer heat from the pipe to the roofing felt. Roofing steel can also be used as a protective coating.
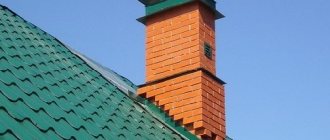
The location of the chimney on the roof of a wooden building
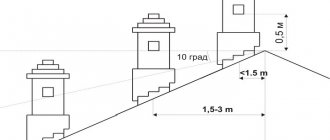
The head of a chimney on the roof of a wooden building must rise above it to a height of at least 20 centimeters from the top of the ridge if the pipe is located directly next to the ridge or simply on a flat roof.
If the chimney pipe is less than one and a half meters away from the ridge, then its height should also not be less than 50 centimeters.
If the chimney pipe is located at a distance of one and a half to three meters from the ridge, then its head should not be below the level of the ridge.
height of pipe above roof
If your chimney is more than three meters from the ridge, then to calculate the height of the pipe head you must draw an imaginary line directed from the ridge of the roof with a decrease of 10 degrees.
Preparing the area for ceiling cutting
The central point at which the sandwich pipe will be installed is found using a plumb line. The location that has been chosen for the passage of the pipe is marked, and then a hole is made. If it is made with your own hands, it is recommended to decorate it from the side of the steam room to preserve aesthetics. To do this, you can use a stainless steel or galvanized sheet. The size of the sheet should be larger than the size of the hole for the chimney.
The hole for the chimney should be slightly wider than the pipe that will pass through it
When preparing the site, you should pay attention to several important points:
- When installing a sandwich structure vertically, it is worth remembering that the holes are marked first at the top point, and then at the bottom points. That is, first of all, markings must be carried out on the roof. When marking, be sure to use a plumb line to determine the center;
- when using production models of units, it is recommended to carefully study the instructions, which usually indicate tips and preferences for installing a specific model of ceiling cutting;
- Do-it-yourself ceiling passage units for chimneys are made using stainless steel sheets. The hole in the sheet is 1–2 mm larger than the sandwich pipe.
Helpful information! The ideal option is when the location of the heating equipment and chimney structure is calculated at the very beginning when creating a construction project. In this case, you can calculate the installation of beams in advance and provide the necessary distance between them for installing a sandwich chimney.
If the installation of the chimney will be carried out in an already finished building, then it is considered necessary to make changes to the design of the ceiling above the stove. Part of the beam (closest to the chimney) is cut out and reinforced with special jumpers.
Stages of installation of a finished pass-through unit
Today, there are pass-through units with a round or rectangular cross-section on sale. Installation of such a unit is carried out in stages. Let's consider the main stages of arranging the ceiling trim:
- First of all, the ends of the holes made in the ceiling are covered with a layer of heat-insulating material.
- Next, you need to cover the bottom sheet of the passage box with insulation, as well as all places that come into contact with the ceiling. The insulator can be foiled basalt cardboard or mineralite.
- Then a pipe is passed into the passage unit, and the structure is brought to the hole made in the ceiling. The structure is fixed with special screws in the right places. As a rule, units are sold with ready-made holes for self-tapping screws, which simplifies installation.
- The cross-sectional indicator of the opening of the passage unit must be larger than that of the sandwich chimney. A tight fit of the pipe to the passage unit is not recommended. It is desirable that there is a gap of at least 5 mm from the wall of the unit pipe to the wall of the sandwich chimney. If necessary, you can insulate the gap using a special asbestos cord.
- The insulation is then carried out from the attic side. After this, the box is filled with expanded clay or any other heat-insulating material.
- After the pipe has been installed, you can decorate the cutting unit in the attic (if necessary).
The cutting unit in the attic is arranged in the same way as on the ceiling
Selection of thermal insulation material
Today, the building materials market is distinguished by a variety of thermal insulators, which have different technical characteristics and may differ in price. Let's consider the main materials that are used for thermal insulation purposes when laying sandwich pipes through the ceiling and roof:
Basalt or mineral wool. Such materials are used quite often when constructing sandwich pipes. The temperature that these insulation materials can withstand reaches up to 600 °C. Let's consider the main disadvantages of basalt and mineral wool:
- Such materials are not environmentally friendly and may cause harm to human health. When heated, such cotton wool releases harmful substances - formaldehyde;
- mineral and basalt wool have a rather poor coefficient of water resistance. When wet, they lose their protective qualities.
- Over time, wool can cake and lose its thermal insulation characteristics.
Expanded clay. It has high insulating characteristics. When condensation forms, followed by wetting, expanded clay, unlike mineral wool, quickly restores its protective properties. The disadvantage of this material is that when installing pass-through units, special containers are required for it.
You can insulate cuttings with different materials, but it is better to choose those that will not harm human health
Minerite. The composition of such insulating material includes: cement, cellulose and various mineral additives. Minerite is resistant to temperatures up to 600 °C. When wet, it does not lose its insulating properties, and when heated, it does not emit carcinogens harmful to human health.
Asbestos. Asbestos itself has fairly good thermal insulation properties, but when heated it releases carcinogens. The use of asbestos as insulation is recommended by experts only as a last resort.
Sand or clay . Such materials were used long before modern thermal insulators appeared. The thermal insulation properties of these natural products are inferior to specially developed modern insulation materials, however, some owners prefer to use natural ones as thermal insulation.
Requirements for the installation of chimneys
The basic standards for installing a chimney are the distance to wooden structures and other flammable elements. So, the information is presented as follows:
- The distance to the tree must be at least 15 cm if the pipe is made of brick or concrete.
- The distance increases to 25 cm if the pipe material is ceramic.
Important! It is imperative to remember that not only wooden structures, but also most finishing materials also easily catch fire, so the distance to them must also be taken into account.
Brick chimney
Chimneys made of refractory bricks continue to be popular for wooden houses. The important rules for its laying are the following:
- To make a chimney from the floor to the ceiling, that is, inside the room you need to use limestone or cement-limestone mortar; masonry on the roof is carried out with cement mortar.
- The inside surface of the pipe cannot be plastered.
- The chimney must be laid from red solid brick, the seam of which is no more than 10 mm.
- If the structure is heavy, it must be strengthened with a foundation.
- The destruction of brickwork occurs due to acidic condensation, as a result of which debris gets inside, thereby reducing the cross-section of the channel. Soot accumulates inside brick chimneys due to the roughness of the surface.
It is recommended to carry out such an event as a sleeve. It consists of filling the space between the brick and the pipe with concrete to eliminate some of the negative aspects.
Ceramic chimneys
Chimneys made of ceramics are gaining increasing popularity in wooden houses. This is due to the following advantages:
- The modular system is sold ready-made.
- Ceramics are durable, heat-resistant and acid-resistant.
- Unlike brick, soot does not accumulate here due to the smooth surface.
- However, such chimneys are very heavy and require a solid foundation. Moreover, the distance from the chimney to the wooden wall must be at least 25 cm.
Metal chimneys
Chimneys made from sandwich pipes are no less popular due to the following advantages:
- Simplicity and ease of installation.
- Light weight structure when no additional foundation is needed.
- Thanks to the smooth surface, there is no soot settling and the continuous circulation of the air flow is not disrupted.
- During installation it is filled with basalt wool for thermal insulation.
- It is characterized by durability and safety due to the use of stainless steel inside.
- In this case, the interfloor overlap is solved through factory cutting. An important point is the connection of the chimney pipes, in which they must be outside the structure and not fall into the ceiling.