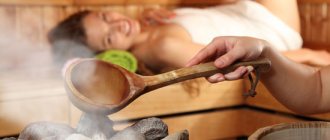
Everyone knows the healing and relaxing properties of a sauna. Due to the peculiarities of our climate, a steam room or sauna is needed in every home. Frequent rains in the fall, severe frosts in the winter, sudden temperature changes - all this can significantly undermine the health and immunity of any person. The sauna, in turn, can be an excellent prevention not only of colds, but also of bad mood and autumn blues.
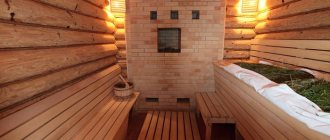
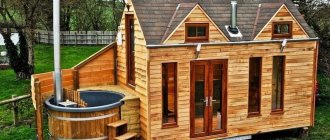
Sauna equipped in a country house
Today, a sauna in the house is not only fashionable and convenient, but also very affordable, since you can equip it yourself. The sauna, located right in the house, will be available to you at any time, regardless of the weather and time of day.
In addition, it is worth noting the economic component of the issue. When building several premises under one roof at once, you can reduce your money and labor costs. The construction of a common foundation, roof and walls can significantly reduce construction time and costs. Saving space on a plot of land is also important.
Preparatory work
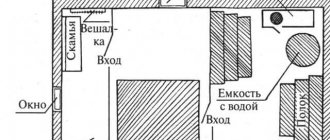
First of all, you need to make a drawing.
The presence of a stable air flow in the building makes it possible to choose sizes based on the number of users and convenience. The possible ceiling height is 1.9–2.1 m. It is not worth increasing this parameter, since this may lead to the appearance of a “tube effect”, due to which the draft increases and a draft occurs.
In addition, the air near the ceiling will be the hottest. Accordingly, the top shelf should be made at the maximum height. It is important to consider that a person should be able to sit on it without resting his head on the ceiling. The recommended distance is 1–1.1 m from it.
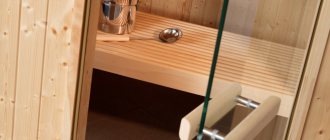
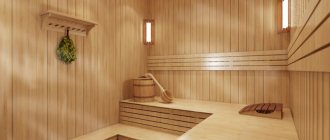
An example of the arrangement of shelves and their sizes
The optimal height of the shelf is 45 cm. If necessary, this parameter can be increased to 65 cm, but sitting on it may be uncomfortable. To fix this, you can build a step 25 cm high.
The rest bench is two-tiered. The height of the lower tier is 65 cm, the upper tier is 105 cm. The width is 35 and 70 cm, respectively.
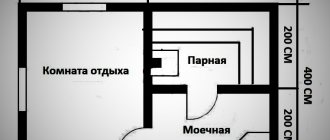
The sauna is smaller in size when compared to a Russian bath. For 3–4 people, a room of 3.3 m2 will be enough. Shelves should be installed in several tiers along the walls. In this case, the optimal ceiling height is 2.1 m.
The length of the wall opposite the entrance is at least 2 m. In order for air to circulate properly, it is important to maintain the ratio of sizes. If you make the correct calculation, then the shelves with places to lie on the upper tier will be exposed to heat from the stove with acceptable air humidity.
What should be the size of the steam room: drawing up a project
The main task of the steam room is to provide high temperature. In the sauna it reaches 120°C. This requires a certain heating of the stove. However, heat in the steam room will be transferred not only from it, but also from the surrounding air. Therefore, metal stoves should not be placed near benches. They can heat up the air very much, which can cause burns.
It is also not recommended to equip a small steam room with a metal stove, as this is dangerous to health. The height of the ceilings in this case will not solve the problem.
The size of the steam room depends on the number of people who will be in it at the same time
Arranging a large steam room with an electric stove is a pointless undertaking, since the cost of electricity will not be offset by any comfort.
To determine the optimal dimensions of a room, the following fact must be taken into account: heat radiation in space diverges in such a way that its intensity after some time weakens in inverse proportion to a value equal to the square of the distance from the radiation device. Accordingly, people located at a distance of 3 m from the stove will be able to receive 4 times less heat than if they were located 1.5 m from the device. Create
This is the disadvantage of large pairs - in order for the heat to reach in the required quantity, you will need to make the stove too hot or overheat the air. Both options are harmful to human health. It is also worth remembering that the main condition for the high effectiveness of sauna procedures is heat dissipation. The larger the steam room, the better this process will occur. Therefore, it is recommended to choose average values for the area of a given room.
To optimize the space inside the steam room, you will need to minimize the base of the floor and increase the area of the shelves. It is recommended to muffle the space under them to reduce the heated volume. This will make it possible to save fuel for the stove and reduce the heating time of the sauna.
It is recommended to indicate all the necessary dimensions in a special technological map.
Video: is it possible to build a sauna/bathhouse in the basement of a private house
Selecting sauna materials
At the next stage, you need to decide on the materials that will be used in the process of building the sauna. You need to prepare:
- brick;
- pipes;
- bars;
- logs;
- sand;
- cement;
- roofing materials;
- glass;
- clay;
- gravel;
- materials for thermal insulation.
You can build a sauna, which consists of one steam room with a locker room, or you can also prepare a washing room or a relaxation room. The set of materials will depend on this.
It is recommended to allocate space for a corridor, which will help prevent the penetration of cooled air into the room.
The main material for a sauna is wood. These can be logs, bars or boards. You can choose exclusively wood to construct the entire structure, including the base and roof. Another option is to use blocks or bricks.
A log house is most often used to build a bathhouse.
Additionally, the log house can be lined with brick to make it more wear-resistant and reduce thermal conductivity.
Log house - logs with specially prepared grooves. They are used for longitudinal fixation. For perpendicular fastening, notches are required. A row of stacked logs is called a crown. To connect the crowns, grooves (have a round shape) and notches are required. If everything is done correctly, then heat loss is excluded.
Pine and larch logs are suitable for making the structure. There should be no resin bags on their inner parts. It is recommended to make the lower crown from dried oak logs, the upper ones from linden or white spruce logs. The fibers should be straight, not slanted.
Straight fiber arrangement is optimal for a bath
If the fibers are inclined, this can lead to significant deformation of the material during the drying process. As a result, the wood will crack.
Nowadays you can find saunas made of glued profiled timber.
The construction made of laminated veneer lumber is quite reliable
Advantages of this design:
- strength of the building;
- flat and smooth surface of the walls, therefore there is no need for finishing;
- there is no shrinkage or deformation;
- resistance to rotting and damage by fungi and pests.
The disadvantage is the high cost.
It is easy to make a sauna from such material with your own hands, and the process takes much less time. There is no heat loss at all, since there are no gaps or cracks.
Which stove to choose for a wooden bath
The heater is most often used because it can provide optimal temperature and humidity.
The optimal stove for a sauna is a heater
You need to select the location of the brick structure at the stage of drawing up the drawing. In the process of laying the base, it is necessary to prepare a place for the stove. A special place for storing firewood is also recommended.
To lay the structure you will need M75 or M150 brick. The amount of material depends on the thermal conductivity of the walls and the layout of the room. On average, 35–40 bricks are needed per 1 m2. For good draft, the chimney device must protrude at least 0.5 m above the roof.
Continuous and temporary stoves are installed in saunas. The latter are able to heat the building more efficiently by heating the stones with hot smoke. The steam from a continuous stove is cleaner.
Heaters can be with a closed or open backfill chamber. This affects the quality of the steam.
An oven with a closed chamber is more environmentally friendly
Next you need to decide on the material for the roof. This is influenced by the climate of the area.
Video: how to equip an infrared sauna in an apartment
Built-in sauna
Built-in projects have the advantage of not having to build a foundation. They don't require a lot of space, they're quite compact. A prerequisite is the presence of good heat and steam insulation, otherwise there is a risk of overheating the rest of the house with the subsequent growth of mold and mildew.
For heating, one of three types of heating is used:
- gas oven;
- heater;
- electric oven.
The main convenience of a sauna at home is accessibility. You don’t have to walk far, which is especially important in winter.
Calculation of materials for construction
First of all, you need to calculate how many floor boards you will need. For example, we will consider a sauna measuring 3.7x3.7 m. To make a floor in it, you need to prepare 25 edged boards.
Edged floor board
Standard board dimensions: thickness - 0.5 cm, width - 15 cm, length - 4 m.
Accordingly, 4 x 0.15 x 0.5 = 0.03 m3 is the area of one board.
The width and length of the sauna is 3.7 m, so to install the floor base you need to prepare 25 boards 15 cm wide and 4 m long.
To arrange the ceiling in a bathhouse, you need 38 boards of lining. The calculation of the material is carried out according to the same scheme. The thickness of one board is 22 mm, width is 100 mm.
In order to complete the interior decoration of the sauna and install partitions, you need 22 mm thick lining.
Linden lining is suitable for a sauna
If you plan to place the boards vertically, you will need approximately 153 boards.
Standard dimensions: board length - 3 m, width - 10 cm, thickness - 2.2 cm.
3 x 0.01 x 0.22 = 0.01 m3 - the area of one board.
Next, you need to calculate the area of the sauna walls: the height is 2.1 m, and the length, taking into account the partitions, is 24 m.
2.1 x 24 = 51 m2
There are 3 boards in 1 m2, respectively 51 x 3 = 153 lining boards for the entire steam room.
To perform a vapor barrier on the internal walls and ceiling structure, you can use various materials, among which vapor barrier film and breathable membrane are especially popular.
Vapor barrier of sauna walls is required
For a sauna 3.7x3.7 m, 44 m2 of material will be required.
To perform the calculation, you need to find out the total area of the ceiling structure and walls, while partitions do not need to be taken into account.
Length excluding partitions - 14.1 m.
2.1x14.1=29.61 m2.
The width and length of the ceiling structure is 3.7 m. The area is 3.7x3.7 = 13.69 m2.
Next you need to add up the area of the walls and ceiling: 29.61 + 13.69 = 43.3 m2.
At the next stage, the materials for the foundation are calculated. The need for cement, crushed stone, sand and other elements will depend on what type of base is planned to be made.
If it is a columnar foundation, then you will need asbestos-cement pipes with a diameter of 20 cm and a length of 150 cm. In the center of each of them, 2 reinforcement rods with a diameter of 5 mm must be mounted.
Types of sauna
Before making the final choice, it is worth studying all types of saunas and determining its location. It can be installed in the house itself or taken out separately. In terms of area, you need to think about how many people the room will be designed for.
To receive guests you will need a relaxation room and a large steam room, while for use in a narrow family circle a miniature project is enough. A good option would be to design a house with a sauna and a garage. This way you can find a place not only for family living, recreation, but also for a car.
Required Tools
To build a sauna base you need:
- carpentry tools;
- shovel;
- trowel;
- building level;
- concrete mixer;
- wheelbarrow;
- container for preparing the solution.
Concrete mixer can be rented
If you plan to mix the solution manually, then you need to prepare a metal container and a shovel. You can also use a construction mixer or a high-power electric drill with a special attachment.
A mixer attachment will help facilitate the process of mixing cement.
During the construction of a sauna, it is impossible to do without an electric jigsaw. With this tool you can make cuts and cuts to achieve unusual shapes in different materials.
An electric jigsaw will allow you to cut a piece of wood into any shape.
Prefabricated sauna
This design is very easy to assemble. The sauna will be mobile; it is often chosen by those who prefer to regularly remodel their home. This option is also suitable for small houses. There are even interesting projects for prefabricated saunas with a terrace.
There are several types of prefabricated models:
- Panel sauna - consists of panels that, after assembly, form walls and ceiling.
- The timber model is assembled from timber, which is considered the most environmentally friendly way of constructing buildings.
For a sauna, it is best to use natural wood. Good heat conductivity and the absence of harmful fumes make wood one of the most popular materials for construction.
Useful tips for finishing
The final stage of construction is interior and exterior finishing. It is best to cover a sauna with clapboard. Each type of wood has its own advantages:
- Linden has an excellent appearance and smells good.
- Alder is able to retain heat well, while it practically does not heat up. It has a varied palette of colors and beautiful designs.
- Pine is used most often. Releases healthy elements when heated.
The disadvantage of alder is that it is soft. Consequently, impacts may cause dents.
The finishing instructions are as follows:
- The first step is to cut the material to the height of the room.
- Next, do the sheathing. You need to start from the corner, and then move smoothly around the perimeter.
- It is recommended to cover them with wax or natural oils intended for saunas.
Treating the lining with wax will extend the life of the sauna
There is no need to treat the lining inside the sauna.
Infrared sauna
An ordinary steam room warms a person's skin by about 1 cm, and infrared radiation - by as much as 5 cm. Thus, an infrared sauna has become a modern and very popular option for arranging a home or even an apartment.
This option has gained popularity due to several factors that have a positive effect on health:
- The procedure reduces cellulite, which is especially in demand among the fair sex.
- There is no such drastic effect on breathing and blood pressure as in a regular bath.
- Weight loss of up to 1 kg was recorded in one session.
Infrared equipment fits well into the design of a one-story house with a sauna. Such saunas can be portable or built-in; they do not require special care or forced ventilation. Arranging such a steam room is possible even on the balcony, on any floor of the cottage.
Walls
After the ceiling is hemmed and the walls are insulated, you can begin installing the wall counter-lattice. The top bar will just rest against the ceiling lining. The bottom one will be near the floor. Another plank should be opposite the future frame of the upper shelf - 855 mm to the top edge (height of the shelf minus the thickness of the plank for the shelves 25 mm and the thickness of the board on which the shelves are assembled 20 mm). The other bar is opposite the middle of the backrest. The remaining space is filled so that the counter-lattice pitch is no more than 500 mm. In our case, two more strips are added. One is between the bottom bar and the top shelf bar. The second is between the top bar and the backrest bar. We start with the wall according to type A (detail No. 5):
On the remaining walls, the spacing of the counter-lattice remains the same as on the long wall (view A). Drawing of the left wall counter-lattice (type B):
An electric heater is installed on the right wall (view B), so at the place where it is attached it is necessary to provide strips to which it will be screwed. In the instructions for the heater we find the dimensions and distances for the mounting frame:
In accordance with these dimensions, we provide a counter-lattice for the right wall (type B):
The wall in which the door will be installed (type D) must also have a stiffening frame around the perimeter of the door (parts No. 10 and No. 12), because In this place, door panels will be made from clapboard. Mounting boards for the door frame are installed in the doorway. At the top, two 100x20 mm strips are enough; along the edges, the strips (part No. 13) are installed opposite each hole in the door frame, into which it is then screwed. Unpack the door in advance and measure these distances.
Typical mistakes during construction
To avoid problems with the performance of the bathhouse, it is worth considering the most common errors:
- Carefully calculate the size of the premises based on the number of people.
- Correct ceiling height. You should not make ceilings lower than 2 meters, since it is not comfortable to be in such a room. In a room with ceilings higher than 2.4 m, there is an overconsumption of coolants.
- The southern and western walls are allocated for windows, and the southern one for the door.
- The windows are not too large - this will help avoid excessive heat loss.
- Use energy-saving materials.
- Choose quality equipment.
Creating flooring in a steam room
The first step in creating the finishing for the steam room and dressing room is the design of the floor covering. For a steam room, it would be best to slightly raise the level of the floors - this measure will help maintain heat in a small room (protection from drafts). The flooring can be made from the following materials:
- ceramic (porcelain) tiles;
- figurative board;
- tongue and groove board.
Even in steam rooms designed for very high temperatures on the floor surface, it does not rise above 30-35 degrees. Therefore, the rough layer of flooring can be made from:
- concrete;
- clay;
- land.
The main task of the correct floor covering is to ensure safety and quick removal of moisture from the steam room (the floors are made with a slight slope for quick removal of liquid). Therefore, the rough level of the floor covering must be covered:
- stopper;
- fiber mat;
- tiles;
- boardwalk;
- sanded board.
If you choose the method of arranging a floor covering using wood, then this will not be difficult to do: first, brick columns are laid on the rough level, on which the logs will be located, and the prepared boards are mounted on them.
Considering that the floor in the steam room does not experience serious loads, the size of the logs can be chosen from 20x20 to 25x25 cm in increments close to the meta. For flooring in a bathhouse or sauna, it is better to use a shaped, tongue-and-groove board. It is better to choose boards with a thickness of 30 cm. Absolutely all material for creating finishing in a bathhouse or sauna must be treated with an antiseptic compound before installation to prevent the formation and spread of fungus.
If ceramic tiles are used as the top layer of the floor covering, the sequence of actions will be as follows:
- creating a floor screed, it is necessary to achieve a perfectly flat surface;
- laying floor tiles using special glue;
- treatment of seams with moisture-resistant grout.
Ceramic tiles on the steam room floor are an excellent opportunity to protect the surface from high humidity and temperature changes, as well as create a durable and easy-to-clean coating. But from the point of view of the danger of sliding on the surface, tiles are not the best option for a steam room. Therefore, low panels or wooden grates are usually laid on top of the porcelain stoneware covering, which must be taken out into the fresh air to dry after each visit to the steam room.
Recommendations
In order to make your own bathhouse in your cottage, you need to adhere to the following recommendations:
- Only a factory stove is allowed as a heat source, which has an automatic shutdown when a certain temperature or operating time is reached;
- It is necessary to install a deluge sprayer to spray water; a pipe with holes connected to the water supply system will also work;
- The area of the steam room should be between eight and twenty square meters;
- For construction, lumber is used that is treated with special compounds to prevent fire and rot.
Backrests and fencing for electric heaters
The backrests are fastened to strips of the same cross-section as those chosen for the shelves and the backrests themselves. The finished shield is screwed to the wall into a pre-designed counter-lattice strip (see above). Wall (view A):
Wall (view B):
Hang the mounting frame with the electric heater. All you have to do is make a decorative fence around the electric heater. Its dimensions take into account the safe distances from the heater body to wooden structures specified in the passport:
The final touch: hang lampshades, a thermometer, a hygrometer and an hourglass. Place the stones in the oven. The sauna is ready.
Ask any questions you have in the comments.
advice, design
Sauna arrangement
To prevent the project from causing trouble, you should pay attention to each stage of arranging the sauna.
Do you need permits?
When reconstruction work is planned in an urban residential building, you need to remember the regulatory documents dictating special conditions. This also applies to a sauna - its construction is permitted, but there are a number of regulatory standards and restrictions.
You can refer to documents such as “Residential multi-apartment buildings” or “Architectural and planning solutions for multi-apartment residential buildings”, where you will find a list of rules and recommendations for the design and construction of saunas
There is a lot of useful information there, without knowledge of which you can receive an administrative penalty in the future.
In wooden apartment buildings (1-2 storeys), the construction of a sauna is strictly prohibited, but in monolithic or brick ones with reinforced concrete floors, regardless of the number of floors and the number of entrances, it is allowed.
Particular attention is paid to the type of stove - a necessary device for sauna equipment. It is recommended to use a factory-made unit, with a passport and technical characteristics, including automatic shutdown after 8 hours of operation and when heated to 130ºС
The stove should not be gas or wood-burning, but must be electric - this is also a necessary condition. Accordingly, it is necessary to install a three-phase power cable into the room.
Any violation (burning with wood, lack of protective shutdown) is punishable by a fine with subsequent correction of the defects.
A number of requirements relate to the premises themselves. For example, if you have a studio apartment with an area of less than 38 m², you can say goodbye to the idea of a home sauna.
The area regulations apply to “two-room apartments” and “three-room apartments”: a two-room apartment is at least 54 m², a three-room apartment is 68 m². The area of the steam room itself is small.
For example, Moscow legislation regulates a “patch” of up to 2 m³, designed for a maximum of 2 people. Such a strict restriction was introduced due to a weak ventilation system, which is sufficient for residential premises, but not enough to maintain a steam room
One of the requirements relates to the materials from which the sauna casing is made. It should be environmentally friendly wood, treated against fungus and mold.
Preference is given to aspen, linden, oak, that is, deciduous species. A wooden frame must be equipped with a fire-fighting device. Usually this is a pipe with many holes, fixed like a cornice (along the perimeter of the ceiling).
It is assumed that, in the event of a fire, spraying water from the holes should extinguish the fire and prevent a fire in the apartment.
In addition, it is necessary to attach a fire sensor to the ceiling, which, in the event of force majeure, transmits a signal to the Ministry of Emergency Situations.
Before visiting the BTI, you need to collect a package of documents, which includes copies of documents for the apartment, a floor plan, an extract from the house register with a copy of the personal account, a drawing of redevelopment or other design changes (usually performed by a licensed construction company).
Be prepared that it will take a lot of patience, time and effort to visit the following authorities (without guarantee of approval):
- fire service;
- HOA or other housing authority responsible for your home;
- housing inspection;
- Rospotrebnadzor department;
- SES;
- architectural and construction supervision inspection.
This list is not final, since the number of approvals depends on the specific region. Remember that permission for conversion will be required even if you want to install a purchased sauna cabin instead of a shower stall.
Shelf frame
Start installing the shelf frame with the rack blanks. For this, a 50x70 mm beam is used. The figure shows the sequential installation of racks. We start with the top shelf, which runs along the entire wall, then the other top shelf.
Secure the adjacent racks with metal corners for rigidity (on the inside). Transverse and longitudinal bars 50x50 mm will connect all the racks of the upper shelves. We recommend that you do not install the bottom shelf racks until you have installed parts #16, 17, 20, and 21.
We recommend fastening the racks of the lower shelf, which are adjacent to the racks of the upper one, together. We complete the installation of the lower shelf by fastening parts No. 18, 19, 22 and 23 racks (No. 15).
The frame of the shelves is done - it's time to install the lower baseboards.
Shelves
The stitching between the shelf levels is where we'll start. First of all, the one opposite the entrance is mounted.
Then install the second side:
We install the end strips of the lower level according to the same principle:
|
We fasten the prepared strips for the shelves with a 20x50 mm rail with the same pitch as that chosen for the racks. Thus, these slats will cover the frame of the shelves. Top shelf layout:
Layout of the lower shelves:
Place the resulting shields on the frame. A 20x50 mm rail that holds the planks together is screwed to the frame.
Why is the project needed?
In order not to rebuild and not spend money on redoing the work, it is better to immediately select a project and follow the drawings exactly. Design helps to correctly plan construction in stages. It includes:
- Drawing up an estimate.
- Calculations for additional work.
- Compliance with regulations.
The sauna has long been an excellent alternative to the bathhouse. It can be built at a lower cost. Warming up procedures will help boost immunity and successfully fight colds. The choice depends on preferences and wishes, all that remains is to choose the most suitable option.
Safety regulations
The sauna requires strict adherence to fire safety rules:
- It is prohibited to install a steam room in a residential building that can accommodate 10 or more people at the same time.
- To finish a built-in steam room, you will need partitions with a high degree of fire resistance.
- The oven is equipped with an automatic shutdown.
- Organize supply and exhaust ventilation.
- The distance from the electric stove to the wall should be at least 20 cm.
Money is often the main factor in choosing a project, but you shouldn’t skimp on safety.
Thermal insulation
In order to spend as little electricity as possible on heating, it is recommended to install good insulation with a thickness of at least 50 mm. The greater the thickness, the faster the heating will be and the lower the consumption on the electricity meter.
You can lay foil on top of the insulation, and seal all joints with special tape. The absence of gaps will help you save money and comfortably use the sauna for a very long time.
Where to place
If you have good ventilation, proper utilities and a reliable power supply, you can have a sauna anywhere.
Location options:
- base;
- attic;
- first floor;
- balcony or loggia.
A dry room does not require waterproofing. Modern electric stoves have eliminated the need for chimneys. A sauna does not require a fire like a bathhouse, so this is a good option for those who do not want to build a separate building.
What can you save on?
If the owner of the future sauna has the skills of a builder, then it is more profitable to build it yourself. Although large construction companies purchase material much cheaper than can be purchased at retail.
One of the cheapest options is a miniature prefabricated sauna, which is simply built into the bathroom.
Ventilation
The stove must have an influx of fresh air, but on the contrary - for exhaust to the street or through general ventilation. If it is not possible to organize natural circulation, then forced ventilation will be required.
The ventilation itself is a corrugated foil connection with clamps. The passages through the walls are lined.
The location of the heater and the configuration of the shelves
We will choose a place for the heater closer to the corner so that it does not interfere with the passage. For easy access to the shelves, it is better to place the electric heater on the opposite side of them. Because The wide wall will have an opening; we will place the heater on the short wall. Based on the size of the heater and its safe distances, you can calculate the width of the upper and lower shelves. In this sauna, along the left wall there is an upper shelf with a width of 590 mm and a lower one - 365. Along the far wall - 690 and 465, respectively. The free space allows you to make any of the shelves even wider, but I will leave these dimensions because... the result is a universal configuration of 7, 6, 5 and 4 strips. It will be comfortable for visitors with different body types and different temperature preferences. It will also be possible to steam while sitting or lying down.
The width of the shelves is calculated by the width of the strip plus 10 mm. The standard plank for sauna shelves is 90 mm. The ten-millimeter gaps are one less than the slats, hence the size. The lower shelves have the same width, with the difference that the outermost strip extends 25 mm inside under the lining.
Video description
You can make a pouring floor like this:
Drains from the bathhouse cannot be poured into reservoirs - they contain detergents, this kills river inhabitants.
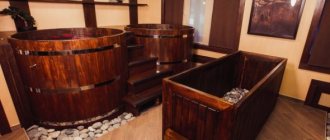
If the sauna is located inside the house, the wash room can be replaced with a regular bathroom.
Locker room and dressing room
If the sauna is located separately, then these rooms perform a vital function. They serve as an additional buffer that prevents cold air from the street from entering the steam room and washing room.
The design of the dressing room depends solely on the preferences of the owners. You can make this room strictly functional so that you can leave outdoor clothes in it and wait for the sauna to warm up. Or you can install a TV, sofas, tables and everything that comes to mind.
The dressing room can be decorated in any way you like Source pimpmyhouse.ru
If you make a sauna with your own hands in a private house, then a dressing room is not necessary. However, its presence is convenient - you can store bath accessories there and undress before the sauna.
If desired, the sauna can be equipped with a swimming pool, a home training room, or a relaxation room.
Electricity supply
Even a dry room requires safety.
- Heat-resistant insulation.
- The power for the electric furnace is laid in the screed, and is not left with a conventional cable running along the wall.
- Sockets cannot be installed inside the steam room.
- Only luminaires designed for use at high temperatures are used.
- Lamps are placed closer to 30 cm to the ceiling.
To prevent short circuits, connections are made through switches with protective shutdown. All switches are located strictly outside the sauna.