Many residents of big cities are looking forward to the weekend to escape the hustle and bustle to the countryside. There is nothing more beautiful than a comfortable holiday in nature, especially if one of the components of comfort is a real Russian bathhouse.
Perhaps every summer resident or owner of a private house dreams of having their own bathhouse, even if the home is fully equipped and has a bathroom. Nothing can compare with a hot steam room and fragrant brooms. The bathhouse cleanses not only the body, but also the soul, relieving stress and uplifting your mood. The easiest way would be to order the construction of a bathhouse from builders, but you can do it yourself, arranging it to your taste and significantly saving money. You just need to purchase the material, prepare the tools and get acquainted with tips and tricks on how to make a bathhouse with your own hands.
Before starting construction, you need to choose a suitable project and decide on materials. Many will agree that the ideal bathhouse should be wooden, but in some regions wood is considered a rare and expensive option, preferring to build bathhouses from brick or foam blocks. After this issue has been resolved, preparations for construction can begin.
Brief overview of the article
- Planning a bathhouse
- Selecting a location
- Construction materials for baths
- What material to choose for walls
- Bathhouse made of timber
- Log sauna
- Frame construction
- Block sauna
- Brick bath
- Construction stages
- Preparing the site
- Construction of the foundation
- Construction of walls and installation of roofing
- Interior decoration
- Oven and shelves
- DIY bath photo
Planning a bathhouse
The simplest, but most expensive option is to choose one of the many ready-made projects. You can also order a drawing, but this will also cost money. Therefore, many of the craftsmen who decide to build create drawings of a bathhouse with their own hands, relying on advice, recommendations and certain standards.
The plan for the future bathhouse should be as accurate as possible. On it you need to draw the locations of windows, doors, stoves and internal wooden structures: benches, shelves, steps. You should also determine the area of the premises and indicate communications.
In summer cottages, simple-type bathhouses are usually installed, containing a relaxation room, a steam room and a washing room. It is advisable to have a dressing room that will not let in the cold from the street and will serve as a storage place for firewood.
The most popular and simplest project is a 3x3 or 3x4 structure. In this case, you get a compact building with a steam room combined with a washing room and a dressing room as a rest room. Two people can steam in such a sauna at the same time. It is not suitable for constant use, but as a summer cottage option it will be very convenient.
Recently, when constructing baths, the steam room is separated from the washing room, choosing a layout of three rooms. In this case, the dimensions of the building should be 4x4 or 6x4.
Modern bathhouses with complex layouts, including up to six interior rooms, a terrace and even an attic floor with a balcony, are often built on sites for private houses and cottages.
But for them it is better to purchase ready-made projects that are designed for building sizes of 8x8 or 10x10. These options are good for frequent use by large companies.
How to choose the right place for a bath
The most important point is to choose where your future bathhouse will be located. The chosen location must comply with both existing legislation and your convenience in using it. The following recommendations will help you when choosing:
- We decide where the bathhouse will be located relative to the house: separately from it or as an extension to it, each of these options has its own pros and cons.
- It is believed that it is better to build a bathhouse in the backyard in silence.
- During construction, be sure to provide ventilation and wastewater disposal.
- When positioning the building, take into account the location of the light and the direction of the wind: the best is the southern part, protected from the wind; I recommend placing the windows to the west.
- The best option for a bathhouse will be located at a distance from other structures; if you decide to add one to the house, be sure to follow fire safety rules.
- When you have decided on the size and its placement, follow the rules of distance from the boundaries of the site (2.5 m) so that neighbors do not have discomfort and complaints in the future.
- Maintain a distance to the water intake - no more than 20m.
Selecting a location
It is better to choose a flat area for construction so that you do not have to make a solid foundation. The place should not be too damp, otherwise the bottom of the building and the floor will begin to rot.
If there is a body of water nearby, it is better to build a bathhouse closer to it, in this case you can plunge into cool water after the steam room. The entrance to the dressing room is usually made from the south side so that snow does not accumulate in front of the door.
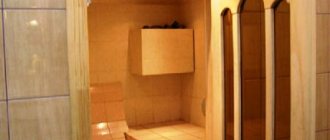
Interior of a Russian bathhouse
The interior of the Russian bathhouse is kept in traditional folk style. The walls are built from solid, cylindrical timber or logs.
Waiting room
At the entrance to the Russian steam bath there is a dressing room. This is where people undress before procedures, get dressed after, and arrange gatherings. Here they set up a long table for a friendly company. There is a samovar and tea accessories on it. A refrigerator and TV are installed in the dressing room.
In winter, the premises are heated by stoves and electric heaters. They spend more time in a warm dressing room than in a steam room. Here they relax after procedures, talk, drink tea and other drinks.
Important! There are dressing rooms without heating; they are equipped with a locker room and storage for firewood.
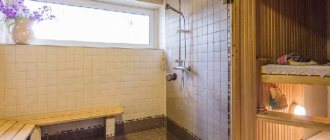
Shower compartment
The shower room, or wash room, is equipped with plastic shower cabins. To ensure that the interior matches the Russian style, the showers are lined with wooden materials. 20-liter barrels of water are placed nearby, and oak brooms are hung on the walls. Huge tubs are attached to the ceiling and a cord or chain is attached to them. To wash yourself with water, you pull the device and the tub turns over.
The washroom floor is covered with ceramic tiles and equipped with a sewer drain.
Advice! The interior of a modern shower room uses ceramic finishing materials. The tiles do not allow moisture to pass through and are easier to care for.
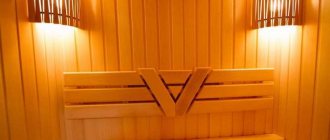
Wood-heated steam room
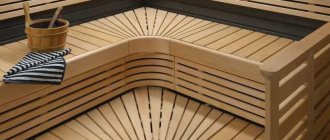
The steam room is located behind the main rooms of the bathhouse. The area of the room is 5 -10 m2. Steam quickly fills and warms up the space in a small room. A mandatory attribute of the steam room is shelves and benches. They enjoy the steam.
A heater is placed nearby - a place where hot stones lie. Cold water is poured onto them until steam forms.
The walls of the steam room are covered with wood that does not contain resins: linden, aspen. These materials are safe and do not emit pungent odors or harmful substances when steamed.
The interior of the Russian bathhouse is shown in this photo.
Often the steam room and wash room are combined into one room. This is done to save space. This arrangement is not very convenient, but is acceptable if all temperature and sanitation standards are met.
Construction materials for baths
Before starting construction, you should prepare all the necessary materials. In addition to what you need for the walls, you need to purchase everything you need for the roof, foundation and finishing. You will definitely need:
- batten;
- ceiling boards or lining 20 mm or slightly thicker;
- lining for wall decoration;
- vapor barrier film for roofing;
- waterproofing film;
- mineral wool for ceiling insulation;
- asbestos sheets for insulating walls near the stove and chimney;
- sand-gravel mixture and cement for foundation work;
- roofing material;
- insulation for walls (if the bathhouse is made of timber or logs).
The constructed bathhouse cannot be used immediately, as it must settle. Therefore, it is recommended to begin construction in early spring.
Building a foundation for a bathhouse
Construction begins from the foundation. Under a Russian bathhouse, which is built from heavy solid logs, a columnar or strip foundation is most often installed. The latter is more reliable, but quite labor-intensive and expensive (video).
Columnar is good if you are building a small bathhouse. The pillars that serve as support for the structure are installed at the corners and load-bearing walls of the building (video).
When the foundation is poured, the base for the furnace is immediately built. It will be quite heavy, so it must be installed on a solid foundation. It is important to choose the right place for the stove: it must heat all rooms at the same time.
What material to choose for walls
The modern building materials market offers various options suitable for building a bathhouse to suit every taste. The most common: wood, concrete blocks and brick.
Since ancient times, construction has been carried out from wood as the most environmentally friendly material that does not require additional finishing. Wooden walls delight with a pleasant aroma and aesthetic appearance.
Main types of wood for felling and their processing
To know how to cut down a bathhouse, you need to select the appropriate types of wood for production.
Most often, coniferous types of wood (pine, spruce, larch) are used for the manufacture of such structures. It is best to choose material from cold regions (for example, Siberia), since in winter the flow of sap along the trunk is least. This reduces the risk of cracks forming when drying the material. Also, trees that are felled in winter have a higher resin content, which increases its resistance to rot. The diameter of the logs must be at least 21 cm (but not more than 35 cm), and the length of all elements must be approximately the same to simplify processing and assembly. All wood must be smooth and free of knots. The area from the root to the beginning of the crown of a pine tree is best suited for this.
Wood for a log house Source sm-news.ru
When laying structural elements, it is recommended to make the first 2-3 crowns from larch, as it has high resistance to moisture. When choosing a material, it is not recommended to use crooked trunks or wood with cracks and rot. The bark should be removed with a scraper, as it hardly touches the working surface underneath. After this, you need to let the material dry for 3-4 days. Also, before cutting, the wood is treated with an antiseptic and impregnated with a fire retardant.
Processed wood for a log house Source im0-tub-ua.yandex.net
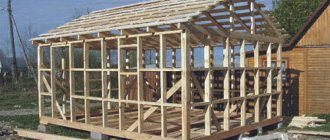
Frame construction
The most inexpensive and simplest option is a self-built frame bathhouse. Even a person with no construction experience can assemble it. This method of construction is the fastest, since in this case there is no need to wait for shrinkage, but to immediately begin interior decoration and installation of windows and doors.
But it should be remembered that the walls of the frame structure require additional insulation.
Types of Corner Joints
There are two types of corner joints - with and without remainder.
The first method is simpler and is called “in the bowl”; there are, in turn, three types:
- a simple half-wood bowl;
- oval comb;
- "in the fat tail."
The first option is more common and is used more often; these are the grooves that are made in standard logs.
Types of log connections
Corner joints are performed using the “claw” method without any residue. It requires a lot of skill and is not easy to do with your own hands. Such a connection requires additional insulation. Therefore, the baths are sheathed on the outside with finishing material.
Corner wall connection
Note! A bathhouse built with ends protruding at the corners is less ventilated. And with even corners, construction will be more economical, because then the logs are needed 50 cm shorter.
The finished log house must be caulked; this is done starting from the bottom crown in a circle. The roof of the bathhouse is usually gable, with a small attic or attic.
Rafter system
The roof consists of the following elements:
- Rafters, consisting of a rafter leg, a tie, a mauerlat, a stand, a purlin and a lining;
- Lathing - from edged and unedged boards;
- Roofing material.
In this form, the log house should be left until the next season for shrinkage and drying.
Construction stages
Detailed step-by-step instructions, which consist of several stages, will help you answer the question of how to build a bathhouse yourself:
Water supply in the bathhouse
The water supply system is organized taking into account the basic requirements:
- possibility of filling water in one design;
- protection of water from freezing at sub-zero temperatures.
Water supply in the bathhouse
The steam room should operate in several options:
- “Russian” steam room, in which a constant supply of wet steam is maintained;
- sauna, where steaming is carried out exclusively using dry steam.
How to find the optimal source of water?
The best option for a bathhouse is an artesian well.
There are wells for sand. Drilling them is estimated to cost a small amount, but it is necessary to install special filters, which is also a costly undertaking.
Before drilling a well, you must make sure that there are no radioactive substances in the soil. Often, a high percentage of radon gas is found in the ground, which is a completely radioactive element that is harmful to health. The study can be ordered from special companies or you can check information about the territory in the regional fund.
The optimal and least expensive option is to dig a conventional well.
Once a decision has been made about the water supply method, the aquifer can be found by observation, experimentation, or test drilling. To equip a well, you need special rings with a tongue-and-groove system that can be quickly fastened to each other. This technology ensures that the rings will not move horizontally. It is advisable to additionally use metal rings to tighten the elements so that the fastening is more reliable.
A bottom filter should be formed at the bottom of the well. For this, stones, crushed stone are used, and geotextiles can also be used.
Water from the well is supplied to the bathhouse through the outlet pipe. It should be completely sealed. Bitumen mastic is not suitable for this. It is advisable to perform multi-layer waterproofing using elements made of silicone, concrete or liquid glass.
How to organize water supply from a well
Work execution technology.
- The hole is closed with silicone, which is plastered with tile adhesive. It must be 100% resistant to water and frost.
- The glue dries completely. Then fiber rubber is applied to it. This material is usually used to protect showers from leaking.
- After this layer has dried, the glue must be applied again, but to a greater thickness.
- Plaster is applied with tile adhesive.
- After a day, the surface is covered with blue clay, on which foam plastic should be laid.
- Loams make the well more decorative.
- All of the above actions should be done in the exact order both from the outside and from the inside of the structure.
Installation of a pumping station
Installation of a pumping station
If a silent system is required, you need to install a submersible pump that is lowered directly into the well.
Installation of a pumping station in a well
A receiver should be connected to the pumping station so that it can be easily used without additional activation every 3-5 minutes. This device will also help normalize the pressure in the system.
Pipe selection
Metal-plastic pipes are considered the most comfortable, but they are often not optimal for a bathhouse. In winter, their gaskets dry out, which can cause a temporary interruption in water supply. Propylene pipes do not corrode, have excellent wear resistance and are equipped with a one-piece structure without additional gaskets.
Bath water supply
Plumbing is carried out from the pumping station to the structure of the filter, tank and collector. A tee is installed inside the well, which serves to carry a drain valve and a check valve necessary for installing a strainer. Additionally, a mesh type filter is placed in front of the pump. It is advisable to ensure that this element of the system is designed for at least 30 tons of liquid and has a carbon cartridge.
Construction of the foundation
When building a bathhouse from timber, it is recommended to build a simple columnar foundation, which is low cost and suitable for light buildings. Holes are dug in the corners and then after a certain distance of several steps. The depth of the pits ranges from one to one and a half meters.
A small amount of ASG is poured onto the bottom, then an asbestos-cement pipe is installed. The fittings are placed inside and the cavity is filled with mortar. After the mortar has hardened, the spaces between the pillars are filled with bricks.
Steam room: tips for comfort
Family Russian bath: 1 - steam room; 2 — shelves; 3 — retractable benches; 4 - water tank; 5 - oven; 6 - dressing room; 7 - hallway.
The formation of the temperature regime in the bath is influenced by two factors - hot water and steam formation. When the water heats up, steam fills the space of the steam room and then cools, thereby increasing the humidity.
This creates excessive dampness, which requires increasing the amount of heat. Tip: 20 minutes before using the steam room, evaporate the water on warm stones with the stove closed.
Now about the technical specifications.
Attention! The doorway to the steam room is made 1.6 m high. The threshold is high. The shelves are 80 cm wide, 2 m long.
A distance of 1 meter must be maintained between the shelves and the ceiling. It is better to make the seats and shelves removable. To prevent the walls of the room from rotting, do not cover the space under the shelf and seat. because The needles secrete resin, try to do without it to avoid burns. Aspen is an ideal option in this matter.
Construction of walls and installation of roofing
The most common material for bathhouse walls is 150x150 timber. The first crown is treated with special antiseptic substances and placed on waterproofing.
More often, the timber is connected “into the paw”. The first crown is checked for the presence of right angles, then the assembly of the walls begins. Each crown is laid with a layer of thermal insulation and connected with iron or wooden pins.
After the walls are erected, the rafters are mounted using metal brackets. The roof of a bathhouse most often has a gable shape. In this case, the rafters rest on the walls and are connected at the top into a ridge. Lathing is installed on the rafters, then steam and waterproofing layers, and insulation. Finally, the roof is installed.
Assembling a log house
Before assembling the log house, it is necessary to make a strip-type foundation, since the wooden structure has a large mass, and put waterproofing on its upper part.
Next, it is recommended to lay 2-3 larch crowns and level the horizontal surface of the log house using a level. During assembly, insulation is placed in the longitudinal groove, and to compact the log, the log is tapped with a wooden mallet or log. Also, after laying each crown, it is necessary to check the horizontal and vertical position of the structure.
After assembly is completed, all cracks and joints are caulked, and excess insulation is removed. After six months, it is recommended to repeat this operation, since the insulation can become saturated with moisture from the drying logs. All wooden structural elements must be treated with an antiseptic 2 times.
Log houseSource metasold.com
How to assemble a log house is shown in this video:
Interior decoration
First, communications are carried out: electricity, water, sewerage. A drainage well should be dug next to the bathhouse, into which water from the washing room will flow.
When making a floor in a bathhouse with your own hands, you should remember that it must be leaky, that is, have gaps for the passage of water.
Then the walls are insulated and finished with clapboards and electrical appliances are installed.
Time to think about the stove
Diagram of an AITO heater stove for a Russian bath.
If you build the stove correctly, you can be sure that the bath will not overheat, and the dissociation of steam will be maximum. In a Russian steam room, they usually make a large stove with stones behind the door, which opens only to add water.
Having decided to build a bathhouse complex yourself, you will have to find a way that will help ensure that the stones warm up well, but do not overheat the room. The answer may be this: build a massive structure, and regulate the temperature by adding water.
Stone backfilling is done using heavy, durable, round-shaped stones; it is better to purchase volcanic rocks.
Peridotite, basalt, granite, and andesite are perfect. To increase the steam volume, pig iron is added.
Grate bars are placed on the bottom of the oven to distribute the load. A good option is a metal stove, which will quickly warm up the air in the bathhouse.
Oven and shelves
The shelf is made of hardwood and mounted on a frame. The stove is installed in compliance with fire safety standards and insulation of the nearest walls and chimney. It is installed on a special monolithic foundation. More often, metal stoves or heaters are installed in bathhouses.
After construction is completed, you can install a table and benches in the dressing room. Place ladles, buckets and basins in the washing room. Prepare brooms.
You can also make many parts for arranging a bathhouse yourself. The best sauna is the one you create with your own hands. It is in it that it will be most pleasant to steam and relax.
Installation of a sauna stove
2 wood-burning heaters : metal and brick . Let's talk about them in more detail and won't ignore electric ovens.
Metal furnaces
A metal batch oven without a container for heating water is very compact. In an iron casing with doors, grates with a stove are placed on metal shelves, which make up the bottom of the combustion chamber.
There are cavities inside the body where stones . Heaters come in open and closed types. When the stove is operating, gases enter the chimney pipe, passing through the channels. The firebox is usually lined with bricks:
The furnace is equipped with chimneys consisting of downwells and collection pipes. The rock chamber has two doors, but chimneys are often installed to allow flue gases into the bottom of the rock chamber from the space around the duct.
Brick heaters
The construction of a brick heater begins with the construction of its foundation. To prevent the stove from sagging or tilting due to soil freezing or moisture, the base must be deepened by 0.5 meters. The transverse dimensions of the support should be larger than that of the stove by one brick .
The foundation for the furnace does not need to be combined with the wall foundation . The distance between them is at least 5 centimeters.
The best foundation is rubble concrete or concrete. In dry soil it can be built from bricks using cement, lime or lime-cement mortar.
The surface of the foundation must be filled with cement-sand mortar, leveled with a lath and covered with waterproofing. Usually this is roofing felt or roofing felt, which is laid in 2 layers (point 4 in the diagram below):
The designations on the diagram are as follows:
- Sole.
- Underground part.
- Upper ledge.
- Waterproofing.
- Kiln masonry.
The building material for the construction of the furnace is ordinary solid brick. Under no circumstances should silicate or hollow bricks be used for masonry.
For more information about sauna stoves, see our article - choosing a sauna stove equipped with a water tank.
Electric heaters
In modern baths, air up to 100 °C is most often heated with an electric heater with a built-in automatic control device. The control unit turns off the heating element when the temperature of the casing exceeds the permissible norm, as well as when, for example, a towel gets on the stove.
An electric heater in a bathhouse must be equipped with a temperature limiter that turns off the heating element, and a time relay that stops the supply of current to the heating element after a certain operating time (up to 5 hours). Today the market is full of various modifications.
DIY bath photo
Choosing the type of bath
Currently, there are dozens of types of baths, but the following types of buildings are most popular:
Dry-air steam rooms are the most common type of sauna, the temperature in the steam room ranges from 80 to 120 degrees. In this case, the humidity indicator does not exceed 30%. Note that this type of bathhouse is most widespread among dacha owners. Baths in most cases use iron stoves, which quickly heat the walls and steam room. Half an hour after lighting, you can already steam and wash in such a bathhouse. It is due to the high speed of kindling that dry-air baths have become most widespread. We also note the economical consumption of firewood. At the same time, it is necessary to note the existing disadvantages of dry-air baths.
The high temperature in the steam room leads to burns of the mucous membranes and lungs. Being in such a bathhouse, especially if it is heated above 100 degrees Celsius, is problematic. Water that falls on hot stones quickly evaporates, so it is difficult to regulate the humidity and temperature in such a bathhouse. The steam in a dry air bath is heavy and damp. If you want to enjoy bath procedures, we recommend that you pay attention to other types of baths.