SHARE ON SOCIAL NETWORKS
FacebookTwitterOkGoogle+PinterestVk
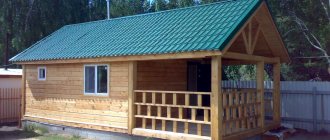
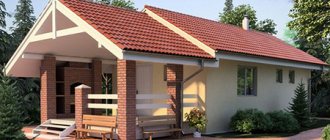
Many steam lovers dream of having a good, but inexpensive, private bathhouse. A place where you can wash, relax, and get a good boost of energy. One of the affordable and budget options is a do-it-yourself frame bathhouse: step-by-step construction instructions will reveal the secrets of frame technology and will become an example for independent construction, starting from the foundation and ending with the correct selection of thermal insulation materials.
Having the skill of assembling frame structures, you can quite simply and quickly build a bathhouse with your own hands
Advantages and disadvantages of frame baths, reviews from owners
Before building a frame bathhouse with your own hands, many people ask themselves: what material to use for its construction? After all, many associate baths with structures made of logs or bricks. But such buildings are quite expensive for their owners, and the time required to warm up, for example, a chopped bathhouse is about 6 hours.
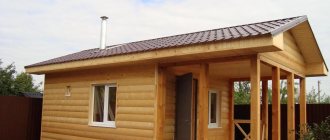
External and internal finishing of a frame bath is most often performed using carriage boards
Advantages of frame technology
The construction of a frame bathhouse solves several problems at once, as these are: a simple construction method, the availability of the materials used and the fast speed of construction. The advantages of frame technology include the following:
- the most affordable construction cost;
- use of lightweight types of foundation;
- low thermal conductivity of the structure contributes to rapid heating;
- the possibility of carrying out communications inside the walls, which has a positive effect on the aesthetic component of the bathhouse structure;
- the absence of shrinkage makes it possible to operate the bathhouse immediately after its construction and finishing;
- use of environmentally friendly materials;
- there is no need to use special construction equipment;
- No special construction skills are required when constructing a frame bathhouse yourself. Videos posted online demonstrate this perfectly;
- the absence of wet construction cycles makes it possible to carry out construction regardless of air temperature and water availability;
- many ways to decorate a building.
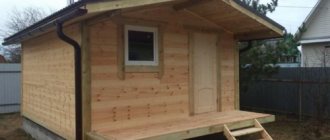
When constructing frame baths, environmentally friendly materials are usually used
All these advantages contribute to the increasing popularity of frame baths. Reviews from owners who used this technology during construction indicate that such structures are economical and, if constructed correctly, can create excellent conditions for comfortable use.
Weaknesses of frame baths, reviews from owners
To weigh the pros and cons of the frame bath construction technology, you can ask for reviews from the owners. There is a lot of information on Internet forums from those who already have such a bathhouse and have been using it for some time. Some leave negative reviews: frame baths, in their opinion, tend to quickly lose their appearance due to the formation of fungus on the walls. This occurs due to the rapid cooling of the room, no matter how well it is insulated.
This drawback can be eliminated by using only high-quality insulation materials for thermal insulation. It is necessary to approach the choice of thermal insulation material with all seriousness. After all, cheap polystyrene foam or mineral wool will not adequately perform their functions. The use of economy class foam can cause a structure fire due to the easy flammability of the insulation.
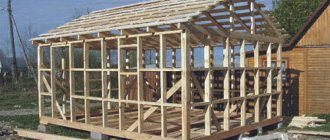
To construct the frame of the bathhouse, timber of various sections is used, as well as boards that have undergone antiseptic treatment
One of the negative aspects described in the reviews is the shrinkage of the bath. Many testify that over time (approximately 1.5-2 years), the frame structure shrinks, the value of which reaches 8-10 cm. This, in turn, can cause deformation of the internal and external finishing of the building.
Helpful advice! To minimize the effects of shrinkage of a frame bath, lumber that has been kiln-dried should be used during construction.
Summarizing the above, we can conclude that the main disadvantages are the significant costs of insulating the walls of a frame bath, the need for thorough antiseptic treatment and low fire resistance. However, given the huge list of advantages, the construction of frame baths is not inferior in popularity to structures made of logs or bricks.
You can get acquainted with some of the assembly nuances and reviews from the owners by watching a video of building a frame bathhouse with your own hands.
What is the best way to sheathe the frame?
In Russian baths they often use a wooden frame.
For high-quality exterior finishing, you need to make the correct sheathing and secure the insulation.
The lathing takes on the functions of ventilation. The gaps will prevent moisture from accumulating on the surface of the timber and insulation. Ventilation gaps provide good air exchange, where there is no room for dampness or fungus.
Fastening is carried out vertically. To insulate the walls of a bathhouse, not all types of thermal insulation can be used.
It is prohibited to use flammable cheap polystyrene foam or polystyrene foam.
Expanded clay and ecowool are not suitable due to the fact that they quickly become saturated with moisture and lose their working properties.
The best insulation options:
- basalt wool;
- kaolin wool;
- vermiculite
Photo: wall construction of a frame bath.
The outside of the frame structure can be finished:
- siding;
- decorative plaster;
- edged board;
- half beam;
- clapboard;
- croaker;
- tiles;
- block house;
- plastic panels.
The cladding with a block house that imitates a log looks beautiful.
You should not use natural stone or brick for external cladding. Otherwise, the frame building will lose an important property - thermal inertia.
For interior work, lining is considered a universal ceiling and wall material. It is convenient for her to sheathe the steam room and dressing room. The lining does not heat up and is easy to install. To decorate the shower, choose ceramic tiles or moisture-resistant wood.
It is forbidden to paint or varnish the finish in the steam room, otherwise when heated it will begin to release toxic substances that are harmful to health.
It is allowed to use moisture-resistant plasterboard for covering the walls in the locker room. OSB and MDF boards are suitable for the same purposes.
Attention is paid to areas of walls, floors and ceilings near the sauna stove. They are laid out with tiles, facing bricks, and sheathed with steel or iron sheets.
The procedure for internal lining of the bathhouse is given in more detail in the section below.
DIY frame bath projects. Photos of the best buildings
Getting acquainted with photos and videos of frame baths with their own hands, many decide to build the structure themselves. Having some experience in construction and taking into account the good practice of constructing objects using frame technology, you can build such a bathhouse quite quickly. However, as in any construction, to avoid serious mistakes, a competent project is necessary.
Projects, photos of do-it-yourself frame baths 3x4, 4x4 m
When building a 3x4 m frame bathhouse with your own hands, you must take into account that the space inside the room should be used as ergonomically as possible. Such mini-baths can be built in a small dacha or a plot of land with a country house, where there is a need to save territory. No more than two people can indulge in bath procedures here.
Before you can build a frame bathhouse quickly and inexpensively, you need to have a ready-made project that you can use as a guide during construction. In principle, a bathhouse can consist of one room, which will combine a steam room, shower and locker room. This is not entirely convenient, since getting dressed after taking procedures in a room with high air temperature and high humidity is not very comfortable.
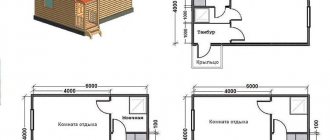
Project of a frame bathhouse 3 by 4 m with three interior rooms
Typical designs for 3x4 m frame baths provide layouts where separate rooms are allocated for a steam room, a wash room and a relaxation room. Such a bath can be heated with one wood-burning stove or boiler. Drawings of a frame bath can also take into account the presence of a modest veranda.
Do-it-yourself construction of 4x4 or 3x4 frame baths, due to their small size, has its advantages:
- decent savings on building materials - if the length of the wall of the structure is 3 m, a six-meter beam is cut in half and there is practically no waste left;
- speed of construction - having a design and drawing of a frame bath, the structure can be erected within 2 weeks;
- strength and durability - given that a minimum of materials is required, you don’t have to skimp on the quality of the wood and choose a high-quality material with good impregnation.
Various layout options for a 4x4 m frame bath
Helpful advice! Any new building on your site, even a small bathhouse, is subject to mandatory registration in the cadastral register.
A review of photos of frame baths of a small area will help you get acquainted with the projects and choose an option to your liking.
Projects of 6x6 frame baths with an attic
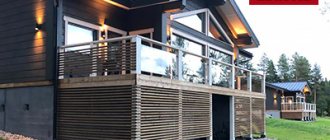
If you are the owner of a large plot of land, it makes sense to build a beautiful and spacious bathhouse. You can steam in it yourself and invite friends - there is enough space for everyone. In projects of frame baths with an attic, a layout has been developed where the rest room, as a rule, occupies up to 20 square meters. m. In the same room there is a staircase leading to the attic floor, which is usually used as a bedroom.
The advantage of a bathhouse with an attic over a one-story building is that you can get additional living space on the second floor. A guest room, bedroom or billiard room is set up there, where you can comfortably spend time with friends. And in terms of cost, such a structure will not differ much from a one-story one, since the main costs will be associated with the construction of the foundation.
Bathhouse project 6 by 6 m with living quarters in the attic
The technical documentation provides for a support-column foundation made of concrete blocks with subsequent waterproofing of the base. For the floor in a frame bath, it is proposed to use a 22 mm edged board (rough flooring) and a 30 mm tongue and groove board for finishing the floor. The floor material must be subjected to antiseptic treatment and insulated with a 10 cm layer of mineral wool.
For walls, partitions and ceilings, timber 100 x 150 mm, board 50 x 100 mm, 40 x 100 mm are used. The partitions and ceiling are sheathed with clapboard that has undergone chamber processing. Under the cladding it is planned to insulate with mineral wool slabs 10 cm thick and install a vapor barrier in two layers. The attic space is also being built from the same materials.
Helpful advice! Having a competent design will allow you to build a reliable structure in the shortest possible time and without unreasonable waste of materials.
According to the specification, the rafter system is made of 100x50 boards, the sheathing is made of 22 mm boards. Wave profile ondulin is used as a roofing covering in three color options (to choose from). Windows can be used wooden or plastic, depending on preference. For the steam room, a wood-burning stove with a water tank is used. At the location of the firebox there is brickwork.
Project of a 6x6 frame bath with an attic in which there is a large recreation room
If you have some skills in constructing structures using frame technology, standard projects can be used to build a frame bathhouse with your own hands. In addition, it is not prohibited to make some adjustments to the finished documentation or offer your own drawings and sketches for the production of an individual project. The option of attaching a small terrace or veranda to the main structure is not excluded.
All design drawings were developed with the prospect of constructing a frame bathhouse with your own hands. Photos posted online by users are clear evidence of this.
What is the purpose of foil?
To achieve effective energy saving in a bathhouse, you will need to not only insulate it, but also use reflective material in the form of a special foil film. Masters claim that it helps return up to 95% of the heat into the room.
The result is that fuel for the stove is saved and the duration of the fire is reduced.
For baths, aluminum foil with a thickness of 30–300 microns is used. It is used in combination with other insulation or is already fixed as its top layer.
Therefore, before covering, they first attach insulating material to the walls and ceiling, thanks to which the heat does not escape beyond the bathhouse. An insulated steam room heats up faster and retains heat longer.
The following are the advantages of foil:
- It acts as a vapor barrier and blocks the access of moisture to the insulation. The generated steam remains on the walls of the steam room.
- Its service life exceeds 50 years. Wooden elements will begin to rot faster than the foil layer will deteriorate.
- Excellent sound insulation. Foil can absorb up to 70% of all sounds and noise.
- Fireproof raw materials. Does not burn. It will become an obstacle to the spread of fire.
- Bathrooms warm up faster and take longer to cool down.
- If you fix the insulation with a foil layer, then the foil will prevent it from falling off.
Among the disadvantages, the following should be noted:
When there is a difference in temperature outside and indoors, condensation appears on the surface of the material. It is important to leave a gap for ventilation before covering. If this is not done, the resulting condensate will begin to be absorbed into the sheathing, which will lead to rotting of the lining. Foil has poor throughput
As users say, she is not breathing. Therefore, the rooms must have good ventilation, both forced and natural (windows, doors). Aluminum particles accumulate in the lungs, causing various respiratory diseases. But if you use the sauna periodically, the risk of harm to health is minimal.
Assembly of frame-panel baths: projects and prices
The construction of a bathhouse using the technology of assembling panel structures on a frame basis is characterized by high construction speed and low costs for basic materials. The projects provide for and take into account all the requirements corresponding to the construction of structures of this category: ventilation, water supply, sewerage, electricity supply.
3D visualization of a small frame bathhouse
Projects of frame-panel baths
The main feature of this technology is that assembling a frame-panel bathhouse with your own hands is very easy - according to the principle of a designer. The modern market offers a large number of ready-made panel kits designed for installation on a frame. Thanks to the three-layer structure and low thermal conductivity of polystyrene foam used in SIP panels, this material has good characteristics and is excellent for baths.
Projects for frame baths assume a gable roof; there is no attic space in it, since the panel structure is a lightweight building. The internal space under the roof can be used for storing bath equipment. Depending on the type of soil on which construction is planned, the foundation for a bathhouse can be columnar, shallow strip or pile. The last version of the base is used on sandy soil.
To create the frame, timber posts are used: 120x120 mm timber is suitable for corner posts; for intermediate supports, material of a smaller cross-section can be used. The ceiling is made of beams 40x75 mm. If the bathhouse is planned for year-round use, the thickness of the insulation is taken to be 15 cm; for seasonal use, a layer of heat insulation of 10 cm is sufficient.
Project of a small frame-panel bathhouse 4 by 3 m
As for the floor, it is recommended to make it pourable. For its installation, an edged or tongue-and-groove board mounted with a slope is suitable. The layout provides for the division of the frame-panel bathhouse into several rooms. The partitions between them are made of wood. If the bathhouse is heated by a stone stove, a separate foundation is made for it.
Price of a turnkey frame-panel bath
Taking into account the construction technology, the cost of a frame-panel bathhouse is always lower than the price of a structure built by any other method. Before placing an order, you should ask the manufacturer about the provision of additional services. Such as installing a stove, installing a roof, installing a chimney. Considering the high speed of assembly, no more than 7 days pass from the date of order to the start of operation of the panel bath.
Taking into account the fact that frame-panel baths are inexpensive, the customer can afford to choose any of the presented projects. This also applies to those whose budget is quite limited.
Manufacturers offer several configuration versions:
- turnkey facility - factory assembly of walls and partitions, finishing of facades and internal walls;
- finishing in the rough version - cladding either the facade or only the internal walls;
- without cladding - the object is only an assembly of panels.
The process of assembling a small frame-panel bathhouse with a foundation on piles
Before you buy a sauna of a frame-panel construction, you need to pay attention to the sandwich assembly diagram. Any deviations in the sequence of arrangement of elements inside the sandwich panel may result in rejection of the product from this manufacturer. If the finishing of the panels can be done independently, then re-sorting all the panels for the correct arrangement of materials in them at your own expense makes no sense.
The cost of a 6x4 frame-panel bath is 308,100 rubles. The project provides for lining the walls and ceiling with clapboard, the façade is imitation timber, the floor is tongue-and-groove boards 26 mm thick, the roof is colored corrugated sheeting, the height of the bathhouse is 2.4 m. Purchase a 7x3 model of the same configuration, only with external finishing from a block house, possible at a price of 266,700 rubles.
Thermal insulation of the wall next to the stove
For the wall frame and insulation located close to the sauna stove, it is necessary to create additional protection to prevent the influence of high temperatures on them. Some experts consider the best choice when solving this problem to be the use of asbestos sheets and slabs.
But since there is an opinion that asbestos is harmful to human health, it is advisable to choose more modern options, including needle-punched mats, isolon, basalt fabrics and others. All of the listed materials can withstand temperatures of several hundred degrees and therefore are able to ensure absolute fire safety.
Fireproof protection is installed in one of two ways:
- decorative trim on top;
- directly onto the vapor barrier layer.
Purchasing turnkey frame baths: projects and prices of structures
Many companies offer ready-made frame bathhouse projects of various layouts and sizes for sale. Not everyone has the opportunity to assemble and install a structure with their own hands: some do not have the necessary skills, others simply do not have the time to assemble it themselves. By purchasing an inexpensive turnkey frame bathhouse, you can save time, money, and at the same time acquire a guarantee of the reliability of the construction.
Project of a turnkey frame bathhouse 4x9 m with a relaxation room and a terrace
For the convenience of users, manufacturers post projects, photos and prices of frame baths on their websites. By visiting the site, you can find complete information about finished structures, indicating dimensions, prices, specifications of materials and services included in the price of the kit. If you do not find a suitable one among the indicated projects, you have the opportunity to make additions to the existing drawings or offer your own sketch according to which the project will be carried out.
A convenient search system allows you to quickly find your favorite option for an inexpensive turnkey frame bath. It is possible to search for a structure by appearance, size, layout, and also select a model with a terrace or a residential attic. Companies offer services for laying the foundation, assembling the structure on your territory, and transporting the object to the site. Seasonal discounts and other bonuses are not excluded when ordering a frame bath.
Prices for turnkey frame baths (for models from different manufacturers) are shown in the table:
| Manufacturer | Project name, dimensions, m | price, rub. | |
| For seasonal use | For year-round use | ||
| SC "Estate" | "Julia", 4x4 | 198100 | 273100 |
| SC "Estate" | "Fun", 6x6 | 315900 | 422900 |
| BK1644 with veranda, 4x4 | 400100 | The price for additional insulation will be confirmed with the manager | |
| BK1568 with terrace, 6x4 | 495100 | The price for additional insulation will be confirmed with the manager | |
| LLC "Master" | "Lada", 6x3 | 340000 | |
| SC "Dachny Mir" | KB-7 with attic and terrace, 6x9 | 590100 | |
| SC "Teremok" | B6607, 6x6 | 315100 | |
| SC "Teremok" | B6901, 6x9 | 600100 | |
The price of the basic set of frame baths does not include the cost of the stove. Manufacturers offer the customer several modifications of sauna stoves. It is possible to install your own version of the furnace or boiler.
Helpful advice! The cost of installing heating equipment can be discussed with the work team before purchasing a turnkey frame bathhouse.
Lining a wooden bathhouse with clapboard inside: is it necessary?
The first reaction of those who learn about the owner’s decision to line the inside of a wooden bathhouse with clapboard is, of course, surprise - was it worth spending money on expensive wood if you then cover it, like in a cinder block bathhouse, with clapboard?
But here, as in the story with the Roman and his shoes - “who of you knows where they are too tight for me?” Therefore, we will proceed from the fact that, without any particular reason, the owner of a wooden bathhouse will not hide its advantages under a layer of lining.
What reason could force him to do this? First of all, the thickness of the log house or timber is insufficient. If the calculation was wrong, then it’s time to dig, or not to dig – it will still be cold. And if so, then you need to insulate yourself. When you have insulated, you need to think about finishing, and the most common one is lining.
It also happens that you want to make a thermos in a steam room - cover it with foil. And if you do this, then the foil goes into the bathhouse under the lining. Insulation may or may not be done, the main thing is to separate the foil from other materials by air space - this is both a ventilation gap and a condition for the heat-reflecting screen to work, because metal conducts heat very well, while air conducts heat very poorly.
That is, in order to sheathe the inside of a bathhouse with foil and clapboard, you need to make a lath (on top of the insulation or directly on the wall), fasten the foil to the lathing, fill the slats again, now with counter-lattens, and install the clapboard on it.
Log house inside
Of course, before you start covering the log house, you should caulk it thoroughly or otherwise eliminate all heat leakage points.
After this, the issue of additional insulation is resolved. If it is necessary, then a complete thermal insulation “pie” is installed; if not, then it is enough to do as described above: make a lath, foil, counter-lattice in the steam room and sheathe the inside of the bathhouse frame with clapboard.
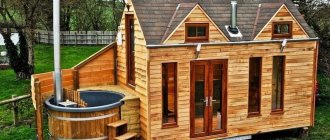
Where to buy a house kit for a small frame bath
It is much easier to build a frame bathhouse with your own hands, using a kind of construction kit - a house kit, which includes all the large-format elements for construction. The main components of a frame bath house kit are beams and panels. You can use ready-made house kits only if there is a foundation. All components are adjusted to size (if necessary), assembled and secured to the base.
A finished small frame bathhouse made of timber, installed on a foundation of concrete pillars
House kits for small frame baths have some advantages over structures erected permanently. Firstly, the compact dimensions of the mini-bath allow its structure to be installed even in a modest area. Secondly, it is possible to quickly dismantle the structure and transport it to another location. Thirdly, the presence of internal communications wiring allows you to quickly connect and immediately use the bathhouse for its intended purpose.
Factory-made house kits are accompanied by bathhouse designs with assembly drawings and architectural sections. At the customer’s request, the company can offer services for obtaining permits and obtaining technical specifications for electricity, gas, and water supply. A package of all permitting documents is attached to the standard project.
Typically, the lowest cost of kits comes from those organizations that independently manufacture all components. Thanks to the factory assembly and adjustment of the panels, which accounts for more than 70% of the cost of all work, the cost of installing a bathhouse on the site is significantly reduced. The customer just has to build a lightweight foundation, choose the optimal design and purchase a prefabricated frame bath house kit.
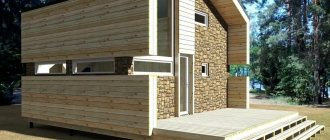
Frame bathhouse of a small area, built with your own hands
Helpful advice! If this is your first time encountering frame technology, check out the materials on the Internet on how to build a frame bathhouse with your own hands. Step-by-step instructions take into account all stages and features of installation.
You can buy a factory-built house kit for a 6*6 frame bath, the basic composition of which includes a foundation, 150 mm mineral wool insulation, finishing, electrical, plumbing and water supply, at a price of 442,900 rubles, for example, in a construction store. It is possible to buy only a project with working drawings, the cost of which is 7,500 rubles.
Frame material
Main raw materials:
- beam;
- metal profile.
Let's look at the pros and cons of using each material for the frame.
Wooden beam
It is often used as a raw material for the frame of houses, verandas, and baths.
The thickness (section) of the beam is selected in accordance with the load-bearing capacity of the structure, the type of heat-insulating material.
Wood raw materials are purchased, impregnated at the factory, or treated with antiseptics independently before installation. The costs in both cases are almost the same. But if you buy ready-made timber, you will save time.
The frame consists of an upper and lower frame.
If the bathhouse is insulated, then the thermal insulation layer is made less than the thickness of the timber.
Advantages of a wooden frame:
- convenience and ease of material processing and installation;
- affordable price;
- environmental friendliness of the material;
- attractive look.
The main disadvantage is the limited service life and the need for periodic maintenance of the wood. In addition, we must not forget about the high probability of shrinkage.
Metallic profile
Masters call such structures LSTK - light steel thin-walled structures.
The raw materials are profile pipes, channels, angles (optional).
It is best to take profile pipes with a cross section of 60×60 mm, 100×100 mm.
The metal frame is compatible with any type of foundation. It is not used so often for arranging baths.
The key factor that affects the cost of the structure is the profile section. The larger the cross-section, the more difficult it is for the pipe to bend, so the cost of the work increases.
For the outer cladding of the frame, corrugated sheeting, siding, and PVC panels are suitable.
Among the advantages of a metal frame structure:
- Quick installation.
- Possibility to assemble the building at any time of the year. Metal is not afraid of temperature changes, while a bathhouse made of brick or aerated concrete needs to be laid out only at above-zero temperatures, otherwise the masonry mortar will lose its properties.
- Does not shrink throughout the entire period of use.
- Provided high-quality anti-corrosion treatment has a long service life.
- Light weight simplifies the process of transportation and installation.
- Low price compared to stone and brick baths.
The downside is the need for high-quality anti-corrosion treatment of the metal. Otherwise, the metal will begin to rust.
Do-it-yourself frame bath: step-by-step construction instructions
When building a frame bathhouse with your own hands, you should remember that this is not just a room where you can wash yourself. This building must have internal and external harmony, consistent style and a warm atmosphere. Due to its light weight, the frame bath does not require shrinkage; it can be erected at any time of the year. The use of advanced frame technology allows us to achieve structural reliability and long service life. Use the tips from the video review on how to build a frame bathhouse with your own hands: a step-by-step guide.
Construction of the foundation of a 3x6 frame bath with your own hands: step-by-step instructions
Before building a frame bathhouse, you must first select a location for the structure and prepare the site. The site is cleared of trees, bushes, grass, and unnecessary debris and stones that may interfere with the correct marking of the territory are removed. If there is a slope or unevenness in the terrain, the site should be leveled: the hills should be cut off, and the excavations should be filled with soil to the required level.
Markings for the foundation of the bathhouse are made using wooden pegs and a cord. All marking angles must be maintained and correspond to 90°. As a rule, small structures of frame baths can be installed without a foundation. However, if clay soils predominate on the site, it would be useful to arrange a strip base.
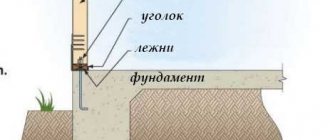
To install the foundation, it is necessary to dig a ditch half a meter deep along the marking line, its width should be about 40 cm. Having installed the formwork, you should pour the foundation and place the pins in the soft solution to fix the strapping. After the concrete has set, they begin laying the strapping beam.
Construction of a frame bathhouse with your own hands. Step 1: laying out the foundation
Helpful advice! Before assembling the structure, you need to make sure that the concrete is mature and dry: it is dried for 3-4 days, covered with polyethylene, then uncovered and kept for another couple of days.
The frame of the bathhouse, which plays a load-bearing role, is built from wooden beams that have undergone antiseptic treatment. The section of the beam is selected based on the load-bearing capacity and the insulation used. It should be clarified that the layer of thermal insulation located between the racks should not exceed the thickness of the beam itself. For the lower and upper trim, as well as corner posts, timber with a larger cross-section is used than for intermediate supports.
The strapping begins from the corner of the foundation, using a 10x10 cm beam. The connection of the strapping beam in the corners is done using the “paw” method and securely fixing it with nails. Previously installed pins will help to avoid displacement of the beam. Before laying the framing beam, the concrete surface of the base must be completely cut off with roofing felt. After this, 8 pieces of braces are placed in the corners.
Construction of a frame bathhouse with your own hands. Step 2: Frame Construction
Assembling the walls of the structure
It is more convenient to assemble the frame in an open area in the yard. Calculation of the pitch of the racks depends on the use of sheathing material. So that the sheathing sheets do not have to be adjusted and they form a dense wall, the pitch of the intermediate posts is taken to be 60 cm. This distance is also suitable for installing insulation: its standard width is approximately the same. The insulation will be located between the racks by surprise and will support itself.
In places where, according to the design, openings will be located, the step can be increased by 35-40 cm. Where the frame will be adjacent to the lintels, it is necessary to install additional racks made of timber. In parallel with the installation of the racks, you can lay out the floor joists from a 15x5 cm board. All components of the frame are carefully assembled, leveled and connected. The space between the vertical supports is filled with thermal insulation material.
For the external cladding of the frame, I most often use carriage boards. But you can also use other materials that the modern construction market offers: siding, block house, facing brick, thermal panels. However, a bathhouse lined with clapboard looks good and natural. The lining is installed in a horizontal orientation, having previously laid a waterproofing layer.
Construction of a frame bathhouse with your own hands. Step 3: assembly and insulation of walls
Many users post online photos of the stages of building a frame bathhouse with their own hands. Photo reports will help you visually familiarize yourself with the nuances of independent construction.
Insulation scheme for a frame bath
One of the important points in assembling a frame bath is its thermal insulation. Both the selection of material and its installation should be approached with all responsibility. Mineral wool can be used as insulation. This material is characterized by high vapor permeability, it is non-flammable and walls with such insulation “breathe”. This achieves the effect of a log bath.
You can lay mineral fiber formed into slabs or rolls, but it is preferable to use the first option. Insulation boards are laid between the racks. If the sheets in the corners of the frame niche are deformed and do not fit tightly, it is necessary to straighten the sheets using a knife. The insulation must be in close contact with the wooden frame elements around the entire perimeter, as well as with each other.
Helpful advice! Experts recommend insulating a frame bath with two layers of 5 cm each: the first layer is made of insulation in slabs, the second is made of rolled material. Thus, all connecting lines will be blocked.
Diagram of the internal structure of the walls of a frame bath
A layer of waterproofing is laid between the insulation boards and the outer skin of the frame. For this you can use, for example, Tektoten film. The fact is that during operation, the open insulation is partially blown through the ventilation gap, which leads to a decrease in the thickness of the insulation and a deterioration in its thermal insulation properties. Laying wind-waterproofing protection from a vapor-permeable membrane will guarantee the effectiveness of the thermal insulation layer.
On the inside, a vapor barrier is made of polyethylene aluminum foil. The joints of the film are glued with tape, after which the interior finishing begins. The process of insulating the frame is quite labor-intensive and requires careful execution. If the technology is not maintained, mineral wool may shrink over time, which will affect the thermal insulation parameters of the entire structure.
The video below will demonstrate in more detail the technology of structural insulation during the construction of a frame bath.
Roof arrangement
For a small bathhouse, a gable or hipped roof shape is suitable. Easier to implement - gable. The rafter system of such a roof is made of wooden beams 15x5 cm. For convenience and safety, all structural elements should be assembled on the ground. To avoid errors during assembly, it is recommended to make a layout, the shape of which will be repeated by all rafter elements.
In order to make a model, you need to connect the upper ends of the two rafters with a nail. The lower edges of the rafter legs are placed and secured at the points where the supports are planned. The resulting figure is secured with a transverse jumper - a crossbar. The crossbar is connected to the rafter legs using screws.
When all the roof trusses have been assembled, they begin installing them on site. The first step is to fix the front elements, between which a construction cord is pulled for reference. Its location will coincide with the line of the roof ridge. The remaining elements are mounted at its level. The pitch between trusses is usually 1.2 m, although it can be changed up or down.
Construction of a frame bathhouse with your own hands. Step 4: roof arrangement
Helpful advice! When taking the step of the rafter legs, it is necessary to take into account the location of the chimney. It should be centered between the rafters.
When installing each of the trusses, you should check the verticality of the installation using a plumb line. If there are deviations from the vertical, it is necessary to level their position by placing pieces of boards of appropriate thickness under the rafter leg. Next, they arrange the sheathing. If ondulin or other soft material is used as a roofing covering, the distance between the sheathing elements should be no more than 1 cm.
The roof is insulated using the materials used to insulate the frame. The roof is covered with roofing material. The ridge is protected with a corner made of galvanized sheet or a factory-made element.
Scheme of insulation of the ceiling of a frame bath
Floor construction and finishing
The peculiarity of bathhouse floors is that their design can be different depending on the purpose of the room in which they are installed. In rooms that are in direct contact with water, a pouring floor is installed. Its design consists of a flooring made of boards, between which gaps are left to allow drainage to pass into the ground. There is no need to insulate such floors.
The construction of the floor of a frame bath begins with laying the logs. If the distance between support points is more than 3 m, it is recommended to erect support columns. In places where the lags come into contact with the strip base and posts, waterproofing from several layers of roofing material is used. Boards are mounted on the joists.
Helpful advice! In order to be able to dry the flooded floor, its floorboards are not fixed to the joists.
Construction of a frame bathhouse with your own hands. Step 5: Flooring
The boards in the poured floor structure are placed with a gap of 3 to 4 mm. The interval should also be between the flooring line and the bath wall (about 2 cm). If the soil under the building is sandy, you can limit yourself to filling a 25 cm layer of gravel. The distance from the surface of the gravel to the subfloor should be 10-12 cm. If the soil is clayey, it is necessary to build a tray from which water will be directed to the drainage pit.
For recreation areas, a floor with a “non-leakage” structure is installed. Its installation begins with a subfloor made of two rows of boards. A continuous flooring of pine boards is laid on top. At first they are simply baited. And only when all the interior finishing work is completed and the room is properly dried, the floor boards are finally adjusted and completely fixed.
It should be noted that the floorboards should be located with a slope towards the point where wastewater is collected and discharged into the sewer. A hole is made at the lowest point of the wooden flooring and connected to the drain siphon. A non-leakage floor requires insulation, which is placed in front of the finishing coating.
Diagram demonstrating the correct arrangement of the floor in the steam room
Basic requirements for wood wall coverings
When choosing a lining, you need to consider a number of requirements:
Moisture resistance. The boards must be resistant to moisture, so that premature rotting does not begin, and dry quickly, which also protects them from rot. Smoothness. High-quality lining has a flat, smooth surface. The absence of knots, gaps, and roughness eliminates the risk of mechanical damage to the skin and penetration of excess moisture into the coating. Low thermal conductivity
An important quality, since you can get burned on wood that is too hot. Hygiene. The wood should be easy to clean.
It is better to choose linden for the steam room, since it is easy to clean, has low thermal conductivity, and has beneficial properties. Larch also meets most requirements. Low thermal conductivity, strength, density, positive effect on the body, and moisture resistance make larch stand out among other species.
According to experienced builders, it is better to use African oak (abashi). Low thermal conductivity, strength, lightness, resistance to rotting and deformation, absence of chips, cracks, beautiful wood pattern of abashi make it a bestseller, but there is one drawback - too high cost.
Wood should not be treated with stain, varnish, or other chemicals, since when the air is heated they will release harmful substances.
Selection of lining
Finishing
Wooden floors are impregnated with linseed oil to reduce moisture penetration. Concrete floors are finished with ceramic tiles and porcelain stoneware with a rough surface. For the manufacture of benches and wall decoration, only hardwood is used to reduce the release of resins into the atmosphere of the room.
Coniferous wood is not used for making bath furniture, covering walls, or ceilings. Benches, benches and shelves are impregnated with oil or combined with wax. Do not use varnishes and synthetic dyes, the fumes of which in the heat will harm your health.
Ways to fasten the lining
Two types of fasteners are used for installation.
Kleimers
Safe type of installation. Doesn't damage the planks.
Having fixed the bracket on the tenon, it is attached to the sheathing beam. You need to start from the center, then move to the edges, maintaining verticality or horizontality. Claypers are used for laying lining on ceilings and walls. If necessary, it will be possible to dismantle several planks without damaging other elements of the bathhouse design.
Nails or screws
For the self-tapping screws, pre-drill a hole with a diameter slightly smaller than the size. Self-tapping screws are screwed into a tenon or groove at an angle of 45 degrees.
The nails are simply driven into the slats in the right places. To avoid rust on the surface, it is recommended to use copper or galvanized nails. But it is worth considering that they will cost twice as much as usual.
In any case, the cap will be flush with the bar. Places of fasteners are sanded and polished. There should be no burrs or defects left on the surface.
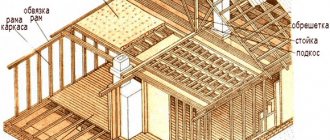
Construction technology
External supports are mounted according to the planning scheme, connected to each other by horizontal and diagonal connections. The vertical posts rest on the lower beam frame and are connected from above with bars. The supports are placed in increments of 30, 40, 60 cm, the base and top chords are made from parts similar in cross-section to the racks. Internal and external coverings are attached to the vertical elements of the frame.
The parts are equipped with cuts, grooves and tenons for easy assembly of the bathhouse frame. The modular version according to the standard design is supplied disassembled with precisely adjusted connections and detailed instructions. The elements do not need to be modified in place for step-by-step joining.