Everyone knows that the floor in a bathhouse should be moisture-resistant, rot-resistant and warm, but only builders have an idea of how to make high-quality insulation of this part of the structure so that the surface meets the other requirements of this room. This is especially true for a frame bath. We will tell you how to make such a floor with your own hands. By strictly following our instructions and the description of the process from the video, you will get a comfortable floor that dries quickly between procedures, is strong and durable.
Construction of frame bath walls
The wall of a frame bath is a wooden frame, the voids of which are filled with insulation, lined with sheet materials or clapboard.
This design stores heat well, does not require heating costs, is easy to repair, and local and spot repairs are allowed. It is important not to confuse frame and frame-panel baths, these are two different construction technologies
The advantages also include the almost absolute absence of shrinkage, which allows for final finishing immediately during construction. Requirements for the composition of the walls are moisture resistance and the absence of release of toxic substances when heated.
Advice! You should also carefully monitor fire safety, since the traditional source of heat in a bathhouse is a stove, an element that is risky in itself. Therefore, it is advisable to use non-flammable and non-toxic materials when insulating.
Pie wall frame bath
The multi-layer construction of walls with insulation, vapor barrier or, as an option, a multifunctional membrane, has received the name “pie” among experts. The construction of such a pie is the main reason for the abundance of advantages and useful properties of frame walls.
The composition of the pie usually includes:
- Timber 150 by 50. Edged boards are often used.
- Mineral insulation located in the spaces between the wooden parts. The most preferred option is mineral wool slabs.
- Oriented strand board (OSB), thickness must be at least 15 mm.
- Horizontal sheathing.
- A layer of insulation for horizontal sheathing.
- A layer of waterproofing (or multifunctional membrane).
- Vertical sheathing.
- Exterior finishing.
- Vapor-releasing material.
- Interior decoration. Most often this is lining.
Photo
Option 1
Option 2 (easier)
Option 3 (the simplest)
This set allows you to store heat, does not get wet, is protected from atmospheric influences from the outside and from the absorption of water vapor from the inside. The effectiveness of the pie has been tested many times and there is no doubt about its reliability.
Insulation procedure
The insulation process begins after the construction of the wooden frame, and then the wall pie of the frame bath is created. The first step is to fill the voids between the frame boards with insulation. The material is cut exactly to size and placed into gaps.
Important! It is necessary to carefully adjust the pieces of insulation. All cracks and voids must be additionally filled with polyurethane foam to avoid the formation of cold bridges
foil inside. A layer of membrane or wind protection is laid on the outside
A sheathing is installed on top of it, on which the outer cladding is mounted. Between the outer skin and the insulation, due to the sheathing, an air gap is created that promotes ventilation and drying of condensate
A layer of membrane or wind protection is laid on the outside. A sheathing is installed on top of it, on which the outer cladding is mounted. Between the outer skin and the insulation, due to the sheathing, an air gap is created that promotes ventilation and drying of condensate.
Protecting thermal insulation from moisture
As already mentioned, protection from moisture is a layer of vapor barrier reinforced from the inside of the wall. As an insulator, ordinary aluminum foil or foil on kraft paper is used, which is somewhat easier to install. The vapor barrier strips (or membranes) are supposed to be connected to each other with aluminum tape to obtain a hermetically sealed seal. On the outside, a similar windproofing film is used to protect against external moisture.
Wall thickness of frame bath
The main value is the width of the frame boards. Recommended – 150 mm. Adding to this the thickness of two layers of sheathing, internal cladding and external cladding, we obtain a total wall thickness of about 250 - 270 mm. The dimensions are arbitrary; in each specific case, the builder’s choice may fall on materials of other thicknesses. The main condition remains compliance with the principle of operation of the cake, which provides insulation and eliminates the effects of condensation.
Hint: there are opinions that 10 centimeters of insulation is enough, in which case, the above can be reduced by 5 cm.
The walls are insulated directly during the construction of the bathhouse. Actually, insulation and construction are, in fact, one process that can be conditionally divided into certain stages. Nuances may arise due to the use of different types of insulation, adding or, conversely, excluding certain technological operations. For example, insulation with foam plastic entails the need for additional filling of cracks and voids with polyurethane foam. The final sequence of actions is determined by the material of the insulation used.
Thermal insulation of walls
To create thermal insulation for the walls in a steam room, a set of the same materials is used as for insulating the ceiling, and the process itself occurs in a certain order.
Vertical wooden blocks are nailed to the walls of the steam room in the bathhouse. The distance between them should be equal to the width of the roll of insulation material. The space between the bars is filled with insulating material. Here many may have a question about how to insulate
Any modern material will do. It is very important that the insulation fits tightly into the space so that there are no gaps left, otherwise it will not be possible to properly insulate the steam room. A waterproofing layer is laid on top of the insulation and nailed down with wooden blocks. It is worth noting that there should be no gaps or holes between the waterproofing and the insulation to prevent moisture from getting into the insulation. At the final stage, the walls are faced.
This video contains tips on insulating bath walls.
Installation of a heated floor system
The presence of a heated floor promotes the rapid evaporation of moisture from the heated floor surface. This type of floor dries quickly and mold and mildew do not have time to form on it. And the constantly warm surface is very comfortable for bare feet! These reasons determined the choice of electric flooring for the steam room, washing room and rest room.
To facilitate cable installation, a 50x50 mm masonry mesh is laid on the surface of the vapor barrier. The mesh parts are connected with wire.
Installation of masonry mesh for vapor barrier
The cable was secured with 100 mm ties. A heated floor sensor is installed in the wall.
Laying underfloor heating cables on a grid
Installation of a heated floor sensor on the wall
Before pouring the mortar, the masonry mesh was raised 1 cm from the floor. To do this, pieces were cut from the remains of foamed polyethylene (left over after insulating plumbing pipes) and placed under the mesh. You can use any other material that does not wrinkle, does not bend and holds its shape.
The thickness of the floor screed is 30 mm. In the steam room, relaxation room - without a slope, in the sink - with a slope of 5 mm/1 m towards the drain. To form a flat surface, beacons were used - a U-shaped profile 19x20mm. First, wood grouse were placed on the floor surface using a laser level, and beacons were laid on top of them.
Exposed beacons for screed installation
The screed was filled with a cement-sand mixture with a plasticizer (PVA glue) and fiber (reinforcing additive). Mixed in a concrete mixer. The solution turns out to be gray, dense, and almost as strong as metal.
The next day, the beacons were removed from the fresh screed and the wood grouse were unscrewed. The resulting holes are filled with mortar and rubbed flush with the hardened screed. Afterwards, the screed is moistened with water and covered with a film to prevent cracking. The film is removed after the screed has completely hardened. I did it after 5 days.
Screed device for subsequent tiling
Wiring
All wiring is in metal hoses, connections are in boxes on terminals.
In the panel there is a general RCD of 30 mA, then there are 3 circuits. Electricity was pulled from the house through the air, fortunately the distance is small. He screwed a hook into one of the walls of the bathhouse, and screwed the same one into the wall of the house (the distance from the hooks to the ground is about three meters). He pulled a strong cable between them, around which a conductive cable was wrapped. The photo shows the clamps that are attached to the hooks. It is mounted like this:
- the SIP wire is moved apart, a place for the clamp is prepared;
- the SIP wire is inserted into the grooves of the anchor clamp;
- the wires “wedge”;
- The anchor clamp is attached to the hook - support.
I installed sockets, switches (class IP-44) and a panel in the dressing room. The distance from the floor to the sockets was 90 cm. In the steam room and washing room I ran wires only for the lamps (I tried to do everything away from the stove), because in these rooms it is too humid and sockets simply cannot be installed.
He took copper cables and pulled them through a non-flammable metal corrugation, which he secured with clamps. In some places we had to drill holes in the support beams to install the corrugation. I installed the socket boxes when I covered the walls with clapboard. And the sockets, switches and beautiful lamps themselves (for the steam room I took with a heat-resistant lamp, class IP-54) were installed last.
I'm doing grounding. The grounding was done as expected - a triangle, the vertical corners were welded with a 40 mm strip. The RCD is triggered “at once”
The grounding was done as it should be - a triangle, the vertical half-meter corners were welded with a 40 mm strip. To do this, I had to enlist the help of an electrician friend who had a welding machine. A triangle trench was dug near the bathhouse. They drove the triangle welded from the corners into the ground. Then they welded another section of steel strip, which was brought above the ground near the wall of the bathhouse.
Strip and conductor Everything took about two hours. I treated the metal strip with bitumen to prevent it from rusting. I dug the ditches, compacted them, and next summer I will sow a lawn there.
Found it on the Internet, maybe it will be useful to someone
Features of building a frame bath with your own hands
Before you begin construction work on the construction of a frame bath, you need to know some of the features of the work
Experts recommend paying attention to three important points - vapor barrier, thermal insulation and choice of wood type
Vapor barrier
Please note: it is better not to use roofing felt as a vapor barrier material when building a frame bath - when heated, it emits a rather specific, unpleasant odor into the air. A vapor barrier layer is laid between the inner lining of the bathhouse and the insulation layer. A vapor barrier layer is laid between the inner lining of the bathhouse and the insulation layer
A vapor barrier layer is laid between the inner lining of the bathhouse and the insulation layer.
Thermal insulation
Experts say that mineral wool and/or fiberglass can be safely used as a thermal insulation material for a frame bath.
Wood for a frame bath
The main requirements for choosing wood for building a frame bathhouse with your own hands are:
- the material must be well and completely dried;
- the best choice would be larch, aspen or linden - they have a low thermal conductivity threshold;
- for external walls you will need boards 30 mm thick;
- the external cladding of the building can be made of pine or larch;
- The internal lining is made of wood of any species, but preference is best given to linden.
Application of DIY insulation
The second most commonly used insulation for frame-type baths are compositions based on sawdust and shavings. Processed in a certain way, the material is poured in portions and compacted. A sandwich wall using sawdust has the following structure (from the inside to the outside):
Insulating a bathhouse with sawdust
- plank cladding;
- kraft paper (no air gap);
- sawdust with a layer thickness of 10 cm;
- kraft paper;
- plank cladding.
The boards play the role of both a strength frame and decorative cladding. Reflective screens are usually not used, since the default option with sawdust should be the simplest structurally and inexpensively.
Pre-treatment of sawdust involves soaking it in a lime solution. Lime gives the material moisture resistance and is quite effective in fire protection.
If the work is carried out in the warm season, there is no need to dry the limestone chips before installation. Evaporation of excess moisture occurs quite quickly after backfilling.
In operation, processed sawdust has proven to be the same effective material as mineral wool, but lacking one of its main disadvantages - high hygroscopicity. To insulate floors, sawdust is used in the composition of cellular concrete. Treated sawdust is poured into natural coffered false ceilings in a layer of about 200 mm with moderate compaction. The top layer is covered with a waterproof membrane.
Selection of materials for insulation
Expanded clay, polystyrene foam, extruded polystyrene foam, basalt wool can be used as insulation for sauna floors, but the highest quality insulation can be achieved when using polystyrene foam boards, which not only meet all the requirements for heat preservation in the sauna, but also do not collapse from exposure to high humidity and temperatures, resistant to biological damage.
Floor installation on supports
To maintain heat in the bathhouse, you will have to make a base that will cover the free space under the floor, blown by the wind. Do-it-yourself basement cladding not only protects floors from freezing, but also improves the appearance of the building's facade, allowing you to design the site in a certain style.
It’s easy to make concrete or wood floors with your own hands; both options have their advantages and disadvantages.
Concrete flooring has a fairly high cost, its installation is highly labor-intensive, but the service life of a concrete floor covering reaches over 50 years. Wooden floors are distinguished by high comfort - feet step on warm wood, heated floorboards have a wonderful aroma of wood, and the floors heat up quickly.
Wooden floors are susceptible to rapid deterioration when exposed to increased moisture, and therefore are short-lived. The service life of wooden floors in bathhouses does not exceed 7 years. However, wood is a very inexpensive material, easy to process and not in short supply. Therefore, relaying the floor with your own hands will not be difficult; during repairs, it is easy to insulate old floors again.
We recommend watching a video on how to install a floor with your own hands.
Stage 7: Insulation and vapor barrier
Frame structures are highly susceptible to moisture, especially when there is a temperature difference between indoors and outdoors. To avoid this problem, it is necessary to consider a vapor barrier layer. For this purpose, aluminum film, special film or glassine are used. It is not recommended to use roofing material - it will emit an unpleasant odor. It is usually installed at the stage of wall insulation.
The technology for constructing frame buildings involves layer-by-layer laying of materials, so the end result is a so-called “pie”. Typically it consists of the following elements:
- external facing material;
- vapor barrier layer;
- insulation;
- vapor barrier layer;
- internal lining.
The materials should not fit tightly together, so you should leave a small air gap up to 5 cm thick, which is necessary to increase the service life of the building.
The thermal insulation of the steam room should be carefully considered. The material used for it is usually foil material, placed with foil inside. This creates a “thermos effect”, which allows you to retain heat inside the room longer. It is recommended to cover the walls and ceiling inside the bathhouse with hardwood clapboard (linden or aspen). When using pine or spruce boards, the resin will drip onto the body when heated.
Find out how to make a fountain on your property by following the link.
Types of insulation for baths
It is better to use insulation for a frame bath in the form of mats.
If you choose the wrong insulation or lay it in an insufficient layer, the functionality of the steam room will be lost. Materials for insulating a frame bath can be natural or artificial. Bathhouses and synthetic insulation are incompatible; of course, the design will be cheap, but some can emit harmful fumes when heated. Natural ones include:
- Wood-fiber.
- Basaltic.
- Made from linen.
For artificial ones:
- Fiberglass.
- Expanded polystyrene.
Depending on the shape of the frame bath, choose the types: tiled or matte. A rolled one is also suitable, but it will be more difficult to place it in a frame cake. Any beginner can cut and lay insulation in the form of slabs or mats; just understand the technology and finish reading this article.
Wood fiber insulation
Wood fiber insulation is made from waste lumber.
The basis of the material is wood fibers, which are knitted with various synthetic fibers. It is non-allergenic and does not cause irritation to the skin when styling. The material is made by recycling lumber. It is a misconception that such insulation is made from waste paper. Thanks to its ability to absorb moisture and also quickly release it, a frame bathhouse will breathe like a full-fledged wooden one. One of the brightest representatives of insulation based on wood fibers is ecowool, the price of which starts from 120 rubles. /kg.
The main disadvantage is its ability to absorb moisture. If the hood in the bathhouse is performed incorrectly, then moisture can linger in the wall structure for a long time and they will begin to rot.
Basalt insulation
Basalt wool is made from mineral fibers by binding them with an adhesive composition. The main advantages include:
- High heat-saving properties.
- Does not burn, can withstand temperatures up to 900° C.
- It does not lose its quality characteristics over the years, so its service life is more than 20 years.
- Increases sound insulation.
- Does not absorb moisture and does not retain it in the frame structure.
The main disadvantage of the material was discovered at the end of 2014. Previously, it was considered one of the most environmentally friendly materials. It turned out that the adhesive composition used for gluing basalt fibers can release minor formaldehyde vapors. Whether or not the reaction intensifies during heating of the steam room, no studies have been conducted.
Linen fiber insulation
Flax mats began to be used not so long ago. The material is made from compressed flax fibers. There are no additives in the composition, such as formaldehyde. the material is completely environmentally friendly and is able to absorb and release moisture. And due to the dense pressing, the slabs have a high ability to conserve heat.
The main disadvantage of the slabs is the lack of time-testing and rodents. Mice love to build nests in flax fibers and chew holes in walls. Over time, the bathhouse will lose its thermal insulation properties.
Fiberglass insulation
Glass wool releases small particles of glass fiber during operation. which are dangerous to human health.
Glass wool is made from glass fibers bound together with synthetic glue. It is difficult to work with the material with your own hands, since when fibers enter the air, they settle on the skin and enter the respiratory tract. They may cause skin irritation and allergic reactions.
Glass wool has no less advantages:
- Does not burn.
- Its price is low.
- Easy to install.
- Has high thermal insulation.
- Creates slight sound insulation.
If the choice fell on glass wool, then all work on insulating a frame bath must be carried out in protective clothing and a respirator.
Expanded polystyrene for insulation
Polystyrene foam can be used to insulate the walls of a frame bath.
Expanded polystyrene is made by foaming polystyrene. Moreover, the larger and smaller the air bubbles in the material, the higher its thermal insulation properties. One of the brightest representatives of polystyrene foam. It is possible to insulate the walls of a frame bath with polystyrene foam, but it is not recommended. Moreover, insulate the ceiling and the space around the chimneys. Expanded polystyrene has a high fire hazard. It ignites from any spark. If the structure is insulated with foam plastic, then the cake must have protection. The material has a number of advantages:
- Low price. (The cheapest insulation option).
- Waterproof.
Any of the listed materials is used to insulate a frame bath. The main thing is to carry out the installation, observing all the rules.
Stage 5: Rafter system
As floor beams and rafters for a frame bath, you should use timber with a cross-section of at least 15x5 cm, pre-treated with an antiseptic.
They must be placed on edge, and then fastened together with long screws and metal plates. When installing in a vertical position, it is important to secure the common screed with a ridge beam of the same cross-section. The beams are always released outside at a distance of 40 cm, which allows you to subsequently lay the roofing material correctly. Roof lathing is made from boards up to 25 cm thick, laid directly from the roof ridge.
When building a small frame bathhouse, the rafter system can be assembled on the ground, which is much more convenient if several people are working. As a roofing material, soft or metal tiles laid on a layer of thermal insulation and a wind-moisture-proof membrane are suitable.
If an attic is planned for the bathhouse, then the floor in it must be insulated. In addition, it is necessary to consider the ventilation system, since steam will actively accumulate in this room.
Floor design in baths
It makes sense to analyze each type of flooring in detail when it comes to residential or public buildings. However, installing a floor in a bathhouse on screw piles is possible even with minimal knowledge and skills.
If a sufficiently high grillage is provided, then a hanging non-leaking plank floor in a frame bathhouse on stilts will be the optimal solution. An additional layer of insulation will allow you to use the bathhouse at any time of the year, otherwise in winter such a floor will be very cold.
A pile foundation allows you to protect the lower part of the deck from any external influences, in particular precipitation, flooding or simply moisture. But from the inside, such a floor is constantly subject to changes in temperature and humidity, because condensation forms in the steam room, and water is also supplied to the washing room.
Conclusion
Insulation of a frame bath requires an integrated approach. You need to start from the floor and work your way up. A combination of several materials can be used. When insulating, make sure there are no cracks or gaps in the frame structure.
If you don’t know what materials to choose for insulating a bath, you can’t calculate their consumption and are looking for a suitable team, use the service on the website poliol.ru. There are more than 630 registered teams of performers ready to help you. Leave a request on the website to contact a consultant. He will tell you about the cost of the work and help you select a team. Consultation on poliol.ru is free.
How to make a floor in a bathhouse on screw piles - sequence with examples
The invention of the pile foundation belongs to the designer Alexander Mitchell, who first tested this technology during the construction of a lighthouse in Delaware Bay back in 1850. The essence of the method was that the piles were not driven into the thickness of the soil, but were screwed in by giving one of the ends of the pillar a pointed shape. This method was not only effective, but also stood the test of time and is still used today.
The military began to use pile foundations especially actively to accommodate rolling stock. This technology is also extremely relevant in hard-to-reach areas. In particular, in the northern regions, columnar foundations and the method of driving in supports were almost abandoned, replacing them with screw piles.
If we talk about the Russian Federation, then in some areas where the climate is especially harsh, screw piles are used as the most acceptable type of foundation for residential and industrial construction.
If you want to build a bathhouse on your site from laminated veneer lumber or a log frame, then a pile screw foundation is perfect.
Stage 1: Design
Frame construction is suitable both for the construction of small steam rooms on the site, and for the creation of real country houses for relaxation.
The choice of design and area depends only on the size of the site, personal budget and needs. Before starting the main work, you should decide on the location of the bathhouse. To do this, it is important to take into account the location of utilities, the topography and layout of the site, the presence of a reservoir and other water bodies nearby. In addition, it is advisable to conduct a geological analysis of the soil, since the type of future bathhouse foundation depends on this.
Upon completion of the preparatory work, you should have a detailed plan of the area, a drawing of the building with all the necessary elements, and an approximate estimate for materials for construction. If you are not confident that you can draw up a competent project yourself, it is better to turn to professionals - this will allow you to avoid serious mistakes and miscalculations in the future.
In the bathhouse drawing you need to show the organization of the chimney, ventilation and communication networks. All elements are closely interconnected, so sometimes a plan in several projections is required.
Features of flooring on stilts
I usually use a pile foundation in the following cases:
- carrying out work on aggressive soils (rocky, marshy, etc.);
- with uneven ground surface;
- limited construction periods;
- impossibility of bringing the soil foundation into a condition suitable for construction.
This type of foundation consists of metal pipes with a metal tip installed at the edges. A cone-shaped tip is inserted into the thickness of the earth and firmly fixed in it. If the soil is loose, then I compact it additionally with soil.
To evenly distribute the weight of the structure on the foundation, the tops of the piles are cut at the same level, the caps are installed, and a circular winding is installed on top. They combine the pillars into a continuous structure.
Keep in mind that screw piles are not driven into the soil, but are screwed in manually or mechanically!
general information
One of these structures is a frame bathhouse, the construction of which does not take much time. Such a structure does not require a particularly strong foundation - to build it, it will be enough to build a strip foundation, pour columns, or use the pile-screw method.
The technology for creating a foundation depends on the condition and moisture of the soil at the construction site. And also, depending on the future operating conditions of the structure, its reliable insulation should be ensured in order to ensure a long service life. At the same time, one of the most important stages in the construction of such a bathhouse is the installation of the floor.
Types of floor coverings in the washing room
In private households, wooden (leaky or non-leaky) and concrete floor structures are usually laid in the washing sections of bathhouses.
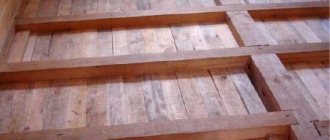
As practice shows, the easiest option in terms of implementation is the leaking floor shown in the photo. On a pre-prepared base, which can be a concrete screed, a lower crown, support pillars, etc., logs are attached - they will become the basis for installing flooring from boards.
Floor elements are laid at intervals of 3-5 millimeters. It is through these gaps that water will be drained. Typically, leaking floor coverings are made dismountable. This design allows, if necessary, to remove the flooring and efficiently dry the boards outdoors.
Floor layout and basic requirements
The main thing in organizing a wooden floor with a drain is, oddly enough, not the technology for making the finished floor layer, but the proper preparation of the underground space. It is errors in the organization of the underground that become the most common reason that the tree begins to rot ahead of time.
Particular attention should also be paid to ventilation of the space under the floorboards; there must be either special holes for ventilation, or the possibility of raising the boards in order to dry them faster
In addition to the fact that a wooden floor is not as cold to the touch as a tiled floor, it is also noticeably cheaper and easier to organize than a tiled floor, which requires the obligatory arrangement of a layer of concrete screed at least 5-7 cm thick. If necessary, construction the most budget-friendly construction, it is wooden floors that are laid most often, and a small drainage hole is installed directly under the bathhouse as a space for water drainage.
Scheme of organization of design details:
Prev 1of1 Next
The second option using roofing felt:
Prev 1of1 Next
Option number three from an old Soviet book:
Prev 1of1 Next
Next, we will look at examples of various schemes for installing a wooden floor in a bathhouse with water draining through the cracks between the floorboards, the so-called “flow floor”. Also, using the example of finished structures, you will be able to see different approaches to the implementation of the three basic principles of durable wooden floors with a drain:
- The presence of a slope at the surface of the underground so that the water does not linger anywhere, but completely flows into the drain hole.
- A properly organized sewer system that ensures the flow of water without its accumulation in places not intended for this purpose.
- Take measures to ensure ventilation in the underground space in order to effectively dry out the floor wood and support beams.
Foundation cladding
In order for the support pillars to have a more presentable appearance, as well as to protect them from dirt and dampness caused by melting snow or flooding with water from a reservoir, they should be additionally finished. Various facing materials will help protect the floor in a bathhouse on screw piles, as well as emphasize the appearance of the building itself.
Since the main damage can be caused by snow and flows of dirty water in the off-season, special attention should be paid to the waterproofing qualities of cladding materials.
A good facing material for decorating the floor in a bathhouse is ceramic or tiled floor tiles. As a rule, they do not put a solid board under it, but prefer chipboards, plywood and other materials that are attached to the bars in the floor.
Underground
The choice of floor type and drainage of water in a bathhouse with wooden floors depends on the composition of the soil. If it easily absorbs water, like sandstones or sandy loams, then the issue will be resolved with little effort. It is enough to dig a hole and fill it with filtration materials. The filter can be ordinary crushed stone. Water will break against it and quickly seep to the drainage layer.
Clay rocks almost do not allow water to pass through. In this case, a hydraulic structure is installed in the underground from a tank and pipes leading into the pit. Water can drain by gravity or under the influence of auxiliary elements fixed in the structure.
For a non-leakage floor, drainage of drainage water is arranged in the underground, for which a hydraulic structure is used. Also of particular importance is the arrangement of floor ventilation, built on the presence of gaps and holes.
Step-by-step DIY installation instructions
Let's consider the procedure for creating a pile-screw foundation.
The work is carried out in stages, the sequence of actions has a strictly defined order:
Preparation
A pile-screw foundation has an important feature - it can be created on uneven terrain that does not require preliminary leveling (planning).
It is possible to build on slopes or in folds, which makes it possible to effectively use areas that are inconvenient from the point of view of traditional construction. Therefore, preparatory work can be reduced to clearing the area of plants and foreign interfering objects.
Make markings and mark all pile installation points with pegs. Then, small (up to 30 cm) recesses are made at the installation sites, which facilitate the entry of the blades into the ground.
The fertile layer of soil creates noticeable resistance due to the abundance of roots, plant stems and other obstacles, so it is better to remove it.
Driving piles
Installation of screw piles is done either manually or mechanically. Manual installation is possible in the presence of relatively soft soil without man-made inclusions or rock debris.
The diameter of the barrels available for manual immersion is limited to 87 mm.
The most common 108mm diameter piles are often too difficult to construct due to the high soil resistance.
The machine method allows you to obtain high-quality installation of screw piles, observing a certain angle, screwing force and depth.
The power of construction equipment allows you to freely work with piles up to 159 mm in diameter, which is quite enough for the construction of a fairly large private house.
The piles are driven to a predetermined depth. Usually it is determined by the level of occurrence of dense layers, or the soil resistance force exceeds the force permissible for a given shaft, which breaks off the technological hole.
A pile that has reached the required level of adhesion to the ground rotates with great effort or stops doing so altogether.
You cannot try to continue rotating - the welding may not hold up, the blades will come off and the pile will become unable to perform its functions.
NOTE! When installing screw piles, it is forbidden to reverse - try to unscrew the trunk back. This weakens the adhesion of the blades to the ground and eliminates the possibility of repeated immersion in this place
Harness
After installing all the piles, trimming is performed. This is a procedure that allows you to adjust the height of trunks protruding from the ground to a single level and form them into an even horizontal plane.
Install a laser level with the function of constructing planes at the required height and cut off excess sections of pipes.
After trimming, the internal cavities of the piles are filled with concrete, increasing their strength.
Then they install the strapping (grillage) - a belt that connects all the piles into a single system and at the same time serves as a supporting element for the walls of the house. The cut tops are covered with caps with horizontal platforms on which metal or wooden beams are installed.
For fixation on the platforms there are technological holes for bolted connections.
IMPORTANT! Sometimes the trim and grillage are different elements. The piping is performed below the level of installation of the grillage and connects all the piles together, forming a system like a lattice. Metal sections of a channel or I-beam are used, welded to the walls of the trunks
Metal sections of a channel or I-beam are used, welded to the walls of the trunks.
Old floor replacement technology
Consists of the following steps:
- Skirting boards are removed. This must be done carefully so as not to damage the boards. Wooden pads will come in handy.
- The screws are gradually removed from the boards.
- The logs and beams are inspected for traces of mold and mildew. Infected, rotten elements are removed.
- The logs are dismantled. Areas with chips are trimmed and sanded.
- The lower part of the walls, which was under the baseboard, is treated with an antiseptic. Logs suitable for reuse are also disinfected.
- Now you can begin laying the new flooring.
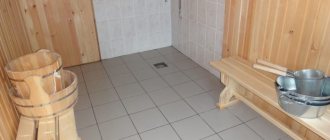
Photo: interior of a Russian bathhouse
Types of floor coverings in the washing room
In private households, wooden (leaky or non-leaky) and concrete floor structures are usually laid in the washing sections of bathhouses.
As practice shows, the easiest option in terms of implementation is the leaking floor shown in the photo. On a pre-prepared base, which can be a concrete screed, a lower crown, support pillars, etc., logs are attached - they will become the basis for installing flooring from boards.
Floor elements are laid at intervals of 3-5 millimeters. It is through these gaps that water will be drained. Typically, leaking floor coverings are made dismountable. This design allows, if necessary, to remove the flooring and efficiently dry the boards outdoors.
When creating a non-leaking floor from wood materials, its elements are laid without gaps. This design does not provide for the disassembly of boards. It is equipped with a slope in the direction of the drain hole. Next, the water enters the reservoir and is discharged outside the building through a pipeline.
Non-leakage flooring in the bathhouse in the washing department requires the presence of a rough base and laying a layer of thermal insulation
Particular attention should be paid to solving the problem of ventilation of the underground space. One or more holes are made in the floor for ventilation - their number depends on the area of the room
Plastic pipes with a cross section of 50 or 100 millimeters are inserted into them.
By the way, when a bathhouse is built, heated floors in the washing room are designed to be leak-free.
Concrete floors in the garbage room are made quite often, because they have many advantages:
- simple device;
- durability, strength and reliability;
- ease of care.
There are several ways to solve this problem:
- move in special shoes;
- insulate the floor;
- install a floor heating system, which will require considerable financial expenses.
Wooden floor that does not leak. Construction stages
According to the project, the installation of non-leaking floors in the bathhouse should begin at the stage of laying logs or beams - the base of the future floor should not be laid level, but with a slight slope (about 100) towards the planned drain.
A metal ventilation pipe must be installed between the upper and lower layers of the floor (rough and finishing) - its presence must also be provided for at the initial stages of constructing the floor in the bathhouse.
The set of tools a craftsman needs for construction is very small:
The list of materials is also not too extensive and they are not very expensive:
- bars 30x30 mm;
- several sheets of moisture-resistant plywood;
- mineral wool;
- waterproofing film;
- floor boards (exclusively from hardwood);
- construction tape;
- nails.
Stages of work:
- The base of the floor, the bars, is nailed to the joists.
- Use plywood sheets as a subfloor: they must be nailed end-to-end to the beams.
- Place an insulating layer of film on the plywood, securing it with an overlapping stapler. Make sure that there is not a single crack left. If there are any left, they need to be sealed with tape.
- Place a layer of mineral wool on the film; it will act as insulation, so there should be no gaps in it either.
- Make sure that the insulation layer has a minimum thickness of 15-18 mm.
- There should be another layer of film on top of the mineral wool. In this case, it will already be a vapor barrier.
- Fill the top (finish) layer of the floor. For this purpose, use nails equal in length to twice the thickness of the board. Fit the boards as tightly as possible.
The floor in a frame bath cannot be coated with varnishes and paints, since high temperatures and moisture levels can cause dyes to be toxic and therefore dangerous.
And this article talks about external wiring.
Here https://ru-house.net/stroitelstvo/okna/plastikovye/ you will find many useful articles about plastic windows.
How to build a structure correctly?
The process consists of the following steps:
- After the foundation has been arranged, construction of the bathhouse begins:
- First, determine the height of the walls and the type of roof.
- At the corners, the supports are made of beams, fastening them with corners.
- Then edged boards are attached to the grillage. Struts are installed between them.
- The process is completed by connecting the parts with the top trim.
- Next, a reliable floor is built, immediately insulating it. To secure the floor covering, it is necessary to install the logs on the grillage, connecting them to the base using metal corners.
After completing the subfloor, the installation of walls begins. The technology here is somewhat different for timber and frame structures.
From timber
A month after the construction of the base, they begin to attach the crown of the strapping
The bottom block is treated with an antiseptic. Nails are used to connect elements. When the beams are laid, they pause to allow the frame to shrink.
This process lasts about six months. Then the cracks are sealed using tow or sealant. First they caulk the lower crown, after which they gradually move upward.
Construction of a frame structure
The contour in the form of a frame is erected from timber treated with an antiseptic. Its cross-section is selected taking into account the insulation used and the load-bearing capacity of the material. For the strapping and corner posts you need a more massive beam.
Installation begins from the corner, connecting the timber with nails. Before laying, cover the grillage with roofing felt. Braces are attached in all corners. It is better to assemble the frame on the site. For its external cladding, it is recommended to use carriage boards, although other materials are also suitable. The lining is fixed horizontally, laying waterproofing underneath it.
An important stage of construction is thermal insulation of the structure. Mineral wool is often used as insulation. It has a good vapor permeability, the material does not burn, and allows the walls to “breathe.” You can also lay mineral fiber rolls. The slabs are mounted between the racks.
Waterproofing in the form of a film is attached between the insulation and the outer skin. The inside is lined with aluminum foil with a polyethylene layer. The joints are taped, then the interior finishing is done.
When equipping floors, take into account the purpose of the room. Where there is a lot of water, a torrential foundation is installed. It consists of a boardwalk with gaps allowing drainage to pass down. Such floors do not provide insulation.
Small gaps are made between the boards, leaving gaps around the perimeter as well. If there is sandy soil under the bathhouse, crushed stone is poured on top of it, leaving a gap of 10 cm to the floor. If the soil is clayey, a tray is built that directs water to the drain tank.
Recreational areas require a floor that does not leak. First, make a rough flooring using a couple of layers of boards. A continuous pine covering is installed on them, with insulation placed underneath.
Stage 4: Construction of walls
Installation of walls on a finished base can only be carried out after the cement has completely dried. Before doing this, you should make sure that the wooden beams of the frame are completely dry, and also pre-coat them with a layer of antiseptic. High-quality boards made of coniferous wood, linden or aspen are used as frame beams. There are two wall installation technologies.
On the foundation
First you need to lay the bottom trim from a strong beam with a cross-section of at least 10x10 cm. You need to prepare the node connections especially carefully; for this, metal corners and long screws are used. To prevent the bottom frame from moving along with the corner posts, it is recommended to pre-install steel pins embedded in the concrete of the foundation.
The base beam must fully match the thickness of the beams of the upper frame. Intermediate frame beams are installed along the walls, which can be attached to the floor joists using additional end bars for fastening. The distance between them varies from 40 to 60 cm, depending on the size of the insulation boards. In the places where the crossbars and windows are connected, you need to add an additional rack.
Wall insulation elements
The rigidity of the structure is provided by wooden sheathing, which is installed both outside and inside the building, usually at the time of thermal insulation work. At each stage of working with walls, you need to use a building level in order to eliminate any bevels that have arisen in a timely manner.
Installation of finished walls
When building a small bathhouse, it is more convenient to build the walls on the ground, and then they need to be lifted and mounted into the base. This allows you to reduce the load on your hands, in addition, you can carry out work on installing the foundation in parallel with the creation of the wall frame. Mounting a wall on a horizontal surface is also convenient when building a second floor. The operating process is identical to the technology presented above. The process of building walls in a bathhouse from rounded logs can be found here.
It is most convenient to construct walls on the ground when more than 2 people take part in the construction. Otherwise, problems will arise when installing the frame on the base.
Floor covering device
Scheme of the floor “pie” (from bottom to top):
- subfloor rolling – OSB-3 (thickness 6mm);
- waterproofing and wind protection – “Izospan A”
- insulation – ecowool
- OSB-3 shield (thickness 18 mm);
- insulation – EPPS, 5 cm;
- vapor barrier – “Izospan D”;
- reinforcing mesh;
- underfloor heating cables;
- screed;
- tile adhesive;
- tile.
Now let's talk more about each layer.
Step #1 - rolling the subfloor
OSB-3 sheets 6 mm thick were nailed to the bottom side of the joists. They have drainage holes drilled for ventilation. A hole was also cut for the drain outlet.
Installation of a subfloor from OSB-3 sheets
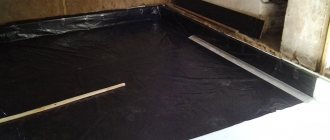
Step #2 - waterproofing the floor
Waterproofing and windproof film “Izospan A” was laid on the roll. All joints were taped with construction tape.
Waterproofing subfloor roll-up with Izospan A film
According to the plan, the supply ventilation hole in the bathhouse will pass under the stove. To organize it, a metal hood box was installed between the joists. A drain tee is also installed.
Installation of the supply ventilation duct
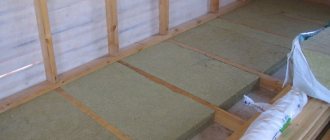
Step #3 - insulation with ecowool
The first layer of insulation is ecowool. But since niches were formed in the ceiling between the joists and the lower frame of the walls (where it is difficult to deliver ecowool), they were filled with Rockwool insulation.
“Rockwool” insulation is laid in niches under the wall trim
I beat the ecowool with an electric drill. During the process, the material increased approximately 2.5-3 times its original volume. The fluffed insulation was laid manually between the joists on the waterproofing. The surface was compacted and leveled with the rule flush with the joists. At this stage, the drainage organization is completed.
Laying ecowool between floor joists
Step #4 - OSB-3 sheathing
Next, the ecowool was covered with another layer of OSB-3. The sheets were cut into pieces so that their edges were located on the joists. Between the logs and the lower frame of the walls, wooden inserts are also fixed, serving as supports for OSB-3.
Embedded timber for OSB-3 support
Taking into account possible expansion (swelling), OSB-3 was laid with a small gap of 2-3 mm. They were secured with self-tapping screws to the joists.
Covering logs with OSB-3 sheets
Step #5 - insulation with EPS boards
The next step is additional insulation of the floor with a layer of EPS (extruded polystyrene foam). The slabs were laid in staggered order. To do this, entire slabs had to be cut with a construction knife (if you have a jigsaw, it’s better to use it).
Floor insulation with EPS sheets
The drain has been waterproofed. “Izospan D” is glued around the drain with double-sided tape, and the joints between the pipe and the film are filled with sealant.
Waterproofing the drain using Izospan film and sealant
Space has been left for installing a concrete slab under the stove.
In the place where it is planned to pour a concrete slab under the furnace, EPS does not fit
Step #6 - Placement of Vapor Barrier
A vapor barrier film “Izospan D” was laid on top of the EPS, and stapled to the EPS. The film is laid with an overlap (by 5 cm), the joints are taped with construction tape. To prevent rotting of the lower framing of the frame, the film is placed on the walls (10-15 cm) and connected to the vapor barrier of the walls.
Organization of a vapor barrier layer from Izospan D film
Installation of a concrete slab under the furnace
The bathhouse will have a metal electric stove. To protect those steaming from burns and to transform the sharp heat coming from the metal walls into pleasant warmth, it is planned to line the stove with bricks. The total weight of a stove with a brick screen will be quite impressive. It is necessary to install a concrete slab that ensures the stability of the furnace equipment and, in function, replaces the foundation.
The dimensions of the foundation slab are 15 cm larger than the dimensions of the brick screen (around the stove) by 15 cm. First of all, reinforcement is created at the location of the slab. A mesh is laid on OSB-3 sheets, its parts are connected with wire into a single web.
Reinforcement of the slab under the stove
Plate thickness – 50 mm. At this height, along the perimeter of the slab, formwork made of boards was installed. Concrete with crushed stone of a fraction of 5-20 mm is poured inside. The slab was covered with film to maintain moisture and prevent cracking of the concrete. For the same purposes, every day the slab was moistened with water from a spray bottle until completely dry.
The concrete slab must stand for at least 2-3 weeks before installing a stove on it
A week later the formwork was removed.
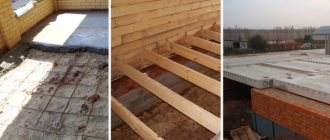
Installation of logs
As a rule, a frame bathhouse is built on a columnar foundation or piles. To connect the load-bearing elements of the base into one whole, a wooden or metal grillage is used. For a bathhouse on stilts, grillages made of steel channels or I-beams are more suitable.
First of all, the installation of a floor in a bathhouse begins with the construction of its frame, that is, the laying of logs. If you decide to build a bathhouse on stilts with a metal grillage, then on top of it you need to fix a wooden beam with a section of 150x50 mm. It is easier to attach logs to it. The construction of the floor of a frame bath on a columnar foundation begins with laying a wooden grillage from beams with a cross-section of 150x50 mm. Not only are the logs attached to it, it is also the basis for the walls.
Depending on the dimensions of the bathhouse, intermediate beams in a wooden frame may be needed for laying the logs. In addition, additional support pillars will need to be installed under intermediate beams and long joists. They can be made from brick. The logs are attached to a wooden grillage and intermediate beams in increments of 40 cm.
Recommended reading: How to properly make a floor slope in a bathhouse
Important: all wooden structures are treated with antiseptics and fire retardants. It is better to make logs under the steam room and washing room from moisture-resistant larch wood
Design options for different types of foundations
Depending on the type of foundation for a frame bath, we will consider installing the floor on the following basis:
- pile or columnar;
- tape;
- slab
Pile or columnar
The most convenient and easy to install is the floor in a frame bathhouse on stilts.
He is not afraid of either dampness or frost. Such a foundation can be easily corrected in case of subsidence (it is enough to jack up the corner and place a pad on the pillar or pile). The cross-sectional design of all floor elements is the same as that used to organize leaky and non-leaky floors in a frame bathhouse.
Tape
It serves as the basis for a frame bathhouse, which is distinguished by its large dimensions and, as a rule, includes several rooms. The construction of the floor in such buildings is also capital, most often it is a concrete floor. When organizing a floor covering, the cross-section of the structural pie has the following form:
- A sand cushion laid on compacted soil.
- Waterproofing layer.
- Insulation (extruded penoplex).
- Reinforcing mesh.
- Heated floor system.
- Screed.
- Clean floor covering.
When installing such a floor, even before pouring the foundation, you should decide in which direction the water should be drained and the sewer pipe should be laid.
Slab
When building frame baths, slab foundations are quite rare, especially in cold latitudes, for a number of reasons:
- The bulkiness of the structure.
- Difficulty in laying communications and draining water.
- Difficulty in heating during the cold season.
- Significant financial costs when pouring the foundation.
Nevertheless, the floor cake with this basis has the following structure:
- Sand pillow.
- Expanded clay layer.
- Reinforced concrete slab.
- Waterproofing layer.
- Insulation.
- Warm floor.
- Screed layer.
- Finish floor covering.
Concrete floor: installation
It becomes a surface directly used for walking. It is a uniformly poured screed, the solution for which can be prepared from a purchased sand-cement mixture. If this is not the final layer, but tiles are still supposed to be on top, you can add a little gypsum with anhydride.
You will also need a number of building materials:
- roofing felt;
- gravel;
- perlite - as insulation;
- mineral wool - for insulation;
- Styrofoam;
- metal mesh - for reinforcement;
- broken brick.
Preparatory stage
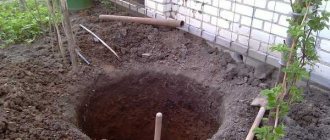
When a master makes a floor in a bathhouse, it is first of all important to design, mark and install a drainage system. It consists of a pair of pipes and an intermediate tank (a pit measuring 40 by 40 by 30 cm with a concrete bottom and walls).
First you need to determine where the drain will be located in the room. Then, from this point, the first communication line is drawn (a diameter of 20 cm will be sufficient) into the prepared underground, equipped with a valve to protect against unpleasant odors. The second pipe, of the same cross-section, is diverted into a ditch or septic tank. Then they move on to preparing the area and leveling the pillow.
Technology for creating a concrete floor pie
If you hold it, you get a structure of 6 layers (hence the name):
- soil that is ready for pouring, that is, compacted and strengthened;
- the first coating is 5 cm thick;
- thermal insulation made of expanded clay or felt;
- reinforcement made from mesh and mortar;
- rough base, which also plays a leveling role;
- Angle-resistant finish for quality drainage.
From the first to the last stage, it is worth remembering the need for a slope of 10 degrees. If you plan to install a stove for a steam room, the foundation for it will need to be built separately.
Installation is carried out in stages
Here is the best answer to the question of how to properly make bath floors with the help of a professional - moving from one stage to another in the following order:
- Site preparation - the top of the soil is removed, the area is covered with sand, and compacted until the surface is perfectly smooth.
- Creating a cushion - gravel of large fractions or broken bricks is poured and leveled even more thoroughly, pressing until the thickness of the ballast is 10 cm.
- Filling “along the beacons” - the solution is evenly distributed so as to create an intermediate layer 5 cm high, covering the gaps with bitumen and not forgetting about the slope.
- Insulation - either roofing material (protection from moisture) is laid with mineral wool, or polystyrene foam, or expanded clay, leveling it along the way.
- Reinforcement - then a metal mesh is placed and covered with liquid concrete (to which you can add perlite for additional thermal insulation).
Article on the topic: How much money does it take to build a brick house?
Basic work: pouring the floor in the bathhouse
It is more convenient to do this not alone, but with three people, since speed of action is important. One specialist needs to mix the solution, the second needs to distribute it over the site (according to the beacons inserted in increments of up to 1 m), the third needs to level it and, until it thickens, compact it. It is extremely important to do the latter, otherwise voids and cavities may form in the screed.
It is necessary to carry out the pouring from the farthest point of the room to the exit, simultaneously using a trowel (trowel) and, as a rule, making circular movements with these tools.
Video - concrete floor on the ground
The floor in the bathhouse is made either on logs or on a concrete base . The concrete screed base can be:
- not covered with anything;
- pourable floors can be made on top of it;
- tiles can be laid on top of the screed (with or without underfloor heating).
Let's first consider the options for waterproofing a concrete floor in a bathhouse.
Concrete
The concrete floor in the bathhouse is made directly on the ground . To do this, the soil is removed to the required depth, leveled, compacted, and a sand or sand-gravel cushion is poured on top.
For more information about floor installation, see the article about insulating floors in bathhouses.
A layer of heat insulation is laid on a base lined with waterproofing . extruded polystyrene foam to be very good for the latter (possibly with increased load resistance) - it is not afraid of water at all.
However, options for installing a concrete floor may differ from each other. , a rough concrete base is poured onto a sand and gravel bed . In this case, waterproofing can be covered with a sand cushion, or it can be done on top of a rough concrete base - which is better?
We believe that waterproofing protects concrete , so it should lie on a sand bed so that the concrete does not draw water from the ground. For the same reason, it is better to overlap the waterproofing on the wall - so that the concrete is surrounded by it at the ends.
So, if there is a rough concrete base, then a heat insulator is placed on it, which can be covered or not covered with plastic film .
The next layer is reinforced concrete screed. For reinforcement, it is good to use a mesh of welded rods. The choice of cell size depends on the load on the floor - 50 mm for the most loaded, 200 mm for the least loaded, you can take 100 mm as the average.
Article on the topic: How to create a house project from OSB timber
So, if the reinforced screed is left as is, there will be an unprotected concrete floor. Why is this bad? Concrete absorbs water, and if after this the temperature drops below zero, the water in the pores will freeze, the ice will widen the cracks, and the concrete will lose some of its strength. Each freeze-thaw cycle will increase the damage.
What can be done in this situation? The cheapest way is to reinforce concrete with pure cement. Or cement with the addition of liquid glass. (Ironizing is the application of a thin layer of cement either a few hours after pouring the screed or the next day.)
Ironing can be considered an old and reliable method of waterproofing concrete. In addition to this, there are other methods, but let's look at them in relation to the washing room.
In the washroom
How to waterproof the floor in a bathhouse where water flows freely onto the floor? For example, in the sink?
Let's assume that you still don't want to put tiles on this floor, preferring, for example, a poured floor or ladders. Protection of the concrete screed under the poured floor is very desirable.
And if you don’t iron it, as suggested earlier, then to waterproof the floor in the bathhouse in the washing room, you can use more expensive options - cover it with cement waterproofing, cement-polymer, bitumen-polymer, or penetrating - this is when, when the impregnation dries, crystals are formed inside the concrete, filling pores and cracks. We reviewed all these types of waterproofing materials here.
All this is significantly more expensive than just cement and liquid glass, but even more reliable.
In a sink under tiles
The tiles, of course, do not allow water to pass through, so why spend money on waterproofing the bathhouse floor under the tiles?
In fact, the main purpose of such waterproofing is bathrooms in multi-storey buildings, where there is a risk of flooding of neighbors below, and waterproofing reduces this quite significantly , especially expensive and high-quality ones.
In a bathhouse where the floors are arranged with a slope towards the drain, the water does not stagnate, and it turns out that there is no good reason to spend money on waterproofing under the tiles . (This is if you have waterproof polystyrene foam as a thermal insulator.)
If this is not an argument and you want to do everything according to the rules, then we recommend liquid bitumen-polymer mastics , which say that they are suitable for your purposes and the time after which you can start laying tiles. Also, to waterproof the floor of a bathhouse sink, you can use cement compounds , which can be rigid or elastic. Both are suitable.
Article on the topic: What is a wooden house
Wooden
A solid wood floor is designed completely differently than a concrete screed floor. The latter is done directly on the ground. And solid (we clarify so that you do not confuse with pouring) wooden ones are made on logs stretched from one wall to another, due to which there is no contact with the ground.
Do these floors need waterproofing? Of course, protection from water is very desirable for them, as well as protection from fungi that cause rotting. But is it right to call it waterproofing? We think that it’s quite possible, if we don’t talk about waterproofing a wooden floor in a bathhouse strictly in terms of terminology. Because in the latter case it must be covered with roofing felt and/or mastics
In general, there are two options: either you say goodbye to the wooden texture of the floor, covering it with layers of mastic (or any other waterproofing), or the wood continues to look like wood, but then it should be hydrophobized and/or antiseptic.
Hydrophobization is done with compounds that are most often made on the basis of linseed or paraffin oil, with or without the addition of beeswax There are also silicone impregnations that can be used on wood (they can be used on anything from stone to fabric). Read more in the article about impregnation.
Antiseptic treatment is another direction in the struggle for the safety of a wooden floor. You can make it the main and only one. Because the floors themselves do not rot, even if they are constantly wet. Rotting occurs when fungi grow in the wood. And antiseptics kill them. More precisely, even fungicides.
Therefore, it is better to combine antiseptics and water repellents.
In the washroom
The peculiarity of the washroom is that here more water flows onto the floor. If you have wood floors and are already experiencing some problems with water damage, you may want to just cover everything with tiles so you don't have to replace the floors longer.
In this case, the option of waterproofing with polymer cement in several layers is probably suitable, after which tiles can already be laid on this thin screed.
Otherwise, waterproofing a wooden floor in a washing room comes down to the already mentioned water repellents and antiseptics.
In the steam room
The main difference between the steam room and all other sauna rooms is the high temperature. Therefore, they try to use materials that will not emit harmful substances when heated.
Does this apply to the floor of the steam room? Basically, in most of the steam room the floor will be quite cool. The exception is the area in the immediate vicinity of the furnace.
And if the temperature on the floor is low, then this opens up scope for the use of antiseptics and various floor compositions that will make it insensitive to moisture.
Article on the topic: Is it necessary to tie a frame house to the foundation?
In general, waterproofing the floor in a steam room is quite comparable to what is applicable in a washing room.
Installation of wooden flooring
To make a wooden flooring in a frame bath yourself, you need to study the assembly steps, prepare consumables, tools, and study the rules of insulation and waterproofing of the coating.
Selection and calculation of the amount of material
To calculate the amount of consumables, you need to take into account the number of rooms and add up their area. Materials:
- hydro-, steam- and thermal insulation;
- batten;
- slats, bars;
- fasteners, metal corners.
It's better to take a little more materials.
Tool preparation
To install wooden flooring you will need a number of tools:
- wood saw (electric or manual);
- screwdriver, self-tapping screws;
- mallet;
- brush for applying antiseptic.
Flooring arrangement
Stages of flooring arrangement:
- First you need to make a subfloor. To do this, boards or OSB boards are placed on the outside of the joists.
- Using a construction stapler, secure the wind and waterproofing layer.
- Place mineral wool slabs between the joists.
- Cover the insulation with a layer of vapor barrier.
- Fill the OSB plates.
- Place slats on top of the OSB plates. Place EPS panels between them.
There are two ways to continue arranging the floor:
- fill the floorboard at an angle in one direction;
- make a reinforcing mesh, pour the screed, and attach the finishing coating over the screed.
Creating a drain
You also need to pay attention to the drain. In this case, you need to take into account a number of features:
- You should think about the slope of the flooring in advance.
- The drain should be located at the lowest point of the room.
- The drain is made of a plastic pipe, which must be taken outside the bathhouse.
You need to install a grate over the drain to prevent your foot from stepping into it. In addition, the grille will trap large objects and debris.
Thermal and waterproofing
There are several types of waterproofing, each of which has certain features:
- Coating protection. The most common compositions are bitumen, sealants, polymer varnishes, and plaster solutions.
- Pasted waterproofing. Before gluing materials, the surface must be treated with a primer.
- Plaster waterproofing. They are made on the basis of cement, gypsum, polymers. Plaster compositions have special properties.
- Cast waterproofing. These are various solutions, mastics, which are poured in an even layer.
A separate type is impregnating compositions for protecting various materials from moisture. They are easy to apply with a roller or large brush.
Rot protection
To protect wood from rotting, you need to use special antiseptics. It is better to choose products with a minimum amount of harmful chemical elements.
Insulation
There are several types of insulation that can be used for arranging floors in frame buildings:
- expanded clay;
- mineral wool;
- foam glass;
- cement mixtures with various additives.
The choice of insulation depends on the financial capabilities of the owner and the climate zone where the bathhouse is located.