A good-quality wooden bathhouse has long become an integral part of many people’s leisure time. But, in addition to a feeling of satisfaction, it also brings headaches to its owners. Wood and water are not the best of friends. When exposed to moisture, floorboards become unusable over time. And wood wears out quite quickly from mechanical stress. There is a need to repair the floor: from replacing several floorboards to reconstructing the entire flooring as a whole.
Is it possible to avoid this? Certainly! Today there are a number of different solutions, but I would like to focus on one. This is laying tiles on a wooden floor in a bathhouse. And we’ll talk about how to properly lay tiles on the floor in a bathhouse in this article. How to combine seemingly incompatible things, which tiles and adhesive mixtures to choose for this, how to organize the work correctly? Discuss all the subtleties and nuances of the technology, hear the opinions and advice of experts.
The only thing is that we will decide right away in which rooms you need to lay tiles on the floor in the bathhouse, and in which there is no need for this. We will talk about those rooms in which water is intensively used. The floor in the steam room should be wooden, so we will not take it into account in the future.
How wood and tiles combine
The very first question that comes to mind is: is it possible to lay ceramic tiles on a wooden base? There are a number of factors that can become an obstacle to completing this task:
- One of the main requirements for tiles used in rooms with high humidity is moisture resistance. Consequently, the boards under the ceramics will be deprived of air access. And in the absence of ventilation, they will quickly rot.
- Depending on the state of the environment, the tree “plays” - it can change its shape and volume. Tiles are hard and cannot deform to the same extent as wood. A hard and static surface is another condition for installing tiles.
- Changing the size of the gaps between the floorboards can cause cracking or even destruction of the adhesive layer and the tile itself.
In contrast, we note that the floor in a bathhouse made of tiles will be much more durable and practical, and with the right choice of ceramics, it will be resistant to mechanical damage and shocks. The moisture-impermeability of the material will stop the access of moisture to wooden structures, thereby increasing their service life.
As for the aesthetic side of the issue, then, probably, in some cases, natural wood looks preferable. But the level of modern technology has made it possible to create simply a huge number of decorative coatings that will not leave you indifferent. The floor in a bathhouse made of tiles will look very stylish and beautiful. Having weighed all the pros and cons, we can summarize: if you wish, tiles can be laid on a wooden floor in a bathhouse without any problems.
Mistakes when arranging the floor for the washing compartment in the bathhouse
It is unacceptable to save on insulating materials
It is not recommended to lay too thin a layer of thermal insulation or replace the vapor barrier membrane film with ordinary polyethylene film. We must not forget about the extremely important vapor barrier layer. There is no way to do without it. It is not acceptable to finish floors with washable smooth tiles.
Such material in a company with high humidity can cause unwanted falls. The use of any plastic components in the installation and finishing of washroom floors is prohibited. The lack of a ventilation system is a big unacceptable mistake that entails negative consequences for the entire room.
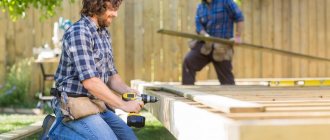
Required Tools
Before starting any work, you must prepare all the necessary tools in advance. You need to work concentratedly and measuredly, and not rush around headlong in search of missing equipment. What you will need for this job:
- Crowbar, nail puller, heavy hammer, hacksaw for dismantling the old floor or its fragments for subsequent replacement.
- Rule, level and tape measure for arranging a new coating and marking it.
- Glass cutter, tile cutter and grinder with discs for cutting ceramics.
- A drill with a mixer attachment and a container of sufficient volume for stirring assembly mixtures.
- Roller or brushes for priming.
- Convenient spatulas, trowel and comb for applying adhesive.
- Rubber hammer for shrinking and leveling tiles during installation.
- A set of rubber spatulas and rags for working with grout.
When selecting a comb, remember that for tile sizes from 5x5 to 15x15 cm, the tooth width should be 3-6 mm. For squares with a side of 25 centimeters, the tooth will be 8, and for 30 - 10 millimeters. If you need anything else, think about it in advance and put the tool so that it is always at hand.
Waterproofing sand cushion
After the sand has settled, you need to spread a plastic film over its surface with an overlap of at least 30 cm at the joints of the strips. This is enough to prevent the groundwater from rising higher. We overlap the film onto the walls by at least 10 cm on each and fasten its edges to a wooden beam using a construction stapler so that they do not fall down. Then we lay PVC film on top of the polyethylene film to waterproof the pools.
On top of the PVC film, for swimming pools, we lay guide bars for the base of the floor (joists). We fill the space between them with sand (if it is a steam room) and polystyrene foam if it is a rest room or washing room. We lay a vapor barrier membrane on top of the bars and fasten it to the staples with a construction stapler. Then we place construction plywood on top of it with a thickness of at least 16 mm.
Choosing ceramic tiles
“Whatever you call the boat, that’s how it will float,” sound the words of one famous song. Which tile you choose - this is the result of all the work. Let's consider the main criteria that you need to pay attention to when making a choice. Remember, floor and wall tiles are two very different things!
- Moisture resistance. The porosity of the material should be minimal. Only in this case will the floor tiles in the bathhouse absorb a minimum of moisture.
- Rough surface. The surface structure should provide reliable grip on the foot, especially in conditions of abundant water.
- Strength and wear resistance. Ceramics must be resistant to load, mechanical stress and possible impacts. Let's not pretend - when both your hands and most furnishings are wet, something often falls on the floor.
- The consignment. It is very important! Make sure every single box of tiles is from the same batch. Products from different batches may differ in color and size.
- Geometric characteristics. The edges must be smooth and regular. If you take several different specimens at a glance, their sizes should perfectly match each other.
To be fair, it should be noted that cladding made from natural materials looks more natural, but glazed plates have increased strength. The markings and special symbols printed on the packaging will tell you about certain properties and qualities of the floor tiles. If you yourself find it difficult to understand the meaning of the designations, do not hesitate to contact your sales consultant.
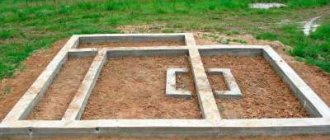
Harness
A grillage is a structure that connects pillars installed in the ground along the entire perimeter of the base.
You don’t need to think that it’s enough to install piles, weld special heels on them, and you can install a house on them. It is worth understanding that in a columnar and pile foundation, each element lives its own separate life, especially if the soil is heaving and unstable.
In addition, it is worth understanding that each pile will be subject to a different load. The piles can simply be driven separately.
Advice! If you want to save money, you can tie it with timber, which is perfect for a frame bathhouse. But the strongest and most reliable grillage is a reinforced concrete strip.
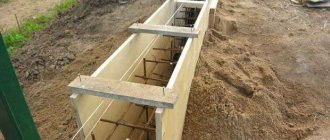
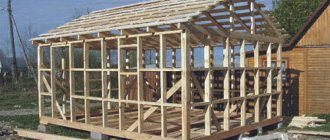
This photo does not show a frame bathhouse, but you can see the piping of the screw foundation with a profile pipe
There are four types of pile foundation lining:
- timber;
- channel;
- I-beam;
- monolithic tape.
Only by arranging a grillage on pile, columnar and screw foundations can you be sure that the structure will stand for a long time and will not require repairs in the next few years.
Bottom harness on pile
At first glance, it seems that tying a pile foundation with a corner or channel seems simple; this work requires certain skills:
- it is necessary to be able to carry out welding work, and the level of training must be appropriate;
- you need to understand exactly how to connect the channel; without experience, the work will be of poor quality;
- The channel is a fairly heavy material, so you will have to attract help.
But nevertheless, the algorithm of actions is quite simple:
- the piles need to be leveled;
- cut the channel into elements of the required size;
- connect the channel to the piles using bolts or welding;
- Apply a special anti-corrosion primer.
When using welding to arrange the strapping, you need to remember that the thermal effect on the steel changes its structure - weakening the material. Therefore, incorrect or insecure proficiency in welding work can result from weakening of the points at which the channel is attached to the supports.
Particular attention should be paid to corner joints, since it is in these places that there is a high probability of weakening of the entire structure
Bottom trim on columnar
It is best to use wood on a columnar base: firstly, it is not expensive, and secondly, it is easy to arrange and process. It is better to use coniferous wood. Advantages:
- increased strength;
- durability;
- low price;
- resinous properties help resist moisture.
Before using wood for strapping, it should be very well prepared:
- treat with antiseptic compounds to prevent rotting;
- impregnate with fire retardants to reduce flammability.
The most suitable material for a grillage would be laminated veneer lumber, since this material is produced using special technology and glued under high pressure.
Preparing the base for tiling
Let's figure out how to make the floor in the bathhouse ready for tiling. The most important and important step at this stage of work will be to check the condition of the existing floor. We carefully check the condition of the flooring. Ceramic coating is durable, so it will be incredibly disappointing if the old base cannot withstand the load and collapses, thereby rendering the entire structure unusable.
How to make a floor in a bathhouse from tiles?
Leaky boards need to be replaced. It is advisable to dismantle the board cover and check the logs. Rotten fragments are replaced with new ones. The distance between the logs, taking into account the increase in load, should not exceed 50 cm. If this size is exceeded, we install additional logs. The ends of the joists should not rest against the wall; the gap should be around 1 centimeter. All wooden elements are carefully treated with an antiseptic composition. From this point on, there are several options for preparing the base to lay tiles on a wooden floor in a bathhouse:
- Filling the screed;
- Leveling the surface using chipboards or plywood sheets;
- Reinforcement of the base with sheets of moisture-resistant plasterboard.
Before starting any of the chosen methods, you should take care of organizing wastewater disposal. Most often, the drain hole is located in the center of the wash room or shower, but it can be shifted to any location you specify. The drain hole is located at the lowest point, so the floor in this room will not be level, but will have a slight slope towards the drain. Otherwise, water will not flow into the sewer system. The slope should be 1 cm of difference in floor level for every meter of distance from the drain hole to the wall.
Filling the screed
After checking the condition of the logs, we return the old boards (if their use is possible) to their places. Their thickness cannot be less than 40 mm. In order for the floor to breathe, the boards are not laid solid, but with gaps of about 10 millimeters. If you decide to make the flooring continuous, be sure to drill a sufficient number of ventilation holes in it.
Standard sheets of multi-ply plywood or any other particle board with a minimum thickness of 12 mm are divided into 4 parts and the resulting tiles are laid on top of the plank flooring perpendicular to the boards. We leave a gap of approximately 3 millimeters between the fragments. The slabs are installed according to the principle of laying bricks - there should be no cross-shaped joints. In these places the structure will “play” and will not provide the required strength. The plywood is glued to a special compound and fixed with self-tapping screws at least every 20 cm. Given the presence of an aggressive environment, the screws must be made of non-corrosion metal or galvanized.
The next layer is waterproofing. Whether it is specialized paper, bitumen tape or just plastic film depends on your capabilities and preferences. Strips of material are spread, overlapping by 7-10 cm. The joints are taped. The waterproofing is also applied to the walls by 10 cm and is also fixed with tape. Along the perimeter, a damper tape with a thickness of 10 and a width of approximately 100 millimeters is attached to the walls.
We lay the reinforcing mesh and fill the screed. What it will be like: a sand-cement mortar with the addition of liquid glass or a specialized mixture is again up to you to decide. We protect the edges of the drain hole with formwork. To get the desired slope without unnecessary problems, we recommend installing beacons and leveling the solution along them. To avoid excessive load on the base, the maximum thickness of the screed should not exceed 30 mm.
Leveling the surface using chipboards or plywood sheets
The floor is leveled with sheets of wood or pressed particle boards. To raise the floor level to the required level, logs are installed on the existing flooring on special stands that are adjustable in height. On the logs, as in the previous version, quarter sheets of plywood are mounted using the “masonry” method. A second layer is laid on top of it so that the seams do not overlap each other. We maintain a gap of about 3 mm between all tiles.
The positive aspect of this option is that insulation can be placed between the joists, thereby simultaneously solving the issue of thermal insulation.
Another very similar option comes down to the fact that instead of point supports on the existing floor, a dry leveling mixture, fine expanded clay or sand is poured over a layer of waterproofing and a damper strip. It is compacted and then covered with plywood sheets or OSB boards.
In both cases, the top layer of plywood is sanded and the seams are puttied. Glue can be used as putty on which the tiles will be laid. The finished surface is covered with a layer of primer, in other words, primed. The adhesive mixture for tiles is selected taking into account the properties of the base material. For example, for OSB, polyurethane compounds can be used.
Laying ceramic tiles on a wooden floor
Reinforcement of the base with sheets of moisture-resistant plasterboard
Absolutely nothing new. Sheets of moisture-resistant plasterboard are laid on the existing floor. The plane is controlled using a building level. To level the flooring, we put pads made of any material at hand that will not shrink: slats, fiberboard, strips of roofing felt. We leave a gap along the edge, which we subsequently seal with sealant. We prime the fixed sheets with a primer.
So, we have prepared the foundation and approached the final stage of work. We only note that for a shower room the best option would be a wet screed. But other methods also have a place with a careful, balanced approach to organizing work. How to properly lay tiles in a bathhouse on a prepared floor? We'll talk about this in the next chapter.
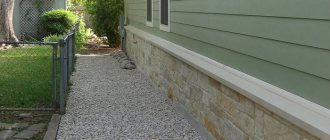
Types of floor coverings in the washing room
In private households, wooden (leaky or non-leaky) and concrete floor structures are usually laid in the washing sections of bathhouses.
As practice shows, the easiest option in terms of implementation is the leaking floor shown in the photo. On a pre-prepared base, which can be a concrete screed, a lower crown, support pillars, etc., logs are attached - they will become the basis for installing flooring from boards.
Floor elements are laid at intervals of 3-5 millimeters. It is through these gaps that water will be drained. Typically, leaking floor coverings are made dismountable. This design allows, if necessary, to remove the flooring and efficiently dry the boards outdoors.
Floor tiling
We mark the floor. If the drain is in the center, we will start dancing from there. You can lay out the tiles in an “envelope” by laying out a central square of triangles. The markings will be made from the center with rays to each corner of the room. The imagination now pictures a pile of tiles cut at different angles... Indeed, the best option would be simple, standard masonry.
The center of the first square will be the drain hole. We make a block from 4 tiles, measure it, and according to the resulting size, divide the entire area into blocks. Why is this necessary? Firstly, it is easier to lay out even rows and adjust seams. And secondly, the glue dries out quite quickly and loses its properties. Therefore, marking will help to apply the mixture to such an area that you can cover with tiles without compromising the properties of the adhesive solution.
Spread the adhesive mixture evenly over the floor and tile surface with a comb. Let us remind you that the tiles are first soaked in water for 5-10 minutes so that the moisture from the adhesive is not absorbed by the porous structure of the material.
Having covered the first fragment of the surface, we repeat the procedure until the floor is completely covered with a decorative layer. To make it easier to align the ceramic plates, we install special mounting crosses in the corners of the seams. One of the nuances of this stage will be the choice of the adhesive mixture: it must be completely compatible with the base material. How to properly prepare the solution for use is written in the manual that is supplied with the glue by the manufacturer.
Wall decoration
Finishing a steam room with your own hands requires certain knowledge and skills, so it makes sense to hire a professional craftsman. In any case, you should have an idea of the key points of construction and finishing work. For interior decoration, only certain materials should be used, which will be discussed further.
Experts advise finishing with paired linings from deciduous trees, since they do not emit resin.
I want to see everything!
I want to see everything!
Linden
Not only flowers and linden honey have healing properties, but also linden wood: when exposed to high temperatures, linden boards spread a pleasant aroma and release essential oils into the air, which are endowed with bactericidal and anti-inflammatory properties. High air humidity in baths contributes to the long-term preservation of the beneficial properties of wood.
Do-it-yourself barrel sauna: construction nuances
The essential oils released into the air are hypoallergenic, which makes linden a very valuable material. During the process of construction and operation, other useful properties of linden are revealed: this wood is easy to sand, has a low density and is practically waterproof.
Aspen
Clean, hygienic, moisture-resistant, having a pleasant light shade, not subject to deformation, aspen is perfect for finishing a bathhouse. Aspen does not rot in an environment with high humidity: when saturated with water vapor, it is able to quickly restore its original dryness. Aspen does not emit resins, has a pleasant, discreet odor and has the ability to clean the bathhouse from “old” steam.
Alder
The moisture-resistant properties of alder have been noticed and used for a long time: this type of wood was used in shipbuilding, bridge construction (making piles), construction, including in the decoration of baths and saunas. The light coffee shade of wood, diluted with marble veins, will make the bathhouse stylish and exclusive.
Abashi
Abashi wood (originally from Africa) is a more expensive and exclusive material for finishing a steam room in a bathhouse. This finish is reliable and durable, despite exposure to high temperatures and humidity. Abashi wood shades range from cream to light yellow, they are pleasing to the eye and look interesting and stylish in the interior. Abashi wood is not subject to deformation, rotting, has low density and high strength, and due to its low thermal conductivity, it does not burn the body, even when very hot.
Canadian cedar
Coniferous trees can also be used in finishing a steam room (usually those varieties that emit the least amount of resin are chosen). In the decoration of elite saunas, expensive and solid Canadian cedar, which has antiseptic properties, is used.
Its dense wood with an original texture and complex coffee shades, when heated, spreads a subtle balsamic aroma that soothes, relaxes, relieves stress and fatigue, and fills the body with strength. Canadian cedar wood is moisture-resistant and heat-resistant.
Sauna from a sea container
A unique and stylish design solution can be a combination of several tree species in the decoration of your steam room or sauna: for example, dark alder harmoniously combines with light abasha, linden or aspen wood. Experiment and enjoy the result!
Grouting joints
The final stage will be grouting the joints. Choose a composition in a contrasting color or to match the general background of the surface - your taste and desire will tell you. Main quality. If, as an example, we consider the range of grouts from the Ceresit company, then there are silicone grouts, elastic water-repellent grouts, and two-component grouts. Antifungal impregnation is offered to protect the grout.
Therefore, your experience, information that you can find in sufficient quantities on our website or consultation with a specialist will help you make the right choice. After the tiles have completely dried, we begin grouting. Mix the solution with a mixer, and use a rubber spatula or small grater to fill the seams. We hold the tool at an angle of approximately 45 degrees - this is how the grout most effectively fills the seam. You need to prepare as much mixture as you can produce in 20-30 minutes. After this time, it will begin to dry out and lose elasticity.
After letting the grout dry a little, use a dry, clean rag to carefully remove excess gypsum from the surface of the tile. After this, wipe clean with a damp cloth and leave until completely dry. As you can see, there is nothing complicated or supernatural about laying tiles on a wooden floor in a bathroom. Please note an important point: the floor level in the washroom should be lower than the floor level of the remaining rooms of the bathhouse, so that in case of problems with the drainage, the water does not flood the neighboring rooms.
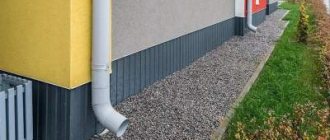
Ventilation design
The simplest method of solving the problem of ventilating the space between the rough base and the final finishing of the floor is to create holes to which pipes are connected that lead water out of the washing room.
There is another way to create ventilation - this is the installation of multi-level floors. Therefore, in each room they make a floor structure of different heights. For example, in the washroom the floor surface will be 3 millimeters lower than in the dressing room.
Option one is the most popular among developers, and the order of work is as follows:
Horizontal drain
It is better to place a horizontal drain close to the wall, since the trim does not look aesthetically pleasing.
- This option for laying tiles is as easy as shelling pears to do with your own hands, even if the screed was initially poured without a slope. First, we calculate the distance from the drain to the opposite wall. The level of floor slope in centimeters towards the drain will be equal to the number of meters. For example, if there is 3 m from the ladder to the wall, then the slope level should be 3 cm.
- Now we measure 3 cm up from the floor on the wall opposite the gutter and attach the beacons. We pull the cords from them towards the drain and fix them in this way. As a result, we have a template according to which we will lay the tiles.
Important: mark the wall in the washing bath, from which we will begin laying the lining towards the drain, in half. The first tile should be placed to the right of the applied markings. Now you should put the required amount of material to the right and left of it. This will be the first row of masonry.
The process for laying each tile is as follows:
- Apply the required amount of glue to the back side of the tile using a notched trowel and lay the tile. We adjust the height of the masonry with a rubber mallet if the screed was poured without a slope.
- Between each tile we install plastic or wooden crosses that regulate the width and uniformity of the seams.
- First, lay all the whole tiles towards the drain and only then lay the outer cut ones. While working, use a damp cloth to remove excess adhesive on the tiles. Otherwise, once it dries, it will be difficult to remove.
- Leave the laid floor for 12-24 hours until the glue dries completely.
- Once the glue has completely dried, you can rub the seams. The grout is applied with a special rubber spatula. Remove excess with a cloth. We treat the joints of the facing material with the wall with silicone.
Recommendations
Adviсe:
- Before choosing a material, you need to carefully examine it for the presence of fungus, mold, and rotten knots.
- If the bathhouse will be used in winter, it is not advisable to make a leaking flooring.
- Before installing the floor, you need to dry the boards.
- The drain must be discharged into a waste well, which can be located 1–3 meters from the bathhouse.
Assembling a floor in a frame bathhouse is not difficult, but to do this you need to take into account the features of such a building, know how to properly insulate it, and protect the base from moisture. It is easier to make a wooden floor, since laying a concrete floor requires a lot of investment.
Central drain
In this case, laying tiles indoors with your own hands will be a little more difficult, but it can still be done.
Here the floor with a slope will be laid using the envelope type. That is, stretch the cords towards the drain from the corners of the room. In all three corners, raise them by the required number of centimeters (see above for how to calculate the height of the clone). You will end up with three or four triangles of possibly different sizes (depending on the location of the drain in the washroom). In order for the laying to be correct, you can start from the base of a larger triangle. That is, from the wall of the washing bath that is wider.
- We take the first tile, apply glue to it and lay it in the center of the largest base. To the sides of this we place the required number of whole tiles. We adjust each one with a mallet in accordance with the established levels.
- We will lay the next row of whole tiles like brickwork, that is, tied together. Thus, you need to lay the entire triangle with whole tiles.
- Using the same principle, you can cover the floor in the area of the remaining triangles.
- The remaining untiled areas of the floor will need to be finished with cut tiles. And each piece will have to be adjusted in accordance with the necessary parameters.
- Now let the cladding dry for 24 hours.
- Finally, apply grout and treat the joints of the tiles and walls with silicone. We rub the seams.
Stage 1: Design
Frame construction is suitable both for the construction of small steam rooms on the site, and for the creation of real country houses for relaxation. The choice of design and area depends only on the size of the site, personal budget and needs. Before starting the main work, you should decide on the location of the bathhouse construction
To do this, it is important to take into account the location of utilities, the topography and layout of the site, the presence of a reservoir and other water bodies nearby. In addition, it is advisable to conduct a geological analysis of the soil, since the type of future bathhouse foundation depends on this
Upon completion of the preparatory work, you should have a detailed plan of the area, a drawing of the building with all the necessary elements, and an approximate estimate for materials for construction. If you are not confident that you can draw up a competent project yourself, it is better to turn to professionals - this will allow you to avoid serious mistakes and miscalculations in the future.
Log repair
If, after opening the wooden floor, it turns out that the joists have reliable support, but are not aligned in the same plane, or some have dried out and bent, then the matter can be corrected with even overhead boards. They can be attached to joists with nails, self-tapping screws, and for those who find this not enough, then with bolts and large washers.
Everything can be leveled at the highest point by pulling the cords in a horizontal plane. If there is a large gap between the lags, then you will have to install additional lags.
The end result is a great timber floor which can be enhanced by adding 15-20mm moisture resistant plywood over the floor. In this case, it needs to be cut crosswise into 4 parts and screwed with self-tapping screws at intervals with a gap of 3–5 mm. We lay the tiles in the usual manner using elastic adhesive on primed plywood.
Complete reconstruction
Finally, the bad thing about a wooden floor is that the joists are no good for support. In this case, you will have to completely or partially replace them and do everything in accordance with the standards for a wooden floor. Then there are no problems with laying tiles. New logs for a wooden floor can be set at the desired height and the tiles can be laid at a given level.
Where to place the sauna stove
Installation of the firebox begins with choosing a location. It is recommended that at the repair planning stage you have information about the characteristics and design of the bath unit that will be used. You will also need to decide on which side the sauna will be heated.
General recommendations for placing a firebox in a sauna room:
A brick or metal unit located in a steam room. Such a device is placed in the central zone or next to the outer partition. Fuel is stored indoors. This option is simple and convenient - you don’t need to leave the bathhouse to add firewood or control or change the heating intensity. The advantage is that the installation work is not difficult, because there is no need to make an opening in the wall.
A metal stove is installed on a non-flammable foundationSource martand.ru
- The part for storing fuel is taken outside the steam room, and the stove is located in the sauna room. Some cast iron models have an external combustion chamber, the doors of which are located in the dressing room or washing area. The heating unit is mounted near the wall - on the right or left side of the front door. To form a chimney wall, a stone heat generator is erected between two rooms. The advantage of this option is the heating of the room where the firebox is located. Accordingly, in the cold season there is no need to turn on additional equipment to heat the room. When the door of the fuel device comes out, the oxygen in the steam room is not burned, there is no need to arrange an air flow. Another positive quality is that fuel material is not brought into the bathhouse, which will make it easier to maintain cleanliness.
- The stove is located near the load-bearing walls, and the firebox is placed outside. Installing a furnace device with a fuel part that is located outside the building is a good option if coal fuel is used as an energy source. During the combustion process, coal produces a huge amount of dust.
The firebox faces the outside of the bathhouse - this is the safest optionSource martand.ru
Step-by-step installation technology
Now let's look at the step-by-step procedure for laying tiles on the floor in the bathroom.
Preparing the base
Preparing a rough base for laying ceramics includes the following steps:
- Waterproofing the base. This stage is carried out before pouring wet screed or self-leveling mixtures so that moisture from the solution does not go down under the influence of gravity. Waterproofing is needed only to prevent moisture from the concrete from spoiling the repairs for neighbors below, so there are no special requirements for it.
- Alignment. It is recommended to lay the tiles on a flat base with a maximum height difference of no more than 1 cm per 1 linear meter. Laying tiles on a thick layer of adhesive is considered a violation of technology. On each bag there is written the maximum thickness of the layer on which tiles can be laid, specifically with this adhesive.
- Surface priming. A mandatory step, which, in addition to reducing the absorbent characteristics of the base, increases the adhesion of the tile adhesive and allows you to remove dust from the surface.
More details about leveling technology, the methods used and other nuances of floor preparation can be found in this material.
Required Tools
For installation work you will need the following tools:
- Comb spatula with teeth depth 8 or 10 mm.
- Building level.
- Tile cutter or grinder.
- Plastic spacer crosses for uniform seams. The optimal seam width is 2–2.5 mm.
- Mixer, drill or hammer drill with an attachment for preparing tile adhesive.
- Rubber hammer for knocking out tiles.
Preparation of glue
When preparing tile adhesive, it is important to follow the manufacturer’s instructions, especially regarding the amount of water added, since not only the consistency, but also the physical and mechanical characteristics of the finished adhesive directly depend on this. The general technology and sequence of mixing dry mixtures is as follows:
- A measured amount of water is poured into a clean, deep container.
- The dry mixture is poured into the water. If you have an assistant, it will be better if the mixture is added while mixing the water.
- The composition is mixed until a homogeneous mass is obtained, in which there are no lumps.
- After a technological break of 5–10 minutes, the solution is mixed again.
With the correct consistency, the glue has good mobility and ductility, but it does not float on the surface, and when applied to a spatula, it remains on it.