Using a bathhouse is impossible without various types of water procedures. Waste water is usually poured directly onto the floor, from where it goes into a pre-prepared drain system. Its design, as a rule, is known only to the owner and is of little interest to ordinary users.
However, sooner or later, any person may face the problem of building their own bathhouse, where they will have to create all the necessary systems. Among them, the drainage system is the most important. Therefore, having an idea about the structure and types of drainage in a bathhouse is very useful, and sometimes necessary.
Let's take a closer look at this issue.
5/5 — (1 vote)
Making a wooden floor in a bathhouse with your own hands
To make wooden flooring in a bathhouse, special floorboards are used, which are placed on logs, which are special transverse beams.
The process of constructing a wooden floor can be more clearly described using the following sequential steps:
At the initial stage, it is necessary to make a pit around the entire perimeter of the steam room, which should have a depth of 40–60 cm. Next, a concrete solution is taken, which is used to fill the edges of the pit and the base. This usually takes about 10 liters of concrete mixture. After waiting for the concrete to completely harden, which usually takes 3-4 days, you can proceed to laying a 5 cm thick layer of crushed stone and sand on the base of the floor. It must be thoroughly compacted.
Having completed the construction of the sand and crushed stone cushion, special brick columns with a cross section of 25 x 25 cm are installed on it, which will serve as support for wooden logs
When constructing these posts, special attention must be paid to ensure that they protrude approximately 2–3 cm above ground level.
Unedged wooden boards with a smooth outer surface can also be used as a material for constructing a wooden leaky floor. First, they must be adjusted to size in accordance with the dimensions of the main structure
After this, they can be laid on the joists. In the process of laying the first board, it is necessary to take into account that there must be a gap of approximately 3 cm from the wall for ventilation. Therefore, the fastening of the first unedged board is carried out taking into account this requirement. All other boards are attached with a gap of 5 mm. To increase the service life of lumber, it is treated with a double layer of drying oil or other protective material.
When installing a non-leaking floor, special wooden beams with a cross section of 50 x 50 cm are laid on the joists. Subsequently, a subfloor with waterproofing will be mounted on them. This design will include several layers to ensure leveling and insulation of the floor before the final installation of the finished floor boards. During the installation of the subfloor, it is allowed to take edged non-standard boards, pre-treated with an antiseptic and drying oil. After laying the rough boards, insulation is placed on them, which can be used as roofing felt and foam plastic 10 cm thick. An additional layer of roofing felt is laid directly on them.
Having completed the work on arranging the rough covering, you can proceed to laying tongue-and-groove boards 15–20 cm thick. All boards are attached to the joists using several nails or they can be screwed with self-tapping screws. Typically, 3–5 screws or nails are enough to install one board. But when calculating their quantity, it is necessary to take into account the thickness of the boards.
How to make a drainage hole for a bathhouse
It is worth starting the construction of a drainage pit only if the groundwater is located deep. Otherwise, the pit will always be filled with groundwater, and the drains simply will not fit into it.
First you need to decide on the sizes. They depend on the number of people who will take a steam bath. The more people there are, the larger the tank will be needed. If there are 3-4 people maximum, the water consumption is approximately 50-60 liters, respectively, the volume of the pit should be slightly larger.
The most optimal shape for drainage from a bath is cylindrical
Then you need to decide on the place where you will install the tank. From experience we can say that the most optimal distance is 2 meters from the bathhouse. It’s not worth it any further - it will be difficult to organize the required slope of the pipes so that the water drains by gravity, closer is also dangerous - the foundation may sag or get wet.
To determine the amount of materials that will be needed to construct a drainage pit, you need to know the type of soil. If the soil does not crumble, there is no need to strengthen the edges of the hole. You just need to dig it up and fill it with filter materials.
At the same time, it is important that the soil absorbs moisture well. Then the treated wastewater will be absorbed, which is very convenient
In this case, crushed stone, expanded clay or broken brick are poured onto the bottom of the pit, and then sand. But such conditions are rare.
It is necessary to strengthen the walls of the pit only when the soil is loose
If the soil is loose, you will have to strengthen the edges of the hole. You can line it with brick (half a brick is enough) or wild stone, leaving gaps for water outflow, you can use slate, or you can bury an old (or new) barrel made of metal or plastic, make holes in the walls for outflow and remove the bottom. The holes should not be large so that rubble does not get stuck in them.
You can make the body of the drainage pit out of brick
If we talk about the shape of the tank, then the best option is a cylinder. In this case, the pressure on the walls is uniform, and besides, a pit of this shape will require repairs much less often. The walls of the pit should not reach 30-40 cm from the ground surface, and the hole should be covered with a lid (iron or concrete).
After the walls of the pit are ready, crushed stone, broken brick, expanded clay are poured, and everything is covered with sand. Drain pipes are connected to the pit from the bathhouse at a slope sufficient for gravity flow of water. As a rule, a difference of 10 mm per meter of pipe is sufficient. Water passing through filter materials is purified and then absorbed by the soil.
Pour crushed stone, broken brick, expanded clay, etc. into the bottom of the drainage hole.
If a square hole is dug to drain the bath, it can be filled with wave slate sheets. Each sheet is placed so that the waves of the previous one are perpendicular (at an angle of 90°).
There are several more options for making a drainage pit from scrap materials. You can take old tires (tires from KAMAZ trucks), make holes in them for better drainage and partially cut off the side surfaces. Next, place the prepared tires one on top of the other in the dug hole, and then cover them with filter materials.
An example of draining a bath from old tires
Methods for covering floors in a bathhouse: which option to choose?
Depending on the wishes and capabilities of the owner, the bathhouse can be made quite simple - a wooden frame consisting of a dressing room and a steam room, or you can build a real bathhouse complex with a dressing room, steam room, washing room and a relaxation room.
How big your sauna will be is up to you to decide.
If we are talking about building a small wooden bathhouse, which can be used only in the warm season, then it is advisable to make the floor from wood. In the case of building a permanent bathhouse made of brick, it is better to lay a reliable concrete floor with waterproofing and drainage. Such a brick bathhouse will be suitable for use both in summer and winter, which significantly increases its functionality.
Complete diagram of sewerage and ventilation in the bathhouse
Another great option in terms of practicality and beauty is laying ceramic tiles on the floor. This material is durable and easy to care for. In addition, the modern market offers a wide selection of different tile designs that will satisfy even the most demanding taste. To avoid the floor slipping during operation and excessive overheating, it is better to place removable wooden grates on the tiles. As you know, the grout between the seams is easily rotten due to high humidity. To prevent this from happening, the tiled floor should be treated with special antiseptic agents.
floor tiles
Tiles on the floor in the steam room
What needs to be done before construction begins
The neck of a hole filled with soil
Everyone knows that the construction of any object or communication must begin with design. The construction of a treatment plant for a bathhouse will not be an exception.
GWL assessment
First of all, you need to find out at what level the groundwater lies. If this level is high enough, then the construction of a traditional drainage pit will have to be abandoned, since it will be filled with soil water.
How can you determine at what distance from the surface soil waters lie? As a rule, to obtain this information it is necessary to carry out a hydrogeological study, including drilling ores. However, a preliminary assessment of the situation can be made using ancient folk methods:
- If there are wells nearby, then based on the level of water in them, one can draw a conclusion about the groundwater level.
- Another sign is that with a high groundwater level, many plants grow on the site that need moisture in large quantities. For example, horsetails, coltsfoot, reeds, sedge, etc.
Brick drain pit
Determining the volume of chambers and other construction nuances
The volume of the receiving chambers depends on the size of the bathhouse - the drainage pit should be larger the larger the number of people who will use the washing room.
If the volume of the pit is insufficient, the wastewater simply will not fit in it and will flow over the edge. Also, you should evaluate the quality of the soil on the site; this determines whether it will be necessary to strengthen the edges of the pit.
The location of the treatment tank should be determined in advance. As a rule, it is recommended to place the pit at a distance of 2-2.5 meters from the bathhouse. Otherwise, it will be difficult to build a pipeline with the required slope.
How to properly lay plank flooring in a steam room
It is important to calculate the consumption and cut the lumber in advance. Soil compaction in progress
Roofing felt is laid in several layers. Joints are coated with bitumen mastic
The soil is being compacted. Roofing felt is laid in several layers. The joints are coated with bitumen mastic.
Installation of beams
In a log building for a steam room, the floor is raised. To do this, it is recommended to lay a 7*10 cm beam. It is laid out around the entire perimeter. Due to this, the strength of the base increases. The main part of the load falls on the bars.
The distance from the beams to the logs is from 1 cm. When the log house shrinks, such a gap will protect the structure from deformation.
The further order is as follows:
- The beams are evenly distributed throughout the floor. Those that are in the center are supported by the support of two walls that are opposite. Additional reinforcement - two large pillars.
- The beams are fixed to the base using anchors. Section – 12 mm, length – from 14 cm.
- Making holes is a responsible procedure that requires care. Otherwise, there is a risk of cracking of the installed structure.
- Fastening is performed through the beam or on top of it. When the anchor passes through the beam, the length is taken a couple of centimeters less.
- 4 anchors are enough for 1 beam.
- Fixation to the support is carried out using metal corners measuring 6*6 cm. The beam is first connected with self-tapping screws to the corner, and to the support - with screws.
- One fastener element is installed on each side of the beam.
The top line under the plinth should be at least 5-10 mm lower than the threshold. The location of the boards and the direction of inclination from one wall to another are noted.
Installation of logs
It is carried out on top of the beams according to the markings. If necessary, the logs are trimmed. A slope (no more than 2 cm) towards the drain is formed.
Fastening elements - perforated metal corners. Perfectly withstand heavy loads. They have many holes for convenient selection of the fixation angle. Therefore, you should not insert a self-tapping screw into each of them. Up to three pieces are enough on each side. They are attached to the side and bottom, increasing the strength of the structure.
If knots and other defects are noticed on the surface of the joists, then fastening is not carried out in this place.
It is recommended to lay a waterproofing material on top of the log with an overlap of 20 to 30 cm, so that it can then be attached to the wall waterproofing.
Another option for fixing lags is to use lag holders based on the tongue-and-groove principle.
Experienced builders fasten the logs using a stretched rope to maintain the level and speed up the process.
Lathing
Wooden slats or pieces of thin boards are nailed to the joists. Insulation is placed on top. Mineral wool is perfect. Can be supplemented with insulating foil.
The slats used are impregnated with a protective antiseptic.
Laying the boards
Performed in the following sequence:
- The gaps between the laid insulation and the wooden elements are filled with polyurethane foam. If possible, the remaining foam that has emerged should not be cut off, otherwise water will get into the pores and the foam will lose its protective properties. It is necessary to trim only if the foam becomes an obstacle to fastening the boards.
- The boards are cut to the required sizes. If the corners of the room are not the same, then each of the wooden elements is cut out separately.
- All cut boards are marked with numbers to avoid confusion.
- The ends of each lumber should fit closely into the openings of the drain tray. Sizing is done manually.
- The boards are laid on the floor according to numbers. It is easiest to work with dry wood. If the raw material is saturated with moisture, then each element will have to be attracted to the other.
- The boards are fastened at both edges with hardware, nails, screws (your choice), but it is preferable and faster to use hardware.
- The length of the fasteners depends on the thickness of the wood.
- When using nails, the length is taken equal to two thicknesses of the boards.
- The gaps between the walls and the floor are foamed.
- Skirting boards (wooden or plastic) are attached to small nails and self-tapping screws.
- Laying of tongue and groove raw materials is done in grooves. The screws must fit tightly into the wood.
A gap of up to 3 cm is left between the joists and boards for better ventilation, quick drying of the floor and long-term operation.
Preparing for drainage installation
Draining used water from the bathhouse, if it is not associated with the use of a pit, is carried out in two stages: first along the internal part of the drainage system, passing directly under the bathhouse, then along the outer section of the pipe. To do this, the method of laying the pipe must be planned at the stage of creating the bathhouse project - with reconnaissance of the properties of the soil around the proposed construction of the facility, calculation of the cross-section of the pipes, their type and the depth of the wells.
Design of the internal part of the drainage system
The design of the internal part of the drainage system is directly related to the type of water collection device. Which, in turn, depends on the design of the floor, which can be:
In addition, preliminary calculations of water consumption for each person are immediately made and, in accordance with this, the diameter of the drain pipes, on which the throughput of the drain system depends.
In any case, the pipe connecting the internal part of the drainage system with the external one must have a slight slope, at least 2 degrees, so that water flows by gravity and it is impossible for it to stagnate in any area where it flows outward.
Design of external drainage area
The external section of the drainage system is a direct continuation of the internal one, and is arranged according to the same physical principles: an inclination to the drainage point of at least 2 degrees, pipes of the same cross-section as inside (or at least not smaller). The cross-section of the pipes, associated with their throughput, is selected according to the following criteria:
If the number of people visiting the bathhouse at a time for about 12 hours does not exceed 5 people, then a pipe with a cross-section of 7 cm is sufficient. If there are more than five or among these five there are especially “zealous” lovers of steaming, then it is better to choose a drain pipe with a diameter of 11 cm .
| You can control the angle of inclination of drain pipes without measuring the degrees of inclination, but by taking into account the difference in levels of each subsequent section of laid pipes. For optimal flow, a difference in levels of 2 cm per meter is sufficient, with a lowering of that part of the pipeline that is closer to the well/septic tank/sewer. |
Video on the topic of planning sewerage in a bathhouse
Installation of wooden floors in a bathhouse: features and recommendations
Installing a wooden floor in a bathhouse has both advantages and disadvantages. The advantages include relatively small financial investments and ease of installation. But the main disadvantage is the fragility of wood due to high levels of humidity and temperature changes; a wooden floor can begin to rot and will have to be re-laid.
Floor on joists in the bathhouse
When installing wooden floors in a bathhouse, it is better to use boards made from coniferous trees - pine, fir, larch and others. Due to the high resin content, such wood is more resistant to moisture, and the essential oils released from the wood will be useful in terms of therapeutic effect
It is also important that boards made of coniferous trees do not become slippery when wet, this will protect those washing from falling
Video - Do-it-yourself bathhouse floor
The wooden floor in the bathhouse can be made leaky or non-leaky.
- The non-leakage floor is laid on a concrete screed with a slope at a slight angle. The slope is made so that the water can flow freely, after which it is discharged into a special sump.
- A leaking wooden floor consists of a plank flooring in which gaps about 3 mm wide are formed to drain the water. Its main advantage is the ability to remove and dry, as a result of which such a floor will not rot and will last longer.
When installing a leaking wooden floor in a bathhouse, it is necessary to provide for a gap underneath it. It is recommended to leave about 50 cm of free space - this way the air can blow freely and from all sides on the boardwalk.
A slope for water drainage is formed under a wooden floor, on a clay or cement surface. There is also supposed to be a pit through which the flowing water will be drained into a filter well. To form an inclined line, gravel is used, which is evenly placed under the clay layer. If the screed is made of cement, the pit must be sealed with waterproofing.
Floor drainage devices
To improve the ventilation of the boards of a leaking floor, you can use the blower of a stone stove if it is installed under the floor, and also vent air from under the floor to the roof using asbestos-cement or plastic pipes.
It is not recommended to paint wood floors or treat them with any compounds. This will not add durability to the tree, but the fact that the boards will stop breathing is a fact. Thus, instead of a rich and healthy pine aroma, there will be a persistent smell of chemical solutions in the bathhouse. Wood is susceptible to decay in any case, so the best option is to thoroughly sand the boards before using them in construction.
Advantages and disadvantages of sewer drain devices
Today, there are a huge number of devices for arranging a drainage system for a bathhouse. They have both positive and negative sides. These include:
Drainage well. It is a deep pit, the walls of which are filled with filtrate. For this, sand, small crushed stone, and pebbles are used.
Drain well. This is a large container for collecting sewer liquids, in which waste from the bathhouse gradually accumulates. As it is filled, it is cleaned using special equipment or a machine.
The advantages of such a system are: ease of installation and arrangement of the drainage pit, low cost. Negative qualities include: frequent cleaning, inconvenient location of the drain well. As a rule, installation should be carried out at the lowest point of the site.
Pit. It is located under the floor covering of the bathhouse. Drain waste is collected in this pit and undergoes independent cleaning through a filtrate of fine materials.
The positive qualities of the system include: low cost of materials, easy installation. The disadvantages of such a structure are: low throughput; it can be used on sandy and sandy loam soils.
Ground filtration. This is a system that consists of a septic tank and several pipes. Purified water passes through them. The pipeline is laid at a certain angle, due to which all the liquid will drain on its own and be absorbed by the soil.
The advantages of such a system are considered to be: it can be used for the entire sewer network; with its help, the liquid is thoroughly cleaned of harmful impurities. A photo of a bathhouse drain shows the process of filtering sewage waste.
Correct sequence of installation of wooden floors
When installing a wooden floor, certain standards must be strictly observed, and calculations must be made accurately and efficiently. For example, too large a distance between the joists will lead to constant squeaking, and the absence of a small gap between the floorboards will cause damage to the entire flooring when the wood begins to dry out.
The boards are laid directly on the logs, which in turn must be installed on small supports. At the points of contact between the joists and the foundation, it is necessary to install an additional insulating layer; inexpensive roofing felt is suitable for this purpose, but at least two layers must be used. Also, some home owners use melted bitumen, but its service life is much shorter than that of roofing felt.
Sequence of installation of a wooden floor:
- Installation of wooden supports. The supports are the basis for further laying of the logs. For floorboards of any thickness, a beam with a cross-section of 25 cm is used. But when the thickness changes, the distance between the supports increases or decreases. The ratio of the board to the embedded supports:
- with a board 19 mm thick, embedded supports should be installed at least every 70 cm;
- with a board 22 mm thick, embedded supports should be installed at least every 80 cm;
- with a board 29 mm thick, embedded supports should be installed at least every 90 cm.
You should know that wooden supports must also have a foundation; usually it is made of concrete, but some owners of private houses prefer to simply install and compact a small embankment.
- Underground installation. If the tree is not mounted to a concrete floor, but there is earth underneath it, then you just need to find out the quality of the soil. If the soil is crumbly and can act as a filter, then it will be enough to make a backfill of gravel; you can also make a mixture of gravel and sand.
The thickness of the layer should be at least 25 cm, but 10-12 cm should be left free before the lag. If the owner of the house does not plan to create a leaking drain, then the entire surface of the earth can be covered with expanded clay. The distance from the expanded clay to the lag is called the ventilation gap and should be at least 15 cm.
- Installation of logs. The basic rule when laying joists is to maintain the ideal level; accordingly, it is necessary to select even material. This is due to the fact that the floorboard will be laid on the logs in the future. If the joists are not positioned horizontally, the entire floor will be uneven.
- Installation of floorboards. The floorboard can be mounted on fixed and precisely measured logs. To begin with, it should be laid and lightly baited, but not secured. The boards must be given time to dry, after which precise and final adjustments can be made. The distance between the boards should be left no more than 2-3 mm.
After completing all installation operations, you can install the plinth on the boards. It must be firmly fixed, without gaps, otherwise moisture may accumulate under the baseboard, which will lead to the appearance of mold or rot.
Installing a wooden floor will not take much time; it is enough to make correct and accurate calculations, otherwise the consequences will require repeating the entire procedure again. After installation is completed, the boards must be left for several days, and then you can confidently steam in your sauna.
How to choose the right material
Modern pipes for organizing a drainage system are made of high-strength plastic. Its service life is 50 years. Pipes are used from:
They are not afraid of water, do not rust or rot. They are easily assembled into a system, attached to each other simply and without much effort. They come in different sizes, among which there is sure to be one that is necessary for specific conditions.
And although cast iron pipes are stronger and more reliable, they are practically not used to create bathhouse drains. They are difficult to transport and install; installation requires special equipment, additional tools and specialists. The result is a costly event that can be avoided.
Asbestos-cement pipes are not recommended for use. They have an uneven surface inside that catches debris. This is especially dangerous if the drainage system is more than 10 meters.
The diameter of the pipes for a steam room with an average degree of use is 11 cm, for small baths 7 cm is enough.
Nuances of the right choice
Before starting construction of a bathhouse, it is important to carefully study all the features of the flooring arrangement and the criteria for its compliance. Before making a floor in a bathhouse, the owner will have to choose a method of water drainage and a material for constructing the floor structure
His decisions are determined by individual preferences and financial capabilities. In most country bath buildings, a concrete screed is poured or a floorboard is laid on prepared logs.
Features of wood flooring
To ensure that the wooden floor in the bathhouse does not lose its aesthetics and technical properties for a long time, experts recommend choosing larch boards. Pine, birch, alder or fir are also suitable. Sometimes wood species can be combined: the final finishing is made from expensive material, and the rough finishing is made from cheaper materials.
Wooden floor in a bathhouseSource ad-cd.netThe raw materials for the finishing coating are prepared in advance and certainly dried. When this condition is not met, the wooden floor quickly deforms. Especially from solid wood. It takes longer to dry, but the possibility of avoiding deformation is not excluded. To prevent such problems, thin beams are laid. This material is designed for lighter loads, but this is compensated by transverse joists. Boards up to 2.5 cm thick are the least likely to deform, so they are considered the best solution for laying joists. But the best option is a board 4 cm thick.
Floors made of wood materials are laid in stages:
- The base is covered with several layers of roofing felt.
- Massive beams are laid at a certain distance along the perimeter of the foundation; they cover the entire space of the future floor.
- The bars (cranial) are attached.
- Logs are laid on the beams (they are cut in certain places to create a slope towards the drain). This is how rough structures are created before insulating the floor in the bathhouse.
- A moisture-proof membrane is fixed to the joists (leaving the ends up to 0.3 m free for attaching them to the wall waterproofing).
- A layer of insulation is laid between the subfloor boards. The optimal solution would be to combine protection from climate influences. For this, it is best to use mineralized wool.
- The finishing coating is arranged using tongue-and-groove boards.
Finishing of wooden floors in a bathhouseSource pol-inform.ru
The arrangement of high-quality floors depends on the material used and the reliability of its fastening. Structural elements have the following connection options:
- The beams are attached to the foundation with anchor bolts (from 14 cm).
- Fastening is carried out using a surface or through method. In the latter case, the anchor can be taken shorter. There are four such bolts per beam.
- The beams are attached to the support posts with self-tapping screws or screws using metal corners.
- The logs are fastened with beams, also using corners. If the logs are not solid, the connecting points are also secured with moisture holders.
- The board with tongues is inserted into different areas (the screws are “sunk” deep into the wood so that they do not interfere with fastening).
The main condition for installing wooden floors in bathhouses is the presence of ventilation holes in the foundation. They are needed so that the wood gets rid of accumulated moisture. Properly made non-leaking floors last up to 10 years.
Pouring a concrete floorSource ad-cd.net
Features of pouring concrete floors
In order to concrete the floors in the bathhouse, steam room and sink, you need to perform the following steps step by step:
- make a sand cushion on a soil base, set up plank formwork;
- prepare the base for the concrete mixture (mix cement with sand and gravel and add water until a liquid, homogeneous mass is obtained;
- pour concrete in an even layer of more than five centimeters;
- place a stiffening frame on the created base;
- reinforce the space in the formwork;
- fill the formwork with the rest of the concrete mass to the top (to give uniformity, the concrete can be compacted using a vibrator;
- The concrete must be thoroughly dried for several weeks.
Features of the in-house system
Internal sewerage must provide drainage in all bathhouses where there are sources of water, and drainage of liquid to the outside
Particular attention is paid to ensuring drainage from the floor of the steam room and shower, drainage from sinks and sinks, and removal of sewage from the toilet. Further, all drains of individual premises can be combined into one outlet or have individual connections
The internal part of the sewer system ends at the point of connection to the external drainage system. You can run the sewer system under the foundation or lead it outside through holes in the basement or foundation. The first option is preferable because it does not damage the structure and helps to bypass the freezing zone. However, this is only possible if the groundwater level is sufficiently deep.
How to remove moisture in a steam room
The most important room in the bathhouse is the steam room. Here, water spills on the floor when pouring over the body and steam condensation accumulates. The task is to collect and remove all moisture, preventing it from accumulating on the surface or underground.
To solve the drainage problem, the following options are used:
| Methods | Arrangement | pros |
| Drip floor. | The top floor covering is made of boards fixed with a gap through which water easily flows down. A concrete screed with a channel (tray) is made under the flooring to collect and drain liquid. The surface of the screed is sloped towards the channel, and the screed itself is sloped towards the outlet pipe. | This is one of the simplest options for organizing a drain. |
| A more complex method involves draining through a hole. | In this case, the concrete surface is made with a slope in the direction of the drain. A drain with a water seal is installed in it. Under the concrete screed, an inclined sewer pipe is laid, connected to an external drainage system. A water seal helps protect the room from sewer odors. The entire system is installed to ensure gravity flow of the liquid. | This scheme allows you to completely eliminate the possibility of water accumulation in the underground and avoid unpleasant odors. |
Drains play an important role in the internal sewerage system. It is best to use standard, ready-made devices that can have dry or wet type valves. A grill is installed on top of them, preventing debris from entering the pipe and creating an attractive appearance.
Arrangement of other premises
The washing (shower) room is different in that here the water flows in streams, and therefore the floor, as a rule, has a waterproof coating (tile, concrete). The water collection system is similar to the design considered, when the floor is sloped in the direction of the drain hole in which a drain with a shutter is installed. The sewer outlet of the toilet and sinks (sinks) is based on a standard design, similar to that used in a house (apartment). A siphon is installed on the outlet pipe, providing a water seal to protect against odors from the sewer.
To equip the internal sewer system, standard metal or plastic pipes are used. A pipe with a diameter of 50 mm is usually used for one drain, and a pipe with a diameter of 110 mm is used for a general drain under the floor. Adapters 50 by 110 mm and tee couplings for lateral outlets allow them to be connected to each other.
Specifics of installation of internal sewerage
The underground drainage system inside the building is carried out at the stage of erecting the bathhouse foundation. It is possible to install pipes with outlets on drainage drains.
Installation is carried out in the following order.
- Preparing a trench for a pipe with digging under the foundation strip.
- Backfilling the cushion with sand and crushed stone at least 20 cm thick to form the required slope.
- Installation and connection of pipes leading outside under the foundation. If a pipe is intended to pass through it, then a corresponding hole is formed in the concrete in advance.
- Insulation of pipes and backfilling with soil, securely fixing them in the desired position.
- Pouring a concrete screed to form a slope towards the drain.
- Installation of a drain with a water seal. The drain grate must be installed strictly at the level of the floor covering. No steps allowed.
Creating waterproofing for the floor
It is necessary to think about installing waterproofing at the first stage of building a bathhouse with your own hands. After all, the building needs good protection from moisture both outside and inside. You need to be especially careful when deciding to create waterproofing when it comes to a bathhouse.
The drain must be located in the lowest place, so we can achieve timely elimination of accumulated water. To do this, the floor should be slightly “beveled” in one direction; this can be done by pouring a cement screed. Next, the screed must be leveled, while maintaining a slight slope.
Before applying the waterproofing solution, the concrete floor should be thoroughly cleaned of various contaminants and dust, so treat its surface with a primer. As soon as the primer dries, you need to apply a waterproofing agent (construction mixture) on top of it.
There is another way to waterproof floors with your own hands - this is pasting. The first step is to prepare the concrete floor, apply several layers of mastic on it, on which a roll insulator is laid. The finishing material is placed or laid on a roll insulator.
Now you know how to properly make bathhouse floors with your own hands.
Answers to frequently asked questions when installing a floor in a bathhouse with your own hands
- What is the best way to treat the flooring in a bathhouse? If your bathhouse has wooden flooring, then it is better not to treat it or paint it at all, so as not to deprive it of the ability to “breathe.” If you decide to paint or treat wood flooring, then get ready for the fact that you will have to breathe in chemicals. This poses a health hazard. It is best to sand the wood, so it will dry out much faster from water. Sooner or later, the wooden flooring in the bathhouse will still begin to rot, and nothing can be done about it.
- What is the height of the flooring in the bathhouse? It is best if you make the floor so that it is located about forty centimeters above the ground. If the bathhouse has natural flooring, then for this you will need boards whose thickness will range from twenty-five to thirty-eight millimeters. You can also install tongue and groove boards; their thickness should also be from twenty-five to thirty-eight millimeters. Don't forget to place the joists on the brick posts.
- What is the difference between the organization of flooring in a Russian bathhouse and other types of bathhouses? In fact, the flooring devices in a Russian bathhouse and in another are carried out in the same way. There are no fundamental differences here.
- What should a floor screed be made from? The screed can be done using ready-made mixtures or you can make the mixture yourself: grade 500 cement, liquid glass, water and sand, all the ingredients need to be mixed well, that’s all, the mixture for screeding the floor with your own hands is ready. If everything is done correctly, then your concrete floor will last a very long time.
- How to drain a bath? The issue of drainage organization should be resolved before the floor is laid. It is necessary to make a concrete floor so that a slight slope is formed towards the drain hole, then it is connected to a pipe through which the water will flow into the cesspool.
What type of sewage system to choose for a bathhouse
In private buildings and country cottages, central drainage in the form of a centralized sewer network is not often found. Perhaps in cottage villages, with development according to some kind of pre-approved (general) plan. Basically, all types of drainage of water used in the household are limited to a septic tank (factory-made or home-made), a more open version of it - a drain well or even a pit where the water goes thanks to loose soil - the latter option assumes a very low groundwater level and soft, almost frost-free water. , winter.
Criteria for choosing a sewer system
When choosing the optimal sewage system for a bathhouse for a particular area, we are guided by the following points:
- the absorbency of the soil in the area where the bathhouse is being built, the tendency for this soil to swell, the characteristics of its flowability;
- how far is the natural water intake located and how deep does the groundwater lie;
- intensity of use of the bathhouse and the associated possible volume of drainage;
- the difference in the height difference between the location of the bathhouse and the point of discharge into the well;
- budget.
Arrangement of a drain well or reservoir
To properly arrange a drain well, its location and operating principle must be figured out already at the bathhouse design stage. The main task in such a design is to correlate the location of the steam room and washing compartment with the well itself and with the slope of the drainage pipe through which the used water will drain.
For families who use the bathhouse only on weekends and in which the number of family members is 3-4 people, and the volume of the drainage pit may be small. So that the drain water had to be pumped out every 4-6 months. And taking into account the fact that during the washing process, detergents that are aggressive to the environment are used (no matter how they are positioned in advertising regarding safety), drainage wells for bathhouses must be as airtight as possible in the sense of the penetration of used water into the soil surrounding the well.
To do this, the walls of such tanks are concreted or waterproofed from the ground in some other way.
Drain well
Drain wells are considered to be reservoirs (pits) completely isolated from the environment. That is, the used water does not go anywhere, settles with solid fractions settling to the bottom, and only after some time is removed (pumped) out of the well.
They are made by digging a hole with earth-moving equipment; waterproofing is ensured by lowering concrete ends into the hole with a sealed bottom on the bottom and sealing the joints between the rings.
Drainage well
A drain option, but without a sealed bottom. Instead, a sand cushion is made at the lowest level, on top of which fine gravel is poured. It is installed in soils that do not have loamy and clay layers, which allows wastewater to undergo deep filtration. If there are such layers, then the drainage well on them serves as a storage well.
Such wells are constructed after assessing the absorption properties of the soil and its throughput per unit of time. the assessment is made after test drilling on the site selected for construction.
Pit under the steam room
If the bathhouse will be used exclusively in the summer (or during the period when the air temperature is in the range of +4⁰С and above), a simple pit located directly under the floor of the steam room can serve as a storage and disposal tank for drain water under the steam room.
Absorption pit
It is a hole dug in the ground in advance, even before the construction of the bathhouse, filled with at least 60% filter material (sand, crushed stone, ceramic or brick chips). Used only for columnar foundations. In winter, in the middle zone and to the north, operation is impossible - the pit freezes and will not absorb and filter drain water. Frequent use of a bathhouse with a steam room, in which such a pit serves as a container for draining water, is also not allowed, since it will not have time to absorb water.
Autonomous sewerage system with settling well
If it is impossible to connect the bathhouse to a centralized sewer system, the best and environmentally friendly option would be to create settling wells - single- or double-circuit.
In the first case, the inlet pipe-tee is located above the same drain (outlet) pipe-tee. In a double-circuit settling well, which ensures even greater purity of settled water, a bypass hole is made between the second and first chambers. Water purification occurs under the influence of gravity, due to which suspension and solid particles of dirty water gradually sink to the bottom and form sludge. And already in it, under the influence of anaerobic bacteria, the decomposition of harmful components into simple non-toxic compounds occurs, which are cleaned from the bottom of such wells at a certain frequency.
Video description
Wood floor construction (leaky)
Leaky floors are very simple in design. It won't be difficult for you to make them. We lay floor beams on the foundation, through roofing felt or similar waterproofing material. We install them strictly along the horizon, using a rope, hydraulic level or laser level. The best types of wood are coniferous species. The best option would be larch: it is not afraid of moisture and mold, and is well impregnated with resin. If it is not available, you can use pine or spruce.
Floor beams
Floor beams: Be sure to treat the beams with an antiseptic. Don't be lazy to do this twice, especially at the ends. The length of these beams should be such that there is a ventilation gap of 2-3 cm between the wall and this beam. Support beams are the basis of the floor, so their size should not be small. Beam with a section of 100 by 150 mm. - that's it. Where is 150 mm. - this is the height. Such a beam will hold the floor well, although it is recommended to place posts under the middle. They can be made from brick or concrete. Don't forget to make a sand and gravel compacted bedding underneath them.
Another option for beams under the floor: the use of a metal channel. This is what I usually do. I take the 16th channel (height 160 mm), drill holes and fix a wooden beam in it with self-tapping screws. Naturally, the cross-section of the timber is not as large as in the first option. After this, I secure this channel using anchors or welding (depending on the foundation). You no longer worry about whether the beams will rot or not.
Soil under the bathhouse: Okay, we've sorted out the floor beams, now let's look at the soil under the bathhouse. What is it like, does it pass water well or not? If it's good, then there's no problem. Just pour a gravel cushion of 20 centimeters. It will act as a kind of filter and all the water through it will go into the ground.
If the soil under the bathhouse is clayey, then we proceed as follows. We dig a kind of gutter and take it outside the bathhouse into a drainage hole or septic tank. We also fill it with a gravel cushion on top. That's it, we have prepared the soil for draining.
By the way, try to make sure that the distance between the ground and the underside of the beams is at least 30 centimeters. A ventilation gap is required here so that the floors below are ventilated. Let's move on to the next stage... Installation of a wooden floor is carried out in an elementary way: we take a planed edged board 30 mm thick, cut it to size (2-3 cm at a time, do not bring it to the wall) and lay it on the beams, having previously treated it with moisture protection. The boards can be screwed in several places with self-tapping screws. Leave gaps of 5 mm between the boards. The water will drain through them. That's why they call leaky floors because water flows through them.
Such floors have one big drawback - they cannot be insulated, which means they are very cold. There is no way to use them in winter, especially in Siberia or the North of the country, your feet will simply freeze. To prevent such bad cases from happening, other types of wooden floors are used - those that do not leak. Let's take a closer look at them.
Video description
Installation of a drainage well:
Ground filtration
This is an optimal drainage system that can be used as a general sewer system for the entire site. Wastewater is transported through inclined pipes into a septic tank, where it is purified and distributed through several pipelines. They take it to the garden to organize irrigation, or accumulate it in a prepared tank. In some designs, the filtered liquid is simply poured into the ground and absorbed.
Advantages of the soil system:
Flaws:
How to install the system step by step:
The gravel layer will need to be changed periodically (every 10-12 years)
Design is carried out not only from the side of the site, but also inside the bathhouse.
Materials and design
Before constructing a floor in a bathhouse, the owner must decide on the requirements that he places on it. Usually the choice has to be made between a concrete structure and wooden boards:
- A concrete foundation takes a long time and is expensive to lay. It is guaranteed to last more than 50 years, and with proper updating and proper operation there is no need to replace it;
- A wooden floor is easy and cheap to construct. It looks great, but needs to be replaced regularly, about every 5-10 years.
If wood is chosen as the material for the floor, you should decide on the type of construction. There is leaking and non-leaking. The first one is easier to arrange and looks more interesting. The boards laid in the bathhouse do not need to be nailed to the joists. They are installed at a distance of at least 3 mm from each other. When you need them to dry quickly, you can simply collect them and take them outside to dry. It is not necessary to construct boards with a gap in the dressing room. In other rooms, a gap of about 2 mm is left from the perimeter walls, creating a conventional frame around the floor, indicated by a small indentation.
Insulation scheme for a leaking floor with water drainage
Advantages and disadvantages of leaking floors
- the structure is built very quickly;
- non-leakage flooring is the leader among other types in terms of cheapness;
- a drainage hole is made in the underground for sewerage; no other systems need to be installed;
- waterproofing and thermal insulation are not laid;
- intended for temporary use, you cannot take a steam bath in winter (in cold climates);
- in order to be able to constantly operate a bathhouse with a leaking floor, it is necessary to build it in a warm climate;
- if you choose poorly hewn boards or place them unevenly, the floor will not be reliable;
- fragility.
Installation of a ground filtration system
A septic tank operating in autonomous mode is the main element of a soil filtration system. It simultaneously functions as both a sump tank and a well that distributes water. Pipes emanating from it distribute filtered water throughout the area.
There are ready-made septic tank designs, but they are quite easy to assemble with your own hands. Typically plastic or metal elements are used for this. A septic tank made of concrete or brick would also be an excellent choice.
In order to make a septic tank with your own hands, you will need concrete rings with a diameter of 1 m.
The process of making a septic tank is not complicated, but a certain sequence should be followed:
- First, a hole 2-3 m deep is dug. The distance from the wall of the bathhouse should be at least 1.5 meters;
- Next, you need to pour a layer of sand at the bottom of the pit, as well as a layer of natural filtrate. Broken brick is suitable as a filtrate;
- Concrete rings are lowered into the pit.
The finished tank is immersed in the ground to a depth of 1.3-2.7 m. Next, a sewer pipe is connected to it, which should be below the soil freezing level.
Next, the pipes are prepared. Usually their diameter does not exceed 10-12 cm. Ordinary sewer pipes can also be used as drainage pipes; you just need to make holes in them.
Important! It is necessary to ensure that the diameter of the holes gradually increases from the beginning of the pipe to its end. This will ensure a uniform outflow of moisture. In order to properly set up a ground filtration system, you must follow the basic rules:
In order to properly set up a ground filtration system, you must follow the basic rules:
- Each drainage pipe should not be longer than 0.25 m;
- Pipes must be laid below the freezing depth of the soil;
- Drains should be located at a distance of 1.5-1.6 m from each other;
- The trench for laying the pipe must be at least 0.5 m wide.
Draining a bathhouse with your own hands - a step-by-step guide:
- First of all, trenches are dug with a slope of 1.5-2 degrees. This is done to ensure that the pipes being laid are on a slope;
- Next, a base for the pipe is laid at the bottom of the trench. It is different for each soil type. For example, for clay soil, sand 10 cm thick is laid at the bottom of the trench, and a layer of gravel of the same thickness is placed on top;
- After the pipe has been laid, it should also be covered with a layer of gravel on top;
- A ventilation pipe is installed at the end of the drain, the height of which does not exceed 0.5-1 m. A protective fungus is installed on top of it to prevent debris from getting into the pipe.
Standard design
In the steam room, the floor should rise slightly compared to the zero level. You can make it higher by only 8-10 cm, and the desired effect will already be achieved - maintaining a high temperature in the room is ensured. In the washing department the floor is made below the finishing level. This improvement will help prevent excess water from entering the remaining compartments of the bath.
When installing the floor in a bathhouse, it is important to follow the consistent laying of materials
- The most common floor design in a bathhouse (layers from top to bottom).
- Finish coating.
- Wood or concrete (final row).
- Small air space.
- Lining (small layer).
- Insulating layers (hydro- and thermal insulation is required, sometimes noise insulation is added separately if there are industries, clubs, or other establishments that are a source of noise near the bathhouse).
- Lathing.
- Insulating layers (in cold winters to protect the floor structure from cold or moisture).
- Rough floor.
- Wooden beams for sheathing.
- Waterproofing (laid on the ground).
The order of laying materials when installing the floor
Dimensions and location
There are many variations on the theme of a window in a steam room: the size and location depend on the goals, preferences and even “beliefs” of the owner.
Number of windows
There is an option to make not one, but two windows in the steam room, but both are small. The first, which can be called the main one, is the one discussed above - a small window where you can stick your head out to cool down a little. And the second, even smaller in size, can be made next to the shelf - to improve the ventilation of this particular area, which is usually stagnant for moisture.
Here is another option for placing a window above the shelf
Number of glasses
There is no reason to install single glass. Firstly, even heat-resistant ones will be subject to strong temperature changes in winter. Double or double glazing is separated by the already mentioned layer of air. Due to this, the difference is significantly reduced.
RECOMMENDATION! The first glass can be made tempered - it is not afraid of high temperatures (however, in real Belarus there are none), and if it breaks, it will break into fragments with a non-sharp edge. The outer glass can be made mirrored with one-way visibility.
For those who are thinking about the number of packages, we can say this: look at how cold the winters are in your region; if the temperature is below -30, then there will be no extra cameras. The second point is how much you are willing to pay for the window. By increasing the number of packages, you increase the cost. Add tempered glass, and everything will become clear whether you want such a window or not.
Should they open and in which direction?
Fixed windows (without the ability to open) are installed solely for the sake of light and space. We believe that they are not very profitable in a bathhouse. It's still better when the windows open.
REMEMBER! Regarding the side: the door from the steam room always opens outward, and the windows always open inward. (Although we also came across categorical statements that the window should open outward.)
Geometric shape
Here the owner has complete freedom of choice - squares and rectangles, oriented vertically and horizontally, with different ratios of length and width. For the sake of beauty, you can even install a round window.
There are no restrictions or rules associated with the form. Everything is purely at your discretion.
Dimensions
A window whose area is calculated using the following formulas is considered optimal:
However, there is no prohibition on making larger windows. For example, when choosing a size, some base it on the possibility of using the window in the steam room as an emergency exit in case of fire. Then everyone determines the dimensions of the person crawling through.
A small window next to the shelf, easy to open and ventilate
Location
Usually a window in a steam room is made above the top shelf. It can be located either in the middle above the shelf, or closer to the head, or even on the wall where the end of the shelf rests (that is, directly behind the head of the person being steamed).
Well, since it is above the shelf, then you need to know how the top shelf itself is counted. You can count from the ceiling: down 210 cm - this is the level of the shelf for the feet of the soarer, and from it up 75-80 cm - the height of the upper shelf. In other words, 130-135 cm from the ceiling.
Consequently, the window is made a little higher (= a little closer to the ceiling).
Another option: align the top edge of the window with the height of the top edge of the door to the steam room.
Regarding the door and stove: since it is recommended to place the door and stove on the same wall, the window is located on the opposite side of both. This is good for burst ventilation. It is also possible to place it on a perpendicular wall relative to the one where the door and stove are.
Orientation by cardinal directions
There are no strict recommendations in this regard. In practical terms, it is usually recommended to orient the bathhouse with the entrance door to the south. And if you don’t want to change the front door too quickly, then it should be positioned so that it doesn’t rain, but this can easily be solved with a canopy or veranda.
So it depends on the project where the outer wall of the steam room will go. But if you have a choice and a desire to admire the setting sun, then design it on the western side. However, this is pure aesthetics.
Adviсe
In order for the process of installing the floor in the bathhouse to go “without a hitch,” experts recommend following a number of instructions.
- For insulation, you should choose materials that are least responsive to elevated temperatures and humidity. That is, it is better to simultaneously organize not only heat, but also hydro and vapor barrier.
- The bars should be laid correctly so that the liquid can flow down along the joint line.
- If there is a possibility that the space under the floor will fill with moisture, it is necessary to create a gap from the internal backfill on top of the soil to the wooden base. Its size reaches 15 centimeters.
- Fiberglass underlays on the waterproofing floor will make movement on the floor inaudible. They are produced in the form of a thick tape, which is extremely convenient.
Wooden materials must be treated with an antiseptic. It is advisable to use a composition that can destroy all microorganisms and prevent damage to boards and beams. In addition, all wooden parts are pre-dried or purchased already in this form.
If this is not done, the material will curl during use, cracks will appear and the shelf life of the floor will be significantly reduced. If it is necessary to install ventilation, it is important to organize its correct output. Typically, a separate pipe follows the path along the wall into the attic. If the foundation is monolithic, then it is recommended to make holes that will connect the ventilation gaps with the air outside. If the steam room area is large, then one drain will not cope with all the water.
It will be necessary to think about several so that the material does not rot too quickly. Dry floors not only eliminate moisture, but also lead to heat loss. In this situation, it is necessary to insulate the foundation and base of the log house, and place the sauna stove below the floor level.
If the foundation is monolithic, then it is recommended to make holes that will connect the ventilation gaps with the air outside. If the steam room area is large, then one drain will not cope with all the water. It will be necessary to think about several so that the material does not rot too quickly. Dry floors not only eliminate moisture, but also lead to heat loss. In this situation, it is necessary to insulate the foundation and base of the log house, and place the sauna stove below the floor level.
- The floor in the steam room rises relative to ground level. And in a separate washing room, on the contrary, it should be lower than in other rooms.
- It is necessary to leave a ventilation gap under the floor. It can be installed at a height of 10–15 cm.
- It is worth installing the finished floor so that there is an angle of inclination in the direction that is directed along the length of the boards, and not in width. This will help extend the service life of the products, since the direction of water is also one of the reasons in the rotting process.
- To prevent the board from bursting when screwing in the screw, you need to work at an angle of 45 degrees.
- Under no circumstances should you use linoleum, laminate or other synthetic coverings in bathhouses, even in the rest room. In any case, such materials will begin to heat up and release substances that can poison the body. In the dressing room, such a covering should be placed on top of a special flooring that allows the floors to dry.
- The selected boards must be edged or tongue-and-groove. Their thickness varies from 25 to 30 mm.
Questions and answers
Let's look at a few questions that inexperienced users most often ask:
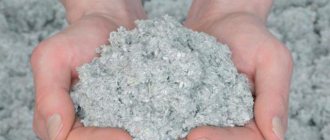
What material is best to use when laying the filter layer in the pit?
Experienced craftsmen recommend making a two-layer backfill. Expanded clay, crushed stone or brick chips are laid underneath. A layer of sand is poured on top. It will separate mucus and suspended fatty particles and slow down siltation of the bottom and walls of the pit. If necessary, the top layer of backfill can be replaced, increasing the overall service life of the filter media.
Is it possible to pour wastewater into a sewer septic tank?
Yes, you can. However, we must take into account that the volume of wastewater from the house is quite large. If waste water from the bathhouse is added to it, the filling of the septic tank will speed up. If its design does not provide for a full waste disposal cycle, it will have to be pumped out more often.
Which is better, a filtration well or a filtration field?
The filtration field takes up a lot of space, but retains its working properties for a long time and does not silt. A filtration well is practically a point element, but its operation is only possible in the presence of sandy or sandy loam soil, and the bottom backfill layer quickly becomes covered with mucus and silts up. If the area of the site is large enough, select a filter field. For ordinary 6 acres, you can only use a well.
Is it possible to dump wastewater not into a container, but to discharge it into a ravine or ditch?
It is possible if their number is not too large and does not create noticeable damage to the surrounding environment. However, just in case, this issue should be discussed with local authorities so that no claims or administrative sanctions arise later.
Is it possible to connect the drains from the bathhouse to the storm sewer?
Yes, you can. However, it is not available in all areas, as well as in country or cottage villages. In addition, storm sewers require frequent cleaning and maintenance, which puts the bathhouse drainage system at risk of periodic temporary failure.
Options for draining water from a bath
Drain pit from a barrel
But not everyone has a central sewer collector or a ditch in their yard nearby, especially if the bathhouse will be used in winter. In this case, you can make a drain hole. The work is physically difficult, although no one forbids you to hire equipment for these purposes.
It is dug at a distance of 3-4 meters from the foundation of the bathhouse. The depth should be 50-60 cm greater than the freezing height of the soil. The volume is selected depending on the size of the bathhouse and the number of people washing in it.
When organizing this type of sewerage system, the depth of groundwater should be taken into account. If they come close to the surface, then there can be no talk of any drain hole. It will always be filled with water, which means that draining the bath will not work normally. In this case, another option is used, but more on that later.
Having dug a hole of the required size, drainage material is poured onto its bottom. Expanded clay, crushed gravel, and crushed brick are used here. These “stones” filter well and allow water to pass through them.
In case of loose soil, it is necessary to strengthen the walls of the pit. It is possible, and even reasonable, to use geotextiles. A simple and quick way is to place concrete rings, or perforated ones, in a dug pit. Thus, having strengthened the walls of the pit, we already get a drainage well, which copes well with its drainage function.
The walls are also strengthened by laying brickwork along them. This is a long and not always practical process. Another option is to install formwork and concrete the walls, but reinforcement must be used. The concrete method is faster, but still labor-intensive. Using an empty iron barrel is a quick and practical option. You just need to cut out the bottom and punch small holes on the side.
But what if you have clayey, swampy soils on your site or the groundwater does not lie deep? Here you will have to fork out money and install a septic tank. A septic tank is a large reservoir that is buried deep in the ground, and as it fills, it is pumped out with a sewer truck (here is a detailed article for you). This is not a cheap option, but on marshy and clayey soils this is the most optimal method.
To avoid freezing in winter, you should not walk on such drainage wells and trample snow. It is best, on the contrary, to take a shovel and cover the well itself and the surrounding area with a blanket of snow.
Drain pipe method
In general, this method is similar to the previous ones and differs only in the type of materials and slight differences in the design of the septic tank. The longer pipe length is important here . At the same time, it is important to install the pipe itself at the stage of pouring the foundation with a slope towards the area for building a sump.
The sump is made on the basis of concrete rings that make up the walls of the pit. The bottom, in turn, should not be covered with anything for better absorption of waste. The pipe is laid without corners or bends, and the diameter of the pipe is taken to be the maximum possible among sewer pipes for domestic waste. When installing a pipe, it is important to insulate it , since when the soil freezes, the water in the pipe can freeze and deform the plastic, at best.