What is the difficulty of insulating the floor in a bathhouse?
Very often, a bathhouse is a separate house in the country. It’s rare for anyone to maintain above-zero temperatures in winter. More often it is “heated” only for use and this is the difficulty. For insulation, you need a material that can withstand frost/defrost and is not afraid of moisture. After all, if we are talking about a Russian bath, and not a sauna, then the humidity in the steam room will be close to 90%. In other rooms, perhaps lower, but also far from normal. So, there are two criteria for choosing insulation: it should not be afraid of periodic heating, and it should also tolerate humidity normally or not absorb moisture at all.
Typically, a bathhouse and a change house often appear on the site first. And only then does the construction of the house begin
Another option to choose from is security. Baths are usually heated by wood stoves, and in most cases the buildings themselves are made of wood. The combination of open fire and wood is always dangerous. Therefore, it is advisable to insulate with non-flammable material. But there are no such things, and therefore they try to choose one that has a high ignition temperature, does not smoke when burning, and does not spread combustion.
How and with what to insulate the floor in a bathhouse. Choosing the best options
There are also requirements for floor construction. We don’t heat a bathhouse every day, even if it is in the yard, and therefore the design must be thought out so that during “downtime” the materials are dried. To do this, you need a working and well-thought-out ventilation system, a blown/ventilated subfloor. Otherwise, literally in a couple of years everything will have to be redone.
Practical advice
Experienced craftsmen have formulated several tips for those who decide to insulate a steam room with their own hands:
Window design. To reduce heat loss from windows, it is better to make them small and carefully insulate the opening and slopes. In addition, they need to be placed lower so that the hottest air does not touch them. At the same time, condensation on the glass will be reduced. Multi-chamber metal-plastic windows should be installed to reduce heat loss through the frame. The doorway should be low, with a high threshold. This will reduce the outflow of warm air through the upper part and the influx of cold air through the lower part of the opening. You should select the furnace power corresponding to the area of the steam room
It is also important to place a sufficient amount of stones in the heater. To speed up heating and increase heat transfer, stones are placed in special wire mesh around the chimney or firebox body.
A properly insulated steam room warms up quickly and retains heat for a long time. It is cozy and comfortable, fuel is consumed economically. If a home craftsman has the skills of general construction work and follows the recommendations given, he can easily insulate the steam room with his own hands.
Insulation materials
In general, the floor in a bathhouse can be insulated with any insulation material. There are rooms with different operating modes and the floor structure may be different. Let's look at the most common materials that can be used to insulate a bath.
- Foam glass (foam glass). Not to say that it is widespread, but it is an ideal option in all respects for any room. Foam glass does not get wet, is not afraid of moisture, frost, can withstand temperatures up to 100°C without problems, does not emit anything, does not burn, does not support combustion. It, like ordinary glass, melts at a very high temperature and does not emit anything. It has very good thermal insulation characteristics; a small layer is needed to achieve the required degree of protection. The material has low vapor permeability and this must be kept in mind when choosing a floor design. There is only one drawback - the price. Foam glass comes in the form of blocks, granules, and you can also find scraps. The most expensive blocks are (about $350 per cube), the cheapest are scraps (about $40 per cube). Blocks can be placed between the logs, granules and trimmings can be used as backfill. This is a much more effective (but also more expensive) replacement for expanded clay.
New technologies bring new materials. For example, foam glass is almost ideal as insulation - Expanded polystyrene (not foam). The best option is extruded polystyrene foam. It can be placed in the screed or between the joists. It has excellent thermal insulation properties and does not absorb water (or rather, it does, but in a very small amount). Up to a temperature of 95°C it is environmentally safe, but above that it begins to release not the most beneficial substances. In relation to floor insulation in a bathhouse, it can be installed in any room. The floor is not walls and it simply has no chance of heating above 40°C. But polystyrene foam is flammable and vapor-proof. That is, good ventilation is needed.
How to insulate floors in a bathhouse and with what depends on how you are going to make them - Mineral wool.
- Stone wool can only be used in dry rooms. She will work great here. It is better to insulate the floor in a bathhouse using a different material. If you want mineral wool, look at glass wool. The humidity in the bathhouse is still high. If wet stone wool freezes, it does not restore its properties after freezing, but immediately loses them by 40%. So after two frosts there will be nothing left. Just rubbish that doesn't affect anything at all.
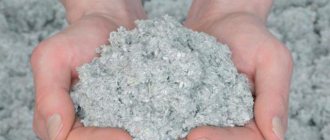
Glass wool is very itchy, but is not afraid of moisture, which is very important in a bathhouse
Working with glass wool is difficult and difficult. It pricks even through overalls. But she is not afraid of getting wet. It also slightly reduces its properties when wet, but after drying the characteristics remain almost unchanged.
From old memory, many still remember such insulation as expanded clay. Until there was an alternative, it could still be considered insulation. Now, to replace a layer of mineral wool with a thickness of, for example, 8 cm, you need to pour 40 cm of expanded clay. Yes, it is cheap, but it is afraid of water, which makes it completely unattractive.
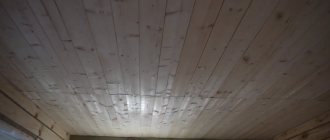
Attention to the ceiling of the room
Any insulation of a sauna steam room begins from the ceiling surface. For it, you need to take materials twice as thick as for the walls - after all, this is where all the hot air and steam rises. In addition, if the built bathhouse will be used like a real Russian one, that is, with thick, humid steam, it is under no circumstances possible to insulate the ceiling of the steam room using the same technology as for saunas. After all, in such a steam room the steam will begin to leave, and there will not be much left for bath procedures.
- Step 1. The ceiling needs to be covered with rolled paper so that the joints have a generous overlap.
- Step 2. Now the paper is secured with 5x5 cm bars, between which insulating materials are mounted.
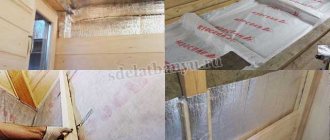
Step 3. At this stage you will already need foil - it will cover the insulator
The main thing is that it has 100% solidity - this is important. And it needs to be secured with a special aluminum adhesive tape, which can be purchased today at any hardware store.
Moreover, such tape is often sold immediately with foil for insulation, which is very convenient. True, among such tapes there are both high-quality and low-quality ones. Checking this is quite simple - you just need to stick a piece of tape to a piece of foil right in the store and try to tear it off. If it turns out to be ordinary tape, it won’t work.
Step 4. The extreme sections and all joints must be especially carefully secured - after all, in the future, the foil is precisely intended to contain steam and reflect heat. After all, if moisture penetrates into the insulation for a steam room through some gap in the ceiling, the consequences will be quite unpleasant
Therefore, it is important to check everything thoroughly for leaks later. Instead of aluminum foil, it is allowed to use wax paper and thick cardboard, pre-impregnated with drying oil.
But it is necessary to lay a layer of clay on such a vapor barrier - and only then proceed to the direct insulation of the ceiling. Step 5. The foil should be secured with small bars - preferably 2x3 cm, in order to maintain good air exchange and then mount the decorative trim you like on the bars themselves.
If the insulation turns out to be dense enough, you can still use a cement-sand screed on it for strength. If not, lay down fiberboard sheets, or cover with windproof film, and then lay the floor boards on it
But when insulating the ceiling of a steam room, special attention should be paid to the passage of the chimney - heat should not escape through it, and the ceiling should not heat up in this area
Bath floor pie
There are two types of rooms in the bathhouse. The first - with high humidity and large quantities of water - is a steam room and shower. The second is with conditions that can be called “normal”. This is usually the locker room and rest room. Sometimes these are two rooms, sometimes one. There may also be a firebox, but more often the stove is heated from the rest room, and its rear part opens into the steam room.
There is no right solution. Everyone chooses their own. About a dozen options
How to make a floor in the “dry rooms” of a bathhouse
The locker room and rest room have a regular insulated floor. But “regular” gender can also be different. In the sense that there are several ways to arrange it. What they usually agree on is that these rooms have wooden floors. Still, it is more comfortable and the room becomes warmer faster. In this case, the floor structure itself may be different:
- The floor is on the ground with concrete preparation and the floor is on joists. This option is good on soils with high humidity, as it allows for high-quality waterproofing of the floor. But you need to think about frost heaving so that the slab doesn’t “bruise.”
Still, wooden floors feel the warmest - Wooden insulated floor with joists. This means that the logs rest on the foundation or its frame. If necessary, fold the posts that support the beam between the support points. A cheaper option, which, however, retains heat well with proper selection of materials.
If you don’t want to make a wooden floor in the bathhouse, then make a standard concrete floor pie on the ground. But this option is more suitable for baths with constant heating. It is impossible to warm up a concrete slab quickly. In this case, you can consider electric floor heating. To prevent your feet from getting cold, you can lay downed ladders on the floor.
Water drainage must be provided in the washing room/shower room and in the steam room. These are so-called “wet” rooms and their floor pattern is different. And the device is also different.
Required tools and accessories
Tool for insulating concrete floors and leveling screeds
To carry out thermal insulation work you will need:
- tape measure and pencil;
- steel square and level;
- construction knife and hacksaw;
- screwdriver and drill;
- electric plane;
- container for water and cement;
- rule and trowel;
- construction mixer or mixer attachment for a drill;
- galvanized screws.
Depending on the technology used and the type of insulated floor, additional material may be required, which is calculated individually for each room.
Shower floors in the steam room
Let's start with the fact that the floor in the steam room is made only of wood. The tile, firstly, has a high heat capacity. By the time it warms up, it will be time to go home. Secondly, it can get so hot that even felt boots won’t save you. So, the floor in the steam room is wooden, but it can be torrential or not. Torrential is when the finished flooring of boards is deliberately made to be cracked. The board is laid with a gap of 5 mm or so. And under the flooring there is a rough floor, with a slope towards the drain, and the drain through the ladder leads into a drain hole or sewer.
In the washroom/shower room and in the steam room, you can make a leaky/spillable floor
With such a floor arrangement, you can pour water into the steam room. Even in bathhouses that are not heated in winter, until everything cools down it will dry out. True, if there is ventilation and it works well. To be more confident, you can not nail down the flooring, but make wooden ladders, which after the bath can be taken outside or into a more ventilated room to dry.
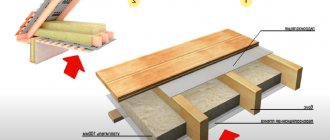
Insulation: how to lay materials
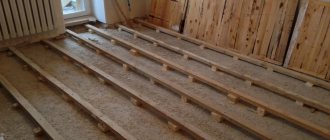
But what about insulating the floor in a bathhouse with such a device? And the floor under the bottom layer needs to be insulated. If as in the picture (the floor is along the joists), then nail the cranial bars. They can be a support for stacked polystyrene foam or foam glass blocks. The distance between the insulation and the timber is filled with foam.
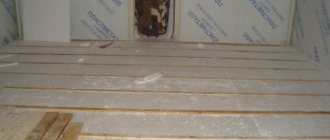
For loose types of insulation, pieces of sheet moisture-resistant material (OSB or moisture-resistant plywood) are laid on the skull blocks. Expanded clay, granulated foam glass or its cuttings are poured into the resulting “troughs”.
The leaking floor in the bathhouse consists of two “layers”. The first one from the bottom is waterproof with a built-in drain/drain for water. The second is wooden slotted flooring
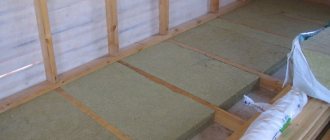
To lay mineral wool slabs between joists you can:
- pull a cord or wire or strong synthetic twine “snake”;
- line it with a net (albeit a plastic one);
- stuff thin slats.
Mineral wool slabs are laid at random. Their width should be slightly larger than the width of the trough - by 2-3 cm. Then the material holds well, and cracks do not form during “shrinkage”.
Protection of insulation from soil moisture
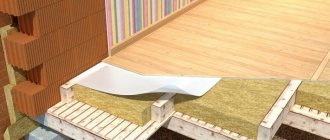
When using mineral wool, expanded clay or foam glass granules, the insulation must be protected from moisture in the soil. It is always there and there is always evaporation. At the same time, no matter how hard you try, some of the moist air will get from the premises into the insulation. And this moisture must be removed. Where? Usually in the underground, in which ventilation holes (vents) are made. That is, if the floor was insulated with mineral wool, expanded clay, broken or granulated foam glass, we nail a membrane from below on the subfloor side.
To maintain the normal condition of the insulation, membranes are needed
The membrane must have one-sided vapor conductivity. It should release steam from the insulation, but not let it in. There are such membranes. They are nailed using clamping strips. The holes that are formed in this case are additionally sealed. Only in combination with protection from moisture, the insulation of the floor in the bathhouse will be durable. Otherwise, you will get problems in a year.
When using slabs made of foam glass or expanded polystyrene, additional protection from moisture is not needed. Both materials do not absorb moisture and practically do not conduct steam.
Non-spillable floor in the steam room
The non-spillable floor in the steam room is made of tongue-and-groove boards and has an organized drain. The boards are laid with a slope towards the drain. The floor drain is a concrete or metal (less commonly) gutter. The slope of the board is small - 1 cm per meter. Do not need anymore.
How are non-leakage floors constructed in a bathhouse - in a steam room or shower/wash room
That is, structurally it is an ordinary wooden floor. Except that you have to make a drain. It is done either at the wall opposite the shelf, or as in the picture above, in the middle.
The insulation of the floor in a bathhouse of this design is similar to that described above. Except that:
- Thermal insulation material must be protected from moisture, which still seeps through the wooden flooring. But you also need to remove the moisture that has already got there. So again we need a membrane with one-way conductivity. It is placed so that moisture is not allowed into the insulation, but vapor is released. Below, by the way, under the insulation, if your soil is open and concrete preparation has not been made with waterproofing laid out, a membrane is also needed. It is nailed as described above.
How to make a drain in a steam room with a wooden floor - There must be an air gap between the top edge of the insulating material and the flooring. It is needed so that the moisture that settles on the membrane can evaporate. A ventilation gap is provided with wooden slats (thickness of at least 20 mm), which are placed across the joists.
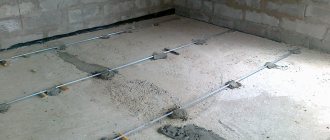
How to insulate floors in a bathhouse and with what: floor insulation scheme by joists
In general, the cake is standard. That is, we insulate the floor in the bathhouse according to the usual scheme. The whole difference is in the thickness of the insulation and the presence of a gutter for drainage. And the thickness of the insulation in the steam room is taken taking into account the fact that it needs to be heated as quickly as possible. Therefore, they usually take 50% more layers than for ordinary rooms.
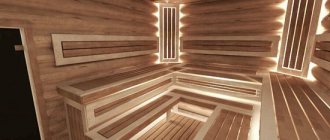
We insulate the steam room
The steam room in the bathhouse requires special attention. After all, it is here that the highest level of moisture and elevated temperature are observed during operation. Therefore, insulation, waterproofing and finishing of this room must be done with special materials.
The ceiling of the steam room is subject to maximum heating during operation (up to 150 °C). Therefore, the question of how to insulate the ceiling of a bathhouse is solved by using materials with high heat resistance.
If there is no attic or attic, insulation is installed in the following order:
- wooden lattice made of timber on the ceiling boards;
- sheathing elements;
- thermal insulation;
- vapor barrier.
If there is an upper room - an attic, an attic - the insulation scheme looks slightly different. A layer of clay at least 2 cm thick is applied to the ceiling boards. This will ensure moisture retention. All small holes, joints between boards, etc. are filled with bulk material. Typically, expanded clay or wood chips are used for this. The thickness of this layer is at least 20 cm.
https://youtube.com/watch?v=1BMehi4cwNU
A box-shaped base of rafter supports is mounted on the ceiling around the chimney. This will provide a gap of 20 cm between the pipe and the heat insulator, required by fire safety. A non-flammable heat insulator such as glass wool or mineral wool is placed inside the box. The main surface of the ceiling is covered with a layer of mineral heat insulator.
Tiled floor in the sink of a wooden bathhouse
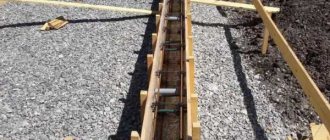
The tiles can be laid on a screed. In this case, you need to make a traditional concrete floor with concrete preparation. You just need to remember that you need to organize the flow of water. So immediately decide on the level of the finishing coating, set up a drain (drain), lay the pipes. Then you can start making the floor.
The technology, in fact, differs only at the very end - it is necessary to form a slope towards the ladder. And so, everything is the same. The bottom of the pit is compacted, crushed stone is laid out in layers, and compacted. Next, you can make a slab with a strength of M150 and a thickness of 3.5-4 cm, or pour crushed stone with lean concrete. The second option is more economical. Wait until the concrete reaches 50% strength and you can continue. To prepare, lay waterproofing and insulation on top. How to insulate the floor in a bathhouse in this case? Expanded polystyrene is optimal. It behaves normally in the screed, the layer is not too large, and is not afraid of moisture. In general, there is no better one.
How to make a tiled floor in a washroom
We lay expanded polystyrene in two layers. The slabs of the second layer overlap the seams of the first. This is for better thermal insulation. The first layer slabs can be attached to the base with long nails with plastic heads. The sheets are glued together with tape, you can foam the seams with foam, cut off the excess and lay out the second layer. You can simply lay it down, you can fix it with something. In principle, it will not go anywhere in a small washroom. We glue the seams of the second layer of polystyrene foam with tape. This is necessary so that the solution is not poured into the cracks - it will worsen the thermal insulation.
The floor in the shower also needs to be insulated
Next, spread a layer of PVC film on the polystyrene foam. This, again, is to prevent the solution from flowing. We roll out a damper tape around the perimeter of the room, lay out reinforcement or reinforcing mesh, set up beacons (don’t forget to form a slight slope towards the ladder) and fill in the screed. Once the concrete has hardened sufficiently, the tiles can be laid. But even with insulation, it will feel cold. There are two options - knock down the wooden gratings or use electric heating. Cable mats are ideal under the tiles. In a couple of hours, with normal thermal insulation, they will warm the floor.
Is it possible to lay tiles if the floor is made with joists? Quite. Again, there are options. You can lay plywood on the subfloor (don’t forget about the slope). Or maybe not plywood, but slate sheets. It is even preferable, since their thermal expansion with tiles is closer than with plywood. Then you can lay the tiles using a special tile adhesive. Special - this is for complex unstable foundations. It is expensive, but the cost of preparatory layers is less.
Still, in wet areas there is nothing better than tiles
You can also pour screed onto the plywood and lay tiles on it. But this makes sense if you are using water heating for the floor from heating or from a warm water tank. If it is electric, then it can be laid directly on plywood.
Preparation of perlite insulation
To mix pulverized sand, you need to choose a room where all doors and windows can be closed while preparing the solution.
- The material is mixed in a deep container with water in a ratio of 2 to 1 until smooth.
- Slowly pour cement (grade M300 or higher) into the resulting solution, in a volume equal to half the measured amount of all components. An ordinary bucket can act as a measuring bucket.
- After this, you need to pour in an additional half bucket of water. Each step must be accompanied by sufficient mixing. At the finishing stage, another half liter of water is added.
The resulting solution should differ from conventional plastic mixtures intended for smoothing out unevenness and finishing. The output should be a crumbly plastic mixture, which can be used to cover the bottom layer of concrete screed with a continuous 10 cm layer. The perlite insulation layer hardens after 5-6 days, after which you can begin pouring the top finishing layer of cement mortar. The waterproofing layer and reinforcing mesh are laid optionally before the finishing leveling layer; they are not mandatory.