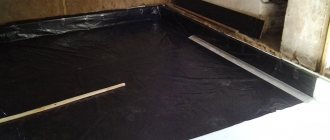
The initial coating with waterproofing material is carried out on the foundation of the bathhouse, and in the case of bathhouses made of timber, it is also desirable to cover the subfloor.
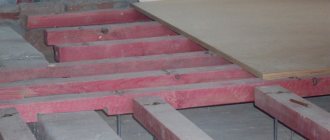
The subfloors of the bathhouse are covered with a special waterproofing membrane. A prerequisite is that along the entire perimeter of the floor the film is placed on the walls in an overlap of about 200 mm in height. If the base of the floor in the bathhouse is concrete, then it is better to make a cement-sand screed: first lay a reinforcing mesh on the floor, and then make a screed. After this, logs are installed on which sheets of plywood, OSB and boards are laid.
Seamless methods for waterproofing bath floors
The simplest method of waterproofing treatment is to use bitumen on the smooth surface of the base of the bathhouse. This method allows you to effectively protect the wood from moisture and significantly save on the waterproofing itself; however, there are also disadvantages, the main one of which is a very strong odor that will take an extremely long time to dissipate.
For waterproofing, it is necessary to use a non-degradable material, for example, a polymer membrane or roofing felt. Bitumen is applied with an overlap of about 100 - 200 mm on the walls to create a waterproof pan in case of flooding. In addition, this procedure is necessary if the walls are not waterproofed.
A possible option is the so-called seamless concrete waterproofing - one of the most effective methods, because it is used for such objects as water parks, swimming pools, public baths. Of course, for a small bathhouse, this method will be of little use and relatively expensive.
Waterproofing bathhouse floors with polymer-cement compounds with a high degree of adhesion (indicator of adhesion to the surface) performs well. This option is suitable for any room; self-leveling mixtures are often used to cover the floor “for finishing”; such materials themselves have some waterproofing effect, and also interact well with waterproofing coatings.
What is the flooring made of?
When arranging a wooden floor, great importance should be given to the choice of material from which the boards are made. The thickness of the board must be at least 30 mm, and the material can be any. Let's consider the most suitable options:
The most suitable for arranging a leaky floor in a bathhouse is oak. However, this is a rather rare and expensive material.
Quite a budget option, but due to the high resin content in wood, it is very susceptible to rotting, but the floor in the dressing room made from it is a good option.
3. Linden or aspen.
The wood is quite durable, but is more suitable for finishing walls and ceilings in a bathhouse.
The best option to create a steam room floor with your own hands. This type of wood is of good quality: when interacting with water, the resin polymerizes and due to this, wood rotting does not occur at all.
To create an optimal design, it is recommended to use one type of wood, so the logs should also be made of larch. You can determine the required amount of timber based on the thickness of the board used for the floor. With a standard thickness of 30 mm, the timber is laid at a distance of 55-60 cm from each other. It is worth adding a few more to the amount of timber obtained in this way (they will be needed when arranging the floor for the stove, for reinforcement).
Of course, larch is good in itself, but additional protection is never superfluous. How to treat the floor in a bathhouse so that it lasts as long as possible? For this purpose, there are many special impregnations created specifically to protect the floors in the bathhouse from moisture.
The cheapest is to treat all lumber twice with regular drying oil.
But you can also use more expensive options, it all depends on your choice. The only point is that treatment with any drug must be carried out 2 times.
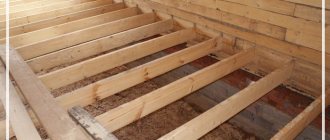
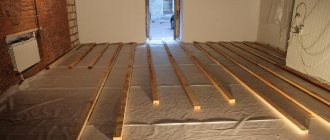
The beams are laid across the building, the first element is placed close to the wall, and the subsequent ones are placed at a distance of 50-60 cm from each other. At the installation site of the stove, the distance between the logs should be reduced to 20 cm. This is necessary in order to strengthen the installation site of the stove, since its total weight with the chimney can reach 500 kg. Before laying the flooring, the logs can be secured, since after laying the boards the structure will become unified and motionless.
Waterproofing the floor in a bathhouse with liquid glass
The process is very similar to previous technologies and is also one of the most economical. Liquid glass is similar in structure to epoxy resin or fused rubber; such a semi-liquid material forms a good waterproof layer.
After finishing the foundation and preparing the floor, pouring liquid glass completely waterproofs the wooden structures. In addition, the material has such properties as: antiseptic effect, fire protection and a high level of adhesion to the source material.
A relative disadvantage of liquid glass is that the durability of such waterproofing is approximately five years, and then the self-destruction of the insulating layer begins. Thus, the layer needs to be made quite thick, but you cannot pour a lot of solution at a time - it hardens very quickly and may harden unevenly.
Good waterproofing with liquid glass is applied in uniform strips; small amounts of solution can be poured onto a small area of the floor, which is very convenient to level. Then the next section is filled and so on. The finished waterproofing made of liquid glass must be at least 3-5 mm thick.
It is very important not to skip areas of pouring; due to the transparency of the solution, you may not see that somewhere there is less solution, and when everything hardens it will be very difficult to fix, treat the pouring carefully.
The frozen mass is covered with roofing felt or an adhesive-based membrane. The joints in the waterproofing are secured with construction tape. All wooden and timber structures must be treated with antiseptics and fire retardants.
The floors in a bathhouse made of timber, as in any other, can be made of ceramic tiles; in this case, it is better to use foil film for waterproofing. The film is laid with the reflective layer facing up. It is imperative to ensure that all coating joints are made with reserve.
In the washing room, it is important to arrange the floors in such a way that the water flows downhill into a special drain (drain grate). To do this, the subfloor boards are laid with a slope so that the water does not stagnate, but flows in one direction. A waterproof finishing floor covering is laid on top of the waterproofing.
High-quality construction of bathhouses from timber requires knowledge of a huge number of nuances, which are best left to professionals.
Any extensions to the house that will be used as a bathhouse or sauna need to be protected as much as possible, since the humidity there will constantly be increased.
Of course, if this is a summer option, then cracks are made in the floor boards to allow moisture to naturally escape.
But if this building is for use all year round, then you need to take seriously the insulation and waterproofing of the floor in the bathhouse.
Types by shape
Over the history of the construction industry and the specific problems arising from the action of water on buildings, many ways to solve the same problem have arisen. Some appeared a very long time ago, but have not lost their relevance in our time, some are the result of technological progress of our days.
In essence, all types of waterproofing can be very roughly divided into the following types:
- Containing bitumen;
- Containing cement;
- Products of new technologies without bitumen and cement.
This is not a typical classification, but it is clear. Because everyone else is silent about the fact that they vary precisely these three categories. Let me tell you from an atypical point of view.
Waterproofing containing bitumen
Bitumen is either natural asphalt (not to be confused with road surfaces) or an artificial product of petroleum refining. Bitumen is extremely diverse in composition , which depends on the place of extraction, and at the same time in properties, in particular, the melting point.
The most primitive method of waterproofing is to use clean bitumen, hard at normal temperatures . To do this, it must be melted and applied hot to the surface.
Being partly resins or being related to them, hot bitumen is a viscous liquid that is applied to horizontal and vertical surfaces using a brush, roller, or spatula.
In this form it can be used for waterproofing foundations, basements and roofs. Moreover, it can be used independently as a coating waterproofing, or as an element of adhesive waterproofing, where roll materials containing bitumen are glued to surfaces using heated clean bitumen.
At the same time, it has a number of disadvantages, due to which the progress of waterproofing products has begun. Bitumen melts in the sun, and in frost it cracks from the cold . The latter violates isolation and is unacceptable. May also peel off from the application surface.
To improve its properties, the following groups of substances are added to it :
- fillers;
- solvents;
- modifiers;
- plasticizers.
Either mineral substances - sand, talc, asbestos, various fibers, crushed stone, ash, etc., or organics - crushed pieces of rubber (rubber) as fillers
Solvents are more of thinners, which improve application possibilities. For this purpose the following is used:
- petrol;
- xylene;
- White Spirit;
- solvent;
- acetone.
Modifiers and plasticizers are a broad group of substances that improve certain properties of bitumen. These are rubbers of various compositions, epoxy resins, as well as thermoplastic elastomers (elastomers based on, for example, polypropylene, styrene-butadiene, urethane, etc.). In addition to them , antistatic agents, antiaging agents, emulsifiers, antiseptics and other components are added.
Liquid waterproofing for baths
The improved bitumen is called "mastic". All mastics are divided into those that require and those that do not require heating before application. All mastics are in a more or less liquid state.
Mastics are used for the same waterproofing purposes as pure bitumen, that is, to cover foundations and roofs, pipes and other structures. Use either independently or as an adhesive for rolled materials .
Hot mastics are most often simple bitumen with a mineral filler (asbestos, talc, etc.). That is, it turns into a liquid state only under the influence of heat.
Cold ones are already liquid, so there is little cooling to solidify them. Either the thinner must evaporate or a chemical reaction must occur.
Liquid waterproofing for a bath consists of three types of compositions:
- bitumen polymers;
- bitumen rubber;
- bitumen-rubber (bitumen-latex).
IMPORTANT! Bitumen rubber is always two-component! These are bitumen, filler, solvent, epoxy resin (first composition) and hardener (second composition). Don't confuse them with rubber/latex molds!
So, there are one-part ones with polymers or latex, there are two-part ones - with epoxy resin and requiring a hardener. All of them are liquid, bituminous, but they also differ in the form of application. They can be coated with structures that need waterproofing, they can be painted, they can be sprayed, cast, so let’s briefly talk about application methods.
Coating waterproofing is when a viscous composition is applied with a brush, roller, or spatula. Application: foundations and roofs.
Painting - differs from coating only in the thickness of the layer (for painting the thickness is up to 1 mm, for coating - up to 4 mm), because the compositions used are more liquid, more fluid. It is not durable and can be used indoors in damp areas.
Cast - the layer is even thicker (up to 25 mm horizontally and up to 50 mm vertically). For vertical pouring, sealed formwork is used. In a bathhouse, this type of waterproofing is not cost-effective.
Sprayed - when the liquid is supplied under pressure and sprayed over the surface to be treated. Special equipment required.
These types are applicable to bitumen-containing compositions; there are other types of application for other substances, which will be discussed later.
Waterproofing in cans
What kind of waterproofing can there be in cans? Only coating and painting, that is, liquid with different viscosities. In terms of composition, these are bitumen-polymers, bitumen-epoxy, bitumen-latex. ( All cement is supplied dry and diluted with water or plasticizer.)
Area of application: usually inside wet rooms, waterproofing under tiles. Sometimes suitable for foundations and basements. It is necessary to clarify the characteristics of “clamping” and “tearing”.
We do not advertise any of the manufacturers, so we’ll just say that all well-known companies have products in the “ready-made waterproofing” line.
Roll or sheet pasted or built-up waterproofing with bitumen
Since the coating coating is imperfect, a combined method of waterproofing has emerged, in which rolled or sheet material impregnated with bitumen is glued to the protected surface using mastics or pure bitumen.
Or there is enough bitumen in the base so that when heated it melts and the material is completely fused onto the protected surface.
Both are divided according to the base material. It could be:
- cardboard;
- fiberglass or fiberglass;
- polyester.
With cardboard - roofing felt (cardboard with layers of bitumen on the surface), rubemast (fused-on roofing felt, a thick layer of bitumen), glassine (roofing felt without topping), roofing felt (cardboard impregnated with bitumen).
On fabric - steklomast, stekloizol, etc.
All this is used on foundations and roofs.
Containing cement
ADVICE! In the most budget-friendly option, someone who would like to take advantage of the property of cement to make concrete waterproof can mix a solution with pure cement and apply it to fresh, but already hardened concrete. This is an old technique for “reinforcing” concrete.
Not only bitumen has long been used for waterproofing buildings, but also cement, the prototype of which was discovered by the ancient Romans.
The advice above is working, but it is worth taking into account the properties of inelastic cement-based waterproofing coatings.
Non-elastic coatings
Modern cement waterproofing can be inelastic or elastic. In the first case, it consists entirely of mineral components, in the second, polymers are added to them .
So, inelastic waterproofing is very good, it easily covers small cracks, but there is one important limitation:
ATTENTION! It can be used where no deformations are expected, there are no moving seams, moving cracks, in general, it is completely static. (The seams between blocks in a prefabricated foundation are considered movable.)
Of course, a properly installed foundation, the type of which is chosen according to the soil, will not experience excessive deformation, which will lead to its destruction, but still, to waterproof the foundation, it is better to use an elastic type of cement waterproofing material. Just in case. Although, if the foundation cracks, then the whole structure will be in trouble; there is no time for waterproofing, which we don’t wish for anyone. (Always consider the geology of the site.)
Another important point: you need to apply solid cement waterproofing from the side on which water pressure comes from the outside (that is, on the pressure), and if water has penetrated and is already being squeezed out of the material on which you applied this waterproofing, then it will be of no use - with reverse pressure (separation), it simply does not work at all. This means that covering the foundation with it from the outside can still be cost-effective, but from the inside it’s just a waste of money.
Elastic coatings
A more modern, more technologically advanced type of cement waterproofing of concrete. The polymer film is formed as a result of the evaporation of water or solvent.
IMPORTANT! On sale you will find one-component and two-component formulations. The former are less elastic than the latter.
In two-component formulations you are offered a dry part and a liquid part. In one-component ones, you yourself dilute the dry part with water according to the instructions. Of course, the more technologically advanced ingredients, the higher the cost.
By the way, elastic cement waterproofing is not intended for contact with drinking water, but inelastic waterproofing can be safely used in drinking tanks, wells, etc.
As for water transmission, elastic cement waterproofing holds water better “by pressing” (see above) than by “lifting”. But it still holds a little (several times less than with external water pressure) - specific numbers should be checked with the manufacturer or seller.
Differences between plaster and penetrating cementitious waterproofing compounds
You can distinguish between these and other compositions primarily by the thickness of the layer - this is an important point, because the effect of plastering and penetrating is different, and this is what affects the thickness of the layer.
So, penetrating cement waterproofing is applied in a thin layer, somewhere up to 1.5 mm, or even half as much. Plaster waterproofing is a type of coating; it is applied in a thick layer up to 25 mm thick (sometimes up to 50 mm, but with a reinforcing mesh). Do you feel the difference?
The fact is that the task of penetrating waterproofing is to be absorbed into the depths of the protected material and it is there, in the capillaries and cracks, to form microcrystals that close the passages for water. And plaster waterproofing prevents water on its own .
Externally, the solutions look similar - a gray mass based on Portland cement. However, you must know what exactly you want to buy. Because they can calmly tell you that plastering is also penetrating.
Injection
This is a complex type of waterproofing, which is used when everything has already begun to leak, that is, during repairs. It is done exclusively by professionals, and even the decision to use injection waterproofing must be made by a professional.
principle is as follows: a compound is supplied into the drilled holes, which penetrates into the ground from the back side of the wall and forms a barrier impenetrable to water there. You can also inject the composition into cracks to fill and heal them.
The composition can be based on cement, but new ones are made on the basis of various polymers.
Other
Here we go beyond bitumen and cement types of waterproofing. We consider it appropriate and interesting to briefly talk about bentonite waterproofing.
Installed bentonite waterproofing
Bentonite is one of the varieties of clay that has the property of greatly increasing its volume under the influence of water, but not letting it out. That is, water is absorbed to the limit into the bentonite itself, and then it is not allowed to pass through, forming a kind of “castle” of a gel-like substance.
Bentonite can be injected, or can be used in the form of mats in which the clay layer is covered on both sides with geotextile, which allows the mats to be rolled into rolls and this clay to be fixed to vertical surfaces on site. This is done using metal fasteners.
Features of penetrating waterproofing
The simplest option would be to treat with bitumen mastic applied to a smooth surface, which protects well from moisture, but leaves a long-lasting odor in the room. If the bathhouse or sauna is large in area, then you can make concrete waterproofing. Processing using polymer-cement materials is well suited. They level the floor and provide seamless protection that better protects against moisture penetration.
Preparatory work
The composition itself does not require preparation; it only needs to be thoroughly mixed using a construction mixer. The main preparatory work is related to the preparation of the surface to be treated.
The cement floor is impregnated only at temperatures above +5 C. When using part of the solution, you need to keep the remaining composition in a tightly closed container. During the impregnation of the floor area, it is necessary to prevent the formation of puddles. In addition, when planning to cover the floor, you must first prepare the floor surface. Liquid glass on the floor can only be applied to a previously cleaned and dry surface.
What tools are needed
To carry out this work you will need the following tools:
Preparing the floor surface
In order for the filling of the floor surface to turn out to be of high quality, the following preparatory work must be carried out: clean the base from dirt, remove grease stains, rust, get rid of loose pieces of old cement, glue or paint using hard brushes, a grinder or chemicals. Then the dust is removed with a vacuum cleaner.
After cleaning, you can examine and eliminate defects such as chips and cracks. Next, the surface is puttied, leveled and primed.
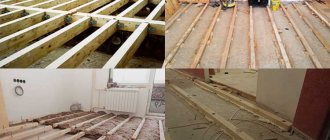
The nuances of waterproofing a wooden floor in a bathhouse
Wood is subject to a large number of destructive processes that can damage its structure. Therefore, the floor in the bathhouse must be properly protected from rotting and fungus. The boards need to be impregnated with special protective substances and have good waterproofing:
• before laying the floor, wooden logs must be processed;
• the subfloor must have drainage and sheathing;
• a film hydrobarrier is applied to the timber laid on the base;
• expanded clay should be placed between the wood;
• After this, the subfloor is laid and its finishing is completed.
Screed arrangement
When arranging a screed in a bathhouse, you need to provide a gap of at least 40 cm between the boards and the screed itself. It is necessary for floor ventilation, provided there are closable vents in the corners of the foundation.
The screed body itself consists of:
What to do with the slope? It must be directed towards the location of the hole for draining wastewater into the septic tank. As a percentage, it should be no more than 30%, i.e. 3 cm per 1 m of floor. It can be calculated that in a washing compartment with a length of 4 m, the slope will be 12 cm. For more accurate measurements, you should use markings applied in the corners of the foundation in increments of 1 cm. For convenience, for this purpose, you can purchase ordinary measuring tapes and stick them in the corners.
After the screed, the logs are laid, wooden beams 100*150 are used for them, and 30 mm boards are laid on top. Thus, it can be calculated that the floor of the bathhouse will be 80 cm above the ground.
The sewage drain pipe is installed in the corner closest to the septic tank. After this, it is brought to the height of the screed and a plug is installed.
Sand is scattered over the ground and compacted thoroughly. The quality of the sand does not matter in this case, so you can use any one. For compaction, a homemade device made from a cut of timber with handles attached to it is suitable.
The next stage is laying crushed stone. It is used to ensure that groundwater does not rise above this level. Therefore, it is optimal to use stones with a fraction of 20-40 mm. Having poured the first layer, gently compact it exactly horizontally. Then, focusing on the marks in the corners, they gradually add crushed stone and compact it towards the desired slope level. In this case, it is worth foreseeing in advance the formation of a bevel at the level of 10%.
After compacting the crushed stone, this layer is completely covered with thickened polyethylene film. It is needed so that while the floor is being poured, cement water cannot penetrate the crushed stone. If the film consists of several sections, then the joining points are firmly fixed with tape.
When carrying out this stage of work, it is worth using soft shoes, since a hard sole can shift the angle of inclination.
Waterproofing a concrete floor in a bathhouse
Concrete is a strong and reliable material, but without proper thermal insulation it can freeze during the cold season. Therefore, in addition to protection from moisture, it is best to provide maximum protection against cold penetration into the room.
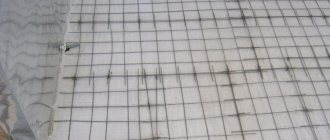
When making a screed, check the evenness of the surface and apply waterproofing mastic in several layers to the cleaned, dried mixture. A thin membrane or dense roofing material in the form of rolls is also laid. All seams are soldered using a hair dryer. Afterwards, a reinforced mesh is laid on which a new layer of concrete screed will be placed. Next comes the final finishing of the floor.
Flooring arrangement
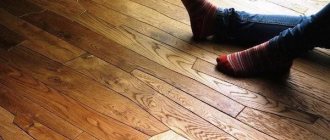
The construction of the floor in the steam room implies the presence of small gaps between the boards; it is desirable that they be the same and amount to no more than 3 mm. For convenience, the installation of boards can be carried out using crosses for laying tiles. If all technologies are followed, it is not difficult to make a floor in a steam room.
How to properly make a floor in a bathhouse? The only rule is not to use nails. Self-tapping screws are best suited for this. Before screwing the screw into the board, you need to drill a hole in it and fill it with silicone sealant. This procedure will additionally protect the screw-in points from contact with water. When screwing in, the self-tapping screw should be slightly recessed into the board. After finishing the work, all screw-in points must be filled with sealant on top.
It is best to use boards at full length to eliminate joints.
To eliminate drafts, before each trip to the bathhouse, it is necessary to close the plugs made in the foundation. However, during the cold season there will still be a cold floor. To eliminate this drawback, you can seal the cracks in the boards with silicone sealant, but this can only be done in the dressing room. The floor in the steam room should remain wet. You can also make a decorative covering in the form of linoleum or rugs in the dressing room.
You can make a floor in a frame bath by following the instructions described above. It’s not at all difficult to make a floor in a bathhouse with your own hands; the main thing is to choose the right materials and create a single structure.
Waterproofing with liquid glass
Liquid glass can be used to waterproof floors made of any material. This is an economical and fast finishing method. After application, the substance turns into a dense crystalline base. The material looks like molten rubber and is very easy to apply to any surface. It prevents not only the penetration of moisture, but also traps air, preventing the room from freezing. The glass is applied to the subfloor, and after hardening it helps to waterproof, prevent the occurrence of bacteria that are hazardous to health, and protect against electricity and fire. Such protection can be used for no more than five years; it is prone to self-destruction.
You shouldn’t mix a lot of glass at once, it crystallizes quickly, and there is a chance you simply won’t have time to apply the entire mixture in a timely manner. You don’t have to worry about humidity during application; unlike other materials, glass is not sensitive to this and will perfectly protect the room after hardening. It is better to apply the material in uniform stripes, after which you need to level the surface using a spatula.
Bathhouses, saunas and steam rooms are functional auxiliary buildings with high humidity, and the waterproofing of the floor in the bathhouse determines its durability. A wooden building at the dacha can be built for the summer season, when cracks are made in the floors for natural drainage of water. However, a capital structure on a suburban site for year-round visiting must be built according to all the rules, with insulation and waterproofing of the floor.
Table of contents:
What is important to know about bath floors?
A country bathhouse is constructed from various materials, including cast walls and brickwork, but in many regions it is customary to build from natural wood. This is a universal material, but with excess steam and moisture, any wood is susceptible to rot, mold and other fungal infections. To avoid having to redo everything after a couple of seasons, it is better to provide proper insulation of the bathhouse:
- foundation;
- floors;
- walls;
- ceilings;
- outlets of all communications.
Water, even with a single flood, can damage a structure, especially when there is constantly high humidity in the building and there is water on the floor. Excessive moisture destroys brickwork, reinforced concrete products, wood and finishing materials. A primitive building with a specific microclimate can be built without any special frills. But even if this is waterproofing the floor of a bathhouse on stilts in a permanent building, everything must be done thoroughly regarding fire safety and protection from bending.
The principle of preparing the mixture
The proportion used when preparing liquid glass with water and other components depends on what types of work will be carried out. If the solution does not adhere well to the surface, then the amount of water must be reduced or cement added. Ideally, it is better to use measuring cups. In this case, only cold water is used.
When carrying out repair and construction work, several compositions are prepared, including sand, cement and other components. To create a waterproof layer, it is best to use a mixed composition of concrete or cement, which must include liquid glass. Solution proportion 1:10:
You can increase the strength and waterproofness of the floor covering if you fill the floor surface with another layer of liquid glass approximately 3 mm thick, and the layer only needs to be applied once.
If the floor surface was treated with a silicate solution before applying the coating, there is no need to wait for it to completely harden, because the homogeneous glassy surface may not adhere to the plaster or primer.
After the screed has dried
As soon as the waterproofing base is completely dry, it is treated with varnish so that the surface becomes glossy and durable. 24 hours after completion of work, the coating can be used.
Liquid glass has a lot of advantages that make the floor not only visually attractive, but also moisture-resistant and antibacterial. And the low cost of the material makes it accessible. Using the recommendations of experts, you can make a floor covering with liquid glass with your own hands.
Advantages and disadvantages
The protective layer is short-lived; after just a year, the coating loses 1 mm.
The service life of liquid glass, according to the warranty card, is 5 years. During use, it was noticed that after this period the coating begins to gradually deteriorate, losing 1 mm of thickness every year. To extend the service life, it is recommended to apply a layer of paint on top of the waterproofing.
Sometimes liquid glass is added to the concrete mixture for its strength
The material qualitatively fills cracks and pores in concrete, plaster, brick, wood and other materials.
To increase the strength and abrasion resistance of the cement mortar, 1 to 10% liquid glass is added to it, not forgetting that the setting time of the mortar is significantly reduced. If you increase the dosage, the coating will become fragile and unstable to mechanical damage.
For a person who does not have experience working with this material, it may be difficult to apply it.