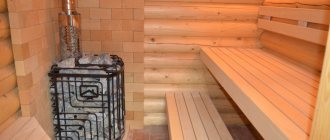
Installation of a leaking floor in a bathhouse
This option has an important advantage: the ability to freely release absorbed moisture. This floor is easiest to make with your own hands.
The boards are laid with small gaps of 3–5 mm between themselves and the walls, so they are freely washed by air. Often they are not even attached to the joists to be able to turn them over or take them outside to dry. Water falling on such a floor immediately flows down without lingering on the boards for long, which increases the service life of the material.
Installation of pouring floors is simple. A system of logs is installed, resting directly on the foundation columns, screw piles or concrete strip. The lags are laid with a mandatory waterproofing cut-off made of roofing material to prevent contact with condensation or capillary moisture, which is typical of concrete bases. The log system is laid as evenly as possible so that the upper ribs form a horizontal plane. To do this, the cord is stretched and the logs are aligned along it in the desired position.
Flooring boards should be planed. If larch is used, it is recommended to lightly scorch the surface with a blowtorch to burn off small sharp fibers. Laying is done horizontally, with gaps between adjacent boards of 3–5 mm. It is not necessary to fasten with nails or self-tapping screws, as the metal will quickly rust.
Laying non-leaking floors
For flooring that does not leak, tongue-and-groove boards of coniferous wood are used. Please note that the boards should be laid with a groove inside the bathhouse.
Before you begin laying the floor, you need to complete the subfloor. For this purpose, bars with a cross section of 50 mm x 50 mm are attached to the bottom edges of the logs. Between the joists, a “subfloor” is laid on these bars. For this use:
- cutting boards,
- unedged board,
- third or second grade board,
- croaker
After laying the “sub” floor, a layer of waterproofing is laid on top:
- glassine,
- roofing felt,
- waterproofing film.
Then lay out a layer of insulation. Expanded clay is well suited for this - it is poured between the joists.
Then waterproofing is done on top again.
And now, the “rough” floor is completely ready, you can begin laying the tongue and groove boards of the finished floor. The boards in the steam room and sink do not need to be secured with nails. Thanks to this, you can easily remove the boards and dry them. Such floors are secured at the edges using a block with a cross-section of 20 mm x 30 mm. The bars are secured to the joists using screws. When the floor needs to be removed, the bars are very easy to dismantle.
In the washing room (in the corners), during flooring, it is necessary to leave holes into which pipes will then be installed (asbestos-cement, galvanized steel, or PVC). The diameter of the pipes can range from 50 mm to 100 mm. This way you will ensure good ventilation in the room.
Gain Setting
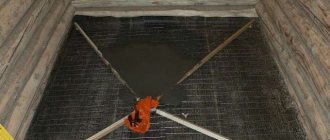
Reinforcement allows you to increase the strength of the concrete screed at an angle, provide better adhesion to the base, and will not allow the layer to deform and slide off this surface. Strengthen inclined surfaces using steel reinforcement with a cross-section of 4-5 millimeters. First you need to cut the blanks to the size of the future concrete base.
Then the reinforcement frame is assembled from the blanks using knitting wire, connecting the rods located perpendicularly. The result is a grid with a cell of 50-80 centimeters. You can also use a ready-made mesh for reinforcement.
The structure is laid between the beacons, on prepared non-metallic pads, which will ensure the required distance between the concrete and the reinforcement. The concrete will be evenly distributed under and above the reinforcement, which will protect the frame from corrosion and the effects of external negative factors.
Preparatory activities
To make a poured floor in a bathhouse, the base is prepared as carefully as possible. Otherwise, the base will not have the necessary strength characteristics, which will significantly reduce the service life of the finished floor. The work is performed in the following sequence:
- Removes a layer of soil 40–45 cm thick. This allows you to get rid of organic residues present in the soil;
- The surface is carefully leveled. A pit is installed in the center of the room, in which water will collect during the operation of the bath;
- A drainage pipe with transverse dimensions of 10–20 cm is installed. The pipe is placed at a slope to ensure the outflow of liquid under the influence of gravity. To prevent accidental clogging of the drain pipe, cover it with a lid or simply plug it with a rag. A fence made of boards or pieces of roofing material is erected around the drain pipe itself. This will allow, if necessary, to replace the installed element if the pipe head does not meet the requirements for it;
- The quality of the work done is controlled. For this purpose, a regular or laser construction level is used.
The soil is removed to a depth of 0.5 mSource googleusercontent.com
Before pouring the concrete solution, the base is thoroughly compacted. To sufficiently compact the soil, a vibrating plate or manual tamper is used, depending on the area of work and the configuration of the bathhouse. A layer of sand 5–10 cm thick and gravel is poured onto a carefully compacted base. The thickness of the second layer is 10 cm. The pillow is carefully compacted.
Stages of work
Before pouring concrete at an angle, you need to study the main stages of the work and strictly follow the order of their implementation. Ignoring even minor operations can ultimately lead to poor quality of the sloped covering and its inability to perform its functions.
Sequence of actions when pouring concrete at an angle:
1) Preparation of the base: thorough cleaning, marking the area
2) Installation of beacons, fixing them at the required distance from each other
3) Performing reinforcement to strengthen concrete
4) Preparation of a solution of the required brand, the consistency and strength of which are adequate to the degree of load of the future site
5) Pouring the concrete mixture at an angle, creating conditions for its effective setting and drying with strength gain
Water drainage methods
Diagram of a filtration system for draining a bath.
The design features of the base and methods of arranging the hydraulic apparatus directly depend on what types of materials the floor will be constructed from. As a rule, wood, cement screed or combinations of materials are used to finish the base. For any type of construction, a system for draining water masses from the bathhouse is prepared in advance.
The design of the drain mechanism can be different and depends on many factors:
- For a bathhouse for three to four people, it is advisable to make a cesspool under the foundation of the structure. The walls of such a pit are edged with brick and covered with sand. As the tank fills with water, the liquid is pumped out of it using a cleaning machine;
- If you are building a bathhouse for a large number of people with your own hands, it is better to make a drain pipe connected to the central sewer system or a separate well;
- To purify wastewater from dirt, it is advisable to install an underground filtration system. It is equipped with a special sump, distribution well and waste pipe;
- A simpler option for water purification would be to install a filter well. Filter material (crushed stone, brick fragments, expanded clay) is poured under the bathhouse. In the process of irrigation with water, the mineral bed is covered with silt, which purifies the wastewater before entering the ground.
Selection of sewer pipes
Choosing a pipe diameter depending on the slope level
A correctly made slope at the base of the ladder does not guarantee the rapid evacuation of water masses from the room. In this matter, the choice of sewer pipes is not the least important. Since the bathhouse uses a non-pressure liquid discharge system, it is advisable to use the following pipes to install the hydraulic apparatus:
- The minimum diameter of the pipe should be 50-60 mm, and the thickness of its walls should be at least 3-4 mm;
- It is advisable to assemble the external pipeline from PVC materials, since they are more frost-resistant;
- During the installation process, pipes are laid in the soil at a level that is below the freezing point.
Installation
Before carrying out it, you should check the sealing of walls, window openings and doors. Then you will need to prepare the base; it must be level. Using a level, check the flatness of the base; if there are deviations, then eliminate them by performing a screed.
Initially, a location for installing the thermostat and access to communications are selected, if we are talking about electric heating; in the case of water heating, the location of the boiler, pipes and taps should be considered.
The installation work is different for each heating system and is described in more detail below.
Wet floor
Installation begins with the selection and organization of the location for the coolant supply. Holes should be made in the walls through which the pipes will pass and the necessary shutoff valves should be installed.
It is best to arrange an outlet for such heating to provide a free niche in the bathhouse, which can be converted into a cabinet so that the communications are invisible.
A mesh for fastening pipes is laid on the pre-leveled floor, which is secured using ties. The pipe must be folded in half to organize not only the coolant input, but also its output.
After checking the installation of water heating, you can connect it to the taps (supply and return).
After this, a test run of the system is performed, which will help identify a leak, if any, and wait for the maximum pressure of the network, which will depend on the heating of the coolant.
At the end of the installation, the screed is poured and the floor material is subsequently laid.
The entire design of water heating is multilayered:
- waterproofing material;
- insulating;
- foil;
- pipes;
- screed with reinforced elements;
- finishing floor
Pipe laying patterns can be different, and although a spiral is often used, sometimes a snake or its double version is used.
Pouring the concrete screed through the laid pipes starts from the far wall and ends at the door.
It is imperative to provide for zoning the room according to beacons, and the concrete mixture poured over the pipes is leveled according to the rule to avoid distortion of the base of the new floor.
If semi-dry mixtures are used for pouring, then after about 6 hours the surface must be sanded so that it does not completely harden.
Dry floor
Its installation will depend on the choice of the type of electric floor, and it can be:
- film;
- cable;
- using heating mats.
Film
It is made of thin strips that emit infrared radiation, it is similar to solar radiation, only unlike the latter, it excludes the influence of harmful ultraviolet radiation. Flexible strips are made of carbon and sealed in a polymer film.
When laying such a floor in a bathhouse, you should first lay Isolon - the material will reflect the resulting heat upward. Then the heating elements are laid out, which are covered with plastic film.
The latter serves as waterproofing for heating elements. At the end of the installation process, the finishing coating is laid.
Cable
The convection type of underfloor heating consists of a heating cable that is laid on a mesh base. Cable flooring is sold in rolls.
Installation of this type of electric floor is a rather labor-intensive process; it is best to entrust it to specialists. It can be used under different floor coverings.
Infrared
The rod elements are called mats. Their name comes from the heating rods that are connected to the power wires. They are connected in parallel, so there is no need to worry if one element fails.
When considering infrared mats, they can be compared to a rope ladder. They are mounted in tile adhesive or cement screed protected with isolon.
For more information about installing an infrared floor, read the article - How is an infrared heated floor installed under tiles? Overview of methods
Drainage system
Moisture will collect in the steam room during procedures, albeit in small quantities. For this reason, a waste water receiver is installed on any type of soil. As a rule, it is an area covered with a special grid in the corner of the room or a shallow pit, the walls of which are made of concrete or coated with clay. The slope of the floor in the bathhouse is brought to this point.
Water can be drained from the receiver in several ways. Most often, a hole is made in the base, from which a pipe is led into a drainage pit or centralized sewer system. To prevent cold air or foreign odors from entering the room, a shutter is installed at the end of the pipe.
Often a closing hole is created at the top of the drainage ditch. It will provide additional ventilation to the room and remove moisture from it.
Why is tilt necessary?
If the degree of inclination is too small, not all the water accumulating on the surface will enter the drainage system.
Tilt of the base towards the drain allows you to quickly remove water from the washing room or steam room in the bathhouse. A rather complex design performs several tasks:
- Prevents fluid accumulation;
- Prevents damage to floor materials;
- Provides quick drying of floors;
- Significantly reduces the chances of developing fungus and mold.
The design of a rough foundation with a slope must be carried out taking into account many technological nuances. If the degree of inclination is too small, not all the water accumulating on the surface will enter the drainage system. If you make the floor slope too large, this will affect the material component of the issue, since it will lead to unnecessary expenses.
Installation of EPS
Comfortable operation is impossible without insulation of concrete floors in the bathhouse.
For these purposes, extruded polystyrene foam (EPS) slabs 5 cm thick are best suited. This material is impervious to moisture and has sufficient density and mechanical strength. The EPS slabs have tongue-and-groove protrusions around the perimeter, ensuring the creation of a continuous monolithic thermal insulation layer.
Thermal insulation begins from the pit. Then its walls are lined flush with the floor level.
The final stage is laying the EPS boards on the floor. All remaining gaps between the plates are filled with polyurethane foam. The result is a single monolithic thermal insulation layer.
Briefly about the main thing
A concrete floor in a bathhouse is the right and economical solution. Such a foundation is not afraid of negative external influences. If the work is performed correctly, the foundation can last for many years. This base is fireproof, has sufficient strength and is easy to install. Not hygroscopic. Withstands significant temperature fluctuations. Doesn't rot.
The last factor makes a concrete base more preferable than its natural wood counterpart. This is explained by the fact that the stone base is not so favorable to the development of fungus. In addition, it does not impose any special requirements for care.
Floor layout and basic requirements
The main thing in organizing a wooden floor with a drain is, oddly enough, not the technology for making the finished floor layer, but the proper preparation of the underground space. It is errors in the organization of the underground that become the most common reason that the tree begins to rot ahead of time.
Particular attention should also be paid to ventilation of the space under the floorboards; there must be either special holes for ventilation, or the possibility of raising the boards in order to dry them faster
In addition to the fact that a wooden floor is not as cold to the touch as a tiled floor, it is also noticeably cheaper and easier to organize than a tiled floor, which requires the obligatory arrangement of a layer of concrete screed at least 5-7 cm thick. If necessary, construction the most budget-friendly construction, it is wooden floors that are laid most often, and a small drainage hole is installed directly under the bathhouse as a space for water drainage.
Scheme of organization of design details:
Prev 1of1 Next
The second option using roofing felt:
Prev 1of1 Next
Option number three from an old Soviet book:
Prev 1of1 Next
Next, we will look at examples of various schemes for installing a wooden floor in a bathhouse with water draining through the cracks between the floorboards, the so-called “flow floor”. Also, using the example of finished structures, you will be able to see different approaches to the implementation of the three basic principles of durable wooden floors with a drain:
- The presence of a slope at the surface of the underground so that the water does not linger anywhere, but completely flows into the drain hole.
- A properly organized sewer system that ensures the flow of water without its accumulation in places not intended for this purpose.
- Take measures to ensure ventilation in the underground space in order to effectively dry out the floor wood and support beams.
How to choose the right material
Modern pipes for organizing a drainage system are made of high-strength plastic. Its service life is 50 years. Pipes are used from:
They are not afraid of water, do not rust or rot. They are easily assembled into a system, attached to each other simply and without much effort. They come in different sizes, among which there is sure to be one that is necessary for specific conditions.
And although cast iron pipes are stronger and more reliable, they are practically not used to create bathhouse drains. They are difficult to transport and install; installation requires special equipment, additional tools and specialists. The result is a costly event that can be avoided.
Asbestos-cement pipes are not recommended for use. They have an uneven surface inside that catches debris. This is especially dangerous if the drainage system is more than 10 meters.
The diameter of the pipes for a steam room with an average degree of use is 11 cm, for small baths 7 cm is enough.
Source
Wood leaky flooring
Crushed stone and sand are laid on the ground. One layer will be enough. This layer is then filled with cement mortar. The floor in the bathhouse should be tilted towards the wall in the form of a shallow funnel (for more details: “Filling the floor in the bathhouse - how to do it yourself”).
A container is placed in the hole to collect water. The container can be brick or be a concrete ring
An important quality that it must have is tightness.
A poured floor in a bathhouse is made in compliance with the following stages of work:
- The water intake is being installed.
- A base is laid, which is intended to waterproof the flooring.
- Boards are laid on top, but not close to each other, but at a distance of 5-6 mm. Even if the laid boards swell greatly, the water will still drain freely.
And in order for the flooring to last as long as possible, it must be dried. Good ventilation can help with this. To remove moist air from under the floor, you can use a stove vent or connect the flooring to the subfloor. To combine, you can use a tin box.
Dialogue with the customer
— Rafis, I wanted to clarify, are you planning to lay some kind of wooden flooring on the floor in the washing room and steam room?
— I definitely didn’t plan to go to the washing room.
- It's clear. As I understand it, the floors were poured and the drains were not installed under the tiles?
— What does “drains not under tiles” mean?
- Look, I see several problems here:
: Slopes too large. 5 cm by 1.5 m is a lot. And there is a risk of falling.
The slopes are organized without taking into account that the tiles will be laid here - there should be 4 trapezoidal perfectly flat planes, not to mention the fact that the screed is poured without reference to the layout of the tiles.
The drains are located asymmetrically and without any logic. By the way, I don’t understand this drain—what is it for?,” I asked, pointing to the drain in the left corner of the washing room:
“I planned a shower in this corner, so I decided to organize a drain here so that water would not run through the entire washing area.
- I see... It’s not clear how to make it all function correctly... The drains are on the same level, right?
- And what between the plums - should there be a rise?
“Well, yes... The water from the shower drains here, and the rest here,” Rafis said, first pointing to the drain in the left corner, then to the right.
— Curious... The layout of the tiles will most likely be along the washing area and dressing room? Not diagonally?
— And there should be a connection between the seams between the washing room and the steam room?
— By the way, what tiles would you recommend?
- The main thing is that it is not slippery. As for the size, it’s also better not to take a large one. Up to 30 cm.
ADDENDUM AND QUESTION TO SPECIALISTS + HAND PLAN OF THE PREMISES IN THE COMMENTS
Wooden non-leaking floor
When organizing such a floor, the logs in the bathhouse are dug into concrete or clay with your own hands. Then boards are laid on top; it is better to use coniferous trees. Under this flooring, a conventional floor screed is performed.
The floor is made with the formation of a slight slope directed towards the middle or towards the room. A grate is installed in the place where the water will collect, and a recess should be made under it to drain the water.
Then there are two options for draining water: making a special sump or connecting to the sewer system. This is the easiest way to organize flooring in a bathhouse.
Features of the floor
For a Russian person, a bathhouse is always a rather extreme way of relaxation.
The floor in the steam room is exposed to various aggressive factors:
- water constantly gets on the floor covering;
- not only steam collects on the floor, but also its condensation, so the surface is constantly wet;
- the air temperature below the room is approximately 40 to 45 degrees;
- strong mechanical stress.
If you choose tiles for the washing area, you should take into account that there are no high steam temperatures in this room, but high-temperature water pours heavily onto the flooring. Therefore, it is necessary to carefully select building materials to create a durable and anti-slip coating.
Concrete
Concrete flooring is often found in a steam room or washing area because it has better properties than wood flooring. The concrete solution contains additives that have a positive effect on the water resistance of the coating. It is reliably protected from rotting and perfectly withstands high humidity.
Laying ceramic tiles in a bathhouse can be done on a concrete floor
However, before you begin creating a concrete base, you should pay attention to creating a drainage system that is responsible for draining water from the floor outside the bathhouse structure
The construction of the drainage system should be carried out in the following order:
- it is necessary to compact the soil;
- create a cushion from crushed stone or sand, you can use broken bricks. The formed pillow should have a thickness of 12 to 18 cm;
- pour a concrete layer, its thickness should be from 5 to 7 cm;
- make a layer for thermal insulation from felt, expanded clay or mineral wool;
- create waterproofing using a thick film of polyethylene, or use roofing felt;
- for reinforcement, use steel wire or mesh made of high-quality metal;
- pour the next layer of concrete, the thickness of which should be from 10 to 15 cm, while forming a slope towards the drain;
- cover the concrete floor with an adhesive-based primer, which will improve adhesion to ceramics.
Wooden
Wooden flooring is a classic option in a Russian bathhouse, since traditionally the entire building is made of natural wood. A wooden floor can be perfectly used for further laying of ceramic tiles if the correct preparation is made.
It must be taken into account that natural wood is an organic material, so it is not characterized by increased resistance to various factors. As you know, wood can swell in rooms with high humidity or shrink if there is not enough moisture in the air
A new wooden floor usually tends to sag within two years, and after this period it may continue to move. Displacements are invisible to the eye, but this property negatively affects the strength of the floor surface. If you lay tiles on a wooden floor, they will soon begin to crack and peel off from the main covering.
To avoid such an unpleasant situation, save your energy, time and money, you need to create a damper layer before using the tiles. It is this that will absorb the movement of natural wood. The damper should be laid in such a way that the elastic side is in contact with the wood, because it is this side that will take the shocks, and the outer hard part can be used for laying tiles.
What are the benefits of ceramic tiles in a bathhouse?
One of the main advantages of ceramic tiles is that they do not allow water to pass through.
Ceramic tiles have a number of distinctive qualities that are suitable in all respects for rooms with high humidity. These include:
- environmentally friendly, since the tiles are made from natural materials - clay with mineral fillers;
— high resistance to wet environments;
— hygiene;
- ease of cleaning;
- heat resistance;
- chemical inertness - resistance to any detergents;
- environmental safety - the tiles do not emit fumes harmful to human health even when heated to the highest temperatures;
- variety in color, pattern and texture.
Ceramic tile
Before tiling wooden walls, the surface is thoroughly cleaned, a layer of waterproofing is installed and leveled. A moisture-resistant adhesive composition is used to lay the tiles.
In order to properly tile the floor, it is necessary to properly arrange the drainage hole and make a concrete screed. The base is made at a slight angle with respect to the drain hole connected to the sewer pipe.
Tiles have important advantages:
- resistance to high humidity;
- high strength and wear resistance;
- environmental safety and durability;
- resistance to fading and darkening;
- ease of maintenance;
- wide range of colors.
The disadvantages of the finishing material include:
- slippery surface that can lead to injury;
- the difficulty of doing installation yourself (practical skills and knowledge are required);
- susceptibility to mechanical damage.
The ceramic tile finish is successfully combined with natural moisture-resistant paint.
Bath design
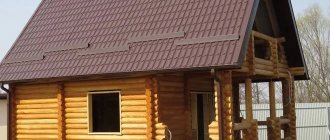
It all depends on what kind of soil is used under the building itself. If these are materials that easily absorb moisture, for example: sand; then you can build a house right on the ground
It is worth paying special attention to the place where you plan to install the shower, since twice as much water will drain there as in the steam room itself. You also need to make sure that your floor can heat up quickly and retain heat for as long as possible.
This is important because the most important thing in a bathhouse is warmth.
If the floor reflects the cold from the ground, the heat will not be sufficiently saturated
This is important because the most important thing in a bathhouse is warmth. If the floor reflects the cold from the ground, the heat will not be sufficiently saturated. This is especially important in cool seasons, because at this time the earth cools down as much as possible.
This is especially important during cool seasons, because at this time the earth cools down as much as possible. Some mandatory points during floor construction:
Some mandatory points during floor construction:
- Construction of a drainage pit. It is necessary in order to pump out accumulated drained water from time to time.
- Creating a cushion on your soil for the primary screed.
- Filling, filling the first layer of your floor covering.
- To preserve heat, you need to lay special insulation and waterproofing of the floor.
- The wording of the second screed.
- A tightening table is installed.
Next we will describe all the points in more detail, so if you are interested, stay on this article.
Construction of a drainage hole
In fact, there will not be as much water in the steam itself as in the shower, but, naturally, although in small quantities, it will be present. Typically, the water receiver is located in the corner of the building. It looks like a grate in the floor, but sometimes people just dig a hole to save money. If you have dug a hole, you must line it with clay or concrete. As you already understood, according to the simple design, there will be a slope towards this part of the bathhouse so that all the water flows there.
Water removal can occur in many ways. The most common of them, which we advise you, is to lead an exit from the pit itself to the central sewer system, using sewer pipes. To prevent an unpleasant and unexpected odor from penetrating into the bathhouse through this pipe, you can simply block the access with a specialized shutter. But the holes and pipes don’t end there. Our pit will need not only a pipe that will drain water from time to time, but also a pipe facing the street, so that it will, as it were, ventilate our pit. Thus, ridding it of unnecessary excess odor and moisture.
If your sauna was installed not on the street, but, say, in the basement of your house, which is quite rare, the drainage hole is a small depression on the floor, from which you simply remove water with a bucket after using the sauna.
In fact, to prevent the drainage pit from looking too terrible and out of the style of the bathhouse, people often decorate it with stones, or use it as a small well to give it beauty.
Cushion for primary screed
This stage takes place so that as little heat as possible goes into the ground. A small depression is made about 50 cm from the ground level, which you must fill with materials such as bricks and various large stones. Trees should not be used, as after backfilling they may simply rot due to moisture. Backfilling occurs in the following way: it is necessary to cover it all with durable clay, and pour a little fine crushed stone and sand “about 15 cm” on top. Afterwards it is necessary to level the entire surface, thereby preparing it for the first pour.
Preparing the base on the ground
When the soil under the bathhouse building is loose or sandy, the flooring can be laid directly on the base, which in this case will be the ground. In this case, in the steam room there is no need to make a drain for a large volume of water. It is necessary to build drainage for the washing room.
Of course, you want to move around in a bathhouse on a warm floor surface, so you should provide maximum protection from the cold coming from the base. Then the air in the heated steam room will cool down for a long time, and maintaining the required temperature will become easier. This problem becomes especially relevant in the cold season, when the soil freezes and begins to take away a large amount of thermal energy.
Pouring the floor in a bathhouse on the ground consists of a number of mandatory measures:
- A drainage hole or well is installed to collect and drain wastewater.
- A cushion is created on the ground for the primary screed.
- Pour the initial layer of coating.
- Insulation and waterproofing are installed.
- Install the top concrete screed.
- Apply a tightening layer.
- Finishing of the floor surface is carried out.
The two main problems that you will have to deal with in a structure located on the ground are as follows:
- reverse capillary movement of moisture from the ground to the screed;
- intense loss of heat, which simply goes into the ground.
When pouring the floor in a bathhouse with a slope, if construction is carried out on the ground, several features must be taken into account:
- you will have to make a massive pillow that will stop the rise of moisture;
- the cushion should act as a damper if the soil in the construction area freezes;
- The rough screed is made with increased thermal protection.
The problem of creating a reliable foundation for a floor covering in a building on the ground is solved as follows:
- the depth of the bottom point of the pillow should be 500-600 mm from the ground level;
- A layer of construction waste, stone fragments, large fractions of gravel, and concrete fragments is poured as a damper. Recommended zone thickness – up to 400 mm;
- A two-layer pillow acts as a neutralizer for the reverse movement of condensate. It consists of zones of backfilling fine gravel with a thickness of 100 mm, and 50 mm of sand. Each layer after filling is leveled, wetted, and compacted with a vibrating machine;
- After the layers of sand and gravel have dried, you can lay the rough support screed.
If construction is carried out on the ground, when solving the problem of how to pour a floor in a bathhouse under tiles or other covering, it is useful to provide good thermal protection. To do this, the rough screed is made using perlite. This material is lightweight, retains heat well, and you can lay a layer of mortar of increased thickness (more than 45-50 mm) without reinforcement.
If in a private house or other building where you plan to build a bathhouse, there is a high foundation and there is an underground floor (the distance from the ground to the load-bearing floor joists), you can make an all-season flooring. To do this, you will need to provide ventilation. Pipes are led into the underground space through the plinth; it is advisable that they be located on different sides of the bathhouse.
An all-season bathhouse floor will require careful waterproofing, antifungal and anti-mold treatment of the logs. Therefore, in order to achieve optimal results when solving the problem of how to fill the floor in a bathhouse with a slope, it is recommended to dismantle and reassemble the flooring when such an option is possible. This will allow the lags to be treated and ensure their durability.
Design options
The type of bathhouse foundation determines the floor design. Inconsistency between the parameters of the base and the flooring contributes to the appearance of stagnation of water and subsequent manifestations in the form of rotting and unpleasant odors. The floor in a bathhouse with a drain involves an organized drainage of water sent to the sewer. There are also older, traditional types of floor construction that provide for a drain under the bathhouse, directly into the ground.
Dependence on the type of base
The following foundations are common and used in the construction of a bathhouse.
- Tape. It is a concrete strip located under the load-bearing walls of the building. In order to make a strip foundation, you need to dig a trench, prepare formwork, reinforcement, and pour concrete. The procedure is quite complex and time-consuming and is used for large buildings.
- Columnar. One of the simplest types of foundation used on stable sandy soils with deep soil water. It is a system of supports made of low columns, folded into a “well” of brick, cinder blocks or other similar briquettes. A flat horizontal platform is required.
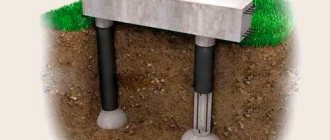
- Pile-screw. It is a system of support points made up of the tops of screw piles screwed into the ground. They have the shape of a pipe with blades applied to the working end, forming a kind of thread on a screw.
The advantages of the latter foundation are that it does not require site preparation. It may have a slope, fold or hump shape. Screw piles can be installed in close proximity to buildings and can be screwed in manually. The immersion is carried out until dense layers of soil are reached, after which all protruding ends of the piles are trimmed or increased to the required height and tied with a channel.
Primary screed
In order to provide additional thermal insulation, it is advisable to make the solution for the first layer of screed based on perlite. This material shown in the photo is an excellent insulator and therefore the floor covering will be warm and pleasant to the touch.
Since perlite is light and consists of small fractions, work with it should be carried out in a place well protected from drafts.
The solution is made with it in several stages:
- Pour 2 buckets of perlite into a concrete mixer and add 1 bucket of water.
- The mixture is thoroughly mixed, and its volume is significantly reduced.
- After the mass is made homogeneous, cement is added to it, which is poured gradually. The mixture continues to be stirred.
- When the mass becomes uniform in color and consistency, pour 1 bucket of perlite into it and pour in several liters of water.
- The mixture should ultimately be free-flowing.
- For perlite to react with cement and water, you need to wait some time - about 10-15 minutes with the concrete mixer turned off.
- Then they continue to knead until the mass is plastic.
If you don’t want to use a bathhouse during the cold season, you can do it simpler and use a mixture of 3 parts sand, 1 part M400 cement and 0.1 parts lime. These components are mixed by adding water until the color is uniform and the solution has the consistency of thick sour cream.
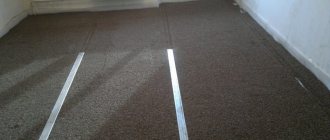
The finished mass is laid out on the subfloor and leveled. You don't have to use guide beacons at this stage. But at the same time, it is imperative to ensure that the floor in the bathhouse is poured correctly with a slope in the direction of the location of the drainage hole.
Preparation of the solution
You can prepare the screed solution yourself or purchase a ready-made dry mixture, for example:
- UMIX M 150 costs 110 rubles per bag.
- “Stone Flower” M 150 for 160 rubles.
- Kreisel-440 for 170 rubles per package.
Typically, such formulations are sold in bags of 25 and 50 kg. To prepare the mixture, you need to add water to the mixture (in the amount indicated in the instructions) and mix everything thoroughly using an electric drill and a mixer attachment.
Important! It is recommended to use ready-made solutions within 15-20 minutes, so prepare everything you need. If you want to save money, you can obtain the desired composition by mixing cement M 400 with sifted sand in a ratio of 1:3 and diluting the resulting mass with water. This solution can be used over the next 1.5-2 hours
This solution can be used over the next 1.5-2 hours
If you want to save money, you can obtain the desired composition by mixing cement M 400 with sifted sand in a ratio of 1:3 and diluting the resulting mass with water. This solution can be used over the next 1.5-2 hours.
When preparing the solution, you should not overdo it with water, as it will increase the setting time of the concrete and increase the humidity in the room.
Healthy! To increase the strength characteristics of the mixture, you can add a ready-made plasticizer or washing powder to it.
How to finish the floor
We already know how to fill the floor in a bathhouse under the tiles. Its surface can be processed with a grinding machine or coated with ceramic material. By the way, today it is used quite often. One option is glass tiles. It is famous for its high level of strength, is resistant to abrasion, and is not afraid of temperature changes. Today, the construction market offers good collections designed specifically for finishing bath rooms. Among all the variety, there is always the opportunity to find an option at your discretion.
Some people prefer to make panels from wood and lay them on a concrete floor. They protect against thermal effects, and if they are also made from valuable species, they provide good benefits for the body.
Pit
A pit is nothing more than a container for wastewater, installed directly under the washing room. It is worth considering that the use of this system is rational only for small baths that are rarely used.
The construction of the pit must be carried out in the following sequence:
- We dig a hole of the selected volume.
- We reinforce the walls with any of the materials: brick, slate, wild stone.
- A filtration cushion is poured onto the bottom: first, a layer of crushed stone, broken brick or expanded clay, after which a layer of sand is poured.
- Next, logs are installed on top of the pit. The floor under the bathhouse is laid on top for drainage. In this case, there should be small gaps between the boards to allow waste water to flow between them.
To install such a system, you will need to perform a number of works:
- First, you need to dig a small hole under the floor, similar in shape to a cube. The length of the rib must be equal to or exceed 50 cm.
- The base and walls of the pit must be insulated from water. Any waterproofing material will do, but it is best to use cement mortar.
- Next, a pipe is laid to the pit, which is located at a height of 10 cm from the floor. It should go out onto the street at a slight slope so that the water can leave the pit on its own.
- Now you can install the hydraulic valve. It is needed in order to prevent unpleasant odors coming from the sewer from entering the bathhouse. The easiest way is to use a homemade hydraulic valve, which is a metal plate installed with a slope. We fix it to the pipe at three points, without fixing only its lower part. It is worth noting that the distance from the base of the pit to the bottom of the plate should be 5 cm. There is another way to make a homemade water seal - you can take a rubber ball and secure it above the pit drain. After filling the tank to a certain level, it floats up, opening the drain. After draining excess water, it lowers, closing the pipe.
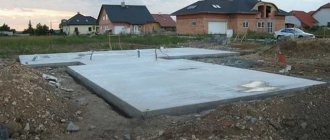
Do-it-yourself concrete floor in a bathhouse
Before you start pouring the concrete floor in the bathhouse with your own hands, pour a sealing sand and gravel pad at least 15 cm thick.
Place a few centimeters of rough concrete screed on the sand and gravel pad. Then lay the insulation on top, and after that, pour the rough layer of concrete screed again. To ensure that the concrete floor in the bathhouse is level, additionally pour a thin layer of self-leveling floor on top.
After this, you can lay tiles for the bath and install a drain.
The gap between the wall and the floor should be sealed not with a plinth, as in the previous version, but with bitumen.
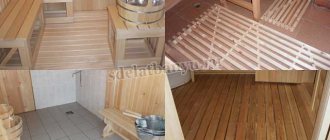
A prerequisite for a concrete floor in a bathhouse is to cover it on top with wooden gratings or cork tiles.
Recommendations
Adviсe:
- Before choosing a material, you need to carefully examine it for the presence of fungus, mold, and rotten knots.
- If the bathhouse will be used in winter, it is not advisable to make a leaking flooring.
- Before installing the floor, you need to dry the boards.
- The drain must be discharged into a waste well, which can be located 1–3 meters from the bathhouse.
Assembling a floor in a frame bathhouse is not difficult, but to do this you need to take into account the features of such a building, know how to properly insulate it, and protect the base from moisture. It is easier to make a wooden floor, since laying a concrete floor requires a lot of investment.
Installation of heated floors in a bathhouse
Opinions about the need for a warm floor in a bathhouse on wooden floors are divided into two opposing points of view. At the same time, competent organization of the process, observance of subtleties and nuances will allow you to install a completely safe system.
In the bathhouse, the floors can be water or electric (film and cable). It is better to give preference to an electric heated floor, since it has many advantages that a water floor, built on the assembly of water pipes, requires reinforcement of the floor with a reinforced screed, does not have. The electrical system is easy to install and is sold as pre-fabricated units, neatly placed on a backing that is poured into concrete.
When installing heated floors, you should pay more attention to the floor covering being laid. A tiled floor will heat up faster; wooden grates can be placed on top. If we are talking about laying a wooden heated floor, then it is better to entrust the work to professionals. The main thing is to know that this type of flooring is possible and has a lot of advantages, one of which is quick drying of the wood, which will avoid the appearance of parasites and rot in the material.
Plasterboard and painting compositions for ceilings and walls
Finishing the wash room in the bath with plasterboard and water-repellent paint is possible if a closed shower is installed in the main room. For small washrooms, it is irrational to use such cladding.
Sheets of moisture-resistant plasterboard are mounted on a wooden or metal sheathing. Next, the surface is primed and painted with a suitable composition.
For painting, safe paints based on natural ingredients are used, the main disadvantage of which is their short service life.
The interior arrangement of a washing room in a private bath requires the correct selection of finishing materials and proper installation. Having an idea of how to make a bathhouse sink practical and functional, you can implement original and practical projects.