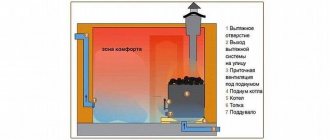
Types of ceiling penetrations
When crossing the ceiling, it is necessary to protect the “pie” materials from heat, and also somehow fix the pipe in a certain position.
This task is accomplished by a ceiling cutout or, as it is also called, a “passage unit.” The pass-through units are industrially manufactured. They are a box made of metal or mineralite, to which a stainless or galvanized steel plate is attached on one side. A hole is made in the middle of this assembly into which a sandwich is inserted. The plate on the side of the room closes the hole in the ceiling, decorating it. It also serves as a support for the heat insulator, which is used to fill the gap between the pipe and the floor beams for better thermal insulation.
This is a mineralite ceiling penetration. View from the attic
There is no disagreement regarding what material to use for the penetrations in the bathhouse: only stainless steel. The fact is that at temperatures that are typical for steam rooms, galvanization releases far from the most useful substances. Therefore, there is only one option: stainless steel.
Everything is installed simply. If the ceiling was made without taking into account the passage of the pipe, a square hole is cut in the right place (between the beams), which is 1-2 cm smaller than the size of the decorative panel. Beams and boards are covered with a layer of thermal insulation. If available, you can nail down strips of mineralite, basalt or asbestos cement cardboard (asbestos is harmful, so use it only as a last resort), just a strip of stone wool insulation. In some cases, padding of the insulation with metal strips is required (when it is needed, see below).
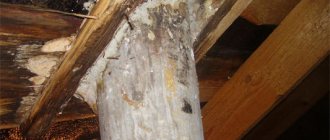
You can't do that - you had to cut a square hole. And the lining on the ceiling near the pipe is already charred...
When installing a pipe on a stove, the device is placed on a straight section that will cross the ceiling. The passage unit simply rises to the desired level. A strip of thermal insulation is placed under its edges that touch the ceiling boards, then everything is fixed with self-tapping screws. In many units, manufacturers even make perforations for self-tapping screws, so even this is not a problem.
The configuration of these products varies. Sometimes a metal cylinder is made around the hole for the pipe. The edges of the decorative plate protrude significantly beyond this cylinder. When installing a pass-through unit of this type, the hole is still cut in a square shape. A circle is also possible, but from the pipe to its edge there must be a distance of at least 130 mm if the pipe is insulated, and 250 mm if it is without insulation
With this option, please note: the size of the plate should be sufficient to mask the hole. In addition, with this form of passage through the ceiling, it is imperative to protect the wood of the ceiling not only with heat insulators, but also to cover it with strips of metal
Pass-through units through the ceiling come in different configurations
There are passage units in which there is no cylinder around the pipe, but there are outer sides around the perimeter. They are made of metal, and can also be made of mineralite. If the sides are made of metal, the edges of the cutout in the ceiling must be lined with a heat insulator (for example, basalt cardboard or the same mineralite). If the sides are made of mineralite, then they themselves are a good heat insulator. So additional thermal insulation of the edges of the cutout is not necessary (but you can play it safe).
About distances to combustible structures
The passage of a chimney pipe through the ceiling of a bathhouse must be done in accordance with all fire safety rules.
For a pipe in a bathhouse, a special assembly for passage through the ceiling must be made. This is a device that provides safe distances from the outer surface of the pipe to the ceiling materials. They are regulated by SNiP 2.04.05-91. The recommendations are as follows (paragraph 3.83):
- from the outer surfaces of brick and concrete pipes to combustible rafters and sheathing - at least 130 mm;
- from ceramic pipes without insulation - at least 250 mm, from them with thermal insulation - 130 mm.
These numbers must be taken into account when installing floor beams. Their pitch is usually taken to be small - about 60 cm. With this pitch, the recommended distances will only be maintained when using pipes with insulation. For example, sandwiches.
The diameter of the furnace outlet pipe is most often 115-120 mm. If you use a sandwich with an insulation thickness of 100 mm when passing through the ceiling, the outer diameter will be 315-320 mm. There must be a distance of at least 130 mm on all sides. It turns out that in this case the distance between adjacent beams should be 130 mm * 2 + 315 mm = 575 mm. We just fall into the gap of 60 cm.
Combustible materials need protection
There are a lot of sandwiches on the market with insulation thicknesses of 35, 40, 45 and 50 mm. You can find a layer of 100 mm mainly in stores specializing in sauna stoves. Only in sauna chimneys there are temperatures from which it is necessary to protect with a 100 mm layer of mineral wool. Is it possible to use a 50 mm layer? You can, but if you want to take it easy, take 100 mm - it’s more reliable.
Let's calculate the minimum distance for chimneys without insulation. In this case, with an internal diameter of 115 mm, the safe distance from the outer edge of the pipe to flammable materials is 250 mm. The distance between the beams in this case should be 250 mm * 2 + 115 mm = 615 mm. It may be a little, but it doesn’t go away. But this calculation is for not the largest diameter of the smoke channel. There are many more. In any case, if the ceiling has not yet been made, calculate the installation pitch of the beams taking this factor into account.
This cannot be done - the distance from the pipe to the ceiling and wall is very small, and the wood is also not protected
At the same time, mandatory Appendix 16 contains recommendations on the setback (distance from the outer surface of the pipe to combustible materials):
- for a fire-protected partition: with a pipe thickness of 120 mm - 200-260 mm;
- with a pipe thickness of 65 mm - 380 mm.
- with a pipe thickness of 120 mm - 260-320 mm;
This application deals with wall setbacks. After all, very often chimneys pass close to walls. And their material also needs protection: the temperature of the flue gases at the outlet of the furnace can reach 500°C. If wood walls are not protected by anything, they will char and then burst into flames. Therefore, a layer of thermal insulation is laid on the walls (cardboard made of mineral wool is suitable), and a sheet of polished stainless steel is stuffed on top.
Exiting the pipe through the roof
When equipping a pipe passage through the roof, care must be taken to ensure that two conditions are met:
- passages through the roofing pie must be fireproof;
- the under-roof space should be protected as much as possible from moisture penetration.
Exiting the chimney through the ridge makes all the work quite simple. Due to the fact that the formation of snow pockets on the ridge is impossible, it is possible to achieve better protection against leaks. But at the same time, this method of installing a roof passage means that in the design of the rafter system the ridge beam will not have load-bearing functions. And this requires additional strengthening of the rafters themselves. If there is an attic, installing additional rafter supports may be undesirable or simply impossible.
That is why developers prefer installing a chimney passage on the slope, directly at the ridge. A snow pocket also does not form in this place, and besides, the rafter system does not need additional strengthening. But besides this, the choice of location for the roof chimney is also influenced by the location of the heating equipment. It should be remembered that the horizontal sections of the chimney should not be more than 1 meter in length. In some cases, it is the location of the boiler that becomes the reason for choosing the method of passing the chimney pipe through the ridge.
Professionals recommend avoiding installing a passage element in the valley (the point where two slopes meet an internal corner), since it is especially difficult to install a roof passage at this point. As a result of rain and snowfall, the junction may not be able to cope with moisture and, as a result, the roof will leak.
It is important to maintain a distance between the rafters and the roof in the range of 25-30 cm. If the roof is made of combustible materials (various types of roofing felt, soft roofing), then a gap of 13-25 cm must be maintained between the material and the chimney wall
If the material is resistant to high temperatures, then this gap can be left minimal, and the pipe on the roof of the house is removed only from the sheathing.
If the roof is a “pie” consisting of hydro-, steam- and thermal insulation, then when installing the passage element, some difficulties may arise due to the violation of the integrity of this layer. As a result of an error, the protective properties of the roof can be significantly reduced. In this case, the chimney can be installed in a separate box, which will isolate the roofing materials from the hot walls. The distance between the inner wall of the box and the chimney should be about 15 cm, while the free space is filled with non-flammable heat-insulating material. It is recommended to use mineral or basalt wool, as it is resistant to moisture.
The waterproofing and vapor barrier is applied to the box using the standard method: the “pie” is cut in the shape of an envelope. The film sheet is brought to the rafters and cross beams, where they are fixed with nails or staples. Then the waterproofing layer is pressed on top with bars, and the vapor barrier is pressed with the base frame under the finishing materials of the attic or attic. After this, the joints of the films and the box are treated with sealant and glued with a special tape.
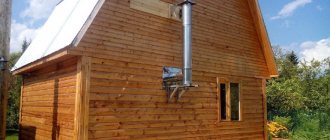
How to install a chimney through a wall
The algorithm for installing a chimney through a wall is simpler than an outlet through the roof. However, there are certain installation requirements that you should know at the bathhouse planning stage:
- The technological hole for the pipe outlet in the wall of the bathhouse is made at a height of at least 1.2-1.5 m.
- The horizontal section of the pipe (from the stove to the external turn to the vertical) should not exceed 1 m. The large length of this section leads to a significant decrease in draft and rapid clogging of the chimney with combustion products.
- The vertical section of the pipe running along the outer wall of the bathhouse should not be adjacent to it by more than 1.5 m. The same distance is left when going around the roof overhang.
- The distance to neighboring buildings when leading a pipe along the street through a wall is prohibited to leave less than 1.5 m to your own building, and less than 3 m to a neighbor’s building.
- For effective smoke removal, it is prohibited to make more than 3 turns of the pipe from horizontal to vertical position.
- The total length of the vertical section must be at least 5 meters to ensure effective traction.
- The pipe has no thermal insulation in the room. After passing through the wall, the insulated sandwich comes out.
Installation of a chimney in a bathhouse through a wall is carried out as follows:
- A segment with a damper (shaver) is connected to the oven through a special adapter. The damper, like in a classic stove, regulates the draft level. Its complete overlap prevents heat from escaping into the atmosphere after the stove goes out. Each joint is treated with fire-resistant sealant and tightened with special clamps.
- A heat-protective reflector screen is installed on the wall in the area of the technological opening. The diameter of the hole is calculated so that the pipe wall does not reach the wall of the bathhouse 45 cm.
- The pipe is taken outside, covering the free space of the box in the wall with thermal insulation. The mineral wool is placed in a special metal mesh, which serves as a mechanical limiter.
- When withdrawing, the structure is continued with a tee. The lower hole of which has a plug, forming a container for collecting resin and condensate. The chimney is periodically cleaned through this hole.
- The vertical section leads straight to the roof canopy. It is bent around corners at 45 or 90 degrees. It is preferable to mount sharp corners for a smooth bend.
- The top of the chimney is decorated with a protective umbrella.
To support the weight of the pipe, special supports are installed on the outside. In addition, after 50 cm, special brackets are installed on the wall of the house to hold the vertical structure in an immovable, fixed position.
We recommend that you read: Is it possible to pour polypropylene pipes into a screed?
The lower supports on the outside of the bathhouse support the weight of not only the vertical section of the structure, but also fix the horizontal elbow, keeping the guide axis away from the stove.
Passage through the roof of a brick chimney
The passage of a chimney through the roof must simultaneously solve two not so simple problems: ensure fire safety and tightness. According to fire safety rules, in places where the chimney comes into contact with flammable materials, the temperature of the chimney walls should not be higher than 50 o C. For brick chimneys, this is solved by increasing the thickness of the walls. For this purpose, stove makers lay out a special penetration. There is no single solution here, since much depends on the angle of the roof. That’s why this option is not very popular today - it’s hard to find a person who can competently and safely make such a penetration through the roof.
When a brick pipe passes through the roof, it is surrounded on all sides by a box of additional rafters and cross beams
How is the question resolved then? They simply make a square or rectangular pipe, which is placed between the rafter legs, and transverse beams are installed above and below the pipe. The distance between the pipe and the wooden structural elements is 13-25 cm. If the distance between the rafters is greater, additional ones are installed. In this way, we minimize the damage that we will certainly cause to the hydro- and vapor barrier of the roof: in order to remove the pipe, we will have to violate the integrity of the films and membranes. When installing the chimney, it ends up in a separate box. The films and membranes inside this box are carefully cut. The cut geometry is similar to the geometry of a pipe or box, but smaller than the dimensions of the rafter box. In the corners, the films are cut at an angle (envelope), the edges of the films are folded and fixed with staples or clamping strips to the elements of the rafter system. The edges and entry points of fasteners are sealed with adhesive tapes or sealants. This operation should be carried out carefully - the durability and reliability of the roof depends on it.
There is another option. This is possible if the temperature of the pipe in the roof area is not higher than 50 o C. In this case, the edges of the films can be glued to the pipe with sealants or the same adhesive tapes (trying to seal everything as best as possible). Now there is free space between the rafters and the brick pipe. It is laid with a heat-resistant heat insulator.
Drainage of water from joints
It is most difficult to seal the joint between a brick pipe and a roof if a rigid roofing material is used.
When venting the chimney through the roof, you need to solve the problem of waterproofing. To do this, use a system of two aprons: a lower one and a decorative one.
First, a lower apron is installed around the pipe. It is usually made of tin and consists of four elements: two sides, a top and a bottom. How to do it, see the next video. Everything is told in detail.
A so-called “tie” must be placed under the lower apron. This is a section of roofing material, a sheet of tin or galvanized metal, which will drain water to the drain (the tie should be this long - extend slightly into the drain) if the chimney is located low or into the valley, if it is closer. The following video further demonstrates the technique for installing an internal brick chimney flashing and also shows how to install a tie and external decorative flashing.
In general, as many materials as there are, there are as many ways to install a pass-through unit. Another video that demonstrates another technique for waterproofing a brick pipe. They use modern materials that are produced here.
It is much easier to waterproof the joint between the chimney pipe and the roof if soft tiles or other soft flexible roofing material is used. On a plastered pipe, coated with impregnation for better adhesion, this material is simply bent and trimmed. You can apply a layer of sealant along the edge of the curved roofing material and secure everything using a pressure strip. The place where the roofing material is connected, the pipe and the strip are also treated with sealant. This video demonstrates the technique of sealing a chimney using soft tiles.
What thermal insulator to use
After the device is fixed to the ceiling, they go up to the attic or second floor and fill the gap between the outer wall of the pipe and the beams with heat insulator.
Basalt wool can be used as thermal insulation. But be sure to check that the operating temperature range should be greater than 600°C.
You can use mineral wool or clay to insulate the pipe.
Some people think this option is not the best. Firstly, during production, resins are used as a binder, which release formaldehyde when heated. Secondly, condensation sometimes runs through the pipe. And mineral wool (and basalt wool too) lose their heat-shielding properties when wet. And when they dry, they are only partially restored. So this option is really not the best.
The penetration is also covered with expanded clay of medium and fine fractions. This is a natural material that is relatively light in weight. Even if it gets wet, it then dries and restores its properties. When wet, the thermal conductivity increases slightly, but it is already worse for expanded clay than for mineral wool.
In the past, sand was often used. The option is not bad in all respects, except for one detail: it gradually wakes up through the cracks. Refilling the sandbox is not difficult, but constant sand on the stove is annoying.
If we talk about natural heat insulators, then you can use clay. It is diluted to a paste-like state and the entire gap is covered. Sometimes expanded clay is used as a filler.
One of the heat insulators is expanded clay
Here is a review of the use of clay when passing a bath pipe:
“Clay rules in cutting! I dismantled the chimney in my bathhouse. Or rather, I took apart what was left: there was a lot of snow, and when it melted, it blew off the entire top. Once you change the top, you need to look at the bottom: the pipe has been standing for 7 years. So here it is. There is zero burning inside, and there is no burnout of the pipe either. Condition: as soon as installed. My penetration is lined around the perimeter with basalt wool, and then everything is covered with clay. This is definitely the best option."
Not everyone recommends using insulation in the passage unit. There is an opinion that it is better to leave the gap unfilled: this way it will be possible to avoid overheating and burning out of this section of the pipe - it will cool better due to air blowing. This may be true, but the radiation from the heated pipe will dry out the nearby wood, and in this case the temperature of spontaneous combustion is significantly reduced - to +50°C.
As you can see, the pipe burned out
There are several ways to avoid overheating. The first, and most rational, is to use the heat that flies out into the pipe and heats it to extreme temperatures for your own needs. There are three options:
One way to avoid overheating is to place stones on the pipe
- Make a water jacket on the metal chimney and use hot water for showering or heating. The system is not so simple; it also requires a remote tank, as well as pipe connections, cold water supply, etc. But temperatures above the water jacket will not be nearly as high, and the pipe will not burn out.
- You can also heat water, but it’s easier: install a samovar-type tank. Hot water is also provided, the chimney does not overheat and is protected. But there are some nuances here: do not let it boil, drain the heated one in time, add the cold one. And doing this is not entirely convenient, since the tank is located quite high: above the stove on a pipe.
- Adapt a net for stones. The water will have to be heated in a different way, but the advantage here is this: after the procedure is completed, the stones dry the bath. Here, too, difficulties may arise: the weight of the stones is considerable, it is unlikely that you can do without support, unless you use the factory version (on the right in the figure). In a homemade version, a structure will be needed to redistribute the mass.
When using any of these methods, the pipe temperatures in the ceiling passage are significantly reduced. The likelihood of burning becomes very small. That's not all. There is a way - simply cool with air. To do this, another one of larger diameter is put on the heat-insulated pipe. A grate is made at the bottom and top through which air enters/exits. For a steam room this is not an option - it will draw out all the steam, but for a washing room it can be used. The method is especially good in the attic and when passing through the roof.
Traction concept
Do not allow dripping condensation to form in the chimney, which gradually destroys the inner surface of the channel. This especially happens in the cold season, when there is a significant decrease in outside air temperature. The process of moisture droplets falling out in the chimney also causes disruption of normal draft. A decrease in the rate of passage of gases from combustion products occurs not only with the internal formation of condensation; the draft force is affected by the humidity of the outside air, which can have different values depending on the weather. A deflector installed above the chimney will help you ignore this indicator.
Is it possible to make a chimney in a small bathhouse without making holes in the roof?
Hello! I want to make a small steam room, 4-5 squares. I don't want to put holes in the roof. Is it possible to bring the chimney directly into the wall and then up? Oleg
Expert answer
Hello, Oleg!
The chimney you are interested in is called an external (or attached) chimney and is widely used by European and American builders. In Russia, they prefer internal chimneys - they allow you to increase the heat transfer of the stove and correspond to domestic architectural traditions.
To lead the pipe through the wall, special elbows are used, or, in other words, bends with bends at different angles, which allows installation to be carried out in the most convenient way. From the outside, a tee is installed on a horizontal or inclined section, to one branch of which the vertical part is connected, and the second is closed with a plug and subsequently used to clean the channel from soot and carbon deposits. To secure the chimney in a vertical position, special clamp holders are used.
To properly install an attached chimney, we recommend listening to the recommendations of experienced stove makers:
- to avoid a drop in draft and also reduce soot formation, the length of the horizontal section should not exceed 1 m;
- the upper cut of the pipe must be protected with a cap, which will protect the gas duct from precipitation;
- the outer part of the chimney must be insulated - this will prevent the formation of condensation and normalize draft in winter;
- the use of round pipes is preferable to rectangular ones, due to the fact that the former create less resistance to the movement of heated gases;
- the cross-sectional area of the chimney must correspond to the power of the heating unit;
- Where the pipe passes through the wall, it is necessary to install a fireproof cutting. Joints inside cuts are not allowed.
We, in turn, recommend that the horizontal section be arranged under the ceiling. Thus, the hottest part of the chimney will be located inside the room, giving off additional heat. In addition, a water heat exchanger is often installed in this area, with the help of which hot water is obtained.
As you can see, a properly designed external chimney allows you to get the same benefits as an internal one, and at the same time does not require, as you say, “to make holes in the roof”, although it has a slight complication in terms of configuration.
stroy-banya.com>
Other articles
Useful tips for stove makers: pay attention...
That's all for now, I'll end it. If I didn’t explain anything clearly, ask questions in the comments. I'll try to answer. Anyone who finds this information useful and informative can share it through the social buttons. networks. I will be very grateful. And now - bye, bye. See you in the next article.
Wisdom Quote: If you want the world to change, be the change.
Source of the article: https://dom-srub-banya.ru/ustanovka-pesochnitsy-v-bane/
Pipe passage through a chimney without a factory passage unit
It is possible to remove the chimney without a passage device. In this case, the edges of the hole in the ceiling are also sealed with a fire-resistant heat insulator, and metal strips are placed on top of it. A protective plate made of non-flammable material is put on the sandwich coming from the oven, in which a hole of a suitable diameter is cut, and holes are drilled along the edges for fasteners. Traditionally this is a sheet of metal. Next, the sandwich is passed into a hole in the ceiling and fixed there using some non-flammable guides. For example, you can use drywall profiles or something similar. The main thing is to securely fasten the pipe and observe the basic rule of fire safety: there must be a distance of at least 36 cm from the edge of the pipe to the flammable material.
You can make a passage through the ceiling with your own hands
Important! When installing and securing the chimney, keep in mind that the pipe changes its size due to thermal expansion. It must be secured so that it can move relative to the roof
Then the pipe is lined with non-flammable material from below (from the ceiling). From the attic or second floor side, the voids formed in the groove are filled with a heat insulator. The requirements for it are still the same: tolerance to high temperatures. Expanded clay may be the most budget-friendly. Actually, this completes the exit of the chimney pipe through the ceiling.
You can make a passage through the ceiling with your own hands
Homemade ceiling cuts
It is possible to install a chimney through the ceiling in a bathhouse without using factory components. You will need:
- Find or cut a sheet of stainless steel that will cover the hole of the required size.
- In its middle, cut out a circle, one or two millimeters larger than the diameter of the pipe that will pass through the ceiling. If it is a sandwich, then slightly larger than the outer diameter of the sandwich.
- Cut a hole of the required size in the ceiling.
- The edges of the cutout along the perimeter are sealed with a layer of basalt wool.
- Place strips of metal on top of the heat insulator.
- You begin to assemble the chimney. Place the first single-walled piece of the stove tube, put a stainless steel square with a cut-out hole on it, and install the sandwich.
One of the options for fixing a pipe in a cut hole - Place the pipe strictly vertically. From the attic side, use metal strips to secure it in the desired position. The planks serve only as guides. The chimney itself does not need to be fixed: it should move freely when changing dimensions (occurs when heating and cooling).
- On the side of the room, place a layer of heat insulation between the ceiling and the plate, and screw the plate onto self-tapping screws. It is better to drill holes in advance: four along the edges, and at least one or two on each side.
- Next, insulate the resulting passage.
As you can see, ceiling cutting is easy to do with your own hands. This is the simplest, but quite reliable option. Another option is presented in the video. The work is more complex, but if you have the appropriate skills, this option of passing a pipe through the ceiling can also be done with your own hands.
Chimney installation
Here is information on how to remove a chimney through a wall with your own hands. Installing a chimney through a wall is easy to do with your own hands.
General points
To prevent the insulation from melting, the first part of the chimney must be made in the form of a piece of pipe without a heat-saving layer. The fasteners are installed at a height protected from overheating. From here you can install a sandwich pipe.
Installation is carried out in two ways:
- Raise the pipe system in the room closer to the ceiling, then take them out.
- The pipes are routed through the wall at the level of the smoke pipe exiting the boiler. In this option, only one connecting elbow is formed. Therefore, traction will be better.
Fastening the sandwich pipe closer to the ridge.
The boiler or stove is installed on a non-combustible base. The wall surface in contact with the boiler must also be insulated. Most often, a sheet of metal is attached to the wall and floor as a base.
Maintenance and cleaning
Over time, the walls of any type of chimney become covered with a coating of soot, which reduces the size of the passage, which leads to a decrease in draft in the stove. There is another danger - when heated, soot can ignite, leading to a fire. Therefore, the pipe must be cleaned regularly.
There are several ways to clean a sauna chimney:
- mechanical cleaning. It is performed using a special rod, preferably a collapsible one with brushes. This is a rather labor-intensive, and most importantly, dirty method. Therefore, before starting work, it is necessary to empty the bathhouse of things, and cover the surface of the walls, ceiling and floor with sheets of plastic film;
- using chemicals. A special product called “Chimney Sweeper log” is placed in the stove, which creates good draft and intense heat during combustion. The soot will burn off and come out through the chimney as ash. This method is mainly used for preventive purposes to increase the time interval between mechanical cleanings.
How to bring a pipe through the roof
To organize a hermetically sealed connection between the roof and the chimney, an internal apron is created at this point. To create it, use the lower abutment strips. The strips are applied to the walls of the chimney, where its upper part is marked. A groove is made along this line using a grinder. Then the dust is carefully removed from the formed border. This is done so that small particles of sand and cement do not fall on the surface of the waterproofing or roof. In some cases, fine grains of sand will turn into an abrasive over time, which can seriously damage the roofing material.
The lower apron begins to be installed from the bottom wall, while only one part of the apron is inserted into the groove. Similarly, this element is attached around the entire perimeter of the chimney. Individual elements must be overlapped with an overlap of 15 cm. The joints are sealed.
For chimneys with a round cross-section, you can purchase special passage elements in hardware stores, consisting of a steel sheet and an apron cap. Their use allows you to significantly speed up the work on equipping the passage of the chimney pipe through the roof. The purchased or manufactured apron should be securely fixed to the roof. At the same time, it is not rigidly fixed to the chimney, since expansion of the material or shrinkage of the rafter system can cause damage to the chimney by the apron (be sure to read: “Roof penetration - device”).
The passage of a chimney pipe through the roof, detailed video instructions:
At the junction of the pipe and the apron, a skirt is installed - a steel clamp, which is secured using a heat-resistant gasket. This approach can significantly improve the waterproofing of the roof in a given location. Upon completion of the installation of the apron, it is necessary to apply sealant to all junctions between the element and the chimney. This helps to obtain a reliable connection that does not leak.
Features of the chimney
Removal of gases through the channel will occur effectively only if the pipe is constructed according to standard dimensions and made of the correct material. These pipe characteristics are selected depending on the type of fuel; the material for the chimney is:
- refractory ceramic bricks;
- asbestos pipes;
- stainless steel;
- sandwich pipes with an inner layer of insulation.
Brick channels are made in the case of a stationary chimney that ensures the removal of gases when heating with wood and coal
To determine the diameter and internal size, the boiler power and the dimensions of the firebox are taken into account. If the calculation is incorrect, reverse draft results or the useful effect of the furnace is significantly reduced.
For gas boilers, it is effective to use pipes with two walls, between which insulation is laid. The problem with a chimney for a gas fuel boiler is internal condensation, so insulation will help avoid significant temperature differences.
It is allowed to install one chimney for two operating heating units, if the internal size of the chimney, raised to the required height above the roof ridge, allows combustion products to be easily removed from both stoves. The cutting section pipe is about 0.8 m high.
Dependence of draft on pipe height
The importance of the chimney in the heating system cannot be overestimated. Attempts to save on an extra meter of pipe will lead to cold walls during the heating season and excessive waste of fuel
The danger of carbon monoxide is that it is invisible and undetectable, but can be fatal.
A narrow chimney of great height relative to the ridge will accelerate the smoke masses, thus reducing heat transfer. To maintain the desired temperature in the room, you will have to add fuel in excess of the norm. A wide channel of small height will allow smoke and gases to rotate arbitrarily in the pipe, their movement will slow down, and most likely a reverse flow of gases will result. Most often this happens in autumn or spring, when the temperature difference between outside and inside decreases and smoke, without overcoming resistance, is drawn into the room through the firebox.
Chimney location and height
To correctly select the height of the chimney relative to the roof ridge, you need to take into account the location of nearby structures. For an outdoor home, the draft indicators will be good, since there is constant blowing and pick-up of smoke masses. If we talk about a small building surrounded by high-rise buildings, then the length of the pipe should be increased. The height of the chimney depends on several factors:
- slope of the roof plane;
- location of the channel on the roof plan relative to the ridge;
- the location of surrounding buildings and trees;
- estimated thickness of snow cover in a specific area.
When installing a chimney, you should determine:
- elevation of the pipe relative to the roof ridge;
- the total length of the smoke channel from the stove;
- type and dimensions of the head;
- the height of the chimney relative to ventilation and windows of neighboring buildings.
Thermal insulation
When installing a smoke exhaust pipe, thermal insulation is required. It will prevent condensation from forming and increase the efficiency of the oven.
Depending on the chimney material, a thermal insulation option is selected.
Mineral wool
Basalt (stone) wool is a fire-resistant and dense heat insulator. The material is used for external and internal work. Insulation is produced in the form of rolls, cylinders, plates, with and without foil. In heating systems with exhaust gas temperatures up to 300°C, basalt cylinders are used. Mats and slabs - in systems with temperatures of 450–700°C.
The advantage of dense material is that it is easier to install on the pipe. To securely fix the insulation, clamps are used.
Basalt cardboard
Cardboard made from basalt fibers is a heat insulator that has recently appeared on the shelves of construction hypermarkets.
Material characteristics:
- Sheet 5–19 mm thick, high density.
- Withstands temperatures of 900°C.
- Resistant to moisture.
- Flexible.
- Service life - 50 years.
To increase the efficiency of insulation, increase the number of layers and secure the basalt cardboard with clamps.
Minerite
The material is a fiber cement board with the addition of special fibers and mineral additives to the base, which increase strength.
Moisture-resistant and fire-resistant mineralite is used in baths and saunas for thermal insulation of transitions in ceilings and installation of thermal protective partitions.
Options:
- withstands temperatures from -80 to +450°C;
- has high hardness and density;
- has good sound insulation;
- resistant to temperature changes.
Minerite is easy to work with - you can cut the material with a hacksaw and fasten it with self-tapping screws.
Fireproof plasterboard
A distinctive feature of fire-resistant drywall is its versatility. According to the method of application, the material is classified as wall, arch, ceiling, for chimneys, etc.
Characteristics of fireproof plasterboard:
- Standard sheet size: 1.5–3 m by 1.2 m (thickness: 12–15 mm), gray color.
- Impregnated with fire retardant.
- Convenient for installation.
- Can be faced with most finishing materials.
- Has good noise-absorbing properties.
Disadvantage: low fire resistance at high temperatures. Therefore, it is better to use it not for the chimney, but to protect building structures from the heat of the stove and chimney.
Glass magnesium sheet
New materials enter the market and compete with classic ones. We are talking about a heavy-duty, moisture-repellent glass-magnesium heat insulator.
Advantages of the material:
- moisture resistance;
- environmental friendliness;
- strength;
- heat and sound insulation due to the specific structure of magnesium;
- light weight.
Disadvantages: high cost and excessive hardness, which complicates installation work.
Rules for choosing pipe length
If the pipe comes out of the roof at a distance of 0.5 m to 1.5 m from the ridge of the roof, then according to the standards it should rise above it by 0.5. This saves chimney material and provides the most efficient heating. During snowfall, the least amount of snow collects in this place, which eliminates leaks during melting. The standards stipulate that the resulting estimated length should not be less than 5 meters, if measured from the surface of the grate to the top edge of the pipe.
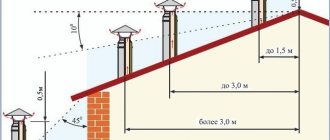
When the chimney exits to the surface more than 3 meters from the ridge, you should draw a horizontal line from the highest point and lower it by an amount of 10º relative to the horizon. Above it the head of the pipe ends. If other buildings are built nearby, then the height of the chimney is higher than the neighboring roofs. For very high neighboring houses, the 45º rule is used, that is, a straight line is drawn at this degree from the neighboring roof to the one where the chimney is made, and the head is arranged slightly higher than the mental straight line.
Types of chimneys for baths
There are two fundamentally different types of chimney:
- Internal (classic). The pipe is routed through the ceiling of the room and the roof.
- External, which became widespread in our country not too long ago. When installing this type of chimney, the pipe is routed through the wall, the main part of it is routed along the street.
Internal chimney
The internal smoke exhaust device in the bathhouse is traditionally used for brick stoves. In this case, the pipe is also made of brick. Install a classic traction control valve. The channel is led vertically from the stove through the ceiling covering, then to the street through the roof.
We recommend that you read: How to properly replace pipes in a sewer system
This type of smoke exhaust device involves two technological openings that require thermal insulation and high-quality waterproofing. Not every person who likes their own steam room can do complex work on their own. The disadvantages of a budget bath include the bulkiness of the brick stove and pipe design. In small steam rooms, such a structure can occupy up to half the area.
An internal chimney with wells and a stove bench can also be made in a bathhouse. A warm wall will allow you to retain maximum heat, which will be useful in northern latitudes. Here it is better to hire a professional and arrange the crossings according to the requirements. At the same time, the internal chimney in the bathhouse will save money on heating.
It is much easier to install a ready-made solid fuel stove in the bathhouse and run the pipe through the wall in the bathhouse with your own hands.
Requirements for chimneys
There are two main requirements for a chimney:
- It must work effectively, removing combustion products quickly and completely. To do this, calculate the diameter and length of the pipe for a specific furnace. The stove in the bathhouse has a simple device with direct exhaust of combustion products (unlike a room stove, where for maximum heat transfer the chimney has winding passages - wells). An ineffective chimney can lead to the accumulation of carbon monoxide, which is deadly to humans.
- It must be safe. All sections of the pipe are isolated from the walls, ceiling, roof, depending on how the smoke exhaust is installed. Fire safety requirements include strict standards for the distance from flammable structures and neighboring buildings.
Additional requirements include high-quality hydro and thermal insulation of the pipe from temperature changes and environmental influences. To comply with all the above requirements for chimneys, installation standards and rules have been developed, which indicate the exact dimensions and distances that are observed at the manufacturing stage of the chimney project.
Exiting the smoke duct to the roof
Before you remove the pipe in the bathhouse through the roof, you need to take care of two factors necessary for the operation:
- select the location of the output;
- purchase the necessary items.
Place for withdrawal
The pipe outlet through the roof of the bathhouse can be done:
on the ridge of the roof. This location of the chimney is considered the most optimal, since snow and other precipitation does not accumulate in this place and good draft is ensured. However, in practice this is not always feasible;
Chimney located on the ridge
not far from the ridge. The location should be based on the rules shown in the figure:
Rules for the location of the chimney duct on the roof of the bathhouse
Under no circumstances should the chimney be placed in a valley (a depression in the roof formed by several slopes).
Required Items
Installing a pipe into a bathhouse through the roof is impossible without the following elements:
- cutting, similar to the passage through the ceiling;
- insulating material (compliance with safety regulations);
- a special apron that protects the chimney from precipitation.
Cuttings can be used either ready-made or self-made.
Aprons can be:
metal, ensuring a rigid connection of the structure to the roof surface;
Metal apron
flexible, made of rubber or silicone;
Flexible apron
built into a sheet of roofing material.
Sheet with built-in apron
The size of the apron is determined based on the diameter of the chimney pipe.
Instructions for removing the pipe
How to remove a pipe in a bathhouse through the roof? To do this you need:
- make a hole of a suitable size in the selected place on the roof (slightly larger than the outlet pipe);
- Carry out reinforcement work around the hole on the floor beams;
- install a groove from the inside of the roof, as when crossing the ceiling;
- bring out the pipe of the required size;
- install an apron on the outer part of the roof.
Scheme of arranging a passage through the roof
Thus, knowing the fire safety rules and instructions for arranging the main components, you can install a chimney for a bathhouse yourself. To do this, you need to purchase all the materials and basic elements of the system. Before firing the stove for the first time, time is required to dry the sealants used (approximately 1 day) and check the tightness of all joints of the chimney duct.
Step by step installation guide
If you do not have enough skills in this area, then it is better to choose a strictly vertical chimney with a pipe cut on the ceiling of the bathhouse. Installation is carried out according to the following algorithm:
- The first step is to purchase the materials that will be needed in the process. These include: directly pipes of the correct diameter, clamps, rubber gaskets for waterproofing, expanded clay, umbrella, fire-resistant asbestos;
- Before installing the stove, the surface behind it is polished using fire-resistant asbestos;
After installing the stove structure, we proceed to installing the chimney in the bathhouse. To do this, a damper is installed on the stove pipe, which is the primary part of the chimney, equipped with a special valve. It serves to regulate the draft force in the chimney. If the valve is half closed, the flow of passing air will be reduced, and therefore the heat in the bath will remain longer; A drawing of the future hole is made in a predetermined place on the ceiling. Its diameter must exceed the diameter of the chimney. Next, according to the finished drawing, an opening for the pipe is cut out. We strongly recommend that you install a metal box with which the chimney will cut into the ceilings. After the pipe is passed through this unit, it is tightly covered with expanded clay or laid with basalt wool. The part of the ceiling closest to the pipe is cleaned with fire-resistant asbestos; Next, using the same principle as in the case of the ceiling, a hole is cut in the roof. In order to carefully guide the pipe through the rafters, bends are used
It is important to remember safety, so if the material with which the roof is covered is flammable, the outlet location is protected with a metal or asbestos sheet; When the pipe is removed through the roof, it is necessary to attach a thick rubber seal on top of it, which serves as waterproofing for the chimney. The seal is treated with a fire-resistant sealant to completely prevent moisture from getting inside; The chimney components must be installed until you reach the desired height of the structure
After this, a special umbrella, called a “fungus”, is attached to the top of the pipe to protect it from various atmospheric precipitation, debris and tree branches.
Information. The key feature of a well-equipped chimney is that even 7-8 hours after heating the bathhouse, heat remains in the room.