A bathhouse with a bathroom is both a modern requirement for comfort, and in some cases an urgent need. Of course, toilet equipment creates a lot of additional problems associated with waste disposal, increasing sanitary standards, and most importantly, allocating space in a small building where the dimensions of all rooms are limited. When planning the construction of a bathhouse, you should correctly assess the need for a bathroom in it and the type of such establishment.
Bathroom in the bathhouse - a convenient option for a bathhouse and sauna separate from the house
Sewerage layout
The considered sewer elements are connected to each other by a pipe. It is laid in a trench (the diagram is shown in the photo), and always below the freezing level of the soil to ensure year-round operation. A cushion of sand and crushed stone is poured into the trench at the bottom. Currently, plastic sewer pipes have become most popular. They are placed on a cushion with a slope to allow water to flow by gravity. To prevent liquid freezing, it is recommended to insulate pipes using mineral wool or other thermal insulation.
Sewerage in a bathhouse is a necessary and obligatory element of the arrangement and must be carried out in accordance with all the rules. It is entirely possible to do it yourself, but it is necessary to take into account all the recommendations and standards.
Reset organization
Without solving the issue of collecting and disposing of sewage, it is impossible to create a bathroom in a bathhouse. The most reliable and safest in terms of sanitary standards is the construction of stationary septic tanks outside the bathhouse area. They are sealed wells of the required capacity, in which the discharged mass is accumulated and subsequently pumped out by sewer trucks.
In the toilet itself, a standard connection of the toilet bowl to the sewer pipe is provided using standard elements. Next, the pipe is laid in a trench with a slope to ensure gravity flow of liquid (at least 2 mm per meter of length). The depth of its installation must exceed the depth of winter freezing of the soil.
The sewer pipe is connected to a sealed storage tank. A septic tank, as a rule, is made of reinforced concrete well rings with a diameter of 0.9-1.2 m with reliable waterproofing of the joints on the outside. The bottom of the well is filled with concrete 20-30 cm thick and reinforced with steel rods. The top of the septic tank is covered with a concrete slab with a hole for a hatch.
Sewerage diagram for a toilet in a bathhouse with a septic tank and ventilation
When constructing an attached toilet, a cesspool is often used for drainage. The main requirement for it is the tightness of the bottom and walls. It can be made by pouring concrete, from sand-lime brick followed by plaster, in the form of a metal or plastic container. The construction of an attached bathroom begins with digging this hole and arranging it. The advantage of this method is that there is no need to lay sewer pipes.
nuance! When planning storage tanks of any design, it should be remembered that feces tend to decompose, releasing substances harmful to the human body.
To eliminate the risk of poisoning, it is necessary to provide a ventilation duct for the outflow of gases from the storage tanks, and the outlet should be raised above the roof of the bathhouse.
We design a sewerage scheme for a bathhouse
For greater design convenience, the unified sewer system is divided into two types: internal and external. The first includes communications indoors, the second - outside the building. Once you familiarize yourself with the basic principles of constructing a circuit, it is easy to develop it yourself.
Design stages
- It is necessary to draw a plan of the bathhouse, taking into account the thickness of the walls and partitions of the building. Graph paper is best for this purpose, but you can also use a regular piece of checkered paper.
- Indicate the dimensions, mark the installation locations of plumbing fixtures or drain points.
- Determine the location of the main pipe outlet.
- If the bathhouse has a toilet, take into account the need to install a drain pipe.
- Plumbing fixtures are connected to the main pipe along the most convenient and short path, aiming for a minimum number of turns in the line.
- The length of the communications is summed up, taking into account the outlet beyond the outer wall of the bathhouse.
- Proceed to constructing a drawing of the external sewer system.
Rules for designing an external network:
- an inspection hatch is provided at the junction of the external and internal sewerage;
- according to SNiP, inspection wells are installed at the turning points of the main line, at the points of connection of a separate side branch of the pipeline, every 15-35 m of a straight main line with a pipe diameter of 100-150 mm;
- according to SNiP, the slope of external sewerage with a pipe diameter of 110-150 mm is 0.01 (1 cm per 1 meter);
- the first inspection well should be located no closer than 3 m and no further than 12 m from the bathhouse;
- if the site has a large slope and there is a toilet in the room, install a multi-stage sewerage system with drop-off wells.
Materials
The ideal building material for a bathhouse is a rounded log, profiled or glued beam. The speed of construction of a building from these materials is high - this will allow you to start using the premises within a short period of time after the start of construction.
A rounded log is much more durable than a regular log. This is explained by the processing technology: after rounding, the sapwood is removed from the trunk - the wet part of the trunk located under the bark. What remains is the hard core of the tree, it is impregnated with resins or tannins, is almost devoid of moisture and lasts much longer than an ordinary log. The workpiece has a cut on one side of the log that perfectly matches the convex part of the other. In addition, such a structure has a very beautiful appearance and does not require external or internal finishing.
Profiled timber simplifies construction so much that assembling a small structure can take 1-2 days. Such a beam has a profiled surface that connects the material into a lock. There is no need to waste time fixing connections. The pressure on the walls eventually closes the beams into a monolith. Finishing all sides does not require wall paneling unless for decorative purposes.
Log houses made of laminated veneer lumber are becoming increasingly popular. A distinctive feature of this material is its high resistance to aggressive atmospheric influences. Its cost is quite affordable, the walls do not require additional insulation. A structure made of laminated veneer lumber is not subject to shrinkage, so the bathhouse can be used immediately after construction is completed.
A frame bath is the most budget-friendly solution. Construction of this type will cost much less than construction from logs or timber. Experts advise using materials that have undergone chamber drying in the construction of a frame bath - this minimizes the effects of shrinkage, which can affect the integrity of the walls. The structure will require careful antiseptic treatment and good insulation. Moreover, the frame structure has high fire resistance.
Planning is the basis of bathroom design
In theory, the difference between the above schemes for arranging a bathroom in a bathhouse according to the water closet scheme lies in the type and location of the sewer tank. Only if connected to a centralized or local village sewer system, there is no point in installing a storage or recycling sewer tank.
In a simplified, cheap version of organizing a toilet, the role of a sewer storage tank will be played by a primitive cesspool located behind the rear wall of the bathhouse.
If it is decided to build a sewer system for a bath toilet using the most complex, but extremely high-quality method for life, the function of a cesspool will be performed by a factory or home-made septic tank.
It is ideal if future bathhouse owners decide at the design stage whether they need a toilet inside or not. You should choose a place to organize it in the bathhouse in advance, because:
- it is recommended to place the bathroom in the corner of the building so that the two walls of this sanitary and hygienic room coincide with the external walls of the bathhouse;
- You should not choose a place to organize it in the dressing room next to the front door if you plan to receive bath procedures in the winter;
- the cesspool must be at least 20m away from the source of process water;
- the distance between the cesspool or septic tank should be minimal, taking into account the fact that turns of the sewer pipeline should be avoided. Choosing a route with a minimum length will allow you to significantly save on materials;
- external sewerage pipes must be laid with a slope towards the cesspool or septic tank, the approximate size of the slope is 1 cm per linear meter of pipeline.
You also need to calculate in advance the point of passage of the sewerage through the foundation, because when it is poured into the formwork, a sleeve is laid horizontally, the height of which must be higher than the line of laying the external sewer pipeline. Pipes leading to the cesspool should be insulated.
If the sleeve was not placed in the foundation being poured, a hole for the sewer pipe can be made with a hammer or hammer drill, and then the space between the pipe and the foundation can be filled with mortar.
Step-by-step process for constructing a toilet
We strongly advise the owner of a country bathhouse, who has decided on how to install a toilet in it, not to neglect complex options and give preference to a stationary bathroom with a septic tank. Let's look at the rules for its construction.
Laying an external sewer line
Laying an external sewer pipeline to a septic tank located at some distance has its own specifics. By analogy with a stationary water supply, the main route should pass below the depth of seasonal freezing of the soils containing the system. This mark must be found out by contacting the local weather service, or found in a collection of standards for building climatology.
To build a trouble-free sewer system, we will follow the technological requirements:
We fill the trench with the sewer branch first with expanded clay, then with the previously selected soil.
Interior arrangement of the bathroom
We pass a drain pipe through the hole in the foundation and attach an angle joint to it to connect to the toilet outlet; it is better if it is a corrugated pipe. Thanks to the use of corrugation, the toilet itself can be slightly shifted or rotated relative to the drain pipe.
From the common water storage tank we lay a plastic line into the toilet or connect a flexible hose. The container for the bathroom can be separate. Before the water supply enters the tank, install a valve to shut off the water supply. Finally, we fasten the toilet according to the type of its design, using the required number of anchors.
Ventilation is an important component of the bathroom
In order to not be disturbed by unpleasant odors and air pockets in the pipeline, the internal sewer system must be equipped with a ventilation system. You can position the ventilation riser:
The first option is easily feasible at the bathhouse construction stage, if the installation of a toilet was included in the project. The second is quite acceptable if the toilet was built after the construction of the building. It should be remembered that the ventilation riser installed inside the bathhouse must rise 70 cm above the intersection point of the roof.
It should not be installed near a smoke exhaust duct, or near window or door openings. To construct ventilation for a bath toilet, a plastic pipe with a diameter of 50 mm is suitable, which is considered sufficient for a rarely used bathroom.
How to decorate a bath toilet?
Despite the general high humidity traditional for a bathhouse, it is recommended to decorate the toilet with moisture-resistant tiles, because it will need to be washed using disinfectants. Moisture in general, and even more so water with household chemicals, has an extremely negative effect on wood.
Ceramics are laid on a wooden floor using a floating pattern, i.e. the screed is poured on top of the plastic film without adjoining the walls of the bathhouse. The resulting gap is finally closed with a plinth. A floating pattern is also used for laying tiles on wooden walls.
First, a “moving” frame is constructed for the installation of plasterboard sheets. They will act as a rigid base. The walls can be finished fragmentarily or completely, it all depends on the personal preferences of the owners.
Information about the rules and technological principles of constructing a toilet in a country bathhouse will be useful for both independent craftsmen and owners who have turned to the services of a team of builders to monitor their actions.
Source
Choosing the type of sewer system
To improve the bathhouse, it is possible to use three types of individual sewerage:
- non-pressure;
- pressure;
- connected to a centralized city drainage system or to the existing sewer system of a private house.
Gravity system
Gravity sewerage
The non-pressure method of drainage is otherwise called gravity. This is the simplest and least expensive type of sanitary sewer system. Its main advantage: energy independence. Installation of a free-flow system requires careful adherence to the slope of the pipes (1-1.5 cm per 1 linear meter) and is impossible if the terrain of the site is difficult.
Sewer slope
To transport wastewater, pipes of a larger diameter are required than when installing a pressure system. Straightness of the highway is highly desirable. If the pipeline diagram includes turning points, inspection wells are installed in these places. This rule is relevant for any type of sewer system.
Pressure system
General scheme of pressure sewerage
The pressure sewer system provides for the forced transportation of wastewater, which is provided by a pump or pumping station. The equipment can be installed both indoors and outdoors. A pressure sewerage system for a bathhouse is built if for some reason it is impossible to make a non-pressure one. Features of this type of sewer:
- pressure is more expensive than non-pressure;
- volatile;
- requires insulation of equipment in winter.
Inset sewerage system
A less labor-intensive, but most troublesome way is to connect to a centralized sewer network. This method is not possible for all bathhouse owners. Therefore, it makes no sense to consider it in all details.
Connection to a centralized sewer network
More often, it is used to connect the wastewater system to an existing septic tank on the site. However, in this case, you will have to choose the type of drainage system (pressure or gravity).
Connection to a septic tank
Recommendations
As is easy to understand, first of all you should decide on the placement of the building on the site and what it will have to demonstrate, that is, the necessary functionality. Only after this can you begin to draw up a project from scratch or select a standard scheme.
Wherever it is impossible to connect to the central sewer system, it will be necessary to provide in the plan an outlet for connecting a sewerage hose
Important: at the same time, it is also worth considering how a special vehicle will approach from outside. In regions with large amounts of winter precipitation, it is recommended to orient the exit to the south
Then the snow at the door will accumulate less, it will more likely melt in the spring, and even freezing winds will cause less inconvenience. It is advisable to orient windows in the rest room and other auxiliary rooms to the west to capture maximum daylight. But these two rules only apply in a completely open and free area. Sometimes darkness and wind shadows from other buildings, fences and tall trees force you to change your approach. Having decided on the main considerations, you can already think about the layout of individual rooms.
The design of the dressing room is always drawn up in such a way that even in the cold winter it retains heat well. Therefore, sometimes it is more correct to even slightly reduce the total area, using a thick layer of insulation and wind protection, than to disturb the microclimate. For somewhat frequent use, it will be necessary to provide space for cabinets. They will take up more space than hooks for clothes, but they immediately give rise to a higher level of the owner’s needs. When planning a terrace, you must immediately provide for its use as a summer replacement for the vestibule. For this purpose, some part can be set aside for a barbecue or barbecue.
Many bathhouses try to use a shower. There are several ways to organize it:
- summer option (in an extension on the street);
- a cabin, as usual in a house or apartment;
- stationary version on a pallet;
- tub.
In any case, the shower area is separated from other parts of the building. In a steam room for 1-2 visitors, a single shelf with a backrest is sufficient. For fairly large sizes, the use of rows of shelves is provided. When determining the height of all rooms, it is necessary to leave some margin over the height of the tallest resident of the house or invited friends. When thinking about arranging a steam room, you can, to save usable space, attach shelves to the wall, and not to the floor, then leaving buckets, basins, and ladles underneath them.
The choice of additional rooms for a private bath is limited, in addition to its size, only by the finances and imagination of the owners. For more pleasant and festive leisure, a billiards room is usually provided.
The arrangement of the rest room deserves special attention. A chic solution for its design would be to use a wood-burning fireplace. True, this option is very expensive - both upon purchase and upon further use. And a few more important rules:
- the steam room is kept as far away from the entrance as possible;
- It is undesirable to enter there directly from the vestibule;
- It is encouraged to place the steam room, shower, washing room and toilet along one wall (to allow all communications to run more directly);
- On the qualitative plan, all electrical network inputs and its distribution throughout the premises must be noted.
When arranging a two-story bathhouse, there is another rule: all “wet” rooms are located below, and all “dry” rooms are located above. This not only eliminates the risk of leakage, but also simplifies the installation of the same internal water supply. We must not forget about fire distances when calculating all sizes. If there is a particularly acute shortage of space (for example, in rooms of 2x2 m), the most rational solution is to use an electric stove rather than a fire one.
Design Features
A bathhouse with a bathroom requires a special approach to design, because... Already at this stage, issues of not only the placement of the toilet on the plan, but also the supply of water supply, organization of sewerage and ventilation should be worked out. There are many standard bathhouse designs that you can safely use on your site. You can choose options for large buildings: a two-story bathhouse with a bathroom or a design for a bathhouse with a bathroom and an attic. In such structures, a certain problem arises with ventilation. Thus, a bathhouse with an attic and a bathroom requires the passage of a ventilation riser through the living space, which requires its reliable insulation and placement along the edge of the attic.
Figure 2. Project of a 6x6 m bathhouse with a bathroom
Typical popular projects include the following:
- 6x6 bathhouse (the design with a bathroom is shown in Fig. 2);
- a bathhouse made of timber with a toilet (Fig. 3);
- bathhouse with shower and toilet (Fig. 4).
Figure 3. Project of a bathhouse made of timber with a toilet
Figure 4. Design of a bathhouse with shower and toilet
In large buildings, finding a place for a toilet is not difficult
In such projects, it is important to place it optimally relative to other rooms. Naturally, the greatest need for a bathroom arises after a bath procedure during a period of relaxation in the relaxation room, which must be taken into account
However, the use of the establishment should not interfere with other vacationers.
It is somewhat more difficult to allocate space in small buildings, but standard options are provided for them as well. Thus, 4x5 bathhouse projects with a bathroom and even a 2x6 bathhouse project with a small bathroom are available for implementation. In small bathhouses, mobile options are more often installed, especially when the desire to increase comfort arose after several years of their operation.
”
A bathhouse with a bathroom is not only a tribute to fashion and prestige. With frequent and year-round bathing procedures, organizing such convenience becomes a necessity. The desire for such a little comfort arises especially acutely when there is a rest room, and also when there are small children in the family. It is best to plan a toilet inside a bathhouse at the design stage, but the problem can be solved in an existing establishment.
Design solution
Information. The design of the building must be taken into account in the project. And this is understandable, because today a bathhouse is not only a room for performing hygiene procedures. It is also a place designed for relaxation and wellness treatments.
This means that the aesthetic appeal of a bathhouse complex is as important for a modern person as the functional side of a bathhouse. How to decorate the interior space and what to cover the exterior walls with is a purely individual question. However, there are also projects that are suitable for everyone without exception.
With bay window
What can harmoniously fit, for example, in a small 5x4m bathhouse with a bay window?
- Pairs department;
- Pool;
- Restroom.
Drain or sewer
Another fundamental point for installing a toilet is draining wastewater, that is, organizing a sewer system.
If it is possible to connect to the network sewer, then this is very good
In the bathhouse itself, in the toilet, you need to install a pipe to which the toilet will subsequently be connected. To do this, you need to accurately determine its location and prepare the space for work. The fact is that simply running the pipe through a wooden floor will be wrong, as this will create a danger of the floor rotting and the spread of dampness. Therefore, it is better to at least lay the floor in the toilet area with ceramic tiles - make a square of 60 by 60 cm, but it would be more practical to lay the entire floor with tiles. But this is already finishing, and we are talking about drainage.
So, you need to cut a round hole in the floor, the diameter of which should be slightly larger than the diameter of the pipe. Lay a metal mesh on the floor equal in size to the planned tiles (60x60 cm or over the entire floor), the mesh must be shot to the floor with a construction stapler. After this, you need to prepare a concrete solution according to the following formula:
1 part water + 2 parts sand + 1 part cement
You will need a little solution at this stage, so do not overdo it. Now you need to carefully cement the prepared space and let it dry. At the same time, it is necessary to remove the drain pipe and secure it in the hole with a solution, this will ensure the reliability of the structure and prevent the spread of a damp environment. All this work will take about a couple of days to dry. The diameter of the pipe for the sewer outlet is usually 100 mm; this diameter is considered optimal for a toilet. Next, from the bathhouse the pipe is laid directly to the drainage point. If it is a sewer, then the pipe is connected directly to the main line. But if you decide to make a separate pit, then you need to say more about it. To finish the conversation about the pipe, it should be noted that the drain pipe must always run at a slight slope along its entire length. It should be buried approximately 50-60 cm into the ground, depending on the climate in which you live.
It is better not to leave the drained sewer next to the tree, but to concrete the floor around it
Water supply
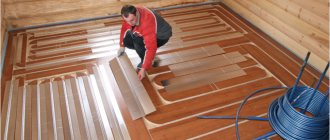
If you have already decided on the location and know exactly where the toilet and plumbing will be located in it, then you need to think about how to supply water to this location. This must be done at a stage when plumbing has not been installed and finishing work has not been carried out. If the bathhouse already has a shower, then the problem is reduced and you will only need to redistribute the water supply from this room. But if there is no water in the bathhouse at all, then there will be more worries.
The first thing that needs to be decided at this stage is how the bathhouse will be used in the winter. If you rarely visit it or it is located in a country house where no one lives, then the water will have to be drained from the system in cold weather. Otherwise, the water in the system will freeze and the entire structure will become unusable. If you don’t want to drain the water, or the bathhouse is located near the house, then you need to think about the heating system. In large baths, which are often used and in which a lot of time is spent, traditionally, a classic heating system is installed.
If there is no heating in your bathhouse, then you can simply insulate the water supply pipes; for this, special insulating sleeves are put on them at the installation stage. They are sold today in any hardware store. Of course, you can wrap the pipes with insulation and fix it, but this is very labor-intensive. In addition, special couplings will not only protect the pipe from freezing, but also prevent the formation of condensation. Therefore, there is no point in experimenting, especially since such couplings are very inexpensive.
It is most convenient to add water to the bathhouse toilet during the construction stage
The installation of a water supply must be approached responsibly and carefully, since the entire operation of the bathhouse will depend on the quality of the water supply. For water supply to the bathhouse, you need to use a plastic pipe with a diameter of 3-4 cm. When purchasing the necessary materials, you also need to purchase plastic corners and fittings that will be needed to connect the system. The plastic water supply system is connected using a special pipe soldering iron, so if you don't have one, it's worth thinking about where to get one.
Mobile dry toilets
A more fashionable name is powder-closet (dry toilet). Does not require any construction work, no water supply or cesspool required. The body's waste products are collected in sealed containers with peat, and the contents are removed as they are filled. Where? Question. You can’t throw it into a flowerbed, as the manufacturers advertise; you’ll have to dig a separate hole each time or build a large storage tank. And if it’s winter, how to dig holes on the site?
Peat dry toilets
But this is not all the problems that arise when using dry closets. Can you imagine a relaxation room in a bathhouse or dressing room, in the corner of which there is a dry closet? No? And we can't. In this regard, we strongly do not recommend purchasing such devices and do not believe the manufacturers’ advertising brochures. You can take these toilets with you when you go on a picnic. And then only if you are a very well-mannered person, you don’t throw anything away in the forest and you bring all the waste to your dacha and bury it in the garden bed.
Peat dry toilet
Disposal of peat from a dry closet
Why problems arise
First of all, you need to decide whether a bathroom is needed in the bathhouse. Maybe it’s easier to run to an existing toilet if necessary? This issue must be resolved taking into account all the features of the bathhouse itself and its comfort.
If a stationary toilet is located very close to the bathhouse or it is used quite rarely, then it is not advisable to place the bathroom inside. The same can be said if there is a very small bathhouse in which there is no rest room.
In most cases, the need for a toilet inside a bathhouse is quite urgent. As a rule, private areas are fenced off with an openwork or mesh fence, which does not allow you to run to the toilet undressed, and getting dressed and undressing spoils the entire bathing procedure. If the bathhouse is used in the cold season, then it is generally difficult to do without a warm internal toilet, especially during a leisurely process with relaxation in the relaxation room. The relevance of such an institution is dictated by the presence of children. They definitely shouldn’t be allowed out into the street when they’re hot. Finally, the design of a bathhouse with a bathroom is about providing comfort and increasing prestige, when you are not ashamed to invite friends to take a steam bath in the bathhouse.
The bathroom is more suitable for a large bath or sauna with a relaxation room
What is the problem with placing a toilet in a bathhouse? The following circumstances can be highlighted:
It is necessary to carefully consider the sewerage and drainage system in the bathhouse
Construction stages
The construction of a bathroom occurs in several stages:
- Determining the type of toilet and method of drainage.
- Choosing a location, drawing up a toilet project.
- Laying sewerage in accordance with technological features.
- Installing a toilet, connecting the sewer pipe to the toilet.
- Interior arrangement.
- Selecting the type of ventilation, location and installation.
The final stage will be finishing. It is better to use ceramic tiles - they are resistant to moisture and do not change appearance when exposed to household chemicals.
A correctly installed toilet increases comfort when taking bath procedures, but when installing it it is important to follow the technology
Video: stages of construction of a country toilet with a shower under one roof
With little effort, you will build the necessary and convenient building with your own hands. Rest and living at the dacha will become much more comfortable. To take a swim after gardening on a hot day, you don’t need to heat water or waste electricity. Thanks to various external finishing materials, a toilet and shower combined in one building will not disturb the architectural ensemble of country buildings.
- Author: Andrey Sokolov
Rate this article:
- 5
- 4
- 3
- 2
- 1
(13 votes, average: 3.2 out of 5)
Share with your friends!
Design Features
To avoid the need to rebuild and remodel the bath room, the initial stage should be designing a steam room. The finished project will give you the opportunity to decide on the purchase of materials and necessary goods, this will save your time and money. You need to choose the right place on the site to locate the steam room with adjacent rooms.
When choosing a location, you need to know a number of important points:
- places where groundwater passes close to the surface are excluded;
- if you manage to place the steam room on a hill, then the problem of draining dirty water will be solved naturally;
- the bathhouse should be located at a great distance from other buildings, the distance from the country house should be at least eight meters, and about 5 meters to the well;
- if there is a lake or reservoir nearby, then it is advisable to build a bathhouse at a distance of 10-15 meters from the shore, which will eliminate the need to build a pool (any nearby body of water will solve the problem of water supply);
- the entrance to the bathhouse should be located from the south, so that during the cold season, snowdrifts do not block the door;
Determining the location
Previously, bathhouses were built mainly without a toilet, since the toilet was located in the yard and everyone used it. There were no toilets in the houses either - they considered it something unnecessary. But modern man has become accustomed to comfort in everything and is no longer ready to put up with inconvenience even when visiting his own bathhouse. Therefore, installing a bathroom in a bathhouse is very relevant and in demand. The main nuance in this matter is the fact that the bathhouse, as a rule, is small in size, and it is not easy to allocate a space in it even measuring one meter by one meter.
In addition, the bathhouse is finished with natural wood and the building itself is also often built from wooden logs, so the owners fear that it will be difficult to organize ventilation. After all, wooden surfaces absorb odors very strongly, and the toilet can ruin any vacation. But not everything is so simple here. If you choose the right location for the toilet and comply with all the technology requirements, the result will be quite reliable and acceptable.
So, the toilet must be located so that the entrance to it is not visible from the rest room; it is better to organize such a “nook”. This will not only avoid drawing unnecessary attention to such a delicate issue, but also possible odors will linger. Also, when choosing a place for a toilet, you need to take into account the location of the sewer pipe or septic tank on your site, since you will have to drain the drain exactly there and the shorter the distance, the lower the costs.
It is also worth saying a few words in favor of completely abandoning the toilet in the bathhouse, because such an opinion is quite common and even occurs more often than a decision in favor of comfort. So, a toilet in a bathhouse will lead to the following inconveniences:
But if all these problems don’t scare you, then let’s move on to the immediate description of the work.
The toilet in the bathhouse should be located so that it does not attract unnecessary attention.
Interior items in the washing room
The ease of use of a shower in a bathhouse depends on the equipment of the room. The room has hooks for clothes and cabinets for detergents. Shelves for storing textiles are often made of wood. Models made of strong plexiglass will help to keep the space optically uncluttered.
Furniture in the roomSource irkutsk.zoon.ru
Instead of traditional benches, compact chairs can be placed along the walls. Wooden sun loungers look impressive, next to which there are cabinets on wheels. The size of the table depends on the washing parameters in the bathhouse. In a large space, a massive table is appropriate; in a small space, a folding model or a bar counter is appropriate.
Arrangement of a washing roomSource izhbani.ru
The washbasin is not a mandatory element of the interior. If the size of the room is limited, then the functions of the sink are taken over by the shower in the bathhouse. Near one of the walls you can place a tall narrow cabinet on which you place a tub of water. Shelves with household chemicals are installed nearby.
A shower cabin is a convenient and practical option, which is often used in a bathhouse. Closed models with swinging doors are easy to place in a spacious washroom. Strong acrylic glass can be traditionally transparent or with a smoke effect (matte). In a compact room, designers recommend options with sliding doors (accordion).
Closed cabinSource dizainexpert.ru
If the shower in the bathhouse is needed only for washing, then open models are used. The design consists of a wall-mounted mixer and a tray. Based on the type of material, there are 5 types of bowls:
- Enameled. The steel is coated with a thin protective layer against destruction. Plumbing is very easy and inexpensive. Strong water pressure causes iron to rattle, and minor damage leads to rust.
- Ceramic. Beautiful, elegant earthenware models will harmoniously fit into the interior of a shower room in a bathhouse.
- Cast iron. The surface of heavy pallets is covered with a layer of enamel. Due to their weight, the structures are difficult to install, but durable.
- Acrylic. To prevent a light shower in a bathhouse from bending under the weight of a person, it is placed on supporting legs during installation.
- Marble. Beautiful, decorative elements are very expensive.
Shower bowlSource strojudacha.ru
A mirror is often used to visually change a space. The irregular shape of a washing area in a bathhouse can be easily transformed with reflective surfaces. If there are no windows, then a decorative element with lighting and curtains will replace the glass block.
Required Tools
When building a country toilet with a shower, you will need the following tools:
- Bayonet and shovel shovels;
- Jigsaw or hacksaw;
- Concrete mixer;
- Electric welding machine;
- Large container with water;
- Buckets or wheelbarrow for carrying concrete mixture, gravel and sand;
- Pliers and wire cutters.
- Screwdriver or Phillips screwdriver.
- Axe.
- Hammer.
- Building level.
- Square.
- Yardstick.
- Cord.
- Self-tapping screws and nails.
- Plane.
- Pencil.
Types of structures
It is considered convenient to connect to a centralized backbone network integrated with the home system. If this option is not available, there are 4 solutions for draining the liquid:
- Drainage well. The model is suitable for a small washing room in a bathhouse. The “cushion”-based design will ensure natural drainage of water into the ground.
- Storage tank. The wastewater enters a special tank that must be pumped out.
- Cesspool. The underground structure is placed at a distance of 2.5 m from buildings (residential, technical and bathhouses). Dimensions are calculated based on the number of people who will use the steam room.
- Septic tank. Sewers come in single- and double-chamber types and operate on the principle of a cleaning well. The role of a reservoir is played by barrels or containers without a bottom. Crushed stone with sand is used as a filter.
When installing a shower drain in a bathhouse, pay attention to the location of groundwater. If the distance is close, the volume of the chamber is increased, otherwise the drains will not fit inside the structure
It is recommended to install a drainage pit and a septic tank in sandy soil. In clay species, moisture stagnates.
Laying the foundation
The reliability and longevity of a home depends on the foundation. In the place where the extension is planned, the foundation of the dwelling is opened. At the same level, a new foundation is laid.
The optimal foundation option for a 1-story wooden house is a monolithic strip foundation. Its depth is 0.5 m. The width is 300 mm.
Interior decoration of the bath
For a brick and block house, a full-fledged foundation is created that can withstand heavy loads.
The base parameters depend on:
- wall structures;
- bearing load;
- type of building materials.
The stages of foundation construction look like this:
- Determine the location of the bathhouse.
- Drive pegs around the perimeter.
- Using the pegs as a guide, stretch the construction twine.
- Set aside the width of the foundation.
- Install cast-off.
- Stretch 2 lines of twine.
- Check the diagonals and the accuracy of right angles (it is advisable to use a range finder and laser level).
- Dig a trench in accordance with the markings. If the house will have a central sewer system, then the trench needs to be drawn to the closest connection to the pipe. Otherwise, it is carried out to a drainage pit, which is arranged separately from the home.
- If the soil is sandy, install temporary formwork. It helps prevent the walls from falling to the bottom. The internal walls of the formwork are laid with roofing felt or film.
- Install a pipe into the trench under the communications and fill it with sand and soil. The trench under the base is filled with sand (coarse-grained) and crushed stone (2/3). Then you need to moisten the backfill with water and compact it well.
- Place tied rods of reinforcement into the trenches, secure the frame with clamps made of plastic.
- Pour concrete, level, dry. Waterproof with roofing felt or bitumen mastic.
It is advisable to lay the foundation in summer or early autumn. It should dry well and stand for 3 weeks.
In winter, screw piles are used to construct the foundation.
Installing a stove in a bathhouse
The last item on our list, but not the least important, will be installing a stove in the bathhouse. There is a separate article on the website about choosing sauna stoves and calculating their power.
Here we will dwell more on the process of installing a stove in a bathhouse. It would be good if a separate foundation was equipped for the sauna stove. It can be connected to the general foundation of the bathhouse, if it is capital. And you should not connect the stove foundation with the general one if the bathhouse is built on a small strip or on block pillars.
After purchase, a cast iron or steel stove should be heated outside 1-2 times - this will burn off all the factory dirt that is in any sauna stove after production.
The sauna stove should first be heated - “burned out” - outside, and only then installed in its place in the sauna.
Only after this is it worth installing the sauna stove in its rightful place in the steam room. And only after this can you pull the chimney up and cut a hole in the roof for the pipe. If you do this in advance, you may make a mistake. Sometimes you see a closed hole in the roof next to a pipe - the result of hasty actions by the owner.
Foundation
Regardless of the type of foundation chosen, you should consider in advance the presence of a centralized water drainage system. It will not be superfluous to carry out a soil analysis before construction to understand what type of foundation is most suitable. The foundation must be strong and frost-resistant.
Timber is a lightweight material that does not require a solid foundation. But for two-story baths, it is worth choosing a strip foundation with a depth of up to 0.5 meters; the base of the bath should be above ground level.
Quite often, a columnar foundation is used - these are concrete beams made of blocks and bricks, erected to a certain height. They are installed at a distance of 2 meters from each other along the entire perimeter of the future bathhouse, at the intersections of load-bearing partitions, in the place where the sauna stove is installed. However, it is not recommended to install it on clay soils.
Steel tubular supports with a propeller blade are screwed into the ground below its freezing level with the same pitch as in the previous version. It can be installed even on a steep slope.
Installing a stove in a bathhouse
Here we will dwell more on the process of installing a stove in a bathhouse. It would be good if a separate foundation was equipped for the sauna stove. It can be connected to the general foundation of the bathhouse, if it is capital. And you should not connect the stove foundation with the general one if the bathhouse is built on a small strip or on block pillars.
After purchase, a cast iron or steel stove should be heated outside 1-2 times - this will burn off all the factory dirt that is in any sauna stove after production.
The sauna stove should first be heated - “burned out” - outside, and only then installed in its place in the sauna.
Only after this is it worth installing the sauna stove in its rightful place in the steam room. And only after this can you pull the chimney up and cut a hole in the roof for the pipe. If you do this in advance, you may make a mistake. Sometimes you see a closed hole in the roof next to a pipe - the result of hasty actions by the owner.
Useful tips
Construction of a bathhouse is an important and responsible process that requires a lot of effort and experience.
Therefore, a few useful tips will help any developer build a convenient, comfortable bathhouse as quickly as possible:
It is very important that dirty water does not accumulate and flow away from the building. To do this, it is necessary to locate the building on a hill. There should absolutely be no drafts in the bathhouse, so it is necessary to correctly position all the doors in the room
Doors cannot be placed opposite each other. To retain heat as much as possible, doors in the bathhouse should be of minimal size. The structure requires a minimum number of small window openings. Low ceilings. To warm up the room as quickly and thoroughly as possible, the ceilings are placed at a height of about two meters from the floor.
In some cases, when the stove in the bathhouse is the only source of heat, it is necessary to carefully plan its location
Heat from the stove should flow to all compartments in the bathhouse. It is extremely important to follow fire safety regulations. It is necessary to equip a dryer for towels, washcloths and other things at a safe distance from the stove. It is necessary to correctly draw up a plan for this room
The scheme must be thought out to the smallest detail. The interior is also thought out in advance.
In the modern world, a bathhouse building is used not only for bathing procedures, but also for relaxing in pleasant company. Based on financial capabilities, a person builds a bathhouse with various additional rooms.
For an overview of the bathhouse with a relaxation room, see the following video.
What to consider?
When building a bathhouse, you need to take into account many nuances. The building must be located on the site at a distance from other structures. You cannot install a bathhouse close to a fence, and you also need to take into account that it is located without disturbing the neighbors. Otherwise, problems are possible that will entail fines and dismantling of the bathhouse.
If possible, it is better to install such a structure in a quiet place, away from the road, surrounded by greenery. It's great if there is a body of water nearby. It is worth considering in advance the installation of all communications. The area should be level, clean, with dense soil. If there are no such conditions, then the surface needs to be prepared: cleared, leveled.
There are many options: wood (logs, timber), various blocks (foam concrete, aerated concrete), brick. When choosing a material, you need to focus on its price, durability, aesthetic and performance qualities. And, of course, the structure must correspond to the general style of the entire site. It is advisable to build a bathhouse from the same material as the main house.
Interior decoration
These will be your main purchases; you can add or remove something from the list at your discretion.
Now we need to consider step by step the internal work in the bathhouse toilet:
Laying ceramic tiles. Most often, in a finished wooden bathhouse, when installing a toilet, ceramic tiles are laid only on the floor. If you cemented part of the floor when removing the sewer, then the work is simplified. If not, then you need to lay a metal mesh on the floor surface so that it covers exactly the distance that you will be tiling. Therefore, you need to prepare tile adhesive as indicated on its packaging. The tiles must be laid very carefully and evenly, checking your work with a building level. If you decide to lay tiles only around the toilet, and not along the entire floor, then the edge of the resulting space must be treated with plastic or metal molding, which is laid immediately under the tiles.
Ceramic tiles fit perfectly on a wooden surface
Toilet installation. As a rule, it does not take much time, the main thing is to do everything carefully and in exact accordance with the instructions included with the plumbing fixtures. The fact is that today there are many models of toilets on sale and different requirements may be imposed on their installation. Therefore, it is necessary to connect the tank to the water supply; to do this, you need to remove a special hose from the tank, which will be connected to the water pipe. Therefore, a siphon is installed in the tank, which is a ready-made mechanism, and the system is checked. The toilet bowl at its junction with the floor can be treated with a transparent sealant, this will avoid excess moisture on the floor.
Installing a toilet according to instructions
Door installation. Even at the stage of creating a toilet in the bathhouse, you can install a door, but it is better to do this at the final stage. The fact is that if you lay tiles in the toilet, the door may get dirty during this work. The door must be installed in one day, clearly leveled and the space between the frame and the wall filled with polyurethane foam. After this, the door cannot be touched for about a day - it must dry.
The door must be installed carefully and wait for it to dry completely.
Source
Why do you need a project and how to choose it
Not only Russians love to take a steam bath, which is not even a place for ablution, but a place for cleansing and rejuvenating the body. That’s why there are many types of them. There are Scandinavian saunas that are very hot because they have almost no steam; there are Japanese ofuro baths, which instead of a steam room have a spacious plunge pool with hot water; There are Turkish hammams that are maximally saturated with moisture, but at a low temperature.
Russian baths are damp, since the heat effect in them is obtained not due to extreme heating, but due to hot steam. The operating mode also affects the selection of building materials, internal and external cladding, and heating methods.
Traditional Russian bath
- The project must take all this into account. And who will implement it - a hired team or you yourself, it doesn’t make much difference. The main thing is to choose the right place for the building, which should be located on the leeward side and preferably not in a lowland.
- A suitable place is when the steam room can be placed near a natural body of water to plunge from the steam room into cold water. But not everyone is so lucky, so many people build an artificial pond next to the bathhouse - if not for swimming, then for pleasant contemplation (read on our website: how to make a beautiful pond in your dacha).
- In general, to make the construction comfortable, you need to take into account many nuances. One of them is the choice of a project that takes into account the number of people using the steam room and provides for passive relaxation. Therefore, not just bathhouses are often designed, but holiday homes with a sauna and other amenities.
Beautiful examples
Today there are many different designs for baths combined with a kitchen. To make the right choice in favor of a particular project, you should take into account the area of the land plot, personal preferences and financial capabilities. Let's look at the most popular options.
Steam room with kitchen and small greenhouse. This layout is convenient because the summer kitchen can be used as a dressing room, and the stove placed in it can be used as a sauna heater. The pipes coming from the water heating tank must be connected to the pipes passing through the greenhouse. Thanks to this, due to the passage of warm water, which heats up during the heating of the bathhouse and cooking, the structure will always be heated. In the greenhouse you can place a compact sofa, a coffee table and a couple of armchairs. This will create an original place to relax.
For information on the interior decoration of a bathhouse with a kitchen, see the following video.
Water seal options
A water seal is an important element of the sewer system, the purpose of which is to cut off unpleasant odors coming from the septic tank (drainage pit). Simply put, this is a water plug that remains in the pipe even if the bathhouse is not in use. An example of the simplest water seal is a U-shaped siphon. In a pipeline made of plastic pipes, a water plug is created using three shaped elements: bends.
The difficulty is that when the sewer system is rarely used, the water in the water seal tends to evaporate. In this case, experts recommend installing a dry shutter. It is a simple plastic or metal structure equipped with a spring and a valve (membrane) that blocks the exit from the pipe. When water enters the system, the damper is folded back under its pressure, and after the flow passes, it returns to its place.
Craftsmen make unique homemade valve systems for bath drains. If you wish, you can use one of the following options.
| System Description | Illustration |
| A plastic funnel with a diameter slightly larger than the cross-section of the pipe and an outlet with a diameter of 3 cm is installed in a vertical position into the gap in the sewer pipe. A plastic ball (for ping-pong or other) is placed in the funnel of such a size that it blocks the narrow exit. When water gets into the pipe, the ball floats up. | A funnel and ball valve. Example for clarity |
| To install a dry seal for a plastic sewer with a pipe diameter of 50 mm, you will need a 50/110 adapter, which needs to be slightly modified: cut at an angle and attach a circle of thick rubber to it. After which the structure is installed at the outlet of the pipe in a septic tank or drainage pit. | Dry shutter Dry seal in the sewer pit |
Ways to decorate a terrace
To create a cozy atmosphere, the terrace must be created in such a way that you want to relax on it. According to the method of designing a terrace or veranda, there are:
Fully open Glazed using double glazed windows, wooden frames, panoramic glazing or polycarbonate
Important! You can install removable closing elements that are removed in the summer, allowing you to make the space open. With the ability to close off the space from prying eyes and light breezes with screens or special fabric sheets.. In the photo below you can see bathhouses with a terrace and barbecue and other options for such structures:
In the photo below you can see bathhouses with a terrace and barbecue and other options for such structures:
Installing a stove in a bathhouse
Here we will dwell more on the process of installing a stove in a bathhouse. It would be good if a separate foundation was equipped for the sauna stove. It can be connected to the general foundation of the bathhouse, if it is capital. And you should not connect the stove foundation with the general one if the bathhouse is built on a small strip or on block pillars.
After purchase, a cast iron or steel stove should be heated outside 1-2 times - this will burn off all the factory dirt that is in any sauna stove after production.
The sauna stove should first be heated - “burned out” - outside, and only then installed in its place in the sauna.
Only after this is it worth installing the sauna stove in its rightful place in the steam room. And only after this can you pull the chimney up and cut a hole in the roof for the pipe. If you do this in advance, you may make a mistake. Sometimes you see a closed hole in the roof next to a pipe - the result of hasty actions by the owner.
Classification
All bath toilets can be divided into 3 groups: outdoor attached, mobile and stationary. The choice of a particular option depends on many conditions: architectural nuances, climate, financial capabilities, personal preferences.
Outdoor attached
An attached outdoor toilet is a traditional option that has been used for a long time as the only correct one. And although modern doctors strongly do not recommend its installation, many bathhouse owners are still installing it. And this is not surprising, because such designs have a number of advantages:
- They can be built at any time, both at the stage of assembling the log house and during the operation of the bathhouse;
- Eliminates the possibility of unpleasant odors forming;
- The internal area of the premises is preserved;
- The entrance to the toilet can be made from two sides;
- There is no need to empty utility networks for the winter;
- You can choose any size and design.
Modern technologies make it possible to equip such a toilet quickly and cheaply. And to ensure a comfortable microclimate, an economical heater is installed.
Using block containers
The use of block containers greatly simplifies the construction of bathhouses with a toilet, shower and utility unit. They include everything you need, including suitable furniture. Block containers for bathhouses are lined with wood inside, and their design corresponds to a classic Russian bathhouse. The entire structure is completely fireproof.
In addition, if necessary, such a bath can be easily transported or moved to another location. All necessary equipment is included in the kit.
Basic design work: determination of the main characteristics of the building
For the convenience of visitors and to create comfortable conditions for receiving bath procedures, it is necessary to provide all the necessary premises. One of the main rooms is a steam room, in which a completely unique temperature and humidity regime and microclimate are created using a heater stove. Together they have a powerful healing effect.
To achieve it requires quite a lot of time, and therefore a long stay of visitors. Designs of bathhouses with a toilet provide for the presence of a full-fledged bathroom, which ensures the possibility of their year-round use. For its installation, an isolated room of sufficient area is allocated, which is equipped with a toilet with a flush cistern.
The simplest solution is to install a dry closet in a designated area that does not require connection to a sewer system. If the wastewater from the bathhouse is drained into a drainage field, care should be taken to connect the bathroom to a public or independent sewerage system. Discharge of sewage containing human waste products directly onto the ground is not allowed and is fraught with serious consequences.
In addition to the listed premises, the bathhouse should have a washing room and a dressing room or rest room. Recently, more and more often, the preliminary and final part of bath procedures begins in the shower. For these purposes, a hydrobox is installed in the washing room, which is much more convenient than traditional basins and buckets and is more familiar to modern people.
Dimensions of individual rooms
The plan of the bathhouse can be drawn up by the performer either manually on paper or using special graphic programs on a computer. Professional architects use AutoCAD or similar editors, which are quite complex and require special knowledge and skills. For independent use, simple software products such as “Sudarushka” or similar are recommended.
The internal layout of the premises is usually as follows:
- The entrance to the bathhouse is arranged through a dressing room or a rest room, from which you can get to the bathroom and washing room. The size of this room is determined based on the planned number of visitors. On average, at least 1.5 square meters must be provided per person. m area.
- The dimensions of the washing room can be limited to an area sufficient to install one or two shower stalls. From here the entrance to the steam room is made, where a person directly receives bath procedures.
- Part of the usable space in this room is occupied by a heater stove, which is located in the center of the building. This position ensures heating of all rooms inside the building, with maximum heat transfer in the steam room.
A bathhouse with a toilet allows you not to go outside if necessary, which allows you to avoid many adverse consequences. The bathroom should be located as far as possible from the stove and have ventilation, which will prevent odors from penetrating into other rooms.
Helpful advice: it is recommended to install doors in the toilet made of metal-plastic or aluminum profiles with vents in the lower part. An exhaust fan is installed in the bathroom to exhaust air outside of it. Reduced pressure will prevent the spread of unpleasant odors.
Arrangement and equipment of rooms in the bathhouse
A health complex with a water supply system and a bathroom needs a full heating system for year-round use. The current instructions of the state sanitary supervision prescribe a minimum temperature value of at least 18°C. At lower values, especially close to zero, the formation of colonies of pathogenic microorganisms or fungi is possible.
When considering designs for bathhouses with a bathroom, it should be borne in mind that the room allocated for these purposes usually does not have windows and must have artificial lighting. Connecting an electric exhaust fan in parallel with the lamp, which will turn on simultaneously with it. The use of such a simple design scheme will allow us to solve the problem of process automation in the simplest way.
The minimum price for the work will be guaranteed if the main building material is one with which the contractor has the skill to work. Brickwork without experience will require a lot of time and labor, which will significantly delay construction. Simpler options are frame structures or profiled timber.
Arrangement of the utility block
The utility block allows you to make a bathhouse not just a bathhouse, but a building where you can also cook food, receive guests, and relax. This allows you to free up a significant part of the residential building and use a separate room for economic purposes.
Of course, the design of a bathhouse with a utility block should differ in the following parameters:
- convenient entrances to the premises;
- good water supply;
- heat exchange networks;
- security measures.
It is worth paying special attention to the last point, since you may need to use both the bathhouse and the utility unit at the same time. Therefore, safety rules must be followed. Good thermal insulation of the room, ventilation system and the use of moisture-resistant materials are also important here.