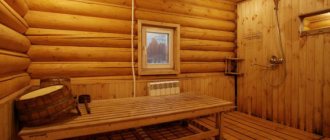
Everyone who builds a house, garage, shed or other structure wants it to last as long as possible and cause as few problems as possible. This fully applies to the bathhouse. Its construction requires taking into account many details and nuances that may not be obvious at first glance. And the owner of a private house should pay great attention to one of these details - the question of waterproofing the floor in the bathhouse and its quality. Want to know more about this? Then check out this article.
Waterproofing the floor in the bathhouse
Main types of bathhouse floor waterproofing
| Traditional | This type of waterproofing can be applied using caulking or gluing. Mastic is applied to the prepared surface in several layers, a roll of waterproofing material is laid, and finishing material is placed on top. This type of insulation provides good water resistance, but reduces the height by almost 50 mm and can emit a pungent bitumen odor. |
| Penetrating | This type of waterproofing is optimal for organizing a bathhouse. The floor is pre-cleaned of dirt and debris and primed. After drying, a layer of waterproofing is applied to it. |
Penetrating waterproofing is divided into types:
RECOMMENDED ON THE TOPIC
- Options for finishing a steam room in a bathhouse:…
- Waterproofing the blind area around...
- Concreting : It is characterized by frost resistance and high density, used in the construction of concrete waterproof structures.
- Polymer-cement : Eco-friendly, durable, has a high level of adhesion.
- Cement inorganic : Used in rooms with high humidity levels
- Seamless : Suitable for all types of premises
Ventilation design
The simplest method of solving the problem of ventilating the space between the rough base and the final finishing of the floor is to create holes to which pipes are connected that lead water out of the washing room.
There is another way to create ventilation - this is the installation of multi-level floors. Therefore, in each room they make a floor structure of different heights. For example, in the washroom the floor surface will be 3 millimeters lower than in the dressing room.
Option one is the most popular among developers, and the order of work is as follows:
- In the corners of the washroom at the base of the floor, holes are left for laying ventilation pipes with a diameter of 5-10 centimeters. The material used to make them may vary.
- Install pipes for ventilation after finishing the walls in the room. Products with a diameter of no more than 5 centimeters can be disguised under the casing. Pipes of a larger cross-section should be installed in bathhouse buildings that are visited more than twice a week. They are mounted in the corners of the room, attached to the surface of the walls using special clamps.
Floor preparation
In order for water to be removed from the premises in a timely manner, it is necessary to correctly design the drainage at the very stage of construction planning. Properly arranged drainage of water from the washing room will protect structural elements from destruction by moisture, as well as from the appearance of unpleasant odors and the appearance of fungus.
The drainage drain must be located at the lowest point of the floor. When pouring a cement screed, the entire flooring is sloped to drain the water independently. A drain is a closed gutter or pipe protected from corrosion and high temperatures.
Acrylic-based antiseptics
Acrylic products not only protect wood, but also give different shades
Acrylic-based antiseptics help prevent the development of almost all types of pathogens. Before application, they are diluted with water, after which they are applied to walls, joists and floor boards. The distinctive features of such antiseptics include:
- Resistance to temperature fluctuations, which allows surface treatment not only in the rest room, but also in the washing room or steam room;
- Resistance to moisture, which helps prevent wood swelling, which subsequently leads to warping;
- High vapor permeability, thanks to which the wood can “breathe”.
If desired, this impregnation can be applied with your own hands. But before breeding and processing wooden surfaces, it is recommended to use protective glasses and gloves that will protect the skin and eyes from contact with the synthetic product.
Drying oil for processing and floors
As a result of polymerization, drying oil forms a very durable protective film
Drying oil is a film-forming composition that is made on a plant basis. Drying oil can be used to treat wooden coverings in the following rooms:
- washing;
- steam room;
- rest room;
- dressing room
As a result of polymerization, the liquid composition forms a very durable protective film that prevents moisture from entering the wood. Drying oil is used to treat coatings not only for disinfection, but also to prevent the appearance of splinters.
Waterproofing wooden floors
The most common material for bathhouse floors is wood - coniferous or deciduous. Wood retains heat well, has an aesthetic appearance and a pleasant smell.
Such floors are comfortable for the feet, but have one significant drawback - under the influence of moisture they can quickly become unusable. Wooden coverings additionally provide ways for moisture to escape - small diameter holes in places where water drains.
Wooden coverings are:
- Leaky : These floors have cracks to allow water to drain into the soil under the bathhouse.
- Non-leakage : In such floors, water flows through a drainage hole into a special water collector and leaves outside the bathhouse through a drain pipe.
EPDM membrane
The cost of installing an EPDM membrane is from RUB 270 per m2
The price of the European quality EPDM membrane itself starts from 610 RUR/sq. meter
EPDM membrane is a roll insulation material that is made from vulcanized synthetic ethylene-propylene-diene rubber polymer with the addition of chemical elements that improve flexibility, strength and ultraviolet protection.
A modern material for waterproofing based on rubber, it is widely used in the construction of roofs and hydraulic structures.
The features of such membranes include not only the composition, but also the installation method.
EPDM is an abbreviation formed from the words Ethylene, Propylene, Diene, Monomer. The name contains an indication of the main components from which synthetic rubber is obtained by vulcanization.
In addition to the main components, the composition includes various additives and additives that improve the technical characteristics of the material. This can be soot, which occupies up to 60 percent of the composition, clay, vulcanizers and technical oils. The EPDM membrane looks like soft and durable rubber.
EPDM membrane for roofing
EPDM membrane for a pond, artificial reservoir - lake membrane
EPDM membrane for a swimming pool, the coating is also suitable for waterproofing a bathhouse
EPDM-based membranes can be single-layer or three-layer. The former are also called pure, and the latter – composite.
Three-layer ones consist of the following layers:
Due to the presence of a bitumen layer, such composite membranes can be laid by melting the bitumen and using it as an adhesive.
Pure (single-layer) membranes can be reinforced or non-reinforced. Reinforced ones are more durable, and non-reinforced ones are more elastic.
Advantages and disadvantages of EPDM membranes
Rubber membranes have a number of advantages that ensure their popularity and demand:
Disadvantages of EPDM-based membranes: they are quite expensive compared to PVC, the choice of colors is small, mostly black. It is better to choose membranes from a European or American manufacturer, since ours are not yet up to the mark in quality.
We specialize in complex tasks
Every year we undergo training from European manufacturers
⇒ We will calculate materials and components within 24 hours
⇒ Proven and high-quality materials
⇒ Free site visit and engineer consultation!
We will select an EPDM membrane for your facility
Or call by phone
The call throughout Russia is free!
Technical characteristics of EPDM membrane
| Physical Properties | Test Method | Test requirements | Typical values | |
1.14 mm 1.52 mm
37.6
Waterproofing installation process
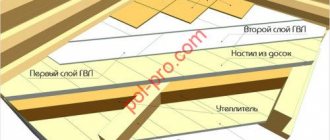
When laying the floor on logs laid at an angle, 50*50 mm bars are attached. Subfloor boards are laid on them, and on them - one or two layers of waterproofing material (roofing felt, plastic film, etc.).
Then mineral wool, glass wool, polystyrene foam or other heat-insulating material is laid on the flooring and protected from moisture. To do this, two or three layers of roofing material are laid, which is coated with molten bitumen or a solution of bitumen in diesel fuel.
Conclusion
In the video presented in this article you will find additional information on this topic. Also, based on the text presented above, we can conclude that there are a number of different types of insulation. They all have their own characteristics and purpose.
Moreover, if surface protection work is done with your own hands, then professionals recommend using highly specialized substances. Therefore, for a bathhouse it is worth using special waterproofing materials designed for the critical conditions inherent in this type of structure.
Did you like the article? Subscribe to our Yandex.Zen channel
Waterproofing concrete floors
In rooms with high humidity, steam rooms and washing rooms, it is recommended to make a concrete floor. Such floor coverings are durable (up to 25 years of operation), moisture-resistant and fireproof. But they also need waterproofing.
Waterproofing a concrete coating should only begin after the concrete has completely dried. To do this, the surface is covered with a cement-sand screed up to 20 mm, onto which waterproofing is then applied. The floor must be level, without cracks or holes. Liquid waterproofing mastic is applied to the screed in several layers, and roll waterproofing (polyethylene film or roofing felt) is applied to it.
Mixed impregnations
Where is it better to use mixed impregnations? Mixed products are products that not only protect walls and floors from rotting, but also prevent fire. The washroom is a room with high humidity, so the likelihood of a fire in it is low. In the rest room, air humidity is approximately 60%, and in the dressing room - no more than 30%.
To provide high-quality protection not only from rotting, but also from fire, it is advisable to use mixed types of impregnations in the dressing room. As a rule, such products contain fire retardant reagents that do not pose a threat to health.
Step-by-step process for waterproofing a floor
After installing the hole for the drain pipe, you can install the waterproofing in just a few simple steps:
- Plywood is secured to the subfloor using screws
- Waterproofing is laid on the plywood so that the edges of the material fit under the lining on the wall
- The joints of the waterproofing material are welded with a construction hair dryer.
- The edges of the waterproofing under the lining are sealed with construction tape
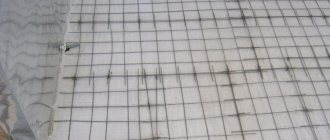
- A reinforcing steel mesh with a slot for the bathhouse sewer drain neck is laid on top of the insulation.
- Next, the entire perimeter of the lining from below and the rocks of the doorway is taped with tape so as not to stain them with cement mortar
- A cement-sand mortar is poured onto the floor and left to dry.
Floors in the bathhouse. How to do it right and not make mistakes!
For the optimal choice of waterproofing material and its installation technology, it is recommended to consult with a specialist in this matter.
Insulation materials
0 votes
+
Vote for!
—
Vote against!
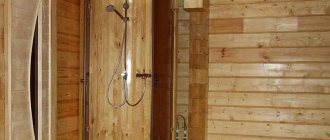
Bathhouses, saunas and steam rooms are functional auxiliary buildings with high humidity, and the waterproofing of the floor in the bathhouse determines its durability. A wooden building at the dacha can be built for the summer season, when cracks are made in the floors for natural drainage of water. However, a capital structure on a suburban site for year-round visiting must be built according to all the rules, with insulation and waterproofing of the floor.
Table of contents:
- What is important to know about bath floors?
- Types of waterproofing of the lower surface
- Properties of penetrating floor waterproofing
- Features of waterproofing wood floors in a bathhouse
- Features of waterproofing concrete floors
- Waterproofing the floor with liquid glass
What is important to know about bath floors?
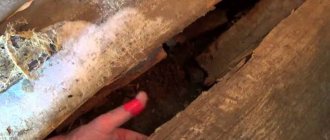
A country bathhouse is constructed from various materials, including cast walls and brickwork, but in many regions it is customary to build from natural wood. This is a universal material, but with excess steam and moisture, any wood is susceptible to rot, mold and other fungal infections. To avoid having to redo everything after a couple of seasons, it is better to provide proper insulation of the bathhouse:
- foundation;
- floors;
- walls;
- ceilings;
- outlets of all communications.
Water, even with a single flood, can damage a structure, especially when there is constantly high humidity in the building and there is water on the floor. Excessive moisture destroys brickwork, reinforced concrete products, wood and finishing materials. A primitive building with a specific microclimate can be built without any special frills. But even if this is waterproofing the floor of a bathhouse on stilts in a permanent building, everything must be done thoroughly regarding fire safety and protection from bending.
In order for a bathhouse to bring nothing but positive emotions for a long period of time, it is important to protect all surfaces from destruction by moisture in stages:
- waterproofing the foundation and floors in all departments;
- vapor barriers and insulation of walls against the formation of condensation with waterproofing;
- vapor barrier and waterproofing of the attic or roof.
The absence of these measures and a complete outflow of water with the possibility of ventilation after using the bathhouse leads to stagnation of used water and rotting of materials. No one enjoys walking through dirty water or slipping on wet surfaces. A dry, insulated and clean bathhouse is hygienic, safe and comfortable. Therefore, a wise home craftsman should take care of all protective measures at the design stage of the building, starting with the foundation, as well as with waterproofing the walls and floors in the bathhouse.
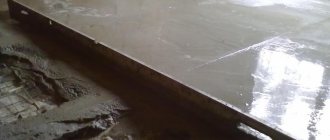
When laying communications and arranging the floor in the bathhouse, drainage should be provided in all rooms and a slight slope in the floor - as in the figure:
If everything is done correctly, then all used water will go into a special hole. This is the simplest gravity-flow system, but it does not exclude waterproofing the floor in the bathhouse. The drain chute must be made of stainless steel or polymers. The place of the water where the feet stand should be insulated from the metal, not too hot or cold. It is advisable that the drainage funnel be away from the place where water procedures are performed.
Attention: When waterproofing the floor in a bathhouse, materials should be applied only to a dry surface, depending on whether they are rolled or poured materials with penetrating characteristics.
Types of waterproofing of the lower surface
High-quality insulation and waterproofing of the floor in a bathhouse is only possible taking into account the characteristics of the base and the type of water drainage from the room:
1. Solid non-leaking floor with drainage made from traditional materials.
2. Leaky floor, lined with sanded boards with a small gap or with drilled holes where drainage is expected. A cold floor with cracks and drainage under the bathhouse is only for the summer option.
Attention: When purchasing materials, it is important to make sure that there is a marking indicating that installation is permitted in a wet room. They also give preference to non-rotting varieties of coniferous wood treated with an antifungal compound.
Properties of penetrating floor waterproofing
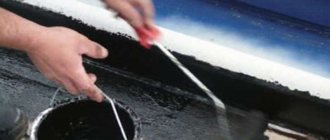
The simplest way to waterproof a non-leaking floor is to treat it with bitumen mastic on a smooth surface, after which a finishing layer is laid. This method provides high-quality protection from moisture, but there are some disadvantages, for example, the specific smell of the material, which takes a long time to erode.
Under the waterproofing flooring, a polymer membrane, glass roofing material, hydroglass insulation and other non-degradable materials are used. The mastic is applied with a brush with an overlap of up to 10 cm over the wall material to make something of a waterproof pallet, on top of which wooden panels, tiles or other suitable flooring are laid.
Classic concrete waterproofing is an effective method, but it is not practical for a small country bathhouse. It is used in the construction of swimming pools and permanent structures or for waterproofing a concrete floor in a city bathhouse.
Waterproofing with polymer-cement compositions is known for excellent adhesion, leveling of the treated surface, strength, and environmental friendliness. Seamless waterproofing guarantees the greatest effect and is suitable for any room.
Important: When performing seamless waterproofing, special attention is paid to areas where communications pass, opening passage to the foundation.
Sometimes a leveling (self-leveling) mixture is used to level the floor, which provides an ideal surface. It interacts well with any type of penetrating insulation - polymer-cement, concrete or polymer-self-leveling.
Features of waterproofing wood floors in a bathhouse
Advice: Before waterproofing the floor in the bathhouse, you need to wait a period of time after the foundation has settled - to ensure the integrity of the coatings. It is better to combine all insulation processes with thermal insulation (expanded clay, mineral wool).
Wood is an ideal eco-material for a bathhouse, since it is susceptible to fungal infections and rotting. High-quality waterproofing of the wooden floor in the bathhouse and impregnation of the boards with protective compounds allows you to control these processes. This requires:
- treat wooden logs for laying the bath floor;
- lay the sheathing on the subfloor, including backfilling with drainage;
- pile up to 100 mm of timber onto the base and lay a layer of film hydrobarrier;
- pour expanded clay between the beams;
- lay the subfloor;
- complete the finishing of the floor.
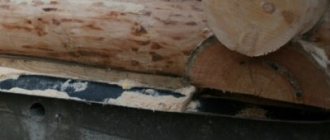
Euroroofing felt, membrane materials or aquaizol are used as the main insulating material. The roofing material at the joint is welded or glued with hot bitumen. It is imperative to leave a gap of 2-3 kg between the insulating layer and the wooden flooring - for ventilation and to prevent the formation of condensation.
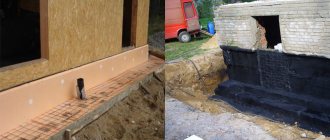
Waterproofing a concrete floor in a bathhouse using Gidroizol is no less effective. In this case, sheets of plywood are nailed to the rough base. The polymer sheet is laid on this base with the ends of the segments placed on adjacent walls. It makes sense to leave the lower ends of the finishing board on the wall temporarily loose, and complete the process after completing the main work.
Features of waterproofing concrete floors
For those who do not know how to properly waterproof a bathhouse floor over a concrete floor, it is important to take into account their specifics. Concrete is known for its reliability, coating strength and durability, but even in such a bath, waterproofing is done properly. When the concrete screed has set, they proceed to arranging protection against water penetration under the floor, as is done with any other type of foundation.
In regions with cold climates, ice may form on the floor if the bathhouse does not have proper thermal insulation. At the same time, even rapid heating of the room is not effective. The use of highly flammable polystyrene foam is undesirable. A layer of waterproofing must be applied on top of the thermal insulation layer to protect against freezing in the winter.
Concrete mixture is applied to the even rough surface of the floor, leveling the base as much as possible so that there are no distortions when finishing the floor. 2-3 layers of waterproofing mastic are applied to the cleaned surface, on which roll materials are laid - a thin membrane or a denser roofing material.
A construction hairdryer is used to seal the seams. A reinforcement mesh is placed on top of the waterproofing and a layer of concrete screed is again made. It is important to be careful not to stain the wall finish when using masking tape. On top of the layer of screed and waterproofing of the floor in the bathhouse, non-slip porcelain tiles or other suitable finishing are laid under the tiles.
Attention: If the bathhouse is a typical log house with a concrete base, then all work on heat and waterproofing is done after the initial shrinkage of the wood. That is, the main work is carried out 1-2 years after completion of the rough construction stage, but before finishing.
Waterproofing the floor with liquid glass
The process of treating a bathhouse floor with liquid glass is almost no different from a similar technology for silicatizing concrete structures. This is the most economical method, and it takes less effort and time. Using liquid glass to waterproof the floor in a bathhouse, we create an analogue of penetrating insulation, but with a different material. This substance, when applied to reinforced concrete, foam concrete, concrete or bricks, provides a crystalline base to fill a solid base.
Liquid glass resembles molten rubber or resin, and this semi-liquid medium forms a waterproof layer. After pouring the foundation and rough preparation of the floor, this viscous transparent mass eliminates the penetration of air and moisture. The basis of such waterproofing is calcium (sodium) silicate with the addition of quartz sand and soda. The melted and frozen mass is crushed into powder, which is then diluted to a certain consistency. The main properties of the viscous mass after hardening:
- water-repellent;
- antiseptic;
- chemically neutral;
- fire protection;
- antistatic;
- high adhesion.
The service life of such waterproofing is short, about 5 years, the silicate mass is prone to self-destruction. The thicker the insulating layer, the longer it will last, especially if covered with protective paint.
You should not make a lot of solution at one time - rapid crystallization occurs. After half an hour it sets, and nothing can be altered or added. It is advisable to have skills in working with the application of liquid construction suspensions, so that in half an hour, before the liquid glass loses its properties, you can treat a significant area of the floor. For beginners in repair, such high-speed processing causes difficulty. The less solution is prepared, the easier it is to handle. But this waterproofing has advantages - the ability to work in conditions of high humidity, penetrating into cracks or holes treated with other materials.
Experts have learned to add liquid silicate mixture to other solutions to obtain new properties. For example, cement solution is often poured into liquid glass in a ratio of 10:1. Here it is important not to violate the ratio, since if the proportions are violated (in the direction of increasing liquid glass), the mixture immediately “tans.” But this property can be used to quickly fill suddenly formed gaps or cracks in the foundation and floor of the bathhouse.
Attention: If the proportions of building mixtures are violated, excessive crystallization can tear the seams and joints of surfaces. The crystalline structure is also susceptible to cracking when subjected to a sharp impact or other mechanical stress.
If ready-to-use liquid glass is stored in a sealed container, it does not lose its properties even with temperature changes. The solution first penetrates into all the cracks, after which you can add a little more to the failed areas. When the liquid glass dries (hardens), after about half an hour it is time to apply the next layer of insulation.
It is better to vacuum the cleaned surface to increase the adhesion of the solution to the screed. If there is any doubt about the integrity of the coating, it is better to further clean the surface with a spatula and a stiff brush to remove all unstable particles. After this, the prepared liquid glass is applied in a small layer with a brush or roller, and after crystallization, the process is repeated.
Experts apply waterproofing with liquid glass in uniform strips, for example, parallel to the wall distant from the door. On a small area of the floor, you can pour the solution in portions, spreading it over the surface with a wide spatula or other tool. It is convenient to work with a wide paint spatula on a long handle or a spiked roller attachment.
Important: During application, air bubbles may form in the solution, which must be eliminated.
The finished insulation layer is removed at least 3–5 mm. Since the material is transparent, it is important not to miss any “bald” areas. After complete crystallization, the finished surface is covered with a protective layer of polyurethane or acrylic varnish.
The “warm floor” systems in the bathhouse deserve special attention, which is best left to specialists. However, all work on arranging high-quality waterproofing can be done independently. When working with any type of waterproofing, it is important to follow safety precautions - work in protective clothing, and ventilate the room well.
Semi-dry screed
The technology of work in this case is the same, only at the finishing stage, troweling work is required, performed by a special grinding machine. This is a plus - the surface immediately turns out to be perfectly flat, without drops or bumps. But you can’t make a semi-dry screed without special equipment.
Laying, leveling and grouting of semi-dry concrete must be carried out by a qualified craftsman , otherwise the result will not live up to expectations.
But if you make the “pie” yourself, the waterproofness and frost resistance of the coating will be higher. Typically, semi-dry screed technology is used for installation in conjunction with a “warm floor” system - the base is level and ready for the finishing coating.
The full article about semi-dry screed is here.
Manufacturers of EPDM membranes and films
EPDM membranes are made by different manufacturers. Market leaders include Firestone, Giscolene, Trelleborg, Carlisle, Resitrix. Among domestic manufacturers, we can highlight companies that produce Cromel, Elon, and Aqualasten materials.
The membrane is supplied in rolls. Their width varies from 1.5 to 20 meters. The length of the fabric in a roll can reach 60 meters. Material thickness – from 0.5 to 4 mm.
Some manufacturers offer to create a coating of the size required for a specific object.
In this case, a membrane of the required dimensions is vulcanized and calendered at the factory, and then delivered to the site in a roll.
This manufacturing method allows you to create hermetic coatings, because during installation there are no joints, the coating is single and homogeneous, it covers the base with a single sheet. The area of such coverage can reach 1000 square meters.
Below are price lists with prices for EPDM membrane per 1 sq. meter depending on the manufacturer.
| Permissible deviation in thickness, % | ASTM D412 | ±10 | ±10 | ±10 |
| Specific gravity, kg/m² | 1.4 | 1.9 | ||
| Tensile strength in MPa | ASTM D412 | 9 | 11 | 11 |
| Critical elongation , min., % | ASTM D412 | 300 | 480 | 465 |
| Tensile strength in kN/m | ASTM D624 (Die C) | 26.3 | 35.0 | 35.0 |
| Factory weld strength , min. | Modified ASTM D816 | Membrane rupture | Membrane rupture | Membrane rupture |
| Resistance to thermal aging Properties after irradiation for 28 days at a temperature of 116°C Tensile strength, min., in MPa Critical elongation, min., % Tear strength, in kN/m Change in linear dimensions, max. | ASTM D573 ASTM D412 ASTM D412 ASTM D624 ASTM D1204 | |||
| Ozone Resistance* Exposure to 100 pphm ozone for 168 hours. At temp. 40°C Sample stretched 50% | ASTM D1149 | No cracks | No cracks | No cracks |
| Brittleness temperature , in °C | ASTM D746 | -45 | -49 | -49 |
| Resistance to water absorption * Weight change after 7 days immersion at 70°C, max, % | ASTM D471 | +8,-2 | +2.0 | +2.0 |
| Vapor permeability max. in (Proc B or BW) | 0/10 | 0.05 | 0.03 | |
| Flexibility/Torsion DMA test | ASTM D5279-08 | No data | 225 MP @ 5°C | |
| Resistance to the spread of fungus and bacteria | ASTM D412 | No data | 0 don't grow | 0 don't grow |
| Resistance to external weather conditions (UV). * Properties after irradiation with a xenon arc of 0.70 W/m², at a black surface temperature of 80 °C | ASTM G21 | No cracks 7560 kJ/m² 3000 h | No cracks 41580 kJ/m² 16500 h. | No cracks 41580 kJ/m² 16500 h |
| At 0.35. W/m², at black surface temperature 80 °C | 6000h. | 33000h. | 33000h. |
| Name of material: | Unit measured | Price |
| Butyl rubber film for pond “GISCOLENE” thickness 0.8 mm width 1.5 meters | m2 | from 450 ₽ |
| Giscolene 120 EPDM membrane 1.2 mm thick | sq. meter | from 700 rub. |
| EPDM membrane Carlisle 1.14 mm | square meter | from 580 rubles |
| Geo EPDM membrane Pond Liner “Carlisle” | m2 | from 590 ₽ |
| EPDM membrane Lineflex 1 mm Türkiye, 45 m2 | Roll | from 23,000 rub. |
| EPDM membrane PondLiner, thickness 1.02 mm, size: 3.05 x 30.48 meters = 92.964 m2 roll | sq. meter | from 800 rubles |
| EPDM membrane Pond Gard Firestone (Firestone) | square meter | from 680 ₽ |
| Facade tape EPDM, pack of 20 meters | PC | 1150 rub. |
| EPDM membrane for joints and junctions | m2 | from 295 rubles |
| EPDM waterproofing tape, Thickness: 0.75/1.0 mm Length: 25 meters Width: according to specification, from 100 to 1700 mm | Package | from 1000 ₽ |
| EPDM membrane Resitrix (Resitrix), roll 10 m2, width 1 meter | sq. meter | contract |
You can buy butyl rubber pond film from us
In our company you can also buy EPDM EPDM membrane
Our company offers not only the EPDM-based coating itself, but also additional materials and accessories: glue, adhesive tapes, sealants, primers, fasteners.
For installation, glue based on neoprene rubber, butyl rubber, and latex is used. Cleaners and solvents are used to prepare surfaces.
There are also sealants, including special edge sealants, as well as water-repellent mastics.
The range offers adhesive tapes of different widths. They can be reinforced. For waterproofing pipes and gutters, special self-adhesive aprons of different sizes are used.
From us you can buy EPDM membrane wholesale and retail.
Typically the EPDM membrane is black, but there are acrylic paint compounds that can be used to change the color of the coating.
Main components for working with EPDM membrane:
Ceiling vapor barrier
Ceiling vapor barrier
Initial data: the ceiling is covered with clapboard, pressed mineral wool was chosen as a thermal insulation material. It is these materials that can guarantee the expected effect from the work performed.
Step 1: Nail the rough ceiling to the ceiling joists. You can use not only edged boards; the gaps do not affect the quality. The main thing is that they are relatively smooth and do not have protruding sharp elements. If any are found, the boards must be cleaned with sandpaper. The thickness of the boards is within 20 mm.
Laying the rough ceiling
Rough ceiling
Step 2. Prepare even and smooth slats approximately five centimeters wide and two centimeters thick, to which the finishing lining of the ceiling will be attached.
Step 3
Carefully spread the foil on the ceiling; this work cannot be done alone; there is a high probability of tearing the material. In terms of strength, foil is not very high
Do not stretch the film too much, but do not allow it to sag more than two centimeters.
Vapor barrier
Step 4. When nailing the planks, be very careful, immediately estimate where they will be installed and do not “fidget” on the film several times.
Step 5. The planks are secured, begin to sheathe the ceiling with clapboard. Fix the ceiling plinths in the corners.
The photo shows the slats and the lining attached to them
DIY clapboard ceiling. The gap between the lining and the wall is up to 2 cm
Flange ceiling
The interior work is completed, go up to the attic to insulate the ceiling. We recommend using mineral wool, but in principle you can use any materials: from foam plastic to expanded clay. Mineral wool has the highest heat-saving characteristics, the optimal thickness is 10 centimeters. Place the cotton wool tightly, without gaps. The sheets are perfectly cut to existing sizes, and unproductive waste is close to zero.
Nail boards on top of the ceiling beams. The thickness and quality of the boards depends on how you will use the attic space in the future. Although our advice is, regardless of “today’s plans,” lay the flooring with high-quality material. The boards must be edged, with a thickness of at least 25 mm, the installation process is no different from the process of laying floorboards. Press them with special or homemade clamps, do not allow cracks or curvature to appear. For fixation, you can use nails or self-tapping screws, the length of the nails is at least 70 mm.
Vapor barrier of bathhouse ceiling with foil