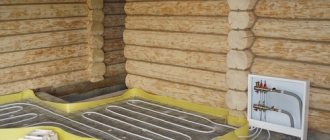
Warm floors have long enjoyed well-deserved popularity. Their different types (water, electric, infrared) are installed in apartments and private houses - it is functional, economical, and comfortable. And it would be quite logical to install a heated floor in the bathhouse from the stove. This will increase the comfort of staying in the steam room and washing room.
Particularly relevant is heated floors in bathhouses with ceramic floors.
Common mistakes when laying heated floors
Underfloor heating systems based on heating cables, mats, infrared films and water pipes provide fast and efficient heating of bath rooms.
Making a heated floor in a bathhouse with your own hands is technically simple, however, many novice craftsmen often make a number of mistakes that can lead to breakdown of the entire system.
What to consider when installing heated floors:
- When choosing a heating cable or mat, it is not the total area that is taken into account, but the square meters that are free from furniture and technical devices. This will prevent overheating of the heating element and its premature failure.
- Heating cables in heating systems must not be shortened. This leads to an increase in their operating power, overheating and breakdown. The correct solution is to reduce the cable installation step or increase the heated area of the room.
- Do not turn on the electric cable for testing until the concrete screed has completely dried. The heating element is checked by determining the resistance of the cable and its insulating frame.
- The heating cable is mounted only on a previously cleaned and dried surface treated with a primer.
- When laying the cable, the minimum permissible distance between parallel lines is taken into account - 5 cm.
- The minimum bending radius of the cable during installation is from 5 to 9 times its thickness.
- The temperature sensor is mounted in a protective corrugated box. At the same time, the structure must be accessible for possible dismantling and replacement.
- When installing the temperature sensor, the sensitive probe must be in contact with the floor surface.
- When laying a heating cable or mat, it is not recommended to walk on it in shoes to avoid possible damage to the heating elements.
- It is best to install a water floor in accordance with the prepared installation diagram. In this case, it is necessary to indicate the distance from the water pipes to the walls and other surfaces, and the location of the connecting elements.
- When installing a water floor, the tightness of the system and the operating pressure of the coolant are carefully checked. This will prevent possible leaks and system breakdown.
- The installed underfloor heating system must not be turned on until the concrete screed has completely dried. According to established standards, this period can be up to 4 weeks.
- Infrared heated floors are installed under linoleum, parquet and laminate boards, and heating cables and mats are installed under porcelain stoneware and ceramic tiles.
Installation technology
Depending on the base material, it is practiced to install a wooden, polystyrene, or concrete heated water floor.
Concrete
It is widely used in Russian latitudes, it is based on a concrete screed with a flexible pipe; it also uses insulation in tandem with polyethylene film. Mineral wool and penoplex are optimal as thermal insulation materials. Concrete is mixed with special additives (they are also used in the construction of swimming pools), which prevent cracking of the dry mass under conditions of frequent temperature changes.
Preparing the base:
- the screed is made with an inclination corresponding to the direction of drainage of water, the maximum angle is 10°;
- the completely dried layer is covered with a polyethylene vapor barrier;
- insulation is laid on top - mineral wool, penoplex;
- holes are formed in the material into which beacons for future screed are placed;
- The top of the “pie” is covered with a metal reinforcing mesh with a cell size of 10x10 cm.
Polyurethane foam tape is fixed along the perimeter along the walls: a soft membrane compensates for the potential expansion of concrete and prevents it from cracking when heated.
The pipe is laid in a spiral taking into account the following recommendations:
between the turns you need to leave gaps no wider than 40 cm, a distance of 25 cm should be maintained from the outer pipe to the walls; When laying a pipeline, the permissible radius of its bend should be taken into account - this is five times the diameter. The product is sold in the form of reels, they are unwound as they are used, fixed with clamps so that there is space for pipe expansion; the pipes are combined into a circuit in a manifold cabinet.
After trial testing, the concrete screed is poured again. It is important that the ambient temperature is kept in the positive range; a vibrator is used to compact the mass
After trial testing, the concrete screed is poured again
It is important that the ambient temperature is kept in the positive range; a vibrator is used to compact the mass
The optimal layer thickness allows you to leave 2 cm of concrete above the pipes; usually it ranges from 7-8 cm. If a tiled floor covering is planned, 5 cm is enough.
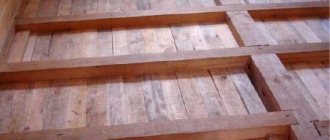
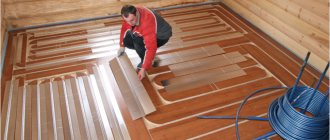
Wood
The flexible pipe is placed in the grooves left between the slats; this space should be wider than 2 cm. Chipboard panels are considered the most budget-friendly base material. Operating procedure:
- The base is leveled and debris is removed.
- A sheathing is formed from timber with a cell side of at least 60 cm, and fiberboard or plywood is stuffed onto it.
- The finished raised floor is covered with a vapor barrier and insulation on top.
- Lay out the boards, in the gaps between which the pipe will be placed. Their height should exceed 2 cm.
- The grooves are insulated with foil to prevent heat leakage downwards, and pipes are placed on it.
- All ends are connected to the manifold cabinet.
- A finishing layer of cladding is formed.
To fix the foil in the gaps, you can use small nails or a stapler. If the raised floor is assembled from fiberboard, foil is glued to the smooth surface of the slabs using double-sided tape.
From polystyrene plates
The base is assembled from segments with ready-made grooves; pipes are inserted into them. Plates are inserted into the gaps to promote more uniform heat distribution. A low and light structure is formed that does not “eat up” the usable space in the room. No labor-intensive concrete screeds are needed here. Polystyrene does not allow moisture to pass through and retains its heat-insulating properties throughout its entire service life.
Installation features:
- the first layer is laid insulation in the form of mineral wool;
- polystyrene foam is installed starting from the far corner, the plates should be placed so that their grooves coincide;
- distribution plates are placed in the holes;
- A flexible pipe is fixed on top.
Polystyrene boards
After checking the functionality of the system, a clean floor covering is formed.
Warm floors for baths: types and some of their features
When installing floor heating systems in a house or apartment, the consumer is always guided by economic feasibility, but, in addition, the complexity of installation work and the maintainability of the structure during operation are also taken into account.
For a bathhouse, these criteria also work, but some other factors are also added related to the different functionality of the premises, the features of the floor, which must be laid with a mandatory slope for water drainage (the only exception may be the rest room).
Also, choosing the type of heated floor requires not only an economic approach to the issue, but also a rational one, related both to the mode of operation of the bathhouse (regularly or from time to time), as well as to the technical feasibility of implementing such a decision.
So, in the bathhouse you can install and operate:
1. Water heated floors. In this case, the source of heating the coolant can be either a boiler or a stove installed in the steam room.
A big disadvantage of these floors can be the difficulty in providing conditions for laying pipes that are mounted on a flat surface, as well as the need to install expensive distribution equipment, although operating costs are low.
2. Electric floors, represented by cable systems or mats. This type can be considered the best option if you do not take into account the cost of electricity consumed (and they consume a lot).
In addition, a revision of the wiring will be required, which must cope with high loads.
You can also make air-heated floors in the bathhouse, represented by a specially installed structure of pipes located under the floor, through which warm air circulates, for heating which several sources can be used.
This type can be considered the most expensive both at the installation stage and during operation.
In addition, you should think about their design at the bathhouse design stage, since adjusting the plan is almost impossible.
General rules for installing floors in bathhouses for heating systems
Regardless of whether you plan to lay pipes under a heated water floor in a bathhouse with your own hands or install electric heating, you first need to take care of the construction of the floor structure itself, which in such cases can be wooden or concrete.
The latter option is preferable, given practicality, but a wooden one, arranged along joists, can be considered more organic for such a room.
The choice, of course, is up to the owner, but even he will have to follow several rules and requirements when installing floors with a heating circuit in a bathhouse.
So, despite the fact that the construction of modern baths is carried out with the construction of a foundation (unlike steam baths built earlier), such a foundation, as a rule, is either shallow, or generally represents a columnar structure. That's why:
- measures must be taken to insulate the floor and protect it from freezing, as well as from moisture and other negative factors;
- if you plan to pour a concrete floor, then it is recommended to select soil slightly below the freezing point and make a coating waterproofing; it would also not hurt to install a clay castle;
- Next, a thermal insulation layer must be laid, the materials for which can be expanded clay or perlite. In addition to insulation, the layer of bulk material also plays the role of a damper;
- further, an additional insulating layer made of modern materials (mineral wool, expanded polystyrene, polyurethane foam and others) should be laid under the heated floors, but it should be taken into account that their use in such structures has some limitations associated with the specific operation of such an object;
- the next stage is pouring the screed, which can be performed in two stages, and in some cases even involves reinforcement.
- the pedestals are treated with coating waterproofing;
- thermal insulation from bulk materials is being laid;
- vapor and waterproofing is arranged, for which special membranes can be used. The latter are fixed with their edges on the pedestals and must have a minimum approach to the walls equal to 100 mm. All joints must be treated with mastic;
- Before laying logs on the pedestals, it is recommended to treat them with moisture-resistant and antiseptic impregnations. For electric floors, it is mandatory to treat lags and fire retardants.
Next, the subfloor is installed with the creation of a thermal insulation layer.
Installation work
If the stove power is not enough, it is recommended to weld the battery tank.
Laying circuits in a bathhouse is no different from similar work in any other room.
- After thermal insulation of the floor, the walls around the perimeter of the steam room are covered with damper tape. It compensates for the thermal expansion of the concrete screed and prevents cracking.
- The tubes are placed on the floor according to the chosen pattern - snake, snail. Secure to the mesh with clamps.
- The tubes are connected to the manifold. Perform a test run of the system to ensure that all connections are tight. Place drainage and drain funnels if needed.
- If everything is in order, the contour is filled with concrete or cement screed. Level the surface along the beacons, not forgetting to maintain a slope to drain the water.
- After the material has completely hardened - at least 28 days - ceramic tiles are laid. Laminate, linoleum, even wooden boards can be used as a finishing coating in a dressing room or guest room.
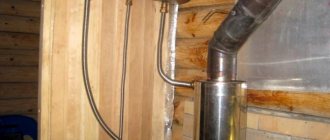
- The second part of the system is mounted: a heat exchanger is installed above the combustion compartment. If this operation is not feasible, you can tie the firebox with metal pipes. This requires experience and ability to work with metal.
- The sauna stove is low-power. It is difficult to heat a large volume of water here. To create a reserve, a battery tank is included in the system. It can be installed next to the stove or through the wall. It is advisable to choose option 2, since the tank is voluminous, and you need to save space in the steam room.
- A mixing unit is installed - it prevents overheating of water in the heating circuit.
- Connect the systems to the collector. A three-way mixing valve is cut into the supply pipe, and a thermal head with a remote sensor is installed here on the return manifold. Connect the pump.
During testing, the water temperature is monitored. It cannot be adjusted while the stove is in operation, so before first use it is necessary to determine how much water should be taken from the return line.
Why install a heated coating in a bathhouse?
The bathhouse is most often located a short distance from the home. In this independent building, the main element is the heater stove and heated exhaust elements that serve for steam generation. But it’s no secret that a bathhouse with just one stove, without additional heating elements, takes a very long time to heat up and staying in it until then is extremely unpleasant.
And, even after heating the entire room, the floors often remain cold. And, since a huge number of receptors are concentrated in the legs, when we step on a cold floor, we immediately risk getting sick. To eliminate this point, it is best to make a coating with heating from a stove.
This procedure does not require special skills, the purchase of expensive equipment and control systems, and, due to the fact that the bathhouse area is not so large, the cost of purchasing materials will be minimal.
Comparison
For comparison, only the heating cable and amorphous tape remained.
| Heating cable | Amorphous tape | |
| Working temperature | 50–80˚C | 38˚C |
| Increasing floor height | Minimum 4 cm (1 cm cable 3 cm tie) | 0.2 cm (thickness of mat with amorphous tape) |
| Actual heating area, relative to the floor | 1–3% | 20–30% |
| Zebra effect | Present | Absent |
| Heating rate/thermal inertia | Medium/high. To reach the operating mode, you need to heat the screed layer. | High/absent. |
| Energy consumption (all other conditions being equal for power and operation) | High | Low. Compared to the energy consumption of the cable system, it is 40–50% lower. |
Regarding uneven heating, it should be explained separately. In the cross-sectional image of an electric heated floor, it is clearly visible that the amorphous tape heats up at a lower temperature of the working element, but at the same time the area is much larger than that of the cable.
This figure schematically shows the principle of formation of the “Zebra” effect. The fact is that the minimum distance between the turns of the cable is 8 cm. And to the floor surface is at least 4.5 cm (3 cm minimum screed thickness 1 cm tile thickness 0.5 cm thickness of the adhesive composition).
The temperature sensor is located between the turns of the cable, at an equal distance, that is, approximately 4 cm.
At a superficial glance, the heating rate should be the same. But according to the Debye model (1912), during heat transfer, the phonon energy is weakened when moving from one medium to another. And in this case, there is a transition of thermal phonons from the screed to the glue, then to the floor covering.
If you increase the thickness of the screed so that the heating is uniform, this will increase the energy consumption and inertia of the structure.
From all the above factors, it follows that the use of amorphous heating tape when organizing an electric heated floor in a bathhouse is the only investment option to achieve the optimal balance between price, efficiency and reliability.
Water insulation
For the installation of water heating, pipes made of polyethylene, steel, and metal-plastic are used. They are mounted according to a special scheme between the base and the concrete screed. The pipes are lined with aluminum foil, which improves heat transfer. The main methods of laying pipes are “snail” and “snake”.
The first method, “snail”, is more suitable for small rooms with one water circuit. It ensures uniform heat distribution over the entire floor area. “Snake” is used in large areas where installation of several circuits is necessary.
Water insulation in the bathhouse will help save your budget
The pipe is laid starting from the outer wall towards the center, not forgetting about the optimal laying step, which is 30 cm. It is better to stick to this configuration, since too small a step leads to unnecessary consumption of pipes, and an increased one leads to uneven heat distribution over the coating, which causes a feeling of discomfort.
Advantages and disadvantages
Water insulation of a bathhouse floor has several design options. Most often used:
- water heating with wooden base;
- water circuit in concrete screed;
- water insulation system on polystyrene boards.
The choice of foundation depends mainly on the architectural features of the building. If it is large, a concrete screed is usually made, and in a small structure the base for the floor is made of wood.
Warm floor from a wood boiler:
The advantage of water insulation is much lower energy consumption compared to electrical structures. The disadvantages include:
- complex installation process;
- the need for a constantly running water pump;
- Difficulty in repairing a leaking pipe.
Bathhouse with heated floor:
Concrete screed
A properly installed insulated floor on a concrete screed can be compared to a layer cake, where each layer performs its function in the process of heating the bath. Layer cake elements:
- waterproofing;
- thermal insulation;
- heat reflecting element;
- water circuit pipeline;
- reinforced concrete.
Concrete screed will help maintain a suitable temperature in the bathhouse
When installing the screed, it is important not to forget about the slope of its surface towards the drain, which is necessary so that water does not stagnate on it. It is best to make a slope (no more than 3-5°) while pouring the rough screed, immediately before installing the water circuit
Then the concrete layer, after it is finished poured over the water circuit along pre-set beacons that guarantee the correct slope, will be the same thickness everywhere, which will ensure uniform heating of the floor.
Laying schemes
Warm floors are laid according to only two patterns - snail and snake. Installation with a snake is carried out in rooms with an area of up to 10 m2. If you use such a scheme in large rooms, then only the first half of the floor will be able to be fully heated, while a pronounced drop in temperature will be observed on the second.
To compensate for heat losses, a smaller laying step is used. If the standard pipe pitch is considered to be 30 cm, then after passing through half the room it needs to be replaced by 20 cm, and so on for another quarter, then reduced to 15 cm and finishing the installation with this step.
The snail is the most common pipe laying method. It gained popularity due to the simplicity and uniformity of heating the room. If when working with a “snake” we need to bend the pipe by 180°, then when installing the snail it is only 90°, or even bent in a circle. This scheme not only heats the entire room evenly, but also reduces pressure losses along the line.
When installing warm water floors in a bathhouse, it is best to use the snake installation method, since such rooms are usually not large, and the temperature in the circuit is often about 30-350, and at this temperature losses are not terrible.
General principles for laying water heated floors in a bathhouse
Methods for assembling the structure depend on the materials used:
- a flexible pipe is placed directly under the finished floor, covering the entire area; the working fluid flows through it;
- the maximum possible length of such a pipe is 100 m; if it is laid in a spiral, a distance of less than 40 cm should be left between its turns. As a result, one product covers a floor area of 15 square meters. m;
- Several similar preparations are introduced into large premises. In particular, for a steam room with an area of about 30 square meters. m will need two segments of heated floors of 15 square meters each. m;
- in a scheme with two pipes, the ends are sent to the manifold cabinet, where they are combined. A coolant heated by a boiler or furnace is supplied to the bundle, resulting in heating of the room.
When choosing a location for a manifold cabinet, convenience is a priority, because the ends of the pipes serving the heated floor are placed in it. As a rule, a niche in the wall is prepared for it.
Choice of flooring, coolant features
When arranging a traditional Russian bathhouse with your own hands, you usually assemble wooden flooring due to its aesthetics and authenticity, environmental friendliness and ease of installation. Less common is a floor laid with ceramic tiles using frost-resistant adhesive. The latter must contain at least 40% mineral additives, preferably uniformly white and uniform in consistency mixtures.
Since heating in the bathhouse is not regular, in winter there is a high risk of water freezing and damage to pipes. Antifreeze used in heated floors as a coolant consists of diluted glycol; if metal pipelines are installed, anti-corrosion additives are welcome
It is important to ensure complete sealing of the joint area to prevent contact of antifreeze with air
The liquid can be heated from a stove with a water circuit or from a boiler. In the first case, it is assumed that a heat exchanger is installed from a metal tank. If you use a grate welded from pipes for this purpose, the floors will heat up faster and better. The circulation of coolant in the system is ensured by a pump.
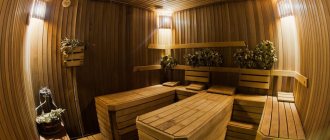
Warm floors: a brief overview of types
Today, a warm floor in a bathhouse relaxation room is a common occurrence and has already become an integral part of comfort. Especially when it comes to tiles and not wood.
To ensure surface heating, the following types of floors can be used:
- water;
- electrical cables;
- infrared;
- air.
Example of water heated floors
At the first stage, the choice should be guided by the financial situation and the requirements of the floors themselves:
- Mermen. A perfectly flat surface is required. You will have to purchase additional equipment to control the temperature. Quite an expensive type, although self-sustaining.
- Cable. They consume a lot of power, so you should make sure that the current wiring can handle the voltage. Cheaper than water ones.
- Infrared. They do not have any specific requirements. Accessible.
- Airborne. Very expensive to install.
Example of electric cable floor
More details about all types, except air, which is too expensive, later in the article.
Warm floor from a stone stove
To equip the floor with heating from the stove, you will need to install a metal jacket.
Its appearance can be described as follows: a central pipe is laid, and branches go from it in different directions, forming a skeleton. Each outlet is connected by pipes, forming a closed system. This structure is installed inside the furnace directly above the firebox. Water circulation can be natural or forced (a circulation pump is used). In addition to arranging the shirt, you will need a thermal (buffer) tank. Its installation is carried out outside the furnace, and is connected to the jacket by a metal pipe. The volume of the buffer tank can be from 100 to 1 thousand liters, it is calculated based on the boiler power. If the heating circuits contain coolant with a volume of more than 100 liters, then there is an option for arrangement without a thermal tank. If you want to create natural circulation of water, then mount the buffer tank and the jacket at the same level. Circulation will be carried out due to the difference in coolant temperature.
What is the key role of the buffer capacity? Its presence helps prevent water from boiling in the system. It is for this reason that the container should not contain less than 100 liters of water. Even if the existing boiler has low power and a heat capacity of only 20 liters, then when the boiling point of water reaches 100°C, the coolant will boil in 5 minutes. For this reason, the buffer capacity is an integral part of the entire system.
Types of devices and materials
To make a warm floor in a bathhouse, you can use several installation methods:
How to insulate the floor in a frame bath?
- Concrete screed is the best option for a bathhouse, since it allows you to significantly save on materials and has a high degree of moisture resistance due to the use of cement. However, such a floor can only be used a month after pouring the screed. In addition, if the pipeline is damaged, it is very difficult to find the leak, so the entire screed will need to be dismantled.
- It is very convenient to use special polystyrene boards for heated floors. They are equipped with a reflective foil layer and have special recesses for fixing heating pipes. However, you will still have to pour screed on top of them.
- Laying heating pipes in a wooden floor system is also possible. However, an accurate calculation is needed to determine the location of the holes in the joists for laying the pipeline. But the maintainability of such floors is higher.
Thermal insulating materials
Perlite granules
If you only need to additionally insulate the bathhouse, it is important not to make a mistake with the material. Here it is important to know the characteristics of such insulators: polystyrene foam, perlite and expanded polystyrene
The first of them is the most budget option. It also has a modest weight and is easy to process. Plates made from it are not subject to rotting and allow moisture into themselves. Panels made of this material are laid in two layers. The joint areas are covered with polyurethane foam. You can also use leftover foam here.
Perlite is also lightweight. But it is quite specific. And for its installation you need to take special measures. For example, the room in the bathhouse must be tightly closed, otherwise even a slight draft will cause the material to fly apart. This minus is compensated by the scanty thermal conductivity of this material during its operation.
The optimal placement of perlite is as follows: it is mixed with water in a 2:1 ratio. Then cement is added to the container. The resulting composition is applied to the concrete base only in a thin layer.
Expanded polystyrene today has replaced standard mineral wool and various bulk insulators. For its installation, 25 cm thick panels and sprayed material are used.
Rules for organizing heating in a bathhouse
Wood heating sauna
The simplest option is a sauna with heating from home. This scheme involves connecting the steam room, dressing room and other premises to the autonomous heat supply of the cottage. But this can only be realized if the bathhouse structure is closely adjacent to the house or is located at a distance of no more than 3-4 m from it.
The most common option for the location of a building on a site is remote from a residential building. How to make water heating in a bathhouse and at the same time optimize the costs of its organization? Options for using standard schemes are possible, but at the same time the specifics of using the bathhouse should be taken into account:
- The source of thermal energy (boiler) must ensure heating of the air in the steam room to a level of +90°C +100°C. For this purpose, special sauna stoves with a container for stones are used;
- For rooms larger than 60 m², it is recommended to install pipe heating. Together with it, you can make a hot water system to increase comfort. If there is a second floor, heating of the attic of the bathhouse must be provided;
- Ensuring the removal of carbon monoxide along with a well-thought-out ventilation system;
- Fire safety. Since wood is used in the vast majority of cases for finishing rooms, its contact with heating elements - pipes, radiators - should be prevented.
Gas heating baths
Another important point is the choice of energy carrier. Gas heating in a bathhouse is advisable only when installing a specialized boiler. Installing homemade structures can lead to emergency and dangerous situations.
In addition to gas, you can use other, no less effective sources of thermal energy:
- Firewood. A traditional type of fuel with which heating a bathhouse in winter turns into a kind of ritual. A significant drawback is the constant monitoring of the fuel level in the firebox, as well as the impossibility of quickly adjusting the water heating level;
- Diesel fuel or used oil. The most unacceptable energy source for a bathhouse. The problem is the unpleasant smell and the difficulty in organizing fuel storage.
How to make gas heating for a bathhouse yourself? To do this, you need to choose the right equipment and components for heat supply - pipes, radiators, as well as containers for indirect heating of hot water.
When heating a bathhouse from the heating system of the house, part of the pipeline located on the street must be insulated. To solve this problem, you can use special heat insulators or an electric heating wire.
Water heating system
A practical and affordable way to organize heating of a bathhouse in winter is to install a water system.
Water is used as a coolant, gas, electricity, liquid and solid fuel are used as fuel, and a stove or boiler is used as heating equipment.
Water heating provides quick and uniform heating of bath rooms with the ability to automatically maintain the set temperature.
There are the following options for arranging water heating:
- Radiator heating. Provides for laying pipes along the walls to which water radiators or convectors of the appropriate size and power are connected. The hot coolant from the boiler moves inside the system, providing space heating.
- Underfloor heating. Its operating principle is similar to that in the previous version. The only difference is that the installation of pipes is carried out in a concrete base after its preliminary insulation and waterproofing. This design is of a non-removable type, and therefore requires compliance with installation technology.
How to choose a stove for a bath
- calculate the required furnace power;
- choose the type of model depending on the type of combustion chamber, based on the size and characteristics of the room;
- decide on the heater (choose a closed or open type);
- For those who prefer to steam while contemplating the fire, they will offer models with doors made of heat-resistant glass.
If, due to its small size, the bathhouse is not equipped with a source of hot water, then our specialists will draw the buyer’s attention to models equipped with tanks, which can be built into the stove, or mounted or remote; in the latter case, they are supposed to be installed in the washing compartment or shower
Preparatory activities
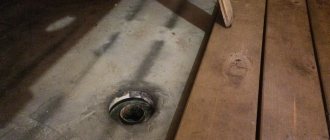
Before starting work on installing a heated floor, it is necessary to prepare the foundation and think over the correct drainage system.
The work is performed in the following sequence:
- The soil is excavated inside the washing compartment within its foundation, and the surface is carefully compacted. At the same time, a pipe is laid in the foundation wall, through which it is planned to drain water into the sewer network.
- After this, a sand-crushed stone cushion fifteen centimeters thick is arranged and compacted.
- Twenty centimeters of it is covered with expanded clay. The slope is maintained.
Installation features
It is almost the same, but each individual species has its own nuances. Initially, it is necessary to prepare a pit well, which will serve to drain water.
In one of the outer walls of the bathhouse, install a pipe, the end of which will go into the collector, drainage ditch or other drainage point. The walls of an organized well must be secured to prevent them from being washed away.
Level the earthen floor and create a sand and gravel cushion 15 cm thick on it; it needs to be leveled and try to compact it more tightly. Pour a 7 centimeter thick concrete screed on top and then wait for it to cool.
Lay waterproofing, insulation on it, then heat-reflecting film. Then the installation process is slightly different.
For electric type
Laying the coolant starts from the thermostat.
To save material and future resource consumption, you must first mark the places where wardrobes or other massive furniture will be installed and go around it.
When the rolled out roll reaches the opposite wall, it must be carefully cut to within a few centimeters. Then lay the next heating tape parallel to the previous one, as close as possible to it.
After installing the coolant, its operation is checked, the cable is connected to the network, if everything works properly and heats up normally, then you can proceed to laying the finishing coating.
For infrared type
The film model of electrical systems is a thick cellophane, inside it there are copper wires, and on top of the material there are graphite strips. The latter, under the influence of electricity, create infrared radiation, which heats not the air, but the floor covering.
There is also an option for such a heating system as plastic mats, for which there is no need to prepare a concrete screed; they are quickly installed and heated. It is better to place infrared mats in an area free from furniture; they should cover at least 70% of the floor.
It is advisable to decide in advance on the location of the mats, make a paper sketch, on which you can also schematically arrange the furniture in order to get around it.
The base for the thermal film should not have strong differences, a slope of 1 cm per 1 linear meter is acceptable, so that the heat does not escape into the floor, it is covered with a thermal insulating substrate.
When laying mats on the floor, you need to move 10 cm away from the walls. They are laid joint to joint, with a gap of 5 mm between them. The cut areas are pre-insulated with bitumen insulation.
When all the infrared mats have been laid, they proceed to installing the thermostat, and then the functionality of the “warm” floor and all its turns is checked.
Specifics of water floor construction
First, a heat-insulating substrate is applied: all debris is removed from the floor of the bathhouse and a heat-insulating layer is laid out. It consists of strips that are fastened together with heat-reflecting tape.
Then a pipe layout diagram is drawn up; to simplify the task, you can use a checkered notebook sheet.
Clips for fastening pipes are placed on the floor, then the plumbing elements themselves are laid and connected to each other, at the outlet they are connected to the boiler. A distance of 20 cm must be maintained between the walls and pipes.
Recommendations for pouring screed
The concrete base for the finishing material is made taking into account the option of arranging a “warm” floor and the specifics of the room, which may be humid.
If these are electric floors, then a plasticizer is added to the solution to create a screed above them. When the infrared mats are fixed, the solution is poured onto them, and then they wait for it to harden.
The dried screed is sanded, and then finishing material is laid on it.
The rough screed under the water floor must be carried out along the beacons.
The walls need to be puttied about 15 cm from the floor, this will help install the damper tape. Expanded clay concrete screed has the highest insulating layer.
First, as for an electric floor, an insulating layer is laid using an adhesive composition, and then the surface is reinforced using a special mesh. It is laid on nickels, which separate it from the insulation by about 4 cm.
After placing the pipes, fill the finished floor with a solution containing a plasticizer and small fractions of crushed stone. You can also use leveling mixtures.
After all the work done to create the screed, you must wait at least 28 days for it to harden well.
If you use a self-leveling mixture, it will dry faster.
Stages of work execution
If you are going to install such a coating in a sauna or bathhouse, I recommend watching the video:
So, we will proceed according to this scheme:
- We clean the primary coating from debris, stones and dust.
- We treat with a deep penetration primer.
- Apply a layer of waterproofing. It is best to use store-bought bulk mixtures and ceresite. If possible, try not to use bitumen mastics or roofing felt for this purpose.
- We glue or nail damper tape around the perimeter of the room.
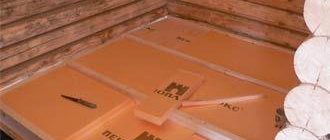
- We install insulation. Expanded polystyrene with a thickness of at least 50 mm is best suited.
- Again a layer of waterproofing, this time a regular construction or greenhouse film will do. You can, of course, use a special reflective coating for warm floors, but the difference in its effectiveness with film is only 1%.
- We lay the reinforcing sheathing.
- We mount it according to the pipe plan, using a snake or snail pattern.
- We tie the pipes with plastic ties.
- We connect all the equipment: heat exchanger, collector, pipes.
- We apply pressure to the system using a portable pump or compressor and set the pressure gauge to the notch.
- After 4 hours, remove the pressure and raise the entire structure by about 1 cm. It is not advisable to place wooden supports under it, as they will subsequently swell. It is necessary to use protective layer clamps for reinforcement or homemade plastic substrates.
- We display beacons.
- Prepare the screed solution: mix 1 bucket of sand, 2 buckets of granite chips (2-3 mm in diameter), 1 bucket of cement and water. Granite chips can be replaced with crushed stone.
- Fill the screed and leave for 4 hours.
- Pour water and cover with film for 3-4 days to evenly distribute moisture throughout the solution.
- We remove the film and wait another 25 days until it hardens completely.
- Apply a clean coat.
And, finally, I would like to say that the best method of heating a bathhouse is considered to be a tiled floor. It combines efficiency, practicality and durability.
This, in principle, is all, dear readers, that we wanted to tell you. If you still have any questions, we suggest you read our other articles. Subscribe to our newsletter and share with friends. Good luck!
Installation of a collector for a warm water floor
The next stage of installation of the “exotic” floor began after the frame was placed under the roof. And it consisted of installing a thermal unit. “What is it for?” - you ask. Everything is simple here. If the temperature in the heating plant is 70-80 degrees, then you will have to walk on such a floor in Japanese geta or French clogs; barefoot will not work. And this device produces the desired and comfortable temperature for the feet.
The price for a water floor collector is decent, but it’s worth it: there are all kinds of protections, a pump is provided, and in general there are a lot of bells and whistles. All you have to do is set the desired temperature, in a word, it’s very convenient. During the summer, you can turn everything off.
Having installed this “smart unit”, we began connecting the heated floor to the central heating. We crashed into the system with a metal pipe with a cross-section of 32 mm. All pipes that run along the street are insulated with mineral wool. There is practically no heat loss to the bathhouse in open areas of the street.
Diagrams and installation instructions for one boiler
The simplest and most economical way to build a combined heating system in a private house is considered to be a scheme with a radiator and heated floor from one boiler. All elements and the circulation pump are already installed from it.
There are wall-mounted boilers that already have a pump built into them. When using a floor-standing model, it will have to be installed separately.
When directly connected to a gas appliance (this is the model that experts recommend installing when installing a combined heating method in private homes), it is recommended to install a container for condensate. Installing a conventional gas boiler will lead to rapid failure of the heat exchanger.
Gas equipment is placed in rooms with ceilings of at least 2 meters. Ventilation is required.
If a solid fuel model is used, then to connect the heated floor to it, you need to install a buffer tank. Its function is to limit the temperature regime, since it is difficult to directly regulate the temperature.
The principle of operation of heating according to a combined scheme - warm floor and battery from one boiler is as follows. The heated water is directed to the mixing unit, where it rests against the safety head. The thermal head determines its temperature, and if it exceeds the required level, the valve opens and the hot and cold coolant is mixed to the required degree.
Then the water is distributed along the contour lines of the floor and radiators. After passing through the entire pipeline, it returns to the heat generator for heating.
The connection diagram for underfloor heating and radiators from one boiler includes the following elements:
- boiler with expansion tank - heats the coolant;
- hydroarrow - wiring, in the form of a pipe with four branches, through which water moves;
- radiator and sex pump - they supply fluid to the collector unit;
- collector - floor loops are connected to its outputs, and hot water is supplied;
- mixing unit - in it the coolant for the TP is diluted;
- thermostat - a head that opens or closes the flow of water into the circuits.
System installation
After constructing the floor “pie” - leveling the base, hydro and thermal insulation and laying the heating elements, you can proceed to installation work and connecting a combined heating system from one boiler (warm floor and radiators). Let's look at the process step by step:
The boiler is installed and its piping is made (in a private house it is often installed in a separate building). The room must have a chimney and air flow.
The pipes from the radiators are connected to the water heater, and a pump is mounted between them.
The floor circuits are connected through a device in which the water is diluted to the required temperature. For this purpose, the following are used: a mixing unit, a 2- or 3-way valve, they are attached to the supply pipe.
A circulation pump is installed.
The floor contours are connected through a comb to a source of hot water; it is the coolant that will heat the room.
Water floor installation
The warm floor in the bathhouse consists of the following structural layers:
- a waterproofing layer is needed to prevent condensation from collecting in the floor during operation of the heating system;
- thermal insulation will prevent heat loss through the lower floors;
- reinforcing mesh protecting the layer of insulating material;
- a reflective layer of foil material will reflect thermal energy into the room;
- a pipeline system laid in a spiral (this will allow the surface to be heated evenly);
- leveling screed with a slight slope in the direction of the drain hole;
- front finishing coat.
Materials used
It is better to take metal-plastic pipes for the circuit - they are resistant to pressure and do not freeze.
For heating, the following materials are needed:
- pipes – steel and plastic for the system;
- stainless steel or brass container with a capacity of up to 100 l;
- coil - made of black or stainless steel, which serves as a heat exchanger;
- bypass and valve for adjustment;
- circulation pump;
- collector - if several rooms are heated, then a device is required for distributing liquid along the circuits;
- fittings, insulation, fasteners.
You will also need additional materials: reinforcing mesh, waterproofing, priming compounds.
Before construction
Let's give some simple tips that will help you build a similar system at home with your own hands. Such a system is fully justified if the stove is heated with wood.
Choosing a floor design
Experts recognize concrete screed as the optimal material for bath floors. The advantages are as follows:
- cement has high moisture resistance;
- simplicity of the device;
- cheap materials.
Flaws:
- damage can only be repaired after complete dismantling;
- Otherwise, it is impossible to localize the accident site.
In addition to concrete, you can also use a wooden floor structure. Holes in the logs are provided in advance in order to carry out the necessary communications. This design, unlike concrete, will make it easy to carry out repairs without dismantling the entire floor.
Insulation
To prevent heat loss, the heated floor structure must be thoroughly insulated. For this, polystyrene plates are used. Special internal gutters will make installation as convenient as possible, and the metallized coating will reflect heat back into the room.
Other nuances
- Unevenness and distortions of the floor will not matter if you make a rough screed.
- Condensation will not accumulate if a layer of waterproofing is laid.
- All energy will be directed into the room and heat loss will be eliminated as much as possible, thanks to the thermal insulation layer.
- Thermal insulation will be protected by a reinforcement mesh.
- Thermal energy will not be lost due to the metallized substrate.
- The “snail” arrangement system will ensure optimal heating of the heating circuit.
- The slope towards the drain must be provided when arranging the finishing screed. Check the slope using a building level.
- Decorative coating will give the floor a finished look. Any material that is not contraindicated for a heated floor system can be used.
Preparation for installation
Before you begin laying a heated floor in a bathhouse, it is advisable to prepare tools, additional materials and the base of the room in advance. This is explained by the fact that only with this approach during installation will no difficulties arise that could interfere with the progress of the work.
Tools that will be needed during installation:
- container for diluting cement mortar;
- spatulas;
- plastic strips - track;
- construction tape;
- screwdriver;
- fastening clips for pipes;
- knife;
- level.
Additional materials for better functionality of heated floors:
- reflective thermal insulation foil;
- thermal insulation material;
- protective material against water penetration;
- pipeline;
- cement mortar;
- finishing coating.
Preparatory work for laying a heated floor in a bathhouse occurs as follows:
- Under the bathhouse, the soil is removed between the enclosing structure of the foundation.
- A pipeline is laid into the foundation wall to drain the liquid.
- The sewer drain is filled and compacted with earth.
- A 15 cm high drainage backfill is made on top of the compacted soil.
The final stage is insulation with expanded clay. The height of its layer depends on the climatic conditions of residence, on average it is 15 – 20 cm.
Thus, having prepared everything necessary, you will need to choose methods for laying water models that will be served by bathhouse stoves.
Infrared floor: what you need to know about it
Installation stage of infrared floor
The advantages of such a system include:
- affordable price;
- simple installation;
- precise temperature control;
- If one plate fails, the others will continue to work.
Installing heated floors in a bathhouse with your own hands must begin with thermal insulation. In principle, this type of heated floors can be laid on any surface, since there are no requirements in this regard.
The rolls are rolled out over the entire area of the room, after which they are connected to the thermostat and to the general power supply.
You can make heated floors in a bathhouse within a day, which is also a nice feature of this electric heating system.
Installation of underfloor heating system
To carry out the work, you will need tools and equipment: a container and mixer for mixing concrete, a spatula, usually scissors for cutting plastic pipes, beacons, a container for heating bitumen.
The materials you need to prepare are: ready-made dry sand-cement mixture (or its individual components), waterproofing (you can take roofing felt and bitumen), thermal insulation (for example, Penoplex), damper tape, clamps, reinforcing mesh, fiberglass, mushroom dowels, plastic pipes diameter 1.6 cm.
Fiber fiber for screed reinforcement
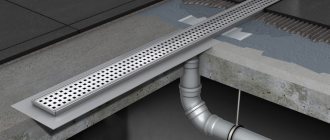
Step 1. The base is cleaned. If defects are found in the form of cracks or potholes, it is necessary to pour a thin screed to level the surface (providing for drainage if necessary). The drainage chute must be made of stainless steel or plastic. After this you will have to wait for the concrete to harden.
Step 2. The base is waterproofed. To do this, heated bitumen is applied in an even layer to the subfloor. Roofing felt sheets are placed on it (with an overlap of 100 mm). After this, the procedure is repeated: a layer of bitumen and a layer of roofing material. In this case, the strips of rolled waterproofing in different layers should be placed perpendicular to each other. The unpleasant smell will disappear over time.
Waterproofing the floor in the bathhouse
Step 3. To reduce heat loss, thermal insulation is installed. She must be tough. The thickness of the sheets is at least 100 mm. During installation, you need to ensure that there are no gaps between the elements.
Laying thermal insulation
Step 4. The metallized substrate is laid.
Step 5. A reinforcing mesh is placed (wire diameter - 4 mm, mesh cell size - 150x150 mm). It is needed to give rigidity to the structure and secure the contours.
Step 6. The perimeter of the room is covered with damper tape. It is made from foamed polyethylene. The purpose of the tape is to compensate for possible thermal expansion of the concrete screed (this effect may cause cracks to appear). It has an adhesive layer applied on it for ease of installation. However, it is recommended to additionally secure the tape with dowel mushrooms.
Step 7. The plastic pipe circuit is laid in a spiral. To do this, at the initial stage, pipes are placed around the perimeter of the room. Gradually, in increments of 25 or 30 cm, they wrap towards the center. From the central point, the contour layout is carried out in the opposite direction (parallel to the previous one) so that in the end there is 12.5 or 15 cm between the pipes.
A circuit of plastic pipes has been laid
The contour is fixed using clamps that secure the pipes to the reinforcing mesh.
Step 8. The thermal circuit is connected to the heat exchanger. A test run of the system is being carried out. It is recommended to leave the heated floor running for two days. This way you can check its functionality and tightness of connections. If no problems are found, you can proceed to filling the system with screed.
Step 9. Mix a solution of CPS and water. For this it is more convenient to use a concrete mixer. But if you don’t have it, you can make do with improvised means (a large container and a shovel). To increase the strength of the base, it is recommended to add fiberglass to the mixture.
Advantages and disadvantages of the system
A heated water floor in a bathhouse, powered by a stove, has the following advantages:
- No structural elements will generate electromagnetic radiation, like an electric heated floor.
- Such a system is considered environmentally friendly and harmless to humans.
- Possibility of maintaining a comfortable microclimate in the bathhouse.
- Saving.
The disadvantages of the system include the following:
- In winter, the water from the pipes will have to be drained so that the frozen liquid does not burst them. Otherwise, you will have to constantly heat the oven. However, if you constantly heat your bathhouse with wood, you won’t be able to save any money. The only way out is to use antifreeze instead of water.
- The second disadvantage is that a lot of heat is spent heating the battery tank, so the stove copes worse with its main tasks - heating the steam room and washing room.
- When simultaneously heating the floors of several rooms in a bathhouse, for example, a steam room, a relaxation room, a washing room and a shower room, a large volume of coolant will be required, which will significantly increase its heating time.
- In such a bathhouse it will not be possible to install leaking floors. Otherwise, the insulation will get wet and the system will become ineffective.
Principle of operation
The device is a pipeline with a coolant inside, which is powered by a sauna stove heated with wood or other fuel. The stove must be converted to heat underfloor heating.
After ignition, it warms up the system, full heating is achieved by the time the steam room is ready. Water circulates using an installed pump; it is included in the mixing unit. Warm pipes heat up the screed and flooring, which in turn transfers it to the room.
Gas heating
The implementation of such a heating system has several options.
- Firstly, as I wrote above, it is possible to install a “classic” heater, in which a gas burner will be used instead of firewood.
- Secondly, you can use a standard gas boiler (the same as in residential buildings). But in this case, you will have to take care of the equipment of heating systems (installation of heating radiators, laying pipes, connecting a gas-carrying pipe to the bathhouse or a cylinder connection system).
- Thirdly, there is the possibility of installing heating from the house. In essence, this is the same option as the previous one, but with its own characteristics and disadvantages. A separate heating main is laid from the boiler used to heat the house to the bathhouse. This option is very convenient if your steam room is adjacent to the house or is very close to it.
Gas heating baths
If the distance to the bathhouse is relatively large, then in order to use this system in winter it is necessary to bury the heating main below the freezing level of the soil and insulate it well. This will prevent the possibility of defrosting and help reduce heat loss.
True, the undoubted advantage of this option is the complete elimination of the problem of maintaining a constant positive temperature in the bathhouse. In addition, you can do all the necessary work (if you have a certain skill) with your own hands.
Water heating is rightfully considered one of the most convenient and effective methods of heating. In such a situation, there are also several options for manufacturing a system, which in any case will be powered from a furnace with a water circuit.
Fortunately, today in specialized stores you can easily select stoves that are ready for installation, equipped with a heat exchanger. This greatly simplifies the task of any builder of his own bathhouse. And now directly about the options.
Water heated floors
- External heating. It is done very simply and, in fact, is arranged in the same way as a brownie. Pipes located along the walls are connected to the furnace. Depending on the area of your bathhouse, a certain number of heating radiators are connected to the pipes. Hot water passing through them heats the structure and, when cooled, returns back to the boiler.
- Water heated floor. The principle of its operation is the same as in the first option. The only difference is that the pipes are hidden in the floor, which was previously insulated (I wrote about insulating floors in a bathhouse in more detail in other articles). This design is considered non-separable (although, of course, there would be a desire to break everything), and therefore requires a very careful approach to the procedure for its manufacture. In this case, I would recommend seeking help from specialists.
Installation
There are various methods for installing heated floors in a bathhouse, which are characterized by general installation rules and certain features. Need to know the step by step guide. Almost all underfloor heating systems must be laid on a heat-insulating material, after which they are covered with a screed on which the floor covering is laid.
In addition, waterproofing acts as an obstacle to the formation of condensation in a structure consisting of several layers. Such a layer can be mineral wool, expanded clay, thick polyethylene film and much more. Let's consider the installation of various systems.
Electric heated floor using cable
Visually, this cable cannot be distinguished from an ordinary wire. The difference lies solely in functionality. A heated cable is capable of converting electrical energy into heat. Such a system is characterized by the presence of a thermostat, thanks to which you can regulate the power and speed of achieving the required temperature.
In addition, manufacturers usually provide temperature sensors, thanks to which you can monitor the operating mode of the cable system.
Please note that the electrical cable used in heated floors can be single-core or double-core. The first option is characterized by greater electromagnetic radiation, however, it is still within normal limits
The second option is characterized by simplicity of layout, since it does not require connecting two ends to the thermostat, since one is enough.
If the cable floor will be laid on a wooden surface, then you need to take care of safety. The wood must be treated with fire retardants, despite the fact that there will be no direct contact between the wire and the floor covering.
For those who want to equip a bathhouse using an electric heated floor, manufacturers provide various devices that will be useful during installation. These devices are special guides, supplemented with fasteners, and a mounting grid. Using the guides, you can place the cables at the optimal distance from each other
It is important that there is a distance of at least 5 cm from the cable on the wall, and at least 10 cm from other heating devices.
Film heated floor
This is the cheapest and fastest installation option. Here, thermal film is produced in special rolls. All you need to do is spread the mat over the floor, secure the strips with adhesive tape or some other simple method. There is no need for a cement screed, which takes a lot of time. In this situation, infrared mats are filled with tile adhesive, onto which the tiles are directly laid. In some cases, the covering is laid directly on the mats.
Water floor
Can be installed in various ways. The choice of one option or another is influenced by the preference of the bathhouse owner and the technical characteristics of the flooring. The most common are two installation methods.
- Concrete type, which is similar to installing electric underfloor heating. The only difference is that the pipes are thicker.
- The flooring method, which is especially popular, as it does not overload the floor covering.
Installing a heated floor using a concrete screed is the most common option, the only downside of which is that it requires a fairly large amount of time. In this case, you don’t have to worry about overheating, so this installation method is chosen quite often. Please note that it is not recommended to install pipes close to each other. The optimal distance between them is 30 cm.
This case does not provide for the presence of bends and kinks. Pipelines must be fastened using clamps and dowels. In some cases, wire is used. The presented method involves running the pipeline in a spiral or snake. This option is not very difficult to build.
Varieties and features
Discarding the classic scheme of a hypocaust with a stove in the basement, we can say that there are two main types of heated floors - water and electric.
Water floors
I would like to feel the warmth under my feet everywhere in the bathhouse, including in the washing room and steam room - the solution would be a water heated floor in the bathhouse. It is quite expensive to install and practically cannot be repaired - any repair, in fact, comes down to replacing the entire structure. But it has the lowest operating costs. And it is also not afraid of humidity, so it is good in the washing room and steam room. So this is the most versatile option.
The coolant of a water heated floor is most often water. Sometimes antifreeze or ethylene glycol is used. In any case, such a floor requires an autonomous heating boiler.
In this case, the boiler is needed directly in the bathhouse. The idea of diverting a main from the main cottage heater is usually a bad idea and not cost effective. The system should not be allowed to freeze in winter. To adjust the entire underfloor heating system, you will have to install a manifold box - so the system turns out to be very cumbersome.
Some craftsmen recommend powering the water floor system from a sauna stove. This cannot be done. Let me explain why.
- Firstly, you should not take away the heat needed to heat the heater.
- Secondly, stoves are heated irregularly, and the water circuit just needs a clear periodicity - freezing is destructive for it. So the water floor must have its own separate boiler.
Electric floor
An electrical underfloor heating system should be considered lighter in weight and easier to install. The easiest way to create a heated floor in a bathhouse with your own hands is just this. Electric floors come in two main types. The first, in the form of mats. The second, in the form of a heating wire, laid, like water pipes, in zigzags.
Electric underfloor heating systems are simple. Rolled mats are easy to repair and simple to install. However, they are completely unsuitable for washing and steam rooms.
Even with all precautions
More precisely, at the time of using the steam room, these systems must be de-energized for safety reasons. And, taking into account the human factor, it is easier not to place them in wet rooms at all.
A significant disadvantage of electric floors is the high cost of operating costs and the need for increased electrical power. But they are very light and are not afraid of frost. It is worth mentioning the ease of adjustment and changing the heating mode.
System Features
Air circulation diagram in the steam room
Since we will use a stove instead of a boiler, it is necessary to install a heat exchanger above the firebox. For these purposes, you can take a regular metal tank or a pipe register. From this heat exchanger, the water floor heating system is installed in the required rooms.
However, in order for the cooled coolant to flow back into the heat exchanger in the furnace, a circulation pump is needed. Without it, the system can only work if the oven is located below floor level. Also in this case, pipes with a larger diameter (24 mm) will be needed, while elements with a diameter of 16 mm are usually used. But even in this case, circulation will be slow and the system ineffective.
The main problem with a floor heating system from a brick stove is that the temperature can be adjusted on the boiler, but the stove does not give us this opportunity. The recommended comfortable temperature for heated floors is 40 °C. The stove in the bathhouse can heat the water to boiling temperature. Therefore, in addition to the pump, you will need to install a mixing unit.
Since it will not be possible to install a large heat exchanger into the stove, you will need to install a battery tank near the stove. It is connected using steel pipes to a heat exchanger. To eliminate heat loss through the base of the floor, thermal insulation materials are laid on it. They effectively reflect energy and help increase the temperature in the room.
How to make a heated floor in a bathhouse with your own hands under the tiles?
The warm floor for water drainage is made with an inclination towards the drainage hole. From there, the water flows through a pipe into a sewer or drainage structure. Also, to increase the moisture resistance of the floor surface, it is recommended to use a cement-sand screed and ceramic tile flooring.
Where to choose
So, which method of heating bath floors is better? To answer this question, it is enough to compare systems from an economical perspective. As practice shows, it is quite expensive to install an electric heated floor over the entire area of the bathhouse. You will especially feel this when you have to pay for electricity. If we start only from this factor, then the thermal energy of a sauna stove can be used for a steam room, and in other rooms, electric heating can serve as an additional source of heat. This floor can be turned on as needed.
So, to summarize, each of the systems described in this article is relevant and has the right to life. So, organizing heating from a stove, electricity or gas boiler is quite possible
It is very important to follow the installation rules. In this case, the underfloor heating will last for more than one year in full working order.
We will be interested to know how you installed heated floors in your bathhouse. If you know how to properly carry out this or that work, then write comments at the end of this article. Perhaps you can help other craftsmen install a heated floor with their own hands, without the involvement of qualified specialists.
Alternatives
Electric and infrared heated floors can serve as a good alternative to water heated floors. Let's look at them in more detail.
Electric heated floors
Similar in nature to water floors. The electric heating cable, which replaces the heating circuit, is the main distinguishing feature of such floors. All other processes occur similarly.
The system requires the installation of an additional machine and careful waterproofing. On the other hand, no heating circuit, pump or heat exchanger are required. If in the previous case we did not have additional costs (if the boiler had sufficient power) for operation, then here we will have to pay a lot for electricity.
There are two types of heating cable: with one core and with two.
The advantages are as follows:
- the floor is easy to manufacture;
- a water circuit for heating will cost more;
- installation of such a heating system does not take much time;
- The thermostat makes it easy to set the desired heating temperature.
Disadvantage: high energy consumption for heating.
Such a system can be used not only in a bathhouse, but also for heating floors in a house.
Infrared heated floors
The existing bathhouse puts the feasibility of implementing a water-heated floor into question. In this case, an infrared floor comes to the rescue. It does not require dismantling the old coating. A thin film with a heater is easy to lay on any base. The installation of a final screed in the bathhouse is also not necessary.
Expert opinion
Pavel Kruglov
Stove maker with 25 years of experience
If you need a budget solution for an existing bathhouse, this is the best choice. For heating adjacent rooms, this is also the optimal solution.