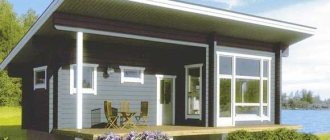
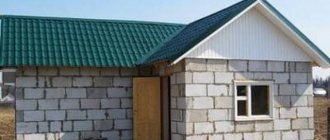
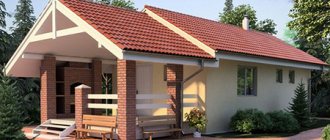
When constructing small buildings - garages, outbuildings, small residential buildings - a lean-to structure is often used instead of a gable roof. It has a number of advantages:
- simplicity of design. As a result, a reduction in the number of structural parts, acceleration and simplification of work;
- reduced roof deck area. Accordingly, costs for materials are reduced (up to two times);
- the ability to do without internal supports for a span of up to 5...6 m;
- simplification of repairs - due to the small slope of the roof, you can stand on it without additional insurance and equipment (applies to roofs with an inclination angle of up to 10 degrees);
- reduction of wind load in the presence of prevailing unidirectional winds.
Unfortunately, there are also disadvantages, the main of which in our region is the increase in the load from precipitation on a flat roof.
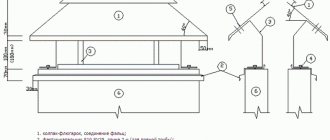
The construction of a simple pitched roof is shown in the diagram below.
What determines the angle of inclination of a pitched roof?
There are flat (up to 5 degrees to the horizontal), low-slope (5...30 degrees) and steep-slope (over 30 degrees) pitched roofs. At the same time, flat and low-slope roofs require very careful waterproofing and water drainage - this is due to the fact that snow lingers on such surfaces and begins to melt from below, from the heat emitted by the house.
Snow and wind loads
These parameters are of great importance when choosing the angle of inclination.
It is believed that snow does not slide off a roof with a slope of less than 20 degrees and remains on the surface. With a greater slope, the preservation of the snow cover depends on the type of roofing material. On roofs with a slope of more than 50 degrees, snow cover does not linger, regardless of the covering, except in certain cases (immediate glaciation, complex structures).
The need to take into account the weight of the snow cover is related to the calculation of the roof’s strength, therefore, before the design begins, it is necessary to clarify the snow loads of the given region. Information can be found in SP 20.13330.2016, section 10 “Snow loads”. There, in the “Wind Impacts” section, there is data for calculating the wind load.
You can easily “estimate” the snow load using a map of the Russian Federation (territory zoning based on the weight of snow cover and wind areas). Please understand that these data are simplified and do not take into account possible nuances associated with prevailing winds, terrain and other factors.
The wind load is calculated taking into account the height of the building and its location. Zone A – open spaces, zone B – forested areas, dense urban development.
When the building height is less than 10 m, it is permissible not to take into account the wind load, with the exception of buildings located in large open spaces.
When calculating the optimal angle of inclination of the structure, it is necessary to take into account:
- to reduce the wind load it is necessary to reduce the angle of the slope;
- To reduce the snow load (ensuring snow sliding), the angle should be increased.
Thus, the decision made is a compromise between the desire to get rid of regular cleaning of the roof from snow and the reluctance to re-lay the covering torn off by the wind. Examples of calculations taking into account snow and wind loads are shown below.
Selecting the type of coating
Depending on how steeply the slope is inclined to the horizontal, you can choose one or another roofing material. Sometimes the inverse problem occurs - the roofing material has already been selected, now it is necessary to determine the permissible angle of inclination.
The permissible and typically applicable roof angles for different materials are listed in more detail in the table below.
Attention: heavy, fragile materials are not suitable for steeply sloped roofs! It is also necessary to take into account the reliability of fastening of individual elements and correctly calculate the waterproofing!
The weight of the roofing material can be taken approximately from the table below or found out independently from the manufacturer/seller.
Important: when making calculations, you should rely on the maximum figure, this will give the necessary margin of safety for the structure!
Insulation and waterproofing
There is only one rule here: the smaller the angle of inclination of the roof, the more thorough the waterproofing should be. Thus, for flat and low-slope structures, it is necessary to install two-layer insulation with careful gluing of joints and obligatory laying of panels (rolls, films) overlapping with a margin of at least 20 cm.
Roof insulation depends on the region of residence, its temperature range, the planned operation of the premises under the roof, heating of the building as a whole and other nuances. The calculation of thermal insulation will not be described in detail here.
The type and specific gravity of the selected materials must be determined in advance; this is required to calculate the prefabricated load from the “roofing pie” on the overall structure and load-bearing walls.
Step 4. Calculate the exact angle of the slope
The angle of a shed roof is usually called the angle at which the rafters and roof slope are inclined to the horizontal plane of the ceiling. Moreover, take this scheme seriously if you want to provide your roof with the correct mechanical strength:
The angle of inclination of the slopes is measured in percentages and degrees. But, if degrees are more or less clear (thanks to the school geometry course), then what are percentages? Percentage is the ratio of the difference in the height of the ridge and cornice to the horizontal of the slope, multiplied by 100.
There is another interesting point: many architects specifically calculate the angle of a pitched roof so that it is equal to the elevation angle of the sun in a given area in mid-spring. Then you can calculate down to the millimeter when and what kind of shadow there will be, which is important for planning terraces in front of the house and other recreation areas.
Determining the angle of inclination
Taking into account the factors stated above - snow and wind load, the selected type of material - and knowing the approximate design of the building, you can determine the angle of the roof. The calculation rules are set out in more detail in the article. Next, based on this information, the prefabricated load (from its own weight and external loads) on the rafter structure is calculated. Based on the calculation results, the pitch of the rafters and their cross-section are determined.
An example of calculating the load on the rafters
Construction is planned in Irkutsk, the house with a height of 5.6 m will be located in a lowland, there are no clearly defined prevailing winds. This area belongs to snow region 2 and wind region 3. Accordingly, the snow load is 120 kg/sq.m., and the wind load is 30 kg/sq.m. Total load 150 kg/sq.m.
Roofing material – metal tiles with a weight of 4 kg/sq.m. A slope of 12 degrees is acceptable for it, but most manufacturers recommend 20...30 degrees for a pitched roof. If we take 20 degrees, it is necessary to ensure high-quality waterproofing, which adds 2...5.5 kg/sq.m. to the weight of a square meter of coating. Since the upper part of the house is planned as residential, insulation is also necessary. For thermal insulation we use basalt wool plus lining the inside with plasterboard. The approximate weight of a square meter of such insulation is about 4.5...5 kg.
It is also necessary to take into account the weight of the wooden sheathing under the metal tiles, this is at least 10...12 kg, and the weight of the rafters themselves.
Thus, the total load on the square weight of the roof from its own weight and external loads will be (without taking into account the weight of the rafters, since their cross-section and pitch are not yet known): 4+5+5+12+150=176 kg/sq.m.
Determining the pitch of the rafters and their cross-section
There are calculation formulas for calculating this data. However, if you do not have an engineering education and the desire to calculate coefficients, you can use tabular values.
To determine the height of a beam (rafter), you can rely on the already known angle of inclination and the estimated length, which is determined using trigonometric formulas.
The difference between the height of one and the second supporting walls of the roof for a span of, for example, 4 m and an inclination angle of 20 degrees will be:
L_bc=L_cd×tgA=6×0.364=2.18 m
Length of rafter leg (rafter):
L_c=L_bc÷sinA=2.18÷sin20=6.4
Taking into account the overhang in both directions of at least 500 mm (mandatory roof overhang), we assume a rafter length of 7.4 m.
For double-support rafters, the table is adopted
It is customary to support spans over 6 m on three points - two load-bearing walls and a truss truss, for example, or supported on a bench. Spans of 4.5 m are applicable in attics, terraces, bathhouses, verandas, as well as various extensions. In residential buildings, as a rule, the distance between supports is equal to or greater than 6 m.
Accordingly, taking into account the length of the rafters, the section of the beam and the step between them are selected.
Please note: the length of the rafter in this case refers to the distance between the support points!
That is, in the example given - the length of the entire rafter leg is 7.5 m and the span is 6 m, it is permissible to use support on load-bearing walls (through the Mauerlat) and the rafter leg. Then the cross-section at a pitch of 140 cm should be taken as 100x200 mm, and at a pitch of 90 cm 75x200 mm are acceptable. It is still advisable to increase the cross-section of the beam by 10...15% to obtain the required safety margin.
You can check the load capacity of the roof and the correctness of the selected angle with the selected parameters in one of the online calculators. There you can also get information about how much materials will be needed to build such a roof.
As can be seen from the screenshot with a simplified drawing of the building, the items “Calculation of rafters”, “Calculation of sheathing”, “Snow load” are drop-down, you need to insert the selected data into them.
The calculation result is shown below.
As can be seen from the result, it is proposed that for a given load, roofing material, size and pitch of rafters, choose a cross-section of beams equal not to 75x200 mm, as proposed in the standards, but to 70x230 mm. However, this is a minimum value, and this cross-section is not standard. Therefore, taking into account the safety margin, it is better to give preference to a section of 100x200 mm.
Important: in addition to conventional rafters (beams), triangular trusses can be used. This will significantly increase the load capacity of the structure, but such elements require professional calculations.
Determine the height to which you want to raise the wall
To ensure the found slope angle of the pitched roof, it is necessary to raise one of the walls higher. How much higher we will find out by remembering the formulas for calculating a right triangle. Using them we also find the length of the rafter legs.
How to calculate the parameters of a pitched roof
When calculating, do not forget that the length is obtained without taking into account overhangs, and they are needed to protect the walls of the house from precipitation. The minimum overhang is 20 cm. But with such a small protrusion beyond the building, the pitched roof looks short. Therefore, overhangs of at least 60 cm are usually made on one-story buildings. On two-story ones they can be up to 120 cm. In this case, the width of the overhang is determined based on aesthetic considerations - the roof should look harmonious.
Example of a drawing in ScratchUp
The easiest way to determine how much the roof needs to be extended is in design programs that allow you to draw the building to scale and “play” with the overhangs. Everything should be displayed in 3 dimensions (the most popular program is ScratchUp). Twist through different sizes of overhangs, decide which one looks better (if there is no project), and then order/make rafters.
How to choose a rafter system project for a house with a pitched roof
As already mentioned, for a pitched roof, depending on the nature of the load-bearing walls and the span, you can choose different types of rafters and their attachment points.
For spans up to 4.5 m (garages, outbuildings, outbuildings, verandas, etc.) it is definitely worth choosing the simplest and most convenient method - leaning on two load-bearing walls through a mauerlat.
Brick wall, mauerlat made of timber for waterproofing, fastening using cut grooves and corners
In more detail this fastening option and another (on the right) with a longitudinal tie beam, on studs
At the same time, to simplify the design, they recommend an interesting method of fastening - with mauerlats only along the supporting walls, without tying the timber into a quadrangle.
At the same time, to simplify the design, they recommend an interesting method of fastening - with mauerlats only along the supporting walls, without tying the timber into a quadrangle.
If the structure is wooden, the rafters are cut into the upper crown or also into the mauerlat (with a frame structure). For a log building, cuts are made for the rafters in the top log (as in the photo below).
Hanging rafter technology
- Install the mauerlat and floor beams. The hanging rafter system does not have vertical and horizontal supports, so there is no need to install racks and purlins. For convenience, mark the center of the roof, along which the ridge will pass, using boards temporarily nailed to the centers of the gables. One edge of the board should mark the center of the roof. The boards mark the height of the roof along the ridge.
- Execute the template. To do this, the board is applied with the lower end to the Mauerlat, and the upper end to the roof height mark. Mark the top cut along the edge of the board, marking the center of the roof, and the bottom cut, along the mauerlat, no more than 1/3 of the width of the board. Apply a template on both sides, clarifying the symmetry of the rafters.
- The required number of rafter legs is made according to the template. Lay them out in pairs. The two rafter legs that form the truss are placed with the upper sections facing each other and fastened with a metal plate or a gusset made of boards with screws or studs. The lower part is attached to the Mauerlat using corners and screws and nails.
DIY pitched roof from start to finish
So, the calculations have been completed and determined:
- tilt angle;
- roofing material;
- methods of heat and waterproofing;
- rafter section;
- rafter pitch;
- method of fastening them.
Now you need to get down to work.
Laying the Mauerlat
This stage is necessary for frame buildings, buildings made of aerated concrete, foam concrete, brick, aerated concrete, stone, monolithic or precast reinforced concrete, as well as for buildings made of panels of any type (including SIP).
One of the options is shown in the video.
Selecting a suitable cross-section of timber (logs).
In fact, this beam only redistributes point loads from the rafters to the entire upper supporting plane of the load-bearing wall, so the cross-section does not matter much. But the general rule should be observed - the greater the total load on the roof and its own weight (see calculation above), the larger the cross-section of the Mauerlat should be. Typically, timber 100x200 mm or larger is accepted. For logs, be sure to cut off the plane so that the support fits as tightly as possible to the load-bearing wall.
Choose a method for attaching the Mauerlat to the wall.
Most often, studs are used, and they are placed in masonry (blocks, bricks) or poured into a reinforcing belt. The technique for laying hairpins is shown in the video tutorial.
At the same time, to prevent the studs from being pulled out of the masonry or belt, they are secured from below - with a piece of welded reinforcement, a washer, a bent end, or something else.
Important: to avoid problems with screwing the nuts onto the studs, it is advisable to protect their threaded ends from sticking of the solution using film while finishing the masonry or pouring the reinforcing belt.
It is also possible to attach the Mauerlat to anchor bolts. Their length is selected as follows: the thickness of the Mauerlat plus at least 10 bolt diameters. Anchor bolts are driven into the masonry (monolith) through a hole in the mauerlat and tightened. To make the support area larger, tightening is done through washers of increased diameter.
The third way is using wire. It is laid in the masonry (monolith) 0.5...0.7 m before the top level of the wall, its length is chosen so that it is enough to tie the beam and twist it, and the thickness is taken to be at least 2...3 mm.
Waterproofing is being installed
For this purpose, roll materials are used - mainly roofing felt in two layers. It can be laid directly on the surface of the load-bearing wall or attached in any way (glue, staples) to the Mauerlat. If studs are already fixed in the wall, it is convenient to “prick” a layer of insulator on them. But at the same time, it is necessary to protect the contact points between the wall and the stud from moisture using coating materials. It is permissible to coat the stud to a height equal to 1/3…4/5 of the thickness of the beam. Please note that waterproofing does not necessarily cover the entire width of the wall, but the strip must be at least 20% wider than the Mauerlat.
It is recommended to lay jute tape over the waterproofing - it will seal the joint and serve as additional protection against freezing, after which the mauerlat should be laid and secured in the chosen way.
Step-by-step instructions for installing pitched roof rafters
Some options for attaching rafters to the Mauerlat or upper crown have already been shown above. This information is presented in detail in the article. But it is worth clarifying certain points.
The angle of support of the rafter leg on the beam must be strictly 90 degrees.
If you do not plan to make an overhang of the roof on one side (adhering to the wall) or you plan to make an overhang on fillets, it is convenient to trim the rafter leg, as shown in the figure below, and secure it with corners, nails, hemming bars or any other method.
In this case, for greater convenience, you can fix a beam with an attached fillet to the wall (mauerlat) - for example, using a ruff driven into the masonry (monolith) and twisted wire.
In this case, trimming the rafters is carried out according to the following scheme.
In other cases, it is easier to use shaped cutouts in the rafter legs so that they lie on the Mauerlat with an overhang that provides the desired roof overhang.
Another option is cuts in the Mauerlat itself.
You can also additionally support the rafter legs on the brickwork (top right in the picture) or the extension of the floor beam (bottom right).
If the overhang is too large and the strength of the rafters is not enough, you can arrange under-roof supports with an additional Mauerlat beam.
Insulation and waterproofing
These stages are performed almost simultaneously. Insulating material can be laid between the rafters from the inside, with sheet material (for example, basalt wool and plasterboard), with the obligatory installation of a vapor barrier film between the insulation and the sheathing. It is also possible to first install the sheathing on top of the vapor barrier and then lay insulation on the outside. The layers of the “roofing cake” are shown using the example of a simple gable roof; for a single-pitch roof, the same installation procedure is used.
A waterproofing membrane (film) is spread over the rafters and thermal insulation and secured with staples to the rafters.
The order of installation from bottom to top along the slope is required, with an overlap of panels of at least 15...20 cm. Counter battens are mounted on top of the film/membrane, followed by a solid or sparse lathing for installation of metal tiles.
Roof insulation
The roofing pie is arranged taking into account the final coating. The cake includes insulation, vapor and waterproofing. To insulate a building, a mixture of concrete and clay, cement slag and other materials are suitable. Quite often, builders use multilayer materials, for example, mineral wool. Insulation boards are:
- slab;
- rolled
Before laying insulation, it is necessary to perform waterproofing. The material is laid out on top of the roofing components.
Before performing insulation, it is necessary to lay waterproofing
It is advisable to do this if the thickness of the heat-saving material is less than the height of the rafters. If the thickness of the insulation corresponds to the height of the supporting element, the film should be mounted on the upper parts of the bars, which are used to increase the height of the supports.
The waterproofing must be installed across the slope with an overlap of 100 mm. A ventilation gap of 50 mm or more must be left between the waterproofing and the roof. To do this, 50x50 mm bars are mounted on top of the film.
The insulation will need to be cut into separate strips and placed between the slats. The material must be mounted by surprise; for this, its width must exceed the distance between nearby supports by 30 mm. Then you need to place the vapor barrier material at the bottom of the rafters and secure it with nails with heads without a protrusion. The vapor barrier is installed with an overlap of approximately 8–10 cm. To ensure the tightness of the canvas, it is recommended to connect it with self-adhesive tape.
Waterproofing a flat or low-slope pitched roof
This issue is quite important, so we will consider it separately. Flat or almost flat pitched roofs, which are usually covered with rolled roofing materials, require enhanced waterproofing.
Therefore, for them, first, primary waterproofing is performed on top of a flat surface (slab or solid flooring on floor beams), then insulation is installed under the screed, then two or more layers of waterproofing are installed.
The slope necessary for rainwater drainage is provided by the so-called “slope”, that is, an embankment made of expanded clay, which allows you to increase the thickness of the screed on one side and reduce it on the other.
To repair or improve the properties of a flat roof, liquid bitumen-polymer mastics are often used, applied in two or three layers.
These mastics are also used for waterproofing roof junctions, for example, to a parapet. However, in general, roofs with a slope of less than 5...10 degrees are rarely used in one-story private houses - the climate of our country is not conducive to such a building style. More often, such options are used in multi-story construction.
For low-slope roofs, flexible tiles are also convenient. It is laid on top of a layer of waterproofing and provides reliable protection from precipitation.
Applications and benefits
Houses with a pitched roof reduce financial and material costs.
Building a pitched roof with your own hands imposes some restrictions on the possibility of application for certain buildings. The device is possible for the following cases:
- garage roof installation;
- installation of roofs over outbuildings;
- installation of rafter systems for small buildings.
A do-it-yourself pitched roof has the following advantages:
- reduction of material consumption;
- reduction of financial costs and labor intensity;
- resistance to wind loads.
The disadvantages include the limited scope of application and the complexity of arranging the attic in the under-roof space.
Laying roofing
On shed roofs, this procedure is performed in the same way as on any other, with one exception: the absence of a ridge or slope connections. Therefore, the roofing material is laid so that it extends slightly beyond the edge of the roof on all sides, or additional elements are used, namely cornice and end strips.
Slate and ceramic tiles are installed extending beyond the rafter system by 2...10 cm (depending on the size of the installation unit). From below, the roof overhangs can be hemmed with various sheet and panel materials.
Materials required for installation
To install a pitched roof, you will need a minimum set of tools - a hammer, a hacksaw or saw, an ax, a knife, a construction stapler, a measuring level and a screwdriver. It is better to use the equipment on batteries so as not to pull electrical wires throughout the entire structure. Necessary materials:
- dry timber with a moisture content of less than 20% and a minimum size of 100x100 mm for the Mauerlat and 50x70 mm for the racks;
- 1st grade edged board made of coniferous and deciduous wood;
- fastening elements: nails, screws, staples, anchor bolts;
- vapor barrier, waterproofing and insulation material;
- finishing roof covering with fasteners.
You will also need additional elements for filing the cornice and a drainage system.
Snow guards for pitched roofs
These devices are necessary for any roofs with a slope angle of less than 45...55 degrees to the horizontal. At the same time, flatter roofs are in greater need of installing snow retainers or snow cutters, since their absence can lead to an avalanche-like meltdown of the snow cover.
More complete information about the types, features of use and the required number of snow guards is presented here.
General characteristics of corrugated sheets
Corrugated sheeting is created from cold-rolled rolled steel, which is subsequently treated with a zinc alloy and an outer coating. Polymer compounds or various paints and varnishes can be used to coat metal sheets. The last stage in creating corrugated sheets is profiling - the process of giving the metal a certain profile shape, which ensures the strength and load-bearing capacity of the finished products.
All profile sheets are divided into three main categories:
- Wall. Products in this group have minimal strength, which is determined by the small thickness of the metal and low profile. The cost of wall sheets is low, but they can only be used to create vertical surfaces or small canopies.
- Bearers. Such sheets have reinforced stiffening ribs, which ensure high strength and load-bearing capacity. The profile height of the load-bearing sheets can reach up to 114 mm, which allows this type of product to be used when installing roofing structures with a large area and long spans.
- Universal. As the name suggests, universal profile sheets are suitable for a wide range of applications. The characteristics of such sheets vary quite widely, and if desired, you can always choose the best option.
Regardless of the type, profile sheets can be used in roofing structures if the profile height exceeds 20 mm and the minimum slope for corrugated sheeting is 8 degrees.