Setting up a bathhouse: features of chimneys
During the combustion of fuel, smoke and carbon monoxide are released, which must be removed, so a sauna stove needs a good chimney. Moreover, it is very different from a conventional chimney used in residential premises.
In order to ensure the safety of bathing procedures and economical fuel consumption, the choice of chimney must be approached very carefully, taking into account the characteristics of a particular stove (its material, power), the planned frequency of use and room parameters.
Types of chimneys at installation site
Flue gases from the furnace are discharged through a pipe, which can be vented outside through the ceiling and roof or through a wall. Each installation method has its own advantages.
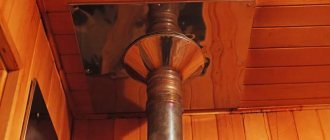
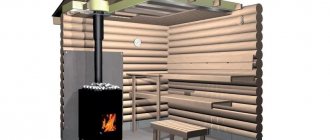
When a sauna pipe is installed inside a steam room, you can make a heater around it or build a tank for heating water to use all the heat produced by the stove. Such a chimney usually does not have bends and turns, going straight up, so it is less likely to become clogged (soot itself falls into the firebox), and it is much easier to clean.
On the other hand, the installation of an internal chimney is complicated by passing through wooden floors and roofing, which must be protected from overheating, and the passage openings must be sealed from precipitation. This leads to higher construction costs and requires more time for installation.
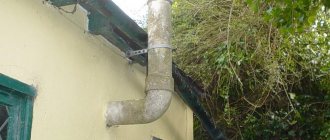
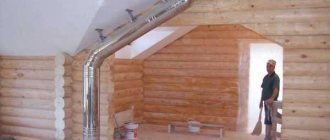
An external chimney does not have these disadvantages. Although the wall at the point where it exits outside also needs to be insulated from the hot pipe, this is much easier and cheaper to do.
When passing through wooden walls, a fire-proof cutting is arranged Source yaplakal.com
However, it also has its disadvantages.
- If the stove is located against the wall and the pipe is immediately vented outside, that part of the heat that could warm the room is not retained in it.
- Cleaning is made difficult by the presence of turns and the accumulation of soot and other combustion products in these places.
- External chimneys for a bathhouse must be equipped with inspection hatches and settling tanks to collect condensate.
- The vertical part of the pipe may abut the roof overhang, which requires additional bends.
External chimney with an outlet to bypass the roof overhang Source sense-life.com
System design
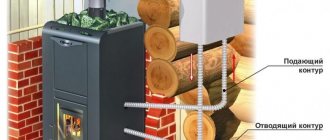
A homemade heat exchanger, simple in design, will serve for heating a house
The principle of operation of a homemade heat exchanger is that the stove transfers energy from the combustion of wood or coal to it, and the heated water is distributed through pipes to all rooms. This heating method allows the inhabitants of the house to enjoy an even distribution of heat. In addition, all rooms warm up much faster, and the cost of purchasing fuel is reduced.
There are two ways to improve the stove heating of a private home:
- build a furnace from scratch for a specific heat exchanger size;
- install a homemade heat exchanger made to the size of the firebox in the existing furnace.
Diagram of a brick oven with a heat exchanger
By making a heat exchanger for heating with your own hands, the homeowner can be sure that his stove with a water circuit will perform no worse than a real solid fuel boiler. The only difference will be that the location of the heat exchanger inlet for the stove will be slightly higher above the floor than for factory boilers. This is a fairly significant difference, which can affect the rate of natural circulation of the coolant.
The connection of the heat exchanger to the heating system must be done in such a way that the cold water supply pipe (return) is located as low as possible.
Just as in a conventional heating system, an expansion tank must be installed at the top point of the pipelines. It will compensate for changes in the volume of heated water and release air bubbles from the system. If heating through a heat exchanger with natural circulation turns out to be insufficient to heat a large cottage, you will have to install a circulation pump in the system.
Types of chimneys by material of manufacture
Not many materials meet the requirements for heat resistance, fire safety, corrosion resistance and mechanical strength. Therefore, traditionally, sauna chimneys are made of brick and metal, and not so long ago ceramic structures appeared on the market.
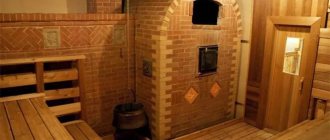
Brick
Brick is the most heat-efficient material, retaining heat for a long time and gradually releasing it into the room. This property is especially valuable for a bathhouse, which is why brick stoves do not lose their popularity. But the pipe for the stove in the bathhouse is usually made of other materials, and there are reasonable explanations for this.
- A brick chimney takes up a lot of space and requires a reinforced foundation due to the heavy load from the heavy structure.
- The laying takes a lot of time and effort, as it must be of very high quality, with sealed seams.
- The rough and porous inner surface of the channel promotes rapid growth of soot and requires frequent cleaning.
Lining a brick chimney helps to avoid this problem, but leads to an increase in cost Source oboiman.ru
As a rule, the same mounted chimney is installed on a brick stove, which is its continuation. A metal structure may not be able to withstand such a weight, so brick chimneys for metal sauna stoves are installed separately and connected to the firebox by a pipe. They are called radical and can be either internal or external.
Main brick chimney Source izba-brevno.ru
See also: Catalog of companies that specialize in the design and installation of fireplaces and stoves
Steel
Steel chimneys produced for sale are made of black, galvanized or stainless steel. They are single- and double-circuit. The latter consist of two pipes of different diameters inserted into each other, between which a thermal insulation material (stone wool) is laid.
Note! At the outlet of the furnace, a single-wall pipe is always installed first.
To simplify installation and make hermetically sealed joints, pipes are equipped with sockets. Assembly and installation are carried out using special fasteners and shaped products - supporting and rotating elements, tees, adapters, bends, etc.
Chimney assembly kit Source stalmir.com
- The thickness of single-wall chimneys is at least 0.8-1 mm, and the steel must be of good quality: if it is crushed by hand, then these are not smoke pipes, but ventilation pipes.
- For double-walled chimneys, it is allowed to use steel with a thickness of 0.5 mm, while the thickness of the intermediate thermal insulation layer is 30-100 mm.
Due to its light weight, aesthetic appeal and affordable price, installing a chimney in a galvanized or stainless steel bathhouse is the most common option. Its advantages also include a smooth internal surface and good corrosion resistance, which prevents deposits from accumulating on the walls.
Wanting to save money, many use ordinary large-section black steel pipes to install a sauna chimney. They have much more weight and are connected by welding. But for a homemade metal stove they are a completely reasonable choice.
Homemade chimney from a black pipe Source stroy-podskazka.ru
Ceramic
Ceramics, like brick, has similar properties and greater weight. Therefore, the ceramic pipe is installed separately from it on a special base with a condensate collector. In addition to pipes 33-50 cm long, the chimney kit includes:
- shaped elements for assembly;
- insulating materials;
- outdoor units;
- upper cone;
- glue for ceramics.
Details of a ceramic chimney Source hottrade.by
How to choose a gas stove
If the time has come to replace the wood-burning stove with a modern heating device, then its choice should be approached with all responsibility.
Gas burners for baths received the name “Bombs” for a reason. This is due to the fact that unlucky buyers trust sellers and purchase devices of dubious origin, the use of which results in explosions, fires, burns and even death. Because of this, there is a myth among people about the dangers of gas heating appliances.
Often the cause of the above emergency situations is the desire to save money and buy burners or a stove as cheaply as possible. You should select gas heating appliances according to certain rules:
- firstly, each burner has a certain fuel consumption, which determines the efficiency and power of the stove. To find out, you need to read the description in the instructions for use. For a small bathhouse, a device whose technical characteristics state that fuel consumption is 1–4 cubic meters per hour is suitable;
- secondly, all assembled gas stoves, as well as burners sold separately, have documents confirming quality and safety standards. If the sellers do not have them, then it is better to bypass this store;
- thirdly, in the steam room it is unacceptable to operate burners and boilers that have damage, leaky connections and expired expiration dates. In other words, gas sauna stoves must be in perfect condition.
During operation, gas furnaces must undergo preventive maintenance. Such a measure is mandatory. This rule must be followed strictly. Failure to comply greatly increases the risk of an emergency.
Tips for selection and installation
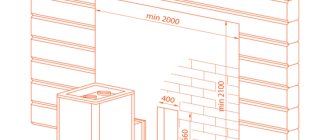
When choosing pipes for a bathhouse, chimneys for stoves, and planning to install them yourself, try to adhere to accepted norms and rules. Most of them concern the length of the pipe and its height relative to the roof ridge. How to correctly calculate this height is shown in the diagram.
Determining the height of the pipe on a ridge roof Source chimney-master.rf
Step-by-step instructions on how to install a heat exchanger with your own hands
The Kuznetsov heat exchanger is installed instead of one of the chimney sections - for this part of the chimney will have to be dismantled. If a chimney is installed from one long pipe, you will have to cut out part of the chimney and install the structure using welding.
Installation methods
The heat exchanger is installed at a certain distance from the heating unit - 200-500 mm, more is possible.
If the chimney is prefabricated, then it is necessary to disassemble part of the chimney. The heat exchanger pipes are cut so that the length of the heat exchanger structure is equal to the dismantled chimney section. The heat exchanger is mounted in the chimney and sealed using heat-resistant sealant. The top of the heat exchanger is painted with heat-resistant paint.
Briefly about the main thing
When choosing from brick, ceramic and steel chimneys, you need to take into account the design of the stove and the type of bathhouse. If the stove is brick, the chimney can also be made of brick, taking care of a strong foundation. Ceramic structures are more suitable for baths with a residential attic or located in the basement of a house. The ideal choice for small one-story free-standing baths would be a single- or double-circuit prefabricated steel chimney. And the most budget option is a black steel pipe, but its installation will require welding work.
Ratings 0
Simple design: coil
A simpler design is a coil made of a copper or aluminum tube.
The diameter of the tube is chosen so that it is convenient to connect it to the fittings of the water storage tank. For bending, pipes with a diameter of no more than 28 mm are more convenient. In any case, the length should not exceed 3 meters - this is a prerequisite for natural coolant circulation. To connect the heating coil to the tank, use a flexible hot water line.
This heat exchanger design can be used to produce hot water, or less often for heating small rooms. Maximum heating efficiency is achieved if the coil is installed on the chimney of a simple stove such as a potbelly stove with a high temperature of the flue gases.
DIY chimney coil
A pipe heat exchanger is usually installed on the chimney of a metal stove installed in a garage or workshop to produce warm water or heating. It is also possible to install a coil on a sauna stove.
Necessary materials:
- pipe made of copper, aluminum or steel - about 3 meters;
- flexible hose for hot water supply with a diameter of ¾ inches - 2 pieces of the required length;
- a storage tank equipped with a float valve for water supply and a drain valve for its consumption;
- ball valve for draining the system.
Sequence of work:
- The most difficult thing when making such a heat exchanger is to bend the pipe into a spiral without reducing its cross-section. Copper pipes with a diameter less than 28 mm can be bent using a pipe bender without heating. Steel and aluminum, as well as larger diameter pipes, must be heated with a blowtorch before forming.
- You can also use this method: fill the pipe with dry sand and tightly plug its ends with wooden plugs. The pipe is bent according to the template - a pipe having the diameter of the chimney, after which the plugs are removed and sand is poured out, the pipe is washed under high pressure of water.
- Threads are cut at the ends of the pipe and adapters are installed for connection to the system.
- The pipe is installed on the chimney. To improve heat transfer, you can solder the coil onto the chimney with tin, having previously degreased the soldering areas and removed oxides with phosphoric acid.
- The tank is hung on the wall or placed on a support above the level of the coil. Connect the heater to the tank using flexible hoses. A drain valve is installed at the lowest point of the system.
When using a coil heat exchanger in closed heating systems, it is necessary to install a circulation pump! The coolant may boil, and if circulation is poor, water hammer can occur, destroying the system elements!
Video: receiving hot water from a coil heat exchanger installed on the chimney
Open siphon type heat exchanger
A very interesting and effective option is to heat water on a stove, but, unfortunately, not very common. An inclined pipe, sealed at the end, is welded into the furnace. Its second end - an open cut - is welded at the bottom of the water tank. When water is poured into the tank, some of it flows into a pipe located in the oven, where it is heated until it boils. The steam released during boiling rises in bubbles. Once in a cold environment, the bubble bursts, transferring a significant part of the heat to the surrounding water. In addition, heat transfer occurs due to the same convection (the movement of hot water up and cold water down).
Siphon heat exchanger. Effective option, but rarely used
One of the practical implementations of such a heat exchanger is shown in the photo. The design has been slightly changed, but the principle remains the same.
DIY heat exchanger for a sauna stove
In this option, the tank is located on a stand in the next room. A hole was made in the wall and in one side of the stove (the stove stands on its side). The length of the pipe is such that it almost reaches the opposite wall of the firebox. The pipe is sealed at the end, the hole in the furnace is slightly larger than the diameter of the pipe, and is not insulated or sealed. The inlet hole is located quite low - firewood is placed directly on this unusual heat exchanger, and then, after burning, coals are heaped onto it if necessary.
How to connect a heat exchanger to a water tank
The owner of such a siphon-type water heat exchanger has been using this unit for more than 6 years. He says that smoke does not enter the room. Sometimes, if you close the door to the steam room too quickly, a small portion of smoke may escape, but this happens very rarely and does not cause any trouble. It is not recommended to make the tank large - it is more convenient to fill the water several times than to wait until a large volume of it heats up. The tank in the photo has a volume of about 50 liters.
Water jacket
Another heat exchanger is simply implemented - a water jacket (water circuit) on the pipe. A larger diameter pipe with two pipes for water supply/discharge is welded onto the chimney section. The principle of operation is still the same: hot water rises up, colder water flows down from the remote tank.
The principle of organizing a water jacket onto a pipe and its connection to a remote tank
This method is more attractive for several reasons:
- heating occurs due to heat that previously simply flew away;
- making such a heat exchanger with your own hands is not difficult, although there are factory-made options;
- can be installed on any metal chimney and for this you do not need to disassemble the stove and make holes in it;
- a heat exchanger on the pipe prevents the penetration of gases from the chimney into the room.
All these advantages make such a device quite attractive. But this solution also has disadvantages:
- complete sealing of seams is required;
- when adding cold water, condensation may form;
- You cannot pour water into a heated system - it may tear the walls of the chimney due to the temperature difference.
The water circuit for the stove is made in a similar way, but in this case, a container with water is built around the body. Almost always, such a heat exchanger is made for round stoves. Firstly, you can select a larger pipe and weld the bottom and top, which is unlikely to be possible with rectangular stoves, and secondly, water moves in a circle easily and the system is efficient, which is difficult to achieve with a square casing.
Principle of operation
The chimney of a metal stove installed in a bathhouse, house or garage becomes very hot when fired. Depending on the design of the stove, its temperature can be from 200 to 500 degrees, which makes it dangerous in terms of fire safety, and accidental touching it can cause a severe burn.
The heat from the chimney can be used for good by placing a heat exchanger on it: tank or coil . The coolant in this case is usually water, and in some cases air. When the coolant comes into contact with the heated walls of the chimney, their temperature is equalized: the chimney is cooled, and the water or air in the heat exchanger, on the contrary, is heated.
When heated, warm water rises to the upper part of the heat exchanger, and from there through the outlet fitting and pipe into the system or storage water tank. Instead of heated water, cold water flows through the inlet fitting. As it heats up, circulation continues, as a result of which the water in the storage tank can heat up to a high temperature.
Air heat exchangers operate on a similar principle: cold air is taken from below, and after heating it is supplied through a pipeline to the heated rooms. This way you can heat an attic in a country house or a relaxation room in a bathhouse, which are heated periodically. It is impossible to install water heating in them, since you will have to regularly drain and fill the system with coolant.
Video description
This video contains complete information about the installation of a UNI chimney, the blocks of which are manufactured in Russia:
Among similar products, it is worth noting the products of such joint ventures as:
- Shidel;
- Wolfshäuer;
- Ecoosmosis;
- Hymen.
But if you prefer completely imported products, then they are represented on our market by the following companies:
- Tona (Germany);
- Marshal (Czech Republic);
- Effe 2 (Italy).
Flaws
Despite many advantages, the installation of a heating element on a chimney pipe also has disadvantages . One of them, the most important, is a sharp decrease in the smoke temperature at the installation site of the heat exchanger. This can lead to deterioration of traction and the formation of condensation, increased soot deposition inside the pipe.
In addition, when connecting a heating system, for example, a garage, you need to calculate the volume of coolant to avoid boiling water and bursting pipes . Welds must be completely sealed.
Any heat exchanger design significantly increases the efficiency of the furnace . For trouble-free operation of the system, it is necessary to carry out a visual inspection of all its elements at least twice a year , and, if necessary, timely repairs, descaling, replacement of gaskets and other necessary maintenance work. In this case, water heating and heating systems will operate flawlessly for a long time.
Video description
How to determine the height of the chimney, watch this video:
- If the horizontal distance from the ridge to the pipe does not exceed 1.5 m, it should rise 50 cm above it.
- At a distance of up to 3 m, the top of the pipe can be at the same level as the ridge.
- If it exceeds 3 m, then you need to draw a line from the ridge at an angle of 100 to the horizontal, and at its intersection with the vertical axis of the pipe installation the required height will be located.
- The length of the chimney above a flat roof should be 1 m.