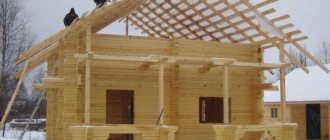
Traditionally, bathhouses are built of wood; a bathhouse made of timber is a common building that can be seen in most areas. But technology does not stand still, and today other materials for construction are available, including foam blocks. This material is not inferior to wood, and in some ways even superior, in addition, it is easier to build a bathhouse with your own hands from foam blocks than from the same timber.
Features of foam blocks
One of the interesting qualities of foam blocks is their resistance to fire. In many ways, this is what makes them suitable for construction in this case. But this material has both its pros and cons, which must be taken into account when adopting it:
- In terms of thermal protection, foam blocks are three times better than conventional bricks. They remain durable at high temperatures.
- They are safe in an environmental sense. They don't rot. Rodents do not show interest in them.
- They do not require treatment with antiseptic or anti-flammable agents.
- They weigh relatively little and are easy to saw, which makes them convenient for construction.
- Requires small financial costs for the installation of a building box.
A significant disadvantage of this material is that it is saturated with moisture.
This can lead to a decrease in its strength characteristics and, finally, to destruction. Therefore, additional efforts are required to prepare foam blocks for existence in conditions of high humidity.
When developing bathhouse projects, you need to take care of good ventilation, possible measures for forced ventilation in the building, as well as organizing the slope of the drains so that water drainage is reliable.
It is also necessary to keep in mind that if the project includes the use of foam blocks of twenty or thirty centimeters thick, you will not have to take additional efforts to insulate the building. And if the bathhouse is used only in the summer, in order to heat it without using too much firewood, blocks even ten centimeters thick will be enough.
During construction, the walls inside are covered with foil or special vapor barrier membranes.
All joints are insulated with wide metallized tape.
To insulate the outside, the walls are covered with mineral wool. This material does not burn, is environmentally friendly, and does not contain mold. Another option is to cover the walls with polystyrene or foam plastic, reinforce them with mesh and cover them with special plaster that does not allow moisture to pass through, but only air.
Advantages and disadvantages
It would take a long time to list the advantages and disadvantages of blocks in bath walls. Everyone will find their own qualitative differences in this material, both good and bad.
It’s still more pleasant to start with the positives:
- foam blocks do not shrink at all;
- the bathhouse is ready for use immediately after construction, external and internal decoration and installation of the stove;
- minimum construction period;
- the cost of the finished structure is two times lower than a wooden frame or brickwork;
- absence of harmful chemicals in the production of concrete blocks and, as a result, absence of unpleasant odors;
- low weight of the material, allowing for easy masonry and the use of the simplest foundation;
- has high heat-repellent qualities;
- are not subject to the growth of mold, mildew or other microorganisms;
- The thickness of the walls is good because you can use just one block at a time, this will be enough to create a warm, comfortable room.
But there is often a fly in the ointment. Therefore, we note the disadvantages:
- If the blocks are not treated with a special hydrophobic solution, they can easily absorb moisture. In winter, even with double insulation, it can freeze and ruin the walls of the bathhouse. The structure may simply crumble.
- When using concrete blocks in such a building with high thermal parameters, the problem of condensation on the walls arises.
Advantages and disadvantages of foam block baths
Foam concrete blocks are good because buildings made from them are very warm and light. A 30 cm thick aerated concrete wall has thermal conductivity characteristics similar to a 1.7 m thick brick wall. This means that when building a house, it does not need additional insulation. When building baths (if the wall is sufficiently thick), only the steam room requires insulation, and then from the inside.
But the following point must be taken into account: these are the characteristics of walls laid on a thin layer (1 mm) of special glue. If you use ordinary cement-sand mortar (the thickness of the joints is then 10-12 mm), the performance will be much worse. This is because the solution in this pair conducts heat many times better, that is, it “flows” through it.
It is also worth considering that only blocks of ideal geometry with deviations in size of no more than 1 mm can be placed on glue. You need to look for these. Otherwise, a 1 mm layer of glue is clearly not enough to correct these deviations. So they put aerated concrete on a thick layer of mortar, not glue (glue is much more expensive, but due to low consumption the masonry is more economical), and then insulated.
Foam blocks are also good because they are easy to work with. Although quite large in size, they have a low weight - 10-14 kg. So one person can easily handle the masonry. They are cut with a hand saw, but it is better to look for a blade using foam concrete rather than metal - it will be easier to work. If necessary, they can be grooved quickly and easily, even with a hand tool.
One tip: look for blocks that have a tongue and groove design. This will make it easier to achieve tight connections, and there is an additional guarantee that the seams will not glow (this happens with a lack of experience).
The relatively low density of aerated concrete is both an advantage and a disadvantage. The disadvantage is that nailing anything to such walls is problematic. For fastening, special dowels are used, which have an increased surface of the spacer elements. Advantage: the design is lightweight, which allows you to make less massive foundations. Less massive foundations mean less costs, because this cycle can account for up to 50% of the cost of the entire construction.
The second serious disadvantage of aerated concrete is its high hygroscopicity. Therefore, when building bathhouses from aerated concrete with your own hands, you need to make hydro- and vapor barriers both inside and outside.
Characteristics of foam concrete used for private housing construction Among porous concrete, aerated concrete absorbs moisture more than others, therefore from this point of view they are not the best choice for building bathhouses. But it is precisely for its production that more expensive equipment is used - the peculiarities of the technology. And as a result, the blocks have better geometry. And gas blocks are often placed on glue rather than on mortar, since the geometry of the material allows this. So from the point of view of thermal conductivity, this material is preferable. And problems with hygroscopicity are solved by organizing a ventilated façade and/or impregnation to reduce hygroscopicity.
Is it possible to build a bathhouse from foam blocks?
There are no special prohibitions for building a foam concrete bathhouse on your site. All the shortcomings of the material can be neutralized if you take a responsible approach to the issue of reliable waterproofing and impregnation of walls with solutions against fungus. Foam blocks do not burn, which is important when placing a bathhouse near a residential building. Light large blocks can be laid by one person. There is no need to hire workers to build a bathhouse.
Important! On average, a foam block bathhouse will last up to 15 years. The owner needs to decide whether this time is enough, despite the low cost of construction.
What is better: gas block or foam block for a bath?
Inexperienced builders often confuse foam block with gas block. They are similar in appearance, but have different characteristics.
The gas block consists of closed pores up to 3 mm in size. In the manufacture of the material, cement is used as the main binder. Additives include sand, a choice of gypsum or lime. The pores are obtained due to aluminum gas generators. In terms of processing, a gas block can be compared to wood. The blocks can be easily sawed with a hacksaw and can be drilled.
The internal structure of the foam block is similar, only the pore size is slightly increased. Another difference is the composition. When making foam concrete, gypsum, aluminum gas former and lime are not used. A gasifier, which can be synthetic or organic, is added to sand and cement.
The table shows the performance characteristics of the materials. Aerated concrete wins in all respects except water absorption. This factor is important for the construction of a bathhouse. Experts advise in cold regions to give preference to gas blocks, but take measures for enhanced waterproofing. For warm areas, it is preferable to build a bathhouse with foam blocks.
In the video they decide on the choice of foam or gas blocks for building a bathhouse:
Types of material for block baths
You can build a bathhouse from blocks with your own hands using various types of building materials:
gas-filled concrete. It is the basis for the manufacture of blocks obtained as a result of a chemical reaction with the release of gas. It features a uniform distribution of air cells. Due to the varying degrees of pore concentration, it differs in density, ranging from 500 to 1000 kg/cm3. The thickness of the building material allows the construction of walls 20 cm thick, which is enough to maintain a comfortable temperature in the room; Types of building block material
ceramic blocks. In appearance they resemble traditional brick. They have increased moisture-resistant characteristics and provide a high level of thermal insulation. They are distinguished by the presence of air channels parallel to the height of the product. Mainly used for exterior decoration, rarely used for the construction of bathhouse walls due to the increased price. Inferior to brick in most characteristics; gas silicate products. The building material is produced by autoclave processing and contains lime. Gas silicate is externally easy to distinguish from other types of concrete products by its snow-white hue and regular geometric shape. The material intensively absorbs moisture, which negatively affects its integrity and strength characteristics. Its properties are inferior to aerated concrete and requires reliable waterproofing; foam concrete. It is a type of aerated concrete product. The manufacturing process involves the introduction of a foaming agent, which provides a porous structure. Available technology allows private production
When purchasing foam blocks made at home, pay attention to quality. For construction, it is convenient to use a foam block with dimensions of 60x20x30 cm; cinder blocks
Building materials, along with concrete, contain various types of slag, which are industrial waste. Cinder blocks are inexpensive compared to other varieties. They have an uneven surface, as well as significant dimensional deviations. You should not immediately use them for a block bath due to the release of harmful substances when heated. Before construction begins, the material must sit for a year; expanded clay concrete. Expanded clay granules made from baked clay are used as filler. Expanded clay concrete is characterized by reduced hygroscopicity and low weight. In terms of performance characteristics, it surpasses foamed concrete, as well as aerated blocks. Expanded clay concrete products have reduced dimensions compared to foam blocks and cinder blocks. Dimensions are 40x20x20 cm.
Types of building blocks blocks
Bathhouse made of foam blocks: projects, photos
Drawing up a project is the initial and mandatory stage of building a bathhouse. It allows you to determine the size of the premises, the location of windows, doors, communications, and also calculate the amount of building material required.
Traditionally, a bathhouse consists of a dressing room, steam room, shower, toilet and rest room. Of course, you can clean some room, but keep in mind that in this case the bathhouse will be less comfortable to use. But if you are designing a bath house, then you can leave only the dressing room and steam room; the rest of the amenities are enough to have in the house itself.
On the Internet you can find free projects for bathhouses made of foam blocks, and you can also immediately see how the building will look in the future. Another option is to contact specialists who will draw up a project specifically tailored to your requirements and taking into account the characteristics of the territory itself. Which option to choose depends on your knowledge and needs. If you are well versed in this area, then you can try to design a bathhouse from foam blocks with a relaxation room yourself.
When drawing up a project, you need to take into account the future location of the bathhouse, assess the groundwater level and financial capabilities, and select or draw up a drawing based on these indicators. The size of the steam room depends on how many people plan to visit it.
Keep in mind that over time your family may grow, possibly making new friends. Therefore, it is better to make a bathhouse with a small reserve, since you are building this structure for more than one year. Also think about in advance which stove for the bathhouse you will choose. For gas, you need to install pipes, for electric, prepare wiring. If the sauna is wood-fired, you may need to make a protective screen around it.
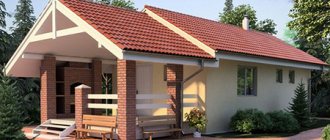
Below are ready-made bathhouse projects made from foam blocks. Of course, this is only a small part of the projects. The location of the rooms and their sizes may vary, it all depends on your desires and needs.
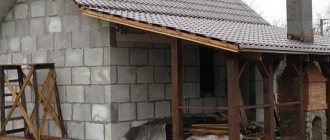
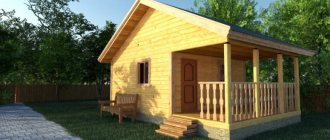
Bathhouse projects made from foam blocks with a terrace will be convenient and functional. You can place a table and chairs on it, then on a summer day, after warming up in the steam room, you can have a snack and relax in the fresh air.
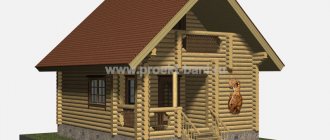
A good design for a bathhouse made of foam blocks for a small area is based on the construction of a building measuring 6x4 m. You can organize 3 or 4 rooms inside. The stove has an exit from the firebox to the dressing room of the bathhouse. If desired, a porch is provided at the entrance. An example of such a bathhouse project is shown in the first photo.
Preparation for construction work
- Washing bath. It is constructed for utilitarian purposes for washing. It consists of two compartments: a small dressing room for clothes with a stove firebox, a steam room and a shower room combined. The dimensions are small - 2 x 3 m on average. If you really want to, you can take a steam bath. A widespread type of bathhouse throughout the country.
- Bathhouse with steam room. Built by connoisseurs to take a steam bath with a broom. Sizes start from 16 square meters (4 x 4 m). A full-fledged bathhouse with several rooms: a dressing room, a shower and a steam room.
- Bath complex on one or two floors. Building with own heating. Year-round communications - hot and cold water. In addition to the steam room and shower, a relaxation room, a bathroom, a swimming pool and a sauna with dry and hot air are being built. A separate vestibule with a furnace firebox and a veranda are arranged.
Any type of bathhouse can be easily erected from foam blocks. The project depends on the budget and availability of space for construction. The best option for placing a bathhouse is an extension to the main residence. In this case, heating, hot and cold water are supplied.
Exemplary bathhouse - with a separate steam room. Then you won't have to wash in the scalding air. A dressing room with a place to relax will improve your emotional mood. A separate vestibule is built for the stove, where firewood and brooms are stored. The rooms will always remain clean - wood chips and smoke will not bother anyone. The built summer veranda and barbecue will replace a separate gazebo.
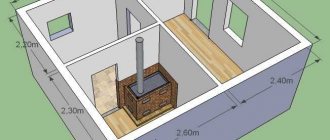
Steam room.
Next, we plan the upcoming work step by step:
- we determine the location of construction;
- We prepare a detailed construction project;
- We calculate the required amount of building materials;
- carefully select foam blocks and cement;
- prepare tools and equipment;
- pour the foundation;
- we install a drain;
- We waterproof the basement and interior spaces;
- we build walls;
- we build a roof;
- We complete the interior and exterior decoration.
After we’ve made the drawings, counted the blocks and found a suitable location, we get to work. It will take 2-3 weeks to pour the foundation, taking into account the complete hardening of the cement. Construction will take the same amount of time. In total, it will take a month and a half to erect the building with your own hands.
Do-it-yourself bathhouse made of foam blocks: step-by-step construction
They begin to build a foam block bathhouse with their own hands by laying the foundation. The next stage is the organization of drainage, forcing out walls, and building a roof. The final touch is the interior and exterior finishing of the bathhouse.
Choosing a place for a bath
But before you begin construction itself, you need to complete a number of preparatory activities. They are, in general, simple, but in many ways the convenience and comfort of your vacation spot will depend on them. First of all, you need to choose a place to build a bathhouse.
This issue must be approached thoroughly. First of all, if you have a river flowing through your property or have access to a body of water, think about the possibility of flooding. Therefore, the building should not be placed closer than 15 meters from the reservoir. Even if the likelihood of a flood is low, erosion of the foundation is quite possible.
Also, you should not place a bathhouse near unfenced areas or exits to the street. A sauna holiday requires a small group of people and prying eyes are not acceptable. If the bathhouse is adjacent to any other room, take care of its waterproofing.
It is important to know that foam concrete absorbs moisture strongly, so we need high-quality waterproofing of the walls from the inside.
Choosing a material for a bath
The choice of material, as well as the choice of project, largely depends on your financial capabilities. After all, the price of a wooden bathhouse will be much more expensive. The choice of foam concrete will significantly reduce costs. In terms of material quality, foam concrete is practically not inferior to wood, and in some components it also has a number of advantages.
So foam blocks:
- This is a “breathable” material just like wood.
- It has good sound insulation, which is almost 10 times higher than that of ordinary brick.
- This is a lightweight material, so you don't need a solid foundation.
- This material is easy to use. Due to its lightness and increased dimensions, this material allows walls to be erected quite quickly and easily.
- Unlike wood, aerated concrete is not flammable, which is an important indicator for a bathhouse.
- Just like wood, it is an environmentally friendly material.
What types of blocks are suitable?
Block baths began to be built relatively recently, but experienced craftsmen have already left feedback on which blocks are best to use for the construction of the structure. Foam concrete blocks have different sizes and different densities - the strength of the material depends on this indicator. The more air that was used to create the foam during the production of the blocks, the less dense they will be.
Foam concrete blocks with a density of D600-D800 are suitable for the construction of a bathhouse. Blocks of this brand are perfect for building a sauna due to their good strength and thermal insulation. They will become the optimal raw material for the construction of load-bearing walls of the structure.
From the requirements for materials for a bath it follows that the raw materials must be reliable and withstand the effects of heat from the inside, and also not absorb moisture. Since foam concrete has the ability to absorb moisture, at the construction stage before finishing it must be treated with a water-repellent agent. Blocks of the D900-D1200 brand will be irrelevant here, since they require additional high-quality thermal insulation. Grade D1300-D1600 will be redundant due to its excessive strength: such material is used for multi-story construction. The most popular stone size is 600x200x300 mm.
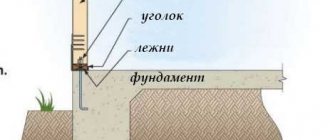
Foundation for a bathhouse made of foam blocks
Most foam block bath projects are based on the construction of a strip foundation. On the base it is convenient to remove walls from foam blocks.
Attention! If the groundwater is high, preference is given to a grillage foundation or a foundation made of a monolithic slab. On dense, stable soil, you can get by with a shallow concrete strip. On loose soil, the project calls for deepening the foundation for a bathhouse made of foam blocks with your own hands below the freezing point.
The base for the bath can be made of two types:
- pour a monolithic concrete strip;
- lay out from ready-made concrete blocks.
In the second option, construction is simplified, but it is necessary to organize access for lifting equipment for laying blocks.
The thickness of the tape is made taking into account the width of the foam blocks. The edges of the foundation should protrude beyond the walls of the bathhouse. For a concrete strip thickness of 30 cm, a trench 50 cm wide is dug. The total height of the base is about 80 cm, of which 20 cm protrudes above ground level.
The construction of the base of the bathhouse consists of the following steps:
- The area is leveled and cleared of vegetation and debris. Markings are made from pegs and cord.
- The trench is dug to the required depth. If we take the average rate of soil freezing in most regions, then the hole is deepened to 80 cm.
- A cushion of sand and crushed stone or gravel is poured onto the bottom of the trench. The total thickness of the two components does not exceed 20 cm. The pillow is watered from a hose with water, and after the liquid is absorbed, it is compacted.
- Formwork is placed along the perimeter of the trench. The shields must protrude at least 20 cm above ground level.
- Inside the trench, a box-shaped reinforced frame is knitted from rods. Reinforcement is used with a thickness of 12 mm. The optimal size of the frame cells is 15x15 cm.
- Concrete with gravel or crushed stone is poured at a time with breaks of a maximum of 3 hours. The mixture is compacted with a vibrator or pierced with a rod to allow air to escape.
- The foundation of the bathhouse is covered with film and moistened daily. After three days, the formwork is removed, and the tape is given at least a month to completely harden.
Important! If the project involves the construction of a pouring floor inside the bathhouse, then ventilation windows - vents - are made in the concrete strip.
After the foundation hardens, construction of the sewer system begins. Remove all the fertile soil inside the tape, where the floor of the bathhouse will be. The pipe is placed outside the concrete strip at a slope of 2 cm/1 linear. m. From above, the pipeline and the entire area inside the tape are covered with a layer of sand 10 cm and gravel - 15 cm. After compaction, an armored mesh is laid on the cushion and filled with a concrete screed 15 cm thick. When it hardens, a monolithic base for the furnace is poured. Outside, along the perimeter of the tape, a similar screed is installed - a blind area, 50 cm wide.
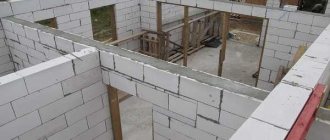
Walling
In a month, the foundation of the bathhouse will stand, you can begin building walls from foam blocks. To prevent the porous material from drawing moisture from the ground, 2 layers of roofing felt are laid on the base along the width of the tape. Using a level, the entire foundation plane is measured again. If shrinkage occurs within a month and differences appear, they are leveled with a screed.
The construction of walls begins from the corners. The first row is laid on cement mortar. Each foam block of the next row is coated with glue 5 mm thick and connected to each other. Leveling is done with a rubber mallet and level. To ensure even laying of the entire row, pull the cord. If halves are needed, the foam block is cut with a hacksaw.
Each row is laid with a shift in half of the foam block, forming a bundle. After every third row, reinforcement is made. A groove is cut along the perimeter of the end of the wall using a wall cutter or grinder, rods are laid, and filled with mortar.
When building walls, following the design, provide window and door openings for the bathhouse. A lintel made of concrete, thick board or metal is placed above them. A new row of foam blocks is laid along the lintel.
Waterproofing and vapor barrier of walls
The problem of hygroscopicity of gas blocks during the construction of baths is solved quite simply today: there are cement-based impregnations with polymer additives that significantly reduce the amount of moisture absorbed by the material (such as “Penetron”). They can be used to coat the finished building inside and outside (in two layers). This will protect against water in its liquid state. But it is better to make a ventilated facade on the outside: it is more reliable in the sense that it protects from precipitation and makes it possible to ventilate the wall, drying out the steam present in it.
But in the most problematic rooms - the steam room and washing room - additional protection from steam will be needed. Vapor barrier from the inside will be done using a special film. Moreover, for a steam room they often use foil on a cardboard or paper base (Izospan FB), for a washing room you can get by with a regular vapor barrier.
Steam room wall insulation
You can do it differently: without impregnation. It costs a lot, and the consumption is decent - at least 7 liters per square meter. To reduce consumption, you can first putty the wall (with breathable putty) and then treat it. But in this situation, labor intensity increases.
If you provide good ventilation, there will be no problems without impregnation. For example, a cake of insulation and waterproofing in a steam room made of aerated concrete can be made like this (from the wall, inward):
- sheathing;
- heat insulator (basalt wool with minimal formaldehyde release) 5 cm thick;
- foil paper taped at the joints and in places of fastening with foil tape;
- counter-lattice creating a ventilation gap of 3-5 cm;
- lining.
If you ensure normal ventilation of the facade from the outside, and do not close the pores tightly, such insulation should work normally, and it will dry out quite well. It is only important to make the vapor barrier from the inside (from the steam room) reliable. For this film, the films are laid with an overlap of 10-15 cm, and at the joints (two strips are obtained) they are glued with double-sided tape.
There is a second approach to thermal insulation of walls. It is based on preventing moisture from reaching the outer wall. In this case, it is recommended to build a frame inside that will completely cut off the walls from moist air.
To do this, a vapor barrier is placed on the walls, a sheathing is placed on it, then a rough wall, another sheathing, between the beams of which the insulation is laid out. It is covered with another layer of vapor barrier film, on top of which the sheathing and finishing (lining) are already placed. This frame “eats” about 20 cm around the perimeter. A luxury that not everyone can afford.
In both cases, for effective ventilation of the insulation, closed on all sides with films, it is necessary to make two ventilation holes in each wall, closed with doors. The holes are not through. They do not go into the steam room (washing room), but end in a layer of insulation. In order not to reduce the temperature, the doors are closed while vaping. They are opened to dry after the procedures, because steam will still get inside, albeit in smaller quantities.
With any solution, the bottom of the wall 10-15 centimeters is decorated with ceramic tiles - they protect well from splashes, covering the wettest part. And higher up (but with an overlap in height onto the tile) comes the sheathing.
For waterproofing in the steam room, there is another option - gluing foam glass slabs. This material is quite expensive, but its waterproofing is excellent and there are no leaks. There is foam glass: European, Belarusian, Chinese. The most expensive and highest quality is European, the cheapest and lowest quality is Chinese. They “put” it on a special glue, there is no hassle with gluing: everything is easy and simple. To achieve the required degree of waterproofing, a layer of 50 mm is sufficient.
Washing room wall insulation
There is not much point in walling up such a pie in the sink: if the walls are finished with tiles laid with special glue, the problem is easier to solve. True, it still requires treatment: first, a layer of plaster is applied to close the pores of the aerated concrete, and then a layer of thin-layer hydrophobic waterproofing (these are cement-based compounds).
It is only important to coat the walls well with liquid waterproofing, following all the manufacturer’s recommendations. This coating works simply: it penetrates the pores of the concrete. The polymers contained in it begin to crystallize, and the growing crystals prevent the passage of water. The amount of water absorbed becomes significantly smaller.
The same composition can be used to treat walls outside. But such impregnation costs a lot, and the consumption is high. Moreover, the facade still needs finishing in this case: the surface is not very attractive.
Roof
The roof of the bathhouse must not only be reliable, but also withstand steam shock from the inside. A gable rafter roof is the best choice for a bathhouse made of foam blocks.
The roof is installed after the laying of the stove and chimney is completed. Roof installation sequence:
- Place a mauerlat - a beam with a cross-section of at least 180 mm - on the longitudinal walls. Secure it with anchor bolts.
- Make a rafter template: take 2 boards, connect them with the edges to form a kind of “scissors”, nail them.
- Place the free ends of the rafters on the mauerlat, select the desired angle of the slope and fix it by attaching the transverse board with self-tapping screws.
- Take beams 150x500 mm, attach them to the template, make the necessary markings and cut the rafters.
- Fasten the rafters with self-tapping screws (3 pieces for each connection).
- Raise the rafters to the edge of the bathhouse, mark the places where they join the Mauerlat.
- Hem the junctions of the rafters and the mauerlat so that they fit tightly together.
- Connect the rafters and the mauerlat using steel angles, staples, overlays and self-tapping screws.
- Make rafters for the opposite end of the roof using a similar pattern and secure them.
- Pull the cord between the two installed rafters, secure their trusses with oblique supports.
- Cut the remaining trusses and fasten them in increments of 500 mm strictly along the stretched cord.
- Take 100x400 mm boards and secure them with self-tapping screws or nails as roof sheathing at a pitch suitable for subsequent fastening of the insulation.
- Make a rough ceiling from 25 mm thick boards, securing them between the rafters.
- Lay 190 mm thick foam on top.
- Lay the finished attic floor from boards 20–25 mm thick.
- Lay the roofing material (corrugated sheeting or metal tiles).
- Secure the ridge and make a galvanized collar around the pipe.
Do not forget about the ventilation equipment for the interior of the bathhouse, for which leave 2 holes with a diameter of 100 mm at opposite ends of the floor. The gap between the rafter leg and the chimney must be at least 400 mm.
The last stage of wall construction and the reinforced sauna belt:
Interior of a bathhouse with a swimming pool
The choice of style depends on the preferences of the owners and the harmonious combination of materials. Do not overload the room with decor. The room should have enough space to move around freely.
Popular interior design styles:
- Russian;
- country;
- Mediterranean;
- Oriental.
Pool decoration often includes tiles and mosaics in the following colors:
- blue, light blue, azure;
- beige, brown;
- White gray;
- light green.
People try not to use flashy bright shades of red and purple, since they are visually irritating to a person. To create a relaxing atmosphere, it is better to choose calm pastel colors.
The photo shows an example of decorating a room with a corner pool in a modern style. The ceiling is finished with composite panels with spotlights, so that the lighting is distributed evenly. The floor is ceramic tiles. The doors from the steam room to the pool are glass. On the walls there are panels with a repeating pattern of a sunset on the sea.
Finishing the pool and the area around it with small mosaics remains always relevant.
Here is a half-timbered room with protruding massive beams on the ceiling and panoramic glazing.
The classic clapboard finish will fit into any style. Here the owners decided to add some textiles in the form of white curtains.
The photo above is an example of a small sauna with a square pool. The bathroom is small. The shower room is located in the same room, just separated by a curtain. The steam room is hidden behind a glass door. There was also room for a table with chairs.
This is a combination of different styles. The walls are brick. The ceiling is lined with clapboard. Many windows make the room bright. The pool is oval in shape, finished with porcelain stoneware.
Such a small tank will fit compactly even in a small Russian bathhouse. Large windows offer a beautiful view of the winter forest. The lower part of the walls is lined with stone, the top with decorative plaster.
External and internal finishing
The choice of material for finishing work depends on financial capabilities and taste preferences. Usually, the outside walls are simply plastered in 2 layers with a total thickness of 10–15 mm and covered with siding or simply painted with water-repellent paint, having previously been puttied and covered with a primer. We recommend material about projects of a bathhouse with a swimming pool.
From the inside, lining made from non-coniferous wood looks like a good option. You can also use pine lining, but at high temperatures it will “cry”. They attach it to a pre-made frame with finishing galvanized nails or clamps, leaving a gap of several millimeters between the insulation (penofol and vapor barrier) and the lining itself. But what projects there are for bathhouses made of timber are detailed in this material.
How to decorate the inside of a bathhouse:
Sometimes the inside of a foam block bathhouse is also plastered and covered with facing tiles. But this is a more expensive and not entirely aesthetically advantageous method, and it is also quite labor-intensive. Check out our article about cladding panels.
A foam concrete bathhouse is a compromise option when finances and space on the site for the construction of a full-fledged structure made of logs or timber are not enough, but the desire to steam in your own sauna is great.
Finishing a block bath
The work on finishing the bath room includes:
- high-quality internal lining;
- exterior finishing.
Finishing activities indoors require fastening the sheathing, installing thermal insulation material, as well as protection with a vapor barrier membrane.
Finishing a bathhouse made of expanded clay concrete blocks
Various options for interior finishing are possible, which are attached to an insulated and vapor-insulated frame:
- wooden lining. It will saturate the room with a unique aroma during bath procedures;
- salt blocks. This is an original finishing option that has a beneficial effect on the respiratory system.
Exterior finishing activities include:
- Installation of external waterproofing.
- Fastening of thermal insulating ventilated panels.
- Installation of finishing.
Subtleties of design
When developing a drawing of a future bathhouse, you must take into account its size. Only knowing the exact scale of the structure can you correctly draw up a project for such a room
In addition, additional buildings located nearby or under the same roof should be taken into account. Currently, you can find many bathhouse designs measuring 3x4, 4x4, 5x4, 4x6 m
This scale is small, so you need to be careful when designing these rooms. The design must simultaneously accommodate a steam room, a washing room, and often a shower room with a changing room. As a rule, in these cases, most of the space is set aside for the steam room. Often such baths have a window.
There may even be two openings (in the washing room and steam room). They act as necessary ventilation. Often, projects of such small rooms are combined with other residential buildings (garages, guest houses) to make the structures look more beautiful and solid.
In this case, many experts strongly recommend creating such areas outside the room. Today, a considerable number of projects for the design of larger baths have also been proposed. Their size is 6x6 m, some designs may be larger (+ 2-3 sq. m). Premises of this size can easily accommodate all the necessary rooms (shower, locker room, washing room, vestibule, steam room). In addition, such buildings often contain small recreation areas for the owners.
In these types of baths it is worth installing window openings. Their size must correspond to the dimensions of the room itself, since large structures require good ventilation. It is better to place windows in several rooms at once. Often such large-scale baths are made two-story. Moreover, the second tier is also made of a rather large size. Most often it is reserved for a swimming pool or a large recreation room.
The second floor of such premises does not necessarily need to be additionally insulated. Warm steam from the first tier will penetrate the room, warming it up. Due to the uniform distribution of heat, the temperature of the upper zone will not be too high, it will remain optimal. When building two-story bathhouses, experts and designers do not recommend combining them outside with other buildings. After all, they can completely ruin the beautiful appearance of the bathhouse and make the structure too overloaded. Therefore, it is better to place all other additional structures separately.
With swimming pool
Often, when building baths from foam blocks, swimming pools are placed in them. But it should be remembered that they should only be installed in structures with a large area. Otherwise, the design will be cumbersome and will cause significant inconvenience. If you are building a two-story building, it is better to place such an element on the second tier.
Today, on the building materials market, anyone can see various options for swimming pools for baths. They can be of various shapes (round, rectangular, square, semicircular). The choice of the appropriate option depends on the internal layout of the building. At the same time, we must not forget that the design of such premises with a swimming pool will cost the owners a lot.
With terrace
You can often find projects of bathhouses with a veranda. It can be included in projects of small buildings. According to some experts and designers, the terrace can fit perfectly into any type of design, regardless of size. If you are building your bathhouse from foam blocks, the veranda can be made from this material. But options are possible in which terraces are made from a different base (wood, metal, plastic, decorative stone).
Some designers advise placing small pieces of furniture (tables, sofas, chairs) on terraces. It is worth remembering that the veranda cannot be overloaded. Otherwise it will look ridiculous. If you are arranging a two-story bathhouse, then such structures should be placed on the upper tier.
Small buildings
Today, experts can offer designs for bathhouses made of foam blocks with dimensions smaller than standard ones. Such premises often include only a washing room and a steam room. Other zones in similar structures may be too small or cannot be accommodated there at all. Often, in order to increase the area of a small bathhouse, owners build a second floor of the same scale.
On the upper tier you can place a shower room, a relaxation room, and a small swimming pool. If you do not want to build another floor, remember that it is better not to load such structures with verandas and other additional elements. Even in small bath rooms it is necessary to place window openings. For these structures, two small windows are enough. In small-scale baths this will be enough for ventilation.