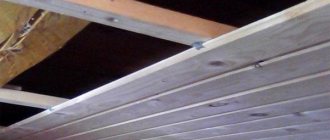
- Types of installation: where to install
- How to choose the size and shape of a chimney
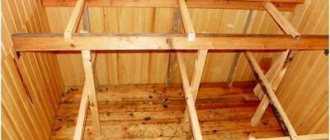
- Preparatory stage
Before you begin installation, familiarize yourself with how to properly install a chimney pipe in a bathhouse with your own hands. The process largely depends on how competently you can choose a design, based on the parameters of the stove and the volume of the steam room.
In addition, it is necessary to consciously approach the choice of material, set of elements and installation method. And also in this article we will talk about the main design features of chimney systems, and the problems that can arise if installed incorrectly.
Design features of a chimney for a steam room
- The chimney is a vertical structure mounted inside the bathhouse or on the facade of the building. Its main task is to remove fuel combustion products at a speed sufficient to maintain natural draft in the furnace.
- A well-designed design ensures quick heating of the bath, maintaining the necessary microclimate in the steam room and economical fuel consumption.
- The most common problems with smoke exhaust ducts: Extremely strong draft, which will lead to rapid burning of fuel without adequate heating of the steam room. Traction too weak. An inadequate amount of oxygen enters the firebox, as a result of which the combustion process is interrupted, and then the thermal conductivity of the stove decreases.
- Proper installation of the chimney is a guarantee of your own safety and the longest possible service life.
Checking the quality of the chimney assembly
When the chimney is completely assembled and checked for defects or defects, you should test fire the stove with a small amount of dry firewood. Immediately after lighting, you should check the entire length of the chimney, paying special attention to the joints.
Initially, slight smoke may appear in the bathhouse premises due to the combustion of oil contaminants on the outer surface of the chimney. This one is okay. There is no need to worry about this.
If the results of the first chimney check are positive, the stove should be heated at full power for another two to three hours. This is enough to reveal newly discovered deficiencies. Special attention is needed
During operation of the chimney, a tarnished color may appear on the pipes. This is a normal reaction of steel when heated to a high temperature.
If smoke from the furnace firebox enters the steam room, this most likely indicates insufficient draft in the chimney. To increase traction, you will have to increase the pipe by another 0.5-1.0 meters.
To Contents
Choosing material for a chimney in a bathhouse
The market offers a wide range of raw materials for the production of smoke exhaust structures; let’s briefly name each of them.
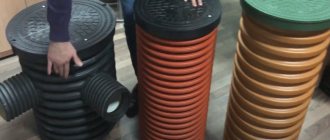
Asbestos cement pipe
It is low cost and easy to install, however, due to its porous structure it can accumulate condensate.
Black metal
It conducts heat very well and heats up quickly, but lacks corrosion resistance. It has a large mass, which complicates the installation process and also requires the construction of a foundation.
Brick chimney
The model is quite expensive and difficult to install, although its appearance is very pleasant. If you do not line the inside, the structure becomes clogged with soot, susceptible to condensation, dampness, and subsequently cracking and allowing carbon monoxide to leak.
Ceramic chimneys
Due to its strength, ceramics can withstand high temperatures, are durable and can be used with any type of boiler. However, the installation of such a chimney is very expensive, and the design itself is poorly maintainable. Therefore, installation should only be carried out by a qualified technician, and the owners will have to treat this ventilation system with care.
Stainless steel
Most bath complexes - home or commercial - use this option. This is due to excellent resistance to atmospheric agents; soot virtually does not accumulate, and the installation will last for many years. The appearance fits well with any bathhouse exterior; the shiny surface is pleasing to the eye. In addition, this design is quite easy to maintain.
Our production
Single wall chimneys
Double wall chimneys
Mounting elements
Glass
A glass smoke duct is a good choice, since this material has minimal inertness and is resistant to moisture and corrosion. The constant increase in the cost of installing such a structure is due to the complexity of the process and the high cost of fire-resistant glass in general. Therefore, such chimneys are the most expensive systems these days, although the cost is fully justified by the advantages of this option.
How to clean a pipe
Evidence of a clogged chimney passage is smoke and an unpleasant odor in the room, as well as poor draft. There is an urgent need to clean the pipe, and you will have to do it yourself. To do this, in some cases it is enough to heat the stove with a special type of firewood or use a certain tool.
In other cases, a mechanical cleaning method should be used. In this case, a special scraper and a stiff brush with a link handle are used. The pipe is cleaned from the roof, which causes a large amount of soot to get inside. It is recommended to cover the firebox with thick fabric, close all doors and windows and cover the furniture.
The next method does not require protection from soot and is more gentle. The stove is heated with aspen wood, which releases a lot of heat and thereby increases draft, thus the pipe cleans itself. It is recommended to clean the chimney with aspen firewood once every 12 months.
Cleaning with various chemicals is available, but this option poses an environmental hazard.
What pipes are used
You need to know that the likelihood of using the sauna without a threat to your health depends on how the chimney of the sauna stove is installed.
The chimney installation scheme comes in two configurations: internal and external. Depending on this, the chimney elements are selected.
Types of installation: where to install
Installation can take place on brackets through the wall or straight through the roof.
In the first case, the entire system is carried into the wall, and then rises, adjacent to the bathhouse, but without passing through it. This looks more aesthetically pleasing, and has the following advantages:
- the free space of the steam room is not used;
- there is no risk of getting burned on steel or stone;
- less chance of fire;
- it’s easier - you don’t need to make a hole through the entire attic;
- cases of smoke are easier to detect, as well as to track the general condition.
But at the same time:
- heat loss increases, since steam actually immediately enters the outside;
- the installation itself is more difficult due to the need to comply with the dimensions of the connection between the hole in the wall and the parts of the product;
- The heating of the pipe is greater due to the fact that the gases escape in the horizontal direction. With this arrangement, the resistance of the flue gases when moving through the channel increases;
- In terms of the number of elements, this option is 10% more expensive than the usual one.
When installing smoke exhaust systems in a straight line through the roof, the chimney is located straight, without bends, it departs from the boiler and goes upward, where it crosses the ceiling and exits on the back side of the roof. Advantages of such a connection:
- Stable draft due to the location of the chimney closer to the roof ridge.
- The condensate container is kept warm, so its cleaning pocket is dry and clean. This extends the service life.
- Cold bridges do not form in the walls, and thermal insulation is not compromised.
- The stability of the smoke exhaust duct is higher due to the fastenings to the roof. The fasteners themselves can be chosen cheaper than for the option on the facade.
- The aesthetics of the structure are not spoiled by side smoke outlets.
- Only a small part of the structure is located outside, which deteriorates over time from snow and rain. You can inspect and clean most of it without leaving the building.
- You can use non-insulated parts of the chimney that are located inside the bathhouse.
- This option is easier and 10% cheaper to install than when outputting through a wall.
- Flue gases go up, there is no obstacle to their exit. Heating is less than with a horizontal connection, since the resistance to smoke flow is minimal.
However, there are also weaknesses:
- The probability of “missing” the occurrence of a fire is higher, since smoke occurs in the ceilings that are located in the attic and on the roof, and they are simply not visible until the fire appears.
- Heat loss through the roof. Tightness is restored when waterproofing is installed before coating.
- Reduction of usable area, since according to safety requirements there should be nothing around the stove pipe for a bath.
- Increased costs for changing the roof and ceiling of the steam room, in particular, after finishing the final finishing.
- If the integrity of the smoke exhaust structure is damaged, the bathhouse begins to smoke.
- Condensation leaks and accumulated soot spoil the appearance of the roof.
- Burns from heated parts are possible in emergency situations.
When deciding on the installation method, the following nuances must be taken into account:
- dimensions of the building - if it is very small, then it is logical to make an external structure;
- the steam room is built from scratch or in an old room - in the first case, you can immediately think about the issue of insulation;
- Do you need to heat adjacent rooms?
External placement
An external smoke channel device is more expensive and difficult to install. This is due to increased requirements for compliance with the dimensions of the connection between the hole in the wall and parts of the product. For external installation, it is necessary to use double-walled chimneys to avoid the formation of condensation and fire. It is external structures that are the least flammable, since the smoke is instantly directed outside, rather than circulating through a pipe located in the building. The advantage of such a system is the absence of the need to make a hole in the ceiling and roof and saving of internal space. This reduces the risk of carbon monoxide poisoning.
Internal placement
The main advantage of the internal location of the chimney is the easy provision of draft in the chimney structure, which is achieved by the vertical direction of the exhaust gases. In this design, the main part will be located in the interior of the building, which allows the bath room to heat up much faster. However, from a fire safety point of view, this design is more dangerous, since it is much more difficult to notice smoke in the ceiling or in the attic.
Pipe installation process
The installation of a chimney structure in a bathhouse is determined by certain sequential actions, which are described in detail in this step-by-step instruction for installing a chimney:
- Holes 45x45 cm are cut out in the roof and ceiling of the bathhouse;
- Two 50 cm square plates are cut out of metal, with which the chimney will be attached;
- It is necessary to make mounting holes in the corners of the prepared plates;
- A round hole is made in the middle of one of the blanks;
Round hole for chimney
- The second plate will be attached to the roof slope; for this you need to make an oval hole in it;
- A galvanized casing is put on internal and pre-insulated pipes;
- The ends are jammed with rings and the edges of the tube are bent from the outside;
- The insulated end of the lower chimney is inserted into the round hole of one of the metal plates, and the non-insulated end is pushed onto the pipe;
- The metal sheet is screwed to the ceiling, and it is imperative to ensure that all gaps are in the same position;
- Using a pre-welded pipe, the upper pipe is placed on the lower pipe, connecting them with a clamp;
- A second metal plate is screwed to the inner surface of the roof;
- Clay or expanded clay is used to fill the space between the pipe and the wooden components;
Pipe passage filled with expanded clay
- Where the pipe passes through the roof, a layer of waterproofing is laid and a seal is installed;
- Then a special protective cap from precipitation is placed on it.
Is it possible to install a sandwich chimney in a bathhouse with your own hands?
The use of this design allows you to prevent and protect the room from possible fires. Thanks to the insulation, the heating temperature of the pipe usually does not rise.
There is a certain sequence that accompanies proper self-assembly. Strict compliance with the rules and recommendations of the manufacturer, guaranteeing the uninterrupted operation of the chimney system.
Installation of a metal stove with a remote firebox in a log house
Let's consider the option of installing a fireproof anti-shrink wall made of LV mineralite.
A special fastening method will allow installation in the log house before it shrinks, and the floating design of the fastening elements will prevent the rigid wall from deforming. Minerit LV
Minerite
Step 1. Prepare the opening in the wall. We cut it out with a chainsaw according to the markings.
Hole in the wall
Step 2. Cover the inner surface of the opening with mineralite. We saw the mineralite sheet into three pieces. We cut out two vertical pieces based on the height of the opening minus 10 cm. We cut out the horizontal part with a length equal to the width of the opening minus 2 cm. The width of the mineralite section should be equal to the thickness of the timber or log from which the wall of the bathhouse was built.
Step 3. We nail foil to the inside perimeter, and then mineralite. First, we fix the vertical sections with nails, then the horizontal ones.
Step 4. It is necessary to make an opening in the mineralite sheets, which will protect the wall from the heat of the stove. The remote furnace firebox will pass through this opening. We take measurements of the remote firebox, then make markings with a pencil and cut the sheet so that there is 3 cm on each side between the remote channel and the sheet.
Installation of foil and mineralite. Finishing of the opening can be done both before and after installation of the main slabs of refractory material
You can do it differently - first we fix the sheet on the wall, and then we cut the opening for the remote firebox.
Mounting mineralite to the wall
The sheet is fixed, you can cut out the opening
Step 5. Drill oval holes in the sheet for self-tapping screws. When shrinkage occurs, the screws will move downward inside these holes, while the sheet will remain motionless. We fix the foil insulation on the wall (with a stapler), and then use self-tapping screws and a washer to fix the mineralite sheet (we mount the sheet on the steam room side).
Step 6. We attach the second layer of mineralite with an air gap of 3 cm. To do this, you need to purchase a mounting kit with ceramic or steel bushings.
Mounting kit
Once again, you need to drill oval holes, but be sure to make sure that the fasteners of the first and second sheets do not end up at the same point.
The photo shows a diagram of the installation of a protective screen made of mineralite. Double-layer sheathing. If the stove has an external firebox, make an opening according to the instructions
When joining two sheets at 90 degrees, we make cuts at the ends at 45 degrees for a more aesthetic appearance.
After installing the sheets, we install the stove on the base. We adjust the legs, making sure that the external channel is located exactly in the center of the opening cut in the mineralite. We take foil-coated basalt wool and place it tightly between the walls of the outlet channel and the mineralite. In this case, the foil should “look” towards the steel walls of the channel.
Adviсe
Craftsmen use different methods of installing stoves and protecting walls. So, for example, in a log bath it will be more convenient to install mineralite on a wooden sheathing. Antisepticize the 50x50 mm bars, drill holes for self-tapping screws and fix the sheathing posts exactly vertically. The mineralite will already be fixed to this sheathing with self-tapping screws.
Lathing
If you plan to cover the wall from the inside (from the steam room side) with mineralite for further finishing, for example, with a coil, and finish the portal with brick from the outside, then it is worth carrying out the work in the following sequence:
- From the side of the steam room, fix a sheet of mineralite;
- cut a hole for the outlet channel;
- secure the horizontal guides from the plasterboard profile. Fasten the strips with self-tapping screws at the top of the opening, along the bottom and exactly above the opening for the fuel channel;
- install the vertical posts of the sheathing from the profile, fix them with self-tapping screws through the shelves;
- take basalt wool and lay it between the sheathing posts;
- sew up the opening with mineralite (from the dressing room side);
- install the stove in its place;
- Now, on the side of the dressing room, fill the opening with brick (don’t forget to put insulation in the cracks), and on the side of the steam room, apply decorative finishing with stone.
Lathing and insulation
View from the steam room and dressing room
Fixed furnace portal
Walls and chimney after finishing with a coil
The process of finishing the oven itself
The work on installing the furnace does not end there. Be sure to install a water tank and a heat exchanger, if they are provided for in the design, install the chimney in accordance with fire safety rules, prepare and lay the stones in the mesh.
What should you pay attention to when installing a chimney in a bathhouse?
Below are guidelines on what to focus on first.
How to choose the size and shape of a chimney
The small cross-sectional size will prevent the removal of fuel products in the required quantity. The volumetric section, on the contrary, contributes to the movement of smoke too quickly, which will not allow the bathhouse room to be properly heated. This, in turn, will increase fuel costs. You should take this point seriously, since the result will depend on it.
Deciding on the form is easy if you take into account the basic principle of its operation. Chimneys tend to heat up unevenly, as a result of which smoke comes out to the roof surface along the central axis. It follows that the correct shape is a circle. Cylindrical structures heat the room much faster and do not require unnecessary financial costs.
A chimney with a rectangular cross-section provokes turbulence that interferes with the necessary draft. A rectangular configuration is permissible only when we are talking about heating devices that do not require powerful traction.
Pipe diameter
The scale is determined by the degree of power draft of the sauna stove and is located in the intermediate range from 115 to 270 (mm). However, in order to accurately determine the diameter, you need to familiarize yourself with some of the requirements specified by the manufacturer in the instructions. If you do not have a diagram for installing a chimney for a bathhouse with your own hands, then it will be enough to know the ratio of the cross-sectional diameters of different shapes. It looks like this:
- cylindrical – 1 to 10;
- rectangular - 1 to 1.5.
For brick chimneys, the minimum cross-sectional diameter should be 140x140 mm.
The successful operation of a chimney system primarily depends on how accurately the pipe size is determined.
Flue height
According to the standard, its height should be at least 5 meters. The calculation of the height of the chimney is carried out in accordance with the basic technical characteristics of the materials.
The channel should be located at least half a meter above the roof ridge and not below its level. In this case, it is worth taking into account the thickness of the roofing covering and the angle of inclination of the roof slope. The height is selected without taking into account the chimney “umbrella”.
Rules for laying a brick chimney
Laying should begin at the top of the stove. A pre-installed pipe is installed on the stove. Brick laying is carried out as in the construction of walls, but there are a number of nuances:
- In order for the stove to provide heat properly and for the smoke to escape through the channels, you need to carefully monitor the level of the structure. You need to use a measuring device after each laid row.
- When building a brick chimney, just like a stove, it is necessary to use not the standard solution, which includes cement and sand, but add clay to the mixture. The proportions of the solution are: 2: 5: 1.
- The thickness of the solution layer should vary from 5 to 10 mm. An indicator equal to a centimeter is critical. If you exceed it, the masonry will collapse quite quickly;
- The joints between bricks must be carefully sealed. If this procedure is neglected, sparks may enter the room.
- Installation should be made exclusively from whole bricks. The use of quarters and halves may lead to the need to increase the solution consumption, which is unacceptable.
From the above, the following conclusion should be drawn: a brick chimney has a lot of undoubted advantages, but its installation is complicated by many factors. Therefore, it is unlikely that you will be able to install it yourself without having the appropriate experience.
General installation recommendations
It is necessary to study in as much detail as possible the information on how to properly make a chimney pipe in a bathhouse and all the details related to its installation, because reliability, service life, performance and, above all, your safety will depend on its quality. Any seemingly insignificant mistake can provoke irreversible consequences.
First you need to familiarize yourself with the main instructions of specialists and instructions (if available).
Preparatory stage
The areas where the smoke channel passes through the ceilings must first be protected. The step-by-step guide for this stage of installing a chimney in a bathhouse with your own hands is as follows:
- Preparing the passage pipe. It is required to fill its exterior with basalt wool.
- Next, you need to insulate the inside of the unit - decide on the installation point on the ceiling and prepare a hole of the desired shape.
- In the area where it meets the ceiling, spread another thermal insulation layer and then proceed to the cutting device.
- Be sure to leave a small gap between the passage unit and the smoke channel.
Roof work
Start this stage by dismantling the roof:
- It is necessary to determine the dimensions from both the internal and external areas of the roof, taking into account the roof slope (slope).
- Cut a hole inside the roof. To do this, cover the opening areas with metal sheets on both edges, the thickness of which should be 0.5 (mm). You need to make 4 holes measuring 450 by 450 (mm), using the square section method. The scale depends largely on the adapter.
- A roof flashing or master flash is used to pass the chimney through the roof. Their main task is to seal the passage and protect against moisture.
Please note: the master flush must be placed under the top edge of the roof to avoid leakage. Also, seal the joint with the pipe and secure everything with roofing screws.
Passage through the wall
We invite you to familiarize yourself in more detail with two installation schemes with detailed descriptions.
In the case of installing a chimney for a bathhouse with your own hands with a side outlet, the process is carried out as follows:
1 installation option
Passage through the wall, outside the bathhouse. When choosing a chimney for a wood-burning stove in a bathhouse, you need to choose a stainless steel pipe 0.8 mm thick. We install an adapter on the furnace pipe (if you have a metal one) (this is the starting element when assembling condensate), then a single-wall pipe of at least 0.5 m or a pipe heat exchanger (if you plan to have hot water in the washing room). We install a damper on the heat exchanger. We will talk about the need for a gate in a separate article.
Next, we place a 90° elbow on the gate, place a start-sandwich on it to transition from a single-wall pipe to a double-wall, and then a 1.0 m sandwich pipe. If your wall is not wide, then you can put a 0.5 m pipe.
An important point: to pass through walls and ceilings, it is necessary to use a sandwich.
The section of the wall (as well as the ceiling) is the most fire hazardous in the bathhouse, so it is necessary to take the equipment of this unit seriously. We propose installing a PPU (ceiling-passage unit) inside the steam room; the opening is closed from the outside with a screen (stainless steel sheet). If your wall is wide, then you will need a second PPU for installation outside. Ferrum's assortment includes polyurethane foam of various configurations. We will go into more detail in a separate article on this element.
It is necessary to loosely lay kaolin wool or sheets of technical mineral wool into the passage unit in a layer of 5-7 cm in order to remove “excess” heat. There is no need to add more cotton wool, as this may cause the sandwich to overheat. Next, we attach a sandwich tee to the pipe outside the bathhouse. We install a condensate drain at the bottom of the tee. On top of the tee we attach 1.0 m sandwich pipes in the amount of 3 pieces or more, depending on the height of the bath.
Given the weight of double-walled chimneys, you will need to install a mounting platform and a console from below to strengthen the kit. For stability from above to the wall of the bathhouse, we attach the chimney with a wall clamp. The final element of the main pipe will be the head.
The next stage of work will be connecting a 75 liter water tank to the heat exchanger, but we will talk about this separately.
Special instructions:
- After you have checked that all the chimney elements are in place and fit together well, we recommend sealing the joints with silicone sealant at 150° before installation.
- During installation, all modules are attached inside the previous element with the narrow end (along the condensate).
- Do not forget that all joints of the sandwich pipe, elbow, tee and adapter must be secured with clamps. All these elements are available in a wide range in the Ferrum line, the price list for which can be found on the website.
- The lengths of the chimney elements must be selected so that the connection does not end up inside the ceilings.
- If there is a tee in the chimney, then it must be placed on the mounting platform with fastening. The distance between sites must be at least 5.0 m from each other.
- To pass through the floors, it is necessary to use a ceiling-passage assembly.
Installation option 2
Internal location of the chimney. In terms of the set of elements, this option is almost no different from the first. It is imperative to use a sandwich pipe to pass through the ceiling.
An additional element when installing inside a bathhouse is the roof trim.
Making and installing a protective (pass-through) box with your own hands
- Make 4 metal sheets on a scale of 50 by 50 (cm) with holes cut out (in the middle) in accordance with the size of the pipe.
- Using a welding machine, connect the existing sheets to each other or fasten them with self-tapping screws.
- The resulting metal box is insulated using basalt wool, and a foil coating is made on top of the previous layer.
- A pipe is inserted into the box. The box is installed in the ceiling passages and secured with screws.
- Then attach a steel sheet with a pre-cut hole for the chimney to the roof surface.
Assembling the chimney structure
When the stove is not located clearly under the ceiling opening, an elbow (bend) is used. But you shouldn’t overuse it, as soot and fumes can accumulate inside.
A head is attached on top, which you can build yourself in a simple way. But it is still recommended to purchase a ready-made version.
The outer pipe is designed as follows:
- First, the knee is attached to the wall, and only then the main device.
- A ready-made protective box filled with expanded clay is attached to the wall, from which the main part rises outward.
- Then, from the outside of the room, a tee is attached to it. Each of the parts is connected in turn.
Fastening: how to properly install a chimney pipe in a bathhouse
Upon completion of the chimney assembly, attach the tee to the mounting platform and tightly compress all existing joints with clamps. A cone is placed on the last pipe (sandwich), an umbrella or deflector is placed on the cone to prevent precipitation from entering and wind blocking the smoke channel.
The pipe is more than 1.5 meters higher than the roof and is secured with a tension clamp.
Installation of a chimney
A window measuring at least 50x50 cm is cut into the ceiling or wall covering. A passage unit with a hole equal to the diameter of the pipe, plus 3-5 mm, is mounted into this hole for free installation, which must be secured with special metal fasteners in pre-made holes, after which, fastened with a wall. Then the pipe is inserted into the protective box. From the attic side, fill the metal box with expanded clay. As a decorative element after installation, you can use a stainless steel protective screen, which increases fire safety.
Completion of installation work
Next, when you have completed the installation process, be sure to remove the additional coating from the pipes and apply a fire-resistant sealant instead.
Types of chimneys
Before deducing anything, let's see what kind of chimneys there are. It does not take a lot of time.
According to the material, the chimney can be made of either metal, brick , or ceramics. All three are resistant to high temperatures and have their own advantages and disadvantages.
Sandwich pipe for a chimney in a bathhouse through the roof.
Brick
A brick chimney is a stove classic.
It is usually installed by the same master who makes the stove, so technological issues need not be considered - stove business is complex. However, it is worth noting that such a chimney will last longer than a metal one, but it will have to be cleaned more often and this will be more difficult to do than with a pipe.
The reason to build a separate complex brick structure with elbows may be the desire to reduce heat loss - by passing smoke even from an iron stove through it, you get a significant cooling of the smoke coming out.
Combination - an iron stove and a brick pipe that accumulates heat, laid out with your own hands by a non-professional
In a bathhouse, a brick chimney is applicable to a brick stove for lovers of Russian traditions .
In addition, it is permissible to line chimneys made of other materials with bricks.
Metal
Metal options prevail because they have better price-quality ratio. The metal can be either black iron (needs painting), that is, steel with a high carbon content, or stainless steel (alloy steel).
Metal monotube. Photo StroyDom
By design, these can be either single pipes or sandwiches, that is, two pipes of different diameters, nested one inside the other, with a mineral wool lining. See photo above.
Usually a monopipe runs to the ceiling, and then it turns into a sandwich.
ATTENTION! The problem with sandwiches is that they often have internal tubes that burn out, making them dangerous. If water (condensation) gets into the mineral wool, it ceases to insulate heat and the outer pipe overheats.
Ceramic
The most expensive and best option. Ceramics do not burn out like iron, do not clog like brick, it is easier to clean from soot, and it is durable. In addition to the price, the downside is that such pipes weigh much more than metal ones.
IMPORTANT! Ceramics are the safest to use.
There are two options for location: the pipe exits through the roof of the bathhouse and the pipe exits from the bathhouse to the roof along the external wall.
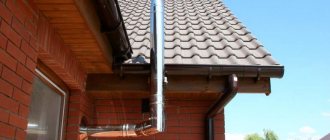
External
The least expensive method of output - for this you will need only one hole in the wall, through which the pipe will be brought out into the street, and then there is a bend and it rushes up, fastened at some distance from the wall. Drilling through the roof of a chimney in this case is only possible if there are roof overhangs and they are in the way. Otherwise - no penetrations at all.
Exiting the chimney pipe through the wall. Photo by NZSK
If there is no goal to save heat, for example, by taking it away from the chimney, then external output is easiest to implement, especially for independent work.
Interior
However, this article is devoted to installing a chimney in a bathhouse through the ceiling and roof. Driving it through ceilings is both more common and more dangerous. But compliance with regulations will significantly reduce risks.
Mistakes when installing a chimney in a bathhouse
- Assembly based on smoke, not condensation. The most common and common mistake that very quickly damages the pipe.
- Placement of wooden floors close to the pipes in the ceiling and walls. Savings on polyurethane foam.
- The use of materials that are strictly contraindicated for use as a smoke exhaust, since some of them can cause a fire.
- Insufficient chimney height.
- Grouping several chimney structures into one.
- Arbitrary calculation of the scale and diameter of materials.
Installing a chimney is a very serious process that requires the necessary skills, attentiveness, patience, and a responsible approach to studying information about various installation methods. If you strictly follow the manufacturers' instructions or the tips given in this article, you will definitely not make mistakes in the process.
Remember that chimney repairs often cost many times more than just installation services. It is for this reason that it is better to follow all the rules and recommendations at the bathhouse design stage.
Which is better, galvanized or stainless steel chimneys?
Traditionally, the main material for constructing a chimney is refractory brick. At present, such chimneys for removing combustion products from a wood-burning stove have not lost their relevance and are unlikely to lose their use. After all, it often happens that the owner of a Russian bathhouse wants only a brick heater, and with it a brick chimney.
But modern industry also offers alternative double-walled sandwich chimneys made of stainless steel or galvanized steel. In this regard, the question reasonably arises of what steel is best to make it from.
It would seem a strange question. After all, everyone knows that stainless steel has incomparable advantages over ordinary steel, including galvanized steel. These include high properties to resist corrosion, high temperatures, and appearance, which is very important when arranging the interior of a bathhouse.
Although galvanized coating allows you to extend the service life of a steel chimney, it is not to the same extent as stainless pipes. Any mechanical damage (scratches, dents, etc.) during installation will negatively affect the durability of the galvanized chimney itself. Damaged areas will become a source of corrosion, eventually rendering the entire pipe completely unusable. And this is the first step towards a fire in the bathhouse.
But there is one drawback of stainless chimneys and components - their high price compared to galvanized steel. For example, according to the Novosibirsk price list, the price of a meter-long thermally insulated sandwich pipe with a diameter of 115×175 mm (insulation thickness 30 mm) made of stainless steel is 1,500 rubles, and of galvanized steel – 1,000 rubles.
The same products from the Voronezh enterprise Ferrum can be purchased at the prices shown in this picture:
As you can see, there is a price difference. But it is not so significant as to refuse to install a stainless steel chimney. And given the excellent performance properties of stainless steel products, you should give preference to it
.
To somehow reduce costs, you can make a combined chimney. So in the steam room with its “extreme conditions” and increased requirements for fire safety, as well as to give it a more respectable appearance, you can use stainless modular elements, and in the attic or outside the bathhouse made of galvanized steel.
However, during installation, difficulties may arise in joining modules made of different materials. Therefore, when purchasing, you should definitely check the possibility of their assembly. Purchasing products from only one manufacturer will provide an additional guarantee of assembly.
To Contents
Basic requirements for sauna stoves
A chimney for a sauna boiler not only removes combustion products from the room, but also ensures optimal use of fuel in the heating unit. At the same time, a properly constructed channel for removing furnace gases should guarantee the safe operation of the heating device. This factor is ensured not only by the correct selection of materials and chimney design, but also by the organization of the boiler room infrastructure. It must have sufficient supply and exhaust ventilation to ensure the supply of oxygen for combustion of the stove and the removal of combustion products or the gas itself that enters the room.
To remove flue gases from a bathhouse, an external wall chimney is often built, since it does not take up space in the room and provides better fire safety
Gas boilers are the safest to operate and cheap compared to other types of heating units. They do not give off the smell of burnt fuel and do not leave debris in the form of ash or slag.
Gas boilers are more economical and safe compared to thermal units using other types of fuel
When using a gas boiler in a bathhouse, you need to follow some recommendations:
- If there is no gas supply from the central line, you can use fuel from cylinders. They must be placed outdoors in a specially equipped cabinet.
- For safe operation of the gas unit, you need to use an automatic control system that will control the heating mode, as well as a gas analyzer in case of leakage.
- The base made of refractory materials for the stove must be at least 10 centimeters larger than its external dimensions.
- To install a gas pipeline, you need to use only steel or copper pipes.
Thermal insulation materials
Metal chimney pipes must be insulated to prevent condensation from forming.
When arranging a chimney in a bathhouse, the type of heat insulator is of great importance. Most often used:
Mineral wool that can withstand heating up to 600°C. Among the disadvantages of this material are the release of formaldehyde when heated and the deterioration of protective properties when wet.
Minerite, which contains cement, cellulose and mineral fillers. The material heats up to 600°C without releasing any substances harmful to health and does not lose its qualities when exposed to water.
Asbestos also has good heat-insulating properties, but when heated strongly, it releases substances harmful to health.
Advantages and disadvantages
The advantages of an external type chimney include:
- increased level of security. The pipe will not have to violate the integrity of the roof and attic floor, which will eliminate the risk of rain and melt water leaking into the gaps between the chimney walls and the roofing elements;
- fire safety. The main part of the chimney is located outside the room, which is safer for such buildings, where the creation of unstable temperature and humidity conditions is initially expected;
- compactness. This type of design does not take up much space inside the bathhouse, which is especially important for small rooms;
- ease of installation. When assembling the channel, it is necessary to equip only 1 passage through the building envelope.
Quite significant disadvantages of installing such a chimney are:
- rapid cooling of the structure, which means condensation will form inside it. Such a structure requires significant costs for enhanced insulation;
- presence of turns. The smoke exhaust pipe exiting through the wall is configured with one or two turns, which reduce the draft inside the structure and interfere with the normal functioning of the stove. To correct this drawback, products of larger diameter are used.
How to cover a pipe on the roof of a bathhouse
Based on experience in operating metal chimneys, we can say that the main problem always remains ensuring seals at the joints and at points of contact with the roofing. Metal expands when heated, so any hard type of seal will fail over time.
Additional thermal insulation with a cord reduces the thermal load on the foam
In the lock, at the junction of the two sections, the elastic band can be reinforced with red heat-resistant sealant. It is actively used for repairing hot areas of mufflers and exhaust systems. But only the joints of the upper sections can be sealed; the rest of the chimney, especially at the outlet of the stove, is sealed with asbestos cord.
Is it possible to use polyurethane foam in a bath?
It’s another matter if you need to fix the pipe body in an opening or passage through a wall or pier. For relatively cold sandwich pipes, if the surface temperature does not exceed 120°C, polyurethane foam is suitable for the bath, but with preliminary coating of the surface with a heat-resistant mixture of liquid glass and asbestos.
For hotter chimneys, with temperatures up to 250 ° C, you can use the same scheme, but with the obligatory additional winding of the pipe with a basalt or asbestos fiber cord. The remaining space is filled with heat-resistant foam for chimneys. You can use “Soudal Soudafoam FR” or “Ognez”, “MAKROFLEX FR77”, any material with a zero flammability class according to EN 13501-1B.
If heated for a long time, even fire-resistant foam can ignite
You cannot directly apply polyurethane foam to the chimney. The best and most heat-resistant polyurethane foam seal lasts a maximum of 360 minutes. heating Then the process of oxidation and destruction begins. Therefore, we must wrap the chimney with fiberglass, mica or cord and only then blow it with foam.
To seal the chimney on the roof of the bathhouse, you can use superheated liquid glass. The pipe must also first be wrapped in one layer of fiberglass, but the material must first be washed to remove lubricants. Add ¼ part of water with liquid soap and asbestos fiber to liquid glass.
We wrap the wooden roof structures in foil, fill the space around the chimney with a thick mixture and heat it with a hand-held gas burner. When heated, the glass boils, turning into a kind of mineral foam. The surface must be coated with protective paint or sealed with a metal apron.
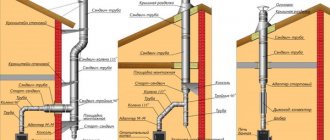
Design of external and internal chimneys
The design of the chimney is selected depending on the characteristics of the selected stove. The pipe package includes several components, each with its own functional features. For a bathhouse with a brick stove, you can use brick, metal, ceramics, and for a metal stove - a ceramic or metal chimney. You can use brick, but laying the pipe yourself will be difficult. You will have to hire a bricklayer - a stove maker.
The main components of the chimney (design lists start from top to bottom):
- Head (probe) - prevents sparks from hitting the roof and neighboring buildings, as well as from flooding during rain.
- Master flush.
- Chimney made of double sandwich or brick.
- PPU (Ceiling assembly where it goes through).
- Chimney made of double sandwich or brick.
- Single iron pipe.
When choosing a brick structure, you need to be prepared for complex cleaning and maintenance. A massive foundation is needed for the stove, since a brick chimney weighs a lot, and the entire load will fall on the stove.
A simpler assembly that does not require special knowledge is a ready-made structure made from sandwich pipes. It consists of a double structure between which asbestos is laid. More heat-saving and lighter. They are made up of individual elements: elbow, deflectors, tees, rain protection, adapters and gate. Fastened using brackets that are mounted with clamps.
Requirements for the manufacture of the structure
It is important to make gaps where the pipe passes through the holes.
When preparing to build a chimney, you need to familiarize yourself with the standards that the chimney must comply with:
- If the pipe comes out of the roof at a distance of one and a half meters from the ridge, then it makes more sense to mount the structure at a height of 50 cm above the very top part of the roof;
- When the distance between the ridge and the chimney is at least one and a half and no more than three meters, it is more advisable to install the chimney at the same level as the roof deck;
- If the ridge and pipe are more than 3 meters apart from each other, the chimney should be mounted above the dotted line, which is conventionally drawn horizontally from the highest point of the roof at an angle of 10 degrees;
- Only 1 meter of chimney should go out from the flat roof;
- The chimney, located one and a half meters above the roof, is certainly secured with guy wires.