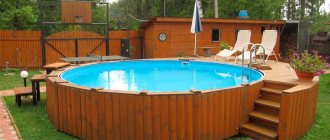
Every summer resident dreams of having his own swimming pool, which will allow him to relieve fatigue after a working day, keep his body in good physical shape, recharge with positive energy and simply refresh himself on a hot summer day. Many consider such a structure an unaffordable luxury, however, if you want to build a concrete pool with your own hands, it will be inexpensive. To do this, you will need certain skills, knowledge of technology and the availability of the necessary construction tools.
Today there are quite a lot of building materials that allow you to create a concrete pool at minimal financial cost. These economical options will be discussed.
Briefly about construction
The process of constructing concrete block pools is not very simple as some people think. Some choose concrete rings as walls, but this also does not simplify the task. This is due to the following features of this work:
- It is very important to properly ensure that the pool bowl does not come into contact with groundwater. Their constant exposure can negatively affect the condition of the material. In addition, in some cases they may contain unfavorable substances.
- The pool bowl must also be well sealed from the inside. Water may not have a very good effect on the condition of the blocks.
- The masonry must withstand a significant volume of water. It is worth understanding that 1 cubic meter is one ton. The average pool holds about 15 cubic meters of liquid.
IMPORTANT! There should not be any weak points in the walls, since it is in such parts that the first cracks often occur, which over time leads to leakage of the entire bowl.
Thus, building a pool from blocks with your own hands is not a very simple task. Despite this, the result is worth some hard work.
Design
First of all, before you start building a pool, you should develop an appropriate plan. It will allow you to theoretically evaluate the possibility of constructing a given architectural object, as well as preliminary calculate the estimate for this process. If you don’t have at least an approximate diagram, you shouldn’t start taking any action to implement the idea.
The following details should be considered:
- It is necessary to determine how many people will use the pool at the same time.
- You need to think about the overall dimensions of the future object: width, depth and length. It is also worth determining the shape of the bowl. It is believed that the most optimal area is between 25 and 40 square meters. In this case, the depth should be from 1.5 to 2 meters.
- The thickness of the bottom and walls should also be thought out in advance. It should be influenced by the types of soil, the depth of groundwater, the depth of the structure, etc. The worse the soil quality, the more significant the walls should be. This also applies to the base - the deeper the bowl, the more reliable it should be.
Pool design in 3D - A communication scheme should also be developed. It must indicate the sewer system, the location of all filters used, the skimmer, stairs for entry and exit, as well as lighting, if provided.
- Special attention should be paid to methods of emergency and planned water discharge.
As soon as all the above nuances are thought out in the plan, you can immediately begin to carry out the work.
Planning
When designing a house, it is better to immediately take into account the presence of a swimming pool on the site. The arrangement of the entire local area depends on this. After all, you will need to calculate how much space the bathing container, seating area, and seating will take up.
In order to take everything into account, it is better to draw up a diagram, where it will be indicated what will be located where.
To calculate the volume of the pool, you need to take into account the number of people living in the house, and also decide for what purpose the pool is needed. It’s one thing when you just need to cool down in the heat, and quite another if you want to have a full swim.
Typically, the depth standards for a container on a site are 1.5-1.8 m. The width and length can range from 3 to 5 meters. But these figures are conditional, since when developing a project, you will have to take into account the available area and the need for other components of landscaping the local area. Some people only need a swimming pool, and a fancy one at that, while others, in addition to the tank, need a garden with fruit trees, flower beds and lawns for swimming. It is worth deciding on the preferences of all family members.
It often happens that the construction of a swimming pool has to begin when a house and other buildings already exist. In this case, you need to look for a suitable site, clear it, and perhaps move some objects to another place.
If you decide to install a pool at home, it is advisable to do it on the ground floor. And in this case, you should definitely think about its arrangement even at the stage of installing the foundation of the building.
If there is an idea to build a pool on other floors, you will need the help of specialists who will accurately calculate whether the building can withstand such a load.
Pit preparation
Before starting work on digging a pit, it is worth clearing the area of any existing vegetation. First of all, this applies to a variety of shrubs and trees, if available.
Preparing a pit manually with the help of human resources and appropriate equipment in the form of a shovel is advisable only in cases where the pool is quite small.
If the thicket of such a structure is large enough, it is best to resort to the help of an excavator. Renting this equipment often costs as much as hiring a team of workers. That is why there will be no additional expenses in this case.
It is worth noting that the dimensions of the pit should be slightly larger than the dimensions of the pool bowl . This is due to the fact that various equipment, formwork and cushions must be placed in the additional space.
IMPORTANT! To prevent the earth from collapsing from the walls of the pit, experts advise digging at a certain small angle to the vertical.
Selecting a location
The construction of the swimming pools with your own hands, shown in the photo, begins with the selection of the ideal place for their placement . Be sure to take into account the following points:
It would be great if the chosen location consists of clay soil, which, in the event of a waterproofing failure, can stop water leakage.
- The site should have a natural slope of the soil. In this case, it will be easier to carry out the work of digging a pit and you can immediately decide where it is better to install the drainage system.
- Tall trees should not grow near the future pool, the root system of which can sense the moisture nearby and begin to reach towards the walls of the structure. As a result, the waterproofing can be easily damaged. The greatest danger is posed by trees such as poplar, willow, and chestnut. Therefore, if trees grow in the chosen location, they should be eliminated in advance so as not to subsequently restore the damaged structure.
- It is undesirable for low-growing trees to grow in the selected area, the leaves of which will constantly fall into the bowl, and during flowering, the pollen that gets into the water will turn it yellow.
- You should pay attention to which direction the wind blows in your summer cottage. The pool should be placed in such a way that air movement is along the bowl. In this case, debris and dirt will begin to stick to one side, along the edges of which the drain system should be installed.
- Construction of a pool on a site with your own hands should be carried out closer to the water supply to facilitate its filling.
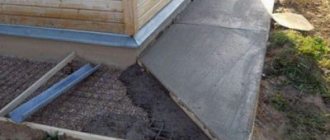
Preparing the base
It is worth constructing a cushion under the pool because in this case concreting will be much easier. In addition, such a base allows you to extend the life of the object. The backfill under the pool bowl should be made of sand and crushed stone. This mixture must be spread evenly along the bottom of the pit and compacted thoroughly. Its height should be between 25 and 35 centimeters.
To waterproof the bottom, you can use polyvinyl chloride (PVC), bitumen or roofing felt. These materials are lined in one or several layers. Be sure to lay them with an overlap of at least 15 centimeters. The edges of the materials need to be placed on the walls of the pit.
How to calculate the amount of material, how to choose it?
First, a drawing of all the walls of the bowl is made, the number of blocks for each plane is calculated (4 walls and a bottom), after which the results are summed up. The easiest way is to calculate the area in m2, and then multiply the result by the number of blocks per 1 m2.
A standard cinder block has dimensions of 390 × 190 × 188 mm. It is easy to calculate that 1 m2 contains 13.6 blocks.
Attention! This value is not entirely correct, since the thickness of the seams is not taken into account. However, when calculating, a supply of material is always needed, so the result is increased by 10%.
Let's say a pool with a depth of 1.5 m has a length of 6 m and a width of 3.5 m:
- Bottom area: 6 × 3.5 = 21 m2.
Area of long walls: 6 × 1.5 = 9 m2.- Short wall area: 3.5 × 1.5 = 5.25 m2.
- Total surface area of the bowl: 21 + (2 × 9) + (2 × 5.25) = 21 + 18 + 10.5 = 49.5 m2.
- Number of cinder blocks: 49.5 × 13.6 = 673.2 pcs.
- We add a 10% margin and get: 673.2 + 67 ≈ 740 pcs.
It is necessary to take into account that the calculation was made for walls of half a block. If you plan to make thicker walls, the amount of material is increased accordingly.
You can choose any cinder blocks, except expanded clay blocks. They absorb water and are less durable. Solid cinder blocks are needed, since hollow ones will not withstand the load from water pressure or from possible soil movements.
Installation on the ground
Hydraulic structures should be laid during the preparation of the pit. In order for the drainage of water to be optimal, a slope should be made at a level of 4 to 8 percent, that is, about 2-4 centimeters per meter of bottom. It should be directed in the direction in which the drain will be installed.
IMPORTANT! Before installing the base, it is worth equipping all sewerage systems that would allow water to be drained from the pool. Also in the additional reception area you can place pumps, filters and other equipment.
The drainage hole must be below the water level. In this case, all the water, if necessary, can completely leave the pool bowl.
Plastic liner lined with brick
Here the situation is simple. Buy a plastic liner for the pool. They are inexpensive and come in different sizes and shapes.
Even when purchasing, consider how the water will be drained - from below, through the bottom drain, from the sides, through nozzles, or over the edge - with a skimmer. Lay pipes according to the type of water drainage when preparing the foundation for the pool.
Installation on the ground
After you have brought the bowl to the site, prepare a flat area for it. It will be necessary to remove the fertile layer of soil with vegetation and make bedding according to all the rules - as described above.
A plastic liner lined with brick is an excellent option for a pool or bathhouse and more
When draining water from the pool at the bottom, it is advisable to make a pit where the pipe should be led out. Equipment can also be located here - pump, filter, etc. With a screamer and a side drain, the pump will in any case be below the water level, so everything is organized more simply here.
Sometimes the liner is placed directly on the sand, sometimes a podium is laid out from the same brick, and the bowl is placed on it. It all depends on the type of soil. If they are not heaving, then you can put them on sand, but on clay and loam soils you will have to make at least some kind of foundation.
If you want, you can lay polystyrene foam under the brick (or on it) - there is no such thing as excess thermal insulation. You can also cover the sides of the bowl with this material, and only then cover it with brick. Great thickness is not needed - 3-5 cm is enough.
Another option for a brick-plastic pool
The waterproofing and rigidity of the walls is ensured by the liner, so there are no special requirements for the masonry and its finishing. Do as you please.
Recessed installation
The liner can be partially buried in the ground. With this option, only the depth of the pit changes. After installing the bowl (with or without thermal insulation - decide for yourself), you will need to fill the gap between the wall of the pool and the pit. This can be previously removed soil, gravel or sand.
Gravel and sand are an option for heaving soil, excavated soil is an option for normal soil. You compact the backfill and begin to cover the protruding part with bricks. Actually, that's all - finishing work remains.
Concreting the bottom and installing a base on it
To prepare the solution for concreting the day, cement is used, the grade of which is not lower than M400. A pure sand-cement mixture should not be used, since certain additives and additional water-repellent substances must be added to it, which will allow the material to withstand aggressive and quite difficult operating conditions in the future.
When preparing the solution, it is necessary to use less water than usual. The result is a semi-dry mixture. Its main advantage is that the ripening period is significantly reduced. Often it is only 7-10 days instead of 28 days.
Water-repellent concrete can be made either using a concrete mixer at home or ordered from the appropriate enterprise. But in the first case, the work must be carried out together, since in no case should premature setting of the components be allowed.
Depending on the additive, after filling you need to wait from 4 to 10 days . As soon as the concrete reaches the required characteristics, the construction of walls can begin.
Brick pool construction technology
You can build a brick bowl with your own hands, but it will be a difficult task. There are several reasons for this:
- It is necessary to ensure tightness from groundwater; it can contain a lot of unhealthy and even very harmful things.
- The bowl must also be sealed from the inside - water destroys the brick.
- Brickwork must withstand a considerable amount of water. After all, 1m3 is one ton. And in a medium-sized pool, 12-18 cubic meters fit.
- On the other hand, the walls will be affected by the force of heaving. A brick wall is made up of fragments, and if there is a weak spot somewhere, it is bound to collapse.
In cross-section, the bowl of a brick pool looks like this
As you can see, the task is not easy. All these problems exist when building a pool made of concrete, but with brick everything is complicated by the fact that the wall is not monolithic. The leakage of the material also adds complications: additional waterproofing measures are required.
Somehow you need to organize the drainage of water. Usually, for this purpose, a technical pit is made near the pool bowl, which is deeper than the pool bowl. The pipe from the drain hole is led into this pit, and there I install a filter unit. Overflow holes in the walls will also be needed. Water from the surface will drain into them. In this way, a stable level is maintained and the most contaminated upper part of the water is removed.
Methods for organizing water drainage
In general, when making a brick pool, the work order will consist of the following steps.
Pit preparation
Mark the dimensions of the pit on the ground - it should be at least 80-100 cm larger than the dimensions of the bowl. Do not forget about the need to make a pit near the main bowl or at a distance, as well as a ditch that should connect them - a pipe is laid in it.
Dimensions are marked using pegs and twine.
First, the fertile layer is removed, then a pit is dug to a depth of at least 40-50 cm deeper than planned: there will also be bedding, a bottom slab and finishing materials.
Preparing the base for the bottom slab
Mark and lay the pipe under the drain. It should go at a slight slope towards the pit. The embedded parts themselves (grid and shutter) will be installed much later - after plastering.
It is better to make the dimensions of the bottom plate 40 cm larger than the planned dimensions of the bowl. This will better compensate for soil heaving.
First of all, we prepare the foundation pit
On the selected area (mark it with pegs and strings), level the bottom, making a slight slope towards the drain. Compact the remaining soil, leveling the bottom.
According to the rules, the next layer is geotextile. This is a thin but very durable non-woven membrane that can withstand greater loads, prevents the displacement of soil layers and does not interfere with the drainage of water. In non-heaving soils, it can not be laid.
The next step is to fill in the bedding and compact it. First it is crushed stone of medium and fine fraction. The layer is about 20 cm. If the groundwater level is high, drainage pipes are laid in gravel along the edges of the platform, which are discharged into a drainage pit or into a system (depending on how your groundwater drainage system is organized). The gravel is compacted carefully using a vibropress. Then there is a 10 cm layer of coarse sand. It is also compacted, to make it easier - it is spilled with water.
A bedding of crushed stone and sand is poured onto the leveled bottom.
The next one is the waterproofing layer. In a budget version, this is high-density polyethylene film. But it is practically useless - it will break in many places when laying reinforcement and pouring concrete. If you want really good waterproofing, use membranes.
Waterproofing strips are laid with an overlap of at least 10-15 cm. The joints are taped with double-sided tape. The edges are placed on the walls of the pit.
Reinforcement
Reinforcing the bottom slab is a long process.
The next step is reinforcing the bottom slab. The recommended thickness of the concrete base is 200 mm.
Ribbed reinforcement is used. The thickness of the rods depends on the type of soil and depth, but you should not use a diameter of less than 12 mm. The reinforcement pitch is 20*20 mm or 30*30 mm. One or two belts - depends on the type of soil. If the soils are heaving, you will need two belts - they will definitely be able to withstand the forces of heaving. If movements are unlikely and the depth of the pool is shallow, one is enough.
The reinforcement must be recessed at least 5 cm into the concrete, so the rods need to be laid on halves of bricks - they will provide the required 5 cm. On top of the rods there must also be a layer of concrete at least 5 cm thick. This will be useful if you have to knit a double reinforcing belt . Then it turns out that the distance from one layer of reinforcement to another will be 100 mm.
To ensure a gap of 5 cm, halves of bricks are laid under the reinforcement
In general, this process is very similar to creating a slab foundation. Read the article about how and what to do.
Concreting the bottom
Pouring the slab with concrete. Concrete of at least M400 is used for the solution. Previously, pure cement-sand mortar was used, but today technology requires the introduction of additional additives to impart water-repellent properties. The amount of cement and sand does not change, but much less water will be needed - it will already be a semi-dry concrete solution. Its advantage is that the aging time of the solution is significantly reduced - to one or two weeks instead of the required 28 days.
The water-repellent solution can be ordered from the company and it will be delivered to you by car, or you can make it yourself in a concrete mixer, but you will have to work with at least two people: you should not allow the edges of the previously laid piece to “seize.” Everything must be done quickly: while one portion is being leveled and compacted, another is already being prepared.
After filling, wait the required time - from 4 to 10 days - depending on the selected additive. After the concrete has gained strength, the construction of walls can begin.
Pouring concrete on the bottom slab
Construction of pool walls made of bricks
Most often, the walls are made of one brick. But this is a very thin wall that can withstand the load of a very small mass of water.
Please note that only red ceramic bricks are used for the construction of swimming pools. Preferably full-bodied. The use of silicate is excluded - it is only suitable for dry buildings.
A swimming pool with a one-brick wall can be built inside a bathhouse. In this case, the load from heaving is supported by the foundation, and the mass of water will not be large - you will not accelerate much in the room.
On the street, the size of the pools is many times larger, and the walls should be two, at least one and a half bricks thick. Moreover, each row should be reinforced with two rods or a metal mesh made of 4-5 mm wire with a pitch of 10-15 cm.
For a medium-sized pool, it is better to make the wall at least one and a half bricks long
When laying, it is recommended to use a solution with a plasticizer or the addition of liquid glass. Make the outer seam as usual, flush with the brick, and make the inner seam half-empty - so that during finishing the adhesion of the plaster mortar to the surface is better.
Do not forget to build pipes into the walls to install water discharge nozzles. An exception is overflow-type pools, in which the skimmers are hung on the side.
Each row, or every two or three, is reinforced with mesh
Plastering and interior finishing
These works are carried out as usual, only the composition must be waterproof, or better yet, water-repellent. You can add liquid glass, just like in masonry mortar.
Prime the dried surface with a deep penetration compound, preferably having antibacterial properties. The second option is to coat the primer with an antiseptic. Cover the prepared walls with a painting net, and then plaster the surfaces.
Some people recommend installing embedded parts before plastering, and some after. When installing on an already plastered surface, a special cord is laid around the perimeter of the part, and the joint is coated with sealant
Before finishing, it is necessary to install embedded parts - bottom drain, wall nozzles.
After plastering, you can either lay tiles/mosaics. It also needs to be placed on water-repellent glue. You can paint the walls and bottom with rubber paint. It will immediately become waterproofing - it creates a thin and elastic film on the surface that does not allow water to pass through.
There is one finishing option without plastering and other work - a special PVC film reinforced with fiberglass. True, if it is sold, it is only in soldered form, and the shapes are usually circle or oval. It is not soldered separately. If you decide to use it, you will have to adjust all the dimensions to fit the existing dimensions.
Instead of tiles, sealants and other finishing, you can use a special PVC film. Just don’t use sand-lime brick for building swimming pools - it breaks down in water. In order for such a pool to exist for at least a few years, there is only one way - film
External waterproofing and insulation
Waterproofing is carried out in exactly the same way as in cases with foundations. The most convenient way is coating. Apply it and let it dry. You can fuse roll waterproofing. You just need it to be of good quality, and that’s not very cheap.
If the soils are heaving, it is advisable to play it safe and put a reinforcing metal mesh on the walls before waterproofing. It is advisable to also plaster it and also with a hydrophobic composition. And only then start applying waterproofing.
The outside of the brick bowl must also be waterproofed
After completing the waterproofing work, it is advisable to insulate the brick pool bowl that you made with your own hands. This will significantly reduce the cost of heating water. And the expected costs will be considerable - to heat 10-15 tons of water by one degree you need a lot of electricity. And since the pool is deep, it will be weakly warmed by the sun. And if you don’t fence it off from the ground yet, you’ll be warming it for a long time.
It is better to use foam polystyrene boards for thermal insulation. This material has excellent thermal insulation characteristics; moreover, it does not conduct or absorb water, so it will additionally protect the bowl from leaking. Another plus is that it does not bloom, fungi and microorganisms do not develop in it, and insects and animals do not eat it. Overall, it's a great option. But it must be taken at a high density - at least 35 kg/m2. So it will also compensate for the movement of the soil during heaving.
Lay polystyrene foam in two layers, overlapping the seams of the bottom with the top slabs. Seal the seams with water-repellent mastic or glue them with reinforced tape (this is the worst option).
Afterwards, all that remains is to backfill: fill the gap between the wall of the pit and the bowl with soil or sand and gravel. The soil is suitable if winter heaving is insignificant. If the heaving is severe, it is better to cover everything with gravel and compact it. This layer will serve to compensate for the loads that occur during freezing.
Another waterproofing option
This is such a difficult process - building a brick pool with your own hands. But this is the most difficult option. There are some easier ones. You can’t call them purely “brick-and-mortar”, but the work is much less and the reliability is higher.
Reinforcement
Reinforcing the bottom of the pool is a mandatory step. In this case, the height of the concrete layer should be about 20 centimeters.
In the reinforcement process, ribbed reinforcement is used. Its cross-section should directly depend on the operating conditions of the pool. But the diameter should not be less than 12 millimeters. The spacing of the twigs should be 20x20 or 30x30 centimeters. It can be equipped with one or two belts. The second option is often chosen in the presence of soil heaving forces.
NOTE! The reinforcement should be recessed into the concrete by 5 centimeters. That is why it is laid on bricks, which give the desired size. The distance between layers should be 10 centimeters.
Walling
In most cases, walls are built in one row of blocks. Due to the fact that these products are quite massive, they can easily withstand the mass of water that will be in the pool.
The first two layers of blocks must be laid on ordinary concrete mortar with water-repellent properties. As for the third row, it is best to reinforce it. This sequence must be continued until the construction of the wall is completed.
The reinforcement can allow the blocks to gain greater rigidity and resistance to the mass of water in the pool. That is why other methods for constructing walls of hydraulic structures of this type do not exist.
Bathhouse made of foam blocks with a swimming pool: photo, plan, tips
In the modern world, there are many different ways to relax after a hard and busy week of work, but the most pleasant and desirable is still relaxing in the bathhouse, as well as swimming in the pool. Therefore, thousands of people who have a private plot are looking for such information on the Internet, a bathhouse made of foam blocks with a swimming pool: photos, plans, tips.
Since everyone wants to choose a suitable project and calculate how much it will cost to build such a place to hang out. It should be noted that in connection with the development of construction and the emergence of new and improved building materials, baths are built not only from logs, but also from foam blocks.
This article describes how bathhouses are built from foam blocks, as well as a lot of other information about what a bathhouse made of foam blocks with a pool is like: photos, plans, tips. But, we should start with the advantages and disadvantages of this material.
Interior decoration
You should not assume that interior finishing of a swimming pool is a fairly simple task that anyone can handle. In fact, it must be carried out in accordance with certain rules and recommendations.
First, the surface of the blocks must be impregnated with an appropriate primer. It is best to choose a deeply penetrating composition that has antibacterial properties. You can also apply an antiseptic on top of this material.
After the preparatory work has been done, it is worth putting an appropriate construction mesh on the block wall. After this, you can begin the plastering process.
If the embedded parts are installed after the walls are covered with mortar, then a special cord should be laid around the perimeter of the products . In this case, all joints must be sealed with sealant.
Waterproofing
Waterproofing the pool should be done in the same way as this work is carried out in relation to the foundations. The easiest way is to use a coating material. It is enough to apply it on the outer wall of the structure, after which you just need to wait for it to dry.
Film waterproofing material can also be used, but in this case you should choose the highest quality and most expensive products. This is due to the fact that the operating conditions of the pool are quite difficult.
In cases where the soils are quite heaving, it is necessary to fill the walls with a metal section before waterproofing work. The top can be plastered with a small layer of mortar.
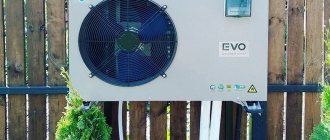
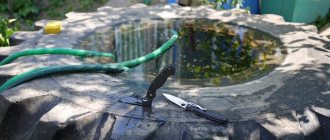
What equipment and materials will be needed?
The construction and installation system for a swimming pool includes the following elements (materials, tools, equipment):
- fittings;
- pump;
- facing film;
- pipes;
- nozzles – 2 pieces;
- skimmer;
- protective finishing and waterproofing fabric;
- fasteners;
- sand filter;
- crushed stone;
- polyurethane foam;
- hacksaw;
- welding machine or wire;
- excavator or shovel (for large or small structures, respectively);
- construction tape (can be replaced with paper clips);
- flange units;
- ladder.
You will also need a concrete mixture, but in small quantities, since it is intended to fill block cavities along the entire height of the structure.
Insulation
In order to reduce the financial costs of heating water in the pool, it needs to be insulated after waterproofing work has been carried out. It is important to understand that heating several tons of water by 1 degree will require quite a lot of electricity. Due to the fact that this structure is buried in the ground, the sun will have minimal influence on it.
For thermal insulation, builders recommend using foamed polystyrene. It performs its main function well and does not absorb water. In addition, various microorganisms do not multiply in such material. Polystyrene is not eaten by insects, so it cannot be damaged in this way.
It is worth noting that it is best to choose high-density thermal insulation material. This figure must exceed 35 kilograms per square meter.
NOTE! Installation of polystyrene should be carried out in two layers. It is necessary to lay it in such a way that it overlaps the joints of each other. Additionally, water-repellent mastic should be applied to the seams.
Step-by-step instructions for building a pool from blocks with your own hands
Since the pool is a rather complex engineering hydraulic structure, it is very important to construct it correctly .
Constructing a pool from concrete blocks with your own hands should be carried out according to clear step-by-step instructions. Only in this case will the end result be a high-quality object that will withstand all existing operating conditions for a long time without problems.
Design and calculation
At this stage, a detailed plan for the construction of the future font from blocks is drawn up. It will allow you to realistically assess the possibility of implementing the idea and draw up an estimate.
During design, the following points are considered:
- The first step is to calculate the size of the pool. The indicator determines how many water procedures a person can take at the same time. A do-it-yourself bowl with an area of 25-40 m2 is considered optimal. Depth varies from 1.5 to 2 m.
- Taking into account the geometry of the area allocated for the construction of a block font, the shape of the bowl is determined.
- The thickness of the bottom of the pool and its block walls depends on the properties of the soil on the site, the level of underground water layers, and the depth of immersion of the bowl into the ground. It is better to trust these calculations to a specialist. The more heaving the soil, the higher the location of groundwater, the thicker the bottom and walls are made. The same applies to the depth level of a bowl made of blocks.
- The pool diagram shows the location of communications. They provide for drainage, sewerage, nozzles, the location of stairs, filters and other equipment for caring for the font.
When everything in the project is carefully thought out, making a pool from blocks will be much easier.
Digging a pit
The construction of a bowl from blocks begins with preparing the area. The area is cleared of debris, trees and bushes. The soil must be leveled into a level area. On the site, stakes and cord mark the contours of the pool. The pit should be slightly larger. Gaps are needed for waterproofing walls and supplying communications.
Excavation work is carried out manually or special equipment is hired. In the first case, it is advisable to dig a hole with a shovel for a small pool made of blocks. If the font is large, you cannot do without an excavator. Special equipment is provided with access. It is important to think about where to put a large amount of land. Part of the soil is left for backfilling the gaps between the walls of the pit and the pool.
Advice! To prevent the earthen walls from collapsing, they are made at a slight slope when digging a pit.
Preparing the base
It is worth constructing a cushion under the pool because in this case concreting will be much easier. In addition, such a base allows you to extend the life of the object. The backfill under the pool bowl should be made of sand and crushed stone. This mixture must be spread evenly along the bottom of the pit and compacted thoroughly. Its height should be between 25 and 35 centimeters.
To waterproof the bottom, you can use polyvinyl chloride (PVC), bitumen or roofing felt. These materials are lined in one or several layers. Be sure to lay them with an overlap of at least 15 centimeters. The edges of the materials need to be placed on the walls of the pit.
Installation on the ground
Hydraulic structures should be laid during the preparation of the pit. In order for the drainage of water to be optimal, a slope should be made at a level of 4 to 8 percent, that is, about 2-4 centimeters per meter of bottom. It should be directed in the direction in which the drain will be installed.
IMPORTANT! Before installing the base, it is worth equipping all sewerage systems that would allow water to be drained from the pool. Also in the additional reception area you can place pumps, filters and other equipment.
The drainage hole must be below the water level. In this case, all the water, if necessary, can completely leave the pool bowl.
Concreting the bottom and installing a base on it
To prepare the solution for concreting the day, cement is used, the grade of which is not lower than M400. A pure sand-cement mixture should not be used, since certain additives and additional water-repellent substances must be added to it, which will allow the material to withstand aggressive and quite difficult operating conditions in the future.
When preparing the solution, it is necessary to use less water than usual. The result is a semi-dry mixture. Its main advantage is that the ripening period is significantly reduced. Often it is only 7-10 days instead of 28 days.
Water-repellent concrete can be made either using a concrete mixer at home or ordered from the appropriate enterprise. But in the first case, the work must be carried out together, since in no case should premature setting of the components be allowed.
Depending on the additive, after filling you need to wait from 4 to 10 days . As soon as the concrete reaches the required characteristics, the construction of walls can begin.
Reinforcement
Reinforcing the bottom of the pool is a mandatory step. In this case, the height of the concrete layer should be about 20 centimeters.
In the reinforcement process, ribbed reinforcement is used. Its cross-section should directly depend on the operating conditions of the pool. But the diameter should not be less than 12 millimeters. The spacing of the twigs should be 20x20 or 30x30 centimeters. It can be equipped with one or two belts. The second option is often chosen in the presence of soil heaving forces.
NOTE! The reinforcement should be recessed into the concrete by 5 centimeters. That is why it is laid on bricks, which give the desired size. The distance between layers should be 10 centimeters.
Walling
In most cases, walls are built in one row of blocks. Due to the fact that these products are quite massive, they can easily withstand the mass of water that will be in the pool.
The first two layers of blocks must be laid on ordinary concrete mortar with water-repellent properties. As for the third row, it is best to reinforce it. This sequence must be continued until the construction of the wall is completed.
The reinforcement can allow the blocks to gain greater rigidity and resistance to the mass of water in the pool. That is why other methods for constructing walls of hydraulic structures of this type do not exist.
Interior decoration
You should not assume that interior finishing of a swimming pool is a fairly simple task that anyone can handle. In fact, it must be carried out in accordance with certain rules and recommendations.
First, the surface of the blocks must be impregnated with an appropriate primer. It is best to choose a deeply penetrating composition that has antibacterial properties. You can also apply an antiseptic on top of this material.
After the preparatory work has been done, it is worth putting an appropriate construction mesh on the block wall. After this, you can begin the plastering process.
If the embedded parts are installed after the walls are covered with mortar, then a special cord should be laid around the perimeter of the products . In this case, all joints must be sealed with sealant.
Waterproofing
Waterproofing the pool should be done in the same way as this work is carried out in relation to the foundations. The easiest way is to use a coating material. It is enough to apply it on the outer wall of the structure, after which you just need to wait for it to dry.
Film waterproofing material can also be used, but in this case you should choose the highest quality and most expensive products. This is due to the fact that the operating conditions of the pool are quite difficult.
In cases where the soils are quite heaving, it is necessary to fill the walls with a metal section before waterproofing work. The top can be plastered with a small layer of mortar.
Insulation
In order to reduce the financial costs of heating water in the pool, it needs to be insulated after waterproofing work has been carried out. It is important to understand that heating several tons of water by 1 degree will require quite a lot of electricity. Due to the fact that this structure is buried in the ground, the sun will have minimal influence on it.
For thermal insulation, builders recommend using foamed polystyrene. It performs its main function well and does not absorb water. In addition, various microorganisms do not multiply in such material. Polystyrene is not eaten by insects, so it cannot be damaged in this way.
It is worth noting that it is best to choose high-density thermal insulation material. This figure must exceed 35 kilograms per square meter.
NOTE! Installation of polystyrene should be carried out in two layers. It is necessary to lay it in such a way that it overlaps the joints of each other. Additionally, water-repellent mastic should be applied to the seams.
Other Important Details
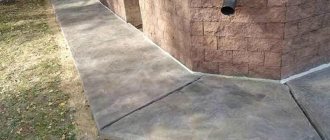
The recess around the perimeter of the pool can be filled in various ways. For this purpose, soil dug during the construction of the pit is often used. But in cases where the soil is quite heaving, crushed stone can be used. It needs to be poured into the hole and compacted quite firmly.
On top of the perimeter of the pool, you can fill it over crushed stone, on top of which you should lay a tiled covering. It is best to use a material with a matte surface. This will increase the level of safety near this hydraulic facility.
Pros and cons of block pools
A review of the positive and negative qualities of the structure will help you decide whether to build a bowl from blocks.
Pros:
- An undeniable advantage is the increased strength of the pool. The masonry can withstand heavy loads and resists seasonal soil movement well. The bowl can be erected in the open air without fear of the destructive effects of negative natural phenomena.
- The font lends itself well to finishing. The bowl is covered with tiles, mosaics, and decorative plaster is used. The owner decorates the pool according to his taste and wealth.
- Despite the complexity of the design, building a swimming pool with blocks yourself will cost less than ordering the installation of a swimming pool made of composite materials.
Minuses:
- If the drainage and water supply system is initially incorrectly equipped, it is difficult to redo it.
- Violation of waterproofing technology or the use of low-quality blocks in construction will lead to leaks.
- Poor masonry damages not only the integrity of the bowl, but also the decorative cladding crumbles.
- A pool made of any type of blocks requires careful maintenance. Failure to follow the rules will lead to the formation of mold on the walls, the water will take on a green tint, and an unpleasant odor will appear.
Among all the shortcomings, the main problem is the complexity of construction. You will need to carry several tons of concrete mortar with your own hands and lay heavy blocks on the walls.
Features of block pools
If you decide to build a font on your site, even before starting the design you need to familiarize yourself with the features of a complex structure:
- The bowl should not come into contact with groundwater in the ground. From such proximity, blocks are destroyed faster. The problem can be solved by creating reliable waterproofing.
- The blocks should not come into contact with water from the inside of the font. Here, similarly, reliable sealing is required.
- It is important to take into account that 1 m3 of water in terms of weight is equal to 1 ton. The masonry of blocks must withstand pressure. Usually they create fonts with their own hands with a volume of up to 15 m3.
- The presence of weak areas in the walls is unacceptable. This is where the first cracks appear and the font begins to leak.
Construction of a swimming pool requires precise design, which is best left to specialists.
Other Important Details
The recess around the perimeter of the pool can be filled in various ways. For this purpose, soil dug during the construction of the pit is often used. But in cases where the soil is quite heaving, crushed stone can be used. It needs to be poured into the hole and compacted quite firmly.
On top of the perimeter of the pool, you can fill it over crushed stone, on top of which you should lay a tiled covering. It is best to use a material with a matte surface. This will increase the level of safety near this hydraulic facility.
Types of blocks
Today, various types of blocks are used to build a swimming pool. First of all, this applies to the following types of material (we do not consider foam blocks, since the walls of an immersion pool must be as rigid as possible):
- Concrete blocks.
- Aerated concrete blocks.
- Cinder blocks (read about cinder block pools below)
- Expanded clay blocks.
The choice of material for the construction of walls should directly depend on operating conditions, climatic factors, as well as the availability of appropriate financial resources.
Table of advantages and disadvantages of materials for the construction of swimming pools
Each type of block used in the construction of swimming pools has its own advantages and disadvantages. That is why, before choosing this or that material, it is worth carefully analyzing these factors in order to understand how best to build the structure.
| Block types | Advantages | Flaws |
| Concrete blocks | High strength, fast construction speed, simplicity, versatility, resistance to low temperatures, ease of installation. | The need to waterproof seams, high cost, impossibility (or limited) use on heaving soils. |
| Aerated concrete blocks | Light weight, ideal geometry, fairly simple installation process. | Low frost resistance and high water absorption, the possibility of fungus spreading in the pores, the presence of shrinkage. |
| Cinder blocks | Relatively light weight and not very significant cost. | Low environmental friendliness, presence of blast furnace slag, low frost resistance, high level of water absorption. |
| Expanded clay blocks | The highest strength, high frost resistance, low water absorption, low cost, no shrinkage. | Relatively heavy weight and not very good geometry, making it difficult to build a flat wall. |
Before choosing one or another type of blocks, it is imperative to evaluate its positive and negative qualities. This will help build a better and more reliable pool that will last for quite a long period of time .
Decoration
Once plastering has been completed, you can begin installing the selected tile covering. It can be either ordinary tile or mosaic. Today, a large number of different versions of these products are sold, as a result of which anyone can create their own unique and original style of pool terrace.
IMPORTANT! Experts recommend laying tiles with water-repellent adhesive. Additionally, the walls and bottom can be painted using rubber paint. It will serve as a waterproofing layer.
Instead of tiles and sealants, a special PVC film is sometimes used. It is a glass fiber reinforced material. Due to the fact that it is sold only in finished form, such a product does not always fit the configuration of the pool.
Practical recommendations
There are also several practical recommendations for building a swimming pool that you should pay attention to:
- The pool should be built away from trees. This is due to the fact that their roots can damage external waterproofing and insulation. In addition, in this case there will be no need to constantly remove leaves from the water.
- The simplest and most convenient shape for a pool is square. Rectangular or with rounded corners.
- Marking the area for the pool should be done using pegs and a stretched cord.
It is imperative to pay attention to all the recommendations of experienced builders . They will make your work easier, faster and more reliable.
Choosing a bathhouse project
Steam room project
The most important place in any bathhouse is the steam room, so when choosing a design for a foam block bathhouse with a relaxation room, you should first think about this room. To do this, first of all you need to decide what you want. This could be a sauna or a Russian bath.
If you prefer a sauna and decide to create it yourself, you must remember that the volume of the room and the calorific value of the stove must match. Therefore, in saunas, ceilings are usually kept small, up to 2.1 meters, otherwise drafts may form.
Based on these dimensions, the size of the shelves for sitting is also taken. So the top shelf should be about 1 meter below the ceiling. Each subsequent one should be 40–45 cm smaller. It is this distance that ensures a comfortable position and allows the legs to rest on the lower bench.
Note! This arrangement of steps assumes that the first step will be 55–65 cm high. This is quite acceptable, since in most cases they sit there with both feet on the bench. There are also children sitting there, calculating the steps for which is quite problematic.
If you are considering a ready-made bathhouse project made from Russian-type foam blocks, then low ceilings, on the contrary, can become a serious problem for preparing steam. This is due to the fact that the finished steam rises and accumulates there. If the ceiling is low, then a sufficient amount of steam will not be able to accumulate there and a few strokes of the broom will completely dispel it.
Also, for the “Russian bath” the instructions require taking into account the need to ventilate the steam room to remove waste steam. To do this, you must have a good opening window opposite the door. Sometimes powerful exhaust systems are now used for this, but this breaks traditions, and bath traditions are sacred.
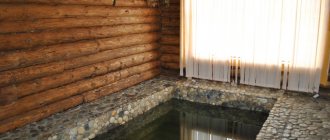
Pool project
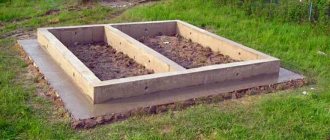
The design of a bathhouse with a pool made of foam blocks has its own peculiarity. Since even at the stage of building the foundation you will need to create a separate foundation for the pool. Since the pool can be of two main types, the arrangement of the foundation for it varies significantly.
Advice: It is not worth tying the foundation of the pool and the building, since they have different loads. This applies to both sunken and overhanging pools.
So you can choose a pool that will be level with the floor of the bathhouse, or have a slight elevation. To build such a structure, you will need a fairly substantial foundation pit, 30–50 cm larger than the size of your pool. If you are considering a bathhouse project made from 6x4 foam blocks, then you cannot place such a pool in such dimensions.
For small projects of foam block baths, the best choice would be elevated pools. They differ in that their base is flush with the floor, and the walls rise to the height of the pool. The foundation for such a water receiver is built solid, but to a depth not greater than the depth of the foundation of the walls. Thanks to this, the labor intensity of work is significantly reduced.
Ready-made bathhouse projects made from foam blocks often offer rounded shapes of pools, but if you will do all the work personally and, moreover, are trying to save money, then it is better to choose straight lines.
But it is worth noting that rounded shapes look much better, but this only applies to pools that are flush with the floor. For elevated pools, a rectangular shape is more preferable.
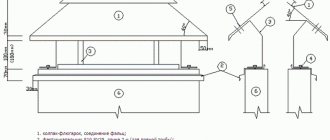
Which roof to choose
According to the method of roof arrangement, the following types are distinguished:
- Shed - mainly used for small buildings, it is quite cheap, one of the easiest to create and has a low windage. The disadvantages include a small angle of inclination due to which snow may accumulate and a not very attractive appearance.
- The gable roof is one of the most popular. Its advantages include a large angle of inclination, which eliminates the accumulation of snow, an attractive appearance and the possibility of arranging an attic space. The disadvantages include high windage, and greater consumption of materials, which increases the cost of creating a roof.
- Multi-pitched roofs are among the most beautiful and expensive. Otherwise, their characteristics are similar to a gable roof.