A smooth surface of the subfloor is the guarantee that the finishing coating will lie flat on the base and will serve faithfully for many years. Moreover, some types of coatings are very particular about the evenness of the base, so sometimes it is necessary to level the subfloor. If the screed is just a little uneven, then it can be covered with a self-leveling mixture, and then it will meet all the necessary requirements. Beacons for self-leveling floors are devices that, of course, can be dispensed with when pouring a thin layer of self-leveling mixture, but it is still recommended to install them. It is also advisable to use them when installing finished self-leveling floors. What are they and how to place them correctly?
Beacons for self-leveling floors
What are beacons?
Beacons are special or hand-made devices that are installed on a rough base and are used to ensure that the poured mixture, be it screed or self-leveling floors, is poured as evenly as possible. It is especially important to use beacons in large areas, when it is extremely difficult to determine by eye how evenly the floor is poured.
What are self-leveling floors
Thus, beacons are installed strictly at a certain level so that their upper boundary is in the same horizontal line. The width between them can be different, but it is advisable to keep it at approximately 1-1.5 m, that is, the width of the rule. When the mixture is poured between two adjacent beacons, the rule rests on them and is carried out along them, allowing you to remove/level out excess mixture and make the surface of the coating in this part of the room perfectly flat.
Floor screed using beacons
Beacons can be used both when pouring screed (mandatory) and when creating self-leveling floors. Moreover, in the latter case, some masters believe that there is no need to use these devices. However, they are mistaken - beacons can not be used only in the case of an almost perfectly level rough foundation, that is, to level out minor differences and only in small areas.
Floor beacons
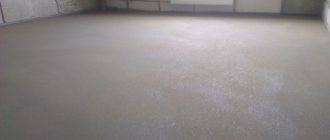
At the moment, self-leveling floors are quite often used in the design of homes and offices , although previously they were used only for industrial premises. This is due to their properties - high resistance to various types of loads. In homes, they began to be used not only because of this, but also because they allow you to create a perfectly flat and water-resistant floor.
Main types of self-leveling compositions for floors
On a note! Thanks to the technology of self-leveling floors in homes, it is now easy and simple to create unique and beautiful 3D bases that will add a unique charm to the interior.
Self-leveling floors 3D
Beacons for self-leveling floors are recommended for use on large areas. It is in large spaces that the mixture cannot spread in an even layer without outside help, and it is unlikely that without beacons it will be possible to make a neat base.
National standard of the Russian Federation GOST R 56379-2015. Floors. Load-bearing capacity test method . (approved by order of the Federal Agency for Technical Regulation and Metrology dated April 3, 2015 N 215-st). File for download.
GOST R 56379-2015
Adviсe
On the day of work, it is necessary to provide protection in the room from drafts - in no case should you open windows or speed up the drying of the solution with any heat guns or hair dryers. If the layer of self-leveling floor is thicker than 3 centimeters, then I would recommend watering the hardening surface once an hour with water from a spray bottle or using a brush, otherwise it may crack.
Plus, at the end of the work, it is advisable to cover it with plastic wrap for a day to reduce moisture evaporation. Remember: the thicker the layer, the higher the likelihood of shrinkage cracks.
Since self-leveling floors shrink slightly when they set, it is recommended to cut off the beacons at the end, or simply pull them out if metal ones were used, and then add the mixture into the grooves. If the floor is being prepared for tiles, as in our case, the beacons can be left alone; they will not interfere.
As a rule, tiles can be laid on such a floor already on the third day after pouring, and it is better not to lay floor coverings earlier than after 7 days.
The described method allows everyone to make a self-leveling floor with their own hands. And no worse than an experienced master. Maybe someone can fill the floors without using beacons, but why should you risk it? Do it with them and get great results! I would be glad if you agree to subscribe to updates and receive announcements of new articles by email! Don't worry, no spam, only announcements :-) Good luck with the repair!
Good afternoon It is necessary to level the floor in the room for laying parquet boards. If you put it into the horizon, you will end up with a rather shabby threshold at the entrance to the room, since there are tiles in the corridor and there is no desire to change them. Therefore, the only thing that comes to mind is to install the beacons not horizontally, but so as to bring the future floor level with the corridor. Hence the question: is it possible to level the self-leveling floor along the beacons, but not horizontally? It is clear that all of it will not flow to the bottom point, but will it be able to make a curve on the surface? (The difference is approximately 15 mm per 3 m).
Roman, good afternoon. I am interested in the opinion on the feasibility of completion and the reality of achieving a positive result when performing the planned work). The situation is as follows: a screed with a thickness of 80-100mm has been made across the entire area of the apartment, including the toilet and bathroom rooms, so that the plane of the finishing coating (ceramic tiles with an electric heated floor) for the bathroom and toilet is lower than the plane in the remaining rooms of the apartment. I want to remove part of the screed - approx. 50 mm. Bathroom 2.3x2m, toilet 2.3x1.2m. I plan to use a grinder to cut the existing screed into cells approximately 50x50mm with a depth of approximately 50mm, followed by removal with a hammer drill. If this operation is successful, the surface will be uneven. I'm thinking of pouring a self-leveling floor on top. Is there a possibility that it will adhere normally to this level surface, or is additional processing and leveling of the surface required? Do you have experience performing similar work (removing part of the screed)? or maybe at least a theory.
Yesterday I filled the floor in the bathroom and toilet with vetonitom 3000. I made beacons in the toilet, but I was too lazy in the bathtub and decided to fill it without beacons. In general, I was convinced from my own experience that the author of the site is absolutely right, it is necessary to fill only in the beacons, a small mound has formed in the center of the bathtub, now I will remove it. And in the toilet the floor was level.
Good afternoon Firstly, why do you need to make the bathroom and toilet lower? But if you really want it that way, then the screed can be dismantled. The self-leveling floor doesn’t care whether the base is level or not, you can safely fill it, just prime it well.
Good afternoon Roman, tell me about the beacons, they write here that they put tape on top of the beacon, that is, if after the liqueur shrinks, it will be removed almost flush, or am I mistaken? If without tape the beacon then just need to be cut off as a rule?
Good afternoon. The question is not entirely clear. The adhesive tape is used so that the rule does not get dirty when pressed, and so that it can be removed immediately, and not after the solution has set. Immediately after setting, the tape is removed and pouring is performed. Such beacons still protrude a little later, but it is enough to simply cut them off as a rule when the floor hardens.
https://siteproremont.ru
Types of lighthouses
Beacons for self-leveling floors, as well as for screeds, can be made from a variety of materials, and can also be divided into professional and non-professional, point and linear (rack). Usually you have to choose based on the physical properties of the mixture used and the conditions under which you will work. It is also important to remember the skills of the person who will install the floors.
Self-leveling floor, installation of beacons
On a note! It will be easier for a beginner to work with linear type beacons than with point devices.
Table. Professional and non-professional beacons.
| Type | Explanation |
| Professional | Such beacons are sold in stores and are initially designed for arranging a self-leveling floor - there is no need to invent anything here. All you need to do is place them correctly and that’s it – you can start working. These include the so-called rappers. |
| Unprofessional | As you might guess, this type of product includes all those beacons that are made from improvised means or even from cement mortar. This group includes beacons made of slats, cement mortar, screws, etc. |
Also in the category of rack beacons, several types can be distinguished separately.
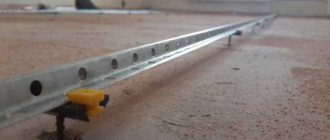
- Metal. Lighthouses are made of metal profiles, usually aluminum. You can buy them in the store. Ideal option for small spaces. Their height can be fixed and adjusted using self-tapping screws. Suitable for screeds with a thickness of about 30 mm.
Beacons made of metal profiles
- Wooden. This is the oldest and most familiar type of lighthouse. They are made from simple wooden blocks of small cross-section (about 25 mm, but the size may vary depending on how high the base will be poured). The main disadvantage of wooden blocks as lighthouses is their tendency to deform under the influence of moisture.
Types of materials for beacons
Separately, we can say about point beacons made from solutions. It is enough to mount small supports of the required height on the rough base from a mortar like cement and lay a guide on them.
On a note! Sometimes beacons are made from steel pipes, but, as a rule, this option is applicable for large areas and heavy, thick ties.
Lighthouses made of square pipes
Concept
When beacons are used for self-leveling floors, this not only simplifies the work process, but also helps reduce labor during installation. With their help, the thickness of the future floor is determined and its height is set.
But there is one feature here - you must have certain knowledge about beacons, the rules for placing them and the types of construction depending on the situation. In addition to factory-made devices, they can be done independently. You just need to have the appropriate materials and tools at hand. Let us consider in detail the main 8 ways to install beacons under a screed.
Beacons for self-leveling bases made of screws
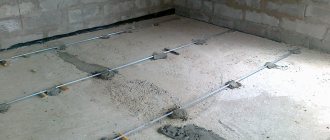
This is one of the simpler options for lighthouses, which is made from scrap materials. During a renovation, and even more so a major one, in any case there will be several screws in the room, from which the beacons are made. Usually it is enough to simply screw them into the base, and stretch the fishing line between them to the desired level.
Advice! It is better to start work from the wall farthest from the exit.
Screws are screwed into the base
The first beacon is installed at a distance of 25-30 cm from the wall. It is necessary to drill shallow holes of the required diameter in the floor into which dowels are inserted. The distances between holes in one row, and between screws in adjacent rows, should be small - about 0.5 m. You can replace a professional dowel with a piece of cork or wood. Self-tapping screws are screwed into it to a certain height. Next, already knowing what level the finished floor should be, a thin scaffold is stretched between the screws. In general, any material will do, but only one that will not stretch much.
It is advisable to remember that this type of structure is most often used for concrete foundations. It is not very suitable for a wooden base - there is a high risk of damaging the previously installed waterproofing.
Layout diagram of the beacon system made from self-tapping screws
On a note! By screwing or unscrewing the screws it is very easy to adjust the level of the beacon in any place. This is convenient in case an error is made in the preliminary calculations.
Useful tips for placing markers
Do-it-yourself floor screed: how to properly make a cement floor screed
Now that you have made your choice and decided for yourself which beacons are best for screeding your particular floor, you can safely get to work. The first thing I want to tell you is how to place rack beacons under the selected screed. Slat markers are long, even slats that are placed wall to wall throughout the room, parallel to utilities or a long wall. The distance between them is 1–1.7 m.
There are several types of rack markers:
- wooden - modern repairmen practically do not use them. If you nevertheless decide to opt for them, then know: the slats must be removed until the mixture is completely dry, after which the furrows must be sealed with the same composition;
- metal - usually such markers mean a profile for drywall. They are placed at a distance of 1–1.4 m and laid on self-tapping screws, screwed in every 40–50 cm. To set the required height of the metal marks, pull the rope from wall to wall.
Tip #1. The composition should be poured along the markers in stripes. To level the solution, use a rule of 2 spans between the “marks”.
Tip #2. Check the height of the profiles at a variety of angles, not just perpendicular. The result should always be the same - zero horizon. After the beacons are placed, they need to be frozen with a solution.
“Marks” made from steel pipes deserve special attention; they are simply irreplaceable when working with concrete. The technology for their installation is as follows:
- we mark the lines for placing “marks” (the extreme markers should be at a distance of 20–30 cm from the walls);
- every 40–50 cm on the installation lines we make slides with mortar into which we will smear our beacons;
- using a rope and a rule, we set all the “marks” according to the planned level of the new floor;
- We cover each beacon along its entire length with the mixture.
Benchmarks (tripods) are professional markers used in work on leveling planes. In the middle of its structure there is a moving rod that indicates the new height of the coating. The level itself is set according to the caps, on top of this rod.
Tip #3. Under no circumstances leave “marks” in the solution! They must be knocked out, and the resulting furrows must be cleaned, primed and sealed with the same compound.
Friends, now that you know in general terms how to place beacons under a screed, I recommend watching this video.
If the information was useful to you, share it with your friends. Subscribe to our groups on social networks and stay up to date with all construction news. Bye everyone!
Benchmarks
These are professional-type pin beacons that are used when installing self-leveling floors. They are small structures with three “legs” and a metal rod in the center. Thus, they resemble a tripod. The height of the central pin can be adjusted as needed.
Benchmark
Installation of such beacons is carried out in 1 m increments in a checkerboard pattern. They are not as easy to use as they seem and are professional type equipment. They are recommended for use only by experienced craftsmen. As a rule, such beacons are removed as soon as the base has been leveled to the desired level.
Important! Benchmarks can only be used on a prepared base - as a rule, the preparatory stage is puttying. Moreover, beacons can be installed only 5 hours after applying the putty. It is also important to use a level to position the pieces correctly.
The benchmark is considered an original and professional beacon, which is used under self-leveling floors
Construction thread can serve well when installing benchmarks. It is stretched along the wall - this creates a special guideline that will help set the desired height of the beacons. The thread will help to achieve a perfectly even finished base, since it will not cause errors caused by micro-irregularities of the rough base, because it is in a suspended state.
conclusions
If you know for sure that you can handle pouring the floor yourself, feel free to take on the job. By using special guidelines and self-leveling compounds, you will definitely be able to achieve evenness of the coating. The main thing is to correctly determine the type of equipment and the value of the zero level.
Inexperienced performers who do not know all the intricacies of technology, of course, are better off entrusting the work to professionals. Since the self-leveling coating is very difficult to dismantle, experiments in this matter will definitely be inappropriate. If you doubt your abilities, it is better to call a construction team who will perform a high-quality coating pouring.
Lighthouses from solution
Lighthouses can also be made from mortar - mortar marks. The advantage of this method over using the same screws is its simplicity and the absence of a negative impact on the base in the form of drilling holes. This is probably why this variation of beacons is used quite often by beginners, despite the fact that it is a point variation.
Photos of installed beacons
The main disadvantage of this method is fragility. Such beacons can easily break/fall off, and this does not require much effort . Moreover, correcting such flaws during the work process is quite difficult.
The essence of the method is simple - piles of mortar are distributed over the floor surface in such a way as to create rows of a certain level of beacons. It is important to understand that the mixture for creating such supports must be identical or similar to that used for pouring the floor.
We install beacons on the solution
About the floor screed tool
To work on the screed, you need a high-quality purchased tool. An aluminum rule is indispensable for this work. The rule is a flat aluminum profile, 15-20 cm wide, truncated into a cone on one side. The length of the rules varies from 50 cm to 3 meters. Bubble indicators of horizontal and vertical levels can be pressed into the rule. When installing screeds, it is better to use the rule of a length of 2 meters.
Let's return to rack beacons and consider which rack beacons are used for floor screed.
Preparing the base
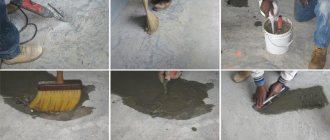
The installation of beacons is carried out on a base that has already been prepared for pouring the floor. That is, first you need to remove the old coating if possible, leaving only the concrete screed. Moreover, if it is in poor condition, then it will have to be dismantled and a new one poured in, the drying period of which is 28 days.
The surface of the screed suitable for installing self-leveling floors should be as flat as possible and should not have deep potholes. All such deformations need to be repaired. It is also recommended to tap the screed for the presence of voids - there should not be any, otherwise the floor may collapse in this part over time.
The foundation must be prepared before installing the beacons
Also, there should be no debris on the surface - the floors should be cleaned with a construction vacuum cleaner. Then a primer mixture is applied, which will improve adhesion and prevent the screed from collecting dust. It is also important to install waterproofing.
Zero Level Calculation
Now it’s time to determine how thick the floor will be poured. However, the same work is carried out before pouring the screed. To do this you need to use a building level. It is important to determine what height differences there are at the rough foundation. So, you can do this as follows: mark a base point at a height of about 1 m from the floor, then use a laser level, the rays of which are reflected along the entire perimeter of the walls, and, taking measurements from the level line to the base, see what the height difference will be. For example, the maximum value will be 1.01 m, and the minimum will be 0.99 m. This means that the height difference is 2 cm. It is this difference that needs to be eliminated when pouring the self-leveling floor in order to obtain an ideal base. After identifying differences, you need to mark the expected level of the poured floor - this will be the main guideline when installing beacons.
Laser level
It is important to remember that the success of the entire operation largely depends on this stage. So you shouldn’t neglect determining the height difference.
On a note! When the main marking is applied, its points can be connected into a single line for ease of work. You can transfer marking points from a height of 1 m using a tape measure. It is important to take into account the future thickness of the self-leveling floor.
Definition of zero level
Step-by-step instructions for installing pendulums
Installation of mortar grade beacons
- The composition for the piles must be mixed in the same consistency and composition as the main self-leveling floor. The piles are constructed along the marked line with an indentation of 35-55 cm. The height must be adjusted. They must be higher than the poured floor.
- While the solution has not hardened, take a rule and, by gently pressing on all the piles, simultaneously level it to the level of the self-leveling floor. To ensure correct and even laying of the mortar, a building level is placed on top of the rule. It will guarantee horizontal installation.
Remove all excess from the solution. And the rule is carried over to the next row. After a day, you can start pouring the liquid floor. First coat the surface of the piles with a primer.
Technology of filling the floor using benchmarks
Let's take a closer look at how a self-leveling floor is poured using self-made benchmarks as beacons.
Step 1. First you need to remove the old base, as well as poorly adhering screed elements. This is a foundation preparation process that should not be neglected. Elements that are difficult to remove can be torn off using a hammer drill. The main thing is to remove everything that doesn’t stick well.
The old base is removed
Step 2. Next, you need to thoroughly dust the surface. A construction vacuum cleaner is used for these purposes. Of course, large pieces of mortar and debris must be removed manually.
Next, dust is removed
Step 3. Next, using a laser level or level, you need to evaluate the evenness of the base by finding the highest and lowest points of the floor. Now you can calculate the approximate middle layer - this data will help calculate the optimal mixture consumption.
The floor level is determined
Calculator for calculating dry mortar for self-leveling floors
Go to calculations
Step 4. After this, the floors need to be primed. The primer is applied with a brush or roller so that not a single square centimeter is missed. Before further work, the primer layer must be dried.
Applying primer
Step 5. Now you can start making homemade benchmarks. To do this, you will need a small piece of plywood in which you need to drill a hole of small diameter (this will be a template), as well as another piece of plywood and hangers for light suspended ceilings.
A small hole is cut in the plywood
Step 6. Using a plywood template, you need to drill several circles of the same diameter from another piece of plywood.
Using a template, cut out circles of the same diameter
Ready-made circles
Step 7. On each of the round blanks, you need to mark the center with a marker and additionally leave three marks at equal distances from each other along the perimeter of the circle (about 1 cm from the edge).
First, the center is marked on each workpiece
Additionally 3 more marks are placed
Step 8. Now you need to remove the metal rods from the ceiling hangers and then take a drill of a slightly smaller diameter than the rods themselves, and use it to drill holes in the wooden circles around the perimeter and in the center of each workpiece.
Holes are drilled in workpieces
Step 9. Next, the benchmarks are assembled. Metal rods from hangers need to be inserted into each circle. The hole in the center should be of such a diameter that the metal rod passes through with force.
Metal rods need to be inserted into the holes
Rods are inserted
Step 10. The outer rods in each workpiece must be installed so that they do not move. This is what the design should look like.
Ready-made homemade benchmarks
Step 11. Next, you need to find the highest point in the room and subtract the minimum acceptable value for the level of the self-leveling floor (for example, 3 mm) from the resulting size. After this, the resulting value must be plotted along the length of the central twig, starting from its bottom.
The central rod is marked
Step 12. The value on one of the bars must be duplicated on the others.
The markings are transferred to the remaining bars
Step 13. Next, you need to place one of the beacons in a place convenient for work and lower the central rod so that the applied mark coincides with the laser beam. Then under the twig you can see the level of thickness of the fill.
Adjusting the first beacon
The mark coincided with the beam
Required fill thickness
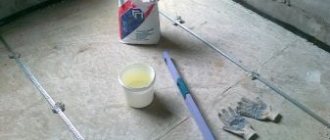
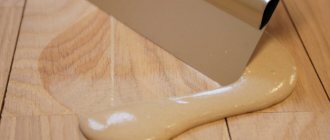
Step 14. Then you need to prepare the filling mixture according to the instructions.
Preparing the mixture for filling the floor
Step 15. When the mixture is ready, you can start pouring. The mixture must be poured onto the base in measured doses, guided by the beacons and leveling the mixture with a spatula. As soon as one area is filled and leveled, the lighthouse must be removed immediately. The remaining holes will immediately be filled with the mixture.
Pouring the floor
The mixture is leveled with a spatula
Step 16. During operation, the beacons can be rearranged, adapting them to a new area of the floor.
Beacons can be rearranged
Step 17. After pouring the floor, you need to roll it with a needle roller to remove air bubbles from it. All you have to do is wait for the floors to dry.
The poured floor is rolled with a needle roller
Prices for self-leveling floors "Starateli"
self-leveling floors prospectors
How to choose the right beacons for wet screeds
If dry building mixtures involve the use of only U-shaped metal profiles, then wet and semi-dry screeds significantly expand this list. For example, mortar-based guides are very popular, for which an ordinary steel pipe is perfect. Some craftsmen even use plasterboard products.
The supports are installed on the concrete surface of the subfloor, on which the pipes are installed. Using auxiliary tools, you can easily select suitable objects for supports; these can be hills of cement mortar, wooden blocks and bricks.
Fastening of drywall or pipes is done using gypsum, alabaster and cement-lime mixtures. Lime-based solutions are not in great demand, which is due to the drying time - it takes about three days. You can proceed to further actions only after the composition has completely hardened.
Self-tapping profiles are often used as beacons for floor screeds. Compared to other methods, the described method is fast, simple and effective. The table below shows an approximate sequence of actions:
| Stage | Description |
| Preparing dowels | Dowels are driven into the surface of the subfloor at a certain distance. It is recommended to choose a step size of no more than 20 cm |
| Installation of metal structures | The profile is carefully applied to the pre-driven rods |
| Fastening structures | Fixing the guides using self-tapping screws. The peculiarity of the process is that the fasteners are easy to adjust, thus it becomes possible to set the profile to the desired level |
When pouring the base, you can use another method, which involves installing wooden blocks instead of metal structures. Boards with dimensions of 14*2*1.5 mm are perfect. The disadvantage is the fragility of the material compared to metal. The risk of rotting and destruction of the entire structure over time is very high. But this method is significantly cheaper and more economically profitable.
Some craftsmen resort to the combined option of using beacons to screed self-leveling floors. The essence of the method is to drill holes in the concrete base for dowels, the distance between which should not exceed one meter. Next, the self-tapping screws are again screwed in to a predetermined tie level.
The final stage is laying the cement mixture between the installed fasteners. Moreover, each slide should slightly exceed the height of the screws. The combined method provides reliable protection of the base, in which the screed will serve for a very long time without collapsing or compromising the integrity of the structure.