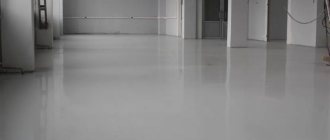
Types of beacons for dry screed
The types of screed beacons are determined by its density, the load on the guides, the skill of the builders and the financial capabilities of the customer.
Dry screed is made from bulk materials and does not tolerate moisture. Therefore, the base of the floor is covered with a film and dry mixtures or expanded clay chips are poured onto it. This means that the use of self-tapping screws for installing beacons is categorically excluded - they will damage the film and break the seal of the substrate.
The use of point beacons and benchmarks is also undesirable. In the first case it is very difficult to level the surface, in the second there are difficulties in using the benchmark itself.
How to install beacons for floor screed using dry mixtures? Linear beacons are used here.
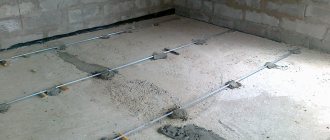
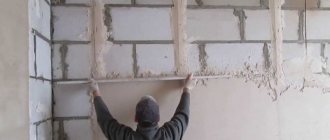
Metal U-shaped profiles can be used as guides. They are laid on the base of the floor with sharp edges up. Alignment along the screed line is carried out using alabaster, which dries very quickly, or by placing pieces of plywood, plastic, tiles and other similar materials under the profile.
For reference: profiles laid with their edges up do not conduct sound.
This type of beacon cannot be dismantled. Therefore, its height should correspond to the thickness of the backfill, approximately 27-30 mm, and the profile should be thick so that its edges do not deform under load. If this condition is ignored, the evenness of the screed is disrupted.
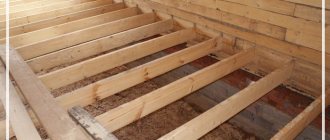
Beacons are used in individual construction:
- from reinforcement;
- slats;
- profile pipes;
- T-shaped profile.
All of them must be removed, and you can walk on the screed only on gypsum fiber sheets (GVL) having dimensions of at least 50 x 50 cm. There are some peculiarities in the construction of beacons for floor screed when using special Knauf dry building mixtures.
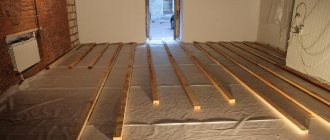
Here, guide rails are used to level the surface.
They are laid on the dry mixture and aligned along the backfill line. Work starts from the wall. After leveling the passage with a leveling bar, the far rail is removed and transferred to the other side, forming a second section. By shifting the slats alternately, the entire surface of the base is leveled. Moving along the loose layer only on sheets of plywood or gypsum fiber board.
Which beacons are better? The specific choice of their type depends on the family budget and the work experience of the performer.
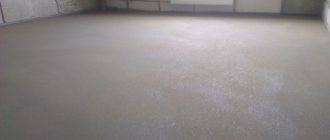
Photo of beacons for dry floor screed.
Adviсe
Before work you need:
- Remove all debris and keep the floor clean;
- Remove unnecessary items and furniture. Nothing should interfere, it is not only convenient, but also safe;
- Prepare tools and materials for work.
Depending on which beacon installation technique you choose, you will need the following tools and materials:
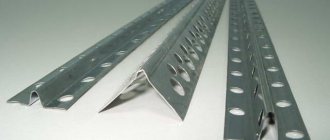
- Profile;
- Drywall;
- Wooden blocks;
- Self-tapping screws;
- Plaster;
- Laser device or hydraulic;
- Spatula, rules.
Attention!!! If the floor is heated, then we make a screed from 5cm, for an ordinary floor - from 3cm.
Beacons for semi-dry and wet screeds
How to install beacons with semi-dry and wet screed? Several types of beacons can be used here:
- linear;
- cement-sand;
- pin (point).
Each of these types has advantages and disadvantages. The ideal option is pin beacons: easy to install, they allow you to pour any type of screed, including under heated floors. A significant drawback is that only professionals work on them. Without experience, you can make irreparable mistakes - the work done will have to start all over again.
Mortar beacons are also easy to make. Height adjustment is made either by cutting the pile, or by adding a solution to it. Minuses:
- easily damaged by careless movement;
- does not allow for monolithic filling;
- it takes time to set, which delays the work of pouring the screed for 5-8 days.
Profile beacons are more difficult to install, but the work of leveling the surface of the mortar is easier; even a novice builder can do it with his own hands. It is enough to follow the rule along the guides of the lighthouse. The disadvantage is the impossibility of monolithic filling.
Let us consider in detail the technology for installing each type of beacon.
Installation of linear beacons
Types of beacons for linear floor screed:
- profile on self-tapping screws;
- profile on the solution.
Profile beacons on self-tapping screws
How to make beacons for floor screed using profiles and screws? For installation you will need:
- aluminum rules: one 2 m long, the second - 1 m, since wooden ones do not guarantee the quality of work;
- perforator;
- level;
- roulette;
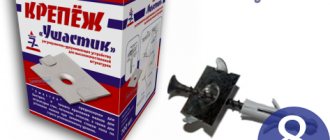
- dowels;
- self-tapping screws with a wrench head;
- fishing line;
- guide profiles, preferably metal (for independent work on flooring);
- screwdriver;
- screwdriver.
The work is carried out in the following sequence.
- The number of rows of beacons and the distance between them is calculated, after which they are marked. To do this, lines are drawn on the wall or base of the floor with chalk, indicating the location of the guide profiles.
- Along the line, at a distance of 4 cm from the wall, a hole is drilled in the screed using a puncher for the dowel. A self-tapping screw is screwed into it with a screwdriver. The height of the head should be below the screed line by the thickness of the U-shaped or the height of the T-shaped profile. Adjustment is carried out with a screwdriver or wrench.
- At the other end of the row, another self-tapping screw is installed in the same way and a cord or fishing line is pulled between them.
- Self-tapping screws are screwed in at a distance of 40-50 cm from each other along the beacon line. Using a bubble level, their primary height adjustment is carried out.
- Using the same scheme, self-tapping screws are installed along the remaining rows.
- Using a level (bubble level) we carry out a transverse check of the horizon. If necessary, adjust the height of the screw.
- We install guide profiles. How to attach them to the screws? U-shaped profiles are simply placed on the heads of the screws, T-shaped ones are secured with special locks.
- After completing the screed, the U-shaped profiles are removed, the screws are unscrewed, and their traces are sealed with cement mortar.
For reference: the profile is available in 2 types: PN, with side slats installed downwards, and regular (T-profile), where the shelves are positioned upwards. Their differences are that the PN profile can be removed from the screed and there is no need to finish filling with expensive mortar. The profile with the shelves positioned upward is frozen into the cement-sand mortar and is not removed. After setting, the surface of the screed sags by 1-2 mm, and the profile remains in place, which requires additional surface treatment with self-leveling mixtures.
Scheme for calculating the number of guides. A – walls, B – guides.
Profile beacons on the solution
How to install beacons with guides on the solution? To work you will need:
- roulette;
- • dry plaster mixture “Rotband” (you can use cement mortar, but its complete setting occurs after 5-8 days, which delays the pouring of the screed at this time);
- trowel and spatula;
- drill with mixer;
- level;
- guides (any material);
- rule;
- container for the mixture.
The order of installation of beacons:
- We determine the lines of the beacons and mark them with chalk;
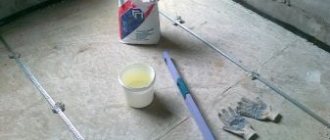
- Using a drill with a mixer, we prepare a mixture for lighthouses based on rotband;
- Along the line of the lighthouse we form mounds of mortar at a distance of 30-40 cm from each other. The outermost piles should fit snugly against the walls. The size of the pile is formed from one “slap” of the trowel;
- Using a rule and a level, we align them. To do this, carefully cut off their top with a spatula or trowel or add a solution. The height of the piles should be lower than the level of the screed by the thickness (height) of the profile used;
- We install the guides.
Important: many craftsmen first screw in self-tapping screws, and then apply a solution to them, which makes it possible to fix the piles very firmly. The screws are screwed in in such a way that they do not interfere with adjusting the height of the mounds when aligning them along the screed line.
When using bars or profile pipes as guides, the question arises: how to secure them to piles of mortar so that they do not move during work? To do this, grab them lightly on the sides with the rotband mixture. It is advisable not to overdo it, because after pouring the screeds they will have to be removed.
The traces from the guides are sealed with the same solution that was poured into the screed.
Attention: in many materials devoted to the construction of beacons, it is recommended to use alabaster to form piles. This is dubious advice, since alabaster does not adhere well to many concrete solutions.
Installation of cement-sand beacons
Professional builders often use beacons based on sand-cement mortar:
- brands;
- solution beacons.
Mortar brands
How to correctly set beacons for floor screed using only cement mortar? For this purpose, piles of mortar are used, aligned along the screed line. Guides are not installed on them. The technology of work is similar to installing piles under the guides, as discussed above.
Mortar brands.
Using such beacons requires skills that novice builders do not have. Therefore, you can use mortar beacons, the work with which is similar to the work with linear analogues.
Mortar beacons
How to properly install beacons on a solution? You will need:
- perforator;
- dowels;
- self-tapping screws;
- screwdriver;
- thin wire;
- cement-lime mortar;
- rule;
- level;
- roulette.
The work is carried out in the following order:
- the number of beacon lines and the distance between them is calculated;
- row markings are applied;
- near the wall, at the ends of each row, 3-5 screws are screwed in (their heads should not be higher than the screed line);
- a wire is stretched between the screws in several rows;
- a “wall” is formed from the solution along the stretched wire;
- with the help of a level, it (“the wall”) is brought out into the horizon with the screed line.
After hardening, beacons are obtained with a continuous surface along the entire length, which is similar to beacons with guide profiles.
Attention: pouring the screed can only be done after the mortar has completely set.
Installation of pin (point) beacons
Pin beacons are used mainly in the installation of heated floors. They are easy to install, consist only of self-tapping screws, but are very difficult to use.
How to install beacons from self-tapping screws? The step-by-step instructions for installing them completely coincide with installing guides on self-tapping screws.
There are only two differences:
- the screw heads are aligned along the screed line;
- The guide profile is not installed.
Beacons for floating screeds should be separately allocated. The essence of the latter is the layer of foam rubber between the base of the floor and the screed itself. Therefore, here you can install beacons only on self-tapping screws - those installed on mortar will not stick.
Installation of pin beacons.
Preparing the base
The installation of beacons is carried out on a base that has already been prepared for pouring the floor. That is, first you need to remove the old coating if possible, leaving only the concrete screed. Moreover, if it is in poor condition, then it will have to be dismantled and a new one poured in, the drying period of which is 28 days.
The surface of the screed suitable for installing self-leveling floors should be as flat as possible and should not have deep potholes. All such deformations need to be repaired. It is also recommended to tap the screed for the presence of voids - there should not be any, otherwise the floor may collapse in this part over time.
The foundation must be prepared before installing the beacons
Also, there should be no debris on the surface - the floors should be cleaned with a construction vacuum cleaner. Then a primer mixture is applied, which will improve adhesion and prevent the screed from collecting dust. It is also important to install waterproofing.
Types of beacons for self-leveling floors
When installing self-leveling floors, performers in many cases do not use beacons, logically believing that the composition will independently level the surface. This judgment has the right to life and is suitable for small spaces.
If the filling area is relatively large, then it is still necessary to use beacons. For these purposes, a benchmark or its homemade analogue is best suited. Their installation and dismantling does not take much time and does not require work skills.
Benchmark
The benchmark belongs to the pin reusable beacons. Consists of a tripod and a central pin with marks at the bottom. The height is adjusted by twisting the pin down or up. This happens as follows:
- Benchmarks are placed a meter apart from each other in a checkerboard pattern. It is necessary to install 5-6 hours after puttying and priming;
- Using a level, the upper part of the pin of all reference points is aligned in one plane (instead of a level, you can use threads stretched between the walls). Since the length of the pin for all beacons is the same, the filling goes to the beginning of the pin if the distance between the fill line and the horizon is equal to the length of the pin, and to the mark coinciding with the fill line if it is less;
- After pouring and leveling the floor, the benchmarks are removed. The mixture independently fills the recesses left by the tripod.
Rapper.
Self-tapping screws
A very simple solution for self-leveling floors is beacons made of self-tapping screws and fishing line. In each corner of the room, 4 self-tapping screws are screwed into dowels. From the wall, parallel to which the fishing line will be stretched, it is necessary to retreat 0.2-0.3 m. At the ends of the lighthouse line, the retreat is 0.1-0.15 m.
The screws are aligned along the fill line (screed). A fishing line is stretched between them. Gets two parallel lines. Along them, at a distance of 30-40 cm, screws are screwed in again. Between them, across the room, a fishing line is also stretched. We get a simple but effective level. After pouring, the screws are dismantled.
Determination of the highest point of the level
In order for the process of establishing beacons and leveling to be productive and complete, it is necessary to determine the highest point of unevenness, so that the zero level of the future coating can be determined.
Step-by-step instruction
- It is necessary to choose the method by which the level will be determined;
- After using the selected method, it is necessary to measure the height of the unevenness;
- At each level, make marks using a special dye thread or pencil;
- If during the process of upholstering the level a higher mark is found, then a new zero level must be set according to it;
- After circling the highest point, you can begin the process of installing beacons.
Other types of beacons
In addition to the types of beacons described above, string beacons are also used in practice. They are mainly used for plastering walls, since the strings sag when stretched horizontally. In small spaces they have undoubted advantages:
- reusable;
- easy sliding of the rule along the string;
- no trace after removing the string;
- easy to install.
The installation of such beacons comes down to attaching string holders to the wall at a given level. Properly installed beacons allow you to obtain a flat surface for installing the floor. High-quality smooth screed, high-quality floor.
Using benchmarks
No master will rely on all the qualities of a polymer leveler in terms of good fluidity and the ability to independently distribute itself evenly over the entire surface. In this case, benchmarks for self-leveling floors are used. With their help, the horizontal is maintained with an accuracy of fractions of millimeters.
The benchmark perfectly determines the level for pouring the self-leveling floor and is a structure in the form of three legs. In its central part there is a metal rod. This pin helps set the height of the future floor throughout the room. You can subsequently install a hydraulic level on their upper part, from which the zero point will be determined.
An alternative to benchmarks are plastic beacons for pouring the floor, which also have a division scale in millimeters. They can be attached to the base using adhesive tape on the bottom or self-tapping screws. True, in the latter case it will be somewhat problematic to remove the devices after filling. The placement of plastic beacons is carried out very quickly - within 15-20 minutes. The most important thing is that the result is the most flat surface possible due to the high precision of elements such as plastic beacons for pouring the floor.
Application of beacons for filling
The installation step of these beacons is one meter. But an inexperienced worker is unlikely to be able to effectively apply them in practice. This requires some skill and careful preparation. Benchmarks are removed immediately after the solution has been leveled over the entire area of the room.